1. 시작하기 전에
이 실용적인 Codelab에서는 듀얼 화면 및 폴더블 기기용 앱 개발의 기본사항을 알아봅니다. 완료되면 앱에서 Pixel Fold, Microsoft Surface Duo, 삼성 Galaxy Z Fold 5 등의 폴더블 기기를 지원할 수 있습니다.
기본 요건
이 Codelab을 완료하려면 다음이 필요합니다.
- Android 앱 빌드 경험
- 활동, 프래그먼트, 뷰 바인딩, xml-layout을 사용한 경험
실행할 작업
다음을 실행하는 간단한 앱을 만듭니다.
- 기기의 기능 표시
- 애플리케이션이 폴더블과 듀얼 화면 기기 중 어느 쪽에서 실행되는지 감지
- 기기 상태 확인
- Jetpack WindowManager를 사용하여 새로운 폼 팩터 기기로 작업합니다.
필요한 항목
- Android 스튜디오 Arctic Fox 및 이후 버전
- 폴더블 기기 또는 에뮬레이터
Android Emulator v30.0.6 이상에는 가상 힌지 센서 및 3D 뷰가 있는 폴더블 지원 기능이 포함되어 있습니다. 아래 이미지처럼 사용할 수 있는 몇 가지 폴더블 에뮬레이터가 있습니다.
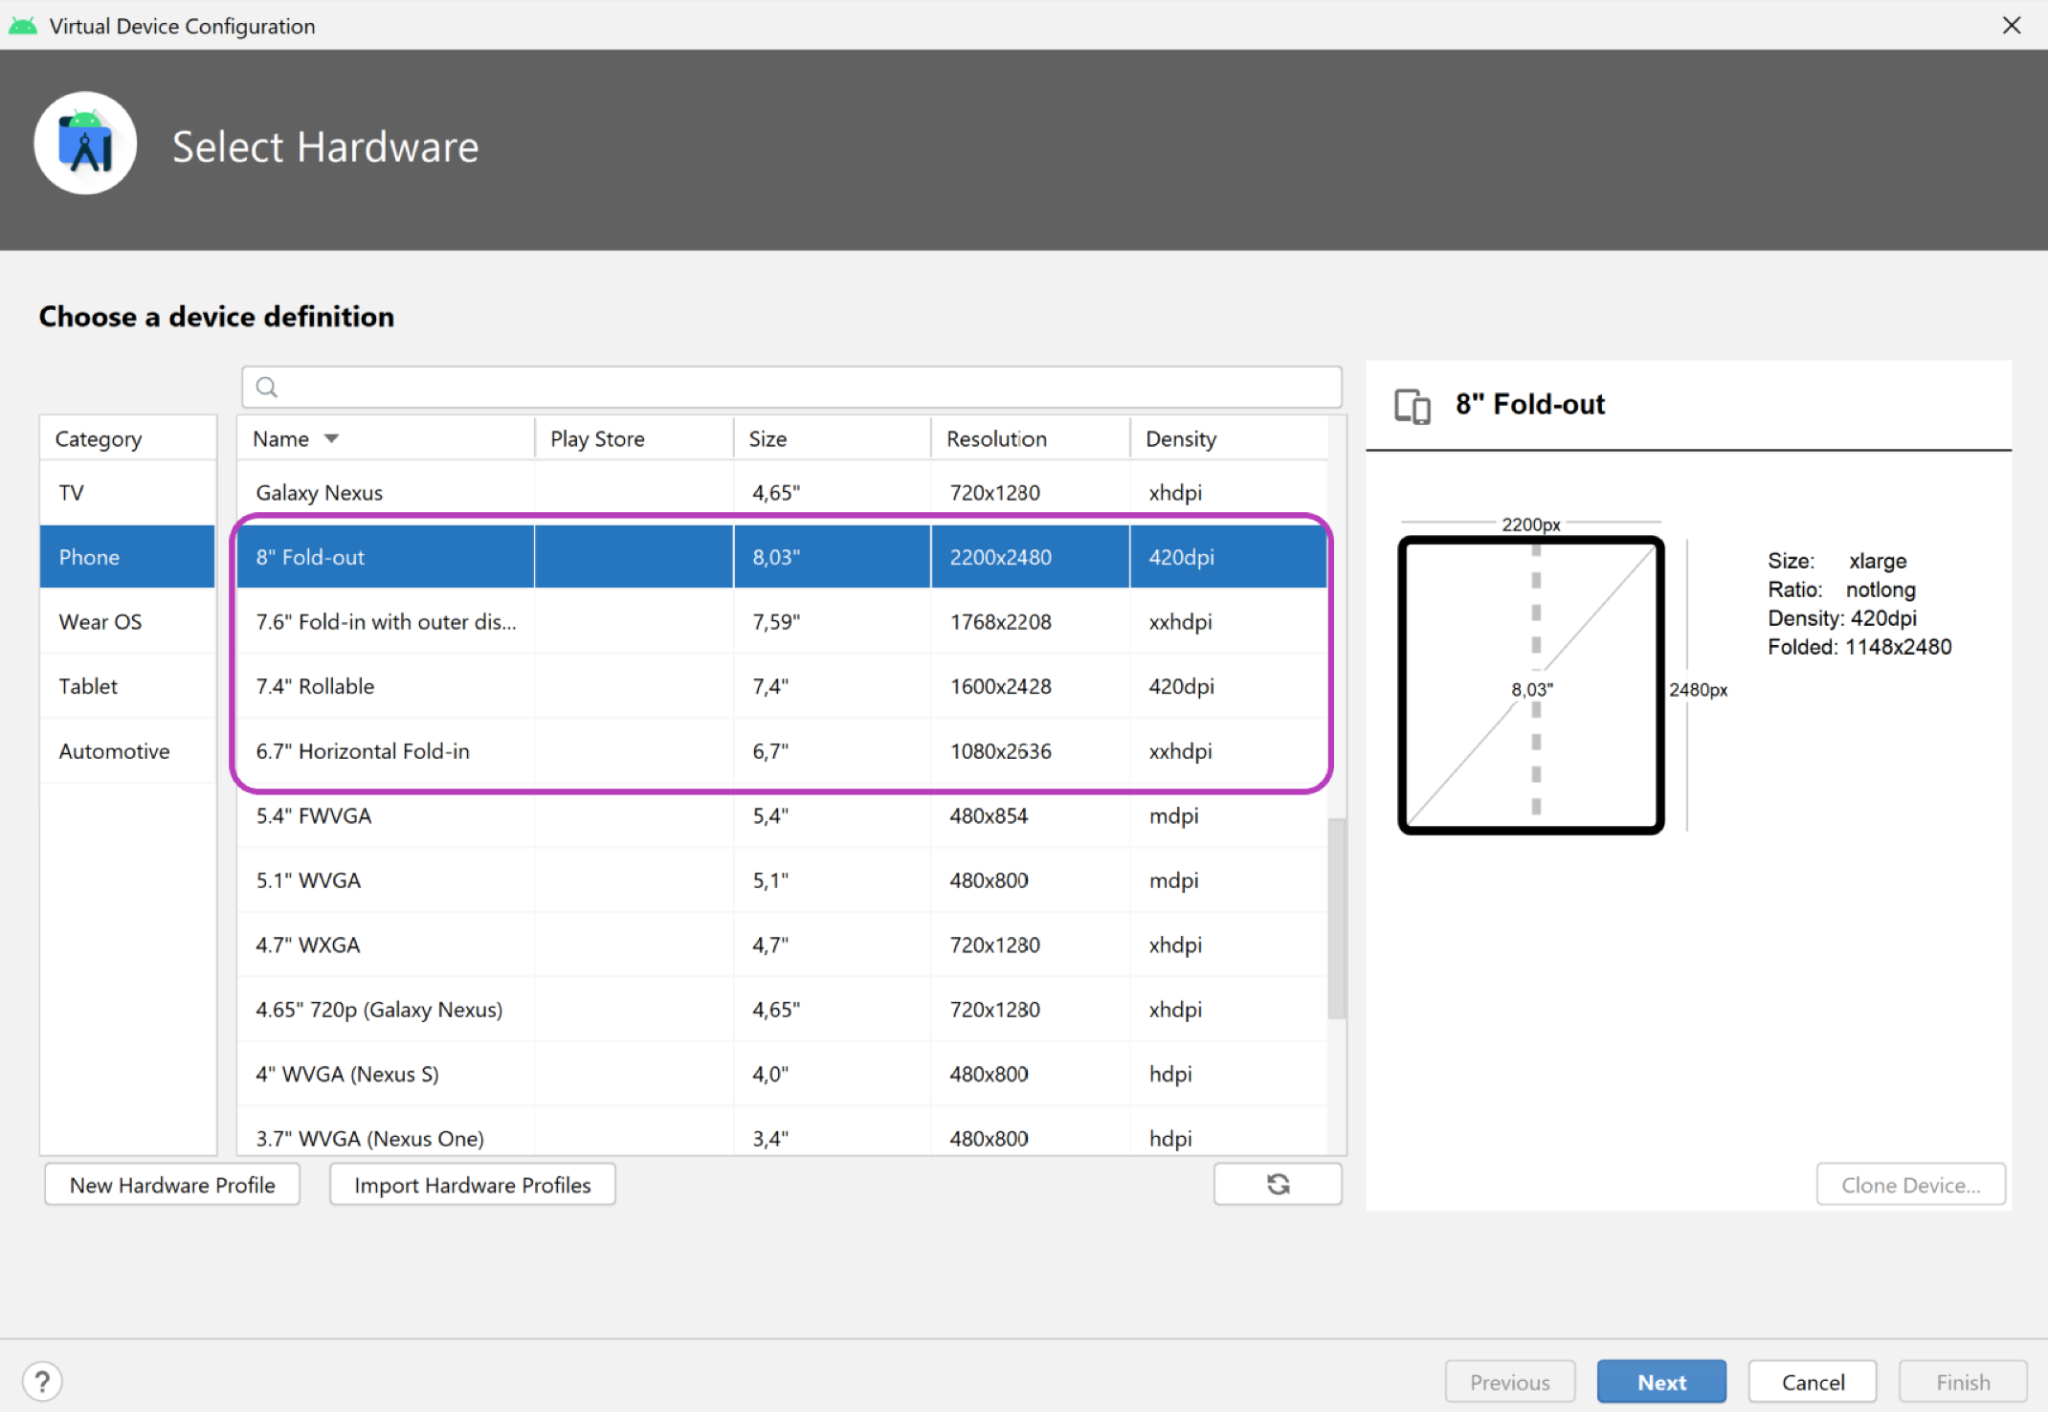
- 듀얼 화면 에뮬레이터를 사용하려면 플랫폼(Windows나 MacOS, GNU/Linux)에 맞는 Microsoft Surface Duo 에뮬레이터를 다운로드하면 됩니다.
2. 단일 화면 기기와 폴더블 기기
폴더블 기기는 사용자에게 이전에 휴대기기에서 사용할 수 있었던 것보다 큰 화면과 더 다양한 사용자 인터페이스를 제공합니다. 이러한 기기는 접었을 때 일반 크기 태블릿보다 작은 경우가 많아서 휴대성과 기능성이 더 뛰어납니다.
이 글을 작성하는 시점을 기준으로 기기 유형에는 두 가지가 있습니다.
- 단일 화면 폴더블 기기(화면 하나를 접을 수 있음). 사용자는
multi-window모드를 사용하여 동시에 같은 화면에서 여러 앱을 실행할 수 있습니다. - 듀얼 화면 폴더블 기기(화면 두 개가 힌지로 결합됨). 이러한 기기도 접을 수 있지만 두 가지 다른 논리 디스플레이 영역이 있습니다.
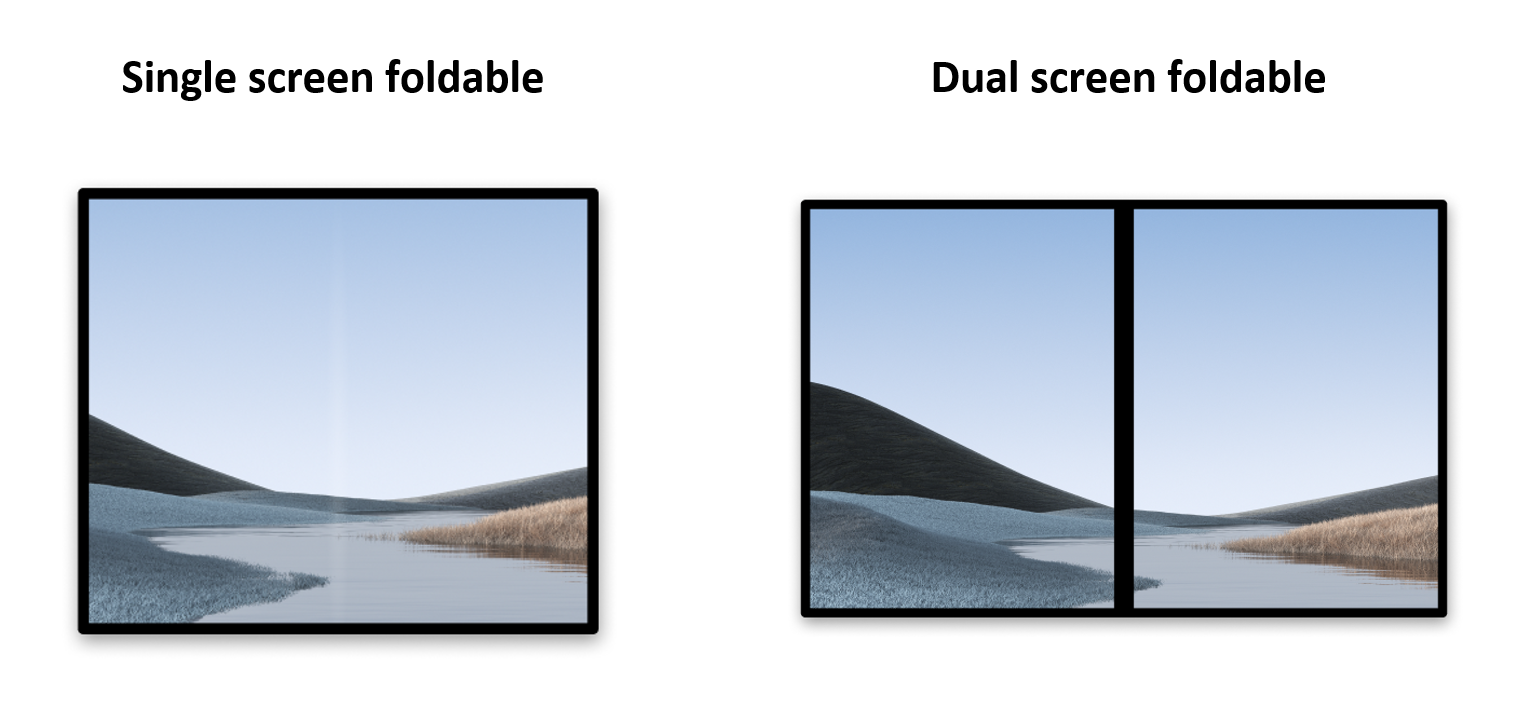
태블릿 및 기타 단일 화면 휴대기기와 마찬가지로 폴더블 기기는 다음 작업을 할 수 있습니다.
- 한 디스플레이 영역에서 앱 하나를 실행합니다.
- 다른 디스플레이 영역에서 두 앱을 하나씩 나란히 실행합니다(
multi-window모드 사용).
단일 화면 기기와 달리 폴더블 기기는 다양한 상태도 지원합니다. 상태는 다양한 방식으로 콘텐츠를 표시하는 데 사용할 수 있습니다.
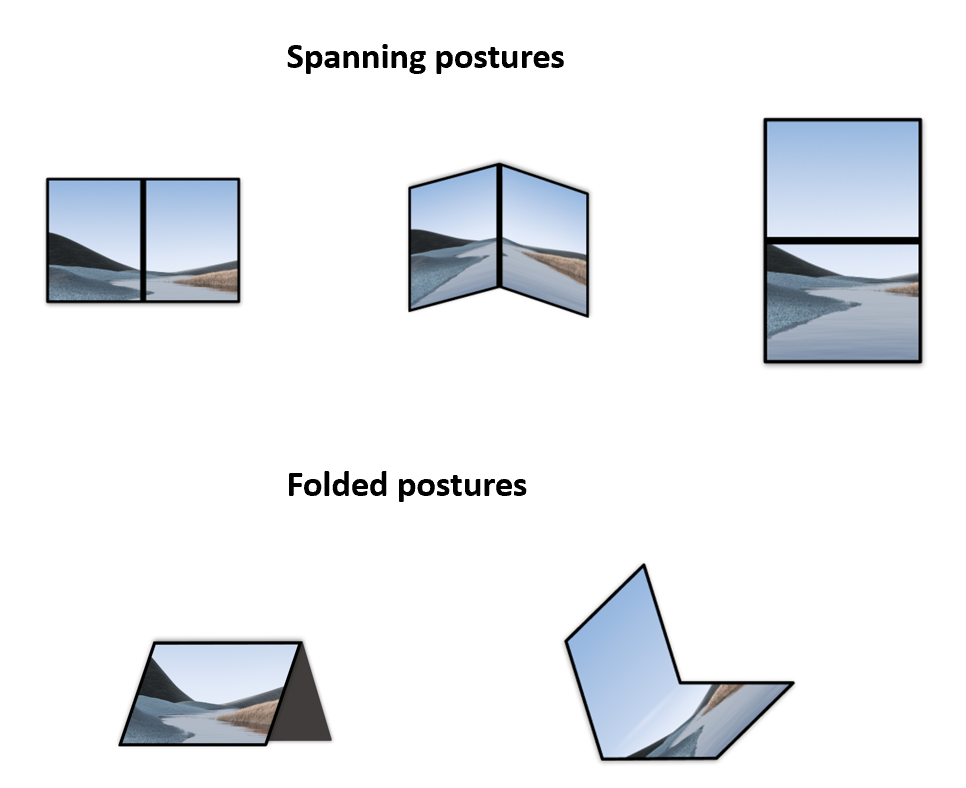
폴더블 기기는 앱이 전체 디스플레이 영역(듀얼 화면 폴더블 기기의 모든 디스플레이 영역)에 걸쳐 스팬(표시)될 때 다양한 스팬 상태를 제공할 수 있습니다.
폴더블 기기는 접힌 상태로도 사용할 수 있습니다. 탁자 모드처럼 평평한 화면 부분과 사용자를 향해 기울어진 부분 간에 논리적 분할을 할 수 있고 텐트 모드와 같이 기기가 스탠드 가젯을 사용하는 것처럼 콘텐츠를 시각화할 수 있습니다.
3. Jetpack WindowManager
Jetpack WindowManager 라이브러리는 애플리케이션 개발자가 새로운 기기 폼 팩터를 지원하도록 돕고 이전 플랫폼 버전과 새 플랫폼 버전에서 모두 다양한 WindowManager 기능을 위한 공통 API 표시 영역을 제공합니다.
주요 기능
Jetpack WindowManager 버전 1.5.1에는 유연한 디스플레이의 접는 부분 또는 물리적 디스플레이 패널 두 개 사이의 힌지를 설명하는 FoldingFeature 클래스가 포함되어 있습니다. API를 통해 기기와 관련된 중요한 정보에 액세스할 수 있습니다.
state(): 정의된 상태 목록(FLAT,HALF_OPENED)에서 기기의 현재 상태를 제공합니다.isSeparating():FoldingFeature를 사용자가 논리적으로 분리된 것으로 볼 수 있는 여러 물리적 영역으로 분할하는 것으로 간주해야 하는지 계산합니다.occlusionType(): 오클루전 모드를 계산하여FoldingFeature가 창의 일부를 가리는지 확인합니다.orientation():FoldingFeature너비가 높이보다 크면FoldingFeature.Orientation.HORIZONTAL을 반환하고 그렇지 않으면FoldingFeature.Orientation.VERTICAL을 반환합니다.bounds(): 물리적 힌지의 경계와 같이 기기 기능의 경계가 포함된Rect인스턴스를 제공합니다.
WindowInfoTracker 인터페이스를 사용하면 windowLayoutInfo()에 액세스하여 사용 가능한 모든 DisplayFeature가 포함된WindowLayoutInfo의 Flow를 수집할 수 있습니다.
4. 설정
새 프로젝트를 만들고 'Empty Activity' 템플릿을 선택합니다.
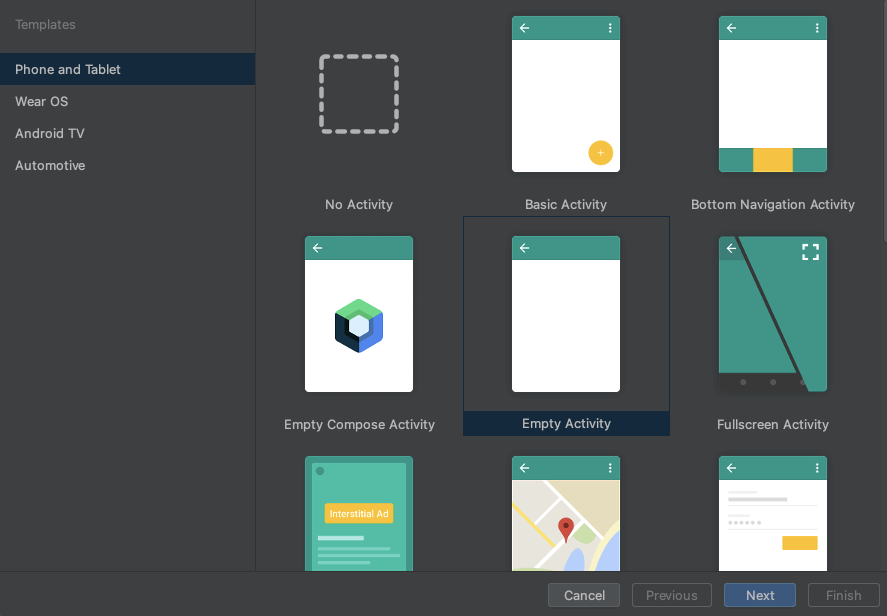
모든 매개변수를 기본값으로 둡니다.
종속 항목 선언
Jetpack WindowManager를 사용하려면 앱 또는 모듈의 build.gradle 파일에 종속 항목을 추가합니다.
app/build.gradle
dependencies {
    ext.windowmanager_version = "1.5.1"

    implementation "androidx.window:window:$windowmanager_version"
    androidTestImplementation "androidx.window:window-testing:$windowmanager_version"

    // Needed to use lifecycleScope to collect the WindowLayoutInfo flow
    implementation "androidx.lifecycle:lifecycle-runtime-ktx:2.6.2"
}
WindowManager 사용
창 기능은 WindowManager의 WindowInfoTracker 인터페이스를 통해 액세스할 수 있습니다.
MainActivity.kt 소스 파일을 열고 WindowInfoTracker.getOrCreate(this@MainActivity)를 호출하여 현재 활동과 연결된 WindowInfoTracker 인스턴스를 초기화합니다.
MainActivity.kt
import androidx.window.layout.WindowInfoTracker

private lateinit var windowInfoTracker: WindowInfoTracker

override fun onCreate(savedInstanceState: Bundle?) {
        super.onCreate(savedInstanceState)

        windowInfoTracker = WindowInfoTracker.getOrCreate(this@MainActivity)
}
WindowInfoTracker 인스턴스를 사용하여 기기의 현재 창 상태에 관한 정보를 가져옵니다.
5. 애플리케이션 UI 설정
Jetpack WindowManager에서 창 측정항목, 레이아웃, 디스플레이 구성에 관한 정보를 가져옵니다. 기본 활동 레이아웃에서 각각의 TextView를 사용하여 이를 표시합니다.
3개의 TextView가 있는 ConstraintLayout을 화면 중앙에 만듭니다.
activity_main.xml 파일을 열고 다음 내용을 붙여넣습니다.
activity_main.xml
<?xml version="1.0" encoding="utf-8"?>
<androidx.constraintlayout.widget.ConstraintLayout xmlns:android="http://schemas.android.com/apk/res/android"
   xmlns:app="http://schemas.android.com/apk/res-auto"
   xmlns:tools="http://schemas.android.com/tools"
   android:id="@+id/constraint_layout"
   android:layout_width="match_parent"
   android:layout_height="match_parent"
   tools:context=".MainActivity">

    <TextView
        android:id="@+id/window_metrics"
        android:layout_width="wrap_content"
        android:layout_height="wrap_content"
        android:padding="20dp"
        tools:text="Window metrics"
        android:textSize="20sp"
        app:layout_constraintBottom_toTopOf="@+id/layout_change"
        app:layout_constraintStart_toStartOf="parent"
        app:layout_constraintTop_toTopOf="parent"
        app:layout_constraintVertical_chainStyle="packed" />

    <TextView
        android:id="@+id/layout_change"
        android:layout_width="wrap_content"
        android:layout_height="wrap_content"
        android:padding="20dp"
        tools:text="Layout change"
        android:textSize="20sp"
        app:layout_constrainedWidth="true"
        app:layout_constraintBottom_toTopOf="@+id/configuration_changed"
        app:layout_constraintStart_toStartOf="parent"
        app:layout_constraintTop_toBottomOf="@+id/window_metrics" />

    <TextView
        android:id="@+id/configuration_changed"
        android:layout_width="wrap_content"
        android:layout_height="wrap_content"
        android:padding="20dp"
        tools:text="Using one logic/physical display - unspanned"
        android:textSize="20sp"
        app:layout_constraintBottom_toBottomOf="parent"
        app:layout_constraintStart_toStartOf="parent"
        app:layout_constraintTop_toBottomOf="@+id/layout_change" />

</androidx.constraintlayout.widget.ConstraintLayout>
이제 코드에서 뷰 바인딩을 사용하여 이러한 UI 요소를 연결하겠습니다. 이렇게 하려면 애플리케이션의 build.gradle 파일에서 사용 설정합니다.
app/build.gradle
android {
   // Other configurations

   buildFeatures {
      viewBinding true
   }
}
Android 스튜디오에서 권장하는 대로 Gradle 프로젝트를 동기화하고 다음 코드를 사용하여 MainActivity.kt에서 뷰 바인딩을 사용합니다.
MainActivity.kt
class MainActivity : AppCompatActivity() {
    private lateinit var windowInfoTracker: WindowInfoTracker
    private lateinit var binding: ActivityMainBinding

    override fun onCreate(savedInstanceState: Bundle?) {
        super.onCreate(savedInstanceState)
        binding = ActivityMainBinding.inflate(layoutInflater)
        setContentView(binding.root)

        windowInfoTracker = WindowInfoTracker.getOrCreate(this@MainActivity)
    }
}
6. WindowMetrics 정보 시각화
MainActivity의 onCreate 메서드에서 WindowMetrics 정보를 가져오고 표시하는 함수를 호출합니다. onCreate 메서드에 obtainWindowMetrics() 호출을 추가합니다.
MainActivity.kt
override fun onCreate(savedInstanceState: Bundle?) {
   super.onCreate(savedInstanceState)
   binding = ActivityMainBinding.inflate(layoutInflater)
   setContentView(binding.root)

   windowInfoTracker = WindowInfoTracker.getOrCreate(this@MainActivity)

   obtainWindowMetrics()
}
obtainWindowMetrics 메서드를 구현합니다.
MainActivity.kt
import androidx.window.layout.WindowMetricsCalculator

private fun obtainWindowMetrics() {
   val wmc = WindowMetricsCalculator.getOrCreate()
   val currentWM = wmc.computeCurrentWindowMetrics(this).bounds.flattenToString()
   val maximumWM = wmc.computeMaximumWindowMetrics(this).bounds.flattenToString()
   binding.windowMetrics.text =
       "CurrentWindowMetrics: ${currentWM}\nMaximumWindowMetrics: ${maximumWM}"
}
컴패니언 함수 getOrCreate()를 통해 WindowMetricsCalculator 인스턴스를 가져옵니다.
WindowMetricsCalculator 인스턴스를 사용하여 정보를 windowMetrics TextView에 설정합니다. 이때 computeCurrentWindowMetrics.bounds 및 computeMaximumWindowMetrics.bounds 함수가 반환하는 값을 사용합니다.
이러한 값은 창이 차지하는 영역의 측정항목에 관한 유용한 정보를 제공합니다.
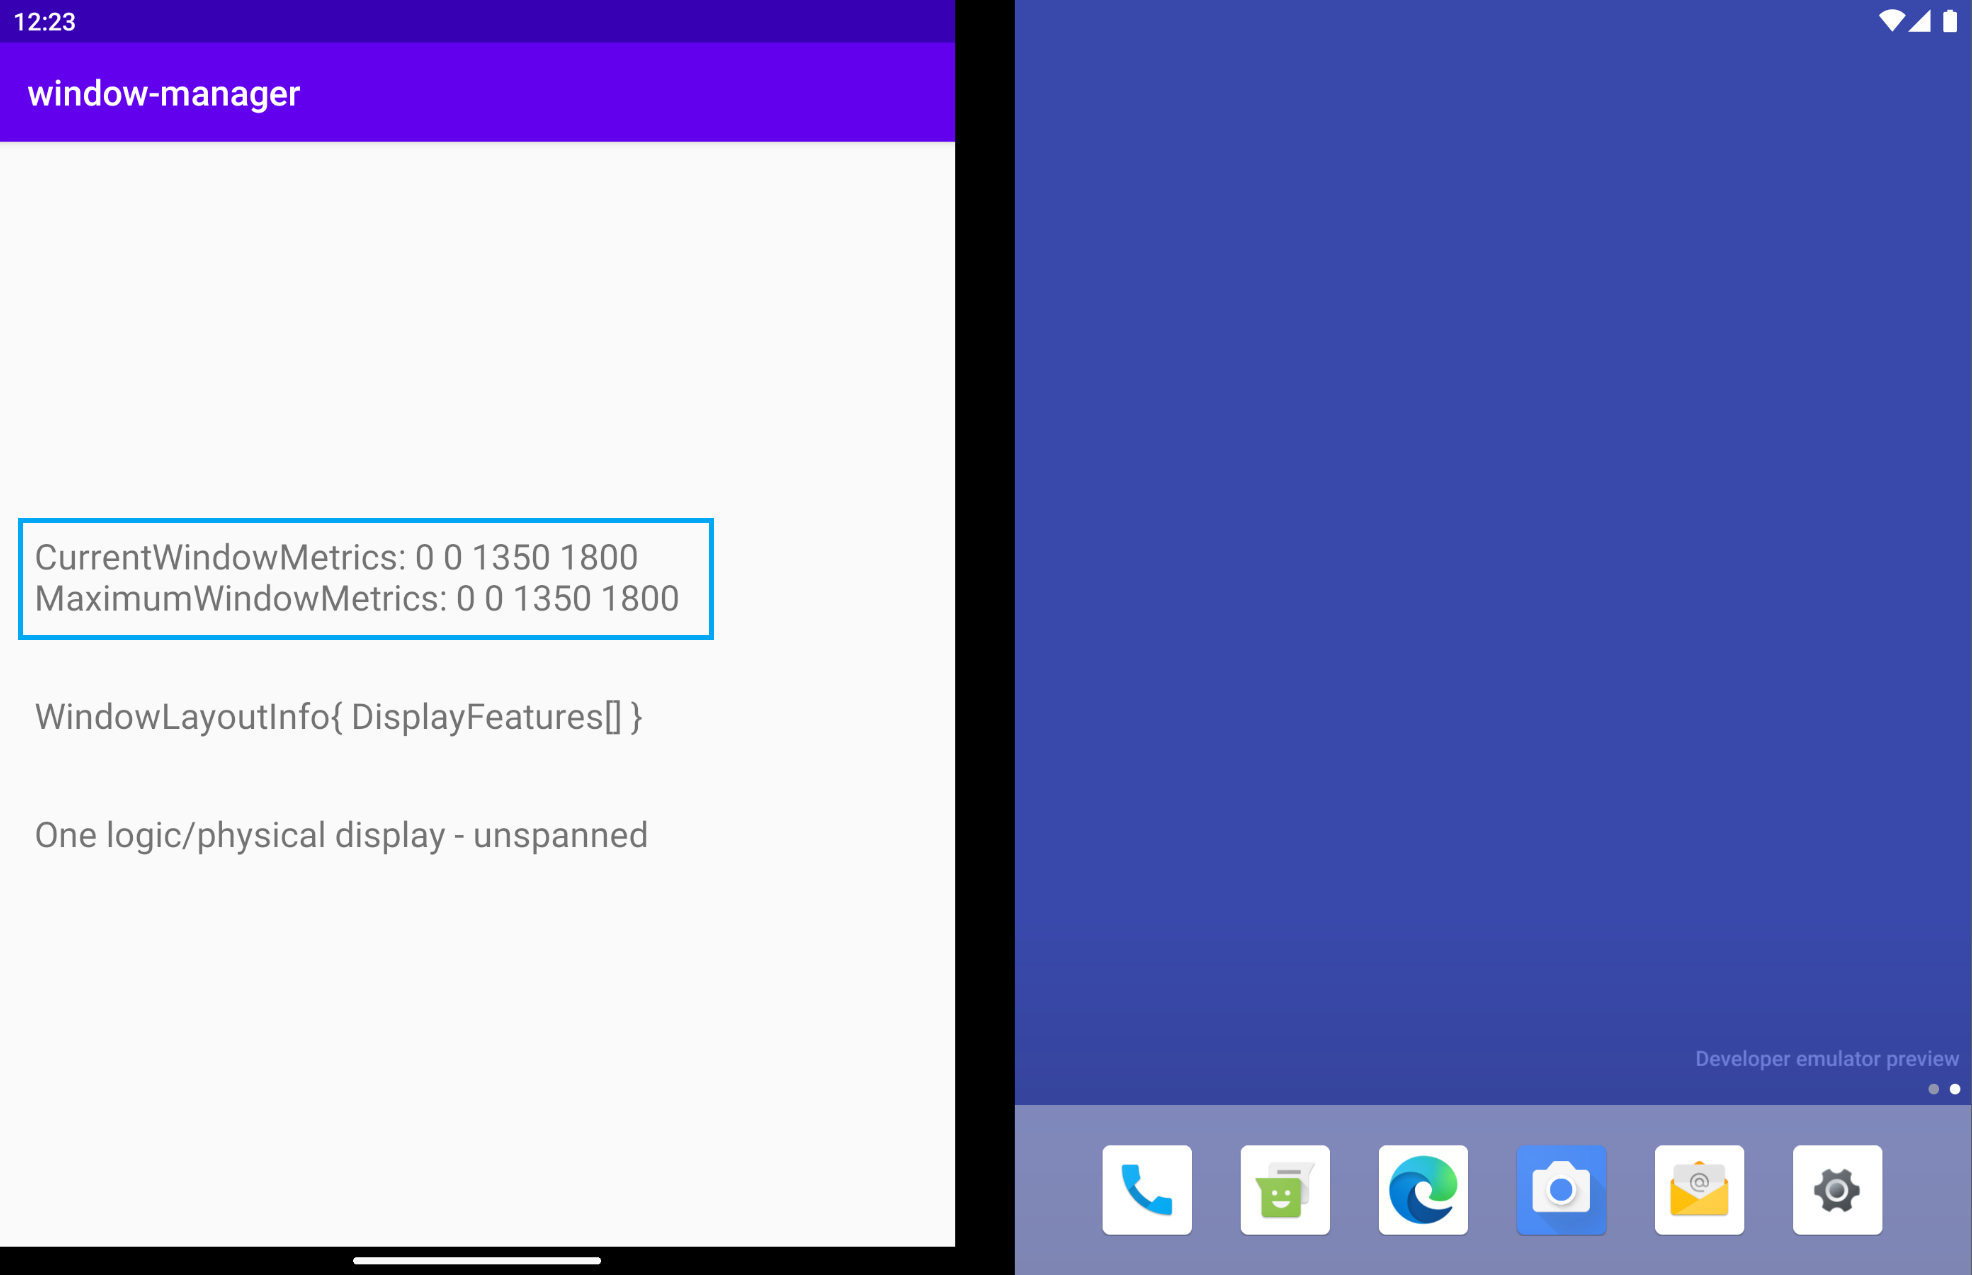
앱을 실행합니다. 듀얼 화면 에뮬레이터(아래 그림)에서는 에뮬레이터가 미러링하는 기기의 크기에 맞는 CurrentWindowMetrics를 가져옵니다. 앱이 단일 화면 모드에서 실행될 때도 측정항목을 확인할 수 있습니다.
앱이 여러 디스플레이에 걸쳐 스팬될 때는 아래 이미지와 같이 창 측정항목이 변경되어 앱에서 사용하는 더 큰 창 영역을 반영합니다.
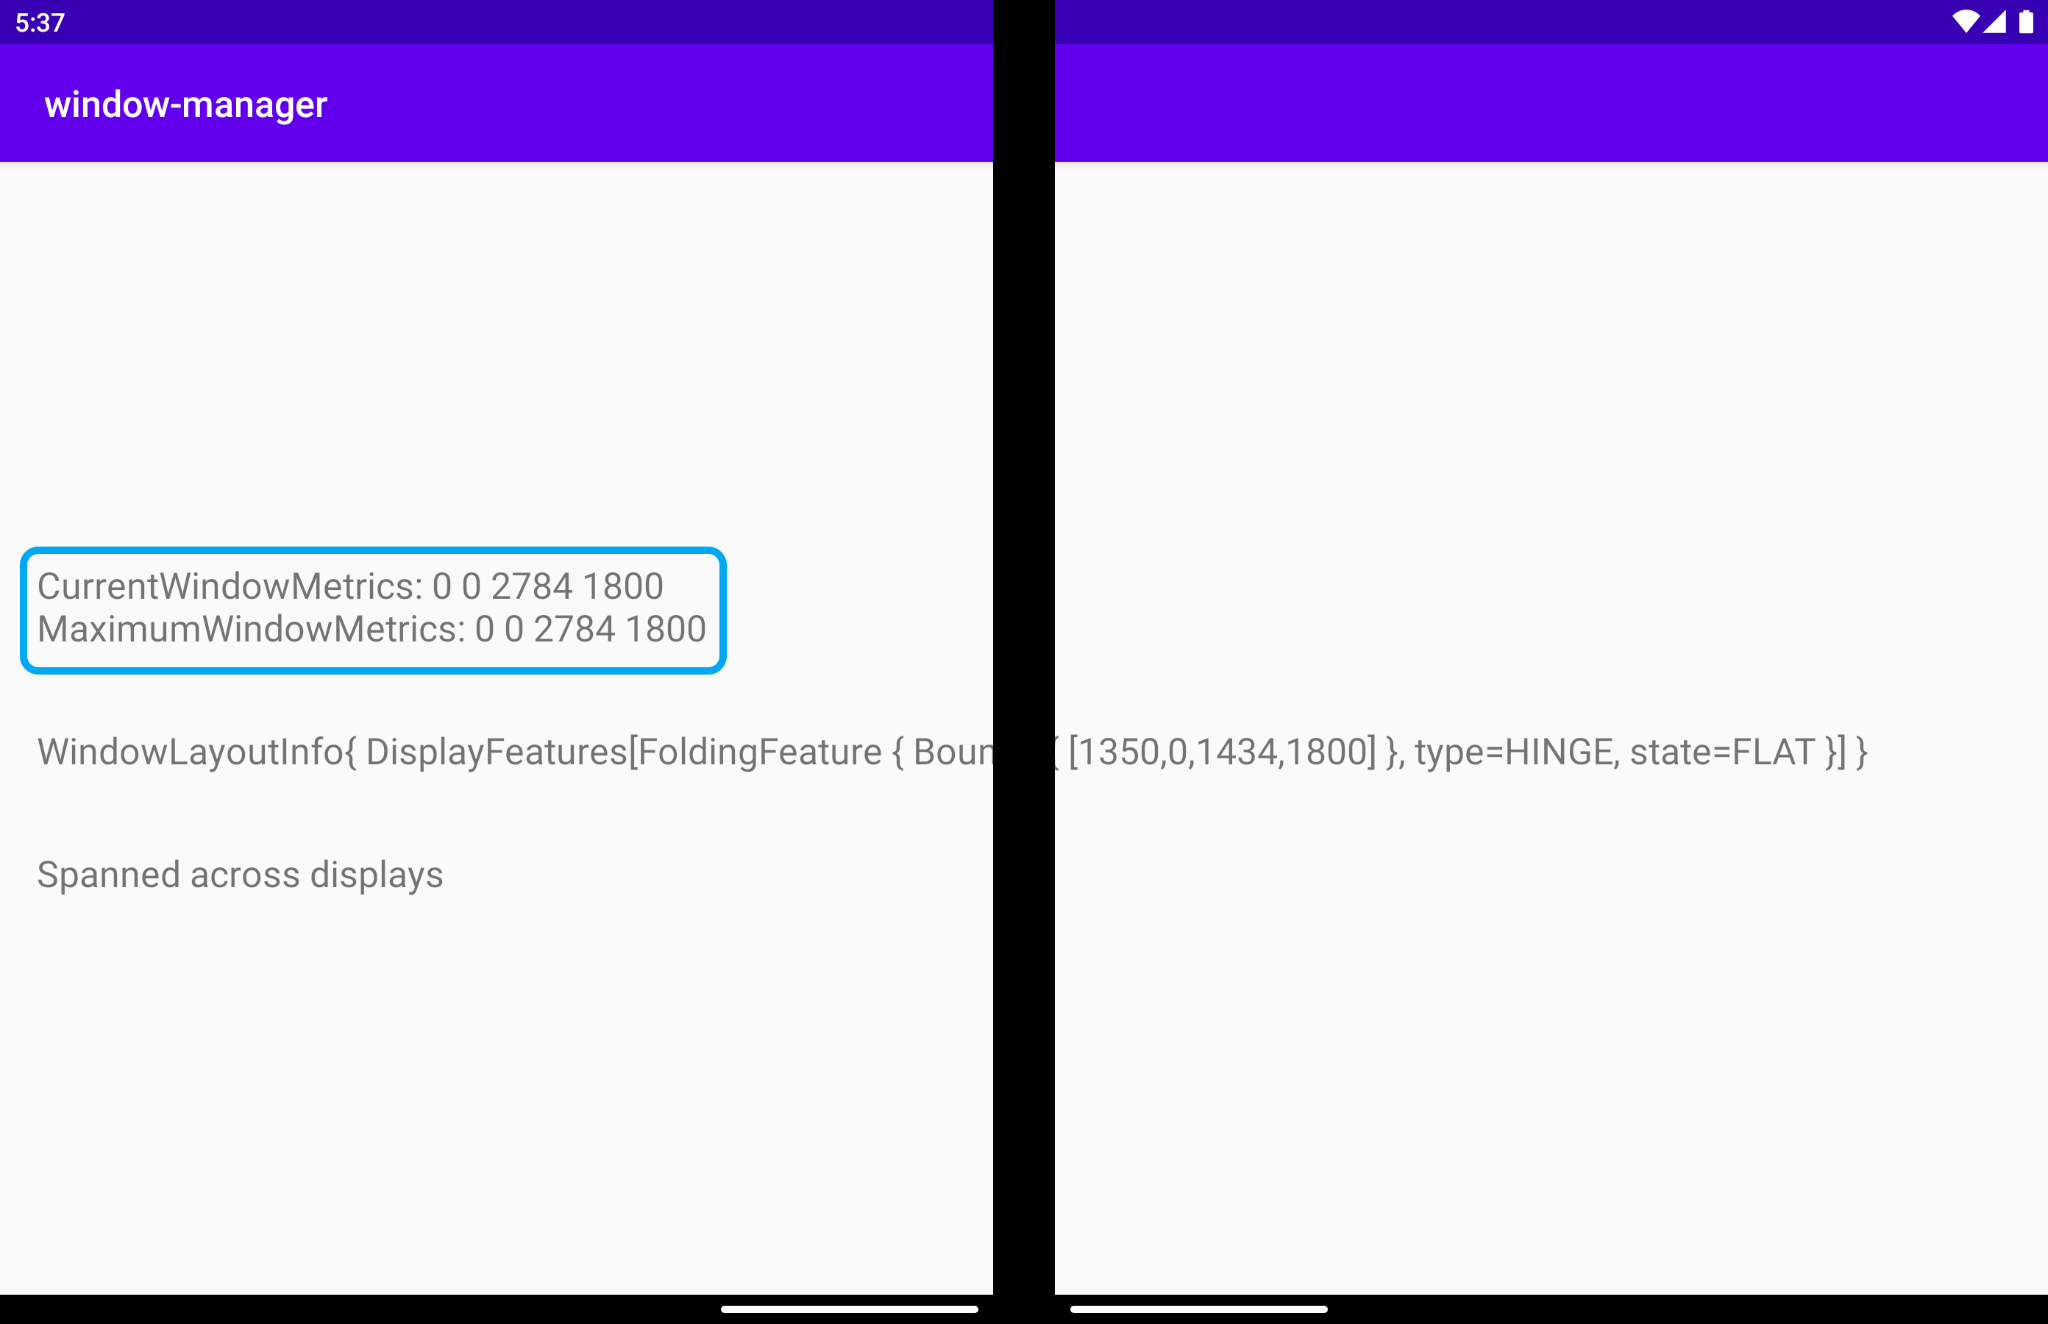
현재 및 최대 창 측정항목은 모두 동일한 값을 보유합니다. 앱이 단일 및 듀얼 화면에서 모두 항상 실행되고 사용 가능한 전체 디스플레이 영역을 차지하기 때문입니다.
수평형 접이식 폴더블 에뮬레이터에서는 앱이 전체 물리적 디스플레이에 스팬되고 멀티 윈도우 모드를 사용하는 경우 값이 달라집니다.
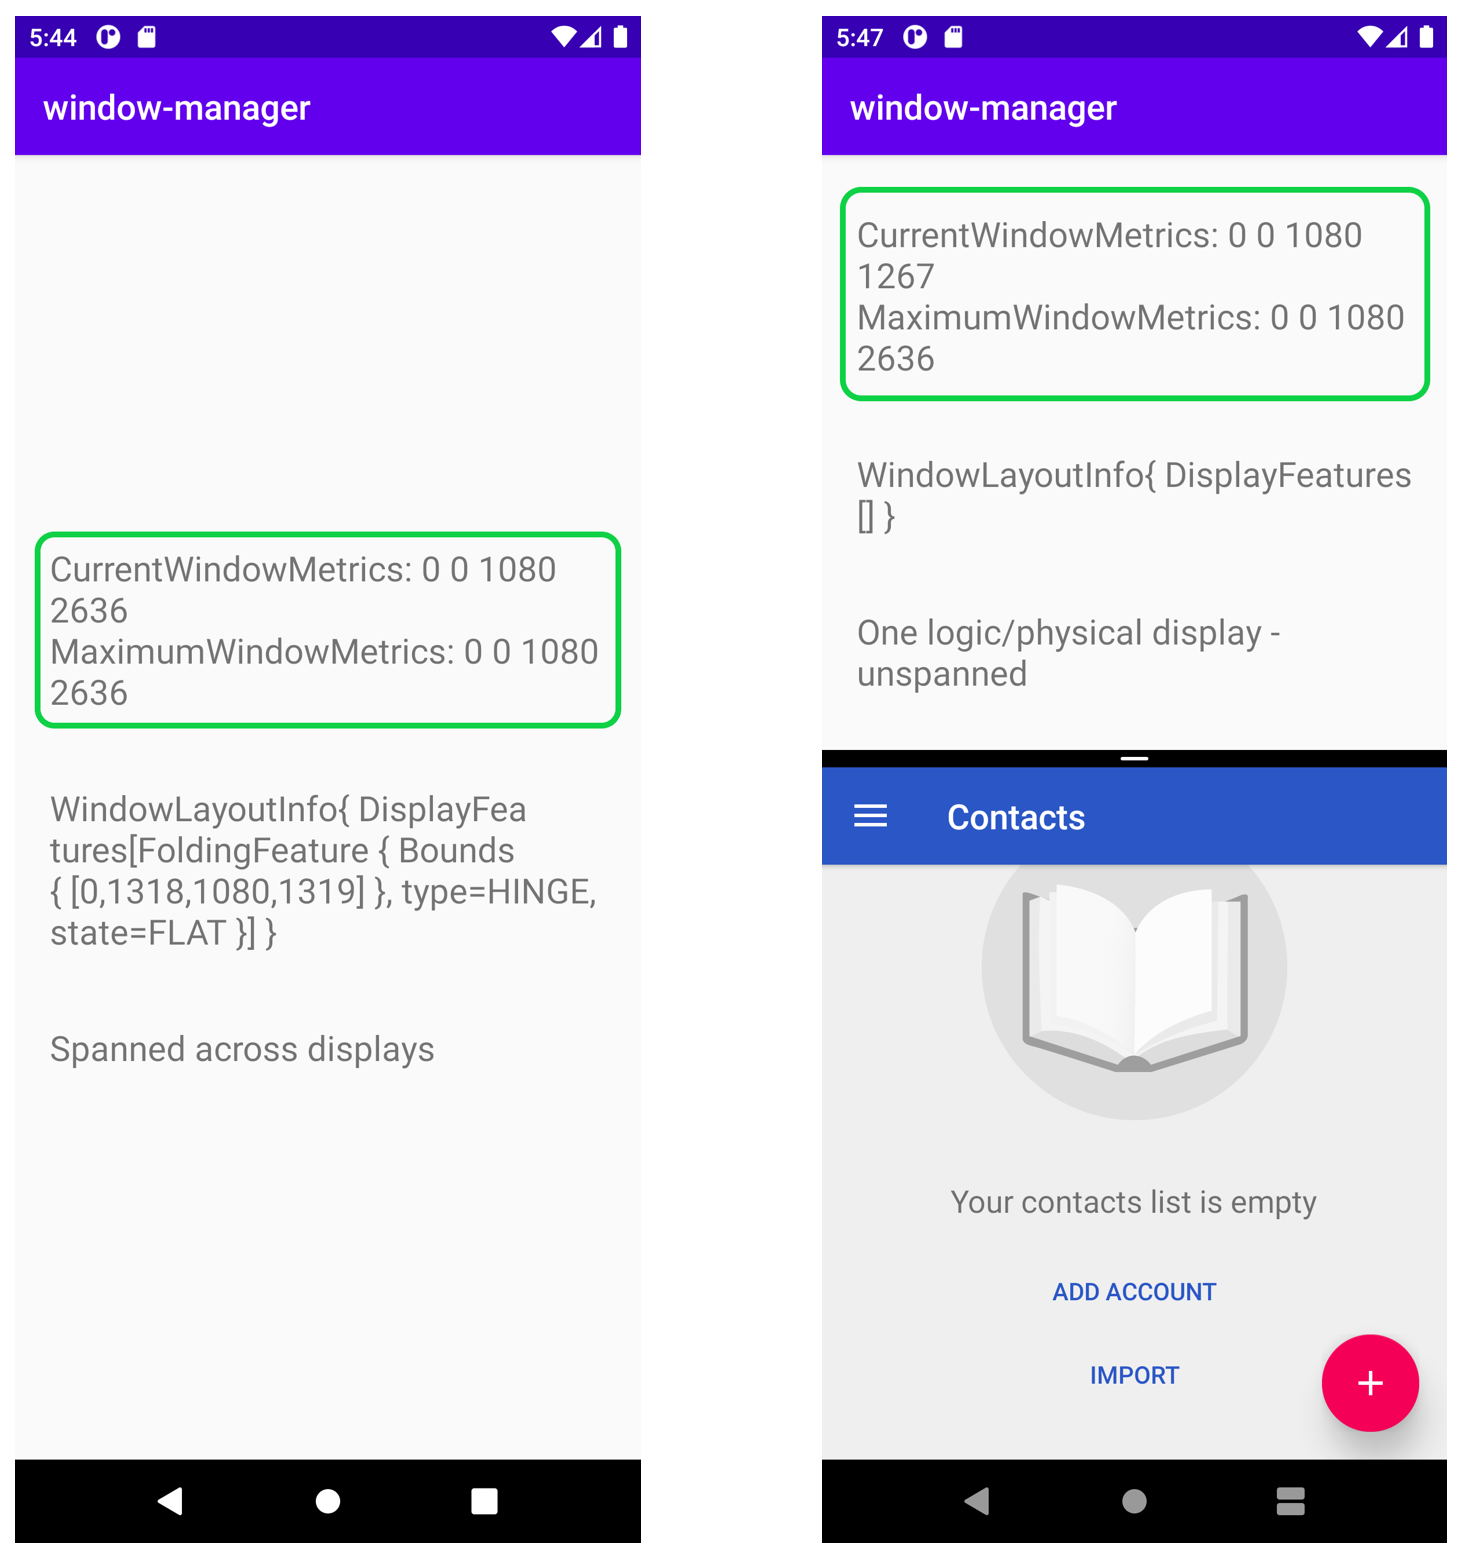
왼쪽 이미지에서 확인할 수 있듯이 두 측정항목의 값은 같습니다. 실행되는 앱이 현재 최대로 사용 가능한 전체 디스플레이 영역을 사용하기 때문입니다.
그러나 오른쪽 이미지에서 멀티 윈도우 모드로 실행되는 앱의 경우 현재 측정항목이 화면 분할 모드의 특정 영역(상단)에서 앱이 실행되는 영역의 크기를 어떻게 표시하는지 확인할 수 있습니다. 또한 최대 측정항목이 기기의 최대 디스플레이 영역을 어떻게 표시하는지 확인할 수 있습니다.
WindowMetricsCalculator에서 제공하는 측정항목은 앱에서 사용하거나 사용할 수 있는 창 영역을 파악하는 데 매우 유용합니다.
7. FoldingFeature 정보 시각화
이제 에뮬레이터나 기기의 DisplayFeatures 특성 및 경계와 함께 창 레이아웃 변경사항을 수신하도록 등록합니다.
WindowInfoTracker#windowLayoutInfo()에서 정보를 수집하려면 각 Lifecycle 객체에 정의된 lifecycleScope를 사용합니다. 이 범위에서 시작된 모든 코루틴은 Lifecycle이 소멸될 때 취소됩니다. lifecycle.coroutineScope 또는 lifecycleOwner.lifecycleScope 속성을 통해 수명 주기의 코루틴 범위에 액세스할 수 있습니다.
MainActivity의 onCreate 메서드에서 WindowInfoTracker 정보를 가져오고 표시하는 함수를 호출합니다. 먼저 onCreate 메서드에 onWindowLayoutInfoChange() 호출을 추가합니다.
MainActivity.kt
override fun onCreate(savedInstanceState: Bundle?) {
   super.onCreate(savedInstanceState)
   binding = ActivityMainBinding.inflate(layoutInflater)
   setContentView(binding.root)

   windowInfoTracker = WindowInfoTracker.getOrCreate(this@MainActivity)

   obtainWindowMetrics()
   onWindowLayoutInfoChange()
}
이 함수의 구현을 사용하여 새 레이아웃 구성이 변경될 때마다 정보를 가져옵니다.
함수 서명 및 스켈레톤을 정의합니다.
MainActivity.kt
private fun onWindowLayoutInfoChange() {
}
함수가 수신하는 매개변수인 WindowInfoTracker를 사용하여 WindowLayoutInfo 데이터를 가져옵니다. WindowLayoutInfo에는 창 내부에 위치한 DisplayFeature 목록이 포함되어 있습니다. 예를 들어 힌지나 디스플레이의 접히는 부분이 창을 가로지르는 경우 시각적 콘텐츠와 상호작용 요소를 두 개의 그룹(예: 목록 세부정보 또는 뷰 컨트롤)으로 분리하는 것이 좋을 수 있습니다.
현재 창 경계 내에 있는 기능만 보고됩니다. 화면에서 창이 이동하거나 크기가 조절되는 경우 이러한 기능의 위치와 크기가 변경될 수 있습니다.
lifecycle-runtime-ktx 종속 항목에 정의된 lifecycleScope를 통해 모든 디스플레이 기능 목록이 포함된 WindowLayoutInfo의 flow를 가져옵니다. 다음과 같이 onWindowLayoutInfoChange의 본문을 추가합니다.
MainActivity.kt
import androidx.lifecycle.Lifecycle
import androidx.lifecycle.lifecycleScope
import androidx.lifecycle.repeatOnLifecycle
import kotlinx.coroutines.Dispatchers
import kotlinx.coroutines.flow.collect
import kotlinx.coroutines.launch

private fun onWindowLayoutInfoChange() {
    lifecycleScope.launch(Dispatchers.Main) {
        lifecycle.repeatOnLifecycle(Lifecycle.State.STARTED) {
            windowInfoTracker.windowLayoutInfo(this@MainActivity)
                .collect { value ->
                    updateUI(value)
                }
        }
    }
}
updateUI 함수는 collect에서 호출됩니다. 이 함수를 구현하여 WindowLayoutInfo의 flow에서 수신한 정보를 표시하고 출력합니다. WindowLayoutInfo 데이터에 디스플레이 기능이 있는지 확인합니다. 디스플레이 기능이 있다면 디스플레이 기능이 앱의 UI와 상호작용하고 있는 것입니다. WindowLayoutInfo 데이터에 디스플레이 기능이 없다면 앱은 단일 화면 기기나 모드 또는 멀티 윈도우 모드에서 실행되고 있는 것입니다.
MainActivity.kt
import androidx.window.layout.WindowLayoutInfo

private fun updateUI(newLayoutInfo: WindowLayoutInfo) {
    binding.layoutChange.text = newLayoutInfo.toString()
    if (newLayoutInfo.displayFeatures.isNotEmpty()) {
        binding.configurationChanged.text = "Spanned across displays"
    } else {
        binding.configurationChanged.text = "One logic/physical display - unspanned"
    }
}
앱을 실행합니다. 듀얼 화면 에뮬레이터에서는 다음과 같이 표시됩니다.
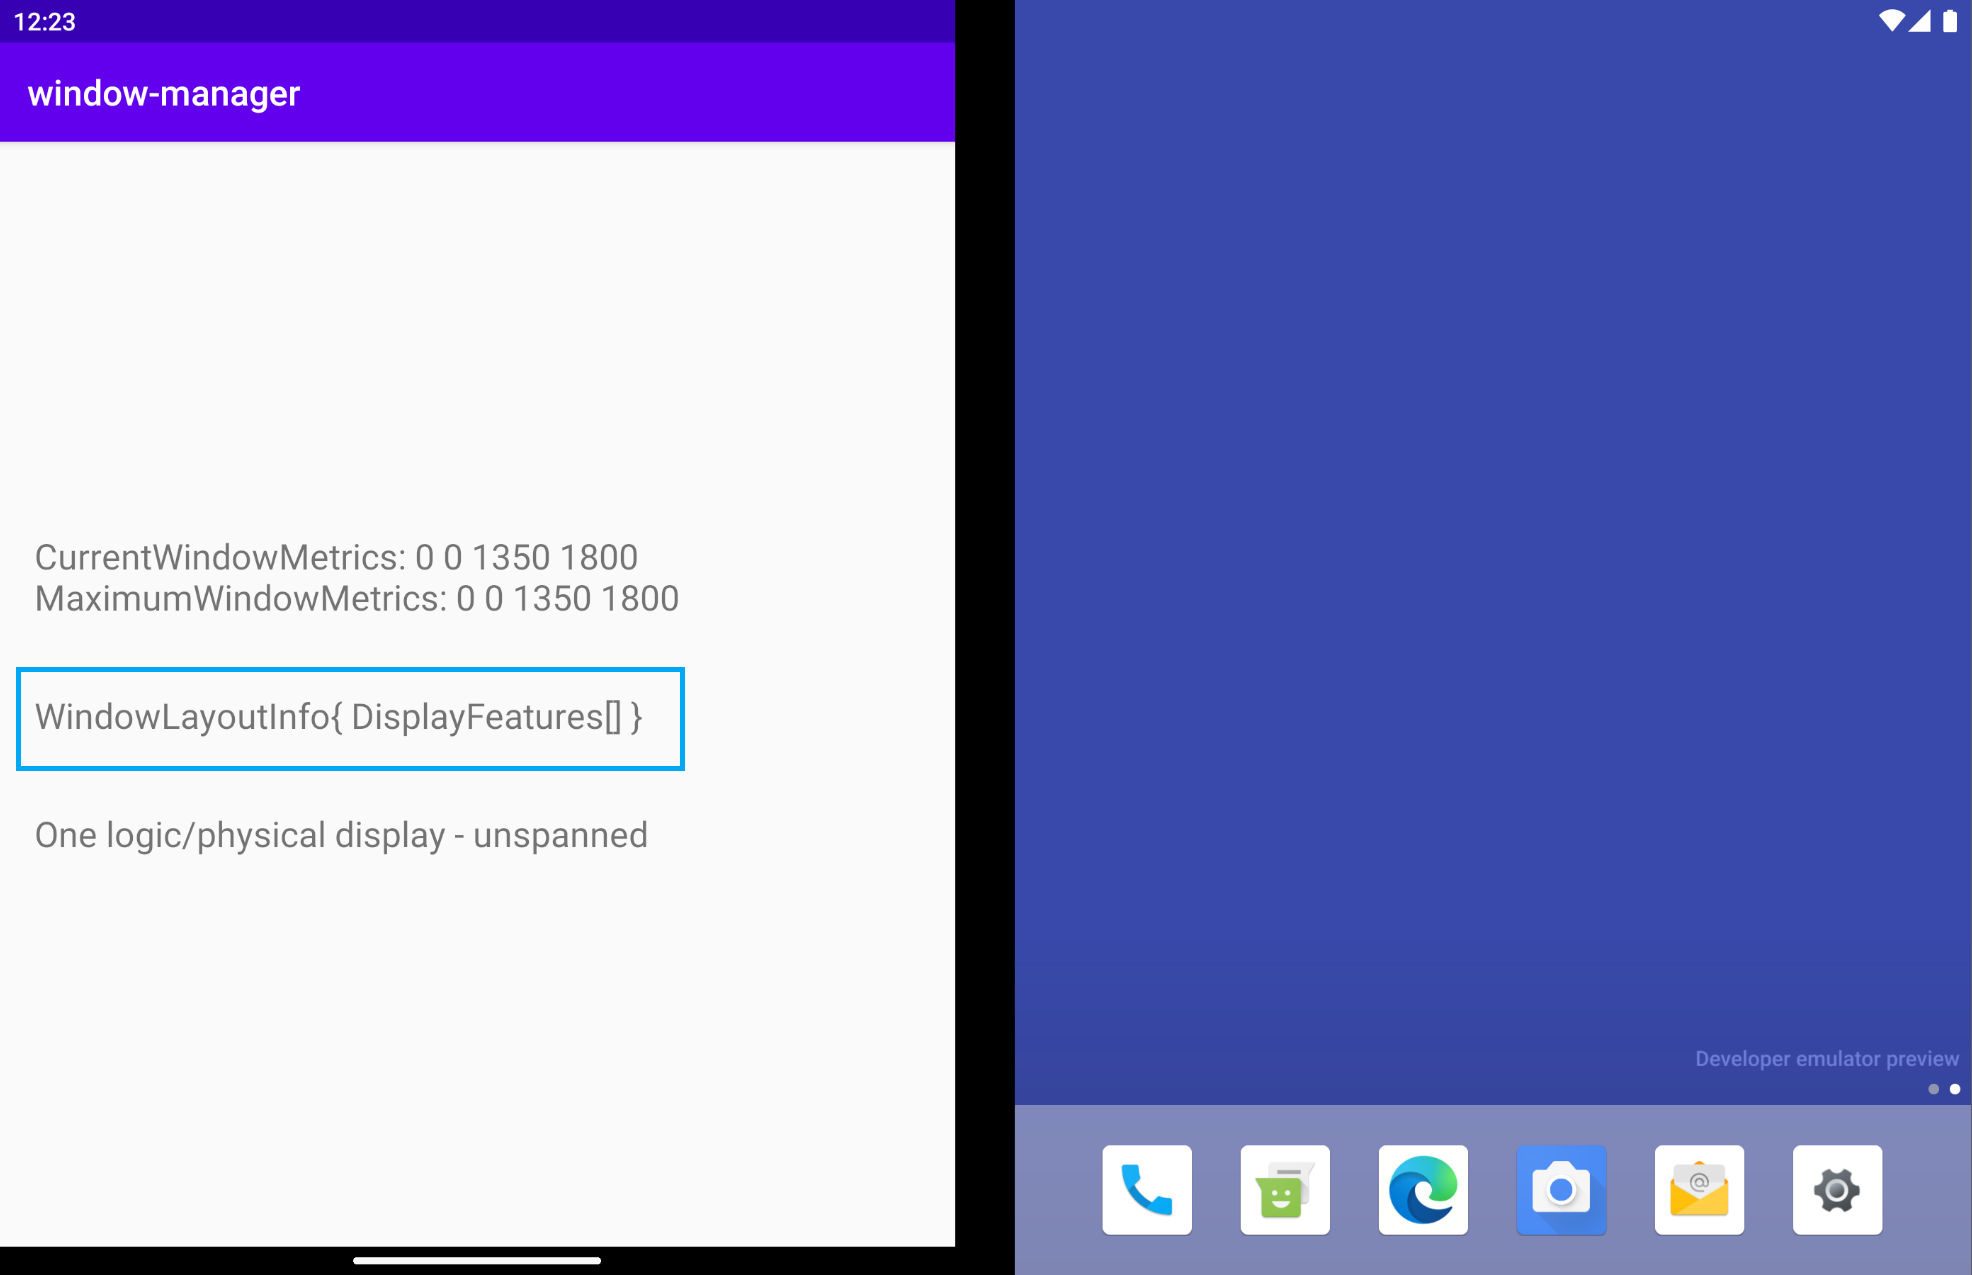
WindowLayoutInfo가 비어 있습니다. 빈 List<DisplayFeature>를 갖습니다. 중간에 힌지가 있는 에뮬레이터가 있다면 WindowManager에서 정보를 가져오는 게 좋습니다.
WindowManager는 앱이 여러 디스플레이(물리적이든 아니든)에 걸쳐 스팬될 때만 (WindowInfoTracker를 통해) WindowLayoutInfo 데이터(기기 기능 유형, 기기 기능 경계, 기기 상태)를 제공합니다. 따라서 이전 그림에서는 앱이 단일 화면 모드에서 실행되어 WindowLayoutInfo가 비어 있습니다.
이 정보가 있으면 앱이 실행 중인 모드(단일 화면 모드 또는 여러 디스플레이에 걸쳐 스팬됨)를 파악할 수 있으므로 UI/UX를 변경하여 이러한 구성에 맞게 조정된 더 나은 사용자 환경을 제공할 수 있습니다.
두 개의 물리적 디스플레이가 없는 기기(일반적으로 물리적 힌지가 없음)에서는 앱이 멀티 윈도우 모드를 사용하여 나란히 실행될 수 있습니다. 이러한 기기에서 앱이 멀티 윈도우 모드로 실행되면 이전 예와 같이 단일 화면에서 실행되는 것처럼 작동하고, 앱이 모든 논리 디스플레이를 차지하여 실행되면 앱이 스팬된 것처럼 작동합니다. 다음 그림을 참고하세요.
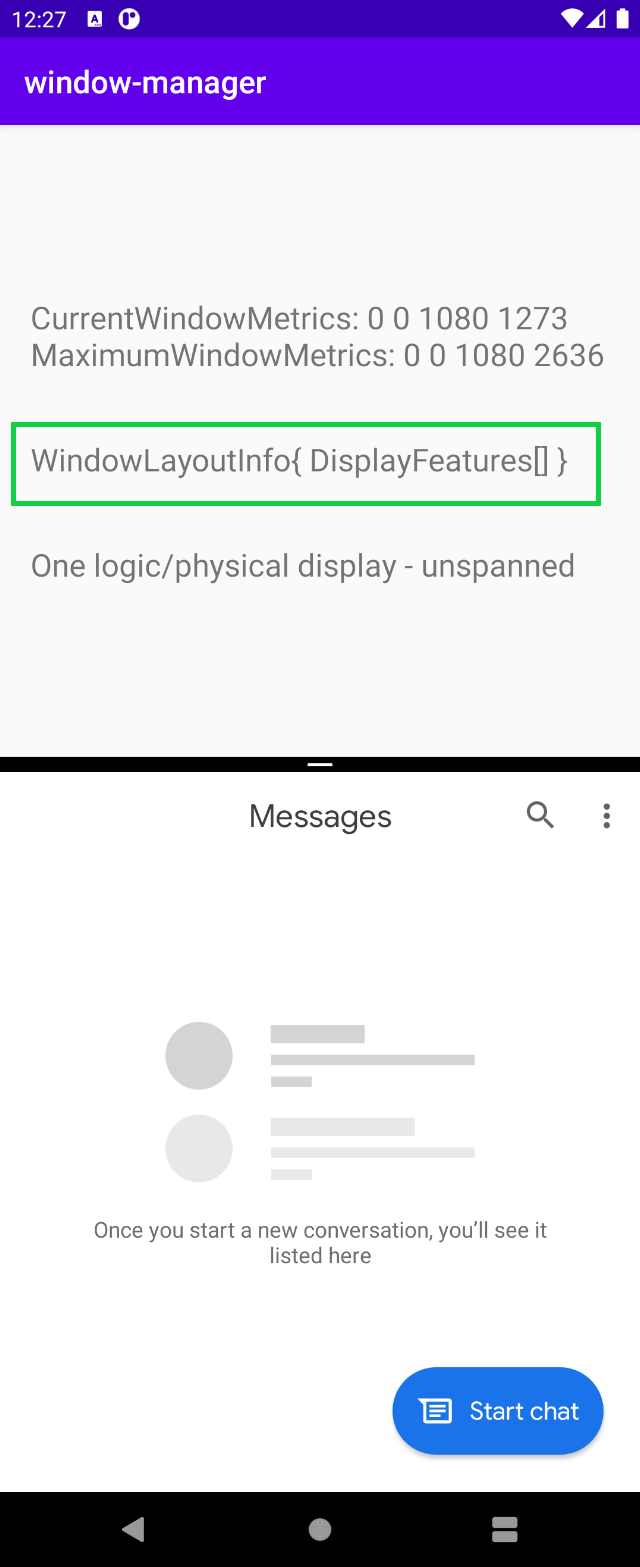
앱이 멀티 윈도우 모드에서 실행되면 WindowManager는 빈 List<LayoutInfo>를 제공합니다.
요약하면 앱이 실행되어 모든 논리 디스플레이를 차지하고 기기 기능(접이식 또는 힌지)과 교차할 때만 WindowLayoutInfo 데이터를 얻고 교차하지 않으면 어떤 정보도 얻지 못합니다. 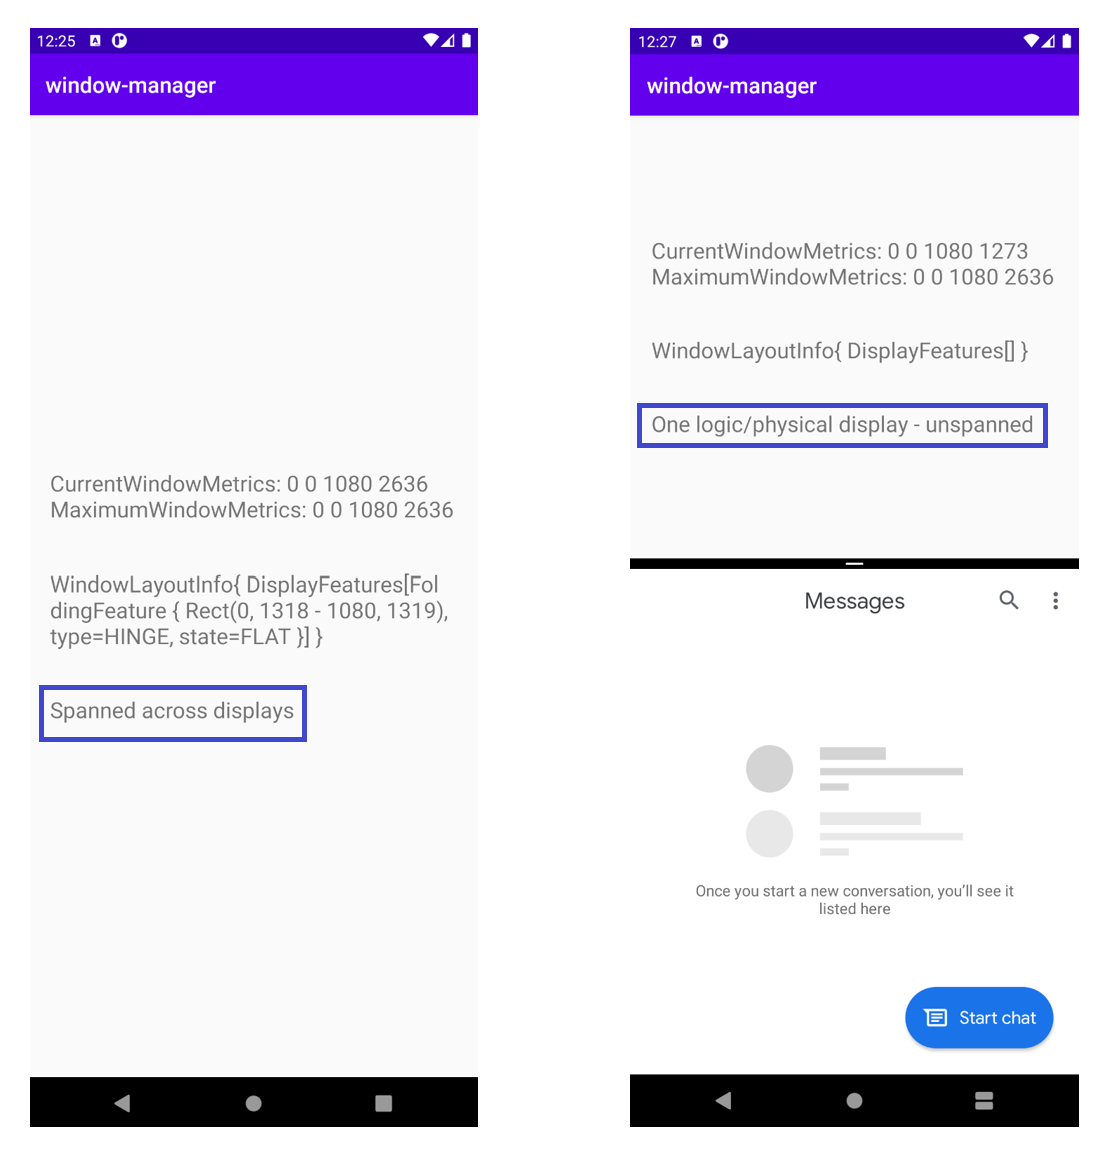
여러 디스플레이에 걸쳐 앱을 스팬하면 어떻게 되나요? 듀얼 화면 에뮬레이터에서 WindowLayoutInfo에 포함되는 FoldingFeature 객체는 기기 기능(HINGE), 기능의 경계(Rect(0, 0~1434, 1800)), 기기 상태(FLAT)에 관한 데이터를 제공합니다.
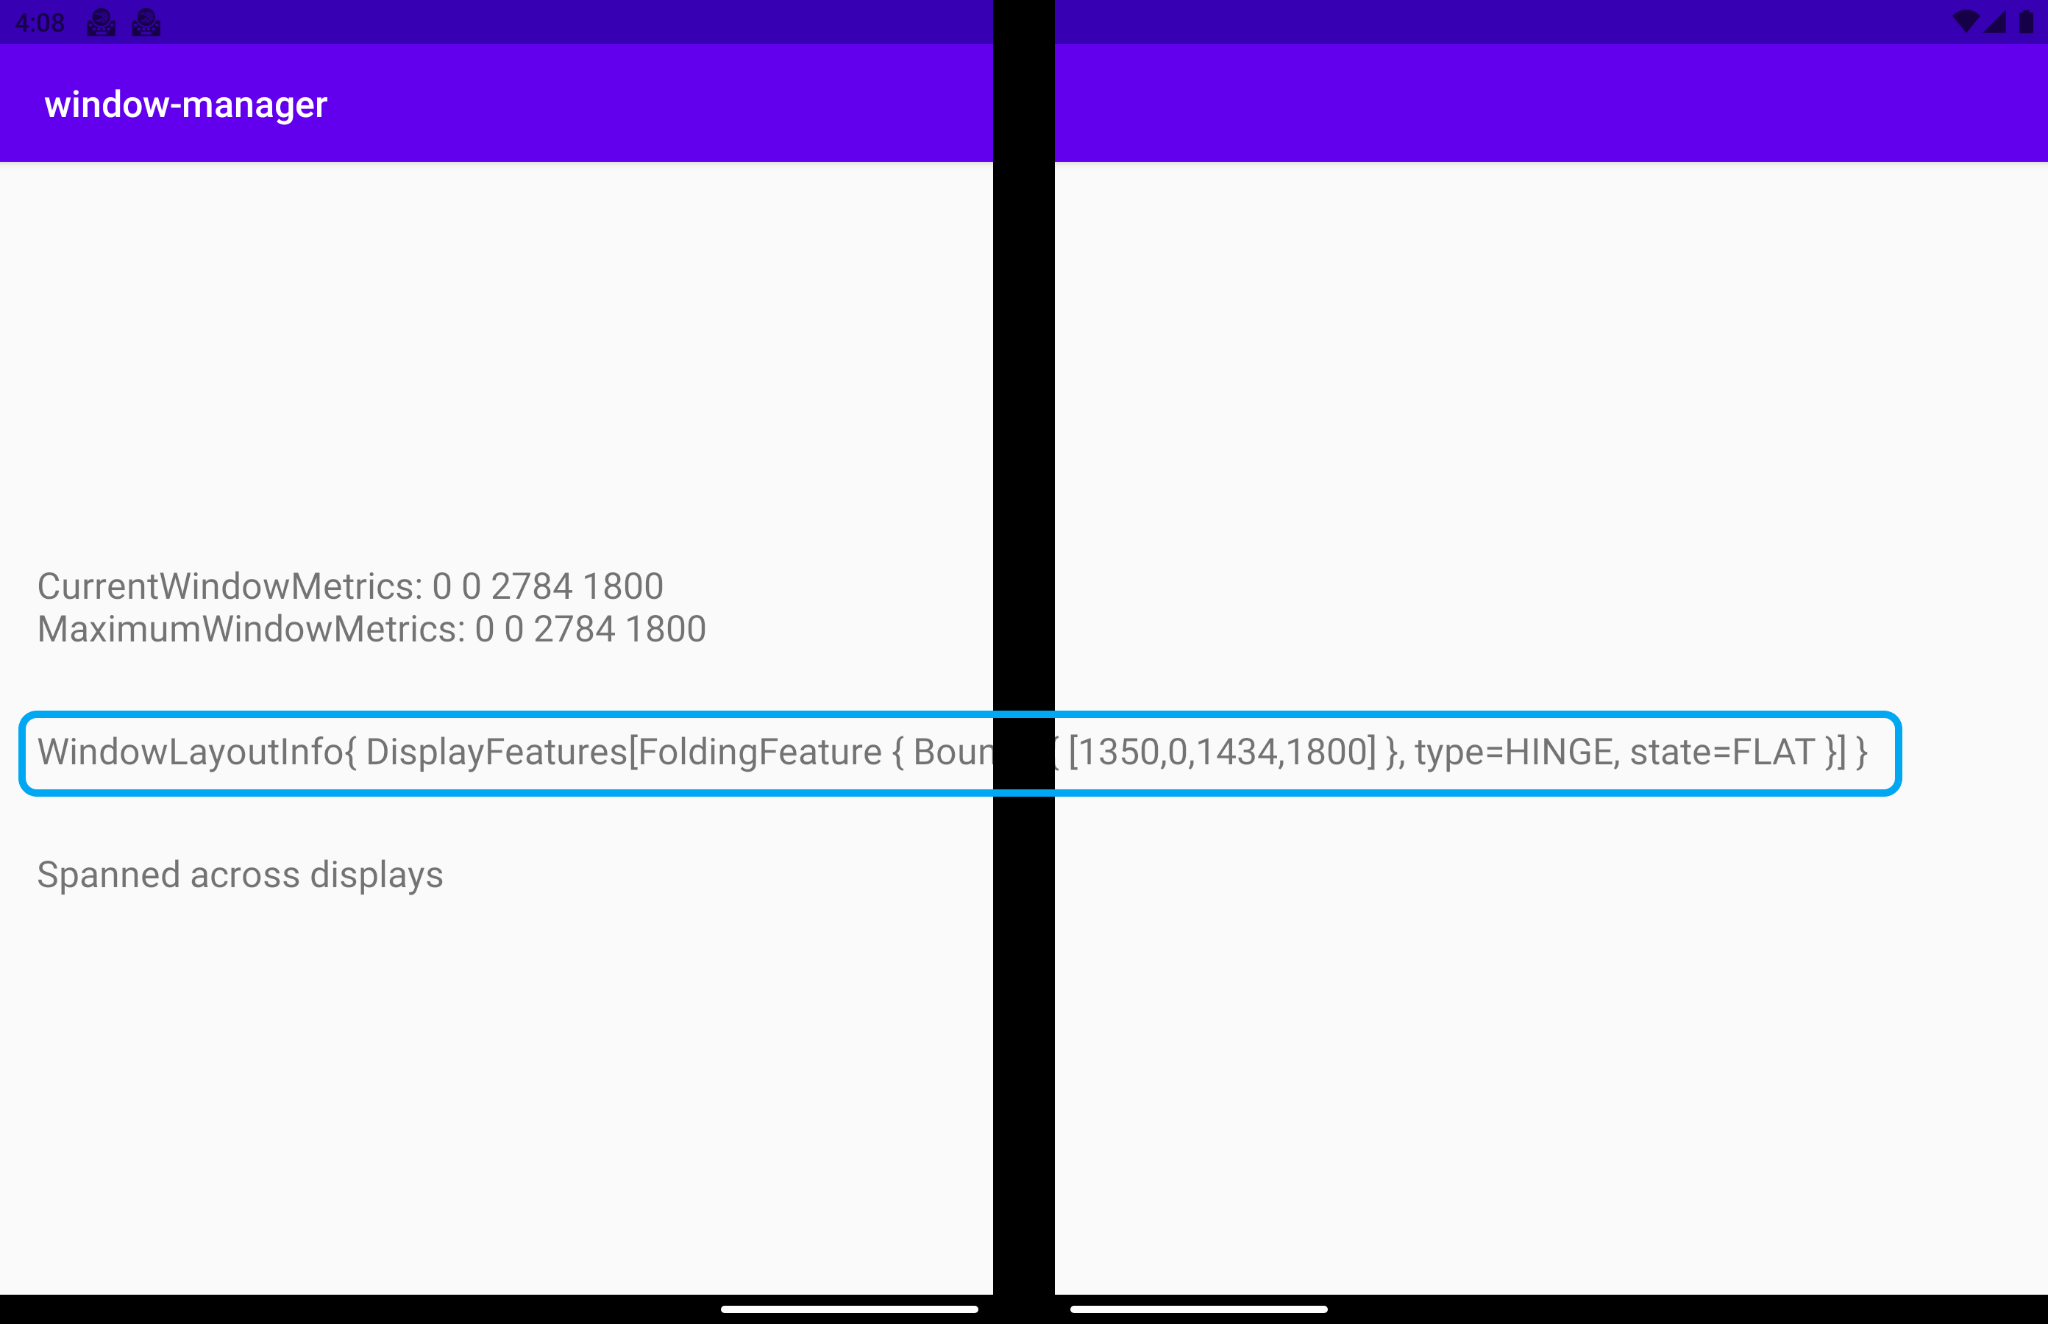
각 필드의 의미를 살펴보겠습니다.
type = TYPE_HINGE: 이 듀얼 화면 에뮬레이터는 물리적 힌지가 있는 실제 Surface Duo 기기를 미러링하고 이는 WindowManager가 보고하는 내용입니다.Bounds[0, 0 - 1434, 1800]: 창 좌표 공간에서 애플리케이션 창 내 기능의 경계 직사각형을 나타냅니다. Surface Duo 기기의 크기 사양을 보면 힌지가 보고된 이러한 경계(왼쪽, 상단, 오른쪽, 하단)에 의해 보고된 정확한 위치에 있음을 알 수 있습니다.State: 기기의 기기 상태를 나타내는 값은 2가지가 있습니다.HALF_OPENED: 폴더블 기기의 힌지가 열린 상태와 닫힌 상태 사이의 중간 위치에 있고 유연한 화면 부분 간 또는 물리적 화면 패널 간에 평평하지 않은 각도가 있습니다.FLAT: 폴더블 기기가 완전히 열려 있고 사용자에게 표시되는 화면 공간이 평평합니다.
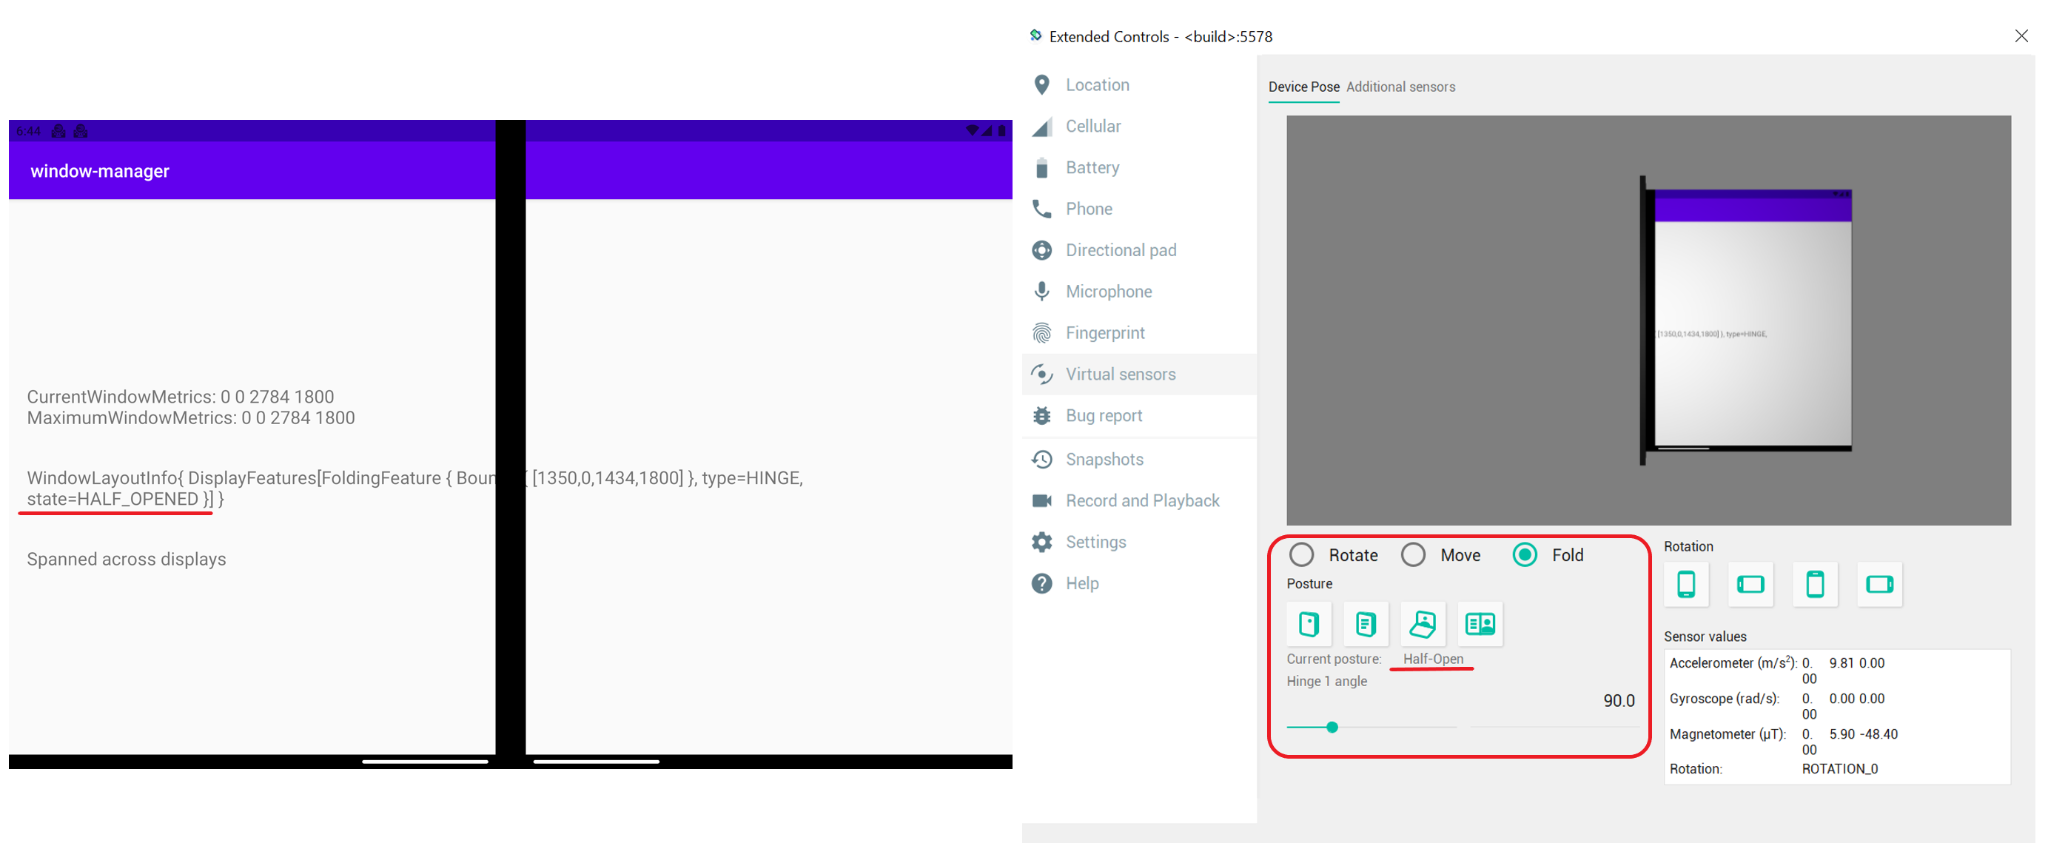
에뮬레이터는 기본적으로 180도로 열리므로 WindowManager에서 반환하는 상태는 FLAT입니다.
가상 센서를 사용하여 에뮬레이터의 상태를 Half-Open 상태로 변경하면 WindowManager에서 새 상태 HALF_OPENED를 알려줍니다.
WindowManager를 사용하여 UI/UX 조정
창 레이아웃 정보를 보여주는 그림에서 볼 수 있듯이, 표시된 정보는 디스플레이 기능으로 잘렸습니다. 여기서도 같은 상황이 발생합니다.
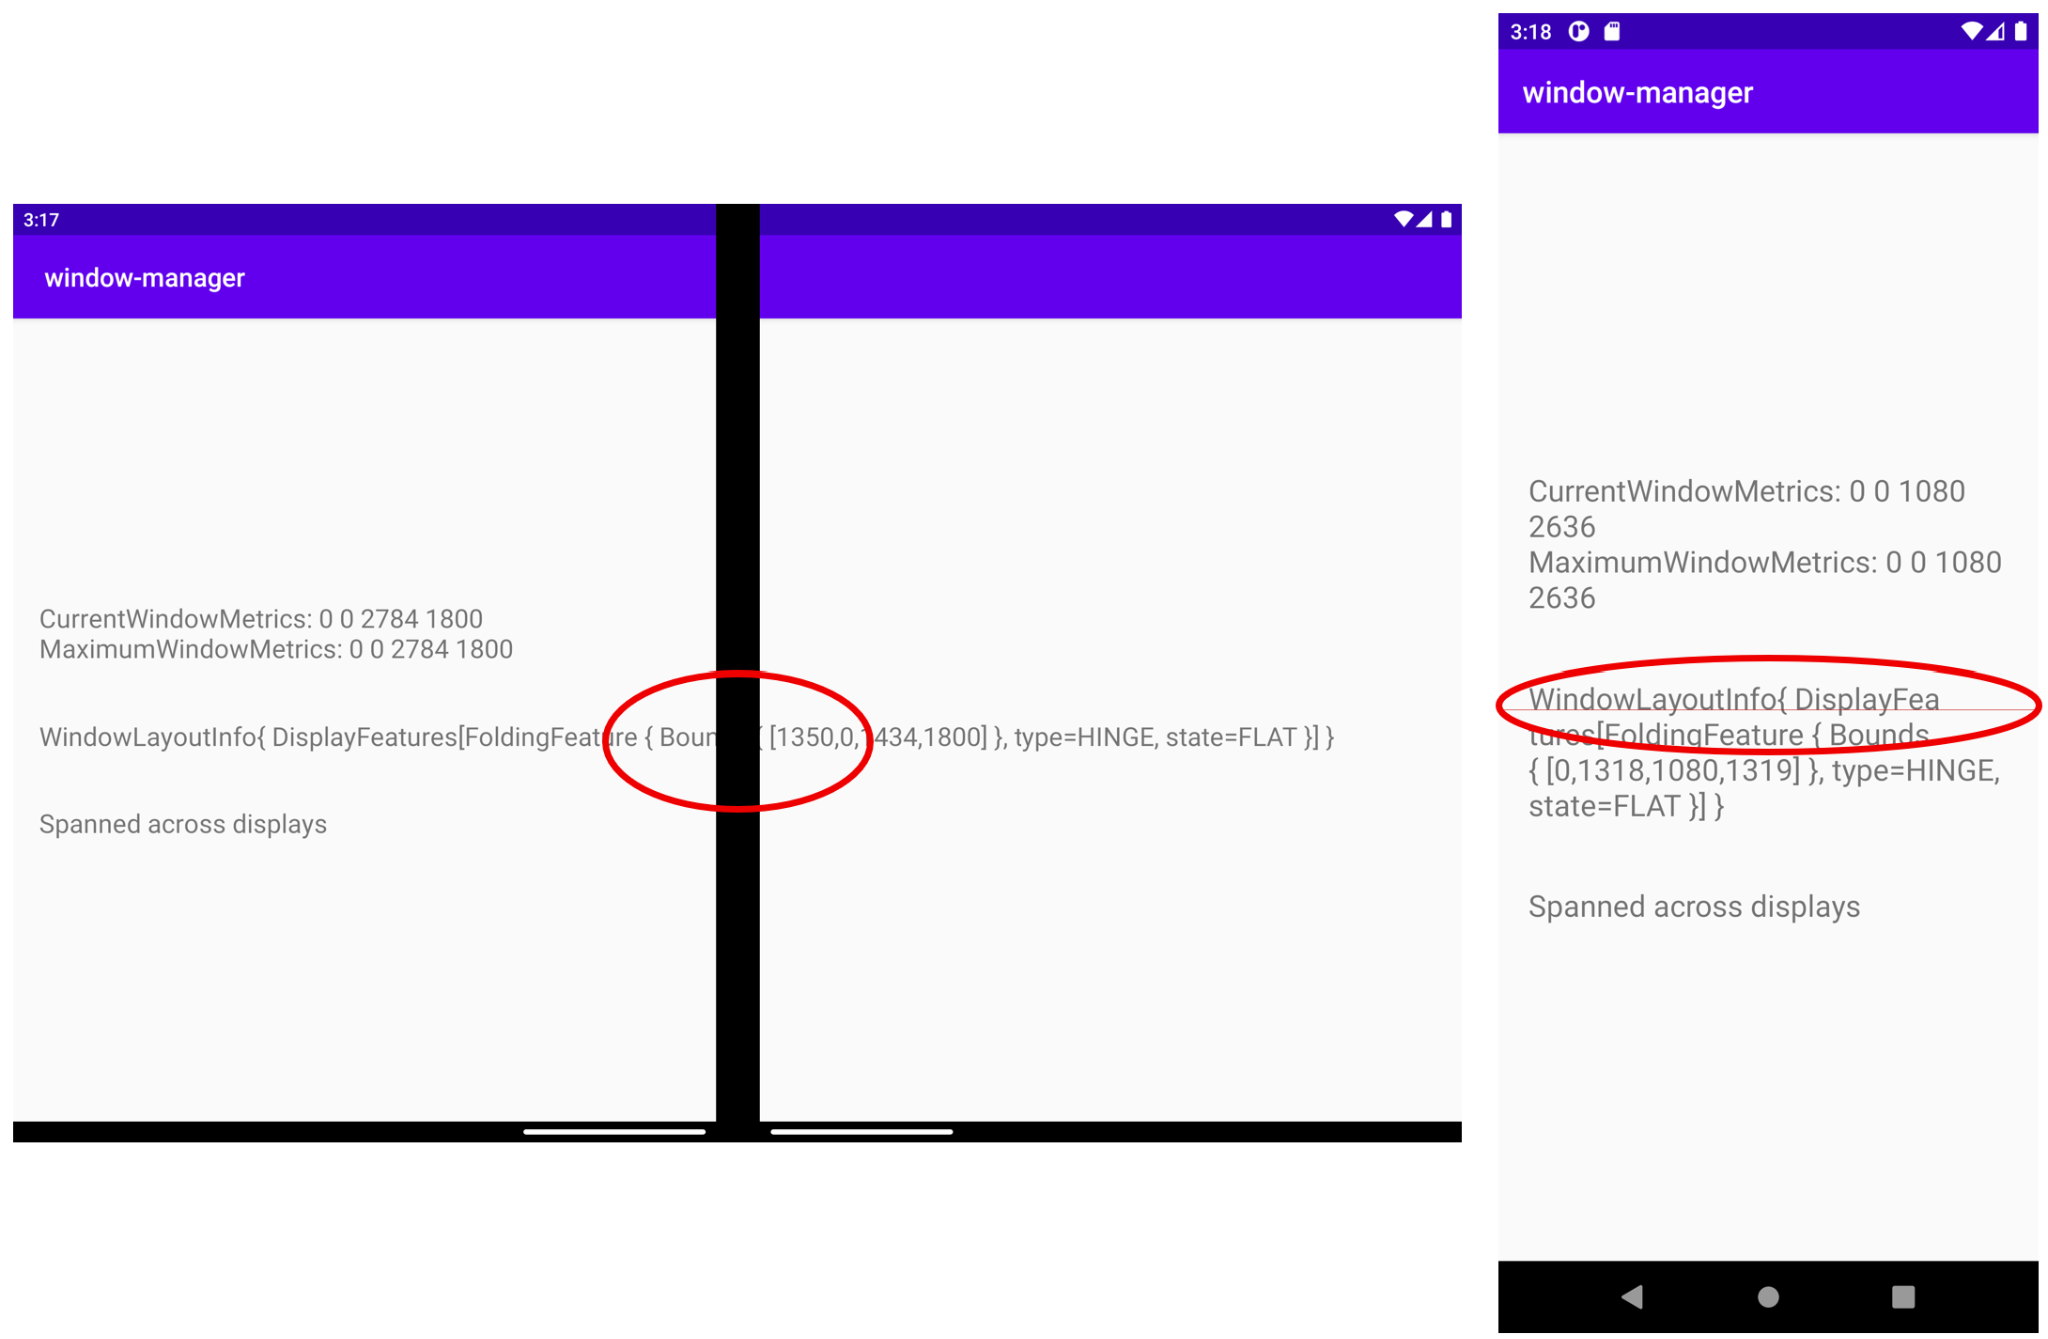
이는 최적의 사용자 환경이 아닙니다. WindowManager에서 제공하는 정보를 사용하여 UI/UX를 조정할 수 있습니다.
이전에 살펴본 것처럼 앱이 여러 디스플레이 영역에 걸쳐 스팬될 때는 앱이 기기 기능과 교차되는 때이기도 하므로 WindowManager는 창 레이아웃 정보를 디스플레이 상태와 디스플레이 경계로 제공합니다. 여기서는 앱이 스팬될 때가 이 정보를 사용하여 UI/UX를 조정해야 하는 때입니다.
다음으로 할 작업은 앱이 스팬되는 런타임에 현재 보유한 UI/UX를 조정하여 중요한 정보가 디스플레이 기능으로 인해 잘리거나 숨겨지지 않도록 하는 것입니다. 기기의 디스플레이 기능을 미러링하여 잘리거나 숨겨진 TextView를 제한하는 참조로 사용할 뷰를 만듭니다. 따라서 더 이상 정보가 누락되지 않습니다.
학습 목적으로 이 새로운 뷰의 색상을 지정합니다. 이렇게 하면 뷰가 실제 기기 디스플레이 기능과 정확히 동일한 위치에 있고 크기도 같음을 쉽게 알 수 있습니다.
activity_main.xml에서 기기 기능 참조로 사용할 새로운 뷰를 추가합니다.
activity_main.xml
<!-- It's not important where this view is placed by default, it will be positioned dynamically at runtime -->
<View
    android:id="@+id/folding_feature"
    android:layout_width="0dp"
    android:layout_height="0dp"
    android:background="@android:color/holo_red_dark"
    android:visibility="gone"
    tools:ignore="MissingConstraints" />
MainActivity.kt에서, 주어진 WindowLayoutInfo의 정보를 표시하는 데 사용한 updateUI() 함수로 이동하여 디스플레이 기능이 있는 if-else 사례에 새 함수 호출을 추가합니다.
MainActivity.kt
private fun updateUI(newLayoutInfo: WindowLayoutInfo) {
   binding.layoutChange.text = newLayoutInfo.toString()
   if (newLayoutInfo.displayFeatures.isNotEmpty()) {
       binding.configurationChanged.text = "Spanned across displays"
       alignViewToFoldingFeatureBounds(newLayoutInfo)
   } else {
       binding.configurationChanged.text = "One logic/physical display - unspanned"
   }
}
WindowLayoutInfo를 매개변수로 수신하는 alignViewToFoldingFeatureBounds 함수를 추가했습니다.
이 함수를 만듭니다. 함수 내에서 ConstraintSet를 만들어 뷰에 새로운 제약 조건을 적용합니다. 그런 다음 WindowLayoutInfo를 사용하여 디스플레이 기능 경계를 가져옵니다. WindowLayoutInfo는 인터페이스일 뿐인 DisplayFeature 목록을 반환하므로 모든 정보에 액세스하려면 FoldingFeature로 변환합니다.
MainActivity.kt
import androidx.constraintlayout.widget.ConstraintSet
import androidx.window.layout.FoldingFeature

private fun alignViewToFoldingFeatureBounds(newLayoutInfo: WindowLayoutInfo) {
   val constraintLayout = binding.constraintLayout
   val set = ConstraintSet()
   set.clone(constraintLayout)

   // Get and translate the feature bounds to the View's coordinate space and current
   // position in the window.
   val foldingFeature = newLayoutInfo.displayFeatures[0] as FoldingFeature
   val bounds = getFeatureBoundsInWindow(foldingFeature, binding.root)


   // Rest of the code to be added in the following steps
}
기능 경계를 뷰의 좌표 공간 및 창의 현재 위치로 변환하는 getFeatureBoundsInWindow() 함수를 정의합니다.
MainActivity.kt
import android.graphics.Rect
import android.view.View
import androidx.window.layout.DisplayFeature

/**
 * Get the bounds of the display feature translated to the View's coordinate space and current
 * position in the window. This will also include view padding in the calculations.
 */
private fun getFeatureBoundsInWindow(
    displayFeature: DisplayFeature,
    view: View,
    includePadding: Boolean = true
): Rect? {
    // Adjust the location of the view in the window to be in the same coordinate space as the feature.
    val viewLocationInWindow = IntArray(2)
    view.getLocationInWindow(viewLocationInWindow)

    // Intersect the feature rectangle in window with view rectangle to clip the bounds.
    val viewRect = Rect(
        viewLocationInWindow[0], viewLocationInWindow[1],
        viewLocationInWindow[0] + view.width, viewLocationInWindow[1] + view.height
    )

    // Include padding if needed
    if (includePadding) {
        viewRect.left += view.paddingLeft
        viewRect.top += view.paddingTop
        viewRect.right -= view.paddingRight
        viewRect.bottom -= view.paddingBottom
    }

    val featureRectInView = Rect(displayFeature.bounds)
    val intersects = featureRectInView.intersect(viewRect)

    // Checks to see if the display feature overlaps with our view at all
    if ((featureRectInView.width() == 0 && featureRectInView.height() == 0) ||
        !intersects
    ) {
        return null
    }

    // Offset the feature coordinates to view coordinate space start point
    featureRectInView.offset(-viewLocationInWindow[0], -viewLocationInWindow[1])

    return featureRectInView
}
디스플레이 기능의 경계에 관한 정보를 사용하여 참조 뷰의 올바른 높이를 설정하고 적절하게 이동할 수 있습니다.
alignViewToFoldingFeatureBounds의 전체 코드는 다음과 같습니다.
MainActivity.kt - alignViewToFoldingFeatureBounds
private fun alignViewToFoldingFeatureBounds(newLayoutInfo: WindowLayoutInfo) {
    val constraintLayout = binding.constraintLayout
    val set = ConstraintSet()
    set.clone(constraintLayout)

    // Get and Translate the feature bounds to the View's coordinate space and current
    // position in the window.
    val foldingFeature = newLayoutInfo.displayFeatures[0] as FoldingFeature
    val bounds = getFeatureBoundsInWindow(foldingFeature, binding.root)

    bounds?.let { rect ->
        // Some devices have a 0px width folding feature. We set a minimum of 1px so we
        // can show the view that mirrors the folding feature in the UI and use it as reference.
        val horizontalFoldingFeatureHeight = (rect.bottom - rect.top).coerceAtLeast(1)
        val verticalFoldingFeatureWidth = (rect.right - rect.left).coerceAtLeast(1)

        // Sets the view to match the height and width of the folding feature
        set.constrainHeight(
            R.id.folding_feature,
            horizontalFoldingFeatureHeight
        )
        set.constrainWidth(
            R.id.folding_feature,
            verticalFoldingFeatureWidth
        )

        set.connect(
            R.id.folding_feature, ConstraintSet.START,
            ConstraintSet.PARENT_ID, ConstraintSet.START, 0
        )
        set.connect(
            R.id.folding_feature, ConstraintSet.TOP,
            ConstraintSet.PARENT_ID, ConstraintSet.TOP, 0
        )

        if (foldingFeature.orientation == FoldingFeature.Orientation.VERTICAL) {
            set.setMargin(R.id.folding_feature, ConstraintSet.START, rect.left)
            set.connect(
                R.id.layout_change, ConstraintSet.END,
                R.id.folding_feature, ConstraintSet.START, 0
            )
        } else {
            // FoldingFeature is Horizontal
            set.setMargin(
                R.id.folding_feature, ConstraintSet.TOP,
                rect.top
            )
            set.connect(
                R.id.layout_change, ConstraintSet.TOP,
                R.id.folding_feature, ConstraintSet.BOTTOM, 0
            )
        }

        // Set the view to visible and apply constraints
        set.setVisibility(R.id.folding_feature, View.VISIBLE)
        set.applyTo(constraintLayout)
    }
}
이제 기기 디스플레이 기능과 충돌한 TextView가 기능이 있는 위치를 고려하므로 콘텐츠가 잘리거나 숨겨지지 않습니다.
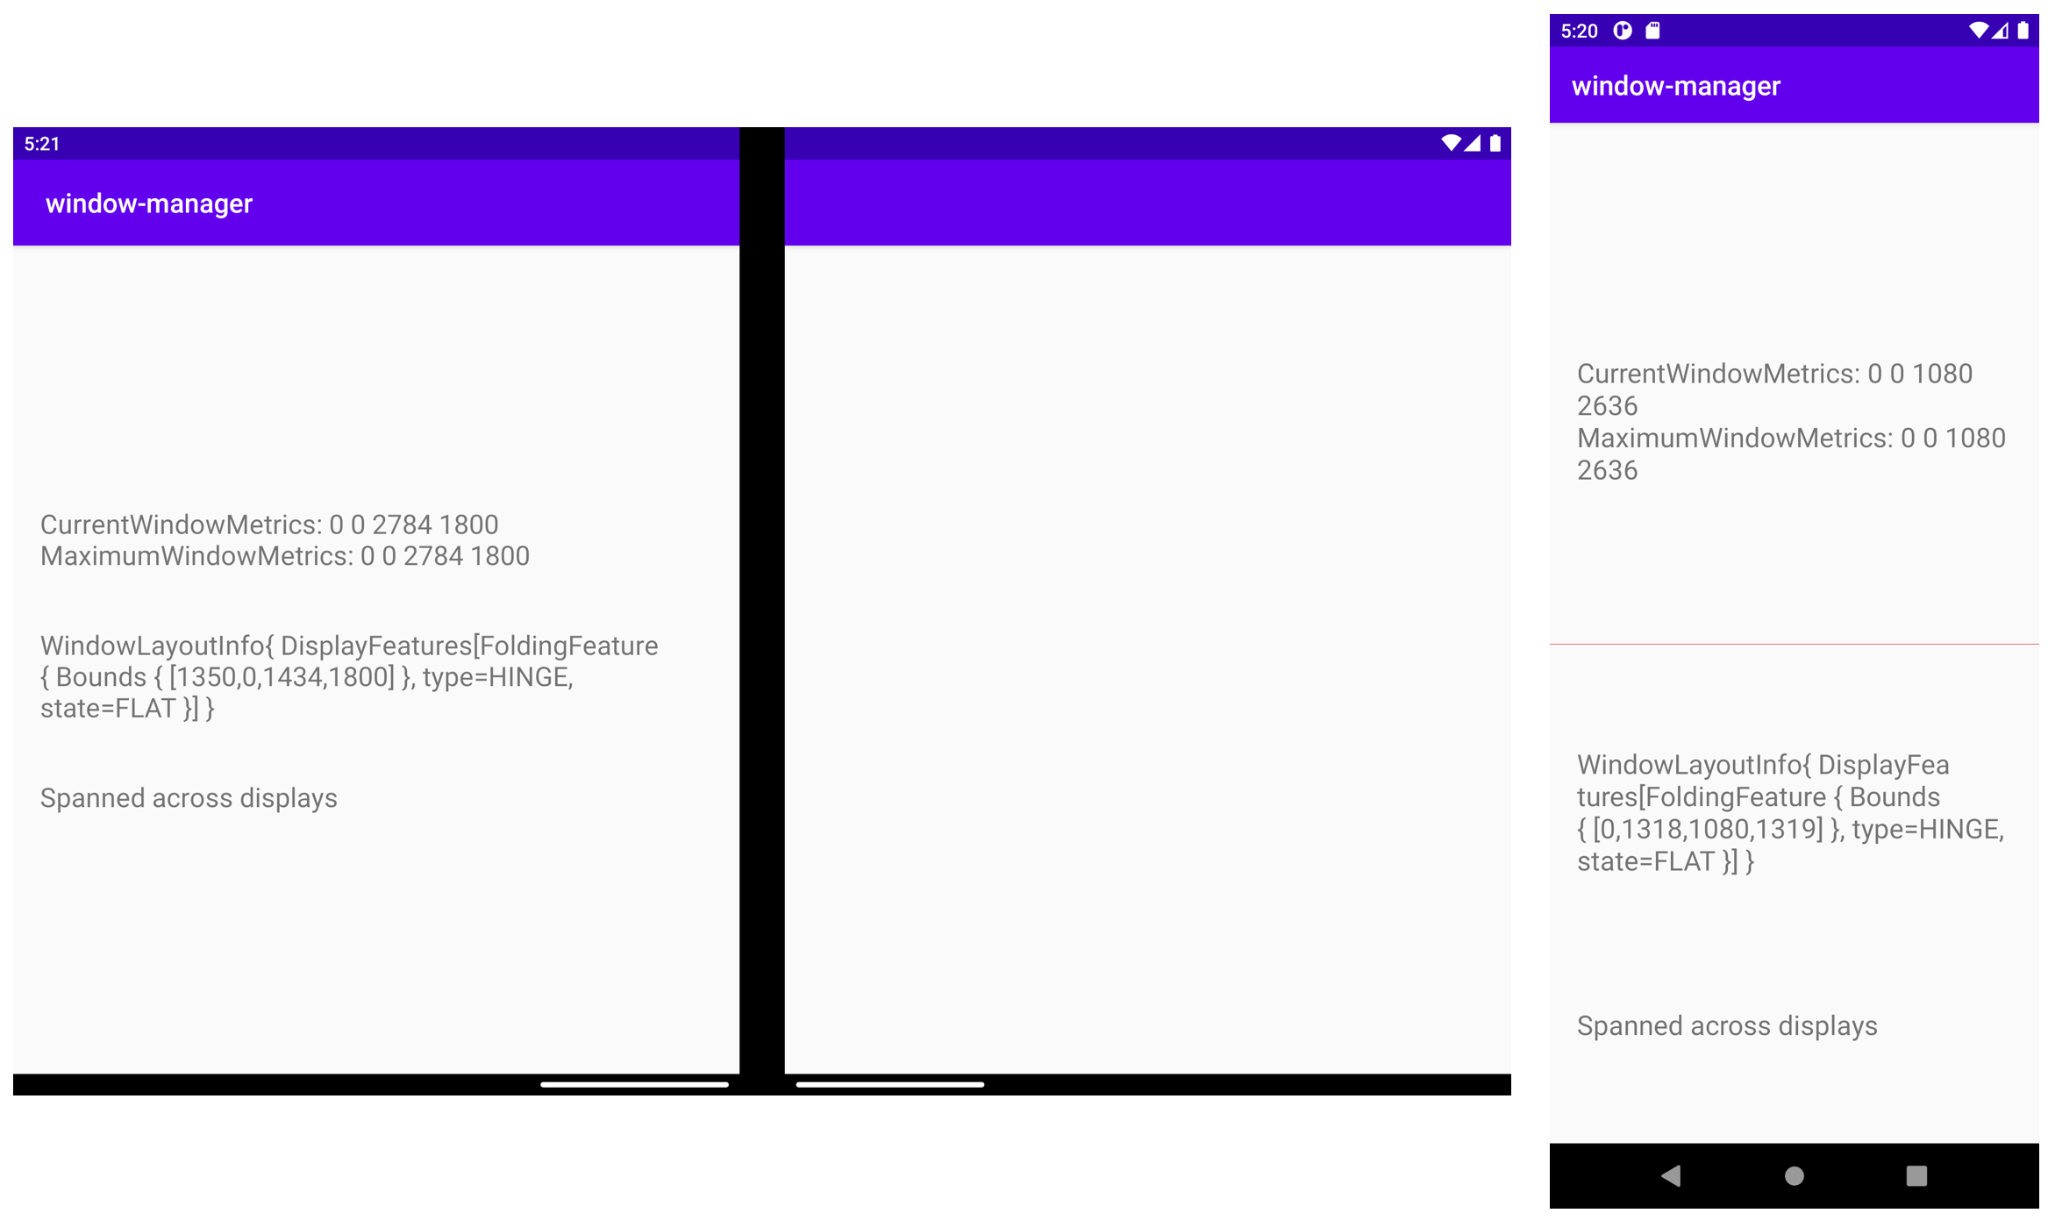
듀얼 화면 에뮬레이터(상단 왼쪽)에서는 콘텐츠를 여러 디스플레이에 걸쳐 표시하고 힌지로 인해 잘렸던 TextView가 어떻게 더 이상 잘리지 않고 정보가 누락되지 않는지 확인할 수 있습니다.
폴더블 에뮬레이터(상단 오른쪽)에서는 접이식 디스플레이 기능이 배치된 위치를 나타내는 연한 빨간색 선이 표시되고 TextView는 이제 기능 아래에 배치되었습니다. 따라서 기기가 접힐 때(예: 노트북 상태인 90도로) 이 기능으로 영향을 받는 정보가 없습니다.
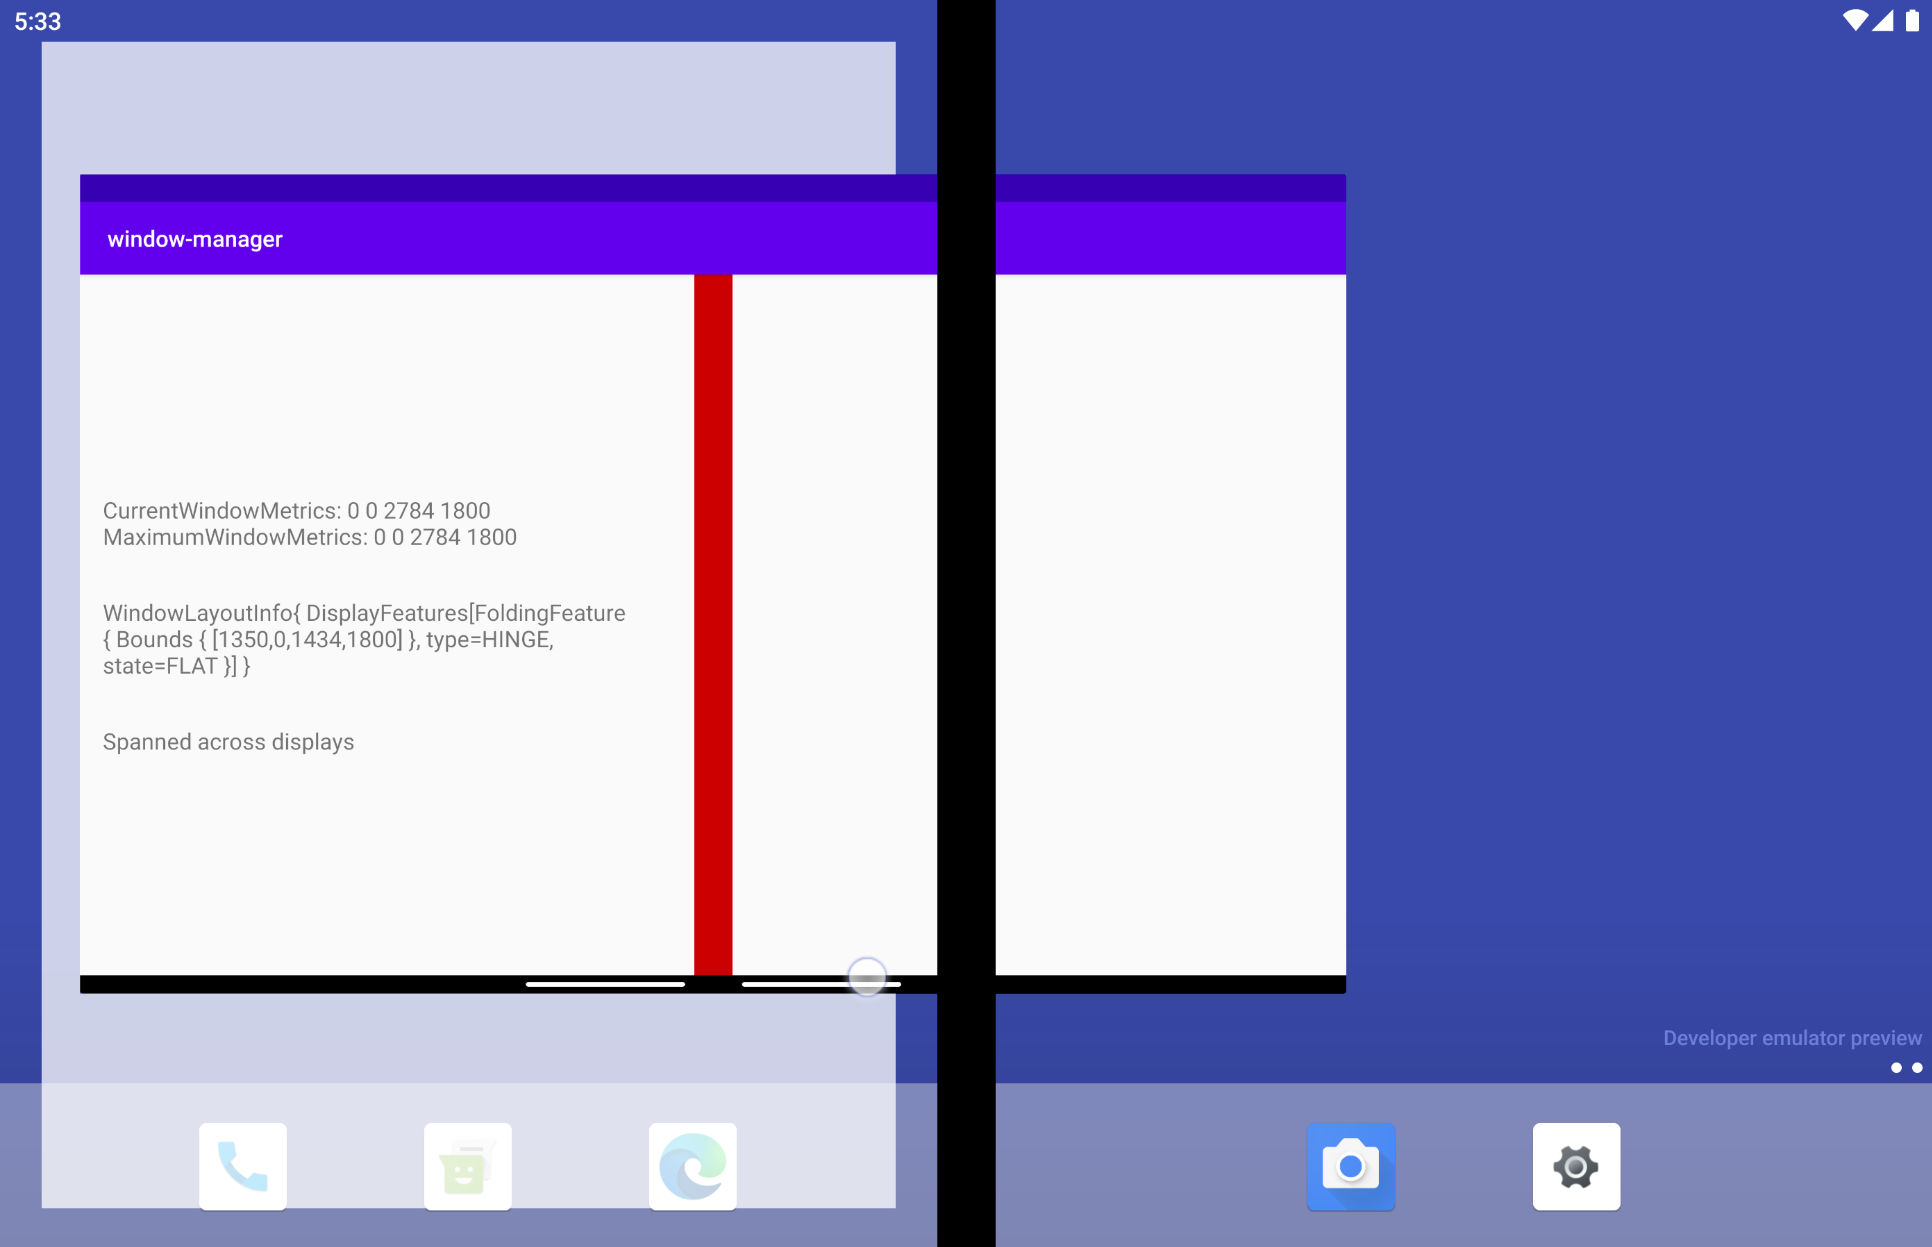
듀얼 화면 에뮬레이터에서 디스플레이 기능의 위치가 궁금하다면 힌지 유형 기기이므로 기능을 나타내는 뷰가 힌지로 인해 숨겨집니다. 그러나 앱이 스팬에서 스팬 해제로 변경되면 기능과 동일한 위치에 올바른 높이와 너비로 표시됩니다.
8. 기타 Jetpack WindowManager 아티팩트
WindowManager는 기본 아티팩트 외에도 앱을 빌드하는 동안 사용 중인 현재 환경을 고려하여 구성요소와 다른 방식으로 상호작용할 수 있도록 도와주는 다른 유용한 아티팩트도 제공합니다.
Java 아티팩트
Kotlin 대신 Java 프로그래밍 언어를 사용하거나 콜백을 통해 이벤트를 수신 대기하는 것이 사용 중인 아키텍처에 더 맞는 방식이라면, 콜백을 통해 이벤트의 리스너를 등록하고 등록 취소하는 Java 친화적인 API를 제공하는 WindowManager의 Java 아티팩트가 유용할 수 있습니다.
RxJava 아티팩트
이미 RxJava(버전 2 또는 3)를 사용하고 있다면 Observables와 Flowables 중 어느 쪽을 사용하든지 코드의 일관성을 유지하는 데 도움이 되는 특정 아티팩트를 사용할 수 있습니다.
9. Jetpack WindowManager를 사용하여 테스트
UI 요소가 FoldingFeature 주위에 배치되는 방식을 테스트하려면 에뮬레이터나 기기에서 폴더블의 상태를 테스트하는 것이 매우 유용할 수 있습니다.
이를 위해 WindowManger는 계측 테스트에 매우 유용한 아티팩트와 함께 제공됩니다.
사용 방법을 알아보겠습니다.
앱 build.gradle 파일에 기본 WindowManager 종속 항목과 함께 테스트 아티팩트 androidx.window:window-testing을 추가했습니다.
window-testing 아티팩트에는 WindowLayoutInfo 값의 스트림 소비를 테스트하는 데 도움이 되는 WindowLayoutInfoPublisherRule이라는 유용한 새 TestRule이 있습니다. WindowLayoutInfoPublisherRule을 사용하면 필요에 따라 다양한 WindowLayoutInfo 값을 푸시할 수 있습니다.
이를 사용하고 이 새로운 아티팩트로 UI를 테스트하는 데 도움이 되는 샘플을 만들려면 Android 스튜디오 템플릿에서 만든 테스트 클래스를 업데이트하세요. ExampleInstrumentedTest 클래스의 모든 코드를 다음으로 바꿉니다.
ExampleInstrumentedTest.kt
import androidx.test.ext.junit.rules.ActivityScenarioRule
import androidx.test.ext.junit.runners.AndroidJUnit4
import androidx.window.testing.layout.WindowLayoutInfoPublisherRule
import org.junit.Rule
import org.junit.rules.RuleChain
import org.junit.rules.TestRule
import org.junit.runner.RunWith

@RunWith(AndroidJUnit4::class)
class MainActivityTest {
    private val activityRule = ActivityScenarioRule(MainActivity::class.java)
    private val publisherRule = WindowLayoutInfoPublisherRule()

    @get:Rule
    val testRule: TestRule

    init {
        testRule = RuleChain.outerRule(publisherRule).around(activityRule)
    }
}
언급된 규칙은 ActvityScenarioRule과 체이닝되어 있습니다.
FoldingFeature를 모의 처리하기 위해, 새 아티팩트에는 이를 위한 몇 가지 매우 유용한 함수가 제공됩니다. 다음은 몇 가지 기본값을 제공하는 가장 간단한 방법입니다.
MainActivity에서 TextView는 접기 기능의 왼쪽에 정렬됩니다. 올바르게 구현되었는지 확인하는 테스트를 만듭니다.
testText_is_left_of_Vertical_FoldingFeature라는 테스트를 만듭니다.
ExampleInstrumentedTest.kt
import androidx.window.layout.FoldingFeature.Orientation.Companion.VERTICAL
import androidx.window.layout.FoldingFeature.State.Companion.FLAT
import androidx.window.testing.layout.FoldingFeature
import androidx.window.testing.layout.TestWindowLayoutInfo
import org.junit.Test

@Test
fun testText_is_left_of_Vertical_FoldingFeature() {
   activityRule.scenario.onActivity { activity ->
       val hinge = FoldingFeature(
           activity = activity,
           state = FLAT,
           orientation = VERTICAL,
           size = 2
       )

       val expected = TestWindowLayoutInfo(listOf(hinge))
       publisherRule.overrideWindowLayoutInfo(expected)
   }

   // Add Assertion with EspressoMatcher here

}
테스트 FoldingFeature의 상태가 FLAT이고 방향은 VERTICAL입니다. 테스트에서 가짜 FoldingFeature를 UI에 표시하여 기기에서의 위치를 확인할 수 있도록 특정 크기를 정의했습니다.
앞에서 인스턴스화한 WindowLayoutInfoPublishRule을 사용하여 가짜 FoldingFeaure를 게시했기 때문에 실제 WindowLayoutInfo 데이터와 같은 방법으로 가져올 수 있습니다.
마지막 단계는 UI 요소가 FoldingFeature를 피하여 정렬되어야 하는 위치에 있는지 테스트하는 것입니다. 이렇게 하려면 방금 만든 테스트의 끝에 어설션을 추가하여 EspressoMatchers를 사용합니다.
ExampleInstrumentedTest.kt
import androidx.test.espresso.assertion.PositionAssertions
import androidx.test.espresso.matcher.ViewMatchers.withId

onView(withId(R.id.layout_change)).check(
    PositionAssertions.isCompletelyLeftOf(withId(R.id.folding_feature))
)
전체 테스트는 다음과 같습니다.
ExampleInstrumentedTest.kt
@Test
fun testText_is_left_of_Vertical_FoldingFeature() {
    activityRule.scenario.onActivity { activity ->
        val hinge = FoldingFeature(
            activity = activity,
            state = FoldingFeature.State.FLAT,
            orientation = FoldingFeature.Orientation.VERTICAL,
            size = 2
        )
        val expected = TestWindowLayoutInfo(listOf(hinge))
        publisherRule.overrideWindowLayoutInfo(expected)
    }
    onView(withId(R.id.layout_change)).check(
        PositionAssertions.isCompletelyLeftOf(withId(R.id.folding_feature))
    )
}
val horizontal_hinge = FoldingFeature(
   activity = activity,
   state = FLAT,
   orientation = HORIZONTAL,
   size = 2
)
이제 기기나 에뮬레이터에서 테스트를 실행하여 애플리케이션이 예상대로 작동하는지 확인할 수 있습니다. 이 테스트를 실행하는 데 폴더블 기기 또는 에뮬레이터가 필요하지 않습니다.
10. 축하합니다
Jetpack WindowManager는 폴더블과 같은 새로운 폼 팩터 기기로 개발자를 지원합니다.
WindowManager가 제공하는 정보는 Android 앱을 폴더블 기기에 맞게 조정하여 더 나은 사용자 환경을 제공하는 데 매우 유용합니다.
이 Codelab에서 알아본 내용은 다음과 같습니다.
- 폴더블 기기의 정의
- 다양한 폴더블 기기의 차이점
- 폴더블 기기, 단일 화면 기기, 태블릿의 차이점
- Jetpack WindowManager API
- Jetpack WindowManager 사용 및 새로운 기기 폼 팩터에 맞게 앱 조정
- Jetpack WindowManager를 사용하여 테스트
