1. 事前準備
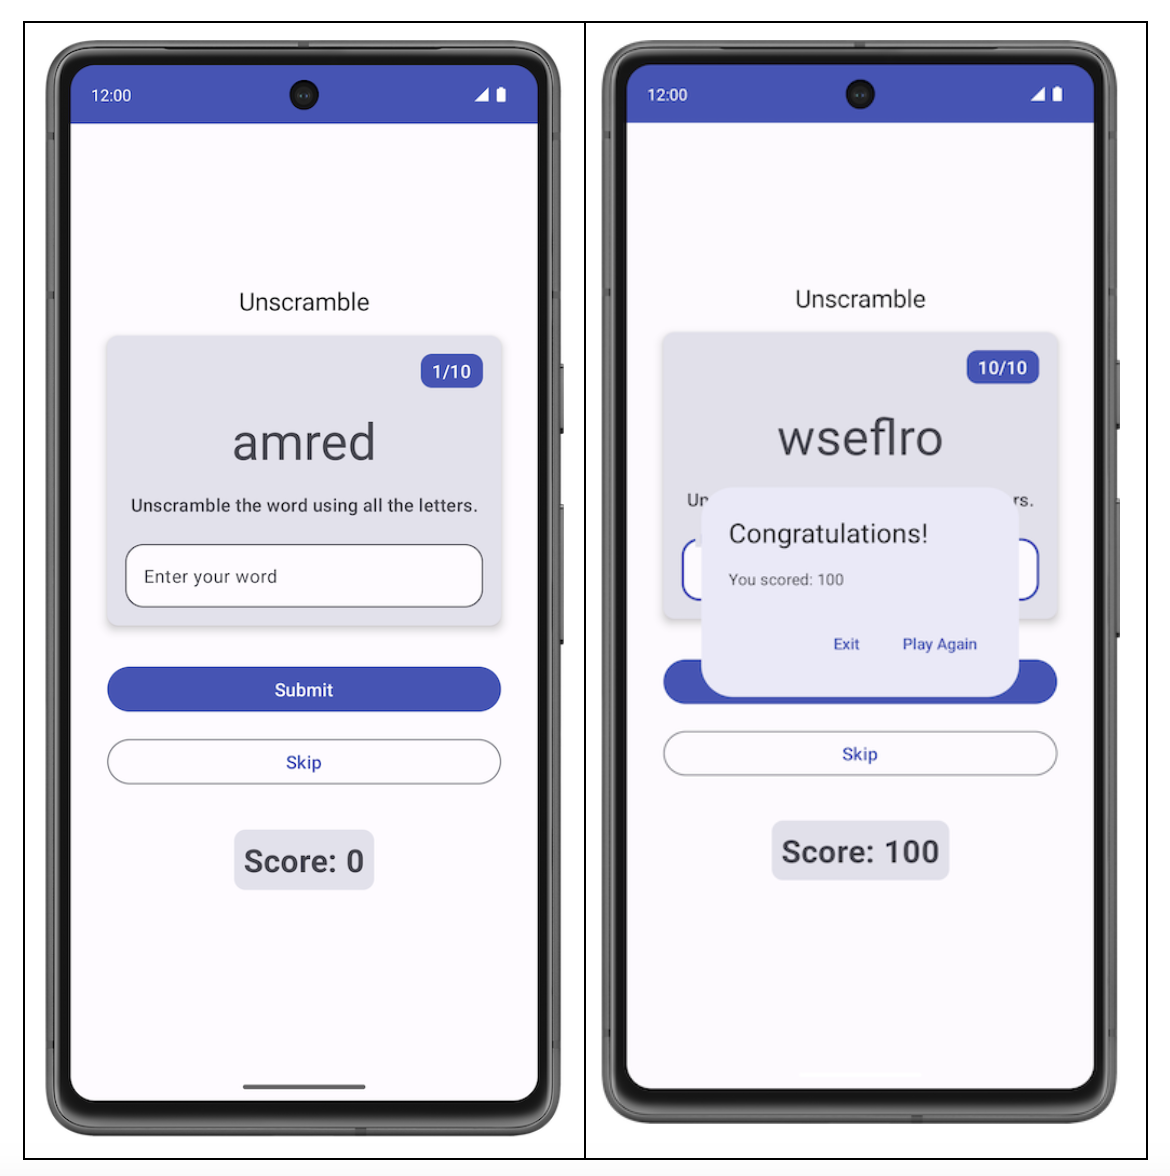
本程式碼研究室會指導您編寫單元測試,以測試 ViewModel 元件。您將為 Unscramble 遊戲應用程式新增單元測試。Unscramble 應用程式是一款有趣的文字遊戲,使用者必須猜測打散的字詞,猜對即可獲得點數。下圖為應用程式的預覽畫面:
在「編寫自動化測試」程式碼研究室中,您已瞭解自動化測試的相關資訊和重要性。此外,您也已瞭解如何實作單元測試。
先前課程的學習重點:
- 自動測試是指可驗證另一段程式碼的準確性的程式碼。
- 測試是應用程式開發流程中相當重要的一環。藉由對應用程式持續執行測試,您可以在公開發布應用程式前,驗證應用程式的功能行為和可用性。
- 您可透過單元測試來測試函式、類別和屬性。
- 本機單元測試會在工作站上執行,也就是說不需要在 Android 裝置或模擬器即可在開發環境中執行。也就是說,在電腦上執行本機測試。
在進行之前,請務必完成撰寫自動測試,以及 Compose 中的 ViewModel 和狀態程式碼研究室。
必要條件
- 對 Kotlin 的瞭解,包括函式、lambda 和無狀態可組合項。
- 對如何在 Jetpack Compose 中建構版面配置有基本瞭解
- 對 Material Design 有基本瞭解
- 實作 ViewModel 的基本知識
課程內容
- 如何在應用程式模組的
build.gradle.kts檔案中新增單元測試的依附元件 - 如何建立測試策略來實作單元測試
- 如何使用 JUnit4 編寫單元測試並瞭解測試執行個體的生命週期
- 如何執行、分析及改善程式碼涵蓋率
建構項目
- Unscramble 遊戲應用程式的單元測試
軟硬體需求
- 最新版 Android Studio
取得範例程式碼
如要開始使用,請先下載範例程式碼:
或者,您也可以複製 GitHub 存放區的程式碼:
$ git clone https://github.com/google-developer-training/basic-android-kotlin-compose-training-unscramble.git
$ cd basic-android-kotlin-compose-training-unscramble
$ git checkout viewmodel
您可以瀏覽 Unscramble GitHub 存放區中的程式碼。
2. 範例程式碼總覽
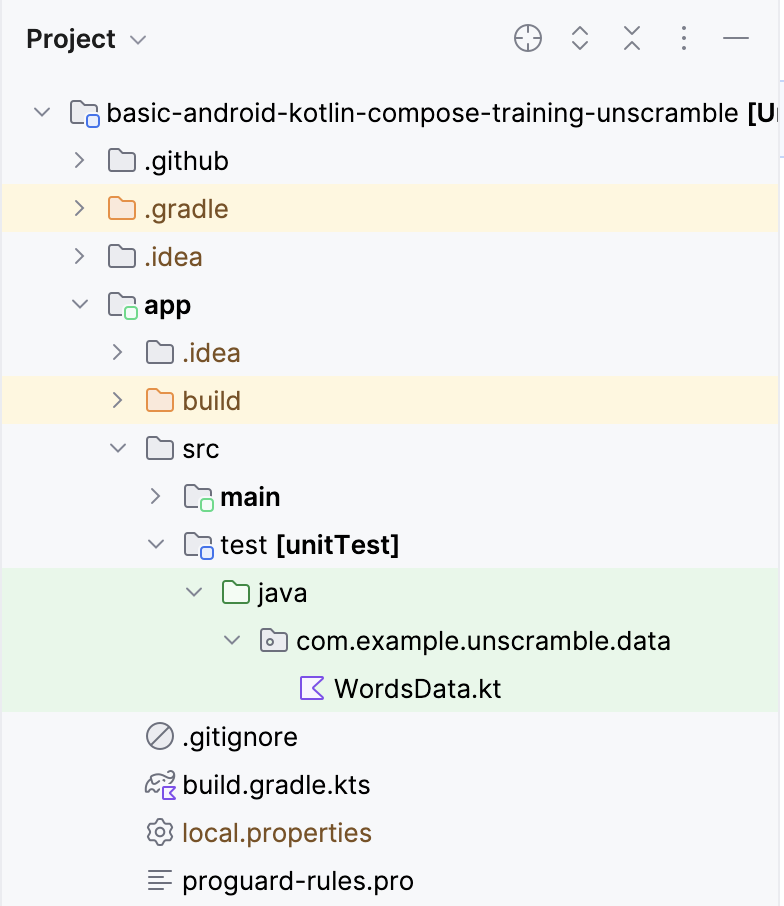
在單元 2 中,您已學到如何將單元測試程式碼放在「src」資料夾下的「test」來源集中,如下圖所示:
範例程式碼含有以下檔案:
WordsData.kt:這個檔案包含用於測試的字詞清單,以及用於從亂序字詞取得重組字詞的getUnscrambledWord()輔助函式。您不需要修改這個檔案。
3. 新增測試依附元件
在本程式碼研究室中,您將使用 JUnit 架構來撰寫單元測試。如要使用這個架構,您必須在應用程式模組的 build.gradle.kts 檔案中將架構新增為依附元件。
您可以使用 implementation 設定指定應用程式所需的依附元件。比方說,如要在應用程式中使用 ViewModel 程式庫,您必須在 androidx.lifecycle:lifecycle-viewmodel-compose 中新增依附元件,如以下程式碼片段所示:
dependencies {

    ...
    implementation("androidx.lifecycle:lifecycle-viewmodel-compose:2.6.1")
}
您現在可以在應用程式的原始碼中使用這個程式庫,Android Studio 可協助您將其新增至產生的應用程式套件檔案 (APK)。不過,您不希望單元測試程式碼包含在 APK 檔案中。測試程式碼不會新增任何使用者要使用的功能,程式碼也會對 APK 的大小造成影響。對於測試程式碼所需的依附元件也是如此。請分開設定。方法是使用 testImplementation 設定,表示該設定適用於本機測試原始碼,而非應用程式程式碼。
如要為專案新增依附元件,請在 build.gradle.kts 檔案的依附元件區塊中指定依附元件設定 (例如 implementation 或 testImplementation)。每項依附元件設定都會為 Gradle 提供不同的依附元件使用方式說明。
如何新增依附元件:
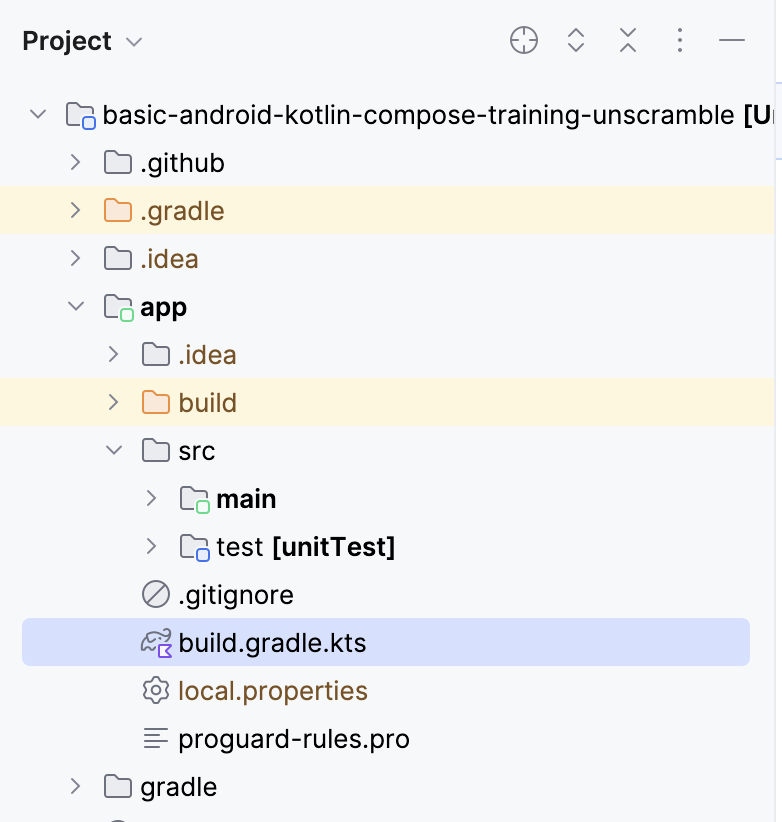
- 開啟
app模組的build.gradle.kts檔案,位於「Project」窗格中的app目錄。
- 在檔案中向下捲動,找出
dependencies{}區塊,使用junit的testImplementation設定新增依附元件。
plugins {
    ...
}

android {
    ...
}

dependencies {
    ...
    testImplementation("junit:junit:4.13.2")
}
- 在 build.gradle.kts 檔案頂端的通知列中,按一下「Sync Now」,讓系統完成匯入和建構程序,如下方螢幕截圖所示:

Compose 物料清單 (BoM)
建議您使用 Compose BoM 管理 Compose 程式庫版本。只要指定 BoM 版本,即可利用 BoM 管理所有 Compose 程式庫版本。
請注意 app 模組 build.gradle.kts 檔案中的依附元件區段。
// No need to copy over
// This is part of starter code
dependencies {

   // Import the Compose BOM
    implementation (platform("androidx.compose:compose-bom:2023.06.01"))
    ...
    implementation("androidx.compose.material3:material3")
    implementation("androidx.compose.ui:ui")
    implementation("androidx.compose.ui:ui-graphics")
    implementation("androidx.compose.ui:ui-tooling-preview")
    ...
}
請留意以下事項:
- Compose 程式庫版本號碼並未指定。
- BOM 是使用
implementation platform("androidx.compose:compose-bom:2023.06.01")匯入。
這是因為 BOM 本身具有不同 Compose 程式庫的穩定版本連結,可順暢搭配運作。在應用程式中使用 BOM 時,不需要將任何版本加到 Compose 程式庫依附元件。更新 BOM 版本後,您使用的所有程式庫都會自動更新至新版本。
如要搭配使用 BOM 與 Compose 測試程式庫 (檢測設備測試),您需要匯入 androidTestImplementation platform("androidx.compose:compose-bom:xxxx.xx.xx")。您可以建立變數,並將其重複用於 implementation 和 androidTestImplementation 變數,如下所示。
// Example, not need to copy over
dependencies {

   // Import the Compose BOM
    implementation(platform("androidx.compose:compose-bom:2023.06.01"))
    implementation("androidx.compose.material:material")
    implementation("androidx.compose.ui:ui")
    implementation("androidx.compose.ui:ui-tooling-preview")

    // ...
    androidTestImplementation(platform("androidx.compose:compose-bom:2023.06.01"))
    androidTestImplementation("androidx.compose.ui:ui-test-junit4")

}
很好!您已成功將測試依附元件新增至應用程式,並瞭解 BOM 相關概念,現在可以開始新增單元測試了。
4. 測試策略
理想的測試策略應以程式碼的不同路徑和界線為主。基本上,您可以將測試分為三個情境:成功路徑、錯誤路徑和界線用途。
- 成功路徑:成功路徑測試 (又稱為滿意路徑測試) 主要著重於測試正流程是否正常運作。正流程是沒有例外狀況或錯誤狀況的流程。與錯誤路徑和界線案例相比,建立成功路徑的情境清單相當簡單,因為它們著重於應用程式的預期行為。
Unscramble 應用程式中的成功路徑範例就是使用者輸入正確的字詞,並且按一下「Submit」按鈕後,就會產生分數、字詞計數和亂序字詞的正確更新。
- 錯誤路徑:錯誤路徑測試的重點是測試負流程中的功能,也就是檢查應用程式如何回應錯誤條件或使用者輸入內容無效。要找出所有可能的錯誤流程並不容易,因為未達成預期的行為時,可能會產生許多可能的結果。
其中一個通用建議是列出所有可能的錯誤路徑,針對這些路徑撰寫測試,並在發掘各種情境的過程中,讓單元測試持續演進。
舉例來說,Unscramble 應用程式中的錯誤路徑之一,就是使用者輸入錯誤字詞並點選「Submit」按鈕,導致系統顯示錯誤訊息,且分數和字詞計數不會更新。
- 界線用途:界線的用途著重於測試應用程式中的邊界條件。在 Unscramble 應用程式中,邊界會檢查應用程式載入時的 UI 狀態,以及使用者播放字詞數量上限後的 UI 狀態。
針對上述類別建立測試情境可以做為測試計畫的準則。
建立測試
良好的單元測試通常具備下列四種屬性:
- 聚焦:將焦點放在測試單元,例如程式碼片段。這段程式碼通常是類別或方法。測試應聚焦於較小的程式碼,且應著重驗證個別程式碼的正確性,而非同時執行多段程式碼。
- 清楚易懂:程式碼應讀起來簡單易懂。開發人員一眼就能瞭解測試背後的意圖。
- 確定性:應一律通過或失敗。無論執行測試幾次,只要沒有對程式碼進行任何變更,測試應該都會產生相同的結果。測試不應凌亂,在某個執行個體中失敗,卻在另一個執行個體中成功,儘管沒有修改程式碼。
- 獨立模式:不需要人為操作或設定,就能獨立執行。
成功路徑
如要為成功路徑撰寫單元測試,您需要聲明,在 GameViewModel 例項已初始化時,如果以正確的猜測字詞呼叫 updateUserGuess() 方法,接著又呼叫 checkUserGuess() 方法,這時會發生以下情況:
- 系統會將正確的猜測傳遞至
updateUserGuess()方法。 - 系統會呼叫
checkUserGuess()方法。 score和isGuessedWordWrong狀態的值會正確更新。
請按照下列步驟建立測試:
- 在測試來源集下建立新的套件
com.example.android.unscramble.ui.test,並新增檔案,如以下螢幕截圖所示:


如要為 GameViewModel 類別編寫單元測試,您需要具備該類別的例項,才能呼叫該類別的方法並驗證狀態。
- 在
GameViewModelTest類別的主體中,宣告viewModel屬性並為其指派GameViewModel類別的執行個體。
class GameViewModelTest {
    private val viewModel = GameViewModel()
}
- 如要為成功路徑撰寫單元測試,請建立
gameViewModel_CorrectWordGuessed_ScoreUpdatedAndErrorFlagUnset()函式,並使用@Test註解加上註解。
class GameViewModelTest {
    private val viewModel = GameViewModel()

    @Test
    fun gameViewModel_CorrectWordGuessed_ScoreUpdatedAndErrorFlagUnset()  {
    }
}
- 匯入下列內容:
import org.junit.Test
如要將正確的玩家字詞傳遞至 viewModel.updateUserGuess() 方法,您必須從 GameUiState 取得打散字詞中的正確打散字詞。如要這麼做,請先取得目前的遊戲 UI 狀態。
- 在函式主體中建立
currentGameUiState變數,並為其指派viewModel.uiState.value。
@Test
fun gameViewModel_CorrectWordGuessed_ScoreUpdatedAndErrorFlagUnset() {
    var currentGameUiState = viewModel.uiState.value
}
- 如要取得正確的玩家猜測,請使用
getUnscrambledWord()函式,其中包含currentGameUiState.currentScrambledWord做為引數,並傳回打散的字詞。將傳回的值儲存在名為correctPlayerWord的新唯讀變數中,並指派getUnscrambledWord()函式傳回的值。
@Test
fun gameViewModel_CorrectWordGuessed_ScoreUpdatedAndErrorFlagUnset() {
    var currentGameUiState = viewModel.uiState.value
    val correctPlayerWord = getUnscrambledWord(currentGameUiState.currentScrambledWord)

}
- 如要確認猜測的字詞是否正確,請將呼叫新增至
viewModel.updateUserGuess()方法,並將correctPlayerWord變數做為引數傳遞。然後呼叫viewModel.checkUserGuess()方法來驗證猜測。
@Test
fun gameViewModel_CorrectWordGuessed_ScoreUpdatedAndErrorFlagUnset() {
    var currentGameUiState = viewModel.uiState.value
    val correctPlayerWord = getUnscrambledWord(currentGameUiState.currentScrambledWord)

    viewModel.updateUserGuess(correctPlayerWord)
    viewModel.checkUserGuess()
}
您現在可以宣告遊戲狀態是符合預期的狀態。
- 從
viewModel.uiState屬性的值取得GameUiState類別的執行個體,並將其儲存在currentGameUiState變數中。
@Test
fun gameViewModel_CorrectWordGuessed_ScoreUpdatedAndErrorFlagUnset() {
    var currentGameUiState = viewModel.uiState.value
    val correctPlayerWord = getUnscrambledWord(currentGameUiState.currentScrambledWord)
    viewModel.updateUserGuess(correctPlayerWord)
    viewModel.checkUserGuess()

    currentGameUiState = viewModel.uiState.value
}
- 如要查看猜測的字詞是否正確且分數已更新,請使用
assertFalse()函式來驗證currentGameUiState.isGuessedWordWrong屬性為false,並使用assertEquals()函式來驗證currentGameUiState.score屬性值等於20。
@Test
fun gameViewModel_CorrectWordGuessed_ScoreUpdatedAndErrorFlagUnset() {
    var currentGameUiState = viewModel.uiState.value
    val correctPlayerWord = getUnscrambledWord(currentGameUiState.currentScrambledWord)
    viewModel.updateUserGuess(correctPlayerWord)
    viewModel.checkUserGuess()

    currentGameUiState = viewModel.uiState.value
    // Assert that checkUserGuess() method updates isGuessedWordWrong is updated correctly.
    assertFalse(currentGameUiState.isGuessedWordWrong)
    // Assert that score is updated correctly.
    assertEquals(20, currentGameUiState.score)
}
- 匯入下列內容:
import org.junit.Assert.assertEquals
import org.junit.Assert.assertFalse
- 如要讓
20值可讀取及重複使用,請建立伴生物件,並將20指派給名為SCORE_AFTER_FIRST_CORRECT_ANSWER的private常數。使用新建立的常數更新測試。
class GameViewModelTest {
    ...
    @Test
    fun gameViewModel_CorrectWordGuessed_ScoreUpdatedAndErrorFlagUnset() {
        ...
        // Assert that score is updated correctly.
        assertEquals(SCORE_AFTER_FIRST_CORRECT_ANSWER, currentGameUiState.score)
    }

    companion object {
        private const val SCORE_AFTER_FIRST_CORRECT_ANSWER = SCORE_INCREASE
    }
}
- 進行測試。
由於所有斷言均有效,測試應會通過,如以下螢幕截圖所示:

錯誤路徑
如要針對錯誤路徑撰寫單元測試,您必須宣告將錯誤的字詞做為引數傳遞至 viewModel.updateUserGuess() 方法,並呼叫 viewModel.checkUserGuess() 方法,如下所示:
currentGameUiState.score屬性的值則維持不變。currentGameUiState.isGuessedWordWrong屬性的值設為true,因為猜測有誤。
請按照下列步驟建立測試:
- 在
GameViewModelTest類別的主體中,建立gameViewModel_IncorrectGuess_ErrorFlagSet()函式並使用@Test註解加上註解。
@Test
fun gameViewModel_IncorrectGuess_ErrorFlagSet() {

}
- 定義
incorrectPlayerWord變數並為其指派"and"值,此值不應出現在字詞清單中。
@Test
fun gameViewModel_IncorrectGuess_ErrorFlagSet() {
    // Given an incorrect word as input
    val incorrectPlayerWord = "and"
}
- 將呼叫新增至
viewModel.updateUserGuess()方法,並將incorrectPlayerWord變數做為引數傳遞。 - 將呼叫新增至
viewModel.checkUserGuess()方法,以驗證猜測結果。
@Test
fun gameViewModel_IncorrectGuess_ErrorFlagSet() {
    // Given an incorrect word as input
    val incorrectPlayerWord = "and"

    viewModel.updateUserGuess(incorrectPlayerWord)
    viewModel.checkUserGuess()
}
- 新增
currentGameUiState變數,並為其指派viewModel.uiState.value狀態的值。 - 使用斷言函式,聲明
currentGameUiState.score屬性的值為0,currentGameUiState.isGuessedWordWrong屬性的值則設為true。
@Test
fun gameViewModel_IncorrectGuess_ErrorFlagSet() {
    // Given an incorrect word as input
    val incorrectPlayerWord = "and"

    viewModel.updateUserGuess(incorrectPlayerWord)
    viewModel.checkUserGuess()

    val currentGameUiState = viewModel.uiState.value
    // Assert that score is unchanged
    assertEquals(0, currentGameUiState.score)
    // Assert that checkUserGuess() method updates isGuessedWordWrong correctly
    assertTrue(currentGameUiState.isGuessedWordWrong)
}
- 匯入下列內容:
import org.junit.Assert.assertTrue
- 執行測試以確認通過。
界線用途
如要測試 UI 的初始狀態,您必須為 GameViewModel 類別撰寫單元測試。該測試必須宣告,在 GameViewModel 初始化後將有以下結果:
currentWordCount屬性已設為1。score屬性已設為0。isGuessedWordWrong屬性已設為false。isGameOver屬性已設為false。
如要新增測試,請完成下列步驟:
- 建立
gameViewModel_Initialization_FirstWordLoaded()方法並使用@Test註解加上備註:
@Test
fun gameViewModel_Initialization_FirstWordLoaded() {

}
- 存取
viewModel.uiState.value屬性以取得GameUiState類別的初始執行個體。請將其指派給新的gameUiState唯讀變數。
@Test
fun gameViewModel_Initialization_FirstWordLoaded() {
    val gameUiState = viewModel.uiState.value
}
- 如要取得正確的玩家字詞,請使用
getUnscrambledWord()函式,該函式可擷取gameUiState.currentScrambledWord字詞並傳回打散的字詞。將傳回的值指派給名為unScrambledWord的新唯讀變數。
@Test
fun gameViewModel_Initialization_FirstWordLoaded() {
    val gameUiState = viewModel.uiState.value
    val unScrambledWord = getUnscrambledWord(gameUiState.currentScrambledWord)

}
- 如要驗證狀態是否正確,請新增
assertTrue()函式,藉此宣告currentWordCount屬性已設為1,且score屬性已設為0。 - 新增
assertFalse()函式,驗證isGuessedWordWrong屬性是否為false,以及isGameOver屬性是否設為false。
@Test
fun gameViewModel_Initialization_FirstWordLoaded() {
    val gameUiState = viewModel.uiState.value
    val unScrambledWord = getUnscrambledWord(gameUiState.currentScrambledWord)

    // Assert that current word is scrambled.
    assertNotEquals(unScrambledWord, gameUiState.currentScrambledWord)
    // Assert that current word count is set to 1.
    assertTrue(gameUiState.currentWordCount == 1)
    // Assert that initially the score is 0.
    assertTrue(gameUiState.score == 0)
    // Assert that the wrong word guessed is false.
    assertFalse(gameUiState.isGuessedWordWrong)
    // Assert that game is not over.
    assertFalse(gameUiState.isGameOver)
}
- 匯入下列內容:
import org.junit.Assert.assertNotEquals
- 執行測試以確認通過。
另一個界線用途就是在使用者猜出所有字詞後測試 UI 狀態。您必須宣告,在使用者正確猜出所有字詞時將有以下結果:
- 分數已更新為最新數值。
currentGameUiState.currentWordCount屬性等於MAX_NO_OF_WORDS常數值。currentGameUiState.isGameOver屬性已設為true。
如要新增測試,請完成下列步驟:
- 建立
gameViewModel_AllWordsGuessed_UiStateUpdatedCorrectly()方法並使用@Test註解加上備註:在該方法中,建立expectedScore變數並為其指派0。
@Test
fun gameViewModel_AllWordsGuessed_UiStateUpdatedCorrectly() {
    var expectedScore = 0
}
- 如要取得初始狀態,請新增
currentGameUiState變數,並將viewModel.uiState.value屬性的值指派給變數。
@Test
fun gameViewModel_AllWordsGuessed_UiStateUpdatedCorrectly() {
    var expectedScore = 0
    var currentGameUiState = viewModel.uiState.value
}
- 如要取得正確的玩家字詞,請使用
getUnscrambledWord()函式,該函式可擷取currentGameUiState.currentScrambledWord字詞並傳回打散的字詞。將傳回的值儲存在名為correctPlayerWord的新唯讀變數中,並指派getUnscrambledWord()函式傳回的值。
@Test
fun gameViewModel_AllWordsGuessed_UiStateUpdatedCorrectly() {
    var expectedScore = 0
    var currentGameUiState = viewModel.uiState.value
    var correctPlayerWord = getUnscrambledWord(currentGameUiState.currentScrambledWord)
}
- 如要測試使用者是否已提供所有答案,請使用
repeat區塊重複執行viewModel.updateUserGuess()方法和viewModel.checkUserGuess()方法MAX_NO_OF_WORDS次。
@Test
fun gameViewModel_AllWordsGuessed_UiStateUpdatedCorrectly() {
    var expectedScore = 0
    var currentGameUiState = viewModel.uiState.value
    var correctPlayerWord = getUnscrambledWord(currentGameUiState.currentScrambledWord)
    repeat(MAX_NO_OF_WORDS) {

    }
}
- 在
repeat區塊中,將SCORE_INCREASE常數的值新增至expectedScore變數,藉此聲明每次回答正確後分數會增加。 - 將呼叫新增至
viewModel.updateUserGuess()方法,並將correctPlayerWord變數做為引數傳遞。 - 新增對
viewModel.checkUserGuess()方法的呼叫,觸發檢查使用者猜測的程序。
@Test
fun gameViewModel_AllWordsGuessed_UiStateUpdatedCorrectly() {
    var expectedScore = 0
    var currentGameUiState = viewModel.uiState.value
    var correctPlayerWord = getUnscrambledWord(currentGameUiState.currentScrambledWord)
    repeat(MAX_NO_OF_WORDS) {
        expectedScore += SCORE_INCREASE
        viewModel.updateUserGuess(correctPlayerWord)
        viewModel.checkUserGuess()
    }
}
- 更新目前的玩家字詞,使用
getUnscrambledWord()函式,該函式會採用currentGameUiState.currentScrambledWord做為引數,並傳回打散的字詞。將傳回的值儲存在名為correctPlayerWord.的新唯讀變數中。如要驗證狀態是否正確,請新增assertEquals()函式,檢查currentGameUiState.score屬性的值是否等於expectedScore變數的值。
@Test
fun gameViewModel_AllWordsGuessed_UiStateUpdatedCorrectly() {
    var expectedScore = 0
    var currentGameUiState = viewModel.uiState.value
    var correctPlayerWord = getUnscrambledWord(currentGameUiState.currentScrambledWord)
    repeat(MAX_NO_OF_WORDS) {
        expectedScore += SCORE_INCREASE
        viewModel.updateUserGuess(correctPlayerWord)
        viewModel.checkUserGuess()
        currentGameUiState = viewModel.uiState.value
        correctPlayerWord = getUnscrambledWord(currentGameUiState.currentScrambledWord)
        // Assert that after each correct answer, score is updated correctly.
        assertEquals(expectedScore, currentGameUiState.score)
    }
}
- 新增
assertEquals()函式,聲明currentGameUiState.currentWordCount屬性的值等於MAX_NO_OF_WORDS常數值,且currentGameUiState.isGameOver屬性的值設為true。
@Test
fun gameViewModel_AllWordsGuessed_UiStateUpdatedCorrectly() {
    var expectedScore = 0
    var currentGameUiState = viewModel.uiState.value
    var correctPlayerWord = getUnscrambledWord(currentGameUiState.currentScrambledWord)
    repeat(MAX_NO_OF_WORDS) {
        expectedScore += SCORE_INCREASE
        viewModel.updateUserGuess(correctPlayerWord)
        viewModel.checkUserGuess()
        currentGameUiState = viewModel.uiState.value
        correctPlayerWord = getUnscrambledWord(currentGameUiState.currentScrambledWord)
        // Assert that after each correct answer, score is updated correctly.
        assertEquals(expectedScore, currentGameUiState.score)
    }
    // Assert that after all questions are answered, the current word count is up-to-date.
    assertEquals(MAX_NO_OF_WORDS, currentGameUiState.currentWordCount)
    // Assert that after 10 questions are answered, the game is over.
    assertTrue(currentGameUiState.isGameOver)
}
- 匯入下列內容:
import com.example.unscramble.data.MAX_NO_OF_WORDS
- 執行測試以確認通過。
測試執行個體生命週期總覽
如果您仔細查看 viewModel 在測試中的初始化方式,可能會發現即使所有測試都使用了 viewModel,viewModel 也只會初始化一次。此程式碼片段說明 viewModel 屬性的定義。
class GameViewModelTest {
    private val viewModel = GameViewModel()

    @Test
    fun gameViewModel_Initialization_FirstWordLoaded() {
        val gameUiState = viewModel.uiState.value
        ...
    }
    ...
}
您或許會想問以下問題:
- 是否所有測試都會重複使用相同的
viewModel執行個體? - 這麼做會引發任何問題嗎?舉例來說,如果在
gameViewModel_CorrectWordGuessed_ScoreUpdatedAndErrorFlagUnset測試方法之後執行gameViewModel_Initialization_FirstWordLoaded測試方法會怎麼樣?初始化測試會失敗嗎?
兩個問題的回答均是否。系統會獨立執行測試方法,避免可變動的測試執行個體狀態產生非預期的副作用。根據預設,在執行每個測試方法之前,JUnit 會為該測試類別新建一個執行個體。
您目前在 GameViewModelTest 類別中有四種測試方法,因此 GameViewModelTest 會執行個體化四次。每個執行個體都有自己的 viewModel 屬性副本。因此,測試執行作業的順序無關緊要。
5. 程式碼涵蓋率簡介
程式碼涵蓋率扮演著重要角色,會決定您必須對應用程式組成類別、方法和程式碼是否充分測試。
Android Studio 提供了本機單元測試工具的測試涵蓋範圍工具,可用於追蹤單元測試所涵蓋應用程式程式碼的百分比和範圍。
使用 Android Studio 在涵蓋範圍內執行測試
如何執行涵蓋率測試:
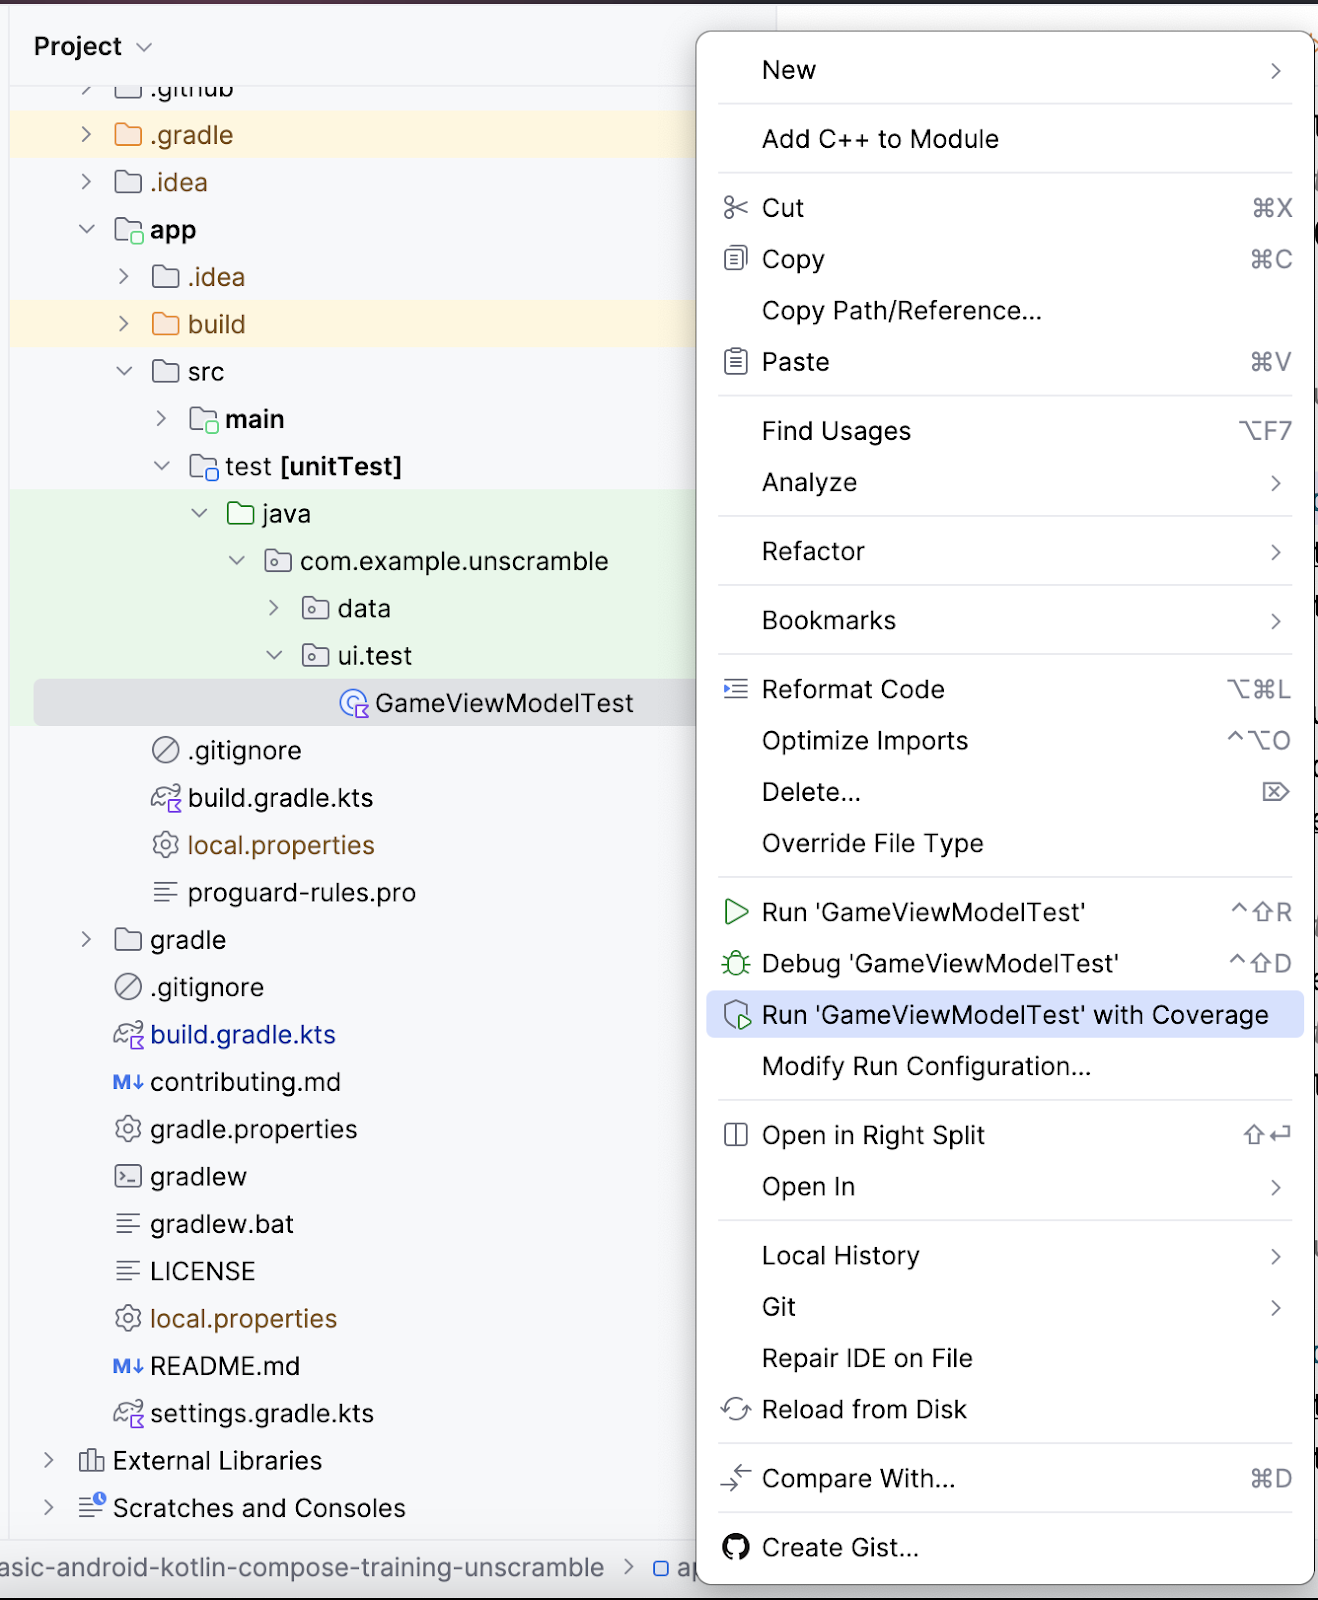
- 在「Project」窗格中的
GameViewModelTest.kt檔案上按一下滑鼠右鍵,然後選取「 Run 'GameViewModelTest' with Coverage」。
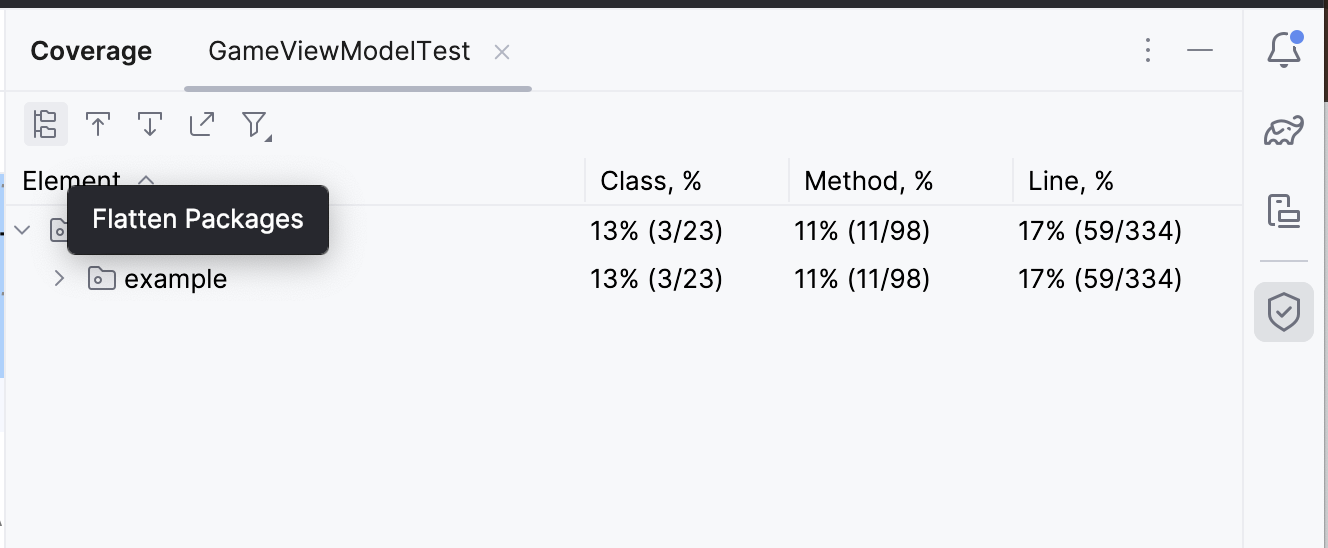
- 測試執行完成後,按一下右側「Coverage」面板中的「Flatten Packages」選項。
- 注意
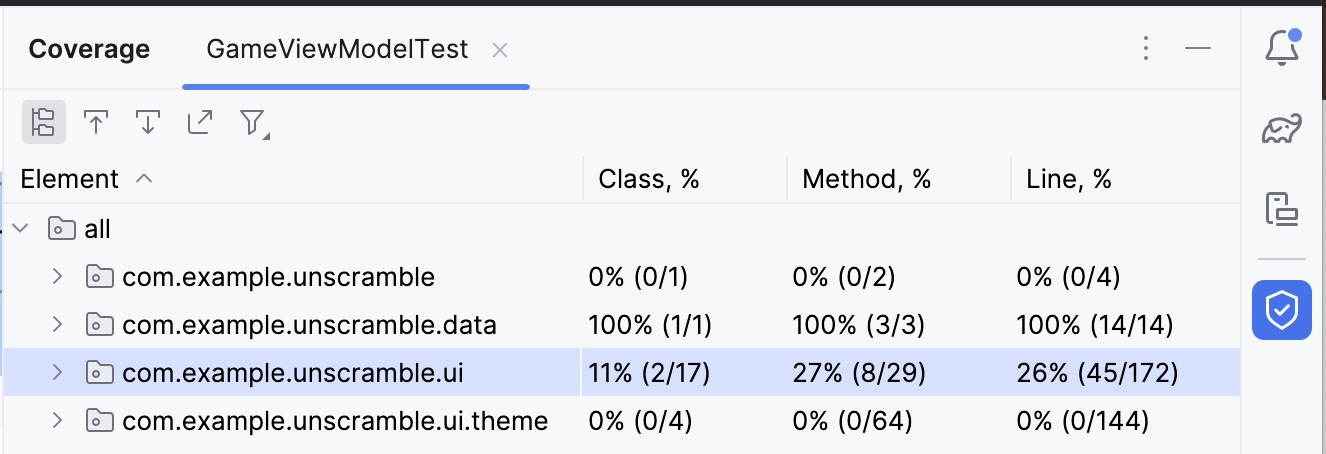
com.example.android.unscramble.ui套件,如下圖所示。
- 按兩下套件
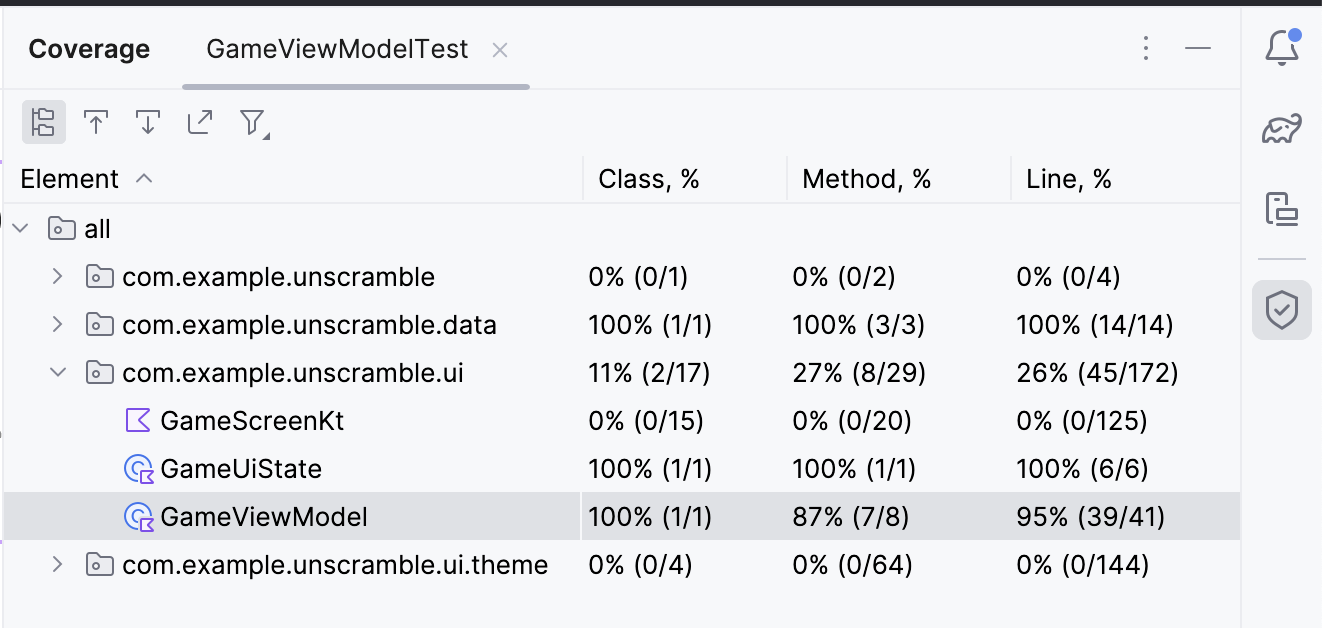
com.example.android.unscramble.ui名稱,查看GameViewModel的涵蓋率,如下圖所示:
分析測試報表
下圖中顯示的報表分為兩個部分:
- 單元測試所涵蓋的方法百分比:在範例圖表中,您到目前為止撰寫的測試涵蓋了 8 個方法中的 7 個方法。佔總方法的 87%。
- 單元測試所涵蓋行數的百分比:在範例圖表中,您撰寫的測試涵蓋 41 行程式碼中的 39 行,占全部程式碼行的 95%。
報表顯示您到目前為止撰寫的單元測試缺少了程式碼的特定部分。如要判斷錯過哪些部分,請完成下列步驟:
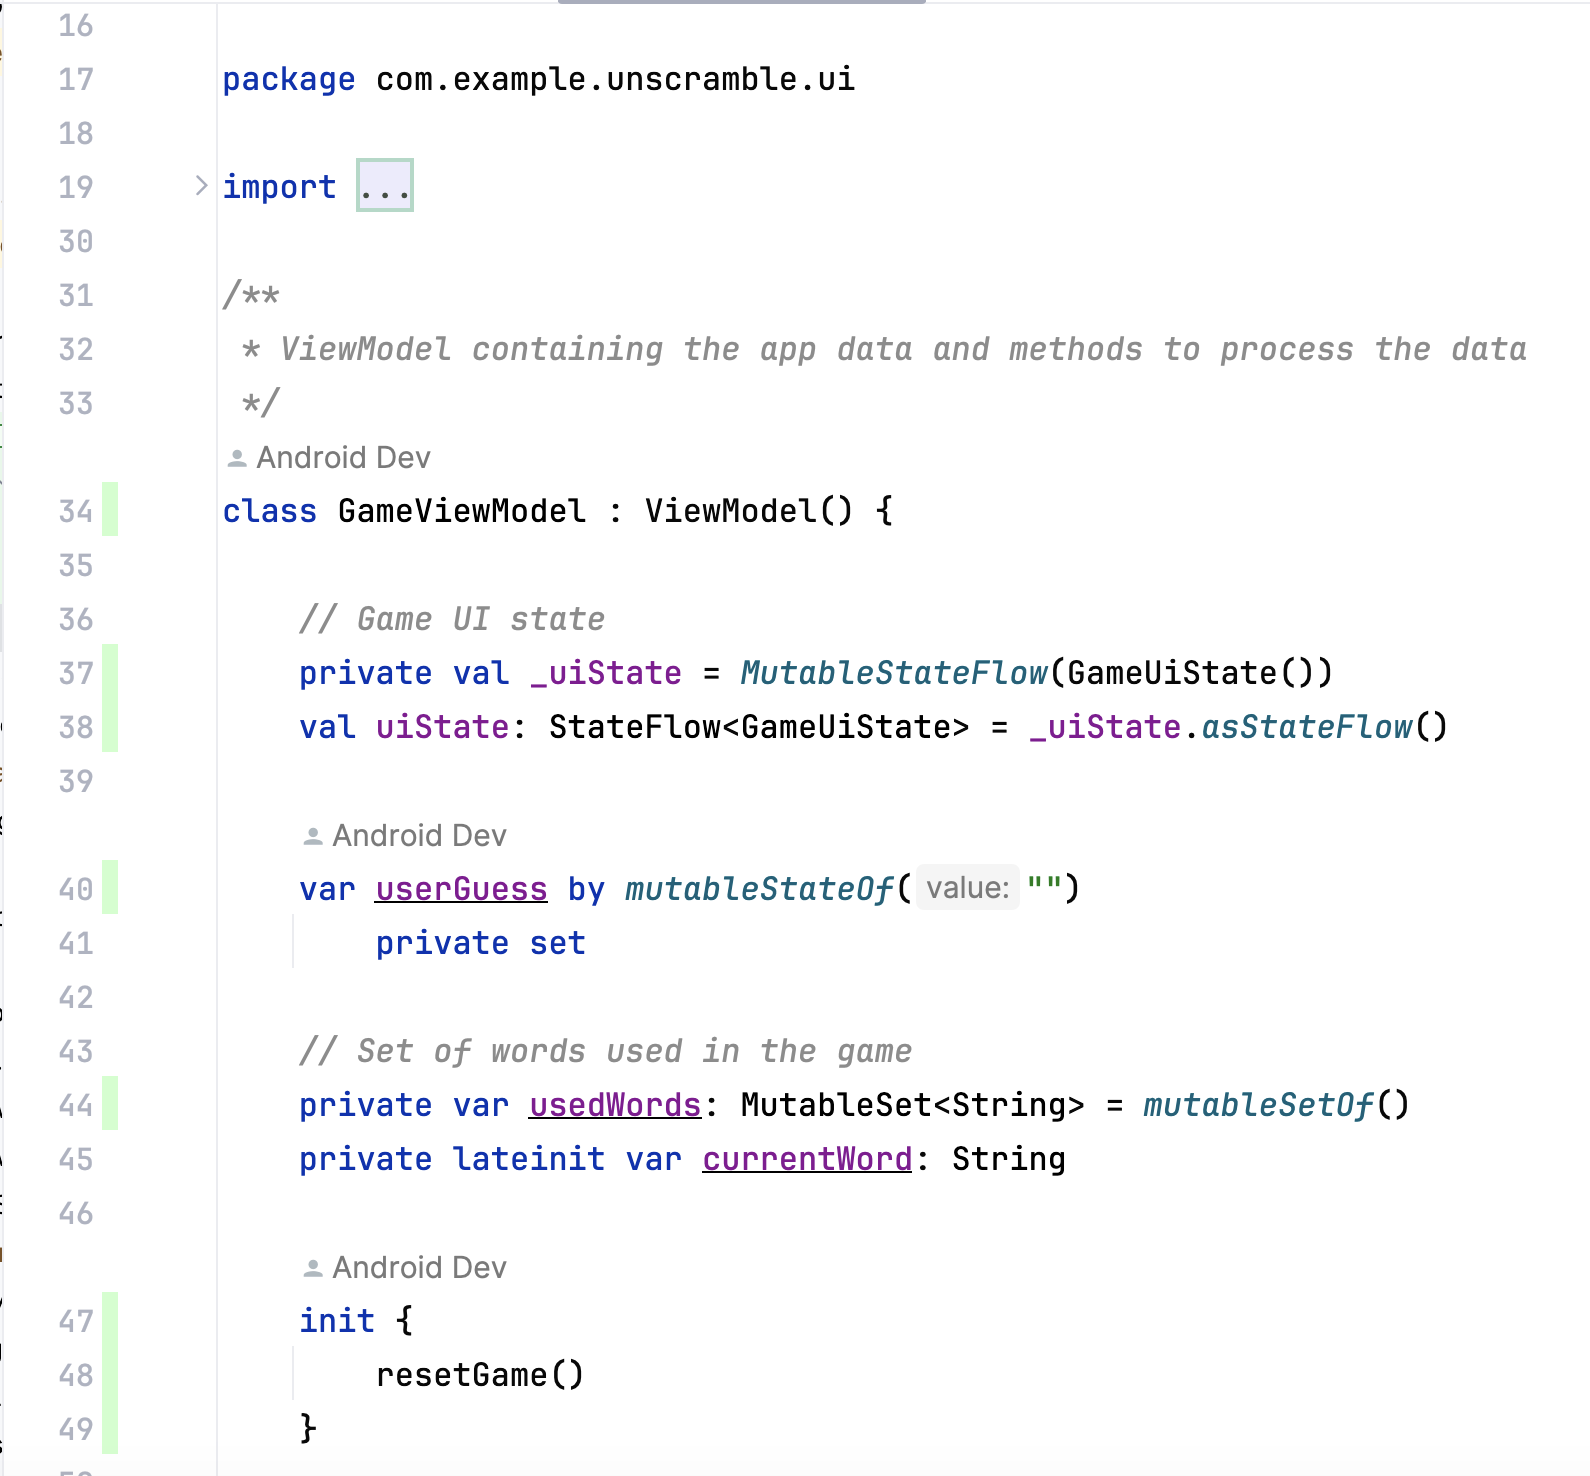
- 按兩下「GameViewModel」GameViewModel。
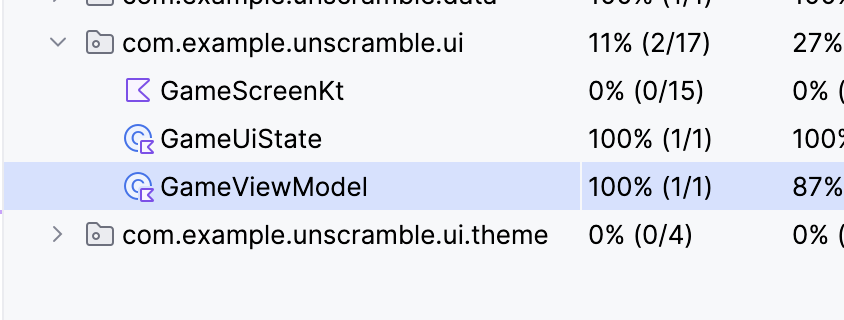
Android Studio 會在視窗左側顯示 GameViewModel.kt 檔案,以及額外的顏色編碼。淺綠色代表程式碼行在測試涵蓋範圍內。
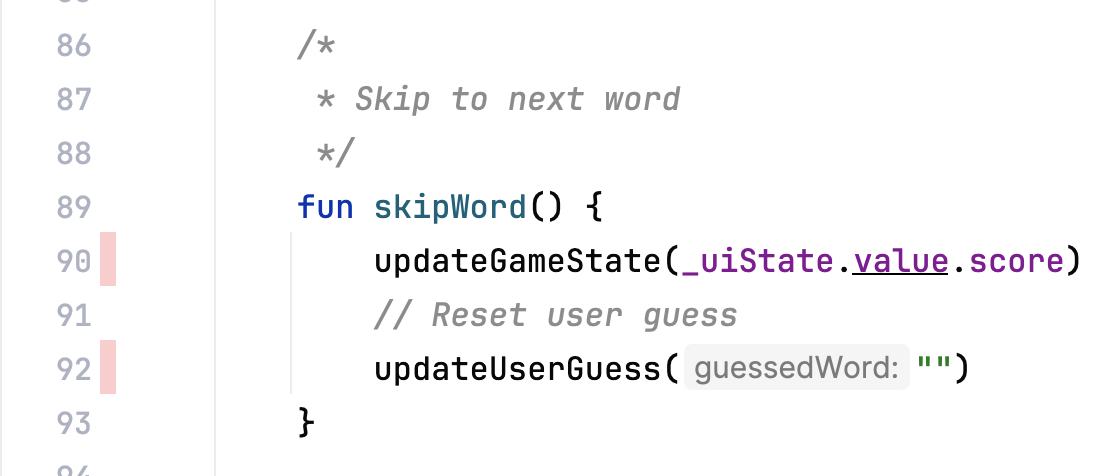
在 GameViewModel 中向下捲動時,可能會發現部分程式碼行有淺粉色標示。這個顏色代表程式碼行不在單元測試的範圍內。
提升涵蓋率
如要擴大涵蓋率,您需要編寫涵蓋遺漏路徑的測試。您必須新增測試,斷言使用者略過字詞時,結果如下:
currentGameUiState.score屬性保持不變。currentGameUiState.currentWordCount屬性以 1 為增量遞增,如以下程式碼片段所示。
如要準備擴大涵蓋率,請在 GameViewModelTest 類別中加入下列測試方法。
@Test
fun gameViewModel_WordSkipped_ScoreUnchangedAndWordCountIncreased() {
    var currentGameUiState = viewModel.uiState.value
    val correctPlayerWord = getUnscrambledWord(currentGameUiState.currentScrambledWord)
    viewModel.updateUserGuess(correctPlayerWord)
    viewModel.checkUserGuess()

    currentGameUiState = viewModel.uiState.value
    val lastWordCount = currentGameUiState.currentWordCount
    viewModel.skipWord()
    currentGameUiState = viewModel.uiState.value
    // Assert that score remains unchanged after word is skipped.
    assertEquals(SCORE_AFTER_FIRST_CORRECT_ANSWER, currentGameUiState.score)
    // Assert that word count is increased by 1 after word is skipped.
    assertEquals(lastWordCount + 1, currentGameUiState.currentWordCount)
}
如要重新執行涵蓋率測試,請完成下列步驟:
- 在
GameViewModelTest.kt檔案上按一下滑鼠右鍵,並從選單中選取「Run 'GameViewModelTest' with Coverage」。 - 建構成功後,請再次前往 GameViewModel 元素,確認涵蓋率百分比為 100%。最終涵蓋率報表如下圖所示。

- 前往
GameViewModel.kt檔案並向下捲動,確認現在是否已涵蓋先前遺漏的路徑。
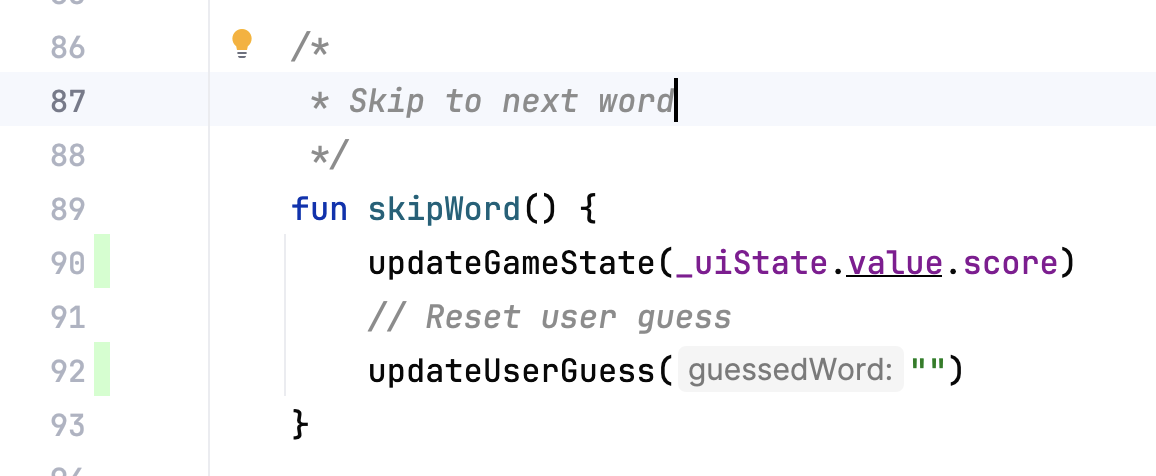
您已瞭解如何執行、分析及提升應用程式程式碼的涵蓋率。
程式碼涵蓋率的高百分比是否意味著應用程式有高品質程式碼?否。程式碼涵蓋率代表單元測試所涵蓋或執行的程式碼百分比。但不表示程式碼是否已通過驗證。如果從單元測試程式碼中移除所有斷言,並執行程式碼涵蓋率,仍舊會顯示 100% 的涵蓋率。
高涵蓋率不代表測試設計正確,且測試可驗證應用程式行為。您必須確保編寫的測試具有宣告,驗證測試類別的行為。您不必苦心撰寫單元測試以追求達到整個應用程式 100% 的測試涵蓋率。請改用 UI 測試來測試應用程式程式碼的某些部分,例如「活動」。
但涵蓋率低表示程式碼的大部分尚未經過測試。使用程式碼涵蓋率做為工具,找出測試未執行的程式碼部分,而非評估程式碼品質的工具。
6. 取得解決方案程式碼
完成程式碼研究室後,如要下載當中用到的程式碼,您可以使用這些 git 指令:
$ git clone https://github.com/google-developer-training/basic-android-kotlin-compose-training-unscramble.git
$ cd basic-android-kotlin-compose-training-unscramble
$ git checkout main
另外,您也可以下載存放區為 ZIP 檔案,然後解壓縮並在 Android Studio 中開啟。
如要查看解決方案程式碼,請前往 GitHub。
7. 結語
恭喜!您已瞭解如何定義測試策略並實作單元測試,以測試 Unscramble 應用程式中的 ViewModel 和 StateFlow。繼續建構 Android 應用程式時,請務必同時撰寫測試和應用程式功能,確保應用程式在整個開發過程中皆可正常運作。
摘要
- 使用
testImplementation設定,表示依附元件是套用到本機測試原始碼,而非應用程式程式碼。 - 目標是將測試分成三種情況:成功路徑、錯誤路徑和界線用途。
- 良好的單元測試至少要有四個特徵:聚焦、可理解、確定性和獨立性。
- 系統會獨立執行測試方法,避免可變動的測試執行個體狀態產生非預期的副作用。
- 根據預設,在執行每個測試方法之前,JUnit 會為該測試類別新建一個執行個體。
- 程式碼涵蓋率扮演著重要角色,會確定您是否正確測試了構成應用程式的類別、方法和程式碼行。
