
1. 前言
在之前的 Codelab 中,您已学过如何使用 Room 持久性库(SQLite 数据库之上的一个抽象层)来存储应用数据。在此 Codelab 中,您将为 Inventory 应用添加更多功能,并了解如何使用 Room 读取、显示、更新和删除 SQLite 数据库中的数据。您将使用 LazyColumn 显示数据库中的数据,并在数据库中的底层数据发生更改时自动更新数据。
前提条件
- 能够使用 Room 库创建 SQLite 数据库并与之交互。
- 能够创建实体、DAO 和数据库类。
- 能够使用数据访问对象 (DAO) 将 Kotlin 函数映射到 SQL 查询。
- 能够在
LazyColumn中显示列表项。 - 完成本单元中的上一个 Codelab:使用 Room 持久保留数据。
学习内容
- 如何读取和显示 SQLite 数据库中的实体。
- 如何使用 Room 库更新和删除 SQLite 数据库中的实体。
您将构建的内容
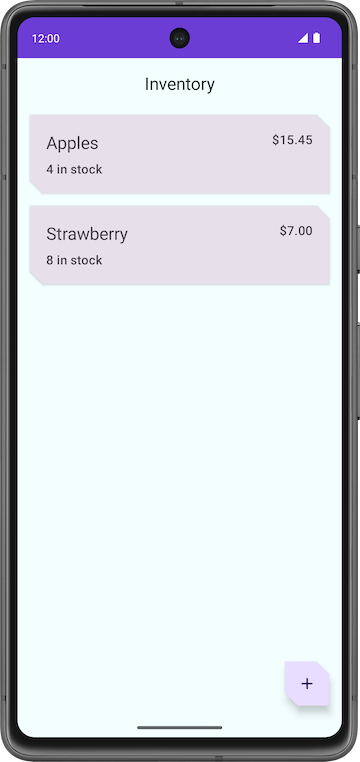
- 一个 Inventory 应用,以列表形式显示商品目录中的各项商品,并可使用 Room 更新、修改和删除应用数据库中的商品。
所需条件
- 一台安装了 Android Studio 的计算机
2. 起始应用概览
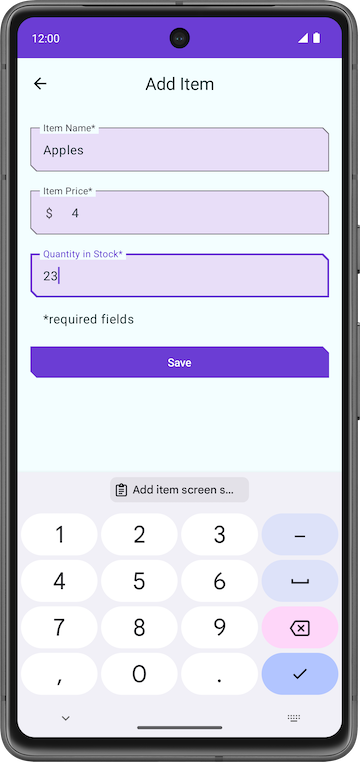
此 Codelab 使用上一个 Codelab 使用 Room 持久保留数据中的 Inventory 应用解决方案代码作为起始代码。起始应用已在使用 Room 持久性库保存数据。用户可以使用 Add Item 界面向应用数据库添加数据。
|
|
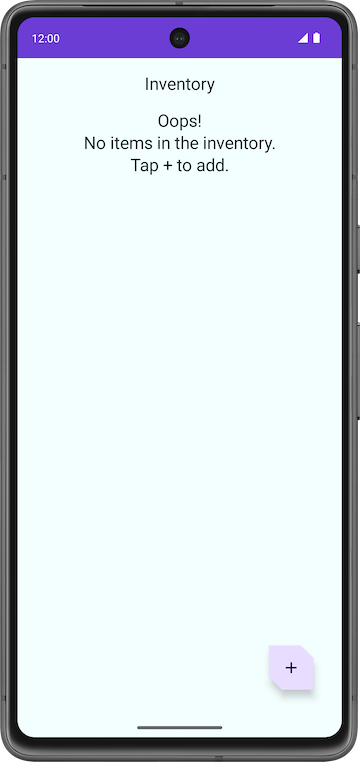
在此 Codelab 中,您将扩展该应用以读取和显示数据,并使用 Room 库更新和删除数据库中的实体。
下载此 Codelab 的起始代码
首先,请下载起始代码:
$ git clone https://github.com/google-developer-training/basic-android-kotlin-compose-training-inventory-app.git
$ cd basic-android-kotlin-compose-training-inventory-app
$ git checkout room
或者,您也可以下载 ZIP 文件形式的代码库,将其解压缩并在 Android Studio 中打开。
如果您想查看此 Codelab 的起始代码,请前往 GitHub 查看。
3. 更新界面状态
在此任务中,您将向应用添加一个 LazyColumn 来显示存储在数据库中的数据。

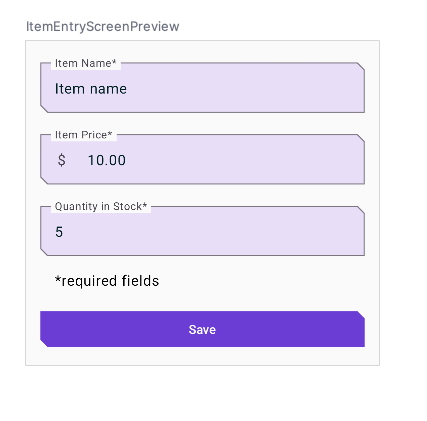
HomeScreen 可组合函数演示
- 打开
ui/home/HomeScreen.kt文件并查看HomeScreen()可组合项。
@Composable
fun HomeScreen(
    navigateToItemEntry: () -> Unit,
    navigateToItemUpdate: (Int) -> Unit,
    modifier: Modifier = Modifier,
) {
    val scrollBehavior = TopAppBarDefaults.enterAlwaysScrollBehavior()

    Scaffold(
        topBar = {
            // Top app with app title
        },
        floatingActionButton = {
            FloatingActionButton(
                // onClick details
            ) {
                Icon(
                    // Icon details
                )
            }
        },
    ) { innerPadding ->

       // Display List header and List of Items
        HomeBody(
            itemList = listOf(),  // Empty list is being passed in for itemList
            onItemClick = navigateToItemUpdate,
            modifier = modifier.padding(innerPadding)
                              .fillMaxSize()
        )
    }
此可组合函数会显示以下各项:
- 带有应用名称的顶部应用栏
- 用于向商品目录中添加新商品的悬浮操作按钮 (FAB)

HomeBody()可组合函数
HomeBody() 可组合函数会根据传入的列表显示商品目录商品。在起始代码实现中,我们将空列表 (listOf()) 传递给了 HomeBody() 可组合函数。如需将商品目录列表传递给此可组合函数,您必须从存储库中检索商品目录数据,并将其传入 HomeViewModel。
在 HomeViewModel 中发出界面状态
当您向 ItemDao 添加用于获取商品的 getItem() 和 getAllItems() 方法时,您将 Flow 指定为返回值类型。回想一下,Flow 代表通用数据流。通过返回 Flow,您只需在指定生命周期内明确调用 DAO 中的方法一次即可。Room 以异步方式处理底层数据的更新。
从数据流中获取数据的过程称为收集数据流。从界面层中的数据流收集数据时,需要考虑一些事项。
- 配置更改等生命周期事件(例如旋转设备)会导致重新创建 activity,进而导致重组,并从您的
Flow重新收集数据。 - 建议您将值缓存为状态,这样现有数据就不会在生命周期事件之间丢失。
- 如果没有任何观察器(例如在可组合项的生命周期结束后),则应取消数据流。
如需从 ViewModel 公开 Flow,推荐使用 StateFlow。无论界面生命周期如何,使用 StateFlow 均可保存和观察数据。如需将 Flow 转换为 StateFlow,您可以使用 stateIn 操作符。
stateIn 操作符有三个参数,如下所述:
scope-viewModelScope定义了StateFlow的生命周期。取消viewModelScope后,StateFlow也会取消。started- 仅当界面可见时,流水线才应有效。为此,请使用SharingStarted.WhileSubscribed()。如需配置从最后一个订阅者消失到停止共享协程之间的延迟时间(以毫秒为单位),请将TIMEOUT_MILLIS传递给SharingStarted.WhileSubscribed()方法。initialValue- 将状态流的初始值设置为HomeUiState()。
将 Flow 转换为 StateFlow 后,您可以使用 collectAsState() 方法对其进行收集,并将其数据转换为相同类型的 State。
在此步骤中,您将检索 Room 数据库中的所有商品,作为界面状态的 StateFlow 可观察 API。当 Room Inventory 数据发生更改时,界面会自动更新。
- 打开
ui/home/HomeViewModel.kt文件,其中包含一个TIMEOUT_MILLIS常量和一个HomeUiState数据类,该类将商品列表作为构造函数参数。
// No need to copy over, this code is part of starter code

class HomeViewModel : ViewModel() {

    companion object {
        private const val TIMEOUT_MILLIS = 5_000L
    }
}

data class HomeUiState(val itemList: List<Item> = listOf())
- 在
HomeViewModel类中,声明一个名为homeUiState且类型为StateFlow<HomeUiState>的val。您很快就要解决初始化错误。
val homeUiState: StateFlow<HomeUiState>
- 对
itemsRepository调用getAllItemsStream(),并将其分配给您刚刚声明的homeUiState。
val homeUiState: StateFlow<HomeUiState> =
    itemsRepository.getAllItemsStream()
您现在会收到一个“Unresolved reference: itemsRepository”错误。如需解决“Unresolved reference”错误,您需要将 ItemsRepository 对象传递给 HomeViewModel。
- 将类型为
ItemsRepository的构造函数参数添加到HomeViewModel类中。
import com.example.inventory.data.ItemsRepository

class HomeViewModel(itemsRepository: ItemsRepository): ViewModel() {
- 在
ui/AppViewModelProvider.kt文件的HomeViewModel初始化程序中,传递ItemsRepository对象,如下所示。
initializer {
    HomeViewModel(inventoryApplication().container.itemsRepository)
}
- 返回至
HomeViewModel.kt文件。请注意类型不匹配错误。如需解决此问题,请添加转换映射,如下所示。
val homeUiState: StateFlow<HomeUiState> =
    itemsRepository.getAllItemsStream().map { HomeUiState(it) }
Android Studio 仍会显示类型不匹配错误。导致此错误的原因在于,homeUiState 的类型为 StateFlow,而 getAllItemsStream() 却返回了 Flow。
- 使用
stateIn操作符将Flow转换为StateFlow。StateFlow是界面状态的可观察 API,可让界面自行更新。
import androidx.lifecycle.viewModelScope
import kotlinx.coroutines.flow.SharingStarted
import kotlinx.coroutines.flow.map
import kotlinx.coroutines.flow.stateIn

val homeUiState: StateFlow<HomeUiState> =
    itemsRepository.getAllItemsStream().map { HomeUiState(it) }
        .stateIn(
            scope = viewModelScope,
            started = SharingStarted.WhileSubscribed(TIMEOUT_MILLIS),
            initialValue = HomeUiState()
        )
- 构建应用,确保代码中没有错误。请注意,用户界面不会有任何变化。
4. 显示商品目录数据
在此任务中,您将收集和更新 HomeScreen 中的界面状态。
- 在
HomeScreen.kt文件的HomeScreen可组合函数中,添加类型为HomeViewModel的新函数参数并对其进行初始化。
import androidx.lifecycle.viewmodel.compose.viewModel
import com.example.inventory.ui.AppViewModelProvider


@Composable
fun HomeScreen(
    navigateToItemEntry: () -> Unit,
    navigateToItemUpdate: (Int) -> Unit,
    modifier: Modifier = Modifier,
    viewModel: HomeViewModel = viewModel(factory = AppViewModelProvider.Factory)
)
- 在
HomeScreen可组合函数中,添加一个名为homeUiState的val,以从HomeViewModel收集界面状态。您将使用collectAsState(),它会从此StateFlow收集值,并通过State表示其最新值。
import androidx.compose.runtime.collectAsState
import androidx.compose.runtime.getValue

val homeUiState by viewModel.homeUiState.collectAsState()
- 更新
HomeBody()函数调用,并将homeUiState.itemList传入itemList参数。
HomeBody(
    itemList = homeUiState.itemList,
    onItemClick = navigateToItemUpdate,
    modifier = modifier.padding(innerPadding)
)
- 运行应用。请注意,如果您已在应用数据库中保存了商品,系统会显示商品目录列表。如果列表为空,请将一些商品目录商品添加到应用数据库。
5. 测试您的数据库
之前的 Codelab 讨论了测试代码的重要性。在此任务中,您将添加一些单元测试来测试 DAO 查询,然后按照此 Codelab 的步骤继续操作时,还将添加更多测试。
如需测试数据库实现,推荐的方法是编写在 Android 设备上运行的 JUnit 测试。由于执行这些测试不需要创建 activity,因此它们的执行速度比界面测试速度快。
- 在
build.gradle.kts (Module :app)文件中,请注意 Espresso 和 JUnit 的以下依赖项。
// Testing
androidTestImplementation("androidx.test.espresso:espresso-core:3.5.1")
androidTestImplementation("androidx.test.ext:junit:1.1.5")
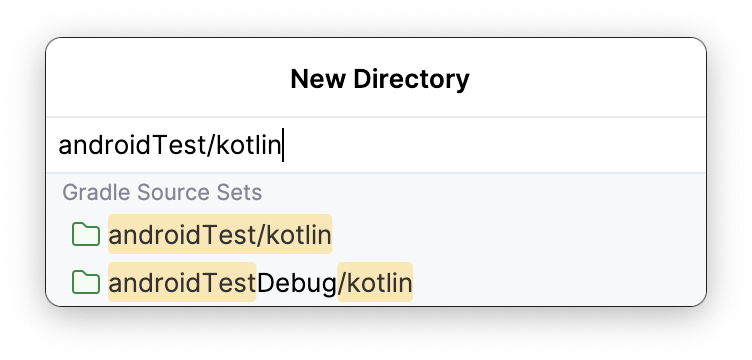
- 切换到 Project 视图,然后右键点击 src > New > Directory,以便为测试创建测试源代码集。
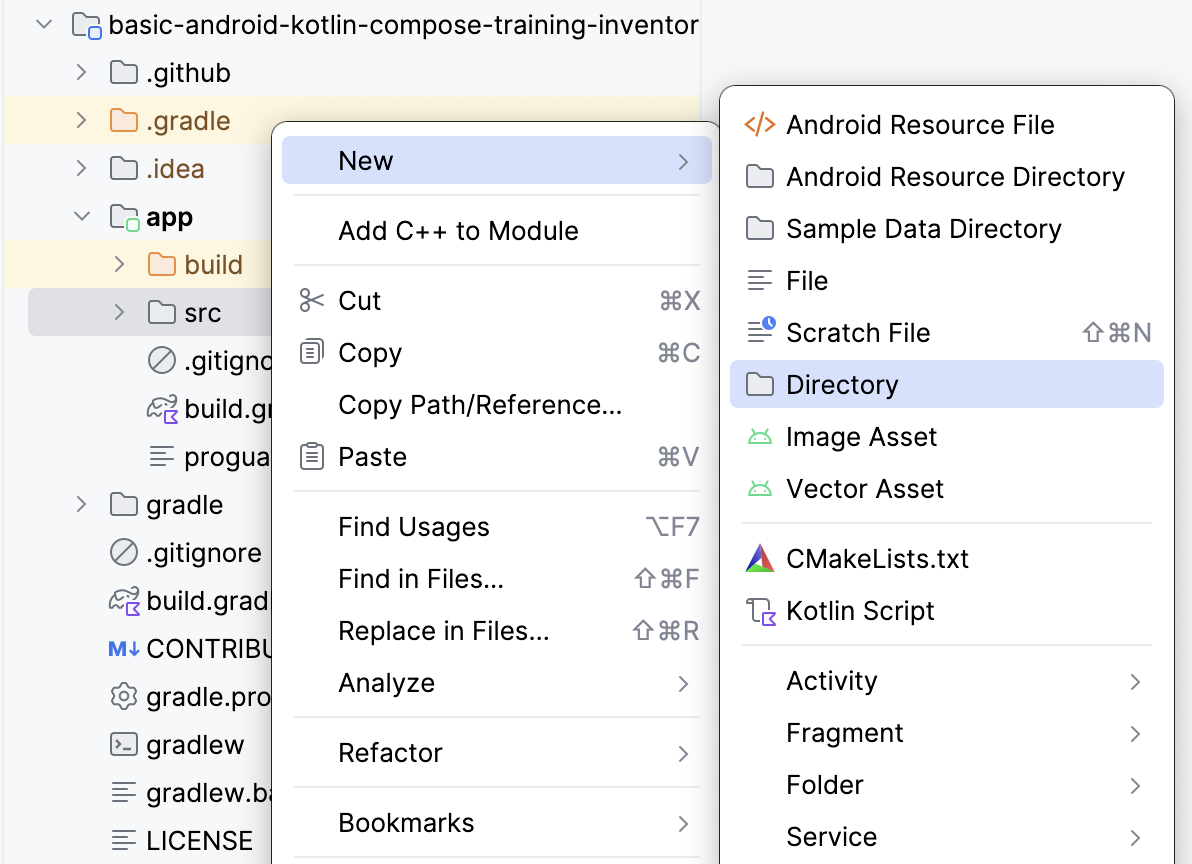
- 从 New Directory 弹出式窗口中选择 androidTest/kotlin。
- 创建一个名为
ItemDaoTest.kt的 Kotlin 类。 - 为
ItemDaoTest类添加@RunWith(AndroidJUnit4::class)注解。现在,您的类如以下示例代码所示:
package com.example.inventory

import androidx.test.ext.junit.runners.AndroidJUnit4
import org.junit.runner.RunWith

@RunWith(AndroidJUnit4::class)
class ItemDaoTest {
}
- 在类内,添加
ItemDao和InventoryDatabase类型的私有var变量。
import com.example.inventory.data.InventoryDatabase
import com.example.inventory.data.ItemDao

private lateinit var itemDao: ItemDao
private lateinit var inventoryDatabase: InventoryDatabase
- 添加一个函数以创建数据库,并为其添加
@Before注解,以便在每次测试之前能够运行该数据库。 - 在该方法内,初始化
itemDao。
import android.content.Context
import androidx.room.Room
import androidx.test.core.app.ApplicationProvider
import org.junit.Before

@Before
fun createDb() {
    val context: Context = ApplicationProvider.getApplicationContext()
    // Using an in-memory database because the information stored here disappears when the
    // process is killed.
    inventoryDatabase = Room.inMemoryDatabaseBuilder(context, InventoryDatabase::class.java)
        // Allowing main thread queries, just for testing.
        .allowMainThreadQueries()
        .build()
    itemDao = inventoryDatabase.itemDao()
}
在此函数中,您将使用内存中的数据库,但不将该数据库保留在磁盘上。为此,您可以使用 inMemoryDatabaseBuilder() 函数。这样做的原因是,信息不需要保留,而是需要随着进程终止而被删除。您是在 .allowMainThreadQueries() 主线程中运行 DAO 查询,专门用于测试。
- 添加其他函数以关闭数据库。然后为该函数添加
@After注解,以在每次测试后运行该函数来关闭数据库。
import org.junit.After
import java.io.IOException

@After
@Throws(IOException::class)
fun closeDb() {
    inventoryDatabase.close()
}
- 在类
ItemDaoTest中声明数据库要使用的商品,如以下代码示例所示:
import com.example.inventory.data.Item

private var item1 = Item(1, "Apples", 10.0, 20)
private var item2 = Item(2, "Bananas", 15.0, 97)
- 添加实用函数,先向数据库中添加一个商品,然后添加两个商品。稍后,您将在测试中使用这些函数。将它们标记为
suspend,以便它们可以在协程中运行。
private suspend fun addOneItemToDb() {
    itemDao.insert(item1)
}

private suspend fun addTwoItemsToDb() {
    itemDao.insert(item1)
    itemDao.insert(item2)
}
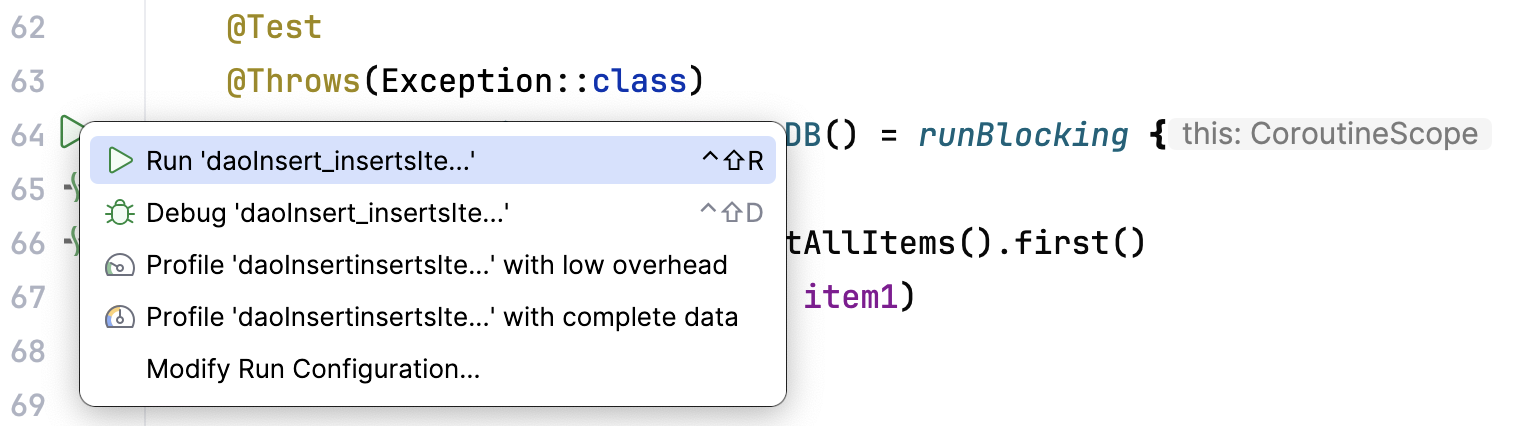
- 为向数据库中插入单个商品的
insert()编写测试。将测试命名为daoInsert_insertsItemIntoDB,并为其添加@Test注解。
import kotlinx.coroutines.flow.first
import kotlinx.coroutines.runBlocking
import org.junit.Assert.assertEquals
import org.junit.Test


@Test
@Throws(Exception::class)
fun daoInsert_insertsItemIntoDB() = runBlocking {
    addOneItemToDb()
    val allItems = itemDao.getAllItems().first()
    assertEquals(allItems[0], item1)
}
在此测试中,您将使用实用函数 addOneItemToDb() 向数据库中添加一个商品。然后,读取数据库中的第一个商品。通过 assertEquals(),您可以将预期值与实际值进行比较。您将使用 runBlocking{} 在新的协程中运行测试。此设置是将实用函数标记为 suspend 的原因。
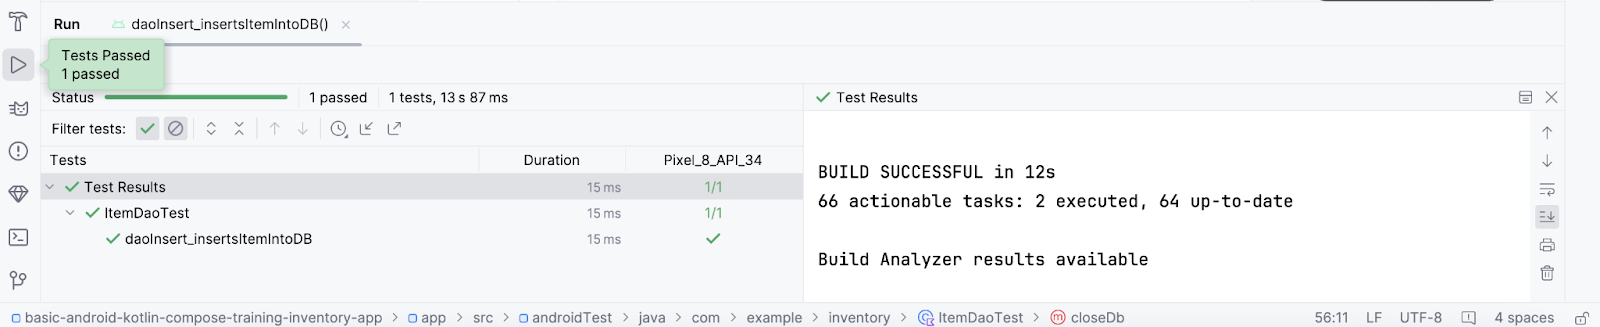
- 运行测试并确保测试通过。
- 为数据库中的
getAllItems()编写另一个测试。将测试命名为daoGetAllItems_returnsAllItemsFromDB。
@Test
@Throws(Exception::class)
fun daoGetAllItems_returnsAllItemsFromDB() = runBlocking {
    addTwoItemsToDb()
    val allItems = itemDao.getAllItems().first()
    assertEquals(allItems[0], item1)
    assertEquals(allItems[1], item2)
}
在上述测试中,您在协程内向数据库中添加了两个商品。然后,您读取了这两个商品,并将其与预期值进行比较。
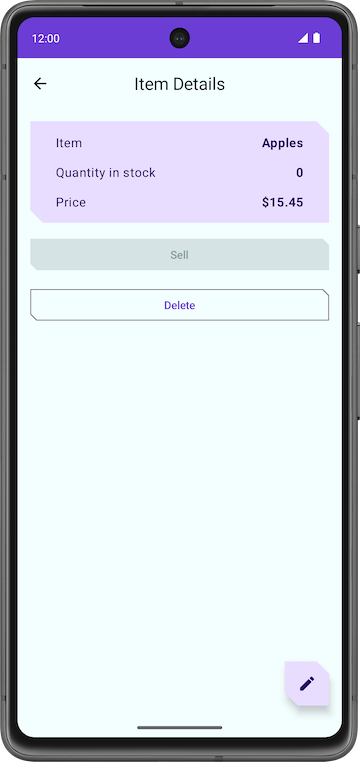
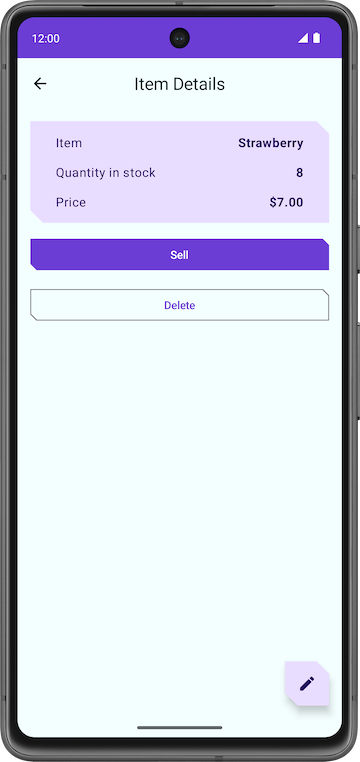
6. 显示商品详情
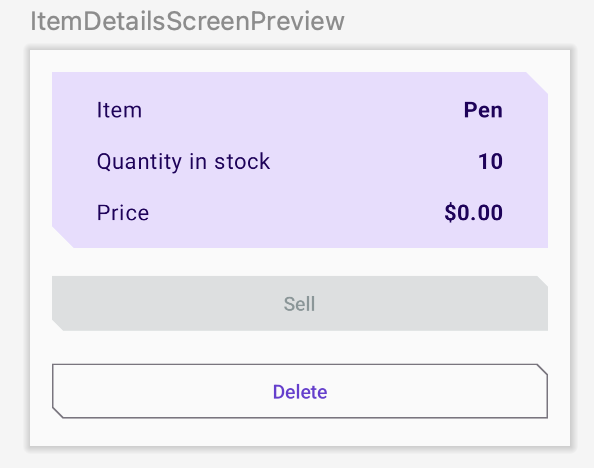
在此任务中,您将读取并在 Item Details 界面上显示实体详情。您将使用 Inventory 应用数据库中的商品界面状态(例如名称、价格和数量),并使用 ItemDetailsScreen 可组合项在 Item Details 界面上显示这些信息。我们为您预先编写了 ItemDetailsScreen 可组合函数,其中包含三个用于显示商品详情的 Text 可组合项。
ui/item/ItemDetailsScreen.kt
此屏幕是起始代码的一部分,显示了相应商品的详细信息,您会在后续 Codelab 中看到这些商品。您在此 Codelab 中不会处理此界面。ItemDetailsViewModel.kt 是此界面的对应 ViewModel。
- 在
HomeScreen可组合函数中,请注意HomeBody()函数调用。navigateToItemUpdate将传递给onItemClick参数,当您点击列表中的任一商品时,此参数会被调用。
// No need to copy over
HomeBody(
    itemList = homeUiState.itemList,
    onItemClick = navigateToItemUpdate,
    modifier = modifier
        .padding(innerPadding)
        .fillMaxSize()
)
- 打开
ui/navigation/InventoryNavGraph.kt并注意HomeScreen可组合项中的navigateToItemUpdate参数。此参数将导航目的地指定为“Item Details”界面。
// No need to copy over
HomeScreen(
    navigateToItemEntry = { navController.navigate(ItemEntryDestination.route) },
    navigateToItemUpdate = {
        navController.navigate("${ItemDetailsDestination.route}/${it}")
   }
我们已为您实现 onItemClick 功能的这一部分。点击列表项后,应用会转到“Item Details”界面。
- 点击商品目录列表中的任意商品,即可查看包含空白字段的“Item Details”界面。
若要使用商品详情填充文本字段,您需要在 ItemDetailsScreen() 中收集界面状态。
- 在
UI/Item/ItemDetailsScreen.kt中,向ItemDetailsScreen可组合项添加一个ItemDetailsViewModel类型的新参数,并使用工厂方法对其进行初始化。
import androidx.lifecycle.viewmodel.compose.viewModel
import com.example.inventory.ui.AppViewModelProvider

@Composable
fun ItemDetailsScreen(
    navigateToEditItem: (Int) -> Unit,
    navigateBack: () -> Unit,
    modifier: Modifier = Modifier,
    viewModel: ItemDetailsViewModel = viewModel(factory = AppViewModelProvider.Factory)
)
- 在
ItemDetailsScreen()可组合项内,创建一个名为uiState的val来收集界面状态。使用collectAsState()收集uiStateStateFlow并通过State表示其最新值。Android Studio 会显示未解决的引用错误。
import androidx.compose.runtime.collectAsState

val uiState = viewModel.uiState.collectAsState()
- 若要解决此错误,请在
ItemDetailsViewModel类中创建一个名为uiState且类型为StateFlow<ItemDetailsUiState>的val。 - 从商品存储库中检索数据,并使用扩展函数
toItemDetails()将其映射到ItemDetailsUiState。我们已经在起始代码中为您编写了扩展函数Item.toItemDetails()。
import androidx.lifecycle.viewModelScope
import kotlinx.coroutines.flow.SharingStarted
import kotlinx.coroutines.flow.StateFlow
import kotlinx.coroutines.flow.filterNotNull
import kotlinx.coroutines.flow.map
import kotlinx.coroutines.flow.stateIn

val uiState: StateFlow<ItemDetailsUiState> =
         itemsRepository.getItemStream(itemId)
             .filterNotNull()
             .map {
                 ItemDetailsUiState(itemDetails = it.toItemDetails())
             }.stateIn(
                 scope = viewModelScope,
                 started = SharingStarted.WhileSubscribed(TIMEOUT_MILLIS),
                 initialValue = ItemDetailsUiState()
             )
- 将
ItemsRepository传入ItemDetailsViewModel中以解决Unresolved reference: itemsRepository错误。
class ItemDetailsViewModel(
    savedStateHandle: SavedStateHandle,
    private val itemsRepository: ItemsRepository
    ) : ViewModel() {
- 在
ui/AppViewModelProvider.kt中,更新ItemDetailsViewModel的初始化程序,如以下代码段所示:
initializer {
    ItemDetailsViewModel(
        this.createSavedStateHandle(),
        inventoryApplication().container.itemsRepository
    )
}
- 返回
ItemDetailsScreen.kt,您会发现ItemDetailsScreen()可组合项中的错误已解决。 - 在
ItemDetailsScreen()可组合项中,更新ItemDetailsBody()函数调用并将uiState.value传入itemUiState实参。
ItemDetailsBody(
    itemUiState = uiState.value,
    onSellItem = {  },
    onDelete = { },
    modifier = modifier.padding(innerPadding)
)
- 观察
ItemDetailsBody()和ItemInputForm()的实现。您将当前选定的item从ItemDetailsBody()传递到ItemDetails()。
// No need to copy over

@Composable
private fun ItemDetailsBody(
    itemUiState: ItemUiState,
    onSellItem: () -> Unit,
    onDelete: () -> Unit,
    modifier: Modifier = Modifier
) {
    Column(
       //...
    ) {
        var deleteConfirmationRequired by rememberSaveable { mutableStateOf(false) }
        ItemDetails(
             item = itemDetailsUiState.itemDetails.toItem(), modifier = Modifier.fillMaxWidth()
         )

      //...
    }
- 运行应用。当您点击 Inventory 界面上的任何列表元素时,系统会显示 Item Details 界面。
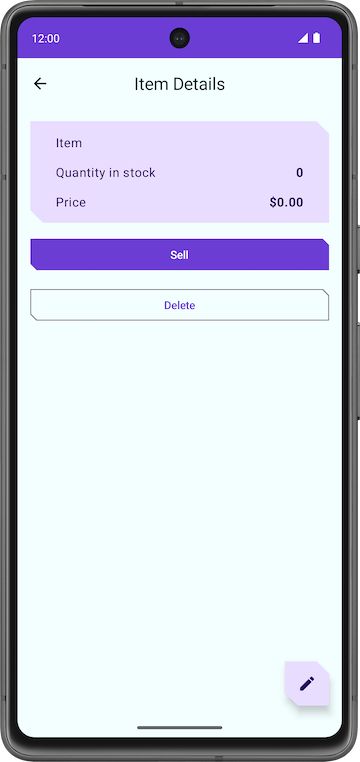
- 请注意,界面已不再空白。该界面会显示从商品目录数据库中检索到的实体详情。

- 点按 Sell 按钮。毫无反应!
在下一部分中,您将实现 Sell 按钮的功能。
7. 实现“Item Details”界面
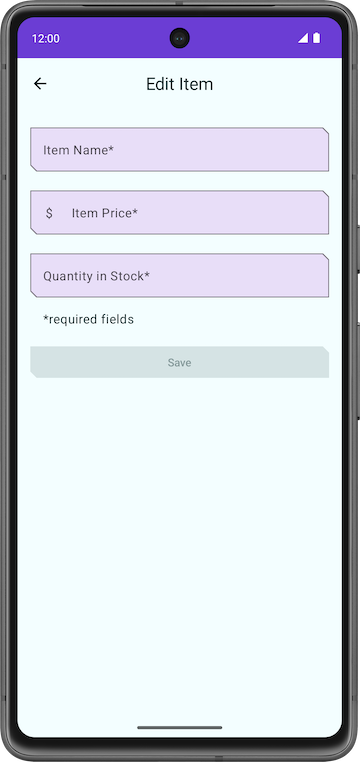
ui/item/ItemEditScreen.kt
在起始代码中已经为您提供了“Edit Item”界面。
此布局包含一些文本字段可组合项,这些可组合项用于修改商品目录中任何新商品的详情。
此应用的代码仍然没有完全正常运行。例如,在 Item Details 界面中,当您点按 Sell 按钮时,Quantity in Stock 不会减少。当您点按 Delete 按钮时,应用会显示确认对话框。但是,当您选择 Yes 按钮时,应用实际上不会删除该商品。
最后,FAB 按钮  会打开一个空的 Edit Item 界面。
在本部分中,您将实现 Sell、Delete 和 FAB 按钮的功能。
8. 实现商品销售功能
在本部分中,您将扩展应用的功能以实现销售功能。此更新涉及以下任务:
- 为 DAO 函数添加测试以更新实体。
- 在
ItemDetailsViewModel中添加一个函数以减少数量并更新应用数据库中的实体。 - 如果数量为零,停用 Sell 按钮。
- 在
ItemDaoTest.kt中,添加一个名为daoUpdateItems_updatesItemsInDB()且不带参数的函数。使用@Test和@Throws(Exception::class)对其进行注解。
@Test
@Throws(Exception::class)
fun daoUpdateItems_updatesItemsInDB()
- 定义函数并创建
runBlocking代码块。在其中调用addTwoItemsToDb()。
fun daoUpdateItems_updatesItemsInDB() = runBlocking {
    addTwoItemsToDb()
}
- 调用
itemDao.update,使用不同的值更新两个实体。
itemDao.update(Item(1, "Apples", 15.0, 25))
itemDao.update(Item(2, "Bananas", 5.0, 50))
- 使用
itemDao.getAllItems()检索实体。将其与更新后的实体进行比较并断言。
val allItems = itemDao.getAllItems().first()
assertEquals(allItems[0], Item(1, "Apples", 15.0, 25))
assertEquals(allItems[1], Item(2, "Bananas", 5.0, 50))
- 确保完成后的函数如下所示:
@Test
@Throws(Exception::class)
fun daoUpdateItems_updatesItemsInDB() = runBlocking {
    addTwoItemsToDb()
    itemDao.update(Item(1, "Apples", 15.0, 25))
    itemDao.update(Item(2, "Bananas", 5.0, 50))

    val allItems = itemDao.getAllItems().first()
    assertEquals(allItems[0], Item(1, "Apples", 15.0, 25))
    assertEquals(allItems[1], Item(2, "Bananas", 5.0, 50))
}
- 运行测试并确保测试通过。
在 ViewModel 中添加一个函数
- 在
ItemDetailsViewModel.kt的ItemDetailsViewModel类中,添加一个名为reduceQuantityByOne()且不带参数的函数。
fun reduceQuantityByOne() {
}
- 在该函数内,使用
viewModelScope.launch{}启动协程。
import kotlinx.coroutines.launch
import androidx.lifecycle.viewModelScope


viewModelScope.launch {
}
- 在
launch代码块内,创建一个名为currentItem的val,并将其设置为uiState.value.toItem()。
val currentItem = uiState.value.toItem()
uiState.value 的类型为 ItemUiState。您可以使用扩展函数 toItem() 将其转换为 Item 实体类型。
- 添加
if语句以检查quality是否大于0。 - 对
itemsRepository调用updateItem()并传入更新后的currentItem。使用copy()更新quantity值,使函数如下所示:
fun reduceQuantityByOne() {
    viewModelScope.launch {
        val currentItem = uiState.value.itemDetails.toItem()
        if (currentItem.quantity > 0) {
    itemsRepository.updateItem(currentItem.copy(quantity = currentItem.quantity - 1))
       }
    }
}
- 返回到
ItemDetailsScreen.kt。 - 在
ItemDetailsScreen可组合项中,转到ItemDetailsBody()函数调用。 - 在
onSellItemlambda 中,调用viewModel.reduceQuantityByOne()。
ItemDetailsBody(
    itemUiState = uiState.value,
    onSellItem = { viewModel.reduceQuantityByOne() },
    onDelete = { },
    modifier = modifier.padding(innerPadding)
)
- 运行应用。
- 在 Inventory 界面上,点击列表元素。当 Item Details 界面显示时,点按 Sell,您会注意到数量值减少了 1。
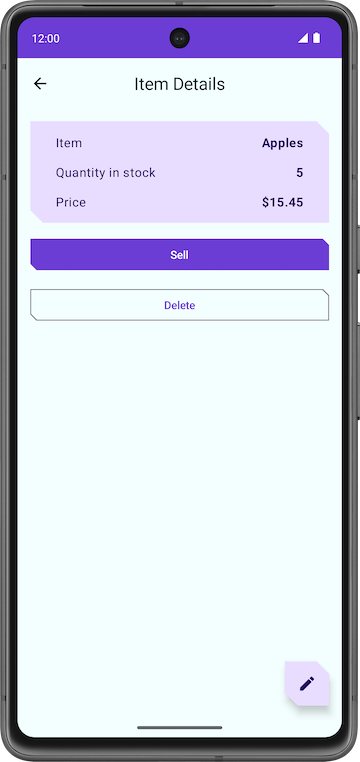
- 在 Item Details 界面中,持续点按 Sell 按钮,直到数量为零。
数量降至零后,再次点按 Sell。没有外观变化,因为函数 reduceQuantityByOne() 会在更新数量之前检查数量是否大于零。

为了向用户提供更好的反馈,您可能需要在没有可供销售的商品时停用 Sell 按钮。
- 在
ItemDetailsViewModel类中,根据map转换中的it.quantity设置outOfStock值。
val uiState: StateFlow<ItemDetailsUiState> =
    itemsRepository.getItemStream(itemId)
        .filterNotNull()
        .map {
            ItemDetailsUiState(outOfStock = it.quantity <= 0, itemDetails = it.toItemDetails())
        }.stateIn(
            //...
        )
- 运行应用。请注意,当库存数量为零时,应用会停用 Sell 按钮。
恭喜您为应用实现了商品销售功能。
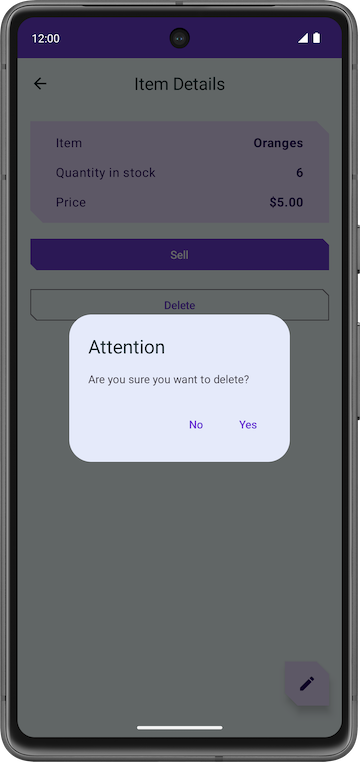
删除商品实体
与上一个任务一样,您必须实现删除功能,进一步扩展应用的功能。与销售功能相比,此功能更易于实现。此过程涉及以下任务:
- 为删除 DAO 查询添加测试。
- 在
ItemDetailsViewModel类中添加一个函数来删除数据库中的实体。 - 更新
ItemDetailsBody可组合项。
添加 DAO 测试
- 在
ItemDaoTest.kt中,添加一个名为daoDeleteItems_deletesAllItemsFromDB()的测试。
@Test
@Throws(Exception::class)
fun daoDeleteItems_deletesAllItemsFromDB()
- 使用
runBlocking {}启动协程。
fun daoDeleteItems_deletesAllItemsFromDB() = runBlocking {
}
- 向数据库添加两个商品,并对这两个商品调用
itemDao.delete(),以将其从数据库中删除。
addTwoItemsToDb()
itemDao.delete(item1)
itemDao.delete(item2)
- 从数据库中检索实体,并检查列表是否为空。完成后的测试应如下所示:
import org.junit.Assert.assertTrue

@Test
@Throws(Exception::class)
fun daoDeleteItems_deletesAllItemsFromDB() = runBlocking {
    addTwoItemsToDb()
    itemDao.delete(item1)
    itemDao.delete(item2)
    val allItems = itemDao.getAllItems().first()
    assertTrue(allItems.isEmpty())
}
在 ItemDetailsViewModel 中添加删除函数
- 在
ItemDetailsViewModel中,添加一个名为deleteItem()的新函数,该函数不带参数也不返回任何内容。 - 在
deleteItem()函数内,添加一个itemsRepository.deleteItem()函数调用并传入uiState.value.toItem()。
suspend fun deleteItem() {
    itemsRepository.deleteItem(uiState.value.itemDetails.toItem())
}
在此函数中,您将使用 toItem() 扩展函数将 uiState 从 itemDetails 类型转换为 Item 实体类型。
- 在
ui/item/ItemDetailsScreen可组合项中,添加一个名为coroutineScope的val,并将其设置为rememberCoroutineScope()。此方法会返回一个协程作用域,该作用域会绑定到调用所在的组件(ItemDetailsScreen可组合项)。
import androidx.compose.runtime.rememberCoroutineScope


val coroutineScope = rememberCoroutineScope()
- 滚动到
ItemDetailsBody()函数。 - 在
onDeletelambda 内使用coroutineScope启动协程。 - 在
launch代码块内,对viewModel调用deleteItem()方法。
import kotlinx.coroutines.launch

ItemDetailsBody(
    itemUiState = uiState.value,
    onSellItem = { viewModel.reduceQuantityByOne() },
    onDelete = {
        coroutineScope.launch {
           viewModel.deleteItem()
    }
    modifier = modifier.padding(innerPadding)
)
- 删除商品后,返回到“Inventory”界面。
- 在
deleteItem()函数调用后调用navigateBack()。
onDelete = {
    coroutineScope.launch {
        viewModel.deleteItem()
        navigateBack()
    }
- 仍在
ItemDetailsScreen.kt文件中,滚动到ItemDetailsBody()函数。
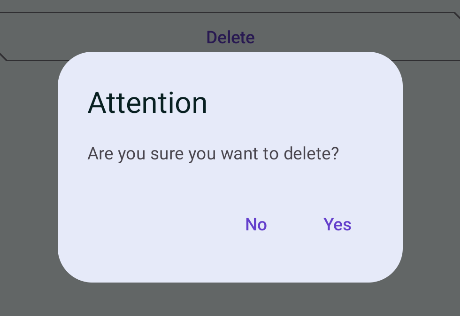
起始代码已包含此函数。此可组合项会显示一个提醒对话框,用于在删除商品之前获取用户确认,并在您点按 Yes 时调用 deleteItem() 函数。
// No need to copy over

@Composable
private fun ItemDetailsBody(
    itemUiState: ItemUiState,
    onSellItem: () -> Unit,
    onDelete: () -> Unit,
    modifier: Modifier = Modifier
) {
    Column(
        /*...*/
    ) {
        //...

        if (deleteConfirmationRequired) {
            DeleteConfirmationDialog(
                onDeleteConfirm = {
                    deleteConfirmationRequired = false
                    onDelete()
                },
                //...
            )
        }
    }
}
当您点按 No 时,应用会关闭提醒对话框。showConfirmationDialog() 函数会显示以下提醒:
- 运行应用。
- 在 Inventory 界面上选择一个列表元素。
- 在 Item Details 界面中,点按 Delete。
- 点按提醒对话框中的 Yes,应用会返回到 Inventory 界面。
- 确认您删除的实体不再位于应用数据库中。
恭喜您实现了删除功能!
|
|
修改商品实体
与前面的部分类似,在此部分中,您将向应用中添加另一项用于修改商品实体的增强功能。
下面,我们将快速过一遍修改应用数据库中实体的步骤:
- 添加测试,测试用于获取商品的 DAO 查询。
- 使用实体详情填充 Edit Item 界面中的文本字段。
- 使用 Room 更新数据库中的实体。
添加 DAO 测试
- 在
ItemDaoTest.kt中,添加一个名为daoGetItem_returnsItemFromDB()的测试。
@Test
@Throws(Exception::class)
fun daoGetItem_returnsItemFromDB()
- 定义函数。在协程内,向数据库添加一个商品。
@Test
@Throws(Exception::class)
fun daoGetItem_returnsItemFromDB() = runBlocking {
    addOneItemToDb()
}
- 使用
itemDao.getItem()函数从数据库中检索实体,并将其设置为名为item的val。
val item = itemDao.getItem(1)
- 将实际值与检索到的值进行比较,并使用
assertEquals()断言。完成后的测试如下所示:
@Test
@Throws(Exception::class)
fun daoGetItem_returnsItemFromDB() = runBlocking {
    addOneItemToDb()
    val item = itemDao.getItem(1)
    assertEquals(item.first(), item1)
}
- 运行测试并确保测试通过。
填充文本字段
运行应用后,请转到 Item Details 界面,然后点击 FAB,您可以看到界面标题现在为 Edit Item。不过,所有文本字段均为空。在此步骤中,您将使用实体详情填充 Edit Item 界面中的文本字段。
|
|
- 在
ItemDetailsScreen.kt中,滚动到ItemDetailsScreen可组合项。 - 在
FloatingActionButton()中,将onClick参数更改为包含uiState.value.itemDetails.id,它是所选实体的id。您可以使用此id检索实体详详情。
FloatingActionButton(
    onClick = { navigateToEditItem(uiState.value.itemDetails.id) },
    modifier = /*...*/
)
- 在
ItemEditViewModel类中,添加init代码块。
init {

}
- 在
init代码块内,使用viewModelScope.launch启动协程。
import kotlinx.coroutines.launch

viewModelScope.launch { }
- 在
launch代码块内,使用itemsRepository.getItemStream(itemId)检索实体详情。
import androidx.lifecycle.viewModelScope
import kotlinx.coroutines.flow.filterNotNull
import kotlinx.coroutines.flow.first


init {
    viewModelScope.launch {
        itemUiState = itemsRepository.getItemStream(itemId)
            .filterNotNull()
            .first()
            .toItemUiState(true)
    }
}
在此发布块中,您添加一个过滤条件,以返回仅包含非 null 值的数据流。借助 toItemUiState(),您可以将 item 实体转换为 ItemUiState。将 actionEnabled 值作为 true 传递,以启用 Save 按钮。
如需解决 Unresolved reference: itemsRepository 错误,您需要将 ItemsRepository 作为依赖项传入 ViewModel。
- 将构造函数参数添加到
ItemEditViewModel类。
class ItemEditViewModel(
    savedStateHandle: SavedStateHandle,
    private val itemsRepository: ItemsRepository
)
- 在
AppViewModelProvider.kt文件的ItemEditViewModel初始化程序中,将ItemsRepository对象添加为参数。
initializer {
    ItemEditViewModel(
        this.createSavedStateHandle(),
        inventoryApplication().container.itemsRepository
    )
}
- 运行应用。
- 前往 Item Details,然后点按
 FAB。
FAB。 - 请注意,这些字段会填充商品详情。
- 修改库存数量或任何其他字段,然后点按 Save 按钮。
毫无反应!这是因为您没有更新应用数据库中的实体。您将在下一部分中修复此问题。
|
|
使用 Room 更新实体
在最后这个任务中,您将添加最后几段代码以实现更新功能。您将在 ViewModel 中定义必要的函数,并在 ItemEditScreen 中使用这些函数。
又到编写代码的时候了!
- 在
ItemEditViewModel类中,添加一个名为updateUiState()的函数,该函数接受ItemUiState对象且不返回任何内容。此函数会使用用户输入的新值更新itemUiState。
fun updateUiState(itemDetails: ItemDetails) {
    itemUiState =
        ItemUiState(itemDetails = itemDetails, isEntryValid = validateInput(itemDetails))
}
在此函数中,您要将传入的 itemDetails 分配给 itemUiState 并更新 isEntryValid 值。如果 itemDetails 为 true,应用会启用 Save 按钮。只有在用户输入的内容有效时,您才将此值设置为 true。
- 转到
ItemEditScreen.kt文件。 - 在
ItemEditScreen可组合项中,向下滚动到ItemEntryBody()函数调用。 - 将
onItemValueChange参数值设为新函数updateUiState。
ItemEntryBody(
    itemUiState = viewModel.itemUiState,
    onItemValueChange = viewModel::updateUiState,
    onSaveClick = { },
    modifier = modifier.padding(innerPadding)
)
- 运行应用。
- 转到 Edit Item 界面。
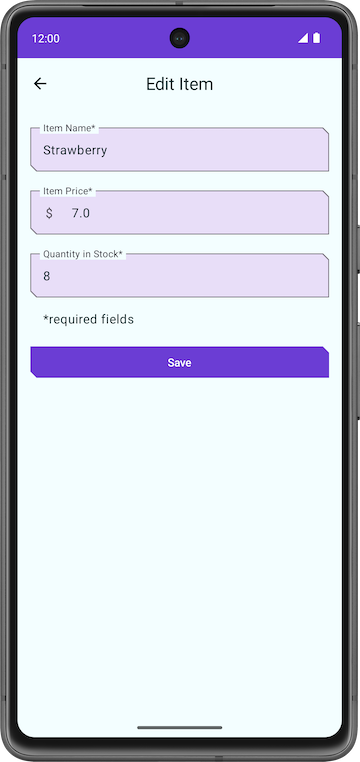
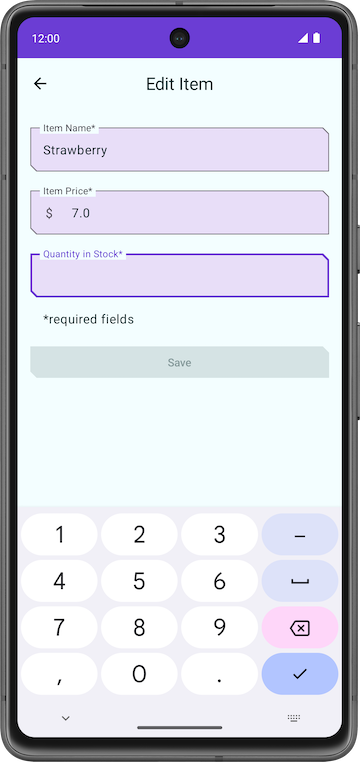
- 将其中一个实体值留空,使其无效。请注意 Save 按钮如何自动停用。
|
|
|
- 返回
ItemEditViewModel类,添加一个名为updateItem()的suspend函数,该函数不接受任何参数。您可以使用此函数将更新后的实体保存到 Room 数据库。
suspend fun updateItem() {
}
- 在
getUpdatedItemEntry()函数内,添加一个if条件,通过使用函数validateInput()来验证用户输入。 - 对
itemsRepository调用updateItem()函数,并传入itemUiState.itemDetails.toItem()。实体必须为Item类型,才能添加到 Room 数据库中。完成后的函数如下所示:
suspend fun updateItem() {
    if (validateInput(itemUiState.itemDetails)) {
        itemsRepository.updateItem(itemUiState.itemDetails.toItem())
    }
}
- 返回到
ItemEditScreen可组合项。您需要使用协程作用域来调用updateItem()函数。创建一个名为coroutineScope的变量并将其设置为rememberCoroutineScope()。
import androidx.compose.runtime.rememberCoroutineScope

val coroutineScope = rememberCoroutineScope()
- 在
ItemEntryBody()函数调用中,更新onSaveClick函数参数以在coroutineScope中启动协程。 - 在
launch代码块内,对viewModel调用updateItem(),然后返回。
import kotlinx.coroutines.launch

onSaveClick = {
    coroutineScope.launch {
        viewModel.updateItem()
        navigateBack()
    }
},
完成后的 ItemEntryBody() 函数调用如下所示:
ItemEntryBody(
    itemUiState = viewModel.itemUiState,
    onItemValueChange = viewModel::updateUiState,
    onSaveClick = {
        coroutineScope.launch {
            viewModel.updateItem()
            navigateBack()
        }
    },
    modifier = modifier.padding(innerPadding)
)
- 运行应用,并尝试修改商品目录商品。您现在可以修改 Inventory 应用数据库中的任何商品。
|
|
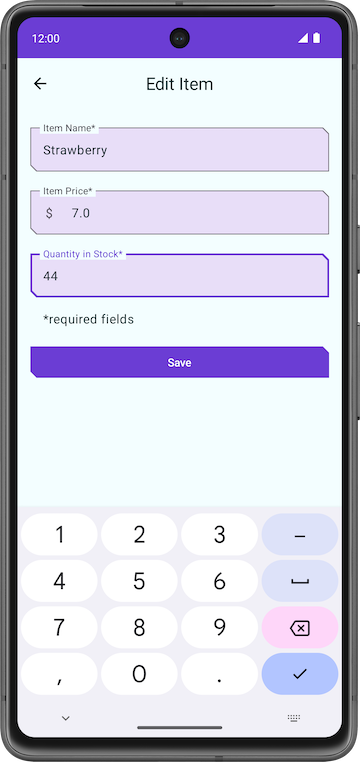

恭喜您创建了自己的第一个使用 Room 管理数据库的应用!
9. 解决方案代码
此 Codelab 的解决方案代码位于下方所示的 GitHub 代码库分支中:
10. 了解更多内容
Android 开发者文档
Kotlin 参考文档