
1. 事前準備
簡介
在本課程中,您將會熟悉如何使用 Compose 建構應用程式,並瞭解如何使用 XML、View、View Binding 和 Fragment 建構應用程式。使用 View 建構應用程式後,您或許就能瞭解,運用 Compose 這類宣告式 UI 建構應用程式有多麼方便。不過,在某些情況下,最好使用 View 而非 Compose。在本程式碼研究室中,您將瞭解如何使用 View Interop,在新式 Compose 應用程式中加入 View 元件。
在我們編寫此程式碼研究室的內容時,Compose 尚未提供您要建立的 UI 元件,因此現在是學習使用 View Interop 的最佳時機!
需求條件:
- 完成「Android 基本概念:使用 Compose」課程的「使用 View 建構 Android 應用程式」程式碼研究室及先前內容。
軟硬體需求
- 已安裝 Android Studio 且連上網路的電腦
- 裝置或模擬器
- Juice Tracker 應用程式的範例程式碼
建構項目
在本程式碼研究室中,您需要將 Spinner、RatingBar 和 AdView 這三個檢視區塊整合到 Compose UI 中,完成 Juice Tracker 應用程式 UI。為建構這些元件,您將使用 View Interoperability,此功能也簡稱 View Interop。透過 View Interop,您可以將檢視區塊納入可組合函式,從而新增到您的應用程式。
程式碼逐步操作說明
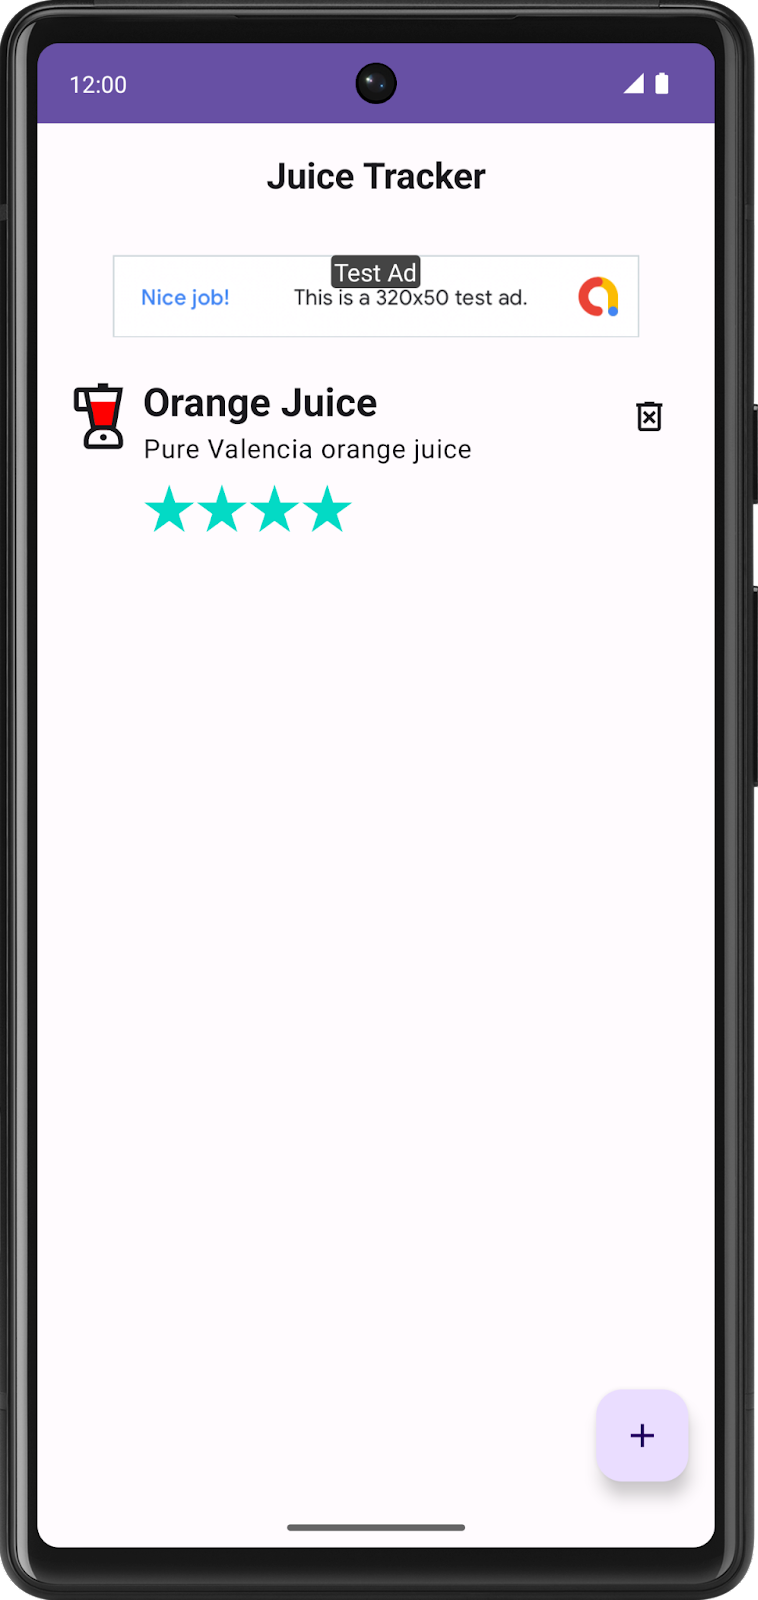
在本程式碼研究室中,您所處理的 JuiceTracker 應用程式,就是「使用檢視區塊建構 Android 應用程式」和「將 Compose 新增到以檢視區塊為基礎的應用程式」程式碼研究室中說明的同一個應用程式。差別在於,這一版範例程式碼完全是以 Compose 編寫。目前此應用程式的輸入對話方塊表缺少顏色和評分輸入內容,清單畫面頂端也沒有廣告橫幅。
bottomsheet 目錄包含所有與輸入對話方塊相關的 UI 元件。這個套件應含有所建立顏色和評分輸入內容的 UI 元件。
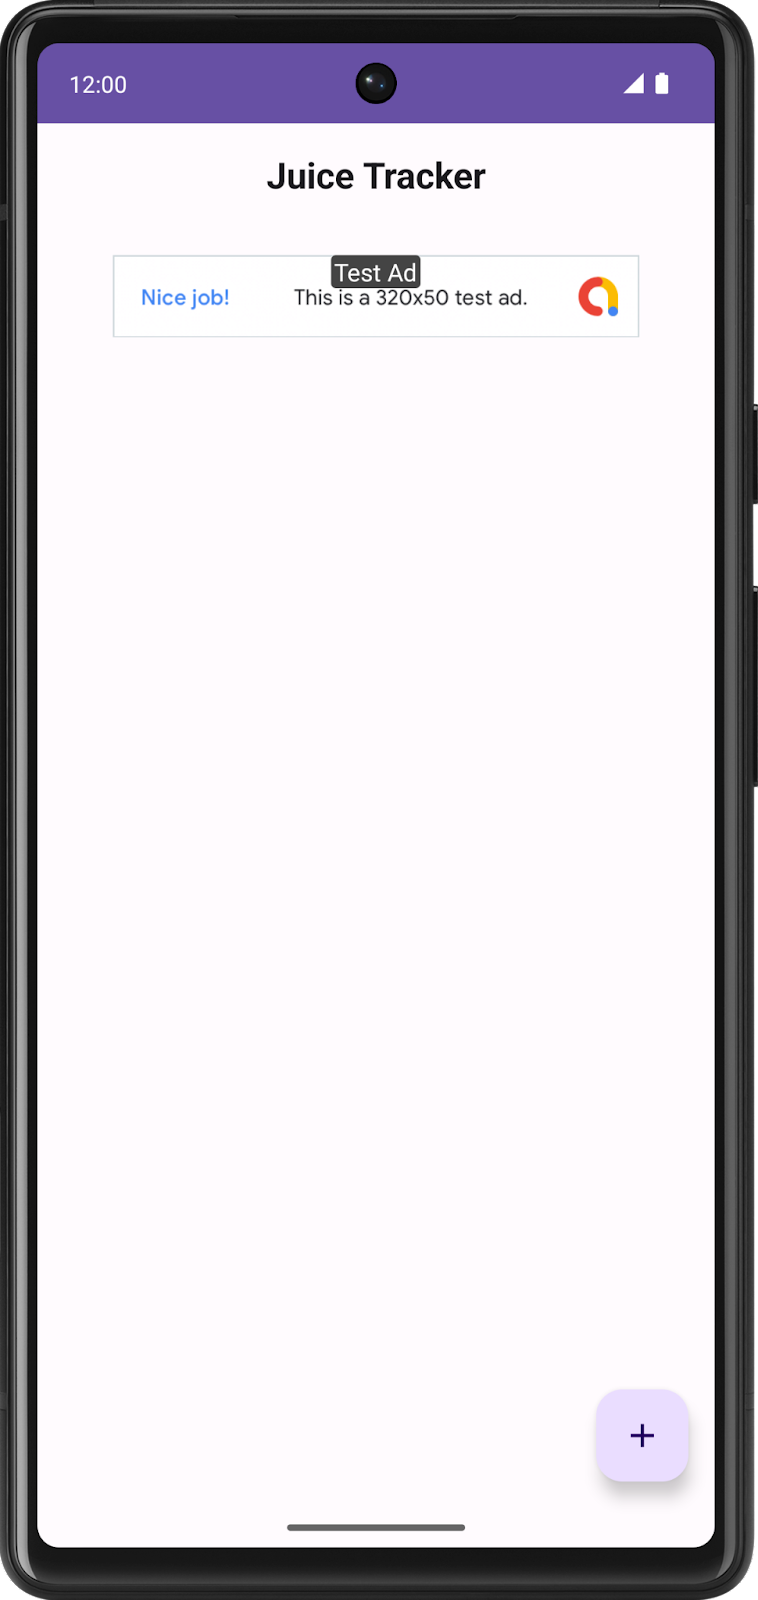
homescreen 包含由主畫面代管的 UI 元件,其中包括 JuiceTracker 清單。這個套件最終應包含所建立的廣告橫幅。
底部功能表、果汁清單等主要使用者介面元件則是由 JuiceTrackerApp.kt 檔案代管。
2. 取得範例程式碼
如要開始使用,請先下載範例程式碼:
或者,您也可以複製 GitHub 存放區的程式碼:
$ git clone https://github.com/google-developer-training/basic-android-kotlin-compose-training-juice-tracker.git
$ cd basic-android-kotlin-compose-training-juice-tracker
$ git checkout compose-starter
- 在 Android Studio 中開啟
basic-android-kotlin-compose-training-juice-tracker資料夾。 - 在 Android Studio 中開啟 Juice Tracker 應用程式程式碼。
3. Gradle 設定
將 Play 服務廣告依附元件新增至應用程式 build.gradle.kts 檔案。
app/build.gradle.kts
android {
   ...
   dependencies {
      ...
      implementation("com.google.android.gms:play-services-ads:22.2.0")
   }
}
4. 設定
將下列值加到 Android 資訊清單的 activity 標記上方,以便啟用要測試的廣告橫幅:
AndroidManifest.xml
...
<meta-data
   android:name="com.google.android.gms.ads.APPLICATION_ID"
   android:value="ca-app-pub-3940256099942544~3347511713" />

...
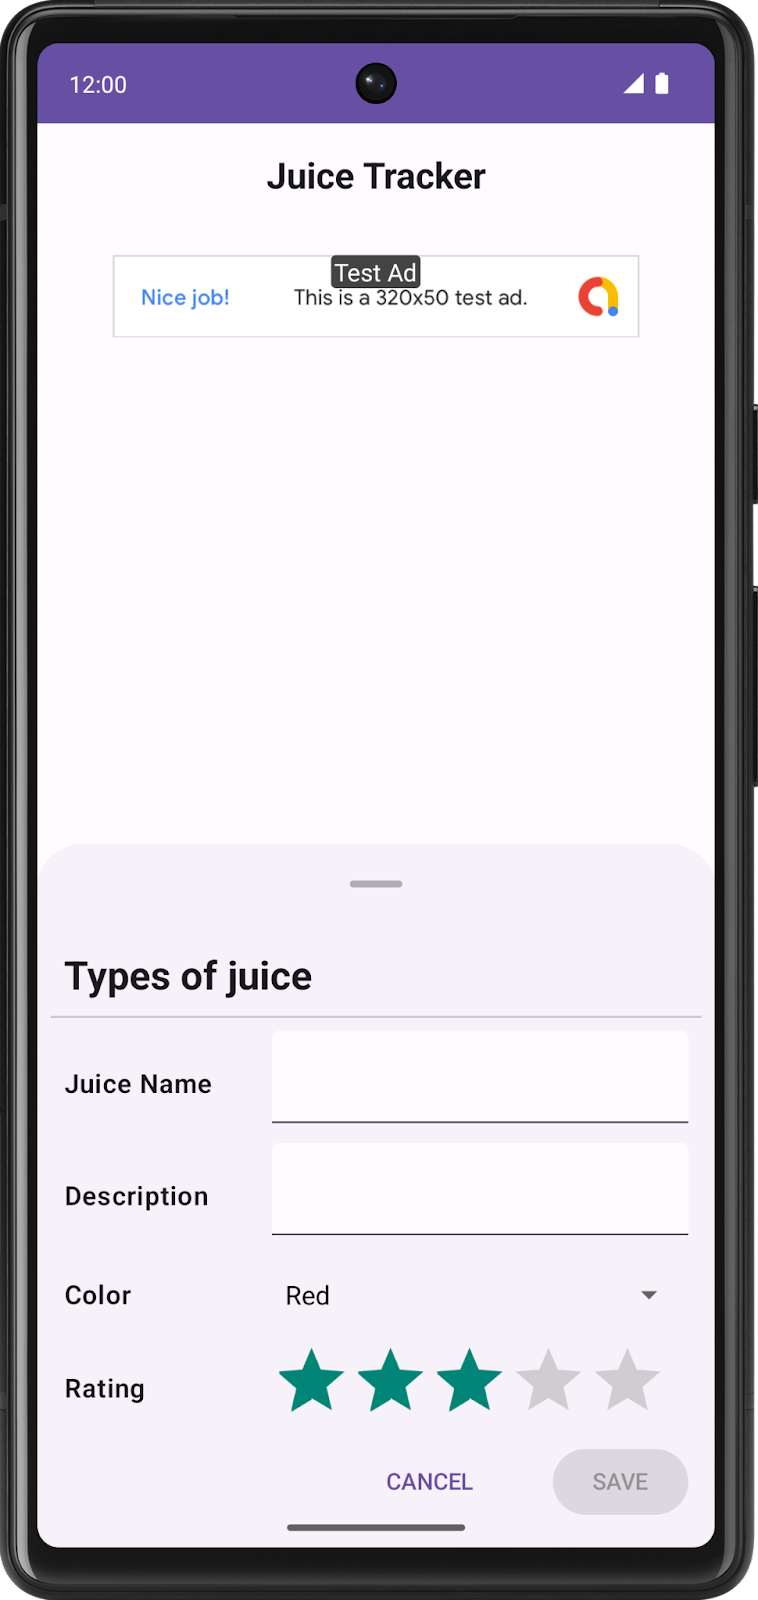
5. 完成輸入對話方塊
在本章節中,您將建立顏色輪轉選單和評分列,完成輸入對話方塊。顏色輪轉選單是用來選擇顏色的元件,評分列則可用來選擇果汁的評分。請參考以下設計:

建立顏色輪轉選單
如要在 Compose 中實作輪轉選單,必須使用 Spinner 類別。Spinner 是 View 元件,並非可組合函式,因此必須透過 Interop 實作。
- 在
bottomsheet目錄中,建立名為ColorSpinnerRow.kt的新檔案。 - 在檔案中建立名為
SpinnerAdapter的新類別。 - 在
SpinnerAdapter的建構函式中,定義名為onColorChange的回呼參數,該參數會採用Int參數。SpinnerAdapter會處理Spinner的回呼函式。
bottomsheet/ColorSpinnerRow.kt
class SpinnerAdapter(val onColorChange: (Int) -> Unit){
}
- 實作
AdapterView.OnItemSelectedListener介面。
您可以藉由實作此介面來定義輪轉選單的點選行為,稍後也將在 Composable 中設定這個轉接程式。
bottomsheet/ColorSpinnerRow.kt
class SpinnerAdapter(val onColorChange: (Int) -> Unit): AdapterView.OnItemSelectedListener {
}
- 實作
AdapterView.OnItemSelectedListener成員函式:onItemSelected()和onNothingSelected()。
bottomsheet/ColorSpinnerRow.kt
class SpinnerAdapter(val onColorChange: (Int) -> Unit): AdapterView.OnItemSelectedListener {
   override fun onItemSelected(parent: AdapterView<*>?, view: View?, position: Int, id: Long) {
        TODO("Not yet implemented")
    }

    override fun onNothingSelected(parent: AdapterView<*>?) {
        TODO("Not yet implemented")
    }
}
- 修改
onItemSelected()函式以呼叫onColorChange()回呼函式。這樣一來,當您選取顏色時,應用程式會在 UI 中更新所選的值。
bottomsheet/ColorSpinnerRow.kt
class SpinnerAdapter(val onColorChange: (Int) -> Unit): AdapterView.OnItemSelectedListener {
   override fun onItemSelected(parent: AdapterView<*>?, view: View?, position: Int, id: Long) {
        onColorChange(position)
    }

    override fun onNothingSelected(parent: AdapterView<*>?) {
        TODO("Not yet implemented")
    }
}
- 修改
onNothingSelected()函式,將顏色設為0。這樣一來,當您未選取任何選項時,預設顏色會是第一個顏色,也就是紅色。
bottomsheet/ColorSpinnerRow.kt
class SpinnerAdapter(val onColorChange: (Int) -> Unit): AdapterView.OnItemSelectedListener {
   override fun onItemSelected(parent: AdapterView<*>?, view: View?, position: Int, id: Long) {
        onColorChange(position)
    }

    override fun onNothingSelected(parent: AdapterView<*>?) {
        onColorChange(0)
    }
}
SpinnerAdapter 是之前建立的函式,作用是透過回呼函式定義輪轉選單的行為。現在您需要建構輪轉選單的內容,並在當中填入資料。
- 在
ColorSpinnerRow.kt檔案內部,但在SpinnerAdapter類別之外,新建名為ColorSpinnerRow的可組合函式。 - 在
ColorSpinnerRow()的方法簽章中,新增用於指定輪轉選單位置的Int參數、接受Int參數的回呼函式和一個修飾符。
bottomsheet/ColorSpinnerRow.kt
...
@Composable
fun ColorSpinnerRow(
    colorSpinnerPosition: Int,
    onColorChange: (Int) -> Unit,
    modifier: Modifier = Modifier
) {
}
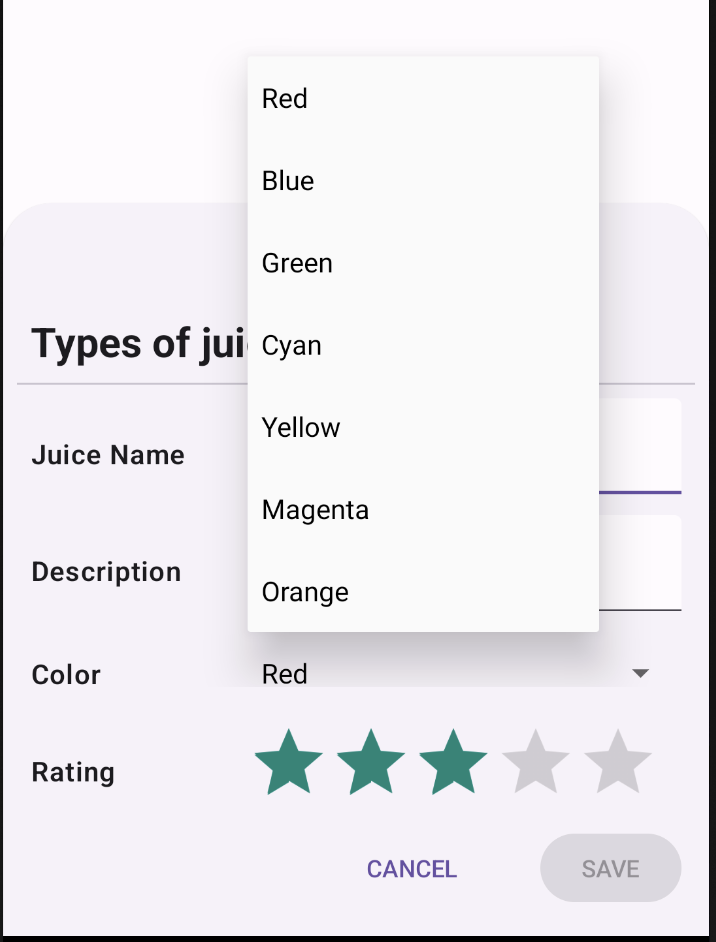
- 在函式中,建立使用
JuiceColor列舉果汁顏色字串資源的陣列。此陣列將成為填入輪轉選單的內容。
bottomsheet/ColorSpinnerRow.kt
...
@Composable
fun ColorSpinnerRow(
    colorSpinnerPosition: Int,
    onColorChange: (Int) -> Unit,
    modifier: Modifier = Modifier
) {
   val juiceColorArray =
        JuiceColor.values().map { juiceColor -> stringResource(juiceColor.label) }

}
- 新增
InputRow()可組合函式並傳遞輸入標籤的顏色字串資源和修飾符,以定義顯示Spinner的輸入列。
bottomsheet/ColorSpinnerRow.kt
...
@Composable
fun ColorSpinnerRow(
    colorSpinnerPosition: Int,
    onColorChange: (Int) -> Unit,
    modifier: Modifier = Modifier
) {
   val juiceColorArray =
        JuiceColor.values().map { juiceColor -> stringResource(juiceColor.label) }
   InputRow(inputLabel = stringResource(R.string.color), modifier = modifier) {
   }
}
接下來,您將建立 Spinner!由於 Spinner 屬於 View 類別,因此您必須使用 Compose 的 View interoperability API 將其納入可組合函式,這時就會用到 AndroidView 可組合函式。
- 如要在 Compose 中使用
Spinner,請在InputRowlambda 主體中建立AndroidView()可組合函式。AndroidView()可組合函式會在可組合函式中建立檢視區塊元素或檢視區塊階層。
bottomsheet/ColorSpinnerRow.kt
...
@Composable
fun ColorSpinnerRow(
    colorSpinnerPosition: Int,
    onColorChange: (Int) -> Unit,
    modifier: Modifier = Modifier
) {
   val juiceColorArray =
        JuiceColor.values().map { juiceColor -> stringResource(juiceColor.label) }
   InputRow(inputLabel = stringResource(R.string.color), modifier = modifier) {
      AndroidView()
   }
}
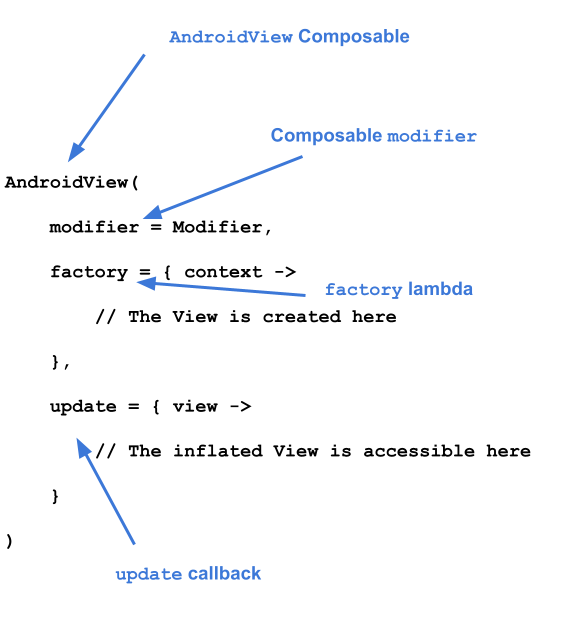
AndroidView 可組合函式使用三個參數:
factorylambda,這是用於建立檢視區塊的函式。update回呼,系統會在factory中建立的檢視區塊加載時呼叫此函式。- 可組合函式
modifier。
- 如要實作
AndroidView,請先傳遞修飾符並填入畫面寬度上限。 - 為
factory參數傳遞 lambda。 factorylambda 接受Context做為參數。建立Spinner類別並傳遞背景資訊。
bottomsheet/ColorSpinnerRow.kt
...
@Composable
fun ColorSpinnerRow(
    colorSpinnerPosition: Int,
    onColorChange: (Int) -> Unit,
    modifier: Modifier = Modifier
) {
   ...
   InputRow(...) {
      AndroidView(
         modifier = Modifier.fillMaxWidth(),
         factory = { context ->
            Spinner(context)
         }
      )
   }
}
就像 RecyclerView.Adapter 將資料提供給 RecyclerView,ArrayAdapter 也會提供資料給 Spinner。Spinner 需要轉接程式來保存色彩陣列。
- 使用
ArrayAdapter設定轉接程式。ArrayAdapter需要結構定義、XML 版面配置和陣列。針對版面配置傳遞simple_spinner_dropdown_item;此版面配置會成為 Android 預設版面配置。
bottomsheet/ColorSpinnerRow.kt
...
@Composable
fun ColorSpinnerRow(
colorSpinnerPosition: Int,
onColorChange: (Int) -> Unit,
modifier: Modifier = Modifier
) {
...
InputRow(...) {
AndroidView(
modifier = Modifier.fillMaxWidth(),
factory = { context ->
Spinner(context).apply {
adapter =
ArrayAdapter(
context,
android.R.layout.simple_spinner_dropdown_item,
juiceColorArray
)
}
}
)
}
}
factory 回呼會傳回其中所建立檢視區塊的例項。update 也是回呼,會接受 factory 回呼所傳回的參數類型。此參數是 factory 所加載檢視區塊的例項。在本例中,由於 Spinner 是在工廠中建立的,因此可從 update lambda 主體中存取該 Spinner 的例項。
- 新增可傳遞
spinner的update回呼,並使用update中提供的回呼來呼叫setSelection()方法。
bottomsheet/ColorSpinnerRow.kt
...
@Composable
fun ColorSpinnerRow(
    colorSpinnerPosition: Int,
    onColorChange: (Int) -> Unit,
    modifier: Modifier = Modifier
) {
   ...
   InputRow(...) {
      //...
         },
         update = { spinner ->
             spinner.setSelection(colorSpinnerPosition)
             spinner.onItemSelectedListener = SpinnerAdapter(onColorChange)
         }
      )
   }
}
- 使用您先前建立的
SpinnerAdapter,在update中設定onItemSelectedListener()回呼。
bottomsheet/ColorSpinnerRow.kt
...
@Composable
fun ColorSpinnerRow(
    colorSpinnerPosition: Int,
    onColorChange: (Int) -> Unit,
    modifier: Modifier = Modifier
) {
   ...
   InputRow(...) {
      AndroidView(
         // ...
         },
         update = { spinner ->
             spinner.setSelection(colorSpinnerPosition)
             spinner.onItemSelectedListener = SpinnerAdapter(onColorChange)
         }
      )
   }
}
顏色輪轉選單元件的程式碼現已完成。
- 新增下列公用程式函式,取得
JuiceColor的列舉索引。您將在下一個步驟中使用此項目。
private fun findColorIndex(color: String): Int {
   val juiceColor = JuiceColor.valueOf(color)
   return JuiceColor.values().indexOf(juiceColor)
}
- 在
EntryBottomSheet.kt檔案的SheetForm可組合函式中實作ColorSpinnerRow。將顏色輪轉選單置於「Description」文字之後,位於按鈕上方。
bottomsheet/EntryBottomSheet.kt
...
@Composable
fun SheetForm(
   juice: Juice,
   onUpdateJuice: (Juice) -> Unit,
   onCancel: () -> Unit,
   onSubmit: () -> Unit,
   modifier: Modifier = Modifier,
) {
   ...
   TextInputRow(
            inputLabel = stringResource(R.string.juice_description),
            fieldValue = juice.description,
            onValueChange = { description -> onUpdateJuice(juice.copy(description = description)) },
            modifier = Modifier.fillMaxWidth()
        )
        ColorSpinnerRow(
            colorSpinnerPosition = findColorIndex(juice.color),
            onColorChange = { color ->
                onUpdateJuice(juice.copy(color = JuiceColor.values()[color].name))
            }
        )
   ButtonRow(
            modifier = Modifier
                .align(Alignment.End)
                .padding(bottom = dimensionResource(R.dimen.padding_medium)),
            onCancel = onCancel,
            onSubmit = onSubmit,
            submitButtonEnabled = juice.name.isNotEmpty()
        )
    }
}
建立評分輸入內容
- 在
bottomsheet目錄中新建名為RatingInputRow.kt的檔案。 - 在
RatingInputRow.kt檔案中,新建名為RatingInputRow()的可組合函式。 - 在方法簽章中,傳遞評分的
Int、具有Int參數的回呼 (用於處理選取變更) 以及修飾符。
bottomsheet/RatingInputRow.kt
@Composable
fun RatingInputRow(rating:Int, onRatingChange: (Int) -> Unit, modifier: Modifier = Modifier){
}
- 與
ColorSpinnerRow一樣,將InputRow新增至包含AndroidView的可組合函式,如以下範例程式碼所示。
bottomsheet/RatingInputRow.kt
@Composable
fun RatingInputRow(rating:Int, onRatingChange: (Int) -> Unit, modifier: Modifier = Modifier){
    InputRow(inputLabel = stringResource(R.string.rating), modifier = modifier) {
        AndroidView(
            factory = {},
            update = {}
        )
    }
}
- 在
factorylambda 主體中,建立RatingBar類別的例項,並提供此設計所需的評分列類型。將stepSize設為1f,強制將評分限制為整數。
bottomsheet/RatingInputRow.kt
@Composable
fun RatingInputRow(rating:Int, onRatingChange: (Int) -> Unit, modifier: Modifier = Modifier){
    InputRow(inputLabel = stringResource(R.string.rating), modifier = modifier) {
        AndroidView(
            factory = { context ->
                RatingBar(context).apply {
                    stepSize = 1f
                }
            },
            update = {}
        )
    }
}
當 View 加載時,系統會設定評分。如前所述,factory 會將 RatingBar 的例項傳回至更新回呼。
- 使用傳遞至可組合函式的評分,為
updatelambda 主體中的RatingBar例項設定評分。 - 設定新的評分時,請使用
RatingBar回呼呼叫onRatingChange()回呼函式,以更新 UI 中的評分。
bottomsheet/RatingInputRow.kt
@Composable
fun RatingInputRow(rating:Int, onRatingChange: (Int) -> Unit, modifier: Modifier = Modifier){
    InputRow(inputLabel = stringResource(R.string.rating), modifier = modifier) {
        AndroidView(
            factory = { context ->
                RatingBar(context).apply {
                    stepSize = 1f
                }
            },
            update = { ratingBar ->
                ratingBar.rating = rating.toFloat()
                ratingBar.setOnRatingBarChangeListener { _, _, _ ->
                    onRatingChange(ratingBar.rating.toInt())
                }
            }
        )
    }
}
評分輸入可組合函式現已完成。
- 在
EntryBottomSheet中使用RatingInputRow()可組合函式。將其放在顏色輪轉選單後面和按鈕上方。
bottomsheet/EntryBottomSheet.kt
@Composable
fun SheetForm(
    juice: Juice,
    onUpdateJuice: (Juice) -> Unit,
    onCancel: () -> Unit,
    onSubmit: () -> Unit,
    modifier: Modifier = Modifier,
) {
    Column(
        modifier = modifier,
        verticalArrangement = Arrangement.spacedBy(4.dp)
    ) {
        ...
        ColorSpinnerRow(
            colorSpinnerPosition = findColorIndex(juice.color),
            onColorChange = { color ->
                onUpdateJuice(juice.copy(color = JuiceColor.values()[color].name))
            }
        )
        RatingInputRow(
            rating = juice.rating,
            onRatingChange = { rating -> onUpdateJuice(juice.copy(rating = rating)) }
        )
        ButtonRow(
            modifier = Modifier.align(Alignment.CenterHorizontally),
            onCancel = onCancel,
            onSubmit = onSubmit,
            submitButtonEnabled = juice.name.isNotEmpty()
        )
    }
}
建立廣告橫幅
- 在
homescreen套件中,新建名為AdBanner.kt的檔案。 - 在
AdBanner.kt檔案中,新建名為AdBanner()的可組合函式。
有別於先前建立的可組合函式,AdBanner 不需要輸入內容。因此,您不需要將其納入 InputRow 可組合函式。但它需要 AndroidView。
- 嘗試自行使用
AdView類別建構橫幅廣告。請務必將廣告大小設為AdSize.BANNER,並將廣告單元編號設為"ca-app-pub-3940256099942544/6300978111"。 - 當
AdView加載時,請使用AdRequest Builder載入廣告。
homescreen/AdBanner.kt
@Composable
fun AdBanner(modifier: Modifier = Modifier) {
    AndroidView(
        modifier = modifier,
        factory = { context ->
            AdView(context).apply {
                setAdSize(AdSize.BANNER)
                // Use test ad unit ID
                adUnitId = "ca-app-pub-3940256099942544/6300978111"
            }
        },
        update = { adView ->
            adView.loadAd(AdRequest.Builder().build())
        }
    )
}
- 將
AdBanner放在JuiceTrackerApp的JuiceTrackerList前面。JuiceTrackerList已在第 83 行宣告。
ui/JuiceTrackerApp.kt
...
AdBanner(
   Modifier
       .fillMaxWidth()
       .padding(
           top = dimensionResource(R.dimen.padding_medium),
           bottom = dimensionResource(R.dimen.padding_small)
       )
)

JuiceTrackerList(
    juices = trackerState,
    onDelete = { juice -> juiceTrackerViewModel.deleteJuice(juice) },
    onUpdate = { juice ->
        juiceTrackerViewModel.updateCurrentJuice(juice)
        scope.launch {
            bottomSheetScaffoldState.bottomSheetState.expand()
        }
     },
)
6. 取得解決方案程式碼
完成程式碼研究室後,如要下載當中用到的程式碼,您可以使用這些 git 指令:
$ git clone https://github.com/google-developer-training/basic-android-kotlin-compose-training-juice-tracker.git
$ cd basic-android-kotlin-compose-training-juice-tracker
$ git checkout compose-with-views
另外,您也可以下載存放區為 ZIP 檔案,然後解壓縮並在 Android Studio 中開啟。
如要查看解決方案程式碼,請前往 GitHub。
7. 瞭解詳情
8. 大功告成!
本課程在此結束,但您的 Android 應用程式開發之路才剛開始!
在這堂課中,您學到了使用 Jetpack Compose 建構應用程式,這是建構原生 Android 應用程式的新式 UI 工具包。您也成功在建構的應用程式中加入清單、單個或多個畫面,並設置在不同元素間移動的機制。您也學會了建立互動式應用程式,清楚該如何讓應用程式根據使用者的輸入內容做出回應並更新 UI;甚至會運用 Material Design,以各種顏色、形狀和字型排版來建立應用程式的主題。最後,您還運用了 Jetpack 和其他第三方程式庫,執行安排工作、從遠端伺服器擷取資料、在本機持續保留資料等作業。
通過修習本課程,您不僅充分瞭解了如何運用 Jetpack Compose 打造精美的回應式應用程式,也獲得了足夠的知識和技能,有能力打造高效率、可維護且富有視覺吸引力的 Android 應用程式。這些基礎知識將有助您繼續學習及培養與 Modern Android Development 和 Compose 相關的技能。
我們衷心感謝大家參與並完成本課程!建議大家可以運用更多資源來進一步學習並擴充相關技能,比如:Android 開發人員說明文件、Android 開發人員專用的 Jetpack Compose 課程、現代化 Android 應用程式的架構、Android 開發人員網誌,以及其他程式碼研究室與範例專案。
最後,別忘了在社群媒體上分享您建構的內容,並使用 #AndroidBasics 主題標記,讓我們和 Android 開發人員社群的其他成員同樣能及時掌握您的學習歷程!
祝您編寫愉快!