
1. 简介
有了 Google Pay API,用户可以使用存储在其 Google 账号中的付款信息随时随地进行付款。在本实验中,您将利用 Google Pay 的 Android 版客户端库,通过创建更快速、更便捷、更安全的体验来提升简化版示例移动应用的结账体验,从而获得更多转化并提高客户满意度。
Auto T-Shirt Shop 是一家创新型商店,它利用人工智能的最新进展,并依据款式偏好、天气、节气时令和流行趋势等信息,为您推荐最适合购买的商品。
互动相关指标的表现都超出预期。然而遗憾的是,这些数据也反映出大量用户在结账过程中放弃了购买。为了解决这个问题,该项目的一位负责人想起曾看过一段视频,其中显示 Google Pay 为其他类似网站带来了可喜的成果;因此,他们决定试一试,相信您能够顺利实现集成。
构建内容
此 Codelab 会指导您将 Google Pay 集成到现有应用中,包括确定用户是否可以使用 Google Pay 支持的付款方式进行付款、付款按钮的放置位置和设计,以及交易的执行方式。
学习内容
- 如何将 Google Pay 集成到现有应用中
- 如何在首选付款方式之间进行选择
- 如何确定用户是否已准备好使用 Google Pay 付款
所需条件
- 一台可连接互联网的计算机
- 可用于构建 Android 应用的开发环境(建议使用 Android Studio)
- 安装了最新版 Google Play 服务的 Android 设备
2. 开始
从 GitHub 克隆代码库:
使用以下命令将代码库克隆到计算机上的文件夹中:
$ git clone https://github.com/google-pay/android-quickstart
或者,如果您更愿意使用 ZIP 归档文件:
浏览示例应用
如您所见,该代码库的文件结构较为简单。此 Codelab 的主要目的是让您能够根据现有和未来的应用来调整此集成,而无需考虑您选择使用的编程语言、库或工具。
3. 将 Google Pay 集成到应用(或您自己的应用)
探索应用
完成应用的构建之后,即可使用模拟器或真实设备预览应用。建议您使用已与 Google 账号和付款方式建立关联的设备。
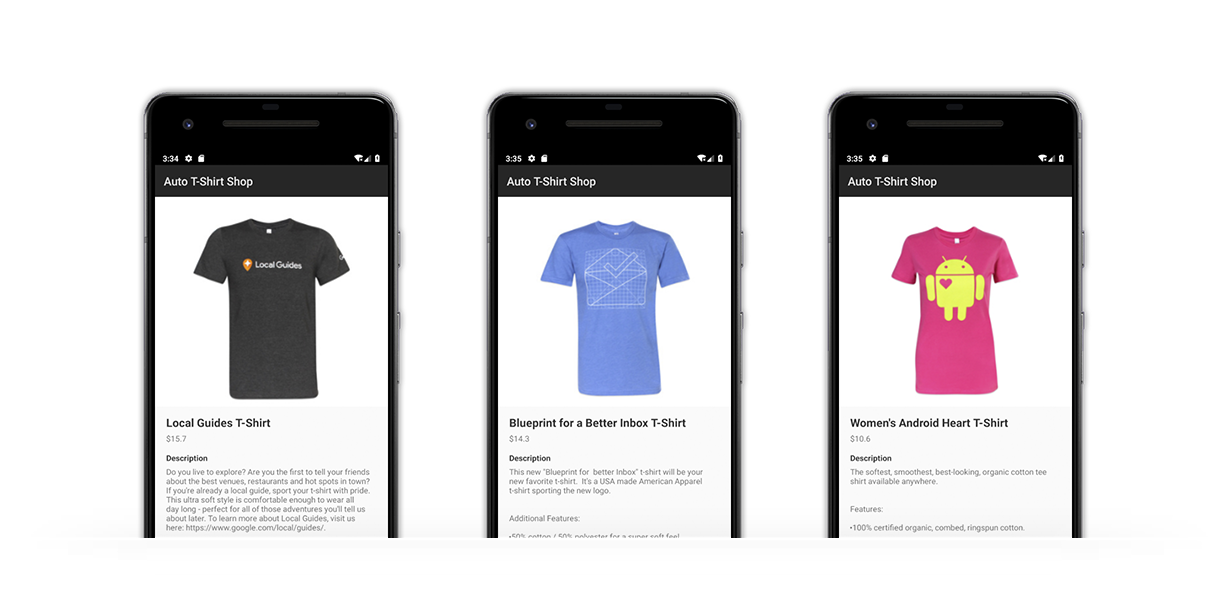
作为此 Codelab 构建基础的应用是一个演示版移动商店,使用了非常先进的机器学习模型,可以根据许多非常复杂的特点向访问者推荐一款 T 恤。现在,如果您碰巧问自己:“为什么每次重新加载网站时,这个网站都会向我推荐不同的 T 恤?”;那么好吧...,坦白来说,这个非常先进的机器学习模型只是一个随机生成器(抱歉)。
在您添加购买方式之前,此演示版商店在构建时尽可能模仿了您的现有应用或潜在应用在如今的运行方式。事实上,尽管我们建议您在此演示版应用的基础上工作,但您也可以继续使用此 Codelab,将 Google Pay 集成到您现有的应用中。
现在,如果您还没有按照现状来运行演示版应用,请立即执行该操作。
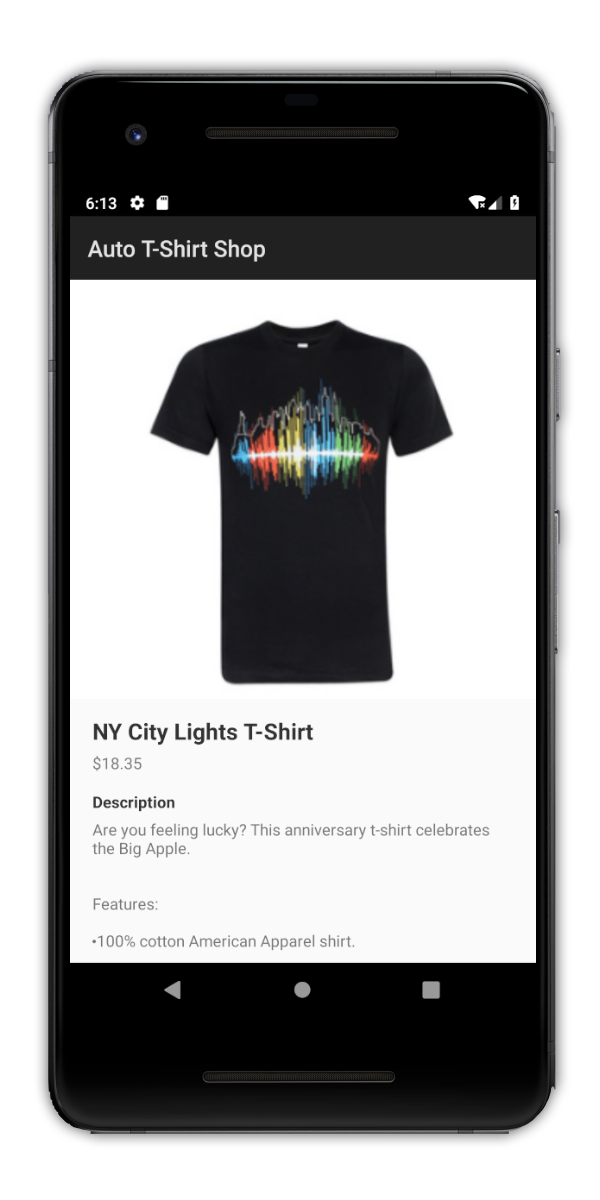
如果您能看到演示版应用:挺正常的,对吗?商品详情视图,其中包含图片、价格、说明和用于转到普通付款方式的按钮。
原则上,本实验的目标是将这套繁琐流程替换为由 Google Pay 提供支持、只需点按两次即可完成的操作体验。
让我们来规划一下吧!
为了更好地理解这种集成,我们将此流程划分成以下几个基本步骤:
- 添加必要的依赖项
- 确定是否能使用 Google Pay 付款
- 显示用于使用 Google Pay 付款的按钮
- 创建并发送付款请求
- 收集结果
4. 添加必要的依赖项
将 Google Play 服务添加到 build.gradle
要开始使用 Google Pay API,首先要做的就是在包含所需软件包的 Google Play 服务中添加相应依赖项。为此,请在应用模块的 build.gradle 文件内,将以下 implementation 项添加到 dependencies 列表中。在此 Codelab 中,此模块名为 app:
implementation "com.google.android.gms:play-services-wallet:18.0.0"
在您的清单文件中启用 API
最后,在您清单文件的 application 节点内添加一个 meta-data 元素。这将告知系统您打算使用此 API 并启用对它的访问权限:
<meta-data
    android:name="com.google.android.gms.wallet.api.enabled"
    android:value="true" />
5. 规划您的界面以及 Google Pay 按钮的显示位置
视图的布局和整体体验至关重要,这些方面会影响用户成功完成付款交易的可能性。借助 Google Pay,只需点按几下即可选择付款方式,这让您在应用中有了更加广泛的选择空间来决定在什么位置和什么时间向用户提供付款方式。例如,您可以在流程的早期阶段,在诸如商品详情视图这样的区域中,添加快速结账选项,以便用户快速地为他们喜欢的商品付款。
在确定如何安排界面和导航后,下一步是放置一个触发使用 Google Pay 来进行付款交易的按钮。此按钮的样式应符合一系列准则,以确保用户在应用中看到该按钮会感到一致和熟悉:
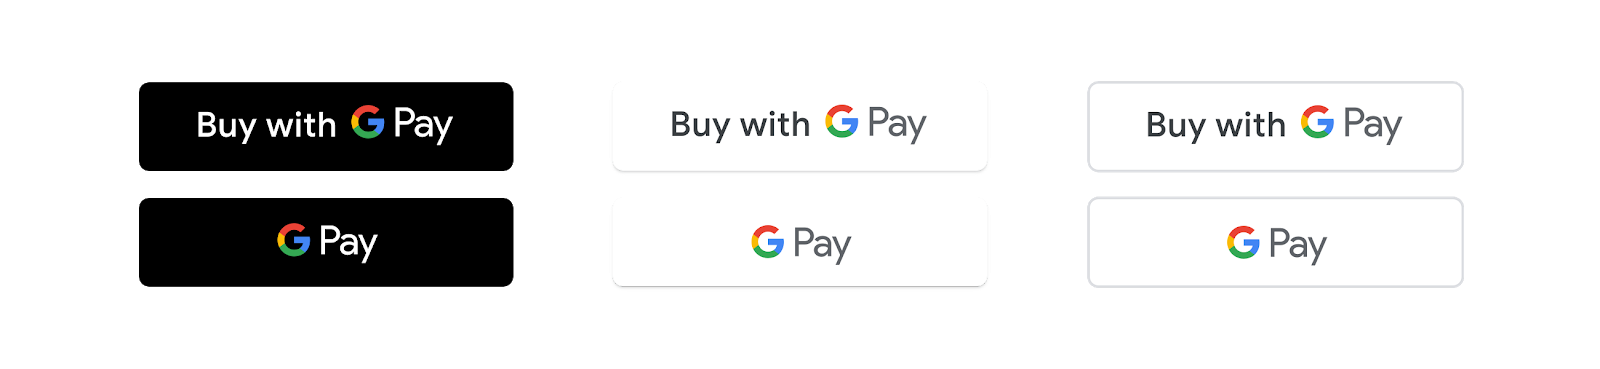
为了让您更轻松地完成这项工作,我们已将所有可用选项打包在一起,涵盖了不同的分辨率和语言区域,并可供下载。此软件包包含 layout、drawable 和 values 资源,您可以直接将其粘贴到项目中。
您可以在 layout 目录下找到需要添加到视图定义 (activity_checkout.xml) 的资源。要将其添加到您的视图中,只需使用 include 元素将其放置在所需位置即可:
<include
    android:id="@+id/googlePayButton"
    layout="@layout/buy_with_googlepay_button"
    android:layout_width=<your_width_dimension>
    android:layout_height="@dimen/buy_button_height"
    android:visibility="gone"/>
6. 初始化和配置 Google Pay API
实例化 API 客户端
要开始使用 API,您需要实例化一个客户端对象,用于调用 Google Pay API。您可以在创建 activity 后立即进行实例化:
private lateinit var paymentsClient: PaymentsClient

override fun onCreate(savedInstanceState: Bundle?) {
    super.onCreate(savedInstanceState)
    setContentView(R.layout.activity_checkout)

    paymentsClient = createPaymentsClient(this)
}

fun createPaymentsClient(activity: Activity): PaymentsClient {
    val walletOptions = Wallet.WalletOptions.Builder()
            .setEnvironment(WalletConstants.ENVIRONMENT_TEST).build()
    return Wallet.getPaymentsClient(activity, walletOptions)
}
使用 WalletOptions 对象来初始化付款客户端。通过将环境设置为 ENVIRONMENT_TEST,您可以在整个集成过程中使用虚拟付款信息进行实验。在准备好创建支持真实交易的操作后,您可以将环境属性更新为 ENVIRONMENT_PRODUCTION。
框架
您每次与 Google Pay API 通信时,都需要在请求中包含一些配置参数,例如您的 API 目标版本。对于本 Codelab,此对象还会包含与应用接受的付款方式有关的信息。最终的结构如下所示:
{
    apiVersion: number,
    apiVersionMinor: number,
    allowedPaymentMethods: Array
}
属性 allowedPaymentMethods 将获取一个付款方式列表。对于每种付款方式,您都必须包含以下属性:
{
    type: 'CARD',
    parameters: {
        allowedCardNetworks: Array.<string>,
        allowedAuthMethods: Array.<string>
    }
}
除了 type 和 parameters 之外,您后续还需要添加 tokenizationSpecification 属性,此属性虽然在确定相关用户是否能使用 Google Pay 付款时不是必需的,但 PaymentDataRequest 调用将使用它来定义如何处理与所选付款方式相关的数据。不过,我们一步一步来。
付款方式配置
在本示例中,您将只接受 Mastercard 和 Visa 银行卡付款,可以是标记化的形式,也可以是主账号 (PAN) 的形式。您的付款方式如下所示:
private val baseCardPaymentMethod = JSONObject().apply {
    put("type", "CARD")
    put("parameters", JSONObject().apply {
        put("allowedCardNetworks", JSONArray(listOf("VISA", "MASTERCARD")))
        put("allowedAuthMethods", JSONArray(listOf("PAN_ONLY", "CRYPTOGRAM_3DS")))
    })
}
两种方式对比
我们来回顾一下。
您已定义了一个要在应用中接受的付款方式,接下来将使用 API 的 2.0 版本。生成的配置如下所示:
private val baseCardPaymentMethod = JSONObject().apply {
    put("type", "CARD")
    put("parameters", JSONObject().apply {
        put("allowedCardNetworks", JSONArray(listOf("VISA", "MASTERCARD")))
        put("allowedAuthMethods", JSONArray(listOf("PAN_ONLY", "CRYPTOGRAM_3DS")))
    })
}

private val googlePayBaseConfiguration = JSONObject().apply {
    put("apiVersion", 2)
    put("apiVersionMinor", 0)
    put("allowedPaymentMethods",  JSONArray().put(baseCardPaymentMethod))
}
现在,基础配置已准备就绪,接下来让我们开始有趣的环节。
7. 确定是否能使用 Google Pay 付款
Google Pay 的主要目标之一是为用户提供更快速、更便捷的结账体验。这不仅适用于用户能够使用 Google Pay 结账的情况,也适用于用户无法使用 Google Pay 结账的情况。借助 isReadyToPay 请求,您可以确定是否能使用 Google Pay 付款,并有机会据此修改网站体验。
您的用户是否能使用 Google Pay 付款?
首先,您需要检查即将在应用中付款的特定用户是否能使用 Google Pay 付款。您必须在此请求中指定 Google Pay API 的版本和网站允许的付款方式。这正是上一步中定义的基本配置对象的内容:
val readyToPayRequest =
        IsReadyToPayRequest.fromJson(googlePayBaseConfiguration.toString())

val readyToPayTask = paymentsClient.isReadyToPay(readyToPayRequest)
task.addOnCompleteListener { task ->
    try {
        task.getResult(ApiException::class.java)?.let(::setGooglePayAvailable)
    } catch (exception: ApiException) {
        // Error determining readiness to use Google Pay.
        // Inspect the logs for more details.
    }
}
如您所见,如果调用返回失败响应,则您无需在 Google Pay 环境中采取进一步的操作。在这种情况下,下一步最应该做的是显示支持其他付款方式的其他界面。
另一方面,如果响应成功,您就可以让用户享受使用 Google Pay 带来的便利;因此,您可以继续操作并显示 Google Pay 按钮,以在用户进行操作(例如:点击按钮)时启动付款流程。
显示用于使用 Google Pay 付款的按钮
此时,您可以继续操作,让 Google Pay 按钮重新显示:
private fun setGooglePayAvailable(available: Boolean) {
    if (available) {
        googlePayButton.visibility = View.VISIBLE
        googlePayButton.setOnClickListener { requestPayment() }
    } else {
       // Unable to pay using Google Pay. Update your UI accordingly.
    }
}

private fun requestPayment() {
  // TODO: Perform transaction
}
请注意,您还定义了一个用于处理按钮点击事件的函数。在下一部分中,您将使用此函数来请求付款方式。
8. 可以付款了!
准备付款请求
此时,您已加载 Google Pay API 并确定应用中的用户可以使用 Google Pay 进行付款。因此,您已在界面中显示 Google Pay 付款按钮,且用户现在可以发起交易了。接下来是加载付款表格,其中包含不同登录用户可用的付款方式。
与之前在定义 isReadyToPay 请求的过程中所做的一样,此调用还需要之前定义的基本配置对象中的属性(apiVersion、apiVersionMinor 和 allowedPaymentMethods)以及一些新属性。这一次,您的付款方式中增加了一个名为 tokenizationSpecification 的新属性,以及只与此请求的目的相关的其他 parameters。此外,还需要添加 transactionInfo 和 merchantInfo。
在付款方式中添加其他必需信息
首先,请创建之前使用的基本银行卡付款方式的副本。此银行卡付款方式现在需要 tokenizationSpecification 属性来定义如何处理与所选付款方式相关的数据,以及实际交易所需的其他数据要求:在此示例中,需要提供完整的账单邮寄地址和电话号码。
tokenizationSpecification 属性
标记化规范决定了系统如何处理您的用户选择的付款方式,以及如何使用付款方式完成交易。
系统支持两种不同类型的处理策略。如果您要在符合 PCI DSS 标准的服务器中处理付款交易,请使用 DIRECT 规范类型。在此示例中,您使用支付网关处理付款,因此需要设置 PAYMENT_GATEWAY 规范类型。标记化规范将如下所示:
private val tokenizationSpecification = JSONObject().apply {
    put("type", "PAYMENT_GATEWAY")
    put("parameters", JSONObject(mapOf(
            "gateway" to "example",
            "gatewayMerchantId" to "exampleGatewayMerchantId")))
}
在 parameters 部分,您可以从 Google Pay API 支持的提供商列表中指定网关,以及每个网关所需的其他配置。根据本实验的目标,使用 example 网关即可满足需求,它会为所执行的交易生成测试结果。
其他参数
同样,您现在可以更详细地指定您需要请求的信息,以便成功完成交易。请留意在此示例中,您需要添加 billingAddressRequired 和 billingAddressParameters 属性,以指明在此次交易中,用户的账单邮寄地址必须是完整的并且包含电话号码。
private val cardPaymentMethod = JSONObject().apply {
    put("type", "CARD")
    put("tokenizationSpecification", tokenizationSpecification)
    put("parameters", JSONObject().apply {
        put("allowedCardNetworks", JSONArray(listOf("VISA", "MASTERCARD")))
        put("allowedAuthMethods", JSONArray(listOf("PAN_ONLY", "CRYPTOGRAM_3DS")))
        put("billingAddressRequired", true)
        put("billingAddressParameters", JSONObject(mapOf("format" to "FULL")))
    })
}
添加交易相关信息
transactionInfo 属性包含一个对象,其中包含有关交易的财务详细信息,即价格和货币代码(ISO 4217 alpha 格式)以及价格状态(可以是 final 或 estimated,具体取决于交易的性质,例如:价格可能会因指定的送货地址而异):
private val transactionInfo = JSONObject().apply {
    put("totalPrice", "123.45")
    put("totalPriceStatus", "FINAL")
    put("currencyCode", "USD")
}
添加商家相关信息
付款请求会在 merchantInfo 属性下获取执行该请求的商家的相关信息。在此 Codelab 中,我们将重点关注以下两个属性:
merchantId是应用获得 Google 批准以在生产环境中运行后,与您的账号关联的 ID。您可以在 Google Pay 商家控制台中的账号下获取商家 ID。请注意,在使用TEST环境时,系统不会评估此属性。merchantName是应用或组织的用户可见名称。此名称可能显示在 Google Pay 付款表格内,以便向用户提供与请求该操作的主体有关的更多信息。
准备就绪后,只需将商家的相关信息添加到 paymentDataRequest 对象即可:
private val merchantInfo = JSONObject().apply {
    put("merchantName", "Example Merchant")
    put("merchantId", "01234567890123456789")
}
请求付款信息并处理结果
现在,将先前定义的配置合并到最终对象中,并将其传递给 loadPaymentData 请求:
private val paymentDataRequestJson = JSONObject(googlePayBaseConfiguration.toString()).apply {
    put("allowedPaymentMethods", JSONArray().put(cardPaymentMethod))
    put("transactionInfo", transactionInfo)
    put("merchantInfo", merchantInfo)
}
此时,您已具备请求 Google Pay API 提供有效付款方式所需的一切条件。为此,请在 PaymentsClient 对象中使用 loadPaymentData 方法,并传递到您刚刚定义的配置中:
val paymentDataRequest =
        PaymentDataRequest.fromJson(paymentDataRequestJson.toString())

AutoResolveHelper.resolveTask(
        paymentsClient.loadPaymentData(paymentDataRequest),
        this, LOAD_PAYMENT_DATA_REQUEST_CODE)
调用此方法会触发 Google Pay 付款表格的显示。如果没有配置错误,您就能看到与当前登录账号关联的有效付款方式的列表。
用户选择付款方式后,该表格即会关闭,而结果将发送回 activity 并通过 onActivityResult 方法将其捕获:
public override fun onActivityResult(requestCode: Int, resultCode: Int, data: Intent) {
    when (requestCode) {
        LOAD_PAYMENT_DATA_REQUEST_CODE -> {
            when (resultCode) {
                Activity.RESULT_OK ->
                    PaymentData.getFromIntent(data)?.let(::handlePaymentSuccess)

                Activity.RESULT_CANCELED -> {
                    // The user cancelled without selecting a payment method.
                }

                AutoResolveHelper.RESULT_ERROR -> {
                    AutoResolveHelper.getStatusFromIntent(data)?.let {
                        handleError(it.statusCode)
                    }
                }
            }
        }
    }
}
如果用户成功选择付款方式,系统将使用包含所选付款方式相关信息的 PaymentData 对象实现该结果:
{
  "apiVersionMinor": 0,
  "apiVersion": 2,
  "paymentMethodData": {
    "description": "Visa •••• 1234",
    "tokenizationData": {
      "type": "PAYMENT_GATEWAY",
      "token": "examplePaymentMethodToken"
    },
    "type": "CARD",
    "info": {
      "cardNetwork": "VISA",
      "cardDetails": "1234",
      "billingAddress": {
        "phoneNumber": ...,
        ...
      }
    }
  }
}
现在,您可以使用此付款方式信息执行实际交易。
private fun handlePaymentSuccess(paymentData: PaymentData) {
    val paymentMethodToken = paymentData
            .getJSONObject("tokenizationData")
            .getString("token")

    // Sample TODO: Use this token to perform a payment through your payment gateway
}
9. 恭喜!
您已成功将 Google Pay API 集成到自己的应用中。
现在,为将其投入生产环境,请务必查看集成核对清单。完成并经过审核之后,您会收到商家 ID (merchantId),以便添加到您的客户端配置中。同样,如果您计划使用(或已在使用)第三方付款处理方或网关,请在 Google Pay 上查看支持的提供商列表并配置您的提供商。如果您要直接与 Google Pay 集成,请参阅与本主题相关的文档部分。
所学内容
- 在您的应用中导入并配置 Google API。
- 确定对该 API 的支持情况,并据此采取相应措施。
- 添加一个按钮,以便用户通过 Google Pay 付款。
- 加载并处理之前存储的用户付款信息。
后续步骤
- 在实际应用中测试 Google Pay(如果您尚未这样做)。
- 在 Google Pay 商家控制台上获取商家 ID。
- 查看集成核对清单。
- 查看两种不同类型的集成,并确定哪种集成更适合您:直接集成,还是使用支付网关或处理方。
了解详情
- 查看库参考文档。
- 如果您发现了错误,请排查实现问题。
- 详细了解如何在 Android 上集成 Google Pay。