您应当已熟悉以下编程术语:
- 类是指对象的蓝图。例如,
Aquarium类是指用于创建Aquarium对象的蓝图。 - 对象是指类的实例;一个水族箱对象是存储在内存中的一个实际
Aquarium。 - 属性是指类的特征,例如
Aquarium的长度、宽度和高度。 - 方法(也称为成员函数)是指类的功能。方法是指您可以对对象“执行”的操作。例如,您可以对
Aquarium执行fillWithWater()操作。 - 接口是指类可以实现的规范。例如,清洁对于水族箱以外的其他对象十分常见,并且对于不同的对象,清洁通常都以类似的方式进行。因此,您可以设置一个名为
Clean的接口,用于定义clean()方法。Aquarium类可以实现Clean接口,以使用软海绵清洁水族箱。 - 软件包是指一种用于将相关代码分组以使其井然有序或构建代码库的方式。创建软件包后,您就可以使用
import直接引用该软件包中的类。
在此任务中,您将创建一个新的软件包和一个包含某些属性及一种方法的类。
第 1 步:创建一个软件包
利用软件包可以使代码保持井然有序。
- 在 Project 窗格的 Hello Kotlin 项目下,右键点击 src > main > kotlin 文件夹。
- 依次选择 New > Package,并将其命名为
example.myapp。
第 2 步:创建一个具有某些属性的类
类使用关键字 class 定义,按照惯例,类名称以大写字母开头。
- 右键点击 example.myapp 软件包。
- 依次选择 New > Kotlin File / Class。
- 在 Kind 下,选择 Class,并将此类命名为
Aquarium。IntelliJ IDEA 会在文件中包含软件包名称,并创建一个空的Aquarium类。 - 在
Aquarium类中,定义并初始化宽度、高度和长度(以厘米为单位)的var属性。使用默认值初始化属性。
package example.myapp

class Aquarium {
    var width: Int = 20
    var height: Int = 40
    var length: Int = 100
}
在后台,Kotlin 会自动为您在 Aquarium 类中定义的属性创建 getter 和 setter,以便您可以直接访问这些属性,例如 myAquarium.length。
第 3 步:创建一个 main() 函数
创建一个名为 Main.kt 的新文件来保存 main() 函数。
- 在左侧的 Project 窗格中,右键点击 example.myapp 软件包。
- 依次选择 New > Kotlin File / Class。
- 在 Kind 下拉列表中,将选项保存为 File,并将此文件命名为
Main.kt。IntelliJ IDEA 会包含软件包名称,但不包含文件的类定义。 - 定义
buildAquarium()函数,并在其中创建一个Aquarium实例。如需创建实例,请引用类,就像将其用作函数Aquarium()一样。这会调用该类的构造函数,并创建Aquarium类的实例,与在其他语言中使用新的keyword类似。 - 定义
main()函数并调用buildAquarium()。
package example.myapp

fun buildAquarium() {
    val myAquarium = Aquarium()
}

fun main() {
    buildAquarium()
}
第 4 步:添加一种方法
- 在
Aquarium类中,添加一种用于输出水族箱尺寸属性的方法。
    fun printSize() {
        println("Width: $width cm " +
                "Length: $length cm " +
                "Height: $height cm ")
    }
- 在
Main.kt中的buildAquarium()内,对myAquarium调用printSize()方法。
fun buildAquarium() {
    val myAquarium = Aquarium()
    myAquarium.printSize()
}
- 点击
main()函数旁边的绿色三角形以运行程序,并观察结果。
⇒ Width: 20 cm Length: 100 cm Height: 40 cm
- 在
buildAquarium()中,添加代码以将高度设置为 60,并输出更改后的尺寸属性。
fun buildAquarium() {
    val myAquarium = Aquarium()
    myAquarium.printSize()
    myAquarium.height = 60
    myAquarium.printSize()
}
- 运行程序并观察输出结果。
⇒ Width: 20 cm Length: 100 cm Height: 40 cm
Width: 20 cm Length: 100 cm Height: 60 cm
在此任务中,您将为类创建一个构造函数,并继续使用属性。
第 1 步:创建一个构造函数
在此步骤中,您将向在第一个任务中创建的 Aquarium 类添加一个构造函数。在前面的示例中,Aquarium 的每个实例都是使用相同的尺寸创建的。创建实例后,您可以通过设置属性来更改实例的尺寸,但是从一开始就使用正确的尺寸创建实例会更加简单。
在某些编程语言(如 Java)中,构造函数是通过在类中创建与类同名的方法定义的。在 Kotlin 中,您可以直接在类声明中定义构造函数,在圆括号内指定参数,就像该类是一种方法一样。至于 Kotlin 中的函数,这些参数也可以包含默认值。
- 在您之前创建的
Aquarium类中,更改类定义以包含三个具有length、width和height默认值的构造函数参数,并将它们赋予相应的属性。
class Aquarium(length: Int = 100, width: Int = 20, height: Int = 40) {
   // Dimensions in cm
   var length: Int = length
   var width: Int = width
   var height: Int = height
...
}
- 更紧凑的 Kotlin 方法是使用
var或val通过该构造函数直接定义属性,并且 Kotlin 还会自动创建 getter 和 setter。然后,您可以移除该类正文中的属性定义。
class Aquarium(var length: Int = 100, var width: Int = 20, var height: Int = 40) {
...
}
- 使用该构造函数创建
Aquarium对象时,您可以不指定任何参数并获取默认值,也可以仅指定部分参数或指定全部参数并创建完全自定义大小的Aquarium。在buildAquarium()函数中,尝试以不同方式使用命名参数创建Aquarium对象。
fun buildAquarium() {
    val aquarium1 = Aquarium()
    aquarium1.printSize()
    // default height and length
    val aquarium2 = Aquarium(width = 25)
    aquarium2.printSize()
    // default width
    val aquarium3 = Aquarium(height = 35, length = 110)
    aquarium3.printSize()
    // everything custom
    val aquarium4 = Aquarium(width = 25, height = 35, length = 110)
    aquarium4.printSize()
}
- 运行程序并观察输出结果。
⇒ Width: 20 cm Length: 100 cm Height: 40 cm
Width: 25 cm Length: 100 cm Height: 40 cm
Width: 20 cm Length: 110 cm Height: 35 cm
Width: 25 cm Length: 110 cm Height: 35 cm
请注意,您不必重载构造函数并为上述每种案例(以及其他组合的一些其他案例)分别编写一个不同的版本。Kotlin 会根据默认值和命名参数创建所需内容。
第 2 步:添加 init 块
上面的示例构造函数仅声明属性并为其赋予表达式的值。如果您的构造函数需要更多初始化代码,您可以将其放在一个或多个 init 块中。在此步骤中,您将向 Aquarium 类添加一些 init 块。
- 在
Aquarium类中,添加init块以输出对象正在初始化,并添加第二个init块以输出水族箱的体积(以升为单位)。请注意,init块可以包含多个语句。
class Aquarium (var length: Int = 100, var width: Int = 20, var height: Int = 40) {
    init {
        println("aquarium initializing")
    }
    init {
        // 1 liter = 1000 cm^3
        println("Volume: ${width * length * height / 1000} liters")
    }
    ...
}
- 运行程序并观察输出结果。
aquarium initializing
Volume: 80 liters
Width: 20 cm Length: 100 cm Height: 40 cm
aquarium initializing
Volume: 100 liters
Width: 25 cm Length: 100 cm Height: 40 cm
aquarium initializing
Volume: 77 liters
Width: 20 cm Length: 110 cm Height: 35 cm
aquarium initializing
Volume: 96 liters
Width: 25 cm Length: 110 cm Height: 35 cm
请注意,系统会按照 init 块在类定义中显示的顺序执行这些块,并在调用构造函数时执行所有这些块。
第 3 步:了解次构造函数
在此步骤中,您将了解次构造函数,并将其中一个次构造函数添加到类中。除可以具有一个或多个 init 块的主构造函数外,Kotlin 类还可以具有一个或多个次构造函数。此功能允许构造函数重载,即允许构造函数具有不同的参数。
- 在
Aquarium类中,使用constructor关键字添加将鱼类数量作为其参数的次构造函数。根据鱼类数量,为水族箱的计算体积(以升为单位)创建val水箱属性。假设每条鱼 2 升 (2000 cm^3) 水,并且额外预留一些空间,这样水就不会溢出了。
constructor(numberOfFish: Int) : this() {
    // 2,000 cm^3 per fish + extra room so water doesn't spill
    val tank = numberOfFish * 2000 * 1.1
}
- 在次构造函数中,确保长度和宽度(在主构造函数中设置)相同,并计算使水箱达到给定体积所需的高度。
    // calculate the height needed
    height = (tank / (length * width)).toInt()
- 在
buildAquarium()函数中,添加调用以使用新的次构造函数创建Aquarium。输出尺寸和体积。
fun buildAquarium() {
    val aquarium6 = Aquarium(numberOfFish = 29)
    aquarium6.printSize()
    println("Volume: ${aquarium6.width * aquarium6.length * aquarium6.height / 1000} liters")
}
- 运行程序并观察输出结果。
⇒ aquarium initializing
Volume: 80 liters
Width: 20 cm Length: 100 cm Height: 31 cm
Volume: 62 liters
请注意,体积将被输出两次,一次在次构造函数执行之前由主构造函数中的 init 块输出,另一次由 buildAquarium() 中的代码输出。
此外,您还可以在主构造函数中添加 constructor 关键字,但在大多数情况下并不需要这样做。
第 4 步:添加一个新属性 getter
在此步骤中,您将添加一个显式属性 getter。Kotlin 会在您定义属性时自动定义 getter 和 setter。但是,有时需要调整或计算某个属性的值。例如,在上面的示例中,您输出了 Aquarium 的体积。您可以通过为该体积定义变量和 getter,使该体积可以用作属性。由于需要计算 volume,因此 getter 需要返回计算得出的值,您可以使用紧跟在属性名称和类型后面的单行函数来实现这一点。
- 在
Aquarium类中,定义一个名为volume的Int属性,并在下一行中定义get()方法来计算体积。
val volume: Int
    get() = width * height * length / 1000  // 1000 cm^3 = 1 liter
- 移除用于输出体积的
init块。 - 移除
buildAquarium()中用于输出体积的代码。 - 在
printSize()方法中,添加一行来输出体积。
fun printSize() {
    println("Width: $width cm " +
            "Length: $length cm " +
            "Height: $height cm "
    )
    // 1 liter = 1000 cm^3
    println("Volume: $volume liters")
}
- 运行程序并观察输出结果。
⇒ aquarium initializing
Width: 20 cm Length: 100 cm Height: 31 cm
Volume: 62 liters
尺寸和体积和之前一样,但仅在通过主构造函数和次构造函数完全初始化对象后,系统才会输出一次体积。
第 5 步:添加一个属性 setter
在此步骤中,您将为体积创建一个新属性 setter。
- 在
Aquarium类中,将volume更改为var,以便可以进行多次设置。 - 通过在 getter 下面添加
set()方法,为volume属性添加 setter,这会根据提供的水量重新计算高度。按照惯例,setter 参数的名称是value,但您可以根据需要进行更改。
var volume: Int
    get() = width * height * length / 1000
    set(value) {
        height = (value * 1000) / (width * length)
    }
- 在
buildAquarium()中,添加代码以将水族箱的体积设置为 70 升。输出新尺寸。
fun buildAquarium() {
    val aquarium6 = Aquarium(numberOfFish = 29)
    aquarium6.printSize()
    aquarium6.volume = 70
    aquarium6.printSize()
}
- 再次运行该程序,并观察更改后的高度和体积。
⇒ aquarium initialized
Width: 20 cm Length: 100 cm Height: 31 cm
Volume: 62 liters
Width: 20 cm Length: 100 cm Height: 35 cm
Volume: 70 liters
截至目前为止,代码中始终不存在可见性修饰符,如 public 或 private。这是因为,默认情况下,Kotlin 中的所有内容都是公开的,这意味着用户可以在任何位置访问所有内容,包括类、方法、属性和成员变量。
在 Kotlin 中,类、对象、接口、构造函数、函数、属性及其 setter 可以具有可见性修饰符:
private意味着将仅在该类(或源文件,如果您使用函数)中可见。protected与private一样,但还将对任何子类可见。internal意味着它将仅在该模块中可见。模块是一组编译在一起的 Kotlin 文件,例如 IntelliJ 项目中的库、客户端或应用、服务器应用。请注意,此处所提及“模块”的用法与 Java 9 中引入的 Java 模块无关。public意味着在该类外可见。默认情况下,所有内容(包括该类的变量和方法)都是公开的。
如需了解详情,请参阅 Kotlin 文档中的可见性修饰符。
成员变量
默认情况下,类中的属性或成员变量是 public。如果您使用 var 定义这些属性或成员变量,它们是可变的,即可读写。如果您使用 val 定义这些属性或成员变量,在初始化后,它们是只读的。
如果您希望您的代码可以读取或写入某个属性,但外部代码只能读取该属性,您可以将该属性及其 getter 保留为公开,并将 setter 声明为不公开,如下所示。
var volume: Int
    get() = width * height * length / 1000
    private set(value) {
        height = (value * 1000) / (width * length)
    }
在此任务中,您将了解子类和继承在 Kotlin 中的运作方式,与您在其他语言中看到的类似,但又有一些区别。
在 Kotlin 中,默认情况下,类无法被子类化。您必须将某个类标记为 open 才能对其进行子类化。在这些子类中,您还必须将属性和成员变量标记为 open,以便在子类中替换它们。必须提供 open 关键字,以防意外泄露作为类定义的一部分的实现详情。
第 1 步:将 Aquarium 类设置为公开
在此步骤中,您将 Aquarium 类设置为 open,以便在下一步中替换该类。
- 使用
open关键字标记Aquarium类及其所有属性。
open class Aquarium (open var length: Int = 100, open var width: Int = 20, open var height: Int = 40) {
    open var volume: Int
        get() = width * height * length / 1000
        set(value) {
            height = (value * 1000) / (width * length)
        }
- 添加一个开放性
shape属性,其具有值"rectangle"。
open val shape = "rectangle"
- 添加一个开放性
water属性,其具有返回Aquarium体积的 90% 的 getter。
    open var water: Double = 0.0
        get() = volume * 0.9
- 将代码添加到
printSize()方法以输出形状和水量(以体积的百分比表示)。
fun printSize() {
    println(shape)
    println("Width: $width cm " +
            "Length: $length cm " +
            "Height: $height cm ")
    // 1 l = 1000 cm^3
    println("Volume: $volume liters Water: $water liters (${water / volume * 100.0}% full)")
}
- 在
buildAquarium()中,更改代码以使用width = 25、length = 25和height = 40创建Aquarium。
fun buildAquarium() {
    val aquarium6 = Aquarium(length = 25, width = 25, height = 40)
    aquarium6.printSize()
}
- 运行程序并观察新输出结果。
⇒ aquarium initializing
rectangle
Width: 25 cm Length: 25 cm Height: 40 cm
Volume: 25 liters Water: 22.5 liters (90.0% full)
第 2 步:创建一个子类
- 创建一个名为
TowerTank的Aquarium的子类,用于实现圆柱形水箱,而不是矩形水箱。您可以在Aquarium下面添加TowerTank,因为您可以在与Aquarium类相同的文件中添加其他类。 - 在
TowerTank中,替换在构造函数中定义的height属性。如需替换属性,请在子类中使用override关键字。
- 使
TowerTank的构造函数采用diameter。调用Aquarium父类中的构造函数时,请将diameter同时用于length和width。
class TowerTank (override var height: Int, var diameter: Int): Aquarium(height = height, width = diameter, length = diameter) {
- 替换体积属性以计算圆柱形。圆柱形的计算公式是圆周率 (PI) 乘以半径的平方再乘以高度。请注意,IntelliJ 可能会将 PI 标记为未定义。您需要从
Main.kt顶部的java.lang.Math导入常量PI。
    override var volume: Int
    // ellipse area = π * r1 * r2
    get() = (width/2 * length/2 * height / 1000 * PI).toInt()
    set(value) {
        height = ((value * 1000 / PI) / (width/2 * length/2)).toInt()
    }
- 在
TowerTank中,替换water属性,使其占体积的 80%。
override var water = volume * 0.8
- 将
shape替换为"cylinder"。
override val shape = "cylinder"
- 最终
TowerTank类应该如以下代码所示。
Aquarium.kt:
package example.myapp

import java.lang.Math.PI

... // existing Aquarium class

class TowerTank (override var height: Int, var diameter: Int): Aquarium(height = height, width = diameter, length = diameter) {
    override var volume: Int
    // ellipse area = π * r1 * r2
    get() = (width/2 * length/2 * height / 1000 * PI).toInt()
    set(value) {
        height = ((value * 1000 / PI) / (width/2 * length/2)).toInt()
    }

    override var water = volume * 0.8
    override val shape = "cylinder"
}
- 在
buildAquarium()中,创建一个直径为 25 厘米、高度为 45 厘米的TowerTank。输出尺寸。
Main.kt:
package example.myapp

fun buildAquarium() {
    val myAquarium = Aquarium(width = 25, length = 25, height = 40)
    myAquarium.printSize()
    val myTower = TowerTank(diameter = 25, height = 40)
    myTower.printSize()
}
- 运行程序并观察输出结果。
⇒ aquarium initializing
rectangle
Width: 25 cm Length: 25 cm Height: 40 cm
Volume: 25 liters Water: 22.5 liters (90.0% full)
aquarium initializing
cylinder
Width: 25 cm Length: 25 cm Height: 40 cm
Volume: 18 liters Water: 14.4 l (80.0% full)
有时,需要定义在一些相关类中共享的共有行为或属性。Kotlin 提供接口和抽象类这两种方法来实现这一点。在此任务中,您将为所有鱼类共有的属性创建一个抽象的 AquariumFish 类。创建一个名为 FishAction 的接口来定义所有鱼类共有的行为。
- 抽象类和接口都无法进行实例化。抽象类可以具有构造函数。
- 由于接口不是类,因此不能包含任何构造函数逻辑。
- 接口无法存储任何状态。
第 1 步:创建一个抽象类
- 在 example.myapp 下,创建一个新文件
AquariumFish.kt。 - 创建一个类(也称为
AquariumFish),并将其标记为abstract。 - 添加一个
String属性color,并将其标记为abstract。
package example.myapp

abstract class AquariumFish {
    abstract val color: String
}
- 创建
AquariumFish、Shark和Plecostomus的两个子类。 - 由于
color是抽象类,因此子类必须实现它。将Shark设为灰色,并将Plecostomus设为金色。
class Shark: AquariumFish() {
    override val color = "grey"
}

class Plecostomus: AquariumFish() {
    override val color = "gold"
}
- 在 Main.kt 中,创建一个
makeFish()函数来测试类。实例化Shark和Plecostomus,然后输出它们的颜色。 - 删除
main()中较早的测试代码,并添加对makeFish()的调用。您的代码应该如以下代码所示。
Main.kt:
package example.myapp

fun makeFish() {
    val shark = Shark()
    val pleco = Plecostomus()

    println("Shark: ${shark.color}")
    println("Plecostomus: ${pleco.color}")
}

fun main () {
    makeFish()
}
- 运行程序并观察输出结果。
⇒ Shark: grey
Plecostomus: gold
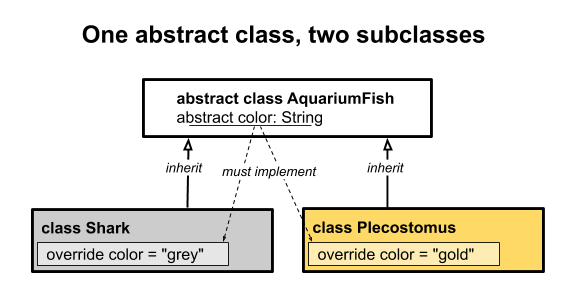
下图所示为应用的类层次结构。Shark 类和 Plecostomus 类都是抽象类 AquariumFish 的子类。

第 2 步:创建一个接口
- 在 AquariumFish.kt 中,使用方法
eat()创建一个名为FishAction的接口。
interface FishAction  {
    fun eat()
}
- 向每个子类添加
FishAction,并通过它输出鱼类的行为实现eat()。
class Shark: AquariumFish(), FishAction {
    override val color = "grey"
    override fun eat() {
        println("hunt and eat fish")
    }
}

class Plecostomus: AquariumFish(), FishAction {
    override val color = "gold"
    override fun eat() {
        println("eat algae")
    }
}
- 在 Main.kt 中的
makeFish()函数中,通过调用eat()让您创建的每条鱼吃东西。
fun makeFish() {
    val shark = Shark()
    val pleco = Plecostomus()
    println("Shark: ${shark.color}")
    shark.eat()
    println("Plecostomus: ${pleco.color}")
    pleco.eat()
}
- 运行程序并观察输出结果。
⇒ Shark: grey
hunt and eat fish
Plecostomus: gold
eat algae
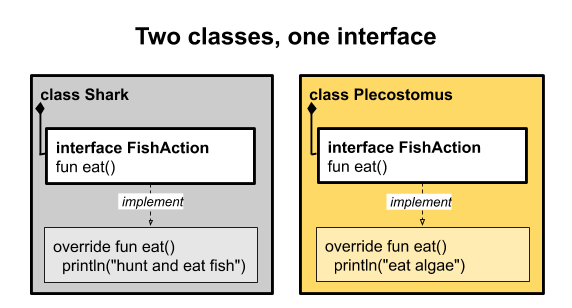
下图所示为 Shark 类和 Plecostomus 类,这两个类都会实现 FishAction 接口。

抽象类与接口的使用条件
上面的示例很简单,但当您拥有大量相互关联的类时,抽象类和接口可帮助您保持设计更简洁有序、更易于维护。
如上所述,抽象类可以具有构造函数,而接口不能,除此之外两者非常相似。两者的使用条件是什么?
当您使用接口设计类时,该类的功能将通过其实现的接口中的方法进行扩展。与从抽象类继承相比,使用接口中定义的特征往往会使代码更易于重用和理解。此外,您可以在一个类中实现多个接口,但只能从一个类创建子类。一般来讲,在可能的情况下,与创建子类相比,首选组合方式(即接口和实例引用)。
- 无法完成某个类时,请使用抽象类。例如,返回到
AquariumFish类,可以使所有AquariumFish实现FishAction,并为eat提供默认实现,同时保留color作为抽象类,因为鱼类实际上没有默认颜色。
interface FishAction  {
    fun eat()
}

abstract class AquariumFish : FishAction {
   abstract val color: String
   override fun eat() = println("yum")
}
上一个任务介绍了抽象类和接口。接口委托是一种高级设计技术,其中接口的方法由帮助程序(或委托)对象实现,该帮助程序(或委托)对象然后由类使用。当您在一系列不相关的类中使用接口时,此技术非常有用。您可以在单独的助手类中实现所需的接口功能。然后,每个不相关的类都使用该帮助程序类的实例来实现该功能。
在此任务中,您将使用接口委托向类添加功能。
第 1 步:创建一个新接口
- 在 AquariumFish.kt 中,移除
AquariumFish类。Plecostomus和Shark将实现鱼类行动和鱼类颜色的接口,而不是继承自AquariumFish类。 - 创建一个新接口
FishColor,用于将颜色定义为字符串。
interface FishColor {
    val color: String
}
- 更改
Plecostomus以实现FishAction和FishColor这两个接口。您需要替换FishColor中的color和FishAction中的eat()。
class Plecostomus: FishAction, FishColor {
    override val color = "gold"
    override fun eat() {
        println("eat algae")
    }
}
- 更改
Shark类,以便同时实现FishAction和FishColor这两个接口,而不是从AquariumFish继承。
class Shark: FishAction, FishColor {
    override val color = "grey"
    override fun eat() {
        println("hunt and eat fish")
    }
}
- 完成后的代码应该如下所示:
package example.myapp

interface FishAction {
    fun eat()
}

interface FishColor {
    val color: String
}

class Plecostomus: FishAction, FishColor {
    override val color = "gold"
    override fun eat() {
        println("eat algae")
    }
}

class Shark: FishAction, FishColor {
    override val color = "grey"
    override fun eat() {
        println("hunt and eat fish")
    }
}
第 2 步:创建一个单例类
接下来,创建一个实现 FishColor 的帮助程序类,以实现委托部分的设置。创建一个名为 GoldColor 的基本类,用于实现 FishColor - 仅指出其颜色为金色。
创建多个 GoldColor 实例没有任何意义,因为所有这些实例将执行完全相同的操作。因此,在 Kotlin 中,您可以声明一个类,在该类中,您只能使用关键字 object 而非 class 来创建该类的一个实例。Kotlin 将创建一个实例,该实例按类名称引用。因此,所有其他对象只能使用该实例。您不能创建此类的其他实例。如果您熟悉单例模式,则可以通过这种方式在 Kotlin 中实现单例。
- 在 AquariumFish.kt 中,为
GoldColor创建一个对象。替换颜色。
object GoldColor : FishColor {
   override val color = "gold"
}
第 3 步:为 FishColor 添加接口委托
现在,您可以使用接口委托。
- 在 AquariumFish.kt 中,从
Plecostomus中移除color的替换项。 - 更改
Plecostomus类,以从GoldColor获取颜色。为此,您可以将by GoldColor添加到类声明中,从而创建委托。换句话说,请使用由GoldColor提供的实现,而不是实现FishColor。因此,每次访问color时,系统都会将其委托给GoldColor。
class Plecostomus:  FishAction, FishColor by GoldColor {
   override fun eat() {
       println("eat algae")
   }
}
在类保持不变的情况下,Plecostomus 的所有实例都将为“gold”。但是,实际上,这些鱼类有许多种颜色。如需解决此问题,您可以添加颜色的构造函数参数,其中将 GoldColor 用作 Plecostomus 的默认颜色。
- 更改
Plecostomus类,以采用传递的fishColor及其构造函数,并将其默认值设置为GoldColor。将委托从by GoldColor更改为by fishColor。
class Plecostomus(fishColor: FishColor = GoldColor):  FishAction,
       FishColor by fishColor {
   override fun eat() {
       println("eat algae")
   }
}
第 4 步:为 FishAction 添加接口委托
同样,您可以对 FishAction 使用接口委托。
- 在 AquariumFish.kt 中,创建一个
PrintingFishAction类来实现FishAction,该类采用Stringfood作为其构造函数参数,然后输出鱼类的食物。
class PrintingFishAction(val food: String) : FishAction {
    override fun eat() {
        println(food)
    }
}
- 在
Plecostomus类中,移除替换函数eat(),以替换为委托。 - 在
Plecostomus的声明中,将FishAction委托给PrintingFishAction,同时传递"eat algae"。 - 除了该委托之外,
Plecostomus类的正文中没有任何代码,这是因为所有替换操作均通过接口委托执行,因此请移除{}。
class Plecostomus (fishColor: FishColor = GoldColor):
        FishAction by PrintingFishAction("eat algae"),
        FishColor by fishColor
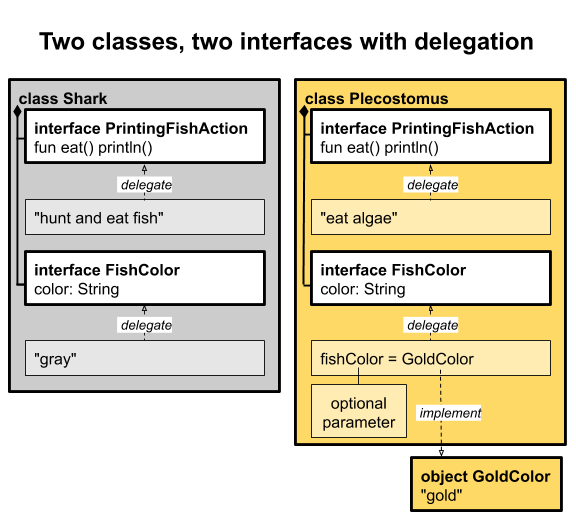
如果您为 Shark 创建了类似的设计,下图会同时示出 Shark 和 Plecostomus 类。它们均由 PrintingFishAction 和 FishColor 接口组成,但会将实现委托给此类接口。

接口委托功能非常强大,在可能会使用其他语言的抽象类时,您通常应当考虑如何使用该接口委托。利用接口委托可以使用组合来插入行为,而无需大量子类,其中每个子类以不同的方式设为专用类。
组合通常会改进封装、降低耦合(相互依赖性)、提高接口简洁性并提高代码可用性。出于这些原因,首选设计方式便是结合使用组合与接口。另一方面,对于某些问题,从抽象类继承往往较为适合。因此,建议您首选组合方式,但在继承有效的情况下,在 Kotlin 中,您也可以采用从抽象类继承的方式!
在一些其他语言中,data 类与 struct 类似,主要用于保存某些数据。Kotlin data 类还有其他一些优点,如用于输出和复制的实用程序。在此任务中,您将创建一个简单的数据类,并了解 Kotlin 为数据类提供的支持。
第 1 步:创建一个数据类
- 在 example.myapp 软件包下添加新软件包
decor,以保存新代码。右键点击 Project 窗格中的 example.myapp,然后依次选择 File > New > Package。 - 在该软件包中,新建一个名为
Decoration的类。
package example.myapp.decor

class Decoration {
}
- 如需将
Decoration设为数据类,请在类声明前面加上关键字data作为前缀。 - 添加一个名为
rocks的String属性,以为该类提供一些数据。
data class Decoration(val rocks: String) {
}
- 在文件中的该类之外,添加一个
makeDecorations()函数,以使用"granite"创建并输出Decoration的实例。
fun makeDecorations() {
    val decoration1 = Decoration("granite")
    println(decoration1)
}
- 添加一个
main()函数以调用makeDecorations(),然后运行程序。由于创建的合理输出是数据类,因此请予以留意。
⇒ Decoration(rocks=granite)
- 在
makeDecorations()中,实例化并输出另外两个“石板灰”Decoration对象。
fun makeDecorations() {
    val decoration1 = Decoration("granite")
    println(decoration1)

    val decoration2 = Decoration("slate")
    println(decoration2)

    val decoration3 = Decoration("slate")
    println(decoration3)
}
- 在
makeDecorations()中,添加一个输出语句,用于输出decoration1与decoration2的比较结果,以及decoration3与decoration2的比较结果。使用由 data 类提供的 equals() 方法。
    println (decoration1.equals(decoration2))
    println (decoration3.equals(decoration2))
- 运行您的代码。
⇒ Decoration(rocks=granite)
Decoration(rocks=slate)
Decoration(rocks=slate)
false
true
第 2 步:使用解构
如需获取数据对象的属性并将其赋给变量,您可以一次赋予一个,如下所示。
val rock = decoration.rock
val wood = decoration.wood
val diver = decoration.diver
相反,您可以为每个属性创建一个变量,并将该数据对象赋给变量组。在 Kotlin 中,为每个变量赋予属性值,
val (rock, wood, diver) = decoration
称为解构,这是一种有用的简写形式。变量的数目应与属性的数目一致,并且变量的赋值顺序与它们在类中的声明顺序一致。以下是您可以在 Decoration.kt 中尝试的完整示例。
// Here is a data class with 3 properties.
data class Decoration2(val rocks: String, val wood: String, val diver: String){
}

fun makeDecorations() {
    val d5 = Decoration2("crystal", "wood", "diver")
    println(d5)

// Assign all properties to variables.
    val (rock, wood, diver) = d5
    println(rock)
    println(wood)
    println(diver)
}
⇒ Decoration2(rocks=crystal, wood=wood, diver=diver)
crystal
wood
diver
如果不需要一个或多个属性,则可以使用 _ 而不是变量名称来跳过此类属性,如下面的代码所示。
val (rock, _, diver) = d5
在此任务中,您将了解 Kotlin 中的某些特殊用途类,包括:
- 单例类
- 伴生对象
- 枚举
第 1 步:重新调用单例类
回顾前面使用 GoldColor 类的示例。
object GoldColor : FishColor {
   override val color = "gold"
}
由于 GoldColor 的每个实例都会执行相同的操作,因此系统将其声明为 object 而不是 class,以使其成为单例。该类只能有一个实例。
第 2 步:创建一个枚举
此外,Kotlin 还支持枚举。枚举是一组命名值或常量。在 Kotlin 中,枚举是一种特殊的类,使您能够按名称引用值,就像在其他语言中一样。它们可以提高代码的可读性。enum 中的每个常量都是一个对象。请在声明前面加上关键字 enum 作为前缀,以声明枚举。虽然基本枚举声明仅需名称列表,但您也可以定义与每个名称相关联的一个或多个字段。
- 在 Decoration.kt 中,尝试枚举示例。
enum class Color(val rgb: Int) {
   RED(0xFF0000), GREEN(0x00FF00), BLUE(0x0000FF);
}
枚举与单例类似 - 枚举中只能有一个值,并且每个值只能有一个。例如,只能有一个 Color.RED、一个 Color.GREEN 和一个 Color.BLUE。在此示例中,为 rgb 属性赋予 RGB 值,以表示颜色分量。此外,枚举还有其他有用的特征。例如,您可以使用 ordinal 属性获取枚举的序数值,还可以使用 name 属性获取该枚举的名称。
- 在 REPL 中,尝试另一个枚举示例。
enum class Direction(val degrees: Int) {
    NORTH(0), SOUTH(180), EAST(90), WEST(270)
}

fun main() {
    println(Direction.EAST.name)
    println(Direction.EAST.ordinal)
    println(Direction.EAST.degrees)
}
⇒ EAST
2
90
本课涵盖内容广泛。虽然其他面向对象的编程语言应当熟悉本课大部分内容,但 Kotlin 增加了一些功能以保持代码简洁、可读。
类和构造函数
- 在 Kotlin 中,使用
class定义一个类。 - Kotlin 会自动为属性创建 setter 和 getter。
- 直接在类定义中定义主构造函数。例如:
class Aquarium(var length: Int = 100, var width: Int = 20, var height: Int = 40) - 如果主构造函数需要其他代码,请将其编写在一个或多个
init块中。 - 类可以使用
constructor定义一个或多个次构造函数,但 Kotlin 样式是使用工厂函数。
可见性修饰符和子类
- 在 Kotlin 中,默认情况下,所有类和函数都是
public,但您可以使用修饰符将可见性更改为internal、private或protected。 - 如需创建子类,必须将父类标记为
open。 - 如需替换子类中的方法和属性,必须将父类中的方法和属性标记为
open。
数据类、单例和枚举
- 通过在声明前面加上
data作为前缀,创建一个数据类。 - 解构是用于将
data对象的属性赋给单独变量的简写形式。 - 通过使用
object而不是class,创建一个单例类。 - 使用
enum class定义枚举。
抽象类、接口和委托
- 抽象类和接口是在类之间共享共有行为的两种方法。
- 抽象类用于定义属性和行为,但将实现留给子类。
- 接口用于定义行为,并且可以为部分或全部行为提供默认实现。
- 当您使用接口组合类时,该类的功能将通过其包含的类实例进行扩展。
- 接口委托通过将实现委托给接口类来使用组合。
- 组合是使用接口委托向类添加功能的一种强大方式。通常情况下,组合是首选方式,但对于某些问题,从抽象类继承更为合适。
