Este documento descreve como configurar diversos testes comuns do Espresso.
Associar uma visualização ao lado de outra
Um layout pode conter certas visualizações que não são exclusivas por si só. Para
exemplo, um botão de chamada repetida em uma tabela de contatos pode ter o mesmo
R.id, contêm o mesmo texto e têm as mesmas propriedades de outras chamadas
na hierarquia de visualização.
Por exemplo, nesta atividade, a visualização com o texto "7" se repete em vários
linhas:
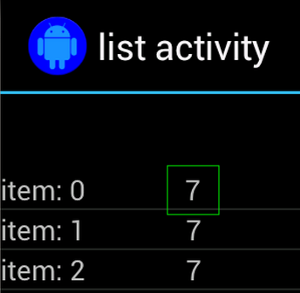
Muitas vezes, a visualização não exclusiva será pareada com um marcador exclusivo localizado
ao lado dele, como o nome do contato ao lado do botão de chamada. Nesse caso,
é possível usar o matcher hasSibling() para restringir sua seleção:
Kotlin
onView(allOf(withText("7"), hasSibling(withText("item: 0"))))
    .perform(click())
Java
onView(allOf(withText("7"), hasSibling(withText("item: 0"))))
    .perform(click());
Associar uma visualização que está dentro de uma barra de ações
O ActionBarTestActivity tem duas barras de ações diferentes: uma
barra de ação e uma barra de ação contextual que é criada a partir de um menu de opções. Ambos
as barras de ações têm um item que fica sempre visível e dois itens que estão apenas
visível no menu flutuante. Quando um item recebe um clique, uma TextView muda para a
conteúdo do item clicado.
A correspondência de ícones visíveis em ambas as barras de ações é direta, como mostrado no seguinte snippet de código:
Kotlin
fun testClickActionBarItem() {
    // We make sure the contextual action bar is hidden.
    onView(withId(R.id.hide_contextual_action_bar))
        .perform(click())

    // Click on the icon - we can find it by the r.Id.
    onView(withId(R.id.action_save))
        .perform(click())

    // Verify that we have really clicked on the icon
    // by checking the TextView content.
    onView(withId(R.id.text_action_bar_result))
        .check(matches(withText("Save")))
}
Java
public void testClickActionBarItem() {
    // We make sure the contextual action bar is hidden.
    onView(withId(R.id.hide_contextual_action_bar))
        .perform(click());

    // Click on the icon - we can find it by the r.Id.
    onView(withId(R.id.action_save))
        .perform(click());

    // Verify that we have really clicked on the icon
    // by checking the TextView content.
    onView(withId(R.id.text_action_bar_result))
        .check(matches(withText("Save")));
}
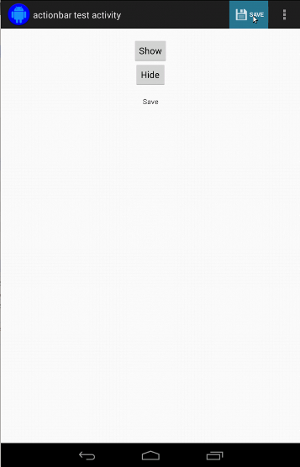
O código é o mesmo para a barra de ações contextual:
Kotlin
fun testClickActionModeItem() {
    // Make sure we show the contextual action bar.
    onView(withId(R.id.show_contextual_action_bar))
        .perform(click())

    // Click on the icon.
    onView((withId(R.id.action_lock)))
        .perform(click())

    // Verify that we have really clicked on the icon
    // by checking the TextView content.
    onView(withId(R.id.text_action_bar_result))
        .check(matches(withText("Lock")))
}
Java
public void testClickActionModeItem() {
    // Make sure we show the contextual action bar.
    onView(withId(R.id.show_contextual_action_bar))
        .perform(click());

    // Click on the icon.
    onView((withId(R.id.action_lock)))
        .perform(click());

    // Verify that we have really clicked on the icon
    // by checking the TextView content.
    onView(withId(R.id.text_action_bar_result))
        .check(matches(withText("Lock")));
}
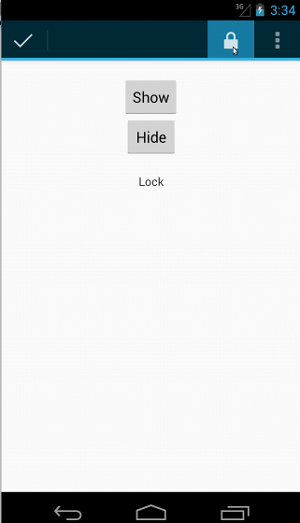
Clicar em itens no menu flutuante é um pouco mais complicado para a ação normal pois alguns dispositivos têm um botão físico de menu flutuante, que abre a itens excedentes em um menu de opções, e alguns dispositivos têm um menu flutuante de software. , que abre um menu flutuante normal. Felizmente, o Espresso lida com isso para nós.
Para a barra de ações normal:
Kotlin
fun testActionBarOverflow() {
    // Make sure we hide the contextual action bar.
    onView(withId(R.id.hide_contextual_action_bar))
        .perform(click())

    // Open the options menu OR open the overflow menu, depending on whether
    // the device has a hardware or software overflow menu button.
    openActionBarOverflowOrOptionsMenu(
            ApplicationProvider.getApplicationContext<Context>())

    // Click the item.
    onView(withText("World"))
        .perform(click())

    // Verify that we have really clicked on the icon by checking
    // the TextView content.
    onView(withId(R.id.text_action_bar_result))
        .check(matches(withText("World")))
}
Java
public void testActionBarOverflow() {
    // Make sure we hide the contextual action bar.
    onView(withId(R.id.hide_contextual_action_bar))
        .perform(click());

    // Open the options menu OR open the overflow menu, depending on whether
    // the device has a hardware or software overflow menu button.
    openActionBarOverflowOrOptionsMenu(
            ApplicationProvider.getApplicationContext());

    // Click the item.
    onView(withText("World"))
        .perform(click());

    // Verify that we have really clicked on the icon by checking
    // the TextView content.
    onView(withId(R.id.text_action_bar_result))
        .check(matches(withText("World")));
}
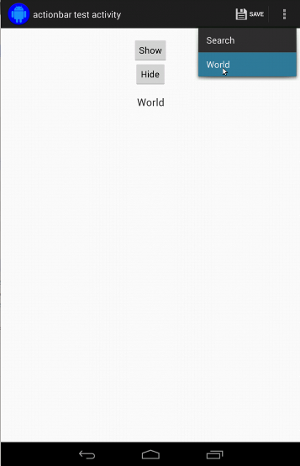
Esta é a aparência da barra em dispositivos com um botão físico de menu flutuante:
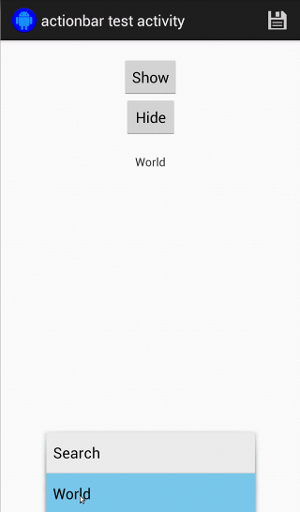
Para a barra de ações contextual, o código também é fácil:
Kotlin
fun testActionModeOverflow() {
    // Show the contextual action bar.
    onView(withId(R.id.show_contextual_action_bar))
        .perform(click())

    // Open the overflow menu from contextual action mode.
    openContextualActionModeOverflowMenu()

    // Click on the item.
    onView(withText("Key"))
        .perform(click())

    // Verify that we have really clicked on the icon by
    // checking the TextView content.
    onView(withId(R.id.text_action_bar_result))
        .check(matches(withText("Key")))
    }
}
Java
public void testActionModeOverflow() {
    // Show the contextual action bar.
    onView(withId(R.id.show_contextual_action_bar))
        .perform(click());

    // Open the overflow menu from contextual action mode.
    openContextualActionModeOverflowMenu();

    // Click on the item.
    onView(withText("Key"))
        .perform(click());

    // Verify that we have really clicked on the icon by
    // checking the TextView content.
    onView(withId(R.id.text_action_bar_result))
        .check(matches(withText("Key")));
    }
}
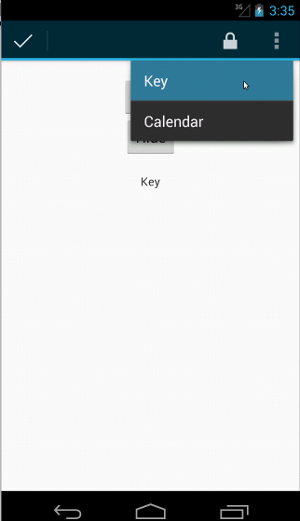
Para ver o código completo dessas amostras, consulte a
ActionBarTest.java (link em inglês) no GitHub.
Declarar que uma visualização não é exibida
Depois de executar uma série de ações, você certamente desejará declarar o
estado da interface em teste. Às vezes, esse pode ser um caso negativo, como quando
que algo não está acontecendo. Lembre-se de que você pode
transformar qualquer visualização de Hamcrest
correspondente em um ViewAssertion usando ViewAssertions.matches().
No exemplo abaixo, usamos o matcher isDisplayed() e o revertemos usando
o matcher not() padrão:
Kotlin
import androidx.test.espresso.Espresso.onView
import androidx.test.espresso.assertion.ViewAssertions.matches
import androidx.test.espresso.matcher.ViewMatchers.isDisplayed
import androidx.test.espresso.matcher.ViewMatchers.withId
import org.hamcrest.Matchers.not

onView(withId(R.id.bottom_left))
    .check(matches(not(isDisplayed())))
Java
import static androidx.test.espresso.Espresso.onView;
import static androidx.test.espresso.assertion.ViewAssertions.matches;
import static androidx.test.espresso.matcher.ViewMatchers.isDisplayed;
import static androidx.test.espresso.matcher.ViewMatchers.withId;
import static org.hamcrest.Matchers.not;

onView(withId(R.id.bottom_left))
    .check(matches(not(isDisplayed())));
A abordagem acima funcionará se a visualização ainda fizer parte da hierarquia. Se for
não, você recebe uma NoMatchingViewException e precisa usar
ViewAssertions.doesNotExist().
Declarar que uma visualização não está presente
Se a visualização sair da hierarquia, o que pode acontecer quando uma
causou uma transição para outra atividade. Use o
ViewAssertions.doesNotExist():
Kotlin
import androidx.test.espresso.Espresso.onView
import androidx.test.espresso.assertion.ViewAssertions.doesNotExist
import androidx.test.espresso.matcher.ViewMatchers.withId

onView(withId(R.id.bottom_left))
    .check(doesNotExist())
Java
import static androidx.test.espresso.Espresso.onView;
import static androidx.test.espresso.assertion.ViewAssertions.doesNotExist;
import static androidx.test.espresso.matcher.ViewMatchers.withId;

onView(withId(R.id.bottom_left))
    .check(doesNotExist());
Declarar que um item de dados não está em um adaptador
Para provar que um item de dados específico não está em uma AdapterView, você precisa fazer
as coisas de modo um pouco diferente. Precisamos encontrar os AdapterView relevantes.
e interroga os dados que ela contém. Não é necessário usar onData().
Em vez disso, usamos onView() para encontrar o AdapterView e depois outro
para trabalhar nos dados dentro da visualização.
Comece pelo matcher:
Kotlin
private fun withAdaptedData(dataMatcher: Matcher<Any>): Matcher<View> {
    return object : TypeSafeMatcher<View>() {

        override fun describeTo(description: Description) {
            description.appendText("with class name: ")
            dataMatcher.describeTo(description)
        }

        public override fun matchesSafely(view: View) : Boolean {
            if (view !is AdapterView<*>) {
                return false
            }

            val adapter = view.adapter
            for (i in 0 until adapter.count) {
                if (dataMatcher.matches(adapter.getItem(i))) {
                    return true
                }
            }

            return false
        }
    }
}
Java
private static Matcher<View> withAdaptedData(final Matcher<Object> dataMatcher) {
    return new TypeSafeMatcher<View>() {

        @Override
        public void describeTo(Description description) {
            description.appendText("with class name: ");
            dataMatcher.describeTo(description);
        }

        @Override
        public boolean matchesSafely(View view) {
            if (!(view instanceof AdapterView)) {
                return false;
            }

            @SuppressWarnings("rawtypes")
            Adapter adapter = ((AdapterView) view).getAdapter();
            for (int i = 0; i < adapter.getCount(); i++) {
                if (dataMatcher.matches(adapter.getItem(i))) {
                    return true;
                }
            }

            return false;
        }
    };
}
Em seguida, basta usar onView() para encontrar a AdapterView:
Kotlin
fun testDataItemNotInAdapter() {
    onView(withId(R.id.list))
          .check(matches(not(withAdaptedData(withItemContent("item: 168")))))
    }
}
Java
@SuppressWarnings("unchecked")
public void testDataItemNotInAdapter() {
    onView(withId(R.id.list))
          .check(matches(not(withAdaptedData(withItemContent("item: 168")))));
    }
}
Temos também uma declaração que falhará se um item for igual a "item: 168". existe em uma visualização de adaptador com a lista de IDs.
Para o exemplo completo, veja o método testDataItemNotInAdapter() na
AdapterViewTest.java
no GitHub.
Usar um gerenciador de falhas personalizado
Substituir o FailureHandler padrão no Espresso por um personalizado permite a
tratamento de erros adicional ou diferente, como fazer uma captura de tela ou transmitir
além de informações extras de depuração.
O exemplo CustomFailureHandlerTest demonstra como implementar uma
gerenciador de falhas:
Kotlin
private class CustomFailureHandler(targetContext: Context) : FailureHandler {
    private val delegate: FailureHandler

    init {
        delegate = DefaultFailureHandler(targetContext)
    }

    override fun handle(error: Throwable, viewMatcher: Matcher<View>) {
        try {
            delegate.handle(error, viewMatcher)
        } catch (e: NoMatchingViewException) {
            throw MySpecialException(e)
        }

    }
}
Java
private static class CustomFailureHandler implements FailureHandler {
    private final FailureHandler delegate;

    public CustomFailureHandler(Context targetContext) {
        delegate = new DefaultFailureHandler(targetContext);
    }

    @Override
    public void handle(Throwable error, Matcher<View> viewMatcher) {
        try {
            delegate.handle(error, viewMatcher);
        } catch (NoMatchingViewException e) {
            throw new MySpecialException(e);
        }
    }
}
Esse gerenciador de falhas gera uma MySpecialException em vez de uma
NoMatchingViewException e delega todas as outras falhas ao
DefaultFailureHandler O CustomFailureHandler pode ser registrado
Espresso no método setUp() do teste:
Kotlin
@Throws(Exception::class)
override fun setUp() {
    super.setUp()
    getActivity()
    setFailureHandler(CustomFailureHandler(
            ApplicationProvider.getApplicationContext<Context>()))
}
Java
@Override
public void setUp() throws Exception {
    super.setUp();
    getActivity();
    setFailureHandler(new CustomFailureHandler(
            ApplicationProvider.getApplicationContext()));
}
Para mais informações, consulte a
FailureHandler
interface e
Espresso.setFailureHandler().
Segmentar janelas não padrão
O Android é compatível com várias janelas. Normalmente, isso é transparente para os usuários
e o desenvolvedor do aplicativo, mas, em certos casos, várias janelas ficam visíveis, como
como quando uma janela de preenchimento automático é desenhada sobre a janela principal do aplicativo
no widget de pesquisa. Para simplificar as coisas, por padrão, o Espresso usa uma heurística para
adivinhar com qual Window você pretende interagir. Essa heurística é quase
é sempre bom o suficiente; No entanto, em casos raros, é necessário especificar a janela
que uma interação deve segmentar. É possível fazer isso fornecendo sua própria janela raiz
correspondente ou Root:
Kotlin
onView(withText("South China Sea"))
    .inRoot(withDecorView(not(`is`(getActivity().getWindow().getDecorView()))))
    .perform(click())
Java
onView(withText("South China Sea"))
    .inRoot(withDecorView(not(is(getActivity().getWindow().getDecorView()))))
    .perform(click());
Assim como acontece com
ViewMatchers,
oferecemos um conjunto de
RootMatchers
Obviamente, você sempre pode implementar seu objeto Matcher.
Confira a API MultipleWindowTest amostra no GitHub.
Associar um cabeçalho ou rodapé em uma visualização de lista
Os cabeçalhos e rodapés são adicionados a ListViews usando addHeaderView() e
addFooterView(). Para garantir que Espresso.onData() saiba qual objeto de dados
transmita um valor de objeto de dados predefinido como o segundo parâmetro
para addHeaderView() e addFooterView(). Exemplo:
Kotlin
const val FOOTER = "FOOTER"
...
val footerView = layoutInflater.inflate(R.layout.list_item, listView, false)
footerView.findViewById<TextView>(R.id.item_content).text = "count:"
footerView.findViewById<TextView>(R.id.item_size).text
        = data.size.toString
listView.addFooterView(footerView, FOOTER, true)
Java
public static final String FOOTER = "FOOTER";
...
View footerView = layoutInflater.inflate(R.layout.list_item, listView, false);
footerView.findViewById<TextView>(R.id.item_content).setText("count:");
footerView.findViewById<TextView>(R.id.item_size).setText(String.valueOf(data.size()));
listView.addFooterView(footerView, FOOTER, true);
Em seguida, programe um matcher para o rodapé:
Kotlin
import org.hamcrest.Matchers.allOf
import org.hamcrest.Matchers.instanceOf
import org.hamcrest.Matchers.`is`

fun isFooter(): Matcher<Any> {
    return allOf(`is`(instanceOf(String::class.java)),
            `is`(LongListActivity.FOOTER))
}
Java
import static org.hamcrest.Matchers.allOf;
import static org.hamcrest.Matchers.instanceOf;
import static org.hamcrest.Matchers.is;

@SuppressWarnings("unchecked")
public static Matcher<Object> isFooter() {
    return allOf(is(instanceOf(String.class)), is(LongListActivity.FOOTER));
}
O carregamento da visualização em um teste é simples:
Kotlin
import androidx.test.espresso.Espresso.onData
import androidx.test.espresso.action.ViewActions.click
import androidx.test.espresso.sample.LongListMatchers.isFooter

fun testClickFooter() {
    onData(isFooter())
        .perform(click())

    // ...
}
Java
import static androidx.test.espresso.Espresso.onData;
import static androidx.test.espresso.action.ViewActions.click;
import static androidx.test.espresso.sample.LongListMatchers.isFooter;

public void testClickFooter() {
    onData(isFooter())
        .perform(click());

    // ...
}
Veja o exemplo de código completo, encontrado no método testClickFooter() de
AdapterViewTest.java
no GitHub.
