
Imagen は画像生成モデルです。ユーザー プロフィール用のカスタム アバターを生成する、またはパーソナライズされたビジュアル アセットを既存の画面フローに取り込んでユーザー エンゲージメントを高めるために使用できます。
Firebase AI Logic SDK を使用すると、Android アプリから Imagen モデルにアクセスできます。Imagen モデルは、Firebase AI Logic の API プロバイダ(ほとんどのデベロッパーにおすすめの Gemini Developer API と Vertex AI)の両方で使用できます。

プロンプトを試す
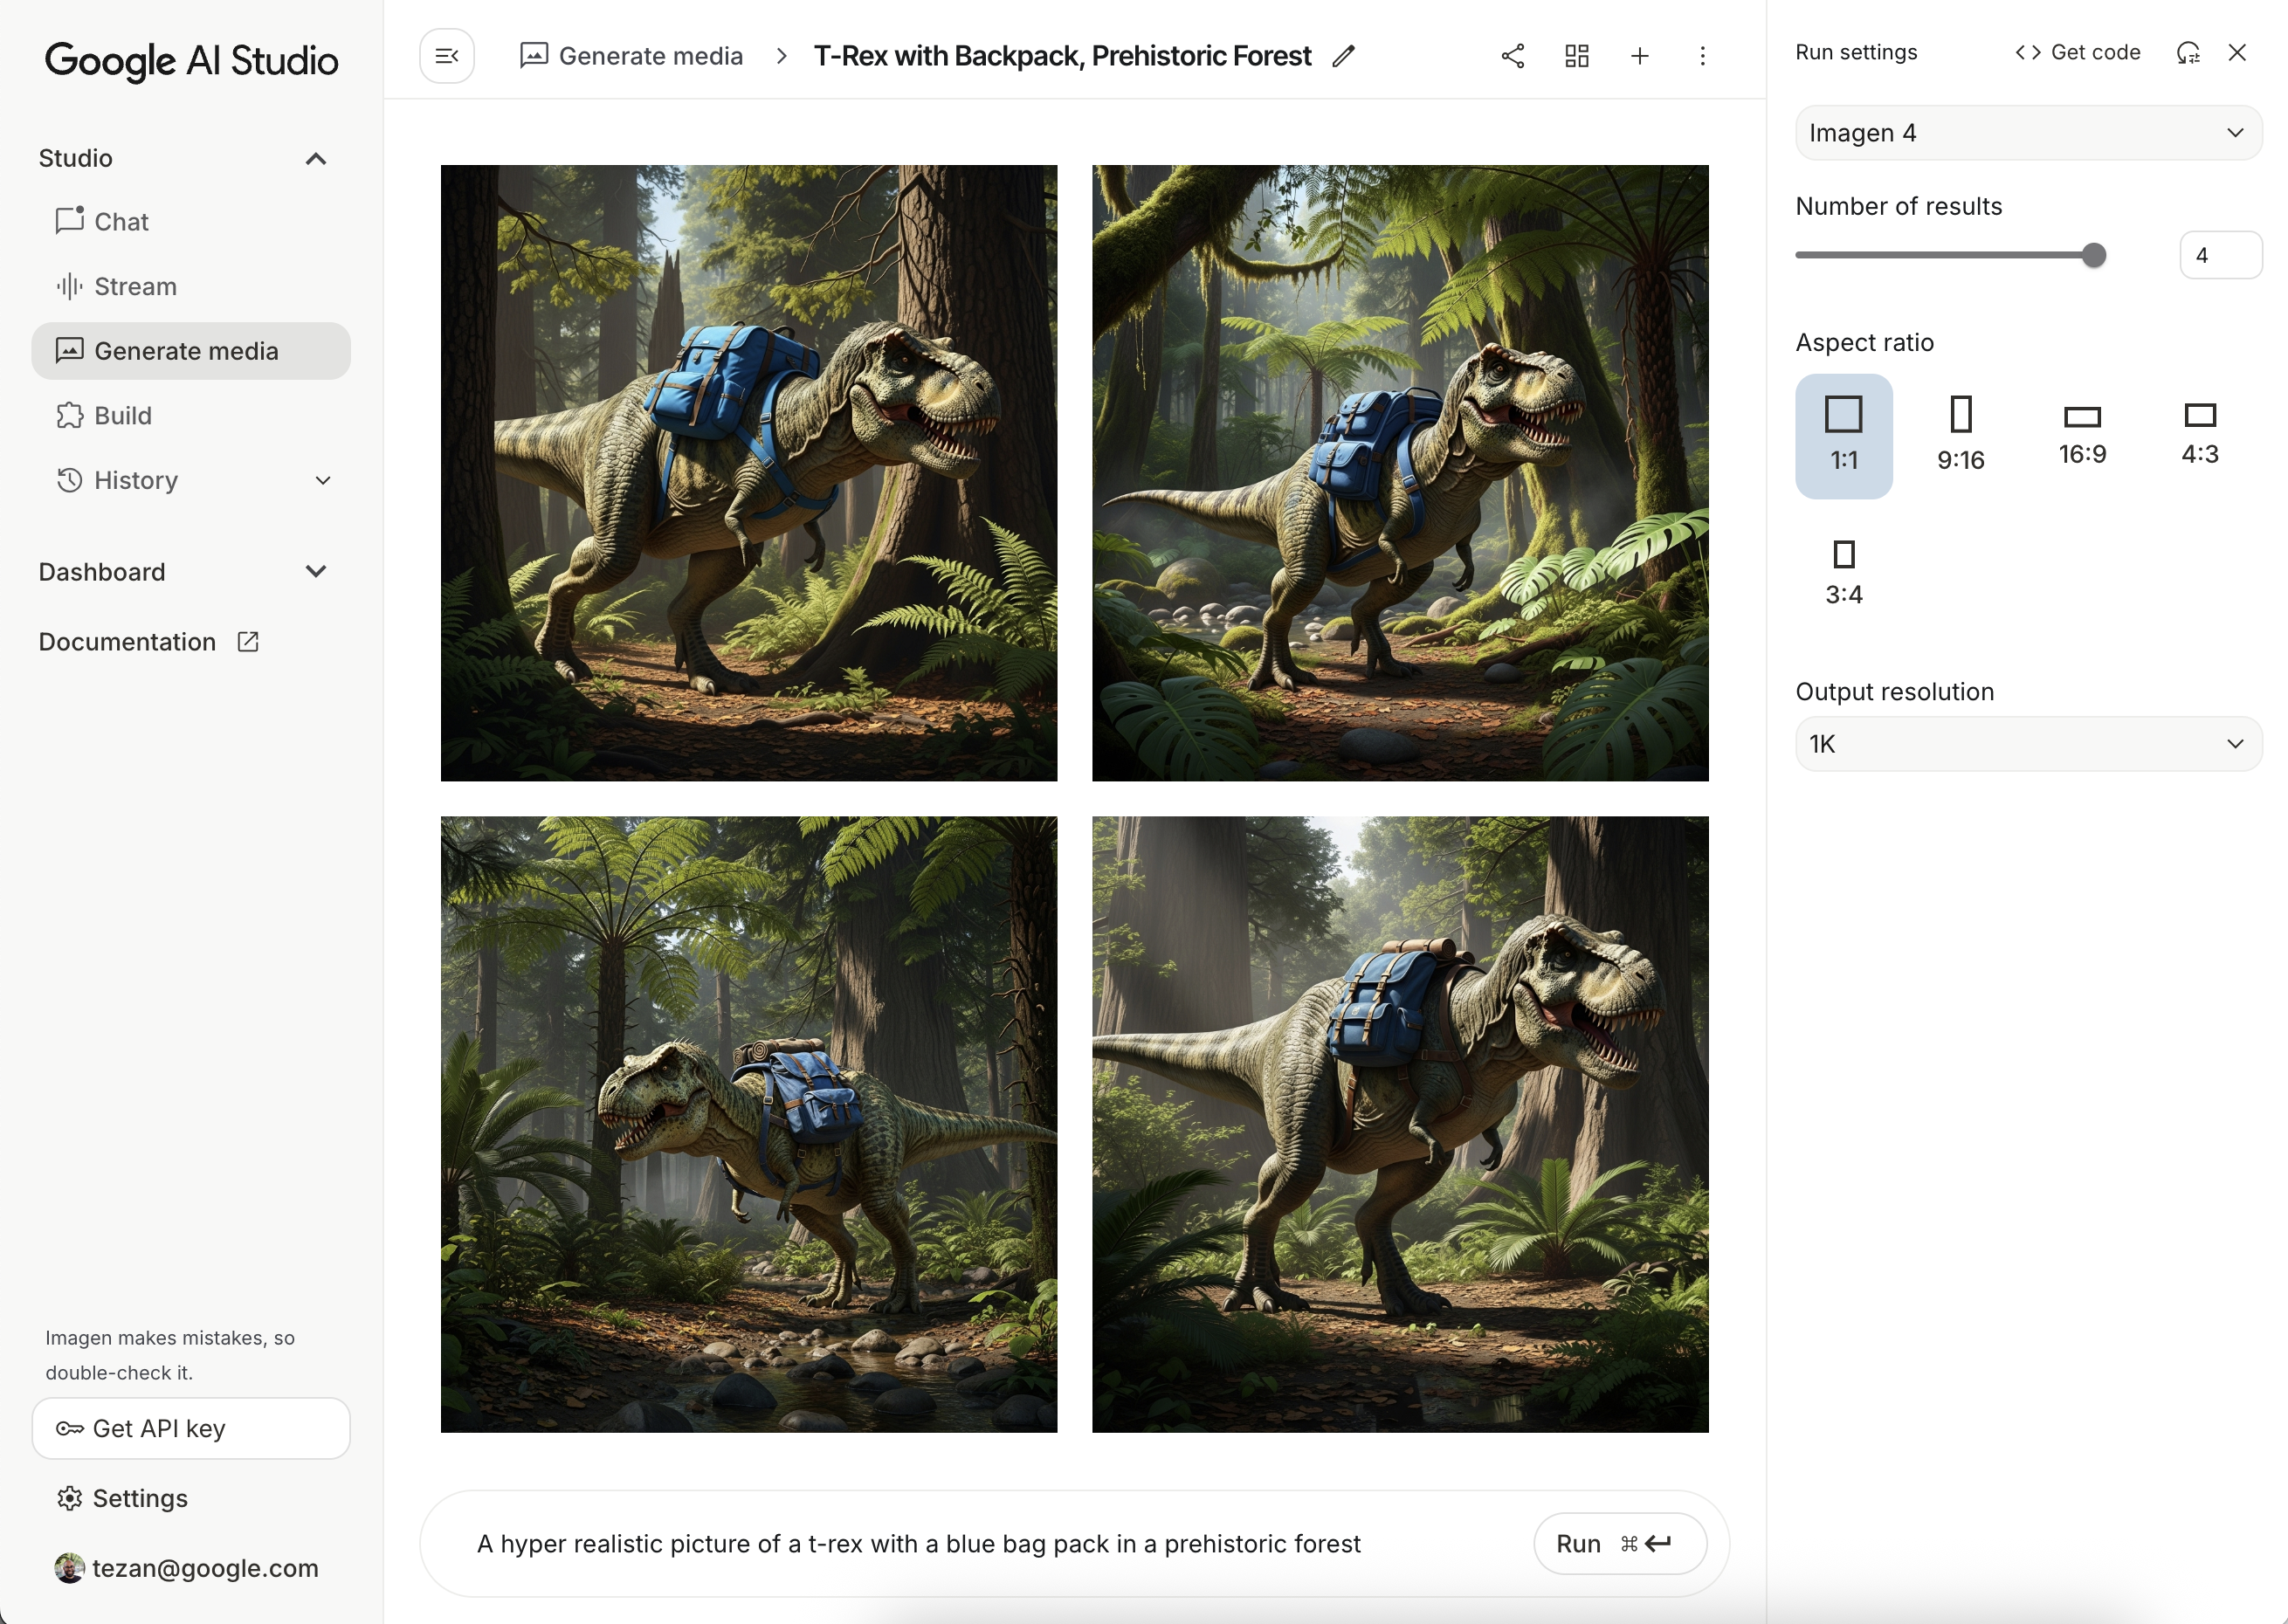
理想的なプロンプトを作成するには、多くの場合、何度も試してみる必要があります。画像プロンプトは、プロンプト設計とプロトタイピング用の IDE である Google AI Studio でテストできます。プロンプトを改善するためのヒントについては、プロンプトと画像属性のガイドをご覧ください。
Firebase プロジェクトを設定してアプリを接続する
Firebase ドキュメントの手順に沿って、Android プロジェクトに Firebase を追加します。
Gradle 依存関係を追加する
次の依存関係を build.gradle ファイルに追加します。
dependencies {
  // Import the BoM for the Firebase platform
  implementation(platform("com.google.firebase:firebase-bom:34.15.0"))

  // Add the dependency for the Firebase AI Logic library. When using the BoM,
  // you don't specify versions in Firebase library dependencies
  implementation("com.google.firebase:firebase-ai")
}
画像を生成
Android アプリで画像を生成するには、まずオプションの構成で ImagenModel をインスタンス化します。
generationConfig パラメータを使用すると、ネガティブ プロンプト、画像の数、出力画像のアスペクト比、画像形式を定義し、透かしを追加できます。safetySettings パラメータを使用して、安全性フィルタと人物フィルタを構成できます。
Kotlin
val config = ImagenGenerationConfig( numberOfImages = 2, aspectRatio = ImagenAspectRatio.LANDSCAPE_16x9, imageFormat = ImagenImageFormat.jpeg(compressionQuality = 100), addWatermark = false, ) // Initialize the Gemini Developer API backend service // For Vertex AI use Firebase.ai(backend = GenerativeBackend.vertexAI()) val model = Firebase.ai(backend = GenerativeBackend.googleAI()).imagenModel( modelName = "imagen-4.0-generate-001", generationConfig = config, safetySettings = ImagenSafetySettings( safetyFilterLevel = ImagenSafetyFilterLevel.BLOCK_LOW_AND_ABOVE, personFilterLevel = ImagenPersonFilterLevel.BLOCK_ALL ), )
Java
ImagenGenerationConfig config = new ImagenGenerationConfig.Builder() .setNumberOfImages(2) .setAspectRatio(ImagenAspectRatio.LANDSCAPE_16x9) .setImageFormat(ImagenImageFormat.jpeg(100)) .setAddWatermark(false) .build(); // For Vertex AI use Firebase.ai(backend = GenerativeBackend.vertexAI()) ImagenModelFutures model = ImagenModelFutures.from( FirebaseAI.getInstance(GenerativeBackend.googleAI()).imagenModel( "imagen-4.0-generate-001", config, new ImagenSafetySettings( ImagenSafetyFilterLevel.BLOCK_LOW_AND_ABOVE, ImagenPersonFilterLevel.BLOCK_ALL)) );
ImagenModel をインスタンス化したら、generateImages を呼び出して画像を生成できます。
Kotlin
val imageResponse = model.generateImages( prompt = "A hyper realistic picture of a t-rex with a blue bagpack in a prehistoric forest", ) val image = imageResponse.images.first() val bitmapImage = image.asBitmap()
Java
ListenableFuture<ImagenGenerationResponse<ImagenInlineImage>> futureResponse = model.generateImages( "A hyper realistic picture of a t-rex with a blue bagpack in a prehistoric forest"); try { ImagenGenerationResponse<ImagenInlineImage> imageResponse = futureResponse.get(); List<ImagenInlineImage> images = null; if (imageResponse != null) { images = imageResponse.getImages(); } if (images != null && !images.isEmpty()) { ImagenInlineImage image = images.get(0); Bitmap bitmapImage = image.asBitmap(); // Use bitmapImage } } catch (ExecutionException | InterruptedException e) { e.printStackTrace(); }
Imagen で画像を編集する
Firebase AI Logic SDK は、Imagen モデルを通じて高度な画像編集機能を提供します。これにより、次のことが可能になります。
- マスクに基づく画像の編集。オブジェクトの挿入や削除、元の境界を超えた画像コンテンツの拡張、背景の変更などのアクションが含まれます。
- 画像をカスタマイズします。特定のスタイル(パターン、テクスチャ、アーティストのスタイル)を適用したり、さまざまな被写体(商品、人物、動物など)に焦点を当てたり、さまざまなコントロール(手描きのスケッチ、Canny エッジ画像、フェイス メッシュなど)に準拠したりします。
モデルの初期化
Imagen 編集機能を使用するには、imagen-3.0-capability-001 などの画像編集をサポートする Imagen モデルを指定します。
val imagenModel = Firebase.ai(backend = GenerativeBackend.vertexAI()) .imagenModel("imagen-3.0-capability-001")
マスクベースの編集
Imagen のマスクベースの編集では、モデルが操作する特定の領域を定義して画像を修正できます。この機能により、マスクの作成と適用、オブジェクトの挿入と削除、元の境界を超えた画像コンテンツの拡張など、さまざまな操作が可能になります。
マスクを作成する
オブジェクトの挿入や削除などのマスクベースの編集を行うには、モデルで編集する必要がある領域(マスク)を定義する必要があります。
マスクを作成するには、ImagenBackgroundMask() または ImagenSemanticMask() を使用してモデルに自動生成させ、クラス ID を渡します。
マスク ビットマップを生成して ImagenRawMask に変換することで、画面上でマスクを手動で描画することもできます。detectDragGestures と Canvas を使用して、アプリで Jetpack Compose を使用してマスク描画ユーザー インターフェースを実装できます。
//import androidx.compose.ui.graphics.Color as ComposeColor @Composable fun ImagenEditingMaskEditor( sourceBitmap: Bitmap, onMaskFinalized: (Bitmap) -> Unit, ) { val paths = remember { mutableStateListOf<Path>() } var currentPath by remember { mutableStateOf<Path?>(null) } var scale by remember { mutableFloatStateOf(1f) } var offsetX by remember { mutableFloatStateOf(0f) } var offsetY by remember { mutableFloatStateOf(0f) } Column( modifier = Modifier.fillMaxSize(), ) { Box( modifier = Modifier .fillMaxWidth() .pointerInput(Unit) { detectDragGestures( onDragStart = { startOffset -> val transformedStart = Offset( (startOffset.x - offsetX) / scale, (startOffset.y - offsetY) / scale, ) currentPath = Path().apply { moveTo(transformedStart.x, transformedStart.y) } }, onDrag = { change, _ -> currentPath?.let { val transformedChange = Offset( (change.position.x - offsetX) / scale, (change.position.y - offsetY) / scale, ) it.lineTo(transformedChange.x, transformedChange.y) currentPath = Path().apply { addPath(it) } } change.consume() }, onDragEnd = { currentPath?.let { paths.add(it) } currentPath = null }, ) }, ) { Image( bitmap = sourceBitmap.asImageBitmap(), contentDescription = null, modifier = Modifier.fillMaxSize(), contentScale = ContentScale.Fit, ) Canvas(modifier = Modifier.fillMaxSize()) { val canvasWidth = size.width val canvasHeight = size.height val bitmapWidth = sourceBitmap.width.toFloat() val bitmapHeight = sourceBitmap.height.toFloat() scale = min(canvasWidth / bitmapWidth, canvasHeight / bitmapHeight) offsetX = (canvasWidth - bitmapWidth * scale) / 2 offsetY = (canvasHeight - bitmapHeight * scale) / 2 withTransform( { translate(left = offsetX, top = offsetY) scale(scale, scale, pivot = Offset.Zero) }, ) { val strokeWidth = 70f / scale val stroke = Stroke(width = strokeWidth, cap = StrokeCap.Round, join = StrokeJoin.Round) val pathColor = ComposeColor.White.copy(alpha = 0.5f) paths.forEach { path -> drawPath(path = path, color = pathColor, style = stroke) } currentPath?.let { path -> drawPath(path = path, color = pathColor, style = stroke) } } } } Button( onClick = { val maskBitmap = createMaskBitmap(sourceBitmap, paths) onMaskFinalized(maskBitmap) }, ) { Text("Save mask") } } }
次に、キャンバスにパスを描画して、マスク ビットマップを作成できます。
// import android.graphics.Color as AndroidColor // import android.graphics.Paint private fun createMaskBitmap( sourceBitmap: Bitmap, paths: SnapshotStateList<Path>, ): Bitmap { val maskBitmap = Bitmap.createBitmap(sourceBitmap.width, sourceBitmap.height, Bitmap.Config.ARGB_8888) val canvas = android.graphics.Canvas(maskBitmap) val paint = Paint().apply { color = AndroidColor.RED strokeWidth = 70f style = Paint.Style.STROKE strokeCap = Paint.Cap.ROUND strokeJoin = Paint.Join.ROUND isAntiAlias = true } paths.forEach { path -> canvas.drawPath(path.asAndroidPath(), paint) } return maskBitmap }
マスクがソース画像と同じサイズであることを確認します。詳細については、Imagen AI カタログのサンプルをご覧ください。
オブジェクトを挿入する
既存の画像に新しいオブジェクトやコンテンツを挿入できます(インペインティング)。モデルは、新しいコンテンツを生成して、指定したマスク領域に挿入します。
これを行うには、editImage() 関数を使用します。元の画像、マスク、挿入するコンテンツを説明するテキスト プロンプトを指定する必要があります。また、ImagenEditingConfig オブジェクトを渡し、その editMode プロパティが ImagenEditMode.INPAINT_INSERTION に設定されていることを確認します。
suspend fun insertFlowersIntoImage( model: ImagenModel, originalImage: Bitmap, mask: ImagenMaskReference ): ImagenGenerationResponse<ImagenInlineImage> { val prompt = "a vase of flowers" // Pass the original image, a mask, the prompt, and an editing configuration. val editedImage = model.editImage( referenceImages = listOf( ImagenRawImage(originalImage.toImagenInlineImage()), mask, ), prompt = prompt, // Define the editing configuration for inpainting and insertion. config = ImagenEditingConfig(ImagenEditMode.INPAINT_INSERTION) ) return editedImage }
オブジェクトを削除する
インペイントを使用すると、画像から不要なオブジェクトを削除できます。これを行うには、editImage 関数を使用します。元の画像と、削除するオブジェクトをハイライト表示するマスクを指定する必要があります。必要に応じて、オブジェクトを説明するテキスト プロンプトを含めることができます。これは、モデルがオブジェクトを正確に識別するのに役立ちます。また、ImagenEditingConfig 内の editMode を ImagenEditMode.INPAINT_REMOVAL に設定する必要があります。
suspend fun removeBallFromImage( model: ImagenModel, originalImage: Bitmap, mask: ImagenMaskReference ): ImagenGenerationResponse<ImagenInlineImage> { // Optional: provide the prompt describing the content to be removed. val prompt = "a ball" // Pass the original image, a mask, the prompt, and an editing configuration. val editedImage = model.editImage( referenceImages = listOf( ImagenRawImage(originalImage.toImagenInlineImage()), mask ), prompt = prompt, // Define the editing configuration for inpainting and removal. config = ImagenEditingConfig(ImagenEditMode.INPAINT_REMOVAL) ) return editedImage }
画像コンテンツを拡大する
outpaintImage() 関数を使用すると、画像を元の境界を超えて拡張できます。これはアウトペインティングと呼ばれます。この関数には、元の画像と、拡大された画像の必要な Dimensions が必要です。必要に応じて、拡張の説明プロンプトを含め、生成された新しい画像内の元の画像の ImagenImagePlacement を指定できます。
suspend fun expandImage(originalImage: Bitmap, imagenModel: ImagenModel): ImagenGenerationResponse<ImagenInlineImage> { // Optionally describe what should appear in the expanded area. val prompt = "a sprawling sandy beach next to the ocean" val editedImage = imagenModel.outpaintImage( originalImage.toImagenInlineImage(), Dimensions(1024, 1024), prompt = prompt, newPosition = ImagenImagePlacement.LEFT_CENTER ) return editedImage }
背景を置き換える
前景の被写体を保持したまま、画像の背景を置き換えることができます。これを行うには、editImage 関数を使用します。元の画像、ImagenBackgroundMask オブジェクト(新しい背景のテキスト プロンプトを含む)、editMode プロパティが ImagenEditMode.INPAINT_INSERTION に設定された ImagenEditingConfig を渡します。
suspend fun replaceBackground(model: ImagenModel, originalImage: Bitmap): ImagenGenerationResponse<ImagenInlineImage> { // Provide the prompt describing the new background. val prompt = "space background" // Pass the original image, a mask, the prompt, and an editing configuration. val editedImage = model.editImage( referenceImages = listOf( ImagenRawImage(originalImage.toImagenInlineImage()), ImagenBackgroundMask(), ), prompt = prompt, config = ImagenEditingConfig(ImagenEditMode.INPAINT_INSERTION) ) return editedImage }
カスタマイズ
Imagen のカスタマイズ機能を使用すると、被写体、コントロール、スタイルを指定する参照画像に基づいて画像を生成または編集できます。これは、モデルをガイドするテキスト プロンプトと 1 つ以上の参照画像を提供することで実現されます。
件名に基づいてカスタマイズする
参照画像(商品、人物、動物など)から特定の被写体の新しい画像を生成できます。テキスト プロンプトと、被写体の参照画像を 1 枚以上指定するだけです。たとえば、ペットの写真をアップロードして、まったく異なる環境でペットの新しい画像を生成できます。
これを行うには、ImagenSubjectReference を使用して件名参照を定義し、プロンプトとともに editImage に渡します。また、editSteps の数を指定する ImagenEditingConfig も含めます。一般的に、editSteps の値が高いほど、結果の品質が向上します。
suspend fun customizeCatImage(model: ImagenModel, referenceCatImage: Bitmap): ImagenGenerationResponse<ImagenInlineImage> { // Define the subject reference using the reference image. val subjectReference = ImagenSubjectReference( image = referenceCatImage.toImagenInlineImage(), referenceId = 1, description = "cat", subjectType = ImagenSubjectReferenceType.ANIMAL ) // Provide a prompt that describes the final image. // The "[1]" links the prompt to the subject reference with ID 1. val prompt = "A cat[1] flying through outer space" // Use the editImage API to perform the subject customization. val editedImage = model.editImage( referenceImages = listOf(subjectReference), prompt = prompt, config = ImagenEditingConfig( editSteps = 50 // Number of editing steps, a higher value can improve quality ) ) return editedImage }
コントロールに基づいてカスタマイズする
この手法では、手描きのスケッチ(「フリーハンド」)、Canny エッジ画像、顔メッシュなどのコントロール参照画像に基づいて新しい画像を生成します。モデルは、新しい画像のレイアウトと構図の構造ガイドとして制御画像を使用し、テキスト プロンプトは色や質感などの詳細を提供します。
ImagenControlReference で制御参照を定義し、プロンプトと ImagenEditingConfig(editSteps の数。値を大きくすると品質が向上する可能性があります)とともに editImage に提供します。
suspend fun customizeCatImageByControl(model: ImagenModel, referenceImage: Bitmap): ImagenGenerationResponse<ImagenInlineImage> { // Define the subject reference using the reference image. val controlReference = ImagenControlReference( image = referenceImage.toImagenInlineImage(), referenceId = 1, type = ImagenControlType.SCRIBBLE, ) val prompt = "A cat flying through outer space arranged like the scribble map[1]" val editedImage = model.editImage( referenceImages = listOf(controlReference), prompt = prompt, config = ImagenEditingConfig( editSteps = 50 ), ) return editedImage }
スタイルに基づいてカスタマイズする
参照画像から特定のスタイル(パターン、テクスチャ、デザインなど)に合わせて画像を生成または編集できます。モデルは参照画像を使用して必要な美観を理解し、テキスト プロンプトで説明されている新しい画像に適用します。たとえば、有名な絵画の画像を指定して、その絵画のスタイルで猫の画像を生成できます。
ImagenStyleReference でスタイル参照を定義し、プロンプトと editImage に渡します。また、ImagenEditingConfig に editSteps の数を指定します(値を大きくすると品質が向上します)。
suspend fun customizeImageByStyle(model: ImagenModel, referenceVanGoghImage: Bitmap): ImagenGenerationResponse<ImagenInlineImage> { // Define the style reference using the reference image. val styleReference = ImagenStyleReference( image = referenceVanGoghImage.toImagenInlineImage(), referenceId = 1, description = "Van Gogh style" ) // Provide a prompt that describes the final image. // The "1" links the prompt to the style reference with ID 1. val prompt = "A cat flying through outer space, in the Van Gogh style[1]" // Use the editImage API to perform the style customization. val editedImage = model.editImage( referenceImages = listOf(styleReference), prompt = prompt, config = ImagenEditingConfig( editSteps = 50 // Number of editing steps, a higher value can improve quality ), ) return editedImage }
次のステップ
- Firebase AI Logic の詳細については、Firebase のドキュメントをご覧ください。
- Android AI サンプル カタログをご覧ください。