借助 Jetpack Compose for XR,您可以使用熟悉的 Compose 概念(例如行和列)以声明方式构建空间界面和布局。这样一来,您就可以将现有的 Android 界面扩展到 3D 空间,或者构建全新的沉浸式 3D 应用。
如果您要将基于 Android View 的现有应用空间化,则有多种开发选项。您可以使用互操作性 API,将 Compose 和 View 搭配使用,也可以直接使用 SceneCore 库。如需了解详情,请参阅我们的视图使用指南。
关于子空间和空间化组件
在为 Android XR 编写应用时,请务必了解子空间和空间化组件的概念。
关于子空间
为 Android XR 开发时,您需要在应用或布局中添加 Subspace。子空间是应用中 3D 空间的一部分,您可以在其中放置 3D 内容、构建 3D 布局,以及为原本的 2D 内容添加深度。仅当启用空间化时,才会渲染子空间。在 Home Space 或非 XR 设备上,该子空间内的任何代码都会被忽略。
您可以通过以下两种方式创建子空间:
Subspace:此可组合项可放置在应用界面层次结构中的任何位置,让您能够维护 2D 和空间界面的布局,而不会丢失文件之间的上下文。这样一来,您就可以更轻松地在 XR 和其他设备类型之间共享现有应用架构,而无需通过整个界面树提升状态或重新设计应用架构。ApplicationSubspace:此函数仅创建应用级子空间,必须放置在应用的空间界面层次结构的最高级别。ApplicationSubspace使用可选的VolumeConstraints渲染空间内容。与Subspace不同,ApplicationSubspace不能嵌套在其他Subspace或ApplicationSubspace中。
如需了解详情,请参阅向应用添加子空间。
关于空间化组件
子空间可组合项:这些组件只能在子空间中呈现。
它们必须先封装在 Subspace 中,然后才能放置在 2D 布局中。
借助 SubspaceModifier,您可以向子空间可组合项添加深度、偏移和定位等属性。
其他空间化组件不需要在子空间内调用。它们由封装在空间容器中的常规 2D 元素组成。如果为 2D 和 3D 布局都定义了这些元素,则可以在这两种布局中使用它们。如果未启用空间化,系统将忽略其空间化功能,并回退到其 2D 对应项。
创建空间面板
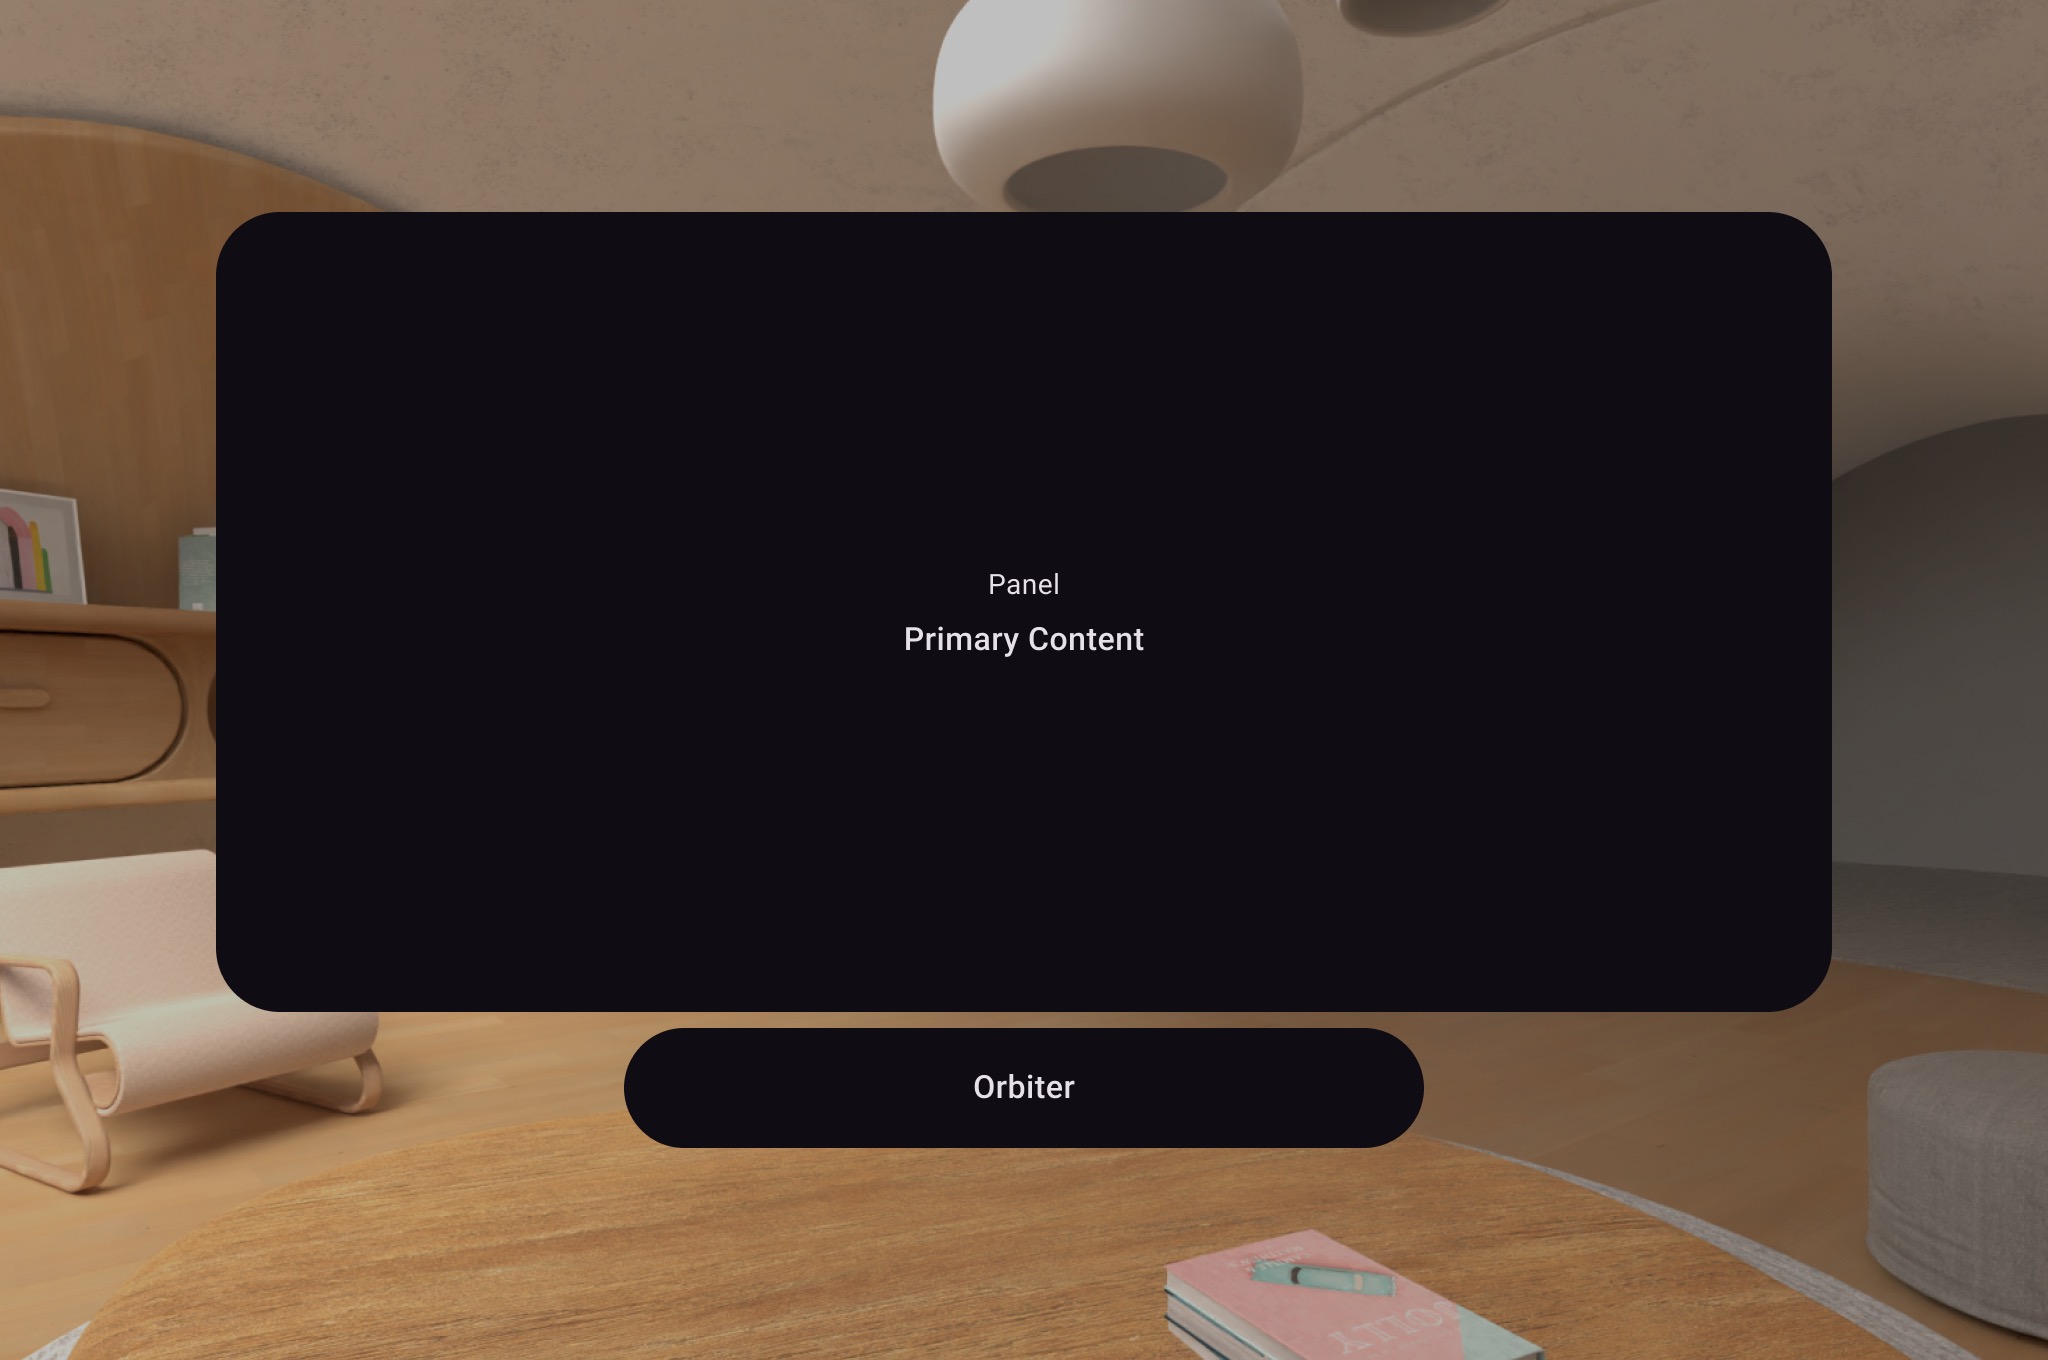
SpatialPanel 是一种子空间可组合项,可用于显示应用内容,例如,您可以在空间面板中显示视频播放、静态图片或任何其他内容。

您可以使用 SubspaceModifier 更改空间面板的大小、行为和位置,如以下示例所示。
Subspace { SpatialPanel( SubspaceModifier .height(824.dp) .width(1400.dp), dragPolicy = MovePolicy(), resizePolicy = ResizePolicy(), ) { SpatialPanelContent() } }
@Composable fun SpatialPanelContent() { Box( Modifier .background(color = Color.Black) .height(500.dp) .width(500.dp), contentAlignment = Alignment.Center ) { Text( text = "Spatial Panel", color = Color.White, fontSize = 25.sp ) } }
代码要点
- 由于
SpatialPanelAPI 是子空间可组合项,因此您必须在Subspace内调用它们。在子空间之外调用它们会抛出异常。 SpatialPanel的大小已使用SubspaceModifier上的height和width规范进行设置。如果省略这些规范,面板的大小将由其内容的测量结果决定。- 通过添加
MovePolicy允许用户移动面板。 - 通过添加
ResizePolicy允许用户调整面板大小。 - 如需详细了解尺寸调整和定位,请参阅我们的空间面板设计指南。如需详细了解代码植入,请参阅我们的参考文档。
MovePolicy 的运作方式
当用户将面板移离自己时,默认情况下,MovePolicy 会以类似于系统在主空间中调整面板大小的方式来缩放面板。所有子内容都会继承此行为。如需停用此功能,请将 shouldScaleWithDistance 参数设置为 false。
创建轨道飞行器
轨道器是一种空间界面组件。它旨在附加到相应的空间面板、布局或其他实体。轨道器通常包含与所锚定的实体相关的导航和情境操作项。例如,如果您创建了一个用于显示视频内容的空间面板,则可以在轨道球中添加视频播放控件。

如下例所示,在 SpatialPanel 中调用轨道飞行器,以封装导航等用户控件。这样一来,系统会根据您的配置,从 2D 布局中提取这些视图,并将其附加到空间面板。
Subspace { SpatialPanel( SubspaceModifier .height(824.dp) .width(1400.dp), dragPolicy = MovePolicy(), resizePolicy = ResizePolicy(), ) { SpatialPanelContent() OrbiterExample() } }
@Composable fun OrbiterExample() { Orbiter( position = ContentEdge.Bottom, offset = 96.dp, alignment = Alignment.CenterHorizontally ) { Surface(Modifier.clip(CircleShape)) { Row( Modifier .background(color = Color.Black) .height(100.dp) .width(600.dp), horizontalArrangement = Arrangement.Center, verticalAlignment = Alignment.CenterVertically ) { Text( text = "Orbiter", color = Color.White, fontSize = 50.sp ) } } } }
代码要点
- 由于轨道飞行器是空间界面组件,因此代码可以在 2D 或 3D 布局中重复使用。在 2D 布局中,应用仅渲染轨道飞行器内部的内容,而忽略轨道飞行器本身。
- 如需详细了解如何使用和设计轨道球,请参阅我们的设计指南。
向空间布局添加多个空间面板
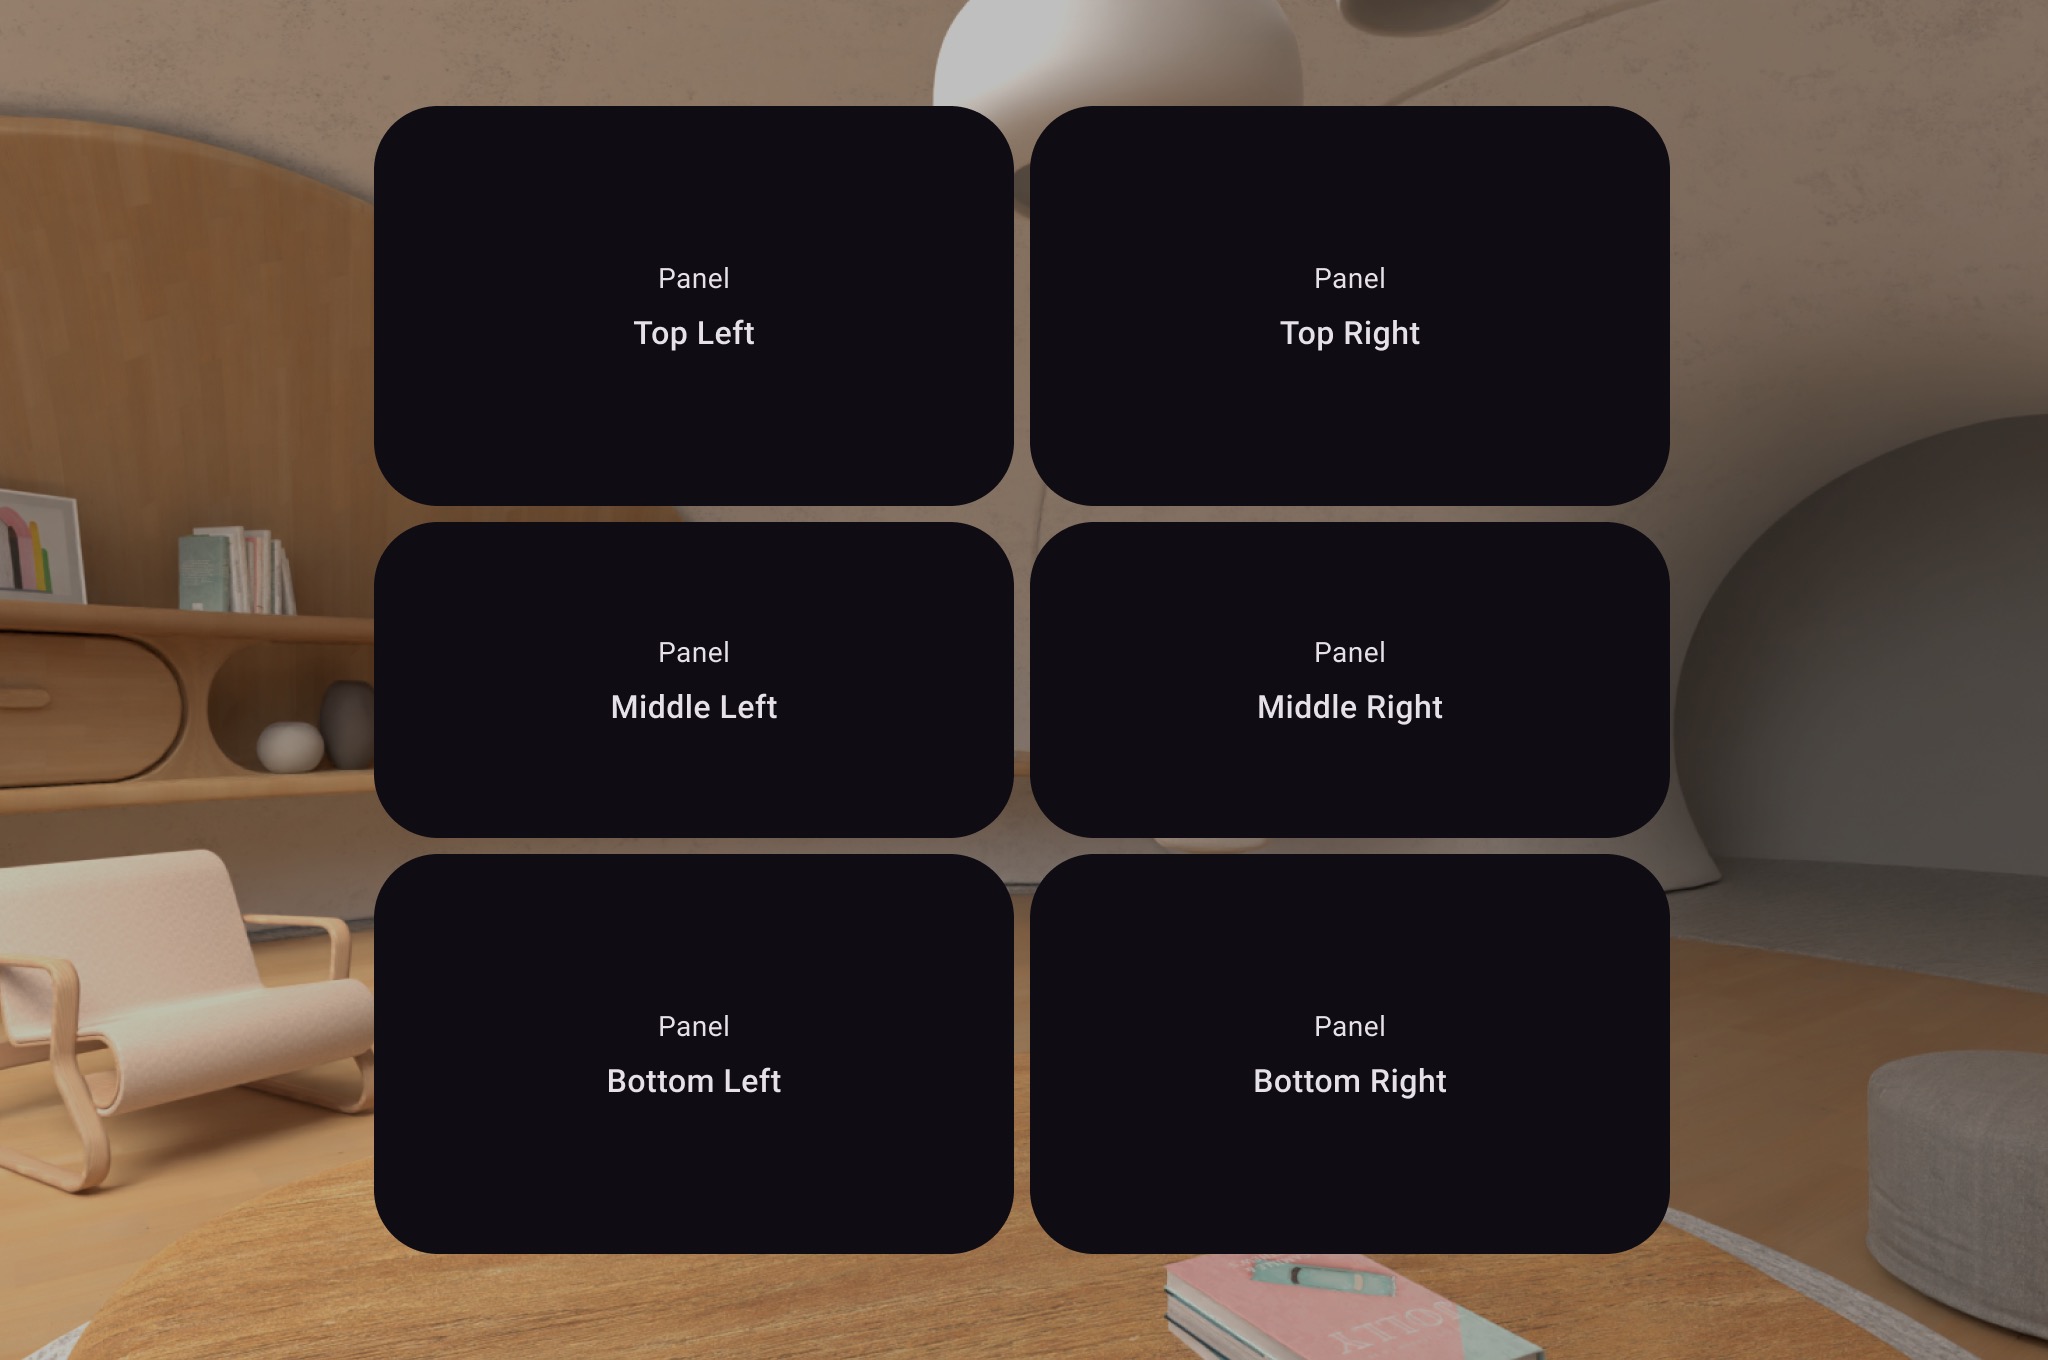
您可以使用 SpatialRow、SpatialColumn、SpatialBox 和 SpatialLayoutSpacer 创建多个空间面板,并将它们放置在空间布局中。

以下代码示例展示了如何执行此操作。
Subspace { SpatialRow { SpatialColumn { SpatialPanel(SubspaceModifier.height(250.dp).width(400.dp)) { SpatialPanelContent("Top Left") } SpatialPanel(SubspaceModifier.height(200.dp).width(400.dp)) { SpatialPanelContent("Middle Left") } SpatialPanel(SubspaceModifier.height(250.dp).width(400.dp)) { SpatialPanelContent("Bottom Left") } } SpatialColumn { SpatialPanel(SubspaceModifier.height(250.dp).width(400.dp)) { SpatialPanelContent("Top Right") } SpatialPanel(SubspaceModifier.height(200.dp).width(400.dp)) { SpatialPanelContent("Middle Right") } SpatialPanel(SubspaceModifier.height(250.dp).width(400.dp)) { SpatialPanelContent("Bottom Right") } } } }
@Composable fun SpatialPanelContent(text: String) { Column( Modifier .background(color = Color.Black) .fillMaxSize(), horizontalAlignment = Alignment.CenterHorizontally, verticalArrangement = Arrangement.Center ) { Text( text = "Panel", color = Color.White, fontSize = 15.sp ) Text( text = text, color = Color.White, fontSize = 25.sp, fontWeight = FontWeight.Bold ) } }
代码要点
SpatialRow、SpatialColumn、SpatialBox和SpatialLayoutSpacer都是子空间可组合项,必须放置在子空间内。- 使用
SubspaceModifier自定义布局。 - 对于一行中有多个面板的布局,我们建议使用
SubspaceModifier将曲面半径设置为 825dp,这样面板就会环绕用户。如需了解详情,请参阅我们的设计指南。
添加图片或视频内容所用的界面
SpatialExternalSurface 是一种可组合的子空间,用于创建和管理应用可在其中绘制内容(例如图片或视频)的 Surface。SpatialExternalSurface 支持立体或单视场内容。
此示例演示了如何使用 Media3 Exoplayer 和 SpatialExternalSurface 加载并排立体视频:
@OptIn(ExperimentalComposeApi::class) @Composable fun SpatialExternalSurfaceContent() { val context = LocalContext.current Subspace { SpatialExternalSurface( modifier = SubspaceModifier .width(1200.dp) // Default width is 400.dp if no width modifier is specified .height(676.dp), // Default height is 400.dp if no height modifier is specified // Use StereoMode.Mono, StereoMode.SideBySide, or StereoMode.TopBottom, depending // upon which type of content you are rendering: monoscopic content, side-by-side stereo // content, or top-bottom stereo content stereoMode = StereoMode.SideBySide, ) { val exoPlayer = remember { ExoPlayer.Builder(context).build() } val videoUri = Uri.Builder() .scheme(ContentResolver.SCHEME_ANDROID_RESOURCE) // Represents a side-by-side stereo video, where each frame contains a pair of // video frames arranged side-by-side. The frame on the left represents the left // eye view, and the frame on the right represents the right eye view. .path("sbs_video.mp4") .build() val mediaItem = MediaItem.fromUri(videoUri) // onSurfaceCreated is invoked only one time, when the Surface is created onSurfaceCreated { surface -> exoPlayer.setVideoSurface(surface) exoPlayer.setMediaItem(mediaItem) exoPlayer.prepare() exoPlayer.play() } // onSurfaceDestroyed is invoked when the SpatialExternalSurface composable and its // associated Surface are destroyed onSurfaceDestroyed { exoPlayer.release() } } } }
代码要点
- 将
StereoMode设置为Mono、SideBySide或TopBottom,具体取决于您要渲染的内容类型:Mono:图像或视频帧由显示给双眼的单个相同图像组成。SideBySide:图片或视频帧包含一对并排排列的图片或视频帧,其中左侧的图片或帧表示左眼视图,右侧的图片或帧表示右眼视图。TopBottom:图片或视频帧包含一对垂直堆叠的图片或视频帧,其中顶部的图片或帧表示左眼视图,底部的图片或帧表示右眼视图。
SpatialExternalSurface仅支持矩形表面。- 此
Surface不会捕获输入事件。 - 无法将
StereoMode更改与应用渲染或视频解码同步。 - 此可组合项无法在其他面板前面呈现,因此如果布局中存在其他面板,您就不应使用
MovePolicy。
添加了用于 DRM 保护的视频内容的 Surface
SpatialExternalSurface 还支持播放受 DRM 保护的视频流。如需启用此功能,您必须创建一个可渲染到受保护的图形缓冲区的安全界面。这样可以防止内容被屏幕录制或被不安全的系统组件访问。
如需创建安全界面,请在 SpatialExternalSurface 可组合项上将 surfaceProtection 参数设置为 SurfaceProtection.Protected。此外,您还必须使用适当的 DRM 信息配置 Media3 Exoplayer,以处理从许可服务器获取许可的过程。
以下示例演示了如何配置 SpatialExternalSurface 和 ExoPlayer 以播放受 DRM 保护的视频流:
@OptIn(ExperimentalComposeApi::class) @Composable fun DrmSpatialVideoPlayer() { val context = LocalContext.current Subspace { SpatialExternalSurface( modifier = SubspaceModifier .width(1200.dp) .height(676.dp), stereoMode = StereoMode.SideBySide, surfaceProtection = SurfaceProtection.Protected ) { val exoPlayer = remember { ExoPlayer.Builder(context).build() } // Define the URI for your DRM-protected content and license server. val videoUri = "https://your-content-provider.com/video.mpd" val drmLicenseUrl = "https://your-license-server.com/license" // Build a MediaItem with the necessary DRM configuration. val mediaItem = MediaItem.Builder() .setUri(videoUri) .setDrmConfiguration( MediaItem.DrmConfiguration.Builder(C.WIDEVINE_UUID) .setLicenseUri(drmLicenseUrl) .build() ) .build() onSurfaceCreated { surface -> // The created surface is secure and can be used by the player. exoPlayer.setVideoSurface(surface) exoPlayer.setMediaItem(mediaItem) exoPlayer.prepare() exoPlayer.play() } onSurfaceDestroyed { exoPlayer.release() } } } }
代码要点
- 受保护的 Surface:将
SpatialExternalSurface上的surfaceProtection = SurfaceProtection.Protected设置为 true 至关重要,这样一来,底层Surface就会由适合 DRM 内容的安全缓冲区提供支持。 - DRM 配置:您必须使用 DRM 方案(例如
C.WIDEVINE_UUID)和许可服务器的 URI 配置MediaItem。ExoPlayer 使用此信息来管理 DRM 会话。 - 安全内容:当渲染到受保护的 surface 时,视频内容会通过安全路径进行解码和显示,这有助于满足内容许可要求。这样还可以防止相应内容出现在屏幕截图中。
添加其他空间界面组件
空间界面组件可以放置在应用界面层次结构中的任何位置。这些元素可在 2D 界面中重复使用,并且只有在启用空间功能时,其空间属性才会显示。这样一来,您无需编写两次代码即可为菜单、对话框和其他组件添加高程。请参阅以下空间界面示例,以便更好地了解如何使用这些元素。
界面组件 |
启用空间化功能后 |
在 2D 环境中 |
|---|---|---|
|
面板将在 z 深度上略微后退,以显示升高的对话框 |
回退到 2D |
|
面板将在 z 深度上略微向后推,以显示升高的弹出式窗口 |
回退到 2D |
|
可将 |
不含空间高度的显示。 |
SpatialDialog
这是一个在短暂延迟后打开的对话框的示例。使用 SpatialDialog 时,对话框会显示在与空间面板相同的 z 深度,并且在启用空间化时,面板会向后推 125dp。如果未启用空间化,也可以使用 SpatialDialog,在这种情况下,SpatialDialog 会回退到其 2D 对应项 Dialog。
@Composable fun DelayedDialog() { var showDialog by remember { mutableStateOf(false) } LaunchedEffect(Unit) { delay(3000) showDialog = true } if (showDialog) { SpatialDialog( onDismissRequest = { showDialog = false }, SpatialDialogProperties( dismissOnBackPress = true ) ) { Box( Modifier .height(150.dp) .width(150.dp) ) { Button(onClick = { showDialog = false }) { Text("OK") } } } } }
代码要点
- 这是一个
SpatialDialog的示例。使用SpatialPopup和SpatialElevation非常相似。如需了解详情,请参阅我们的 API 参考文档。
创建自定义面板和布局
如需创建不受 Compose for XR 支持的自定义面板,您可以使用 SceneCore API 直接处理 PanelEntity 实例和场景图。
将轨道飞行器锚定到空间布局和其他实体
您可以将轨道飞行器锚定到 Compose 中声明的任何实体。这需要在界面元素(例如 SpatialRow、SpatialColumn 或 SpatialBox)的空间布局中声明轨道器。轨道飞行器会锚定到离您声明它的位置最近的父实体。
轨道飞行器的行为取决于您声明它的位置:
- 在封装在
SpatialPanel中的 2D 布局中(如前面的代码段所示),轨道球会锚定到该SpatialPanel。 - 在
Subspace中,轨道器会锚定到最近的父实体,即声明轨道器的空间布局。
以下示例展示了如何将轨道飞行器锚定到空间行:
Subspace { SpatialRow { Orbiter( position = ContentEdge.Top, offset = 8.dp, offsetType = OrbiterOffsetType.InnerEdge, shape = SpatialRoundedCornerShape(size = CornerSize(50)) ) { Text( "Hello World!", style = MaterialTheme.typography.titleMedium, modifier = Modifier .background(Color.White) .padding(16.dp) ) } SpatialPanel( SubspaceModifier .height(824.dp) .width(1400.dp) ) { Box( modifier = Modifier .background(Color.Red) ) } SpatialPanel( SubspaceModifier .height(824.dp) .width(1400.dp) ) { Box( modifier = Modifier .background(Color.Blue) ) } } }
代码要点
- 在 2D 布局之外声明轨道器时,轨道器会锚定到其最近的父实体。在这种情况下,轨道飞行器会锚定到声明它的
SpatialRow的顶部。 SpatialRow、SpatialColumn、SpatialBox等空间布局都具有与之关联的无内容实体。因此,在空间布局中声明的轨道飞行器会锚定到该布局。

