

Gemini Developer API ช่วยให้คุณเข้าถึงโมเดล Gemini ของ Google เพื่อสร้างฟีเจอร์ Generative AI ที่ล้ำสมัยลงในแอป Android ได้ ซึ่งรวมถึง แชทแบบสนทนา การสร้างรูปภาพ (ด้วย Nano Banana) และการสร้างข้อความ ตามอินพุตข้อความ รูปภาพ เสียง และวิดีโอ
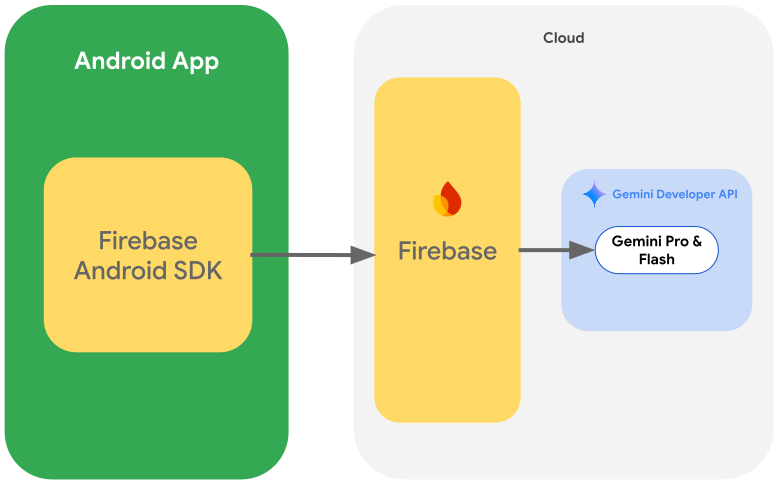
หากต้องการเข้าถึงโมเดล Gemini Pro และ Flash คุณสามารถใช้ Gemini Developer API กับ Firebase AI Logic ได้ ซึ่งช่วยให้คุณเริ่มต้นใช้งานได้โดยไม่ต้องระบุวิธีการชำระเงิน (เช่น บัตรเครดิต) และมีระดับฟรีที่ให้โควต้าอย่างมาก เมื่อ ตรวจสอบการผสานรวมกับฐานผู้ใช้ขนาดเล็กแล้ว คุณจะขยายขนาดได้โดยการอัปเกรดเป็น ระดับแบบชำระเงิน
เริ่มต้นใช้งาน
ก่อนที่จะโต้ตอบกับ Gemini API โดยตรงจากแอป คุณจะต้องทำสิ่งต่อไปนี้ก่อน ซึ่งรวมถึงการทำความคุ้นเคยกับการแจ้ง รวมถึง การตั้งค่า Firebase และแอปเพื่อใช้ SDK
ทดลองใช้พรอมต์
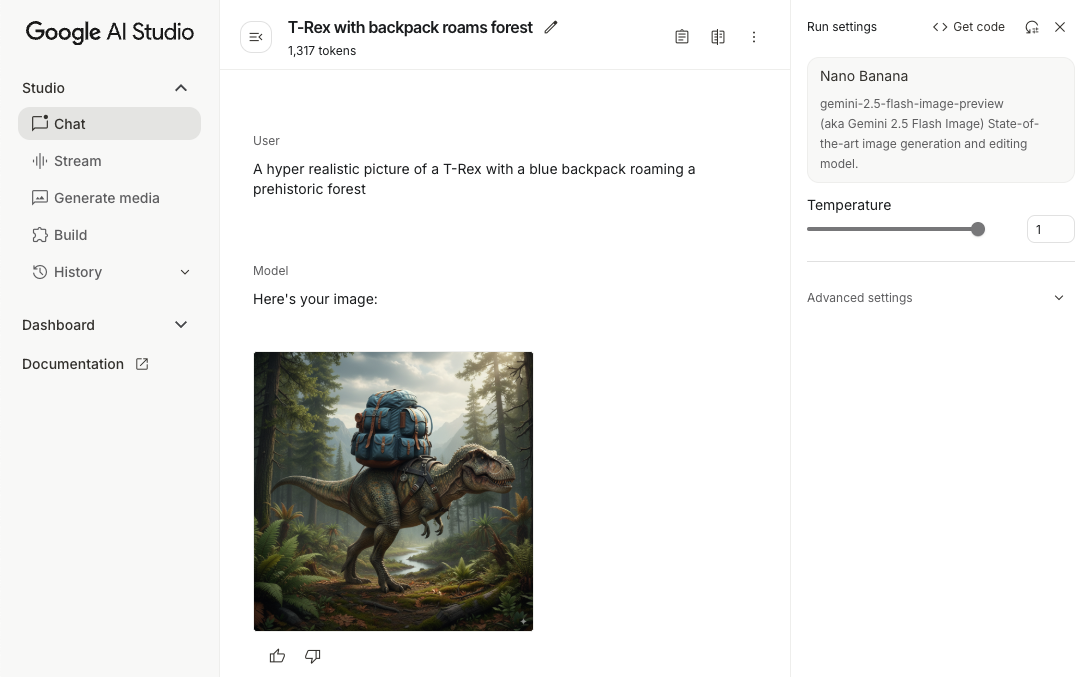
การทดลองใช้พรอมต์จะช่วยให้คุณค้นหาวลี เนื้อหา และรูปแบบที่ดีที่สุดสำหรับแอป Android ได้ Google AI Studio คือสภาพแวดล้อมการพัฒนาแบบผสานรวม (IDE) ที่คุณใช้สร้างต้นแบบและออกแบบพรอมต์สำหรับกรณีการใช้งานของแอปได้
การสร้างพรอมต์ที่มีประสิทธิภาพสำหรับ Use Case ของคุณต้องผ่านการทดลองอย่างกว้างขวาง ซึ่งเป็นส่วนสำคัญของกระบวนการ ดูข้อมูลเพิ่มเติมเกี่ยวกับการแจ้งได้ในเอกสารประกอบของ Firebase
เมื่อพอใจกับพรอมต์แล้ว ให้คลิกปุ่ม <> เพื่อรับข้อมูลโค้ด ที่คุณเพิ่มลงในโค้ดได้
ตั้งค่าโปรเจ็กต์ Firebase และเชื่อมต่อแอปกับ Firebase
เมื่อพร้อมที่จะเรียกใช้ API จากแอปแล้ว ให้ทำตามวิธีการใน "ขั้นตอนที่ 1" ของคู่มือเริ่มต้นใช้งาน Firebase AI Logic เพื่อตั้งค่า Firebase และเปิดใช้ API และบริการที่จำเป็น
เพิ่มการอ้างอิง Gradle
เพิ่มทรัพยากร Dependency ของ Gradle ต่อไปนี้ลงในโมดูลแอป
Kotlin
dependencies {
  // ... other androidx dependencies

  // Import the BoM for the Firebase platform
  implementation(platform("com.google.firebase:firebase-bom:34.18.0"))

  // Add the dependencies for the Firebase AI Logic and App Check libraries
  // When using the BoM, you don't specify versions in Firebase library dependencies
  implementation("com.google.firebase:firebase-ai")
  implementation("com.google.firebase:firebase-appcheck-debug")
}
Java
dependencies {
  // Import the BoM for the Firebase platform
  implementation(platform("com.google.firebase:34.18.0"))

  // Add the dependencies for the Firebase AI Logic and App Check libraries
  // When using the BoM, you don't specify versions in Firebase library dependencies
  implementation("com.google.firebase:firebase-ai")
  implementation("com.google.firebase:firebase-appcheck-debug")

  // Required for one-shot operations (to use `ListenableFuture` from Guava Android)
  implementation("com.google.guava:guava:31.0.1-android")

  // Required for streaming operations (to use `Publisher` from Reactive Streams)
  implementation("org.reactivestreams:reactive-streams:1.0.4")
}
กำหนดค่าผู้ให้บริการแก้ไขข้อบกพร่องของ App Check สำหรับการพัฒนาในเครื่อง
ตั้งแต่ช่วงต้นเดือนกรกฎาคม 2026 เป็นต้นไป Firebase App Check จะบังคับใช้โดยอัตโนมัติเพื่อปกป้อง Gemini API ซึ่งเป็นส่วนหนึ่งของเวิร์กโฟลว์การตั้งค่าแบบมีคำแนะนำสำหรับตรรกะ AI ในคอนโซล Firebase สำหรับการพัฒนาในเครื่อง คุณต้องกำหนดค่าผู้ให้บริการแก้ไขข้อบกพร่องของ App Check เพื่อข้ามการรับรองในขณะที่ยังคงการบังคับใช้ App Check
ในการสร้างการแก้ไขข้อบกพร่อง ให้กำหนดค่า App Check ให้ใช้ผู้ให้บริการแก้ไขข้อบกพร่อง factory ดังนี้
Kotlin
Firebase.initialize(context = this)
Firebase.appCheck.installAppCheckProviderFactory(
    DebugAppCheckProviderFactory.getInstance(),
)
Java
FirebaseApp.initializeApp(/*context=*/ this);
FirebaseAppCheck firebaseAppCheck = FirebaseAppCheck.getInstance();
firebaseAppCheck.installAppCheckProviderFactory(
        DebugAppCheckProviderFactory.getInstance());
รับโทเค็นการแก้ไขข้อบกพร่องโดยทำดังนี้
เรียกใช้แอปในโปรแกรมจำลองหรือบนอุปกรณ์ทดสอบ
มองหาโทเค็นการแก้ไขข้อบกพร่องของ App Check ในบันทึก เช่น
D DebugAppCheckProvider: Enter this debug secret into the allow list
in the Firebase Console for your project: 123a4567-b89c-12d3-e456-789012345678
คัดลอกโทเค็น (เช่น
123a4567-b89c-12d3-e456-789012345678)
ลงทะเบียนโทเค็นการแก้ไขข้อบกพร่องกับ App Check โดยทำดังนี้
ในคอนโซล Firebase ให้ไปที่ ความปลอดภัย > App Check > แท็บแอป
ค้นหาแอปของคุณ คลิกเมนูรายการเพิ่มเติม () แล้วเลือก จัดการโทเค็นการแก้ไขข้อบกพร่อง
ทำตามวิธีการบนหน้าจอเพื่อลงทะเบียนโทเค็นการแก้ไขข้อบกพร่อง
ดูรายละเอียดเกี่ยวกับผู้ให้บริการแก้ไขข้อบกพร่อง (รวมถึงวิธีรับโทเค็นการแก้ไขข้อบกพร่องใหม่) ได้ที่เอกสารอย่างเป็นทางการของ App Check
เริ่มต้นโมเดล Generative
เริ่มต้นด้วยการสร้างอินสแตนซ์ของ GenerativeModel และระบุชื่อโมเดล
Kotlin
// Start by instantiating a GenerativeModel and specifying the model name: val model = Firebase.ai(backend = GenerativeBackend.googleAI()) .generativeModel("gemini-3.5-flash")
Java
GenerativeModel firebaseAI = FirebaseAI.getInstance(GenerativeBackend.googleAI()) .generativeModel("gemini-3.5-flash"); GenerativeModelFutures model = GenerativeModelFutures.from(firebaseAI);
ดูข้อมูลเพิ่มเติมเกี่ยวกับโมเดลที่พร้อมใช้งานเพื่อใช้กับ Gemini Developer API นอกจากนี้ คุณยังดูข้อมูลเพิ่มเติมเกี่ยวกับ การกำหนดค่าพารามิเตอร์ของโมเดลได้ด้วย
โต้ตอบกับ Gemini Developer API จากแอป
เมื่อตั้งค่า Firebase และแอปให้ใช้ SDK แล้ว คุณก็พร้อมที่จะ โต้ตอบกับ Gemini Developer API จากแอป
สร้างข้อความ
หากต้องการสร้างคำตอบเป็นข้อความ ให้เรียกใช้ generateContent() พร้อมพรอมต์ของคุณ
Kotlin
scope.launch { val response = model.generateContent("Write a story about a magic backpack.") }
Java
Content prompt = new Content.Builder() .addText("Write a story about a magic backpack.") .build(); ListenableFuture<GenerateContentResponse> response = model.generateContent(prompt); Futures.addCallback(response, new FutureCallback<GenerateContentResponse>() { @Override public void onSuccess(GenerateContentResponse result) { String resultText = result.getText(); } @Override public void onFailure(Throwable t) { t.printStackTrace(); } }, executor);
สร้างข้อความจากรูปภาพและสื่ออื่นๆ
นอกจากนี้ คุณยังสร้างข้อความจากพรอมต์ที่มีข้อความและรูปภาพหรือสื่ออื่นๆ ได้ด้วย
เมื่อโทรหา generateContent() คุณจะส่งสื่อเป็นข้อมูลในบรรทัดได้
เช่น หากต้องการใช้บิตแมป ให้ใช้ประเภทเนื้อหา image ดังนี้
Kotlin
scope.launch { val response = model.generateContent( content { image(bitmap) text("what is the object in the picture?") } ) }
Java
Content content = new Content.Builder() .addImage(bitmap) .addText("what is the object in the picture?") .build(); ListenableFuture<GenerateContentResponse> response = model.generateContent(content); Futures.addCallback(response, new FutureCallback<GenerateContentResponse>() { @Override public void onSuccess(GenerateContentResponse result) { String resultText = result.getText(); } @Override public void onFailure(Throwable t) { t.printStackTrace(); } }, executor);
หากต้องการส่งไฟล์เสียง ให้ใช้inlineDataประเภทเนื้อหาต่อไปนี้
Kotlin
scope.launch { val contentResolver = applicationContext.contentResolver contentResolver.openInputStream(audioUri).use { stream -> stream?.let { val bytes = it.readBytes() val prompt = content { inlineData(bytes, "audio/mpeg") // Specify the appropriate audio MIME type text("Transcribe this audio recording.") } val response = model.generateContent(prompt) } } }
Java
ContentResolver resolver = applicationContext.getContentResolver(); try (InputStream stream = resolver.openInputStream(audioUri)) { File audioFile = new File(new URI(audioUri.toString())); int audioSize = (int) audioFile.length(); byte[] audioBytes = new byte[audioSize]; if (stream != null) { stream.read(audioBytes, 0, audioBytes.length); stream.close(); // Provide a prompt that includes audio specified earlier and text Content prompt = new Content.Builder() .addInlineData(audioBytes, "audio/mpeg") // Specify the appropriate audio MIME type .addText("Transcribe what's said in this audio recording.") .build(); // To generate text output, call `generateContent` with the prompt ListenableFuture<GenerateContentResponse> response = model.generateContent(prompt); Futures.addCallback(response, new FutureCallback<GenerateContentResponse>() { @Override public void onSuccess(GenerateContentResponse result) { String text = result.getText(); Log.d(TAG, (text == null) ? "" : text); } @Override public void onFailure(Throwable t) { Log.e(TAG, "Failed to generate a response", t); } }, executor); } else { Log.e(TAG, "Error getting input stream for file."); // Handle the error appropriately } } catch (IOException e) { Log.e(TAG, "Failed to read the audio file", e); } catch (URISyntaxException e) { Log.e(TAG, "Invalid audio file", e); }
หากต้องการระบุไฟล์วิดีโอ ให้ใช้inlineDataประเภทเนื้อหาต่อไปนี้
Kotlin
scope.launch { val contentResolver = applicationContext.contentResolver contentResolver.openInputStream(videoUri).use { stream -> stream?.let { val bytes = it.readBytes() val prompt = content { inlineData(bytes, "video/mp4") // Specify the appropriate video MIME type text("Describe the content of this video") } val response = model.generateContent(prompt) } } }
Java
ContentResolver resolver = applicationContext.getContentResolver(); try (InputStream stream = resolver.openInputStream(videoUri)) { File videoFile = new File(new URI(videoUri.toString())); int videoSize = (int) videoFile.length(); byte[] videoBytes = new byte[videoSize]; if (stream != null) { stream.read(videoBytes, 0, videoBytes.length); stream.close(); // Provide a prompt that includes video specified earlier and text Content prompt = new Content.Builder() .addInlineData(videoBytes, "video/mp4") .addText("Describe the content of this video") .build(); // To generate text output, call generateContent with the prompt ListenableFuture<GenerateContentResponse> response = model.generateContent(prompt); Futures.addCallback(response, new FutureCallback<GenerateContentResponse>() { @Override public void onSuccess(GenerateContentResponse result) { String resultText = result.getText(); System.out.println(resultText); } @Override public void onFailure(Throwable t) { t.printStackTrace(); } }, executor); } } catch (IOException e) { e.printStackTrace(); } catch (URISyntaxException e) { e.printStackTrace(); }
ในทำนองเดียวกัน คุณยังส่งเอกสาร PDF (application/pdf) และข้อความธรรมดา
(text/plain) ได้โดยส่ง MIME Type ของเอกสารนั้นๆ เป็นพารามิเตอร์
การสนทนาไปมา
นอกจากนี้ คุณยังรองรับการสนทนาไปมาได้ด้วย เริ่มต้นแชทด้วยฟังก์ชัน startChat() คุณเลือกให้ประวัติข้อความแก่โมเดลได้
จากนั้นเรียกใช้ฟังก์ชัน sendMessage() เพื่อส่งข้อความแชท
Kotlin
val chat = model.startChat( history = listOf( content(role = "user") { text("Hello, I have 2 dogs in my house.") }, content(role = "model") { text("Great to meet you. What would you like to know?") } ) ) scope.launch { val response = chat.sendMessage("How many paws are in my house?") }
Java
Content.Builder userContentBuilder = new Content.Builder(); userContentBuilder.setRole("user"); userContentBuilder.addText("Hello, I have 2 dogs in my house."); Content userContent = userContentBuilder.build(); Content.Builder modelContentBuilder = new Content.Builder(); modelContentBuilder.setRole("model"); modelContentBuilder.addText("Great to meet you. What would you like to know?"); Content modelContent = modelContentBuilder.build(); List<Content> history = Arrays.asList(userContent, modelContent); // Initialize the chat ChatFutures chat = model.startChat(history); // Create a new user message Content.Builder messageBuilder = new Content.Builder(); messageBuilder.setRole("user"); messageBuilder.addText("How many paws are in my house?"); Content message = messageBuilder.build(); // Send the message ListenableFuture<GenerateContentResponse> response = chat.sendMessage(message); Futures.addCallback(response, new FutureCallback<GenerateContentResponse>() { @Override public void onSuccess(GenerateContentResponse result) { String resultText = result.getText(); System.out.println(resultText); } @Override public void onFailure(Throwable t) { t.printStackTrace(); } }, executor);
สร้างรูปภาพบน Android ด้วย Nano Banana
โมเดล Gemini Image (หรือที่เรียกว่า โมเดล Nano Banana) สามารถสร้างและแก้ไข รูปภาพได้โดยใช้ความรู้และการให้เหตุผลเกี่ยวกับโลก โดยจะสร้างรูปภาพที่เกี่ยวข้องตามบริบท ผสานรวมหรือแทรกสลับเอาต์พุตข้อความและรูปภาพได้อย่างราบรื่น นอกจากนี้ โมเดลยังสร้างภาพที่แม่นยำด้วยลำดับข้อความยาวๆ และรองรับการแก้ไขรูปภาพโดยใช้การสนทนาพร้อมทั้งคงบริบทไว้
คู่มือนี้อธิบายวิธีใช้โมเดลรูปภาพ Gemini (โมเดล Nano Banana) โดยใช้ Firebase AI Logic SDK สำหรับ Android ดูรายละเอียดเพิ่มเติมเกี่ยวกับการสร้างรูปภาพด้วย Gemini ในเอกสารประกอบของ Firebase
เริ่มต้นโมเดล Generative
สร้างอินสแตนซ์ของ GenerativeModel และระบุชื่อโมเดลรูปภาพ Gemini (เช่น gemini-3.1-flash-image) จากนั้นกำหนดค่า responseModalities ให้มีทั้ง TEXT และ IMAGE เพื่อสร้างข้อความและรูปภาพที่สลับกัน หากคุณยกเว้น
TEXT โมเดลจะแสดงเฉพาะรูปภาพ
Kotlin
val model = Firebase.ai(backend = GenerativeBackend.googleAI()).generativeModel( modelName = "gemini-3.1-flash-image", // Configure the model to respond with images (required) and text (optional) generationConfig = generationConfig { responseModalities = listOf( ResponseModality.TEXT, ResponseModality.IMAGE ) } )
Java
GenerativeModel ai = FirebaseAI.getInstance(GenerativeBackend.googleAI()).generativeModel( "gemini-3.1-flash-image", // Configure the model to respond with text and images (required) new GenerationConfig.Builder() .setResponseModalities(Arrays.asList(ResponseModality.TEXT, ResponseModality.IMAGE)) .build() ); GenerativeModelFutures model = GenerativeModelFutures.from(ai);
สร้างรูปภาพ (ป้อนข้อความเท่านั้น)
คุณสั่งให้โมเดล Gemini สร้างรูปภาพได้โดยระบุพรอมต์ที่เป็นข้อความเท่านั้น
Kotlin
scope.launch { // Provide a text prompt instructing the model to generate an image val prompt = "A hyper realistic picture of a t-rex with a blue bag pack roaming a pre-historic forest." // To generate image output, call `generateContent` with the text input val generatedImageAsBitmap: Bitmap? = model.generateContent(prompt) .candidates.first().content.parts.filterIsInstance<ImagePart>() .firstOrNull()?.image }
Java
// Provide a text prompt instructing the model to generate an image Content prompt = new Content.Builder() .addText("Generate an image of the Eiffel Tower with fireworks in the background.") .build(); // To generate an image, call `generateContent` with the text input ListenableFuture<GenerateContentResponse> response = model.generateContent(prompt); Futures.addCallback(response, new FutureCallback<GenerateContentResponse>() { @Override public void onSuccess(GenerateContentResponse result) { // iterate over all the parts in the first candidate in the result object for (Part part : result.getCandidates().get(0).getContent().getParts()) { if (part instanceof ImagePart) { ImagePart imagePart = (ImagePart) part; // The returned image as a bitmap Bitmap generatedImageAsBitmap = imagePart.getImage(); break; } } } @Override public void onFailure(Throwable t) { t.printStackTrace(); } }, executor);
แก้ไขรูปภาพ (ข้อความและรูปภาพที่ป้อน)
คุณขอให้โมเดล Gemini แก้ไขรูปภาพที่มีอยู่ได้โดยระบุทั้งข้อความและ รูปภาพอย่างน้อย 1 รูปในพรอมต์
Kotlin
scope.launch { // Provide a text prompt instructing the model to edit the image val prompt = content { image(bitmap) text("Edit this image to make it look like a cartoon") } // To edit the image, call `generateContent` with the prompt (image and text input) val generatedImageAsBitmap: Bitmap? = model.generateContent(prompt) .candidates.first().content.parts.filterIsInstance<ImagePart>().firstOrNull()?.image // Handle the generated text and image }
Java
// Provide an image for the model to edit Bitmap bitmap = BitmapFactory.decodeResource(resources, R.drawable.scones); // Provide a text prompt instructing the model to edit the image Content promptcontent = new Content.Builder() .addImage(bitmap) .addText("Edit this image to make it look like a cartoon") .build(); // To edit the image, call `generateContent` with the prompt (image and text input) ListenableFuture<GenerateContentResponse> response = model.generateContent(promptcontent); Futures.addCallback(response, new FutureCallback<GenerateContentResponse>() { @Override public void onSuccess(GenerateContentResponse result) { // iterate over all the parts in the first candidate in the result object for (Part part : result.getCandidates().get(0).getContent().getParts()) { if (part instanceof ImagePart) { ImagePart imagePart = (ImagePart) part; Bitmap generatedImageAsBitmap = imagePart.getImage(); break; } } } @Override public void onFailure(Throwable t) { t.printStackTrace(); } }, executor);
ทำซ้ำและแก้ไขรูปภาพผ่านการสนทนาไปมา
หากต้องการใช้การแก้ไขรูปภาพในรูปแบบการสนทนา คุณสามารถใช้การสนทนาไปมาได้ ซึ่งจะช่วยให้ส่งคำขอติดตามเพื่อปรับแต่งการแก้ไขได้โดยไม่ต้องส่งรูปภาพต้นฉบับอีกครั้ง
ก่อนอื่น ให้เริ่มต้นแชทกับ startChat() โดยอาจระบุประวัติการแชทด้วย
จากนั้นใช้ sendMessage() สำหรับข้อความถัดไป
Kotlin
scope.launch { // Create the initial prompt instructing the model to edit the image val prompt = content { image(bitmap) text("Edit this image to make it look like a cartoon") } // Initialize the chat val chat = model.startChat() // To generate an initial response, send a user message with the image and text prompt var response = chat.sendMessage(prompt) // Inspect the returned image var generatedImageAsBitmap: Bitmap? = response .candidates.first().content.parts.filterIsInstance<ImagePart>().firstOrNull()?.image // Follow up requests do not need to specify the image again response = chat.sendMessage("But make it old-school line drawing style") generatedImageAsBitmap = response .candidates.first().content.parts.filterIsInstance<ImagePart>().firstOrNull()?.image }
Java
// Provide an image for the model to edit Bitmap bitmap = BitmapFactory.decodeResource(resources, R.drawable.scones); // Initialize the chat ChatFutures chat = model.startChat(); // Create the initial prompt instructing the model to edit the image Content prompt = new Content.Builder() .setRole("user") .addImage(bitmap) .addText("Edit this image to make it look like a cartoon") .build(); // To generate an initial response, send a user message with the image and text prompt ListenableFuture<GenerateContentResponse> response = chat.sendMessage(prompt); // Extract the image from the initial response ListenableFuture<Bitmap> initialRequest = Futures.transform(response, result -> { for (Part part : result.getCandidates().get(0).getContent().getParts()) { if (part instanceof ImagePart) { ImagePart imagePart = (ImagePart) part; return imagePart.getImage(); } } return null; }, executor); // Follow up requests do not need to specify the image again ListenableFuture<GenerateContentResponse> modelResponseFuture = Futures.transformAsync( initialRequest, generatedImage -> { Content followUpPrompt = new Content.Builder() .addText("But make it old-school line drawing style") .build(); return chat.sendMessage(followUpPrompt); }, executor); // Add a final callback to check the reworked image Futures.addCallback(modelResponseFuture, new FutureCallback<GenerateContentResponse>() { @Override public void onSuccess(GenerateContentResponse result) { for (Part part : result.getCandidates().get(0).getContent().getParts()) { if (part instanceof ImagePart) { ImagePart imagePart = (ImagePart) part; Bitmap generatedImageAsBitmap = imagePart.getImage(); break; } } } @Override public void onFailure(Throwable t) { t.printStackTrace(); } }, executor);
ข้อควรพิจารณาและข้อจำกัด
โปรดพิจารณาข้อควรทราบและข้อจำกัดต่อไปนี้
- รูปแบบเอาต์พุต: ระบบจะสร้างรูปภาพเป็น PNG โดยมีขนาดสูงสุด 1024 พิกเซล
- ประเภทอินพุต: โมเดลไม่รองรับอินพุตเสียงหรือวิดีโอสำหรับการสร้างรูปภาพ
- การรองรับภาษา: เพื่อให้ได้ประสิทธิภาพสูงสุด ให้ใช้ภาษาต่อไปนี้
อังกฤษ (
en), สเปน (เม็กซิโก) (es-mx), ญี่ปุ่น (ja-jp), จีนตัวย่อ (zh-cn) และฮินดี (hi-in) - ปัญหาเกี่ยวกับการสร้าง
- การสร้างรูปภาพอาจไม่ทำงานเสมอไป ซึ่งบางครั้งอาจส่งผลให้แสดงผลเป็นข้อความเท่านั้น ลองขอเอาต์พุตรูปภาพอย่างชัดเจน (เช่น "สร้างรูปภาพ" "แสดงรูปภาพไปพร้อมๆ กัน" "อัปเดตรูปภาพ")
- โมเดลอาจหยุดสร้างกลางคัน ลองอีกครั้งหรือลองใช้ พรอมต์อื่น
- โมเดลอาจสร้างข้อความเป็นรูปภาพ ลองขอเอาต์พุตข้อความ อย่างชัดเจน (เช่น "สร้างข้อความบรรยายพร้อม ภาพประกอบ")
ดูรายละเอียดเพิ่มเติมได้ที่เอกสารประกอบของ Firebase
ขั้นตอนถัดไป
หลังจากตั้งค่าแอปแล้ว ให้พิจารณาขั้นตอนถัดไปต่อไปนี้
- ดูแอปตัวอย่างของ Firebase สำหรับการเริ่มต้นใช้งาน Android อย่างรวดเร็วและ แคตตาล็อกตัวอย่าง AI ของ Android ใน GitHub
- เตรียมแอปสำหรับการใช้งานจริง ซึ่งรวมถึง การตั้งค่า Firebase App Check เพื่อปกป้อง Gemini API จากการละเมิดโดยไคลเอ็นต์ที่ไม่ได้รับอนุญาต
- ดูข้อมูลเพิ่มเติมเกี่ยวกับ Firebase AI Logic ในเอกสารประกอบของ Firebase