


欢迎回到“构建智能 Android 应用”博文系列。在本系列中,您将学习如何将一个基本的 Android 应用转变为个性化、智能化的智能体体验。在上一篇博文中,您了解了如何使用 AppFunctions 连接到智能系统。
在这篇博文中,您将学习如何构建在云端运行的自主Agentic Workflows。
有时,任务过于复杂,无法在单个设备会话中完成。例如,预订完整的假期行程涉及协调航班时间、选择酒店房间、预订博物馆门票以及规划餐厅预订。如果您直接在移动设备上运行此多步骤流程,应用可能会关闭,导致您丢失进度。在手机上管理所有这些步骤和 API 凭证也会很快变得复杂。
对于这些长时间运行的多步骤工作流,您可以使用自定义自托管后端。后端在后台执行预订代理,而 Android 应用则连接到会话、直观呈现进度,并仅在必要时请求用户输入。
使用云托管的智能体后端具有以下几项优势:
- 后台执行:预订智能体在云端自主运行,因此即使移动应用进入后台或断开网络连接,进度也不会丢失。
- 复杂的多智能体编排:协调者智能体可以将预订任务委托给专门的子智能体,并处理它们之间的依赖关系。
- 与客户端无关的界面渲染:后端动态描述界面结构,让您无需发布新的客户端版本即可更新界面布局。

考虑到这些优势,我们在 Jetpacker 中添加了预订助理,用于协调航班、酒店、博物馆和餐厅预订。我们来看看如何编排由智能体开发套件 (ADK) 提供支持的多智能体系统,并使用智能体-用户交互协议 (AG-UI) 和智能体-界面协议 (A2UI) 在 Jetpack Compose 中以原生方式发送和显示交互式卡片。
利用 ADK 智能体赋能复杂工作流
您可以使用智能体开发套件 (ADK),而无需使用自定义 REST 端点或复杂的 Web 套接字手动协调编排流程。借助 ADK,您可以定义智能体,并为其配备 Python 函数工具,以便查询数据库和执行预订。

以下是如何定义一个简单智能体并使用 ADK 运行它的方法:
# server/main.py

# Note: ADK supports many different coding languages. For now, we use the Python version as it includes support for A2UI which we'll use later in this blog post.

from google.adk import Agent
from google.adk.runners import InMemoryRunner
from google.adk.tools import FunctionTool

# Define custom tools to interact with database
def search_flights(destination: str, date: str) -> list[str]:
    # In production, here you would query our flight database and return dynamic results
    return ["10:00 AM", "2:00 PM"]

def reserve_flight(flight_time: str) -> str:
    # In production, here you would save the reservation transaction
    return "Reserved flight at " + flight_time

# Instantiate the booking agent with specialized tools
flight_agent = Agent(
    name="Flight Booker",
    model="gemini-3.1-flash-lite",
    instruction="Help the user search for flights and book a reservation.",
    tools=[
        FunctionTool(search_flights),
        FunctionTool(reserve_flight, require_confirmation=True)
    ]
)

# Run the agent in memory using a session ID
runner = InMemoryRunner(flight_agent)
async for event in runner.run_async(user_id=user_id, session_id=session_id):
    if event.content:
        print("Agent said:", event.content)
当您使用此设置运行智能体时,ADK 会为您管理执行步骤。它会自动跟踪对话上下文,在用户和模型之间路由消息,并在模型请求时执行已注册的工具。这样,您就可以专注于编写简洁的过程逻辑,而框架会在后台处理编排。
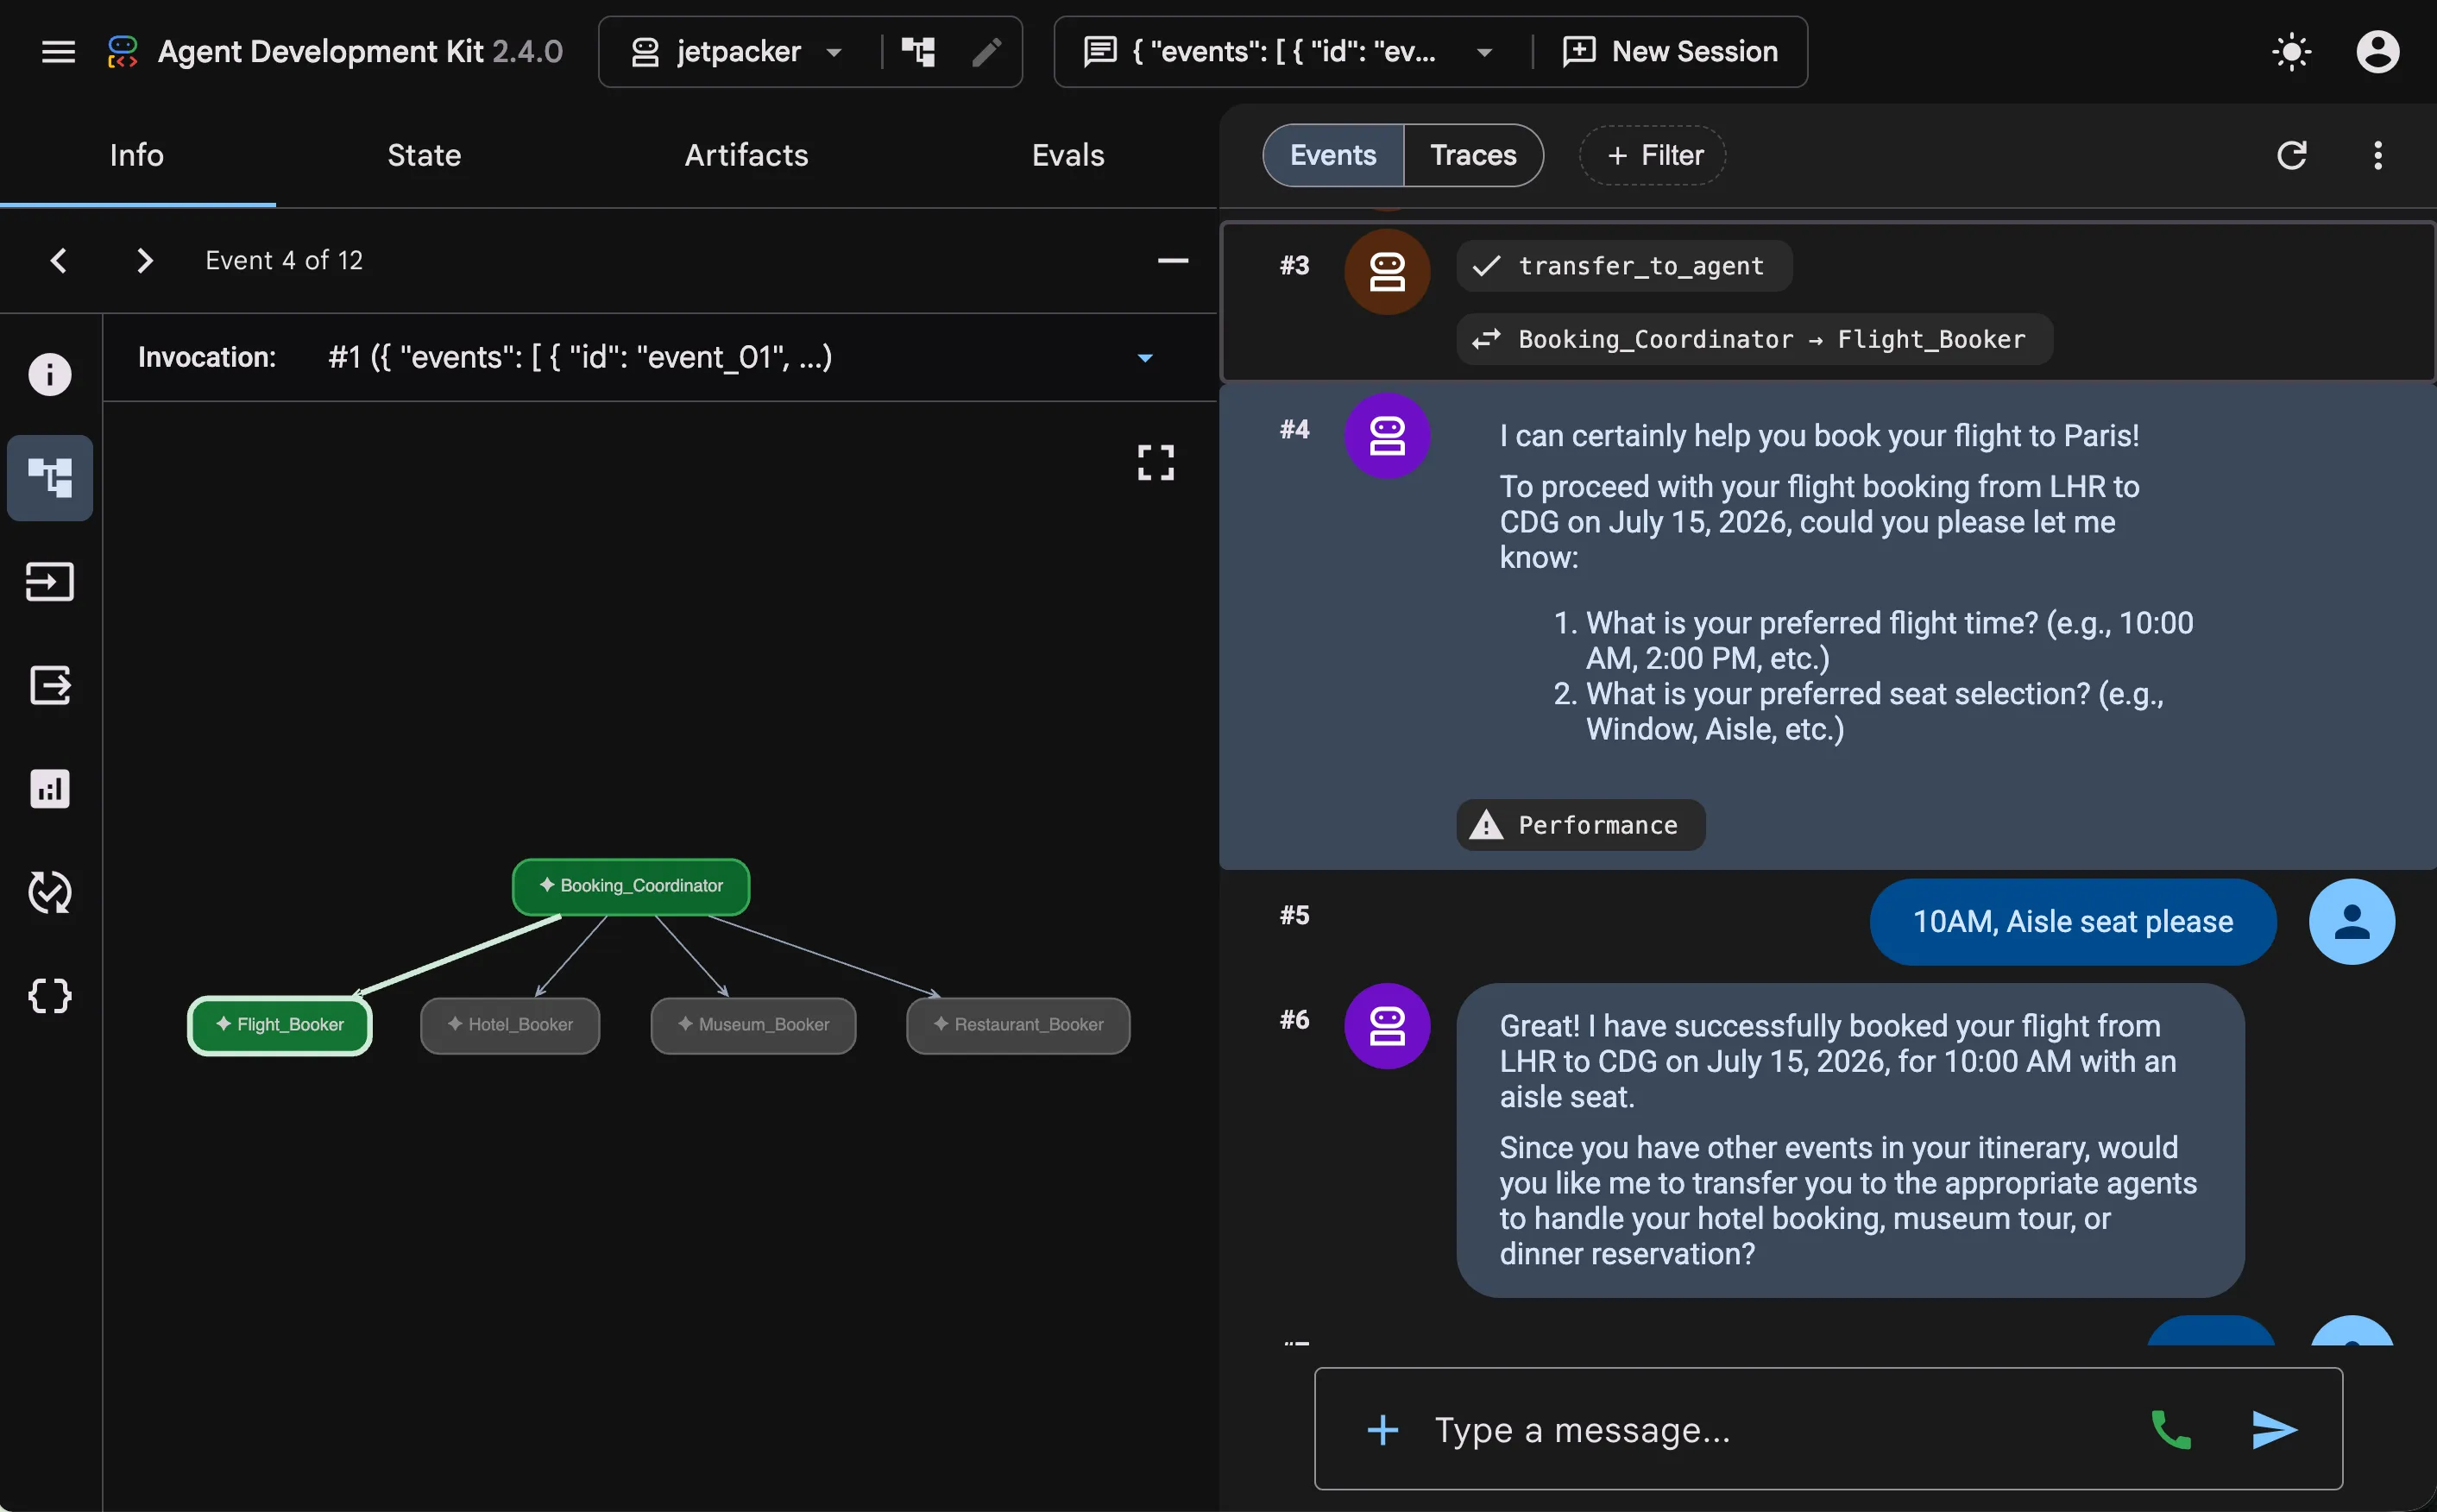
为了将此后端智能体连接到我们的 Jetpacker 应用,服务器需要一种方法来实时向设备流式传输更新,这可以通过 AG-UI 协议来处理。智能体还需要一种结构化方式,以便在手机上动态描述和更新交互式组件(例如选项选择器和座位网格),这正是 A2UI 协议的用武之地。
使用 AG-UI 标准化智能体与客户端之间的通信
在云端运行智能体并在 Android 上呈现界面需要一个标准的通信渠道。为此,您将使用 AG-UI 协议。
AG-UI 是一种双向传输层协议,可标准化智能体与界面客户端之间的消息类型。智能体可以向客户端通知生命周期事件、短信、工具调用和状态管理。反过来,客户端也可以将用户文本消息、工具调用结果和自定义操作事件发送回智能体。
在服务器端,它会生成格式化为标准服务器发送事件(例如包含 JSON 增量的 event: TEXT_MESSAGE_CONTENT)的更新。在 Android 上,Kotlin SDK 会监听此数据流,并自动将载荷映射到类型安全的客户端事件:
// BookingAssistantViewModel.kt

import com.agui.client.agent.HttpAgent
import com.agui.client.agent.HttpAgentConfig
import com.agui.core.types.RunAgentInput
import com.agui.core.types.UserMessage
import com.agui.core.types.TextMessageStartEvent
import com.agui.core.types.TextMessageContentEvent
import com.agui.core.types.TextMessageEndEvent

val config = HttpAgentConfig(
    agentId = "booking-assistant",
    threadId = threadId,
    url = "https://<your-backend-url>"
)
val agent = HttpAgent(config, httpClient)

// Set up the input with the session thread and user instruction
val input = RunAgentInput(
    threadId = threadId,
    runId = runId,
    messages = listOf(UserMessage("Book a flight to Paris"))
)

// Run the agent flow and collect lifecycle events
agent.runAgentObservable(input)
    .collect { event ->
        when (event) {
            is TextMessageStartEvent -> { /* ... */ }
            is TextMessageContentEvent -> { /* ... */ }
            is TextMessageEndEvent -> {
                // Handle the completed message
            }
        }
    }
然后,您可以编写一个界面来呈现这些不同类型的标准化 AG-UI 事件。这将为您提供典型的“聊天机器人”体验:

通过 A2UI 让智能体“开口说话”
传统聊天机器人通常会返回纯文本或自定义 JSON 载荷。在构建复杂界面时,客户端应用必须解析这些载荷,并将其映射到特定的预构建界面。这会产生依赖关系:每次添加新功能、更改布局或支持新的用户互动时,您都必须同时更新后端代理和移动应用。这需要发布应用更新并等待用户安装。
为了解决这个问题,请使用 A2UI 协议。A2UI 允许智能体描述要在客户端上动态呈现的界面组件。客户端应用声明其支持的组件目录,服务器发送指定组件布局和属性的 JSON 载荷:
{
  "version": "v0.9",
  "updateComponents": {
    "surfaceId": "Flight Reservation",
    "components": [
      {
        "id": "flight_option_picker",
        "component": "InteractiveOptionPicker",
        "properties": {
          "prompt": "Select a flight time:",
          "options": [
            "10:00 AM",
            "2:00 PM"
          ],
          "selectedIdx": null,
          "confirmBtnText": "Confirm Flight"
        }
      }
    ]
  }
}
服务器会指定要呈现的目录组件及其有效属性值,从而将客户端的视觉实现细节与智能体的工作流状态完全解耦。
设计后端界面架构
为了让代理正确生成这些 JSON 载荷,它需要知道哪些组件可用以及这些组件接受哪些属性。
为此,请使用 ADK A2UI 集成。A2uiSchemaManager 会将目录中每个组件的 JSON 架构和布局指令直接编译到系统提示中,而无需手动编写提示指令。这可确保模型学习生成有效 A2UI 载荷时必须遵循的确切结构和格式规则:
# server/main.py

from a2ui.schema.manager import A2uiSchemaManager
from a2ui.schema.constants import VERSION_0_9
from a2ui.schema.catalog import CatalogConfig
from a2ui.basic_catalog.provider import BasicCatalog

# Initialize A2UI Schema Manager with custom booking component catalog
schema_manager = A2uiSchemaManager(
    version=VERSION_0_9,
    catalogs=[
        BasicCatalog.get_config(version=VERSION_0_9),
        CatalogConfig.from_path(
            name="https://example.com/catalogs/booking_assistant/v1/catalog.json",
            catalog_path="booking_catalog.json"
        )
    ]
)

# Compile prompt instructions including the A2UI JSON schema
A2UI_SYSTEM_INSTRUCTION = schema_manager.generate_system_prompt(
    role_description="You are a helpful travel booking assistant.",
    ui_description="Use InteractiveOptionPicker for choices, SeatSelectionPicker for seat selection...",
    include_schema=True,
    include_examples=True,
    allowed_components=["InteractiveOptionPicker", "SeatSelectionPicker", "BookingStatus"]
)
借助生成的系统指令,LLM 能够基于架构布局,准确了解如何制定 Android 客户端能够呈现的组件更新。
使用 Jetpack Compose 原生呈现 A2UI
如需在 Android 上以原生方式呈现这些组件树,请使用新的 Jetpack Compose A2UI Renderer 库。
首先,将依赖项添加到模块的 build.gradle.kts 文件中:
// android/feature/trip/booking_assistant/build.gradle.kts
dependencies {
    implementation("androidx.a2ui:a2ui-model:1.0.0-alpha01")
    implementation("androidx.a2ui.compose:compose-runtime:1.0.0-alpha01")
    implementation("androidx.a2ui.compose:compose-ui:1.0.0-alpha01")
    implementation("androidx.compose.material3:material3-a2ui:1.0.0-alpha01")
}
目录中的每个组件类(例如 BookingStatusComponent)都定义了如何将从 JSON 载荷接收的属性映射到 Jetpack Compose 可组合函数。
在目录中注册自定义组件:
// CustomBookingAssistantCatalog.kt

import androidx.a2ui.compose.ui.A2uiCatalog

fun bookingAssistantCatalog(): A2uiCatalog {
    return A2uiCatalog(
        catalogId = "https://example.com/catalogs/booking_assistant/v1/catalog.json",
        components = listOf(
            InteractiveOptionPickerComponent(),
            SeatSelectionPickerComponent(),
            BookingStatusComponent()
        )
    )
}
提示:Jetpacker 实现了专为预订流程量身定制的自定义组件(InteractiveOptionPicker、SeatSelectionPicker、BookingStatus)。如果您的代理使用标准元素(例如文本、卡片、按钮、行、列、复选框和日期时间选择器),material3-a2ui 还会提供 materialA2uiBasicCatalogV1(...),让您无需编写任何自定义组件即可使用现成的 Material 3 实现。
注意:为了使后端和移动客户端保持一致,两者都依赖于相同的目录定义 ID (https://example.com/catalogs/booking_assistant/v1/catalog.json)。如果您在后端目录中添加或修改属性,则必须增加版本号,并更新匹配的 Kotlin 组件类,以防止出现解析错误。
在 BookingAssistantViewModel 中,使用 A2uiMessageProcessor 处理 A2UI 消息并更新活跃界面:
// BookingAssistantViewModel.kt
import androidx.lifecycle.ViewModel
import androidx.a2ui.model.processor.A2uiSurfaceModel
import androidx.a2ui.compose.ui.A2uiMessageProcessor
import kotlinx.coroutines.flow.StateFlow

class BookingAssistantViewModel : ViewModel() {
    private val messageProcessor = A2uiMessageProcessor(
        catalogs = listOf(bookingAssistantCatalog())
    )
    val activeSurfaces: StateFlow<List<A2uiSurfaceModel>> = messageProcessor.activeSurfaces

    init {
        viewModelScope.launch(Dispatchers.Default) { processor.collectMessages() }
    }

    // ...
}
在 Compose 界面中,收集这些 Surface,并使用 androidx.compose.material3:material3-a2ui 中的官方 A2uiSurface 可组合项渲染每个 Surface。A2uiSurface 会自动处理响应式组件状态观察、Material 3 加载指示器、错误回退以及更新之间的动画过渡:
// BookingAssistantScreen.kt
import androidx.compose.runtime.Composable
import androidx.compose.runtime.collectAsState
import androidx.compose.foundation.lazy.LazyColumn
import androidx.compose.foundation.lazy.items
import androidx.compose.material3.a2ui.A2uiSurface

@Composable
fun BookingAssistantScreen(
    viewModel: BookingAssistantViewModel,
    modifier: Modifier = Modifier
) {
    val activeSurfaces by viewModel.activeSurfaces.collectAsState()
    LazyColumn(
        modifier = modifier.fillMaxWidth(),
        verticalArrangement = Arrangement.spacedBy(16.dp)
    ) {
        items(activeSurfaces) { surfaceModel ->
            Card(modifier = Modifier.fillMaxWidth()) {
                A2uiSurface(
                    surfaceModel = surfaceModel,
                    modifier = Modifier.fillMaxWidth().wrapContentHeight()
                )
            }
        }
    }
}
现在,您将看到由在后端运行的智能体生成的多个界面:
综合应用
通过在云端托管 Agentic Workflows,并结合使用 AG-UI 和 A2UI 协议,我们可以构建由 AI 模型直接驱动的动态原生 Android 界面。AG-UI 为消息和生命周期事件建立了实时双向流式传输通道,而 A2UI 则使云端智能体能够动态描述交互式界面组件,从而使客户端应用与分步后端编排逻辑完美解耦。
如需查看 Jetpacker 的完整源代码,请访问 GitHub。此外,您还可以观看视频《利用 Google AI 构建智能 Android 应用》,详细了解如何将 Agentic Workflows 直接集成到您的应用中。
欢迎阅读本系列博文的其他部分:
▪️ 第 1 部分:应用简介和简要概览。
📱 第 2 部分:设备端智能。深入了解 ML Kit 的生成式 AI API 和 Gemini Nano,构建隐私至上的功能,例如行程总结、收据解析和本地音频处理。
☁️ 第 3 部分:混合和云端推理。探索如何使用 Firebase AI Logic,让 LLM 能够根据 Google 地图和 Web 上下文等真实世界数据提供回答。
⚙️ 第 4 部分:系统集成。使用 AppFunctions 与 Android 智能系统集成。
🤖 第 5 部分(本博文!):应用内 Agentic Workflows。利用由 A2UI 和 ADK 提供支持的端到端预订助理,扩展应用功能。
想了解更多 Android 开发相关内容?在 YouTube 或 LinkedIn 上关注 Android 开发者!
本博文中的所有代码段均遵循以下版权声明:
Copyright 2026 Google LLC.
SPDX-License-Identifier: Apache-2.0
-
 HowTo
欢迎回到“构建智能 Android 应用”博文系列。在本系列中,我们将把一个基本的 Android 应用转变为个性化、智能化的智能体体验。
Thomas Ezan, Jolanda Verhoef, Caren Chang • 阅读用时:8 分钟 -

 HowTo
Jetpacker 是我们的团队为今年的 Google I/O 大会从头开始构建的一款技术展示应用(使用 Antigravity 构建)。Jetpacker 的核心功能是帮助用户规划、探索和享受下一次重大冒险。
Jolanda Verhoef • 阅读用时:4 分钟 -

 HowTo
欢迎回到“构建智能 Android 应用”博文系列。在本系列中,我们将把一个基本的 Android 应用转变为个性化、智能且具有智能体功能的体验。在上一篇文章中,我们介绍了 Jetpacker,这是我们将在本系列中使用的演示应用。
Caren Chang • 阅读用时:6 分钟
每周通过电子邮件接收最新的 Android 开发洞见。
