Reminder: By Aug 31, 2025, all new apps and updates to existing apps must use Billing Library version 7 or newer. If you need more time to update your app, you can request an extension until Nov 1, 2025. Learn about Play Billing Library version deprecation.
کدهای پاسخ BillingResult را آزمایش کنید، کدهای پاسخ BillingResult را آزمایش کنید
با مجموعهها، منظم بمانید
ذخیره و طبقهبندی محتوا براساس اولویتهای شما.
کتابخانه صورتحساب Play یک پاسخ BillingResult را برمیگرداند تا به شما اطلاع دهد که نتیجه یک اقدام انجام شده است. برای اطلاعات بیشتر، رسیدگی به کدهای پاسخ BillingResult را ببینید. قبل از استقرار برنامه خود در محیط تولید، می توانید با استفاده از Response Simulator جریان های پاسخ مختلف برنامه خود را آزمایش کنید.
شبیه ساز پاسخ
وقتی برنامه خود را با کتابخانه صورتحساب Play ادغام میکنید، آزمایش همه جریانهای BillingResponseCode ممکن است دشوار باشد، زیرا کنترل زیادی بر ارتباط بین فروشگاه Play و باطن Play ندارید. ویژگی Response Simulator در برنامه Play Billing Lab به شما امکان میدهد پاسخهای کد خطا را برای کتابخانه Play Billing پیکربندی کنید تا سناریوهای مختلف خطای پیچیده را آزمایش کنید.
آزمایش لغو صورتحساب را برای کتابخانه صورتحساب Play فعال کنید
برای فعال کردن ارتباط بین Response Simulator و برنامهتان، باید آزمایش لغو صورتحساب را برای کتابخانه صورتحساب Play از داخل برنامه خود فعال کنید. برای انجام این کار، تگ های فراداده زیر را به فایل AndroidManifest.xml برنامه خود اضافه کنید.
وقتی برنامه خود را در محیط تولید مستقر میکنید، یا باید از یک فایل AndroidManifest.xml جداگانه استفاده کنید که شامل این تگهای فراداده نیست یا مطمئن شوید که این برچسبها را از فایل AndroidManifest.xml حذف کردهاید.
شبیه سازی خطاهای Play Billing Library
برای شبیه سازی خطاهای Play Billing Library، ابتدا کدهای پاسخ را در برنامه Play Billing Lab پیکربندی کنید و سپس برنامه خود را آزمایش کنید.
یک کد پاسخ را پیکربندی کنید
در برنامه Play Billing Lab، با یک حساب آزمایش کننده مجوز برای برنامه خود وارد شوید. این داشبورد Play Billing Lab شامل کارت Response Simulator را نمایش می دهد.
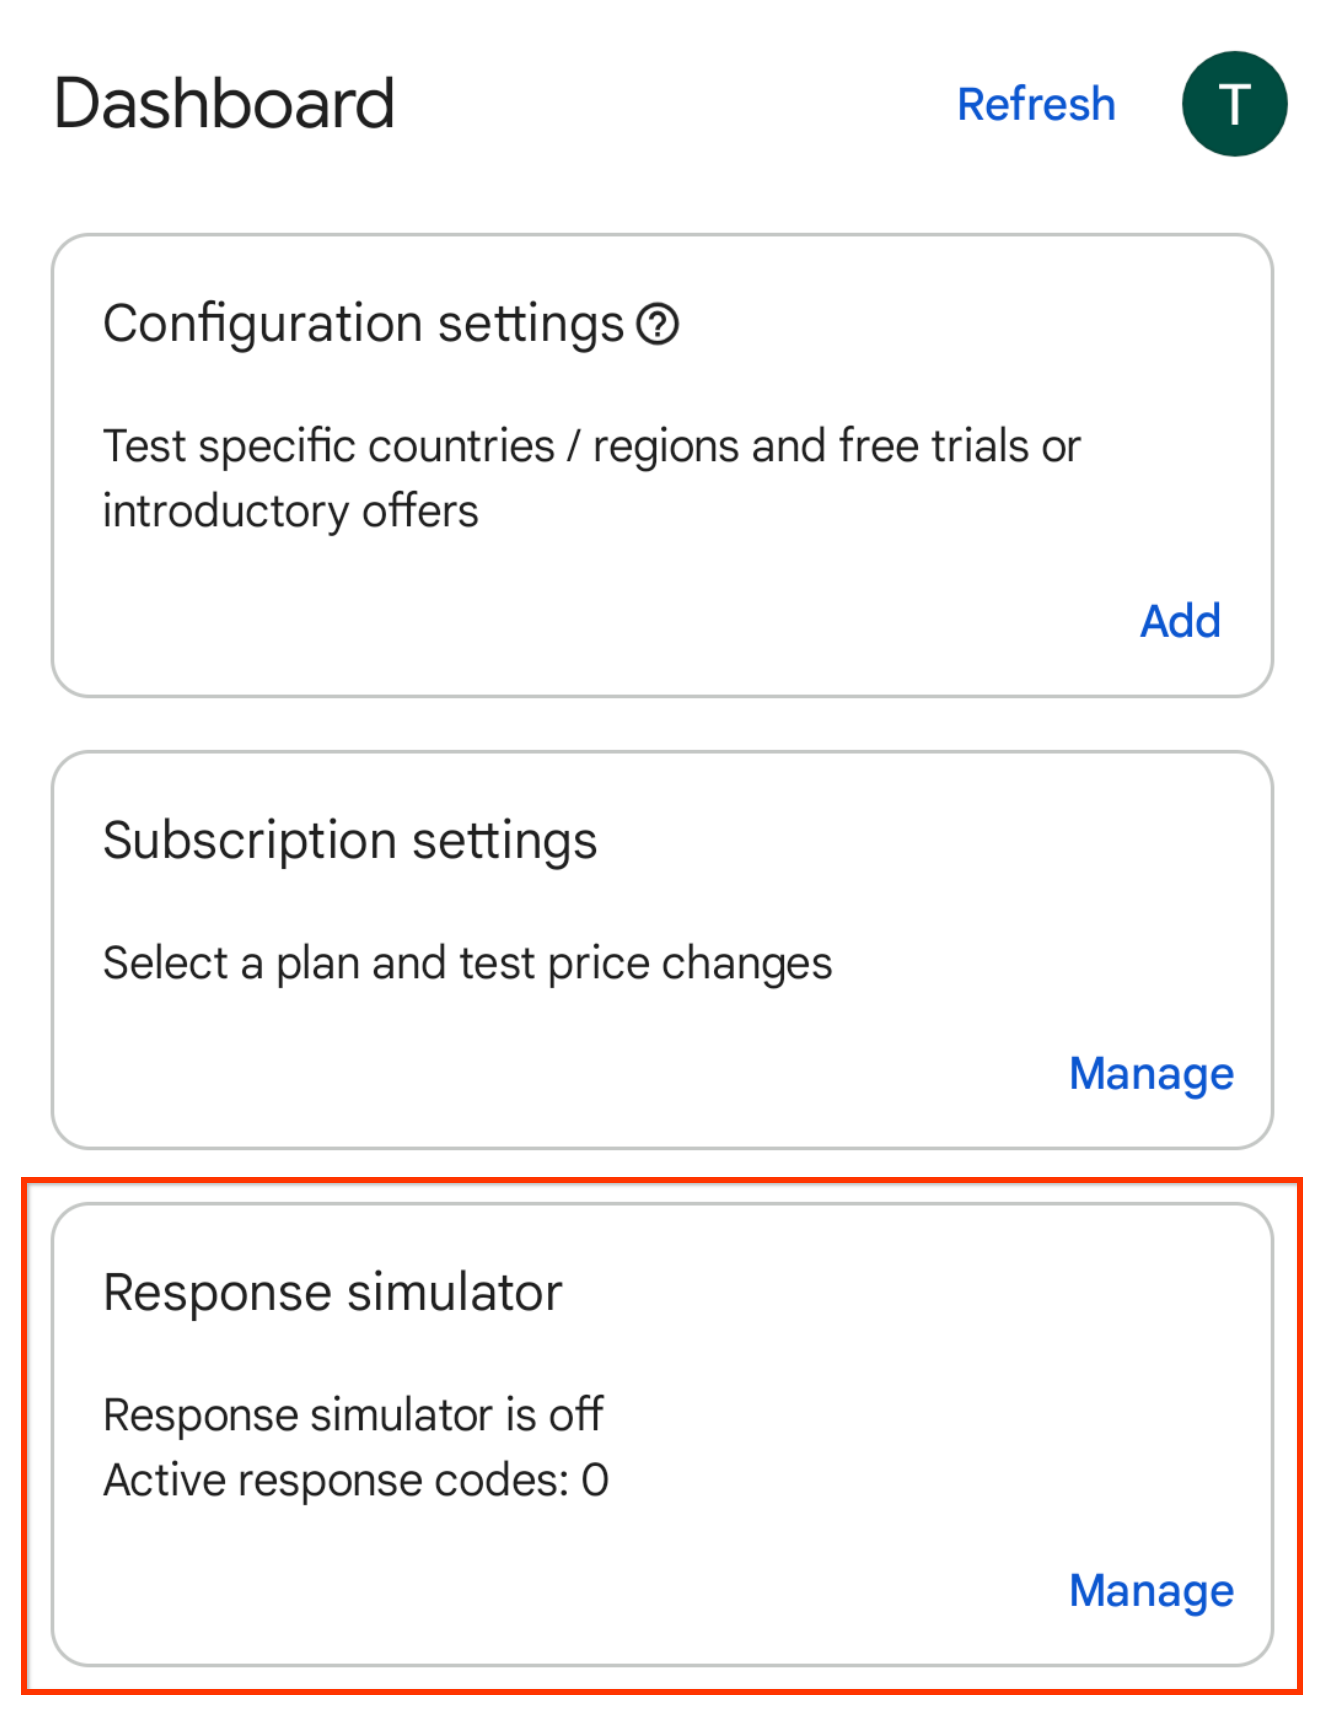
شکل 1. کارت شبیه ساز پاسخ.
روی Manage روی کارت Response Simulator کلیک کنید. این صفحه Response Simulator را نشان می دهد.
وقتی از شما خواسته شد، به اعلانهای Play Billing Lab اجازه دهید وضعیت اتصال برنامه شما را ببیند.
سوئیچ پاسخهای کتابخانه صورتحساب شبیهسازی Play را فعال کنید، اگر قبلاً فعال نشده باشد.
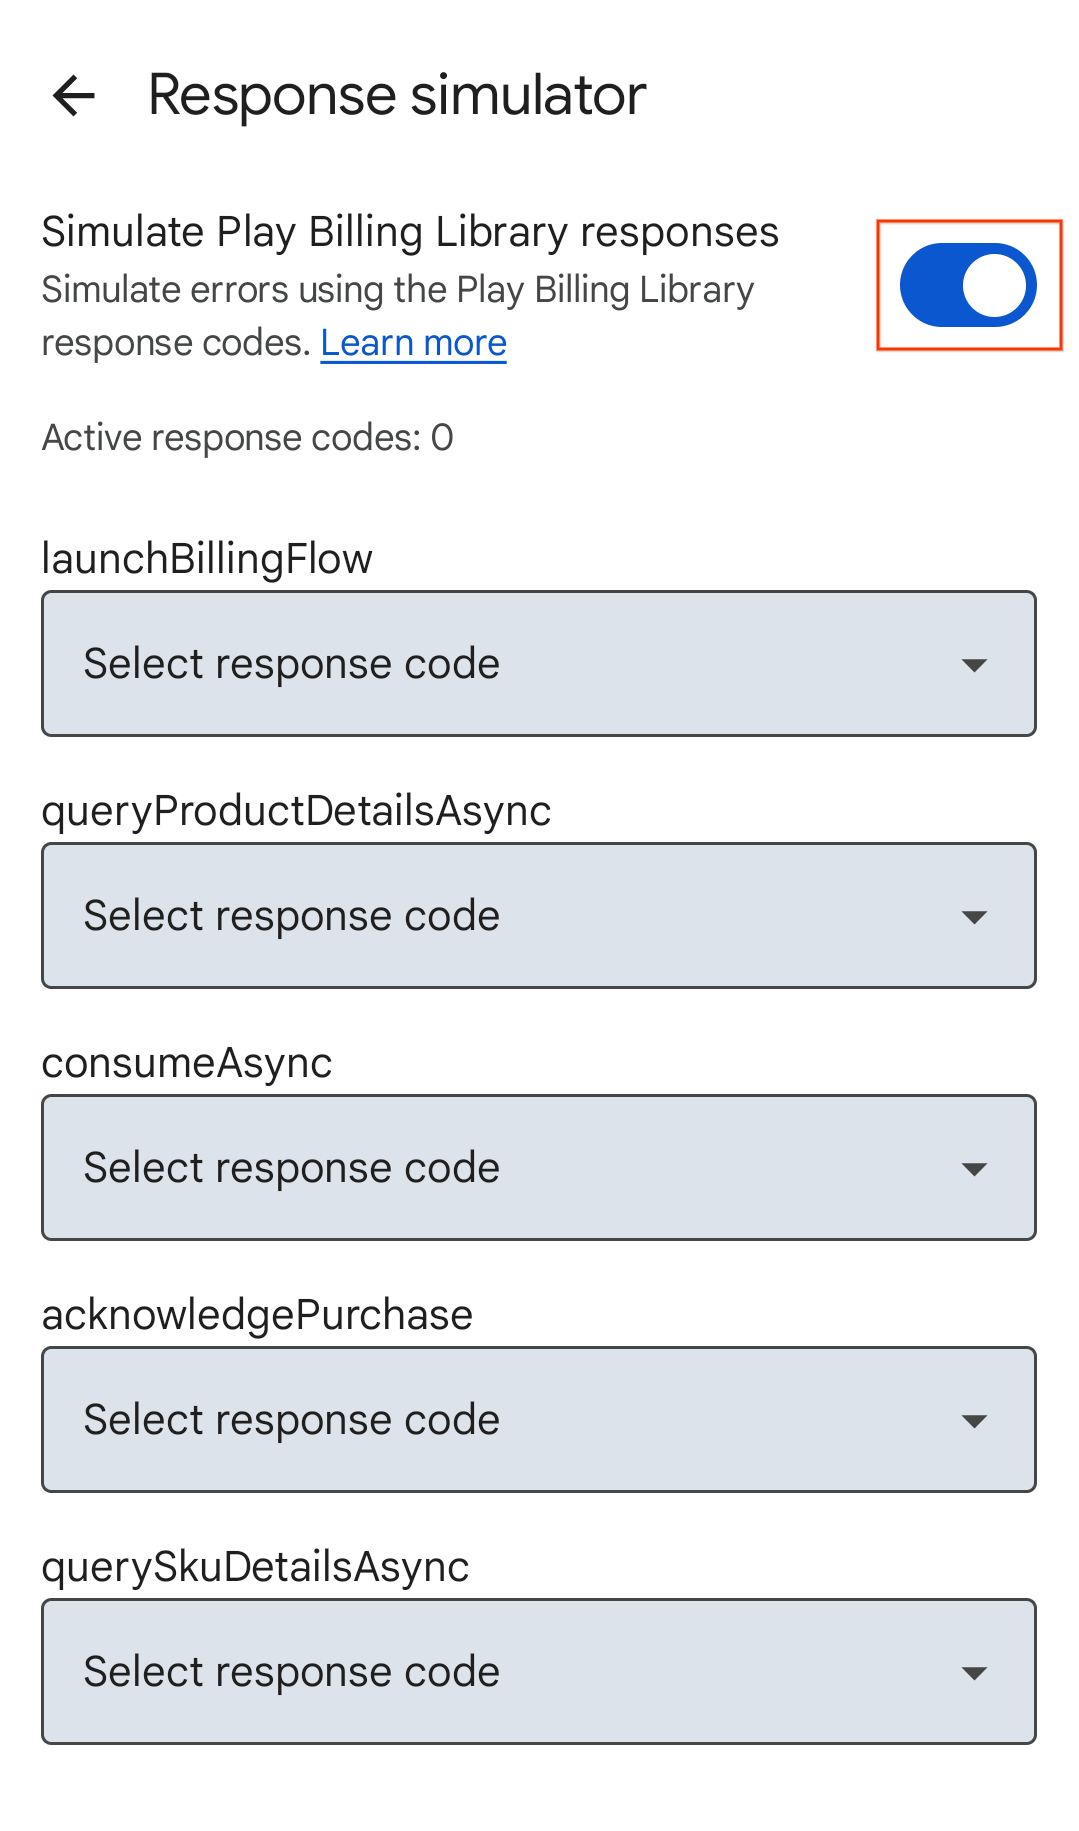
شکل 2. سوئیچ پاسخ کتابخانه صورتحساب Play را شبیه سازی کنید.
کد پاسخی را برای APIهای کتابخانه صورتحساب Play که میخواهید آزمایش کنید، انتخاب کنید. انتخابهای شما بهطور خودکار ذخیره میشوند و Response Simulator آماده ارسال کدهای پاسخ انتخابی به برنامه شما است.
کنترل خطای برنامه خود را آزمایش کنید
برنامه خود را باز کنید
اگر اعلانها را از Play Billing Lab مجاز کردهاید، نماد اعلان Play Billing Lab را در نوار وضعیت دستگاه خود خواهید دید که نشاندهنده اتصال موفقیتآمیز به Response Simulator است.
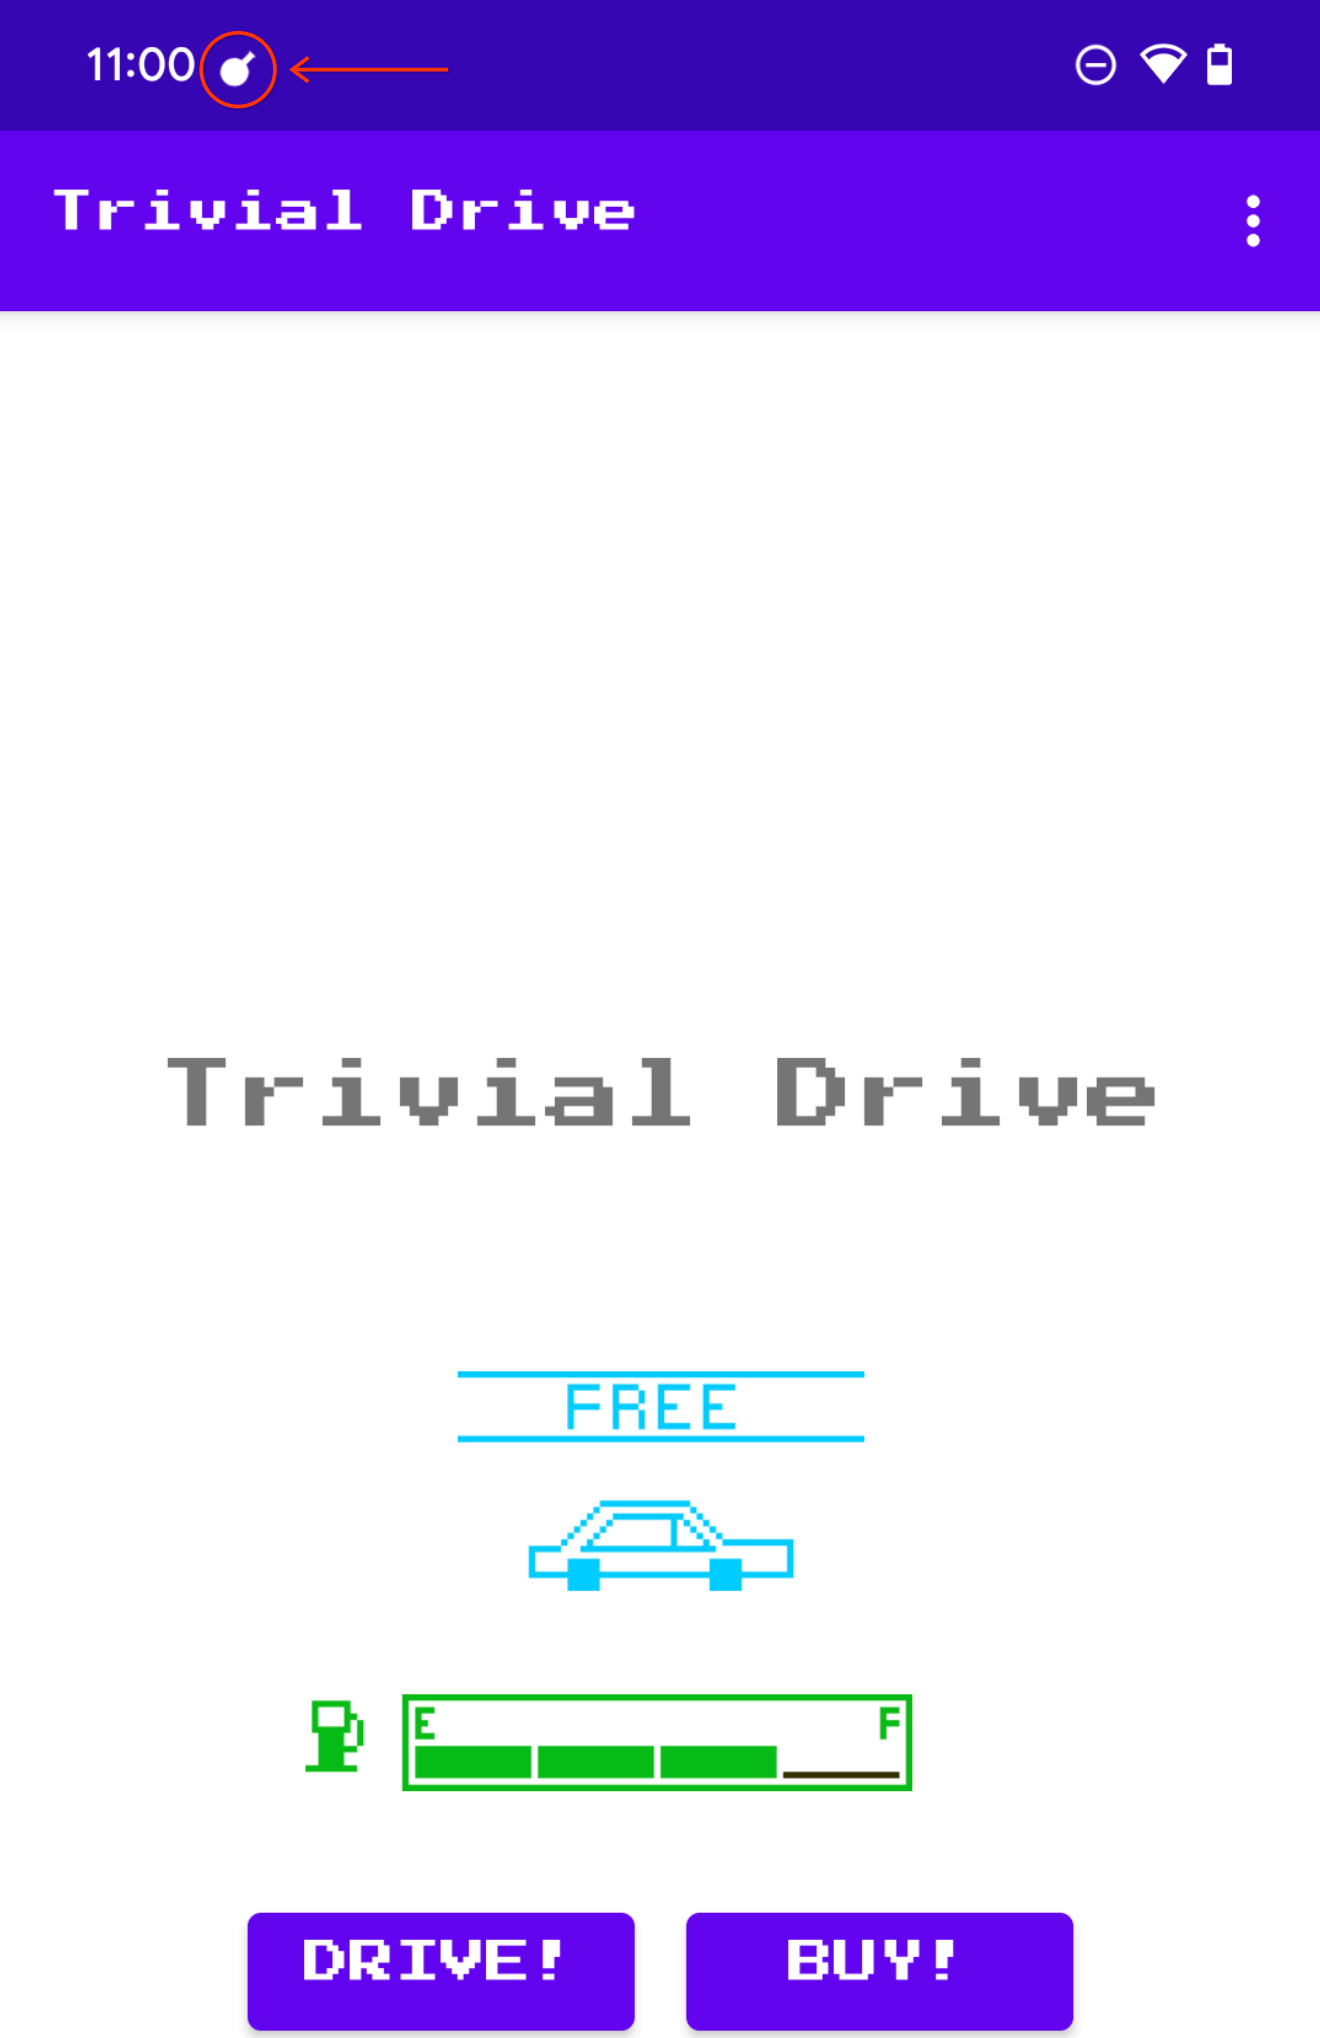
شکل 3. نماد Play Billing Lab که اتصال موفقیت آمیز را نشان می دهد.
روش Play Billing Library API را که میخواهید آزمایش کنید، فعال کنید. برای مثال، اگر میخواهید launchBillingFlow را آزمایش کنید، یک جریان خرید درونبرنامه را آغاز کنید.
محتوا و نمونه کدها در این صفحه مشمول پروانههای توصیفشده در پروانه محتوا هستند. جاوا و OpenJDK علامتهای تجاری یا علامتهای تجاری ثبتشده Oracle و/یا وابستههای آن هستند.
تاریخ آخرین بهروزرسانی 2025-07-29 بهوقت ساعت هماهنگ جهانی.
[null,null,["تاریخ آخرین بهروزرسانی 2025-07-29 بهوقت ساعت هماهنگ جهانی."],[],[],null,["# Test BillingResult response codes\n\nThe Play Billing Library returns a [`BillingResult`](/reference/com/android/billingclient/api/BillingResult) response to let you\nknow the outcome of an action that was triggered. For more\ninformation, see [handling `BillingResult` response codes](/google/play/billing/errors). Before you\ndeploy your app to the production environment, you can test your app's various\nresponse flows by using the Response Simulator.\n\nResponse Simulator\n------------------\n\nWhen you integrate your app with the Play Billing Library, it can be difficult\nto test all of the [`BillingResponseCode`](/reference/com/android/billingclient/api/BillingClient.BillingResponseCode) flows, because you don't have much\ncontrol over the communication between the Play Store and Play's backend.\nThe Response Simulator feature in the [Play Billing Lab](https://play.google.com/store/apps/details?id=com.google.android.apps.play.billingtestcompanion) app lets you\nconfigure error code responses for the Play Billing Library to test various complex\nerror scenarios.\n\n### Enable billing overrides testing for the Play Billing Library\n\n| **Note:** Before testing, ensure that your app is using [Play Billing Library](/google/play/billing/integrate#dependency) version 7.1.1 or later.\n\nTo enable communication between the Response Simulator and your app,\nyou must enable billing overrides testing for the Play Billing Library\nfrom within your app. To do this, add the following metadata tags to your app's\n`AndroidManifest.xml` file. \n\n```scdoc\n\u003cmanifest ... \u003e\n \u003capplication ... \u003e\n ...\n \u003cmeta-data\n android:name=\"com.google.android.play.largest_release_audience.NONPRODUCTION\"\n android:value=\"\" /\u003e\n \u003cmeta-data\n android:name=\"com.google.android.play.billingclient.enableBillingOverridesTesting\"\n android:value=\"true\" /\u003e\n \u003c/application\u003e\n\u003c/manifest\u003e\n```\n| **Note:** Even though adding only the `enableBillingOverridesTesting` tag and setting it to `true` is sufficient to enable billing overrides testing for your app, it's recommended that you also add the `NONPRODUCTION` tag. The `NONPRODUCTION` tag prevents accidental deployment of your app to the production environment with billing overrides testing enabled.\n\nWhen you deploy your app to the production environment, you should either\nuse a separate `AndroidManifest.xml` file that doesn't include these\nmetadata tags or ensure that you've removed these tags from the\n`AndroidManifest.xml` file.\n\n### Simulate Play Billing Library errors\n\nTo simulate Play Billing Library errors, first, configure the response codes\nin the [Play Billing Lab](https://play.google.com/store/apps/details?id=com.google.android.apps.play.billingtestcompanion) app, and then test your app.\n\n#### Configure a response code\n\n1. In the Play Billing Lab app, sign in with a [license tester](/google/play/billing/test#license-testers) account for your app.\n This displays the Play Billing Lab **Dashboard** including\n the **Response Simulator** card.\n\n **Figure 1.** Response Simulator card.\n2. Click **Manage** on the Response Simulator card.\n This shows the **Response Simulator** screen.\n\n3. When prompted, allow notifications from Play Billing Lab to see the connection status of your app.\n\n4. Enable the **Simulate Play Billing Library responses** switch, if it isn't\n already enabled.\n\n **Figure 2.** Simulate Play Billing Library responses switch.\n5. Select a response code for the Play Billing Library APIs that you want\n to test.\n Your selections are automatically saved, and the Response Simulator\n is ready to send the selected response codes to your app.\n\n#### Test your app's error handling\n\n| **Note:** When testing using the Response Simulator, ensure that you first open Play Billing Lab, and then open your app. Opening your app before opening Play Billing Lab may result in issues connecting to the Response Simulator.\n\n1. Open your app.\n\n - If you have allowed notifications from Play Billing Lab, you will see the Play Billing Lab notification icon in your device's status bar which indicates a successful connection to the Response Simulator.\n\n **Figure 3.** Play Billing Lab icon indicating successful connection.\n2. Trigger the Play Billing Library API method you want to test. For example,\n if you want to test the `launchBillingFlow`, initiate an in-app purchase\n flow."]]