
本文档介绍如何设置各种常见的 Espresso 测试。
匹配另一个视图旁边的视图
布局可能会包含某些本身不具唯一性的视图。对于
例如,联系人列表中的一个重复通话按钮可能有相同的
R.id,包含相同的文本,并且与其他调用具有相同的属性
视图层次结构中的按钮。
例如,在此 activity 中,包含文本 "7" 的视图会在多个
行:
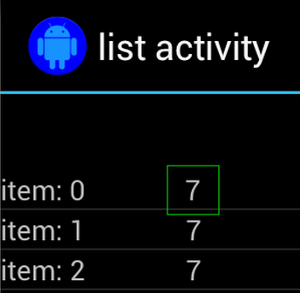
通常,非唯一视图会与位于某个位置的某个唯一标签配对。
例如“致电”按钮旁边的联系人的姓名。在此示例中
可以使用 hasSibling() 匹配器缩小选择范围:
Kotlin
onView(allOf(withText("7"), hasSibling(withText("item: 0"))))
    .perform(click())
Java
onView(allOf(withText("7"), hasSibling(withText("item: 0"))))
    .perform(click());
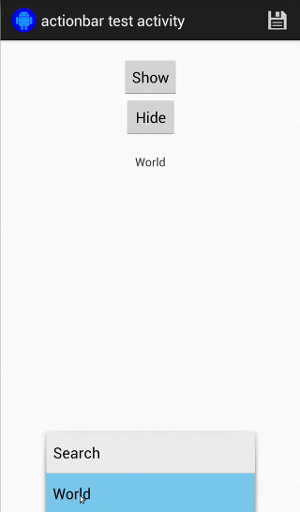
匹配操作栏内的视图
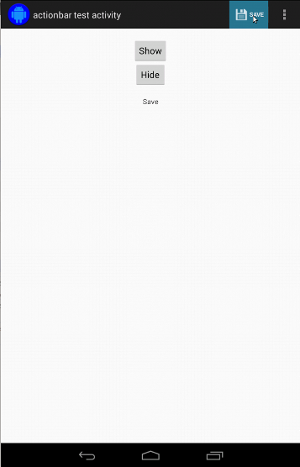
ActionBarTestActivity 具有两个不同的操作栏:一个常规操作栏,
操作栏以及根据选项菜单创建的上下文操作栏。两者都有
操作栏有一个始终可见的项目,以及两个
显示在溢出菜单中。点击某个项时,会将一个 TextView 更改为
所点击项目的内容。
匹配两个操作栏上的可见图标非常简单,如下所示 :
Kotlin
fun testClickActionBarItem() {
    // We make sure the contextual action bar is hidden.
    onView(withId(R.id.hide_contextual_action_bar))
        .perform(click())

    // Click on the icon - we can find it by the r.Id.
    onView(withId(R.id.action_save))
        .perform(click())

    // Verify that we have really clicked on the icon
    // by checking the TextView content.
    onView(withId(R.id.text_action_bar_result))
        .check(matches(withText("Save")))
}
Java
public void testClickActionBarItem() {
    // We make sure the contextual action bar is hidden.
    onView(withId(R.id.hide_contextual_action_bar))
        .perform(click());

    // Click on the icon - we can find it by the r.Id.
    onView(withId(R.id.action_save))
        .perform(click());

    // Verify that we have really clicked on the icon
    // by checking the TextView content.
    onView(withId(R.id.text_action_bar_result))
        .check(matches(withText("Save")));
}
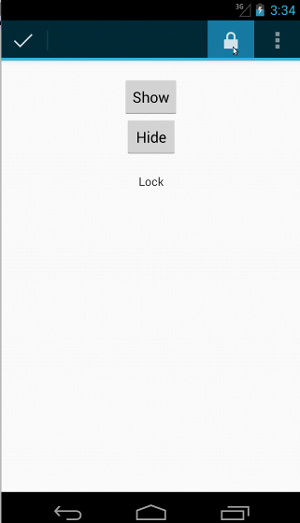
上下文操作栏的代码看起来完全相同:
Kotlin
fun testClickActionModeItem() {
    // Make sure we show the contextual action bar.
    onView(withId(R.id.show_contextual_action_bar))
        .perform(click())

    // Click on the icon.
    onView((withId(R.id.action_lock)))
        .perform(click())

    // Verify that we have really clicked on the icon
    // by checking the TextView content.
    onView(withId(R.id.text_action_bar_result))
        .check(matches(withText("Lock")))
}
Java
public void testClickActionModeItem() {
    // Make sure we show the contextual action bar.
    onView(withId(R.id.show_contextual_action_bar))
        .perform(click());

    // Click on the icon.
    onView((withId(R.id.action_lock)))
        .perform(click());

    // Verify that we have really clicked on the icon
    // by checking the TextView content.
    onView(withId(R.id.text_action_bar_result))
        .check(matches(withText("Lock")));
}
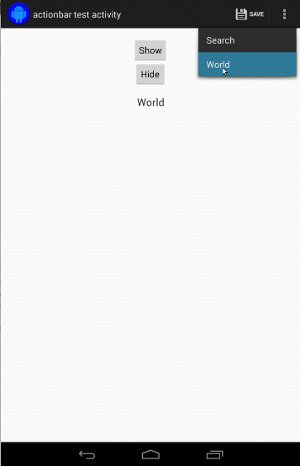
对于普通操作来说,点击溢出菜单中的项目会有些棘手 因为某些设备具有硬件溢出菜单按钮,用于打开 选项菜单中会溢出,以及某些设备会出现软件溢出 菜单按钮,点击此按钮可打开常规溢出菜单。幸运的是,Espresso 处理了 。
对于普通操作栏:
Kotlin
fun testActionBarOverflow() {
    // Make sure we hide the contextual action bar.
    onView(withId(R.id.hide_contextual_action_bar))
        .perform(click())

    // Open the options menu OR open the overflow menu, depending on whether
    // the device has a hardware or software overflow menu button.
    openActionBarOverflowOrOptionsMenu(
            ApplicationProvider.getApplicationContext<Context>())

    // Click the item.
    onView(withText("World"))
        .perform(click())

    // Verify that we have really clicked on the icon by checking
    // the TextView content.
    onView(withId(R.id.text_action_bar_result))
        .check(matches(withText("World")))
}
Java
public void testActionBarOverflow() {
    // Make sure we hide the contextual action bar.
    onView(withId(R.id.hide_contextual_action_bar))
        .perform(click());

    // Open the options menu OR open the overflow menu, depending on whether
    // the device has a hardware or software overflow menu button.
    openActionBarOverflowOrOptionsMenu(
            ApplicationProvider.getApplicationContext());

    // Click the item.
    onView(withText("World"))
        .perform(click());

    // Verify that we have really clicked on the icon by checking
    // the TextView content.
    onView(withId(R.id.text_action_bar_result))
        .check(matches(withText("World")));
}
在具有硬件溢出菜单按钮的设备上,如下所示:
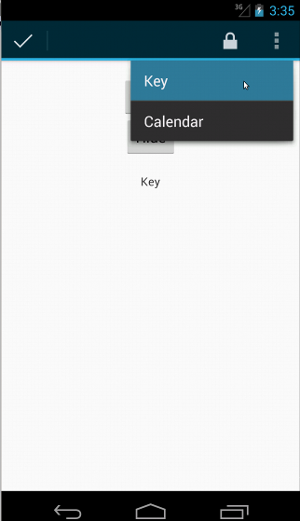
对于上下文操作栏,同样非常简单:
Kotlin
fun testActionModeOverflow() {
    // Show the contextual action bar.
    onView(withId(R.id.show_contextual_action_bar))
        .perform(click())

    // Open the overflow menu from contextual action mode.
    openContextualActionModeOverflowMenu()

    // Click on the item.
    onView(withText("Key"))
        .perform(click())

    // Verify that we have really clicked on the icon by
    // checking the TextView content.
    onView(withId(R.id.text_action_bar_result))
        .check(matches(withText("Key")))
    }
}
Java
public void testActionModeOverflow() {
    // Show the contextual action bar.
    onView(withId(R.id.show_contextual_action_bar))
        .perform(click());

    // Open the overflow menu from contextual action mode.
    openContextualActionModeOverflowMenu();

    // Click on the item.
    onView(withText("Key"))
        .perform(click());

    // Verify that we have really clicked on the icon by
    // checking the TextView content.
    onView(withId(R.id.text_action_bar_result))
        .check(matches(withText("Key")));
    }
}
要查看这些示例的完整代码,请查看
GitHub 上的 ActionBarTest.java 示例。
断言视图未显示
执行一系列操作后,您肯定需要断言
被测界面的状态。有时,这种情况可能为负例,例如,当
并没有发生任何变化请注意,您可以将任意的
hamcrest 视图
匹配器转换为 ViewAssertion 传递至 ViewAssertions.matches()。
在以下示例中,我们采用 isDisplayed() 匹配器,并使用如下命令将其反转:
标准 not() 匹配器:
Kotlin
import androidx.test.espresso.Espresso.onView
import androidx.test.espresso.assertion.ViewAssertions.matches
import androidx.test.espresso.matcher.ViewMatchers.isDisplayed
import androidx.test.espresso.matcher.ViewMatchers.withId
import org.hamcrest.Matchers.not

onView(withId(R.id.bottom_left))
    .check(matches(not(isDisplayed())))
Java
import static androidx.test.espresso.Espresso.onView;
import static androidx.test.espresso.assertion.ViewAssertions.matches;
import static androidx.test.espresso.matcher.ViewMatchers.isDisplayed;
import static androidx.test.espresso.matcher.ViewMatchers.withId;
import static org.hamcrest.Matchers.not;

onView(withId(R.id.bottom_left))
    .check(matches(not(isDisplayed())));
如果相应视图仍然是层次结构的一部分,则上述方法有效。如果
否则,您会收到 NoMatchingViewException,并且需要使用
ViewAssertions.doesNotExist()。
断言视图不存在
如果该视图从视图层次结构中消失 - 当
操作导致转换到另一个 Activity,则应使用
ViewAssertions.doesNotExist():
Kotlin
import androidx.test.espresso.Espresso.onView
import androidx.test.espresso.assertion.ViewAssertions.doesNotExist
import androidx.test.espresso.matcher.ViewMatchers.withId

onView(withId(R.id.bottom_left))
    .check(doesNotExist())
Java
import static androidx.test.espresso.Espresso.onView;
import static androidx.test.espresso.assertion.ViewAssertions.doesNotExist;
import static androidx.test.espresso.matcher.ViewMatchers.withId;

onView(withId(R.id.bottom_left))
    .check(doesNotExist());
断言数据项不在适配器中
如需证明特定数据项不在 AdapterView 中,您必须
会有点不同我们必须找到感兴趣的AdapterView
并查询持有的数据我们不需要使用 onData()。
而是使用 onView() 查找 AdapterView,然后使用另一个
匹配器处理视图内的数据。
首先是匹配器:
Kotlin
private fun withAdaptedData(dataMatcher: Matcher<Any>): Matcher<View> {
    return object : TypeSafeMatcher<View>() {

        override fun describeTo(description: Description) {
            description.appendText("with class name: ")
            dataMatcher.describeTo(description)
        }

        public override fun matchesSafely(view: View) : Boolean {
            if (view !is AdapterView<*>) {
                return false
            }

            val adapter = view.adapter
            for (i in 0 until adapter.count) {
                if (dataMatcher.matches(adapter.getItem(i))) {
                    return true
                }
            }

            return false
        }
    }
}
Java
private static Matcher<View> withAdaptedData(final Matcher<Object> dataMatcher) {
    return new TypeSafeMatcher<View>() {

        @Override
        public void describeTo(Description description) {
            description.appendText("with class name: ");
            dataMatcher.describeTo(description);
        }

        @Override
        public boolean matchesSafely(View view) {
            if (!(view instanceof AdapterView)) {
                return false;
            }

            @SuppressWarnings("rawtypes")
            Adapter adapter = ((AdapterView) view).getAdapter();
            for (int i = 0; i < adapter.getCount(); i++) {
                if (dataMatcher.matches(adapter.getItem(i))) {
                    return true;
                }
            }

            return false;
        }
    };
}
然后,我们只需要使用 onView() 来查找 AdapterView:
Kotlin
fun testDataItemNotInAdapter() {
    onView(withId(R.id.list))
          .check(matches(not(withAdaptedData(withItemContent("item: 168")))))
    }
}
Java
@SuppressWarnings("unchecked")
public void testDataItemNotInAdapter() {
    onView(withId(R.id.list))
          .check(matches(not(withAdaptedData(withItemContent("item: 168")))));
    }
}
我们有一个断言,如果项等于“item: 168”,则会失败 和 ID 列表一起存在于适配器视图中。
有关完整示例,请查看 testDataItemNotInAdapter() 方法(在
AdapterViewTest.java
类。
使用自定义故障处理程序
将 Espresso 中的默认 FailureHandler 替换为自定义 FailureHandler 后,
额外或不同的错误处理方式,例如截取屏幕截图或传递
以及额外的调试信息。
CustomFailureHandlerTest 示例演示了如何实现自定义
失败处理程序:
Kotlin
private class CustomFailureHandler(targetContext: Context) : FailureHandler {
    private val delegate: FailureHandler

    init {
        delegate = DefaultFailureHandler(targetContext)
    }

    override fun handle(error: Throwable, viewMatcher: Matcher<View>) {
        try {
            delegate.handle(error, viewMatcher)
        } catch (e: NoMatchingViewException) {
            throw MySpecialException(e)
        }

    }
}
Java
private static class CustomFailureHandler implements FailureHandler {
    private final FailureHandler delegate;

    public CustomFailureHandler(Context targetContext) {
        delegate = new DefaultFailureHandler(targetContext);
    }

    @Override
    public void handle(Throwable error, Matcher<View> viewMatcher) {
        try {
            delegate.handle(error, viewMatcher);
        } catch (NoMatchingViewException e) {
            throw new MySpecialException(e);
        }
    }
}
此失败处理程序会抛出 MySpecialException,而不是
NoMatchingViewException,并将其他所有故障都委派给
DefaultFailureHandler。该CustomFailureHandler可以注册
在测试的 setUp() 方法中使用 Espresso:
Kotlin
@Throws(Exception::class)
override fun setUp() {
    super.setUp()
    getActivity()
    setFailureHandler(CustomFailureHandler(
            ApplicationProvider.getApplicationContext<Context>()))
}
Java
@Override
public void setUp() throws Exception {
    super.setUp();
    getActivity();
    setFailureHandler(new CustomFailureHandler(
            ApplicationProvider.getApplicationContext()));
}
有关详情,请参阅
FailureHandler
界面和
Espresso.setFailureHandler()。
以非默认窗口为目标
Android 支持多个窗口。通常情况下,此信息对用户是透明的
但在某些情况下,系统会显示多个窗口,例如
就像在主应用窗口上绘制一个自动填充窗口
搜索微件为了简化操作,默认情况下,Espresso 使用启发法
猜测您打算与哪个 Window 进行交互。这种启发法几乎
始终足够好但在极少数情况下
应该定位一次互动为此,您可以提供自己的根窗口
匹配器或 Root 匹配器:
Kotlin
onView(withText("South China Sea"))
    .inRoot(withDecorView(not(`is`(getActivity().getWindow().getDecorView()))))
    .perform(click())
Java
onView(withText("South China Sea"))
    .inRoot(withDecorView(not(is(getActivity().getWindow().getDecorView()))))
    .perform(click());
与使用
ViewMatchers、
我们提供了一系列预先提供的
RootMatchers。
当然,您始终可以实现自己的Matcher对象。
请查看 MultipleWindowTest 示例 。
匹配列表视图中的页眉或页脚
使用 addHeaderView() 和 ListViews 向 ListViews 添加页眉和页脚
addFooterView() 方法。为了确保 Espresso.onData() 知道哪些数据对象
要匹配,请务必将预设的数据对象值作为第二个参数传递
发送给addHeaderView()和addFooterView()。例如:
Kotlin
const val FOOTER = "FOOTER"
...
val footerView = layoutInflater.inflate(R.layout.list_item, listView, false)
footerView.findViewById<TextView>(R.id.item_content).text = "count:"
footerView.findViewById<TextView>(R.id.item_size).text
        = data.size.toString
listView.addFooterView(footerView, FOOTER, true)
Java
public static final String FOOTER = "FOOTER";
...
View footerView = layoutInflater.inflate(R.layout.list_item, listView, false);
footerView.findViewById<TextView>(R.id.item_content).setText("count:");
footerView.findViewById<TextView>(R.id.item_size).setText(String.valueOf(data.size()));
listView.addFooterView(footerView, FOOTER, true);
然后,您可以为页脚编写一个匹配器:
Kotlin
import org.hamcrest.Matchers.allOf
import org.hamcrest.Matchers.instanceOf
import org.hamcrest.Matchers.`is`

fun isFooter(): Matcher<Any> {
    return allOf(`is`(instanceOf(String::class.java)),
            `is`(LongListActivity.FOOTER))
}
Java
import static org.hamcrest.Matchers.allOf;
import static org.hamcrest.Matchers.instanceOf;
import static org.hamcrest.Matchers.is;

@SuppressWarnings("unchecked")
public static Matcher<Object> isFooter() {
    return allOf(is(instanceOf(String.class)), is(LongListActivity.FOOTER));
}
在测试中加载视图很简单:
Kotlin
import androidx.test.espresso.Espresso.onData
import androidx.test.espresso.action.ViewActions.click
import androidx.test.espresso.sample.LongListMatchers.isFooter

fun testClickFooter() {
    onData(isFooter())
        .perform(click())

    // ...
}
Java
import static androidx.test.espresso.Espresso.onData;
import static androidx.test.espresso.action.ViewActions.click;
import static androidx.test.espresso.sample.LongListMatchers.isFooter;

public void testClickFooter() {
    onData(isFooter())
        .perform(click());

    // ...
}
请查看完整的代码示例,可在testClickFooter()
AdapterViewTest.java
。