
يصف هذا المستند كيفية إعداد مجموعة متنوعة من اختبارات الإسبريسو الشائعة.
مطابقة طريقة عرض بجانب طريقة عرض أخرى
يمكن أن يحتوي التخطيط على طرق عرض معينة لا تكون فريدة في حد ذاتها. بالنسبة
مثلاً، يمكن أن يكون زر الاتصال المتكرر في جدول جهات الاتصال مطابقًا
R.id، تحتوي على النص نفسه ولها نفس خصائص المكالمات الأخرى
الأزرار ضمن التسلسل الهرمي للعرض.
على سبيل المثال، في هذا النشاط، يتكرر العرض الذي يتضمن النص "7" عبر عدة
الصفوف:
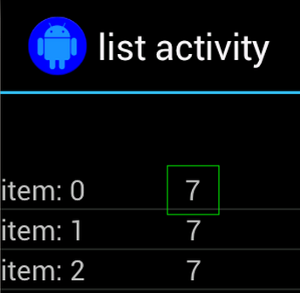
في كثير من الأحيان، سيتم إقران الملف الشخصي غير الفريد مع تصنيف فريد موجود
بجانبه، مثل اسم جهة الاتصال بجانب زر الاتصال. وفي هذه الحالة،
يمكنك استخدام مطابقة hasSibling() لتضييق نطاق اختيارك:
Kotlin
onView(allOf(withText("7"), hasSibling(withText("item: 0"))))
    .perform(click())
Java
onView(allOf(withText("7"), hasSibling(withText("item: 0"))))
    .perform(click());
مطابقة طريقة عرض داخل شريط الإجراءات
يتضمن ActionBarTestActivity شريطَي إجراءات مختلفَين: شريطَي إجراءات عاديَين.
شريط إجراءات وشريط إجراءات سياقي يتم إنشاؤه من قائمة خيارات. كلاهما
تحتوي أشرطة الإجراءات على عنصر واحد مرئي دائمًا وعنصران فقط
مرئية في القائمة الكاملة. عند النقر على أي عنصر، يتم تغيير طريقة عرض TextView إلى
لمحتوى العنصر الذي تم النقر عليه
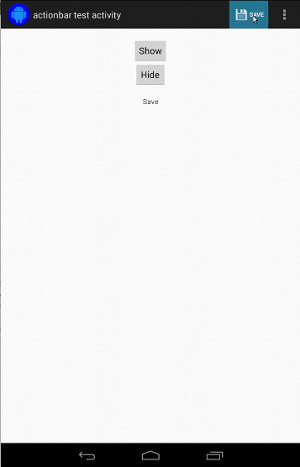
وتُعد مطابقة الرموز المرئية في كل من شريطي الإجراءات أمرًا سهلاً، كما هو موضح في مقتطف الرمز التالي:
Kotlin
fun testClickActionBarItem() {
    // We make sure the contextual action bar is hidden.
    onView(withId(R.id.hide_contextual_action_bar))
        .perform(click())

    // Click on the icon - we can find it by the r.Id.
    onView(withId(R.id.action_save))
        .perform(click())

    // Verify that we have really clicked on the icon
    // by checking the TextView content.
    onView(withId(R.id.text_action_bar_result))
        .check(matches(withText("Save")))
}
Java
public void testClickActionBarItem() {
    // We make sure the contextual action bar is hidden.
    onView(withId(R.id.hide_contextual_action_bar))
        .perform(click());

    // Click on the icon - we can find it by the r.Id.
    onView(withId(R.id.action_save))
        .perform(click());

    // Verify that we have really clicked on the icon
    // by checking the TextView content.
    onView(withId(R.id.text_action_bar_result))
        .check(matches(withText("Save")));
}
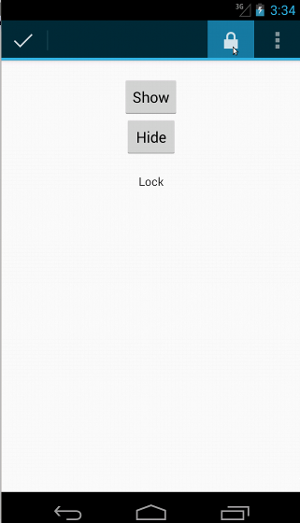
يبدو الرمز متطابقًا في شريط الإجراءات المستندة إلى السياق:
Kotlin
fun testClickActionModeItem() {
    // Make sure we show the contextual action bar.
    onView(withId(R.id.show_contextual_action_bar))
        .perform(click())

    // Click on the icon.
    onView((withId(R.id.action_lock)))
        .perform(click())

    // Verify that we have really clicked on the icon
    // by checking the TextView content.
    onView(withId(R.id.text_action_bar_result))
        .check(matches(withText("Lock")))
}
Java
public void testClickActionModeItem() {
    // Make sure we show the contextual action bar.
    onView(withId(R.id.show_contextual_action_bar))
        .perform(click());

    // Click on the icon.
    onView((withId(R.id.action_lock)))
        .perform(click());

    // Verify that we have really clicked on the icon
    // by checking the TextView content.
    onView(withId(R.id.text_action_bar_result))
        .check(matches(withText("Lock")));
}
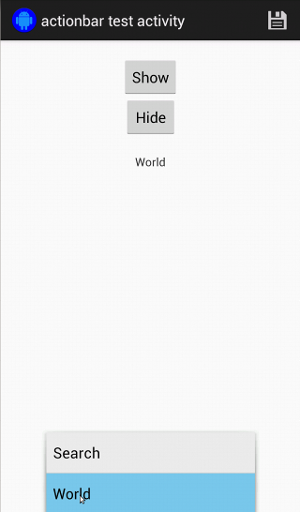
يكون النقر على العناصر في القائمة الكاملة أكثر تعقيدًا قليلاً في تنفيذ الإجراء العادي. الجهاز، لأنّ بعض الأجهزة بها زر القائمة الكاملة للأجهزة، والذي يفتح العناصر الكاملة في قائمة الخيارات، وبعض الأجهزة بها فائض سعة البرامج زر القائمة، الذي يفتح قائمة كاملة عادية. لحسن الحظ، تعالج قهوة الإسبريسو ذلك بالنسبة إلينا.
بالنسبة إلى شريط الإجراءات العادي:
Kotlin
fun testActionBarOverflow() {
    // Make sure we hide the contextual action bar.
    onView(withId(R.id.hide_contextual_action_bar))
        .perform(click())

    // Open the options menu OR open the overflow menu, depending on whether
    // the device has a hardware or software overflow menu button.
    openActionBarOverflowOrOptionsMenu(
            ApplicationProvider.getApplicationContext<Context>())

    // Click the item.
    onView(withText("World"))
        .perform(click())

    // Verify that we have really clicked on the icon by checking
    // the TextView content.
    onView(withId(R.id.text_action_bar_result))
        .check(matches(withText("World")))
}
Java
public void testActionBarOverflow() {
    // Make sure we hide the contextual action bar.
    onView(withId(R.id.hide_contextual_action_bar))
        .perform(click());

    // Open the options menu OR open the overflow menu, depending on whether
    // the device has a hardware or software overflow menu button.
    openActionBarOverflowOrOptionsMenu(
            ApplicationProvider.getApplicationContext());

    // Click the item.
    onView(withText("World"))
        .perform(click());

    // Verify that we have really clicked on the icon by checking
    // the TextView content.
    onView(withId(R.id.text_action_bar_result))
        .check(matches(withText("World")));
}
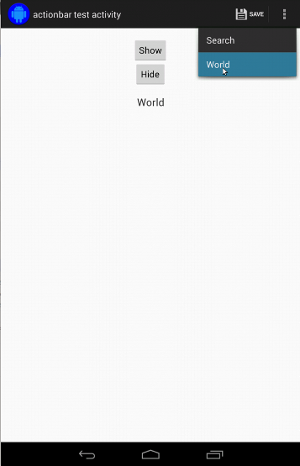
هذا هو الشكل الذي يظهر به ذلك على الأجهزة التي تحتوي على زر القائمة الكاملة للأجهزة:
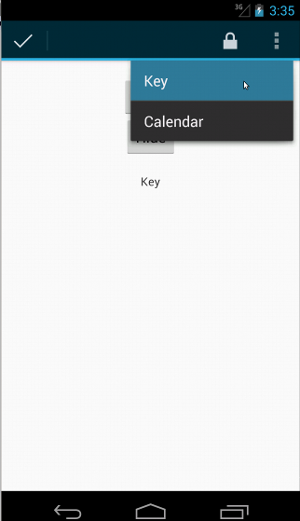
بالنسبة إلى شريط الإجراءات المستند إلى السياق، سيكون الأمر سهلاً مرة أخرى:
Kotlin
fun testActionModeOverflow() {
    // Show the contextual action bar.
    onView(withId(R.id.show_contextual_action_bar))
        .perform(click())

    // Open the overflow menu from contextual action mode.
    openContextualActionModeOverflowMenu()

    // Click on the item.
    onView(withText("Key"))
        .perform(click())

    // Verify that we have really clicked on the icon by
    // checking the TextView content.
    onView(withId(R.id.text_action_bar_result))
        .check(matches(withText("Key")))
    }
}
Java
public void testActionModeOverflow() {
    // Show the contextual action bar.
    onView(withId(R.id.show_contextual_action_bar))
        .perform(click());

    // Open the overflow menu from contextual action mode.
    openContextualActionModeOverflowMenu();

    // Click on the item.
    onView(withText("Key"))
        .perform(click());

    // Verify that we have really clicked on the icon by
    // checking the TextView content.
    onView(withId(R.id.text_action_bar_result))
        .check(matches(withText("Key")));
    }
}
للاطلاع على الرمز الكامل لهذه النماذج، يمكنك عرض
نموذج واحد (ActionBarTest.java) على GitHub.
تأكيد عدم ظهور طريقة عرض
بعد تنفيذ سلسلة من الإجراءات، ستحتاج بالتأكيد إلى تأكيد
حالة واجهة المستخدم قيد الاختبار. في بعض الأحيان، قد تكون هذه حالة سلبية، مثل عندما
عدم حدوث شيء ما. ضع في اعتبارك أنه يمكنك تحويل أي عرض هامكريس
تتطابق مع ViewAssertion باستخدام ViewAssertions.matches().
في المثال أدناه، نأخذ مطابقة isDisplayed() ونعكسها باستخدام
مُطابق not() العادي:
Kotlin
import androidx.test.espresso.Espresso.onView
import androidx.test.espresso.assertion.ViewAssertions.matches
import androidx.test.espresso.matcher.ViewMatchers.isDisplayed
import androidx.test.espresso.matcher.ViewMatchers.withId
import org.hamcrest.Matchers.not

onView(withId(R.id.bottom_left))
    .check(matches(not(isDisplayed())))
Java
import static androidx.test.espresso.Espresso.onView;
import static androidx.test.espresso.assertion.ViewAssertions.matches;
import static androidx.test.espresso.matcher.ViewMatchers.isDisplayed;
import static androidx.test.espresso.matcher.ViewMatchers.withId;
import static org.hamcrest.Matchers.not;

onView(withId(R.id.bottom_left))
    .check(matches(not(isDisplayed())));
يعمل الأسلوب السابق إذا كان العرض لا يزال جزءًا من التدرج الهرمي. إذا كان
لن تحصل على NoMatchingViewException وعليك استخدام
ViewAssertions.doesNotExist()
تأكيد عدم توفّر طريقة عرض
في حالة اختفاء طريقة العرض من التدرج الهرمي، الأمر الذي يمكن أن يحدث عندما
إجراء قد تسبب في الانتقال إلى نشاط آخر - يجب عليك استخدام
ViewAssertions.doesNotExist():
Kotlin
import androidx.test.espresso.Espresso.onView
import androidx.test.espresso.assertion.ViewAssertions.doesNotExist
import androidx.test.espresso.matcher.ViewMatchers.withId

onView(withId(R.id.bottom_left))
    .check(doesNotExist())
Java
import static androidx.test.espresso.Espresso.onView;
import static androidx.test.espresso.assertion.ViewAssertions.doesNotExist;
import static androidx.test.espresso.matcher.ViewMatchers.withId;

onView(withId(R.id.bottom_left))
    .check(doesNotExist());
تأكيد أن أحد عناصر البيانات ليس في محوّل
عليك إثبات أنّ عنصر بيانات معيّن ليس ضمن نطاق AdapterView.
الأمور بشكل مختلف قليلاً. علينا إيجاد AdapterView الذي يهمّنا
إلى البيانات التي بحوزتها والاستجواب عنها. ليس علينا استخدام onData().
بدلاً من ذلك، نستخدم onView() للعثور على AdapterView ثم استخدام قيمة أخرى
للعمل على البيانات داخل العرض.
المطابق أولاً:
Kotlin
private fun withAdaptedData(dataMatcher: Matcher<Any>): Matcher<View> {
    return object : TypeSafeMatcher<View>() {

        override fun describeTo(description: Description) {
            description.appendText("with class name: ")
            dataMatcher.describeTo(description)
        }

        public override fun matchesSafely(view: View) : Boolean {
            if (view !is AdapterView<*>) {
                return false
            }

            val adapter = view.adapter
            for (i in 0 until adapter.count) {
                if (dataMatcher.matches(adapter.getItem(i))) {
                    return true
                }
            }

            return false
        }
    }
}
Java
private static Matcher<View> withAdaptedData(final Matcher<Object> dataMatcher) {
    return new TypeSafeMatcher<View>() {

        @Override
        public void describeTo(Description description) {
            description.appendText("with class name: ");
            dataMatcher.describeTo(description);
        }

        @Override
        public boolean matchesSafely(View view) {
            if (!(view instanceof AdapterView)) {
                return false;
            }

            @SuppressWarnings("rawtypes")
            Adapter adapter = ((AdapterView) view).getAdapter();
            for (int i = 0; i < adapter.getCount(); i++) {
                if (dataMatcher.matches(adapter.getItem(i))) {
                    return true;
                }
            }

            return false;
        }
    };
}
كل ما نحتاج إليه هو onView() للعثور على AdapterView:
Kotlin
fun testDataItemNotInAdapter() {
    onView(withId(R.id.list))
          .check(matches(not(withAdaptedData(withItemContent("item: 168")))))
    }
}
Java
@SuppressWarnings("unchecked")
public void testDataItemNotInAdapter() {
    onView(withId(R.id.list))
          .check(matches(not(withAdaptedData(withItemContent("item: 168")))));
    }
}
ولدينا تأكيد سيفشل إذا كان العنصر يساوي "item: 168" في عرض مهايئ مع قائمة المعرّفات.
للاطّلاع على العيّنة الكاملة، يمكنك مراجعة طريقة testDataItemNotInAdapter() في
AdapterViewTest.java
على جيت هب.
استخدام معالج إخفاق مخصَّص
يمكنك استبدال FailureHandler التلقائية في Espresso بأخرى مخصّصة
طريقة معالجة إضافية أو مختلفة للأخطاء، مثل أخذ لقطة شاشة أو تمرير بيانات
إلى معلومات تصحيح الأخطاء الإضافية.
يوضّح مثال CustomFailureHandlerTest كيفية تنفيذ رمز مخصّص
معالج الإخفاق:
Kotlin
private class CustomFailureHandler(targetContext: Context) : FailureHandler {
    private val delegate: FailureHandler

    init {
        delegate = DefaultFailureHandler(targetContext)
    }

    override fun handle(error: Throwable, viewMatcher: Matcher<View>) {
        try {
            delegate.handle(error, viewMatcher)
        } catch (e: NoMatchingViewException) {
            throw MySpecialException(e)
        }

    }
}
Java
private static class CustomFailureHandler implements FailureHandler {
    private final FailureHandler delegate;

    public CustomFailureHandler(Context targetContext) {
        delegate = new DefaultFailureHandler(targetContext);
    }

    @Override
    public void handle(Throwable error, Matcher<View> viewMatcher) {
        try {
            delegate.handle(error, viewMatcher);
        } catch (NoMatchingViewException e) {
            throw new MySpecialException(e);
        }
    }
}
يعرض معالج الإخفاق هذا MySpecialException بدلاً من
NoMatchingViewException ويفوض جميع الإخفاقات الأخرى إلى
DefaultFailureHandler يمكن تسجيل CustomFailureHandler باستخدام
قهوة الإسبريسو بطريقة الاختبار setUp():
Kotlin
@Throws(Exception::class)
override fun setUp() {
    super.setUp()
    getActivity()
    setFailureHandler(CustomFailureHandler(
            ApplicationProvider.getApplicationContext<Context>()))
}
Java
@Override
public void setUp() throws Exception {
    super.setUp();
    getActivity();
    setFailureHandler(new CustomFailureHandler(
            ApplicationProvider.getApplicationContext()));
}
لمزيد من المعلومات، يُرجى الاطّلاع على
FailureHandler
و
Espresso.setFailureHandler()
استهداف النوافذ غير التلقائية
يتيح Android استخدام نوافذ متعددة. في العادة، يكون هذا واضحًا للمستخدمين
ومطوّر التطبيق، إلا أنه في بعض الحالات تظهر نوافذ متعددة، مثل
كما هو الحال عندما يتم رسم نافذة إكمال تلقائي فوق نافذة التطبيق الرئيسية في
أداة البحث. لتبسيط الأمور، تستخدم قهوة الإسبريسو بشكل افتراضي إرشادات
تخمين أي Window تريد التفاعل معه. يكاد هذا الإرشاد
دائمًا جيدة بما فيه الكفاية؛ ولكن في بعض الحالات النادرة، ستحتاج إلى تحديد النافذة
يجب أن يستهدفه التفاعل. يمكنك إجراء ذلك من خلال توفير نافذة الجذر الخاصة بك.
مطابق، أو مُطابق Root:
Kotlin
onView(withText("South China Sea"))
    .inRoot(withDecorView(not(`is`(getActivity().getWindow().getDecorView()))))
    .perform(click())
Java
onView(withText("South China Sea"))
    .inRoot(withDecorView(not(is(getActivity().getWindow().getDecorView()))))
    .perform(click());
كما هو الحال مع
ViewMatchers،
نقدم مجموعة من الأدوات
RootMatchers
ويمكنك بالطبع تنفيذ كائن Matcher الخاص بك.
ألق نظرة على MultipleWindowTest عيّنة على GitHub.
مطابقة رأس أو تذييل في عرض قائمة
تتم إضافة الرؤوس والتذييلات إلى ListViews باستخدام السمة addHeaderView()
addFooterView() طريقة للتأكُّد من معرفة Espresso.onData() لعنصر البيانات
لمطابقتها، فتأكد من تمرير قيمة كائن بيانات معدة مسبقًا كمعلمة ثانية
إلى addHeaderView() وaddFooterView(). مثلاً:
Kotlin
const val FOOTER = "FOOTER"
...
val footerView = layoutInflater.inflate(R.layout.list_item, listView, false)
footerView.findViewById<TextView>(R.id.item_content).text = "count:"
footerView.findViewById<TextView>(R.id.item_size).text
        = data.size.toString
listView.addFooterView(footerView, FOOTER, true)
Java
public static final String FOOTER = "FOOTER";
...
View footerView = layoutInflater.inflate(R.layout.list_item, listView, false);
footerView.findViewById<TextView>(R.id.item_content).setText("count:");
footerView.findViewById<TextView>(R.id.item_size).setText(String.valueOf(data.size()));
listView.addFooterView(footerView, FOOTER, true);
بعد ذلك، يمكنك كتابة مطابقة للتذييل:
Kotlin
import org.hamcrest.Matchers.allOf
import org.hamcrest.Matchers.instanceOf
import org.hamcrest.Matchers.`is`

fun isFooter(): Matcher<Any> {
    return allOf(`is`(instanceOf(String::class.java)),
            `is`(LongListActivity.FOOTER))
}
Java
import static org.hamcrest.Matchers.allOf;
import static org.hamcrest.Matchers.instanceOf;
import static org.hamcrest.Matchers.is;

@SuppressWarnings("unchecked")
public static Matcher<Object> isFooter() {
    return allOf(is(instanceOf(String.class)), is(LongListActivity.FOOTER));
}
كما أن تحميل طريقة العرض في الاختبار هو أمر تافه:
Kotlin
import androidx.test.espresso.Espresso.onData
import androidx.test.espresso.action.ViewActions.click
import androidx.test.espresso.sample.LongListMatchers.isFooter

fun testClickFooter() {
    onData(isFooter())
        .perform(click())

    // ...
}
Java
import static androidx.test.espresso.Espresso.onData;
import static androidx.test.espresso.action.ViewActions.click;
import static androidx.test.espresso.sample.LongListMatchers.isFooter;

public void testClickFooter() {
    onData(isFooter())
        .perform(click());

    // ...
}
ألقِ نظرة على عينة الرمز الكامل المتوفرة في الطريقة testClickFooter()
AdapterViewTest.java
على GitHub.