
คลาส AndroidJUnitRunner เป็นตัวรันการทดสอบ JUnit ที่ให้คุณเรียกใช้การทดสอบ JUnit 4 ที่มีเครื่องมือวัดผลในอุปกรณ์ Android รวมถึงการทดสอบที่ใช้เฟรมเวิร์ก Espresso, UI Automator และ Compose
โปรแกรมรันทดสอบจะจัดการการโหลดแพ็กเกจทดสอบและแอปที่ทดสอบลงในอุปกรณ์ เรียกใช้การทดสอบ และรายงานผลการทดสอบ
เครื่องมือทดสอบนี้รองรับงานทดสอบทั่วไปหลายอย่าง ซึ่งรวมถึงงานต่อไปนี้
เขียนการทดสอบ JUnit
ข้อมูลโค้ดต่อไปนี้แสดงวิธีที่คุณอาจเขียนการทดสอบ JUnit 4 ที่ตรวจสอบเพื่อยืนยันว่าการดำเนินการ changeText ในคลาส ChangeTextBehavior ทำงานได้อย่างถูกต้อง
Kotlin
@RunWith(AndroidJUnit4::class)
@LargeTest // Optional runner annotation
class ChangeTextBehaviorTest {
 val stringToBeTyped = "Espresso"
 // ActivityTestRule accesses context through the runner
 @get:Rule
 val activityRule = ActivityTestRule(MainActivity::class.java)

 @Test fun changeText_sameActivity() {
 // Type text and then press the button.
 onView(withId(R.id.editTextUserInput))
 .perform(typeText(stringToBeTyped), closeSoftKeyboard())
 onView(withId(R.id.changeTextBt)).perform(click())

 // Check that the text was changed.
 onView(withId(R.id.textToBeChanged))
 .check(matches(withText(stringToBeTyped)))
 }
}
Java
@RunWith(AndroidJUnit4.class)
@LargeTest // Optional runner annotation
public class ChangeTextBehaviorTest {

    private static final String stringToBeTyped = "Espresso";

    @Rule
    public ActivityTestRule<MainActivity>; activityRule =
            new ActivityTestRule<>;(MainActivity.class);

    @Test
    public void changeText_sameActivity() {
        // Type text and then press the button.
        onView(withId(R.id.editTextUserInput))
                .perform(typeText(stringToBeTyped), closeSoftKeyboard());
        onView(withId(R.id.changeTextBt)).perform(click());

        // Check that the text was changed.
        onView(withId(R.id.textToBeChanged))
                .check(matches(withText(stringToBeTyped)));
    }
}
เข้าถึงบริบทของแอปพลิเคชัน
เมื่อใช้ AndroidJUnitRunner เพื่อเรียกใช้การทดสอบ คุณจะเข้าถึงบริบทสําหรับแอปที่ทดสอบได้โดยเรียกใช้เมธอด ApplicationProvider.getApplicationContext() แบบคงที่ หากคุณสร้างคลาสย่อยที่กําหนดเองของ Application ในแอป เมธอดนี้จะแสดงบริบทของคลาสย่อยที่กําหนดเอง
หากคุณเป็นผู้ติดตั้งใช้งานเครื่องมือ คุณจะเข้าถึง API การทดสอบระดับต่ำได้โดยใช้คลาส InstrumentationRegistry คลาสนี้ประกอบด้วยออบเจ็กต์ Instrumentation ออบเจ็กต์แอปเป้าหมาย Context ออบเจ็กต์แอปทดสอบ Context และอาร์กิวเมนต์บรรทัดคำสั่งที่ส่งไปยังการทดสอบ
กรองการทดสอบ
ในการทดสอบ JUnit 4.x คุณสามารถใช้คำอธิบายประกอบเพื่อกำหนดค่าการเรียกใช้การทดสอบได้ ฟีเจอร์นี้ช่วยลดความจำเป็นในการเพิ่มข้อความเทมเพลตและโค้ดแบบมีเงื่อนไขในการทดสอบ นอกจากการกำกับเนื้อหามาตรฐานที่ JUnit 4 รองรับแล้ว TestRunner ยังรองรับการกำกับเนื้อหาสำหรับ Android โดยเฉพาะด้วย ซึ่งรวมถึงการกำกับเนื้อหาต่อไปนี้
@RequiresDevice: ระบุว่าการทดสอบควรทํางานในอุปกรณ์จริงเท่านั้น ไม่ใช่ในโปรแกรมจําลอง@SdkSuppress: ระงับการทดสอบไม่ให้ทํางานใน Android API ระดับที่ต่ำกว่าระดับที่ระบุ ตัวอย่างเช่น หากต้องการระงับการทดสอบ API ระดับต่ำกว่า 23 ทั้งหมดไม่ให้ทํางาน ให้ใช้คำอธิบายประกอบ@SDKSuppress(minSdkVersion=23)@SmallTest,@MediumTestและ@LargeTest: จัดประเภทระยะเวลาที่การทดสอบควรใช้เวลาทํางาน และส่งผลต่อความถี่ที่คุณทําการทดสอบได้ คุณสามารถใช้คำอธิบายประกอบนี้เพื่อกรองการทดสอบที่จะเรียกใช้โดยตั้งค่าพร็อพเพอร์ตี้android.testInstrumentationRunnerArguments.sizeดังนี้
-Pandroid.testInstrumentationRunnerArguments.size=small
การทดสอบกลุ่ม
หากต้องการเรียกใช้การทดสอบแบบขนานกัน โดยแชร์การทดสอบในเซิร์ฟเวอร์หลายเครื่องเพื่อให้ทํางานได้เร็วขึ้น คุณสามารถแบ่งการทดสอบออกเป็นกลุ่มหรือกลุ่มย่อย เครื่องมือเรียกใช้การทดสอบรองรับการแยกชุดทดสอบชุดเดียวออกเป็นหลายกลุ่ม เพื่อให้คุณเรียกใช้การทดสอบที่อยู่ในกลุ่มเดียวกันเป็นกลุ่มได้ง่ายๆ แต่ละกลุ่มจะระบุด้วยหมายเลขดัชนี เมื่อทำการทดสอบ ให้ใช้ตัวเลือก -e numShards เพื่อระบุจำนวนกลุ่มแยกที่จะสร้าง และตัวเลือก -e shardIndex เพื่อระบุกลุ่มที่จะเรียกใช้
ตัวอย่างเช่น หากต้องการแยกชุดทดสอบออกเป็น 10 กลุ่มและเรียกใช้เฉพาะการทดสอบที่จัดกลุ่มไว้ในกลุ่มที่ 2 ให้ใช้คําสั่ง adb ต่อไปนี้
adb shell am instrument -w -e numShards 10 -e shardIndex 2
ใช้ Android Test Orchestrator
Android Test Orchestrator ช่วยให้คุณเรียกใช้การทดสอบของแอปแต่ละรายการภายในการเรียกใช้ Instrumentation ของตนเองได้ เมื่อใช้ AndroidJUnitRunner เวอร์ชัน 1.0 ขึ้นไป คุณจะมีสิทธิ์เข้าถึง Android Test Orchestrator
Android Test Orchestrator มีประโยชน์ต่อไปนี้สําหรับสภาพแวดล้อมการทดสอบ
- สถานะที่แชร์ขั้นต่ำ: การทดสอบแต่ละรายการจะทํางานใน
Instrumentationอินสแตนซ์ของตัวเอง ดังนั้น หากการทดสอบแชร์สถานะแอป ระบบจะนำสถานะที่แชร์ส่วนใหญ่ออกจาก CPU หรือหน่วยความจำของอุปกรณ์หลังจากการทดสอบแต่ละครั้ง หากต้องการนำสถานะที่ใช้ร่วมกันทั้งหมดออกจาก CPU และหน่วยความจำของอุปกรณ์หลังจากการทดสอบแต่ละครั้ง ให้ใช้ FlagclearPackageDataดูตัวอย่างได้ที่ส่วนเปิดใช้จาก Gradle - แยกข้อขัดข้อง: แม้ว่าการทดสอบรายการหนึ่งจะขัดข้อง แต่การทดสอบนั้นจะปิดเฉพาะอินสแตนซ์
Instrumentationของตัวเองเท่านั้น ซึ่งหมายความว่าการทดสอบอื่นๆ ในชุดทดสอบจะยังคงทํางานต่อไปเพื่อให้ผลลัพธ์การทดสอบที่สมบูรณ์
การแยกนี้อาจส่งผลให้เวลาในการเรียกใช้การทดสอบเพิ่มขึ้นเนื่องจาก Android Test Orchestrator จะรีสตาร์ทแอปพลิเคชันหลังจากการทดสอบแต่ละครั้ง
ทั้ง Android Studio และ Firebase Test Lab มี Android Test Orchestrator ติดตั้งไว้ล่วงหน้าแล้ว แต่คุณต้องเปิดใช้ฟีเจอร์ใน Android Studio
เปิดใช้จาก Gradle
หากต้องการเปิดใช้ Android Test Orchestrator โดยใช้เครื่องมือบรรทัดคำสั่ง Gradle ให้ทำตามขั้นตอนต่อไปนี้
- ขั้นตอนที่ 1: แก้ไขไฟล์ gradle เพิ่มคำสั่งต่อไปนี้ลงในไฟล์
build.gradleของโปรเจ็กต์
android {
 defaultConfig {
  ...
  testInstrumentationRunner "androidx.test.runner.AndroidJUnitRunner"

  // The following argument makes the Android Test Orchestrator run its
  // "pm clear" command after each test invocation. This command ensures
  // that the app's state is completely cleared between tests.
  testInstrumentationRunnerArguments clearPackageData: 'true'
 }

 testOptions {
  execution 'ANDROIDX_TEST_ORCHESTRATOR'
 }
}

dependencies {
 androidTestImplementation 'androidx.test:runner:1.1.0'
 androidTestUtil 'androidx.test:orchestrator:1.1.0'
}
- ขั้นตอนที่ 2: เรียกใช้ Android Test Orchestrator โดยดำเนินการตามคําสั่งต่อไปนี้
./gradlew connectedCheck
เปิดใช้จาก Android Studio
หากต้องการเปิดใช้ Android Test Orchestrator ใน Android Studio ให้เพิ่มคำสั่งที่แสดงในเปิดใช้จาก Gradle ลงในไฟล์ build.gradle ของแอป
เปิดใช้จากบรรทัดคำสั่ง
หากต้องการใช้ Android Test Orchestrator ในบรรทัดคำสั่ง ให้เรียกใช้คำสั่งต่อไปนี้ในหน้าต่างเทอร์มินัล
DEVICE_API_LEVEL=$(adb shell getprop ro.build.version.sdk)

FORCE_QUERYABLE_OPTION=""
if [[ $DEVICE_API_LEVEL -ge 30 ]]; then
   FORCE_QUERYABLE_OPTION="--force-queryable"
fi

# uninstall old versions
adb uninstall androidx.test.services
adb uninstall androidx.test.orchestrator

# Install the test orchestrator.
adb install $FORCE_QUERYABLE_OPTION -r path/to/m2repository/androidx/test/orchestrator/1.4.2/orchestrator-1.4.2.apk

# Install test services.
adb install $FORCE_QUERYABLE_OPTION -r path/to/m2repository/androidx/test/services/test-services/1.4.2/test-services-1.4.2.apk

# Replace "com.example.test" with the name of the package containing your tests.
# Add "-e clearPackageData true" to clear your app's data in between runs.
adb shell 'CLASSPATH=$(pm path androidx.test.services) app_process / \
 androidx.test.services.shellexecutor.ShellMain am instrument -w -e \
 targetInstrumentation com.example.test/androidx.test.runner.AndroidJUnitRunner \
 androidx.test.orchestrator/.AndroidTestOrchestrator'
ดังที่ไวยากรณ์คำสั่งแสดง คุณต้องติดตั้ง Android Test Orchestrator แล้วใช้โดยตรง
adb shell pm list instrumentation
การใช้เครื่องมือต่างๆ
หากใช้ชุดเครื่องมืออื่นเพื่อทดสอบแอป คุณยังคงใช้ Android Test Orchestrator ได้โดยทำตามขั้นตอนต่อไปนี้
- รวมแพ็กเกจที่จำเป็นไว้ในไฟล์บิลด์ของแอป
- เปิดใช้ Android Test Orchestrator จากบรรทัดคำสั่ง
สถาปัตยกรรม
APK บริการ Orchestrator จะจัดเก็บไว้ในกระบวนการที่แยกจาก APK การทดสอบและ APK ของแอปที่ทดสอบ
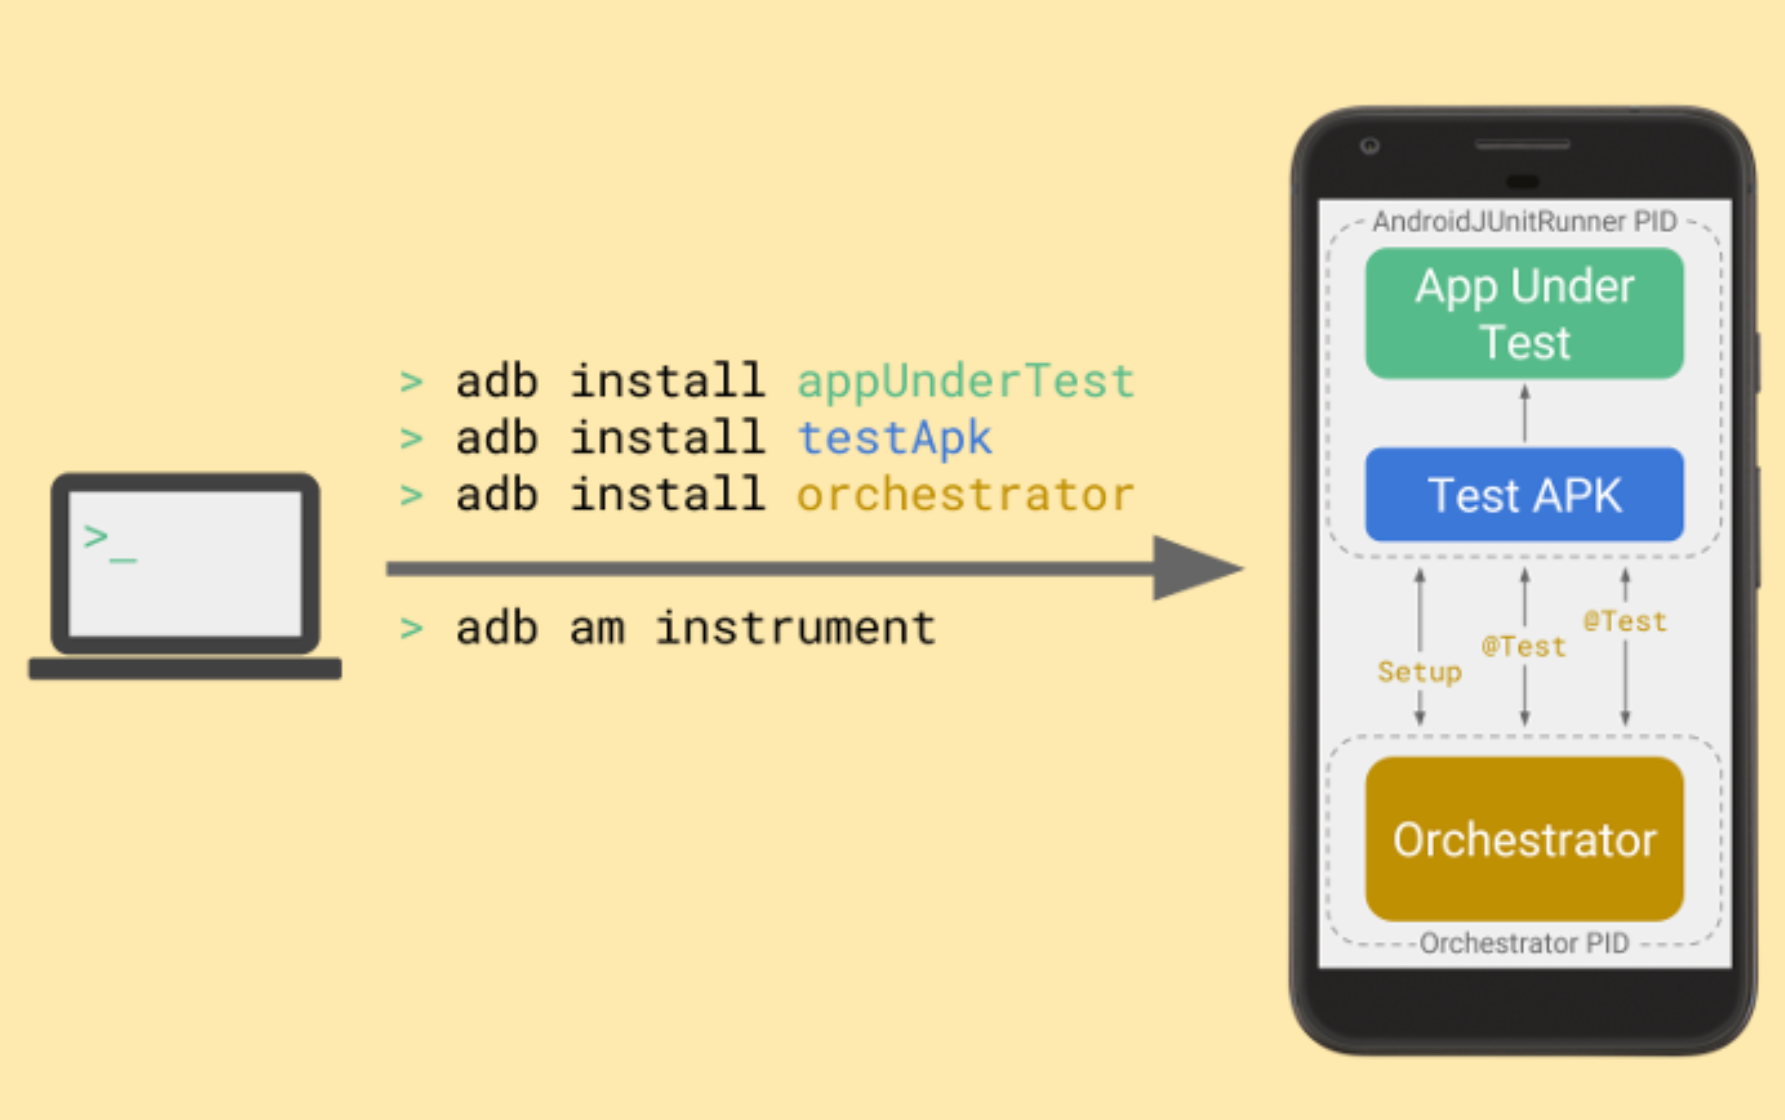
Android Test Orchestrator จะรวบรวมการทดสอบ JUnit ในช่วงเริ่มต้นของการเรียกใช้ชุดทดสอบ แต่หลังจากนั้นจะเรียกใช้การทดสอบแต่ละรายการแยกกันในอินสแตนซ์ Instrumentation ของตนเอง
ข้อมูลเพิ่มเติม
ดูข้อมูลเพิ่มเติมเกี่ยวกับการใช้ AndroidJUnitRunner ได้ที่เอกสารอ้างอิง API
แหล่งข้อมูลเพิ่มเติม
ดูข้อมูลเพิ่มเติมเกี่ยวกับการใช้ AndroidJUnitRunner ได้ที่แหล่งข้อมูลต่อไปนี้
ตัวอย่าง
- AndroidJunitRunnerSample: แสดงคําอธิบายประกอบการทดสอบ การทดสอบที่มีพารามิเตอร์ และการสร้างชุดทดสอบ