
अपने ऐप्लिकेशन कोड में बदलाव करके, Microbenchmark लाइब्रेरी का इस्तेमाल करने का तरीका जानने के लिए, क्विकस्टार्ट सेक्शन देखें. अपने कोडबेस में ज़्यादा मुश्किल बदलावों के साथ पूरा सेटअप करने का तरीका जानने के लिए, पूरे प्रोजेक्ट का सेटअप सेक्शन देखें.
क्विकस्टार्ट
इस सेक्शन में, कोड को मॉड्यूल में ले जाए बिना, मानदंड की तुलना करने और एक बार के मेज़रमेंट को चलाने का तरीका बताया गया है. परफ़ॉर्मेंस के सटीक नतीजे पाने के लिए, इन चरणों में आपके ऐप्लिकेशन में डीबग करने की सुविधा बंद करना शामिल है. इसलिए, इसे अपनी लोकल वर्किंग कॉपी में रखें. साथ ही, अपने सोर्स कंट्रोल सिस्टम में बदलाव न करें.
एक बार बेंचमार्किंग करने के लिए, यह तरीका अपनाएं:
अपनी लाइब्रेरी को मॉड्यूल की
build.gradleयाbuild.gradle.ktsफ़ाइल में जोड़ें:Kotlin
dependencies {
    implementation("androidx.benchmark:benchmark-junit4:1.2.4")
}
Groovy
dependencies {
    implementation 'androidx.benchmark:benchmark-junit4:1.2.4'
}
androidTestImplementationडिपेंडेंसी के बजाय,implementationडिपेंडेंसी का इस्तेमाल करें.androidTestImplementationका इस्तेमाल करने पर, बेंचमार्क नहीं चल पाते, क्योंकि लाइब्रेरी मेनिफ़ेस्ट को ऐप्लिकेशन मेनिफ़ेस्ट में मर्ज नहीं किया जाता.debugके बिल्ड टाइप को अपडेट करें, ताकि उसे डीबग न किया जा सके:Kotlin
android {
    ...
    buildTypes {
        debug {
            isDebuggable = false
        }
    }
}
Groovy
android {
    ...
    buildTypes {
        debug {
            debuggable false
        }
    }
}
testInstrumentationRunnerकोAndroidBenchmarkRunnerमें बदलें:Kotlin
android {
    ...
    defaultConfig {
        testInstrumentationRunner = "androidx.benchmark.junit4.AndroidBenchmarkRunner"
    }
}
Groovy
android {
    ...
    defaultConfig {
        testInstrumentationRunner "androidx.benchmark.junit4.AndroidBenchmarkRunner"
    }
}
अपना बेंचमार्क जोड़ने के लिए,
androidTestडायरेक्ट्री में मौजूद किसी टेस्ट फ़ाइल मेंBenchmarkRuleका एक इंस्टेंस जोड़ें. बेंचमार्क लिखने के बारे में ज़्यादा जानने के लिए, Microbenchmark क्लास बनाना लेख पढ़ें.यहां दिए गए कोड स्निपेट में, इंस्ट्रुमेंट किए गए टेस्ट में बेंचमार्क जोड़ने का तरीका बताया गया है:
Kotlin
@RunWith(AndroidJUnit4::class) class SampleBenchmark { @get:Rule val benchmarkRule = BenchmarkRule() @Test fun benchmarkSomeWork() { benchmarkRule.measureRepeated { doSomeWork() } } }
Java
@RunWith(AndroidJUnit4.class)
class SampleBenchmark {
    @Rule
    public BenchmarkRule benchmarkRule = new BenchmarkRule();

    @Test
    public void benchmarkSomeWork() {
            BenchmarkRuleKt.measureRepeated(
                (Function1<BenchmarkRule.Scope, Unit>) scope -> doSomeWork()
            );
       }
    }
}
बेंचमार्क लिखने का तरीका जानने के लिए, माइक्रोबेंचमार्क क्लास बनाना पर जाएं.
प्रोजेक्ट का पूरा सेटअप
एक बार की जाने वाली बेंचमार्किंग के बजाय, नियमित बेंचमार्किंग सेट अप करने के लिए, बेंचमार्क को उनके खुद के मॉड्यूल में अलग करें. इससे यह पक्का करने में मदद मिलती है कि उनका कॉन्फ़िगरेशन, जैसे कि debuggable को false पर सेट करना, सामान्य टेस्ट से अलग है.
माइक्रोबेंचमार्क आपके कोड को सीधे तौर पर चलाता है. इसलिए, जिस कोड को बेंचमार्क करना है उसे अलग Gradle मॉड्यूल में रखें. साथ ही, उस मॉड्यूल पर निर्भरता सेट करें. ऐसा फ़िगर 1 में दिखाए गए तरीके से करें.
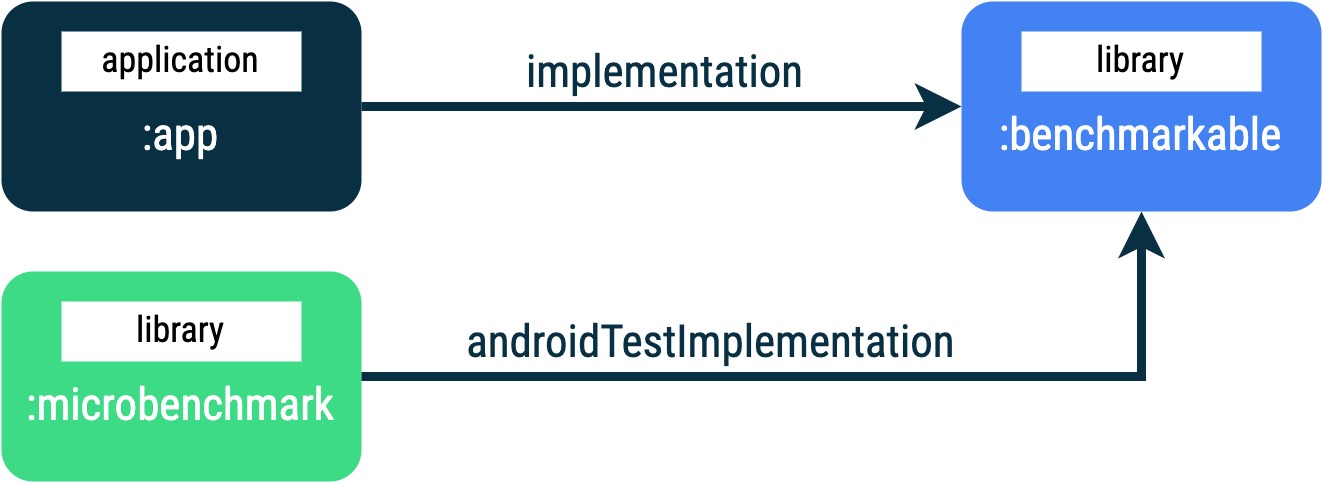
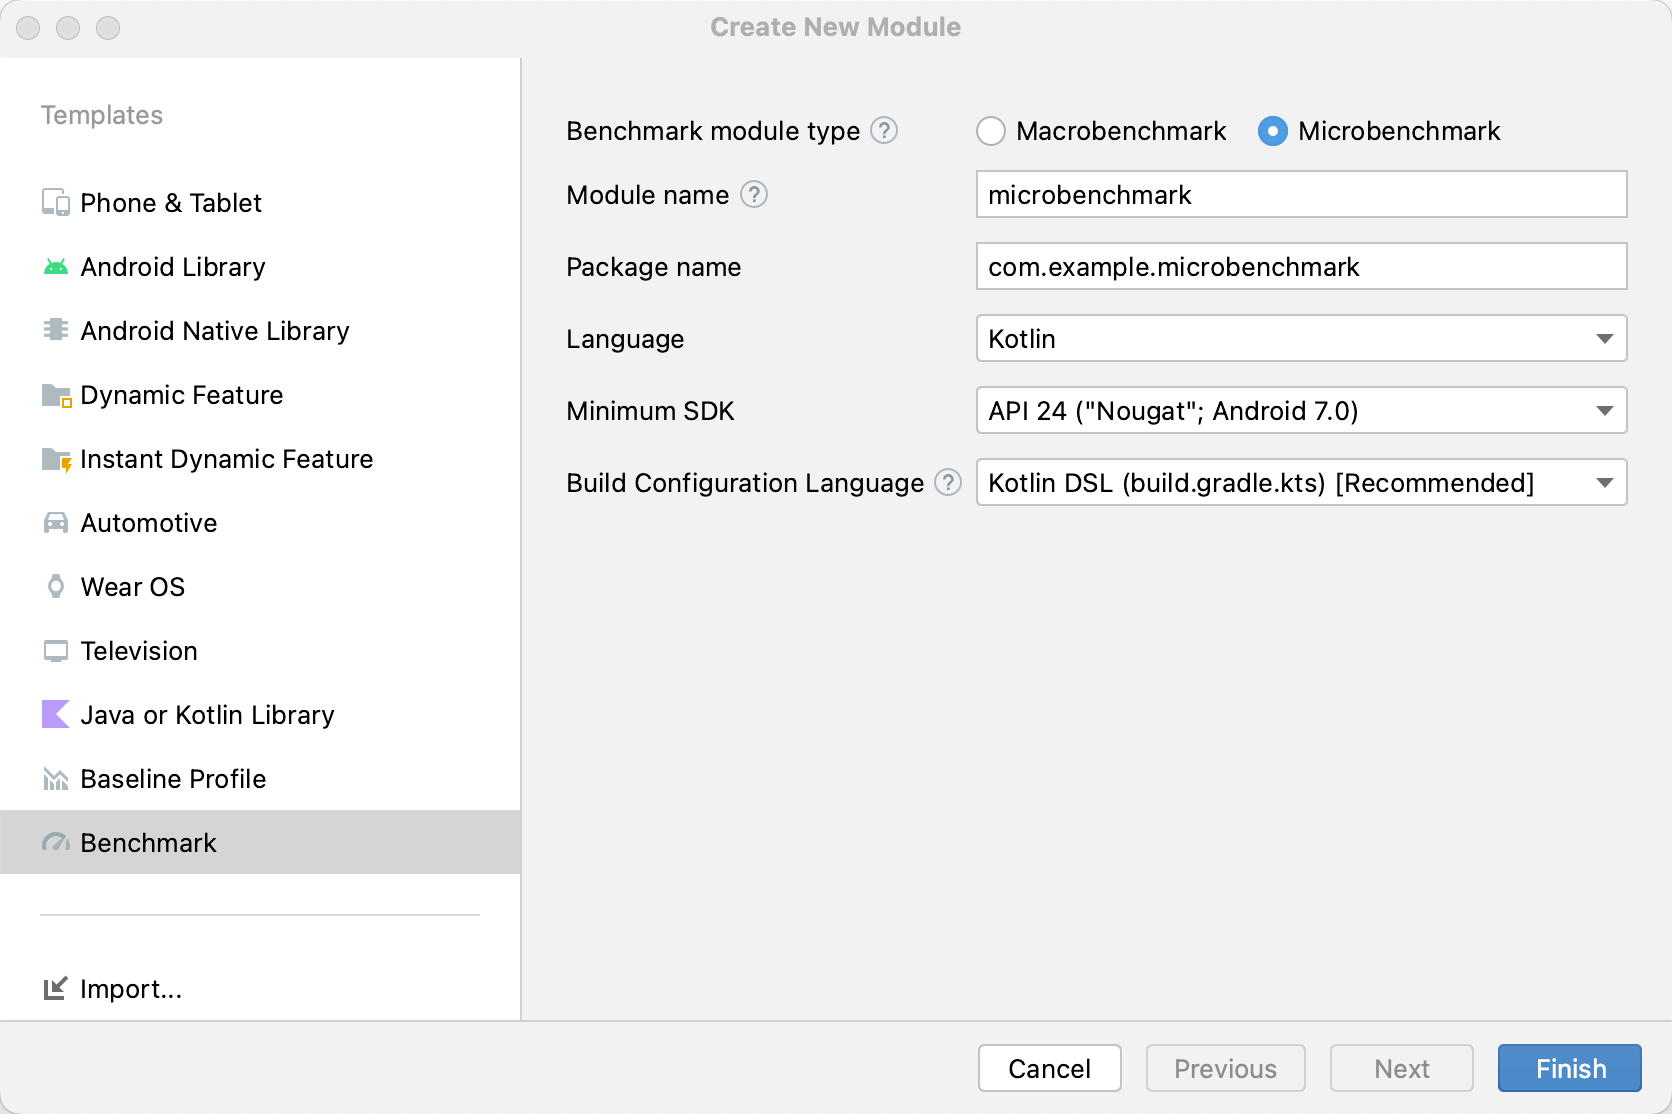
:app, :microbenchmark, और :benchmarkable Gradle मॉड्यूल के साथ ऐप्लिकेशन स्ट्रक्चर. इससे माइक्रोबेंचमार्क, :benchmarkable मॉड्यूल में कोड को बेंचमार्क कर सकते हैं.नया Gradle मॉड्यूल जोड़ने के लिए, Android Studio में मॉड्यूल विज़र्ड का इस्तेमाल किया जा सकता है. विज़र्ड, एक ऐसा मॉड्यूल बनाता है जो बेंचमार्किंग के लिए पहले से कॉन्फ़िगर किया गया होता है. इसमें बेंचमार्क डायरेक्ट्री जोड़ी जाती है और debuggable को false पर सेट किया जाता है.
Android Studio में प्रोजेक्ट पैनल में जाकर, अपने प्रोजेक्ट या मॉड्यूल पर राइट क्लिक करें. इसके बाद, नया > मॉड्यूल पर क्लिक करें.
टेंप्लेट पैनल में, मानदंड चुनें.
मानदंड मॉड्यूल टाइप के तौर पर माइक्रोबेंचमार्क चुनें.
मॉड्यूल के नाम के लिए, "microbenchmark" टाइप करें.
पूरा करें पर क्लिक करें.
मॉड्यूल बनाने के बाद, उसकी build.gradle या build.gradle.kts फ़ाइल बदलें. साथ ही, बेंचमार्क करने के लिए कोड वाले मॉड्यूल में androidTestImplementation जोड़ें:
Kotlin
dependencies {
    // The module name might be different.
    androidTestImplementation(project(":benchmarkable"))
}
Groovy
dependencies {
    // The module name might be different.
    androidTestImplementation project(':benchmarkable')
}
माइक्रोबेंचमार्क क्लास बनाना
बेंचमार्क, स्टैंडर्ड इंस्ट्रुमेंटेशन टेस्ट होते हैं. बेंचमार्क बनाने के लिए, लाइब्रेरी की ओर से उपलब्ध कराई गई BenchmarkRule क्लास का इस्तेमाल करें. गतिविधियों की तुलना करने के लिए, ActivityScenario या ActivityScenarioRule का इस्तेमाल करें. यूआई कोड की परफ़ॉर्मेंस की तुलना करने के लिए, @UiThreadTest का इस्तेमाल करें.
यहां दिए गए कोड में, बेंचमार्क का एक सैंपल दिखाया गया है:
Kotlin
@RunWith(AndroidJUnit4::class) class SampleBenchmark { @get:Rule val benchmarkRule = BenchmarkRule() @Test fun benchmarkSomeWork() { benchmarkRule.measureRepeated { doSomeWork() } } }
Java
@RunWith(AndroidJUnit4.class)
class SampleBenchmark {
    @Rule
    public BenchmarkRule benchmarkRule = new BenchmarkRule();

    @Test
    public void benchmarkSomeWork() {
        final BenchmarkState state = benchmarkRule.getState();
        while (state.keepRunning()) {
            doSomeWork();
        }
    }
}
सेटअप के लिए टाइमिंग की सुविधा बंद करना
आपके पास कोड के उन सेक्शन के लिए टाइमिंग की सुविधा बंद करने का विकल्प होता है जिन्हें आपको runWithTimingDisabled{} ब्लॉक की मदद से मेज़र नहीं करना है. इन सेक्शन में आम तौर पर कुछ कोड होता है, जिसे आपको बेंचमार्क के हर इटरेशन पर चलाना होता है.
Kotlin
// using random with the same seed, so that it generates the same data every run private val random = Random(0) // create the array once and just copy it in benchmarks private val unsorted = IntArray(10_000) { random.nextInt() } @Test fun benchmark_quickSort() { // ... benchmarkRule.measureRepeated { // copy the array with timing disabled to measure only the algorithm itself listToSort = runWithTimingDisabled { unsorted.copyOf() } // sort the array in place and measure how long it takes SortingAlgorithms.quickSort(listToSort) } // assert only once not to add overhead to the benchmarks assertTrue(listToSort.isSorted) }
Java
private final int[] unsorted = new int[10000];

public SampleBenchmark() {
    // Use random with the same seed, so that it generates the same data every
    // run.
    Random random = new Random(0);

    // Create the array once and copy it in benchmarks.
    Arrays.setAll(unsorted, (index) -> random.nextInt());
}

@Test
public void benchmark_quickSort() {
    final BenchmarkState state = benchmarkRule.getState();

    int[] listToSort = new int[0];

    while (state.keepRunning()) {

        // Copy the array with timing disabled to measure only the algorithm
        // itself.
        state.pauseTiming();
        listToSort = Arrays.copyOf(unsorted, 10000);
        state.resumeTiming();

        // Sort the array in place and measure how long it takes.
        SortingAlgorithms.quickSort(listToSort);
    }

    // Assert only once, not to add overhead to the benchmarks.
    assertTrue(SortingAlgorithmsKt.isSorted(listToSort));
}
measureRepeated ब्लॉक और runWithTimingDisabled के अंदर किए गए काम की मात्रा को कम करने की कोशिश करें. measureRepeated ब्लॉक को कई बार चलाया जाता है. इससे बेंचमार्क को चलाने में लगने वाले कुल समय पर असर पड़ सकता है. अगर आपको किसी बेंचमार्क के कुछ नतीजों की पुष्टि करनी है, तो बेंचमार्क के हर इटरेशन के बजाय, आखिरी नतीजे की पुष्टि की जा सकती है.
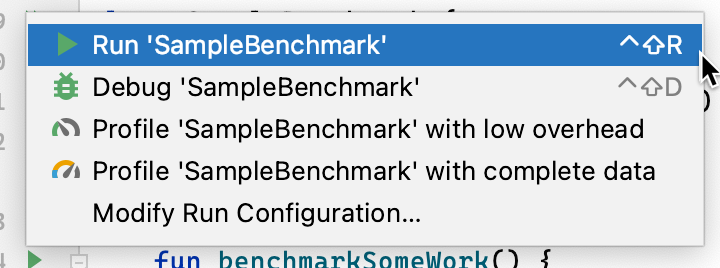
बेंचमार्क चलाना
Android Studio में, अपने बेंचमार्क को उसी तरह चलाएं जैसे किसी @Test को चलाया जाता है. इसके लिए, अपनी टेस्ट क्लास या तरीके के बगल में मौजूद गटर ऐक्शन का इस्तेमाल करें. इसकी जानकारी, तीसरी इमेज में दी गई है.
इसके अलावा, कमांड लाइन से connectedCheck चलाकर, तय किए गए Gradle मॉड्यूल के सभी टेस्ट चलाएं:
./gradlew benchmark:connectedCheckया एक टेस्ट:
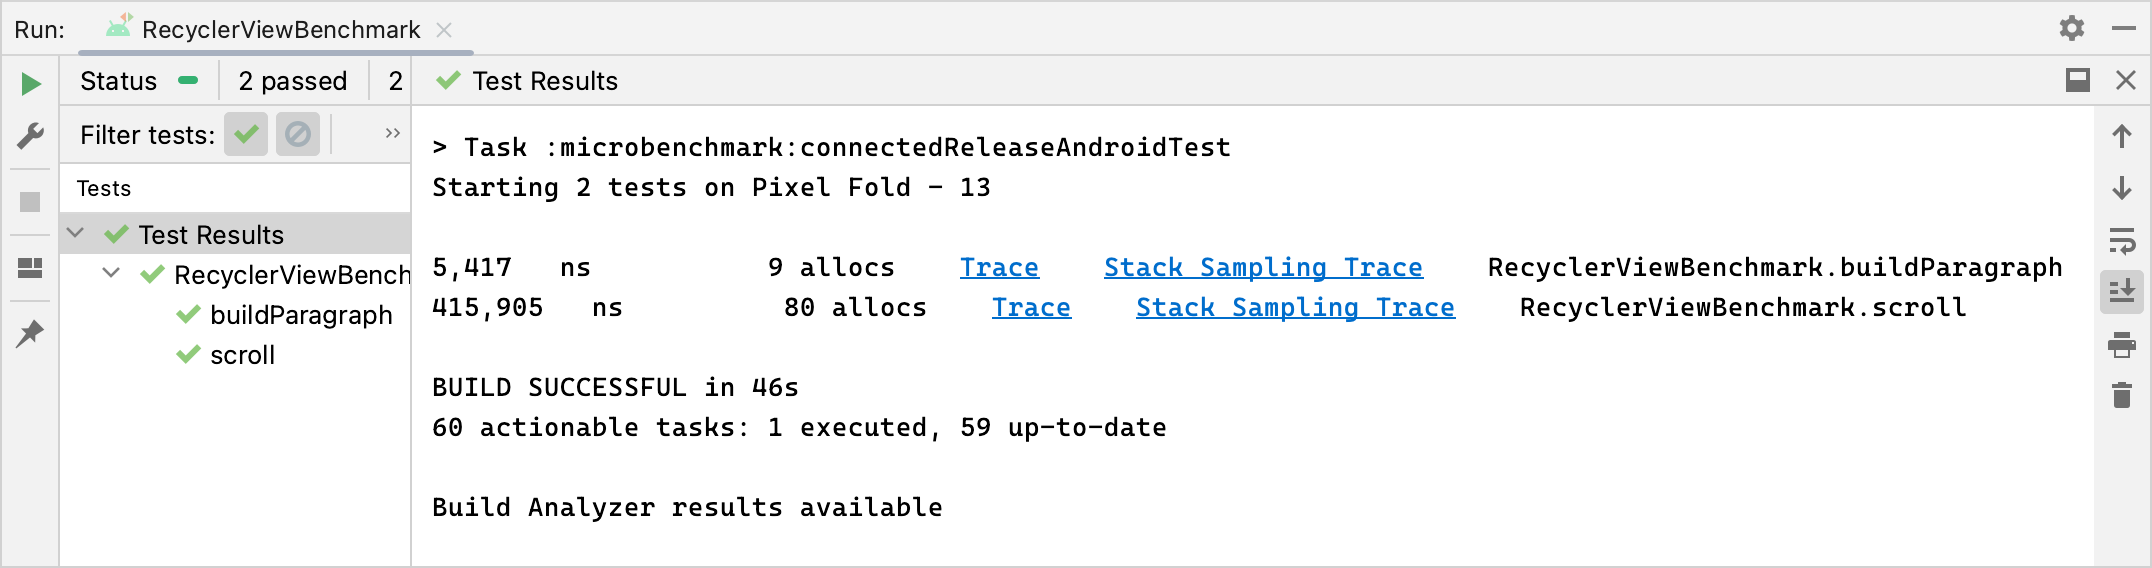
./gradlew benchmark:connectedCheck -P android.testInstrumentationRunnerArguments.class=com.example.benchmark.SampleBenchmark#benchmarkSomeWorkबेंचमार्क के नतीजे
माइक्रोबेंचमार्क टेस्ट के पूरा होने के बाद, मेट्रिक सीधे तौर पर Android Studio में दिखती हैं. साथ ही, पूरी बेंचमार्क रिपोर्ट JSON फ़ॉर्मैट में उपलब्ध होती है. इसमें अन्य मेट्रिक और डिवाइस की जानकारी शामिल होती है.
JSON रिपोर्ट और प्रोफ़ाइलिंग के सभी ट्रेस भी डिवाइस से होस्ट पर अपने-आप कॉपी हो जाते हैं. इन्हें होस्ट मशीन पर इस जगह पर लिखा जाता है:
project_root/module/build/outputs/connected_android_test_additional_output/debugAndroidTest/connected/device_id/
डिफ़ॉल्ट रूप से, JSON रिपोर्ट को डिवाइस पर मौजूद डिस्क में सेव किया जाता है. यह टेस्ट APK के बाहरी शेयर किए गए मीडिया फ़ोल्डर में सेव होती है. आम तौर पर, यह फ़ोल्डर /storage/emulated/0/Android/media/**app_id**/**app_id**-benchmarkData.json में मौजूद होता है.
कॉन्फ़िगरेशन से जुड़ी गड़बड़ियां
लाइब्रेरी इन स्थितियों का पता लगाती है, ताकि यह पक्का किया जा सके कि आपका प्रोजेक्ट और एनवायरमेंट, रिलीज़ के हिसाब से सटीक परफ़ॉर्मेंस के लिए सेट अप किया गया है:
- Debuggable को
falseपर सेट किया गया है. - किसी फ़िज़िकल डिवाइस का इस्तेमाल किया जा रहा हो. इम्यूलेटर काम नहीं करते.
- अगर डिवाइस को रूट किया गया है, तो घड़ियां लॉक हो जाती हैं.
- डिवाइस में कम से कम 25% बैटरी होनी चाहिए.
अगर ऊपर दी गई किसी भी जांच में गड़बड़ी होती है, तो बेंचमार्क रिपोर्ट में गड़बड़ी का मैसेज दिखता है. इससे गलत मेज़रमेंट को बढ़ावा नहीं मिलता.
गड़बड़ी के कुछ टाइप को चेतावनियों के तौर पर दिखाने और उन्हें बेंचमार्क को रोकने से रोकने के लिए, गड़बड़ी के टाइप को कॉमा से अलग की गई सूची में, इंस्ट्रुमेंटेशन आर्ग्युमेंट androidx.benchmark.suppressErrors में पास करें.
इसे अपनी Gradle स्क्रिप्ट से सेट किया जा सकता है. यहां दिए गए उदाहरण में बताया गया है कि इसे कैसे सेट करें:
Kotlin
android {
    defaultConfig {
       …
      testInstrumentationRunnerArguments["androidx.benchmark.suppressErrors"] = "DEBUGGABLE,LOW-BATTERY"
    }
}
Groovy
android {
    defaultConfig {
       …
      testInstrumentationRunnerArguments["androidx.benchmark.suppressErrors"] = "DEBUGGABLE,LOW-BATTERY"
    }
}
कमांड लाइन से भी गड़बड़ियों को छिपाया जा सकता है:
$ ./gradlew :benchmark:connectedCheck -P andoidtestInstrumentationRunnerArguments.androidx.benchmark.supperssErrors=DEBUGGABLE,LOW-BATTERY
गड़बड़ियों को छिपाने से, बेंचमार्क गलत तरीके से कॉन्फ़िगर की गई स्थिति में चलता है. साथ ही, बेंचमार्क के आउटपुट का नाम जान-बूझकर बदल दिया जाता है. इसके लिए, टेस्ट के नामों में गड़बड़ी जोड़ दी जाती है. उदाहरण के लिए, पिछले स्निपेट में सप्रेशन के साथ डीबग किए जा सकने वाले बेंचमार्क को चलाने पर, टेस्ट के नामों के आगे DEBUGGABLE_ जुड़ जाता है.
आपके लिए सुझाव
- ध्यान दें: JavaScript बंद होने पर लिंक का टेक्स्ट दिखता है
- Macrobenchmark लिखना
- Gradle के बिना माइक्रोबेंचमार्क बनाना
- बेसलाइन प्रोफ़ाइलें बनाना {:#creating-profile-rules}