

Android 14 में, डेवलपर के लिए बेहतरीन सुविधाएं और एपीआई उपलब्ध हैं. इनकी मदद से, अपने ऐप्लिकेशन के लिए सुविधाओं के बारे में जाना जा सकता है. साथ ही, इनसे जुड़े एपीआई का इस्तेमाल शुरू किया जा सकता है.
जोड़े गए, बदले गए, और हटाए गए एपीआई की पूरी सूची देखने के लिए, एपीआई के अंतर की रिपोर्ट पढ़ें. जोड़े गए एपीआई के बारे में जानने के लिए, Android API रेफ़रंस देखें. Android 14 के लिए, एपीआई लेवल 34 में जोड़े गए एपीआई देखें. प्लेटफ़ॉर्म में किए गए बदलावों से आपके ऐप्लिकेशन पर पड़ने वाले असर के बारे में जानने के लिए, Android 14 के व्यवहार में हुए बदलावों के बारे में ज़रूर पढ़ें. ये बदलाव Android 14 को टारगेट करने वाले ऐप्लिकेशन और सभी ऐप्लिकेशन पर लागू होते हैं.
इंटरनैशनलाइजेशन
हर ऐप्लिकेशन के हिसाब से पसंद की भाषा
Android 14 में, हर ऐप्लिकेशन के लिए भाषा से जुड़ी उन सुविधाओं को बेहतर बनाया गया है जिन्हें Android 13 (एपीआई लेवल 33) में लॉन्च किया गया था. साथ ही, इसमें ये नई सुविधाएं भी जोड़ी गई हैं:
ऐप्लिकेशन का
localeConfigअपने-आप जनरेट होना: Android Studio Giraffe Canary 7 और AGP 8.1.0-alpha07 से, अपने ऐप्लिकेशन को हर ऐप्लिकेशन के लिए भाषा की सेटिंग के साथ काम करने के लिए कॉन्फ़िगर किया जा सकता है. आपके प्रोजेक्ट के संसाधनों के आधार पर, Android Gradle प्लग इनLocaleConfigफ़ाइल जनरेट करता है और फ़ाइनल मेनिफ़ेस्ट फ़ाइल में इसका रेफ़रंस जोड़ता है. इससे, आपको फ़ाइल को मैन्युअल तरीके से बनाने या अपडेट करने की ज़रूरत नहीं पड़ती. AGP, आपके ऐप्लिकेशन मॉड्यूल केresफ़ोल्डर और लाइब्रेरी मॉड्यूल की डिपेंडेंसी में मौजूद संसाधनों का इस्तेमाल करता है. इससे,LocaleConfigफ़ाइल में शामिल करने के लिए स्थानीय भाषाओं का पता चलता है.ऐप्लिकेशन के
localeConfigके लिए डाइनैमिक अपडेट:LocaleManagerमें दिए गएsetOverrideLocaleConfig()औरgetOverrideLocaleConfig()तरीकों का इस्तेमाल करके, डिवाइस की सिस्टम सेटिंग में, ऐप्लिकेशन पर इस्तेमाल की जा सकने वाली भाषाओं की सूची को डाइनैमिक तौर पर अपडेट करें. इस सुविधा का इस्तेमाल करके, हर इलाके के हिसाब से इस्तेमाल की जा सकने वाली भाषाओं की सूची को पसंद के मुताबिक बनाएं, A/B प्रयोग चलाएं या स्थानीय भाषाओं की अपडेट की गई सूची दें. ऐसा तब करें, जब आपका ऐप्लिकेशन स्थानीय भाषा के लिए सर्वर-साइड पुश का इस्तेमाल करता हो.इनपुट के तरीके के संपादकों (आईएमई) के लिए ऐप्लिकेशन की भाषा दिखना: आईएमई,
getApplicationLocales()के तरीके का इस्तेमाल करके, मौजूदा ऐप्लिकेशन की भाषा की जांच कर सकते हैं और आईएमई की भाषा को उस भाषा से मैच कर सकते हैं.
Grammatical Inflection API
दुनिया भर में 3 अरब लोग लिंग के हिसाब से अलग-अलग तरह से इस्तेमाल होने वाली भाषाएं बोलते हैं. इन भाषाओं में, व्याकरण की कैटगरी, जैसे कि संज्ञा, क्रिया, विशेषण, और प्रीपोज़िशन, उन लोगों और ऑब्जेक्ट के लिंग के हिसाब से बदलते हैं जिनके बारे में बात की जा रही है. आम तौर पर, लैंगिक भेद वाली कई भाषाओं में, मर्दों के लिए इस्तेमाल होने वाले व्याकरण के लिंग को डिफ़ॉल्ट या सामान्य लिंग के तौर पर इस्तेमाल किया जाता है.
उपयोगकर्ताओं को गलत व्याकरण के हिसाब से संबोधित करने से, उनकी परफ़ॉर्मेंस और व्यवहार पर बुरा असर पड़ सकता है. जैसे, महिलाओं को पुल्लिग व्याकरण के हिसाब से संबोधित करना. इसके उलट, यूज़र इंटरफ़ेस (यूआई) में ऐसी भाषा का इस्तेमाल करने से, उपयोगकर्ता के व्याकरण के हिसाब से लिंग की जानकारी सही तरीके से दिखती है. इससे उपयोगकर्ता जुड़ाव बढ़ता है और उपयोगकर्ता को ज़्यादा पसंद के मुताबिक और स्वाभाविक अनुभव मिलता है.
लिंग के आधार पर बोली जाने वाली भाषाओं के लिए, उपयोगकर्ता के हिसाब से यूज़र इंटरफ़ेस (यूआई) बनाने में आपकी मदद करने के लिए, Android 14 में Grammatical Inflection API को जोड़ा गया है. इसकी मदद से, अपने ऐप्लिकेशन को फिर से बनाने के बिना, व्याकरण के हिसाब से लिंग के लिए सहायता जोड़ी जा सकती है.
जगह के हिसाब से प्राथमिकताएं
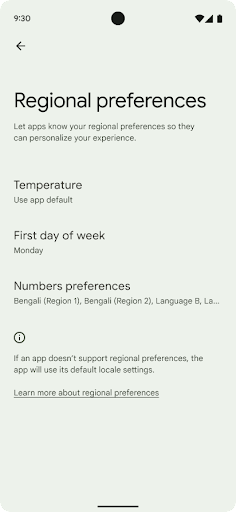
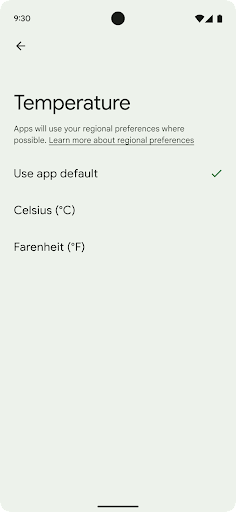
जगह के हिसाब से तापमान सेट करने की सुविधा की मदद से उपयोगकर्ता, तापमान की यूनिट को अपने हिसाब से बना सकते हैं. ऐसा करने के लिए, और क्रमांकन सिस्टम का इस्तेमाल किया जा सकता है. अमेरिका में रहने वाला यूरोपियन शायद तापमान की इकाइयां फ़ैरनहाइट के बजाय सेल्सियस में हों और ऐसे ऐप्लिकेशन जिनका इस्तेमाल सोमवार को हफ़्ते की शुरुआत के तौर पर किया जाता है, न कि अमेरिका की डिफ़ॉल्ट वैल्यू रविवार.
इन प्राथमिकताओं के लिए, Android के नए सेटिंग मेन्यू में उपयोगकर्ताओं को ऐप्लिकेशन की प्राथमिकताएं बदलने के लिए, एक ऐसी जगह मिलती है जहां उन्हें आसानी से ऐप्लिकेशन की प्राथमिकताएं दिखती हैं. ये प्राथमिकताएं, बैकअप लेने और उसे वापस लाने के बाद भी बनी रहती हैं. कई एपीआई और
इंटेंट—जैसे
getTemperatureUnit
और
getFirstDayOfWeek—
अपने ऐप्लिकेशन को उपयोगकर्ता की पसंद के हिसाब से पढ़ने का ऐक्सेस दें, ताकि आपका ऐप्लिकेशन यह तय कर सके कि
जानकारी दिखाता है. आप यह भी रजिस्टर कर सकते हैं कि
BroadcastReceiver का मैंडेट चालू है
ACTION_LOCALE_CHANGED
का इस्तेमाल करें.
इन सेटिंग को खोजने के लिए, सेटिंग ऐप्लिकेशन खोलें और सिस्टम > भाषाएं और इनपुट > जगह के हिसाब से प्राथमिकताएं.
सुलभता
फ़ॉन्ट स्केलिंग को 200% तक बढ़ाने की सुविधा
Android 14 से, सिस्टम में फ़ॉन्ट को 200% तक बड़ा किया जा सकता है. इससे उपयोगकर्ताओं को सुलभता से जुड़ी अतिरिक्त सुविधाएं मिलती हैं.
स्क्रीन पर मौजूद बड़े टेक्स्ट एलिमेंट को बहुत ज़्यादा बड़ा होने से रोकने के लिए, सिस्टम नॉनलीनियर स्केलिंग कर्व का इस्तेमाल करता है. स्केलिंग की इस रणनीति का मतलब है कि बड़े टेक्स्ट को छोटे टेक्स्ट की तरह एक ही दर से स्केल नहीं किया जाता. नॉनलीनियर फ़ॉन्ट स्केलिंग की मदद से, अलग-अलग साइज़ के एलिमेंट के बीच आनुपातिक क्रम को बनाए रखने में मदद मिलती है. साथ ही, इससे ज़्यादा डिग्री पर लीनियर टेक्स्ट स्केलिंग से जुड़े जोखिम को कम किया जा सकता है. जैसे, टेक्स्ट का कट जाना या बहुत बड़े डिसप्ले साइज़ की वजह से टेक्स्ट को पढ़ने में मुश्किल होना.
नॉनलीनियर फ़ॉन्ट स्केलिंग की सुविधा के साथ अपने ऐप्लिकेशन की जांच करना
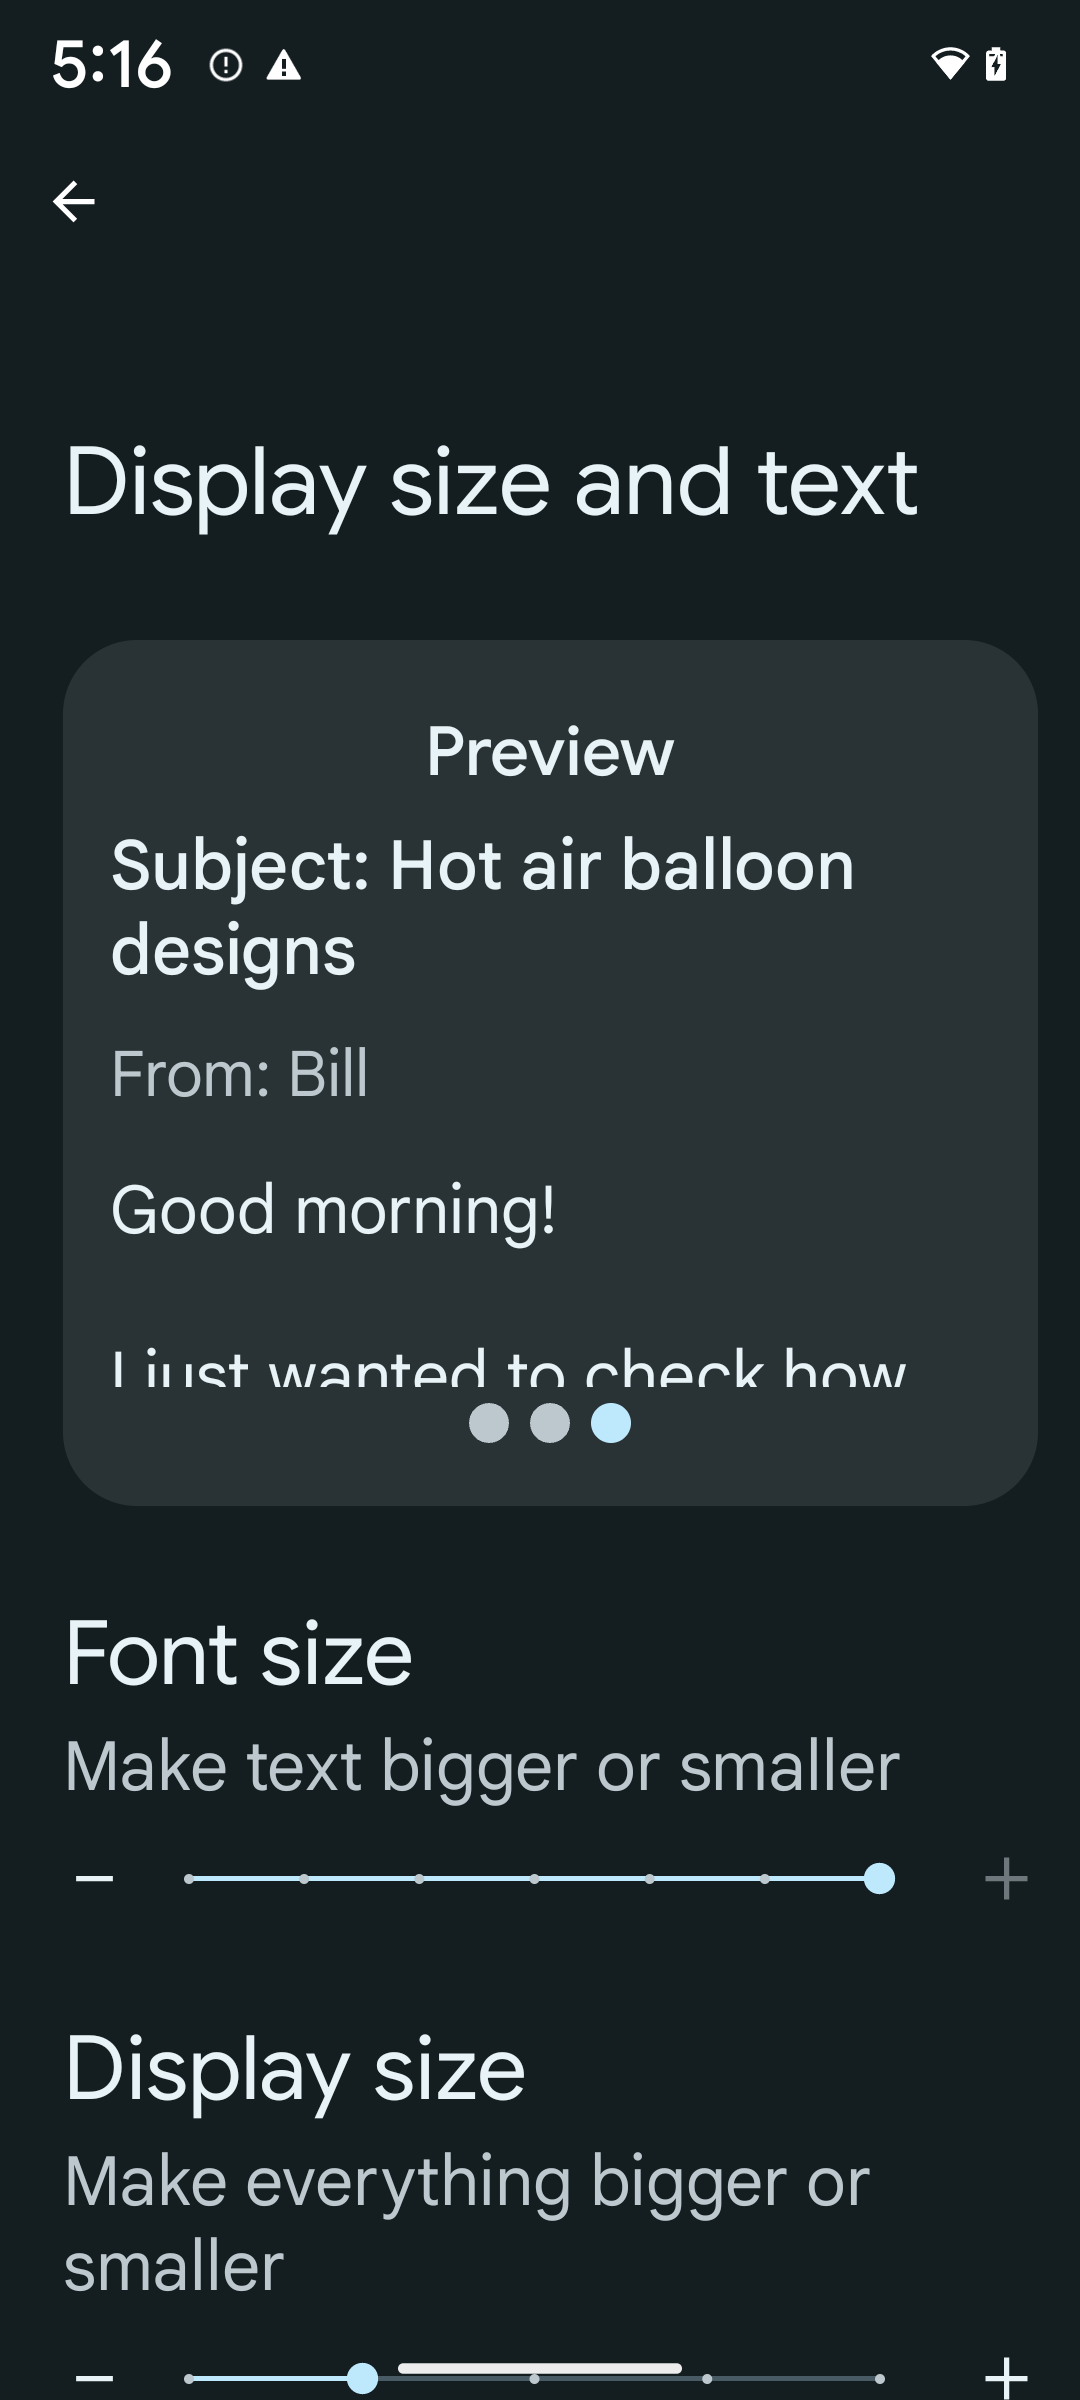
अगर आपने टेक्स्ट के साइज़ को तय करने के लिए, पहले से ही स्केल्ड पिक्सल (sp) यूनिट का इस्तेमाल किया है, तो ये अतिरिक्त विकल्प और स्केलिंग से जुड़े सुधार, आपके ऐप्लिकेशन के टेक्स्ट पर अपने-आप लागू हो जाते हैं. हालांकि, आपको अब भी यूज़र इंटरफ़ेस (यूआई) की टेस्टिंग करनी चाहिए. इसके लिए, फ़ॉन्ट के सबसे बड़े साइज़ (200%) को चालू करें. इससे यह पक्का किया जा सकेगा कि आपका ऐप्लिकेशन, फ़ॉन्ट के साइज़ को सही तरीके से लागू करता है और इस्तेमाल में आसानी पर असर डाले बिना, बड़े फ़ॉन्ट साइज़ को अडजस्ट कर सकता है.
फ़ॉन्ट का साइज़ 200% पर सेट करने के लिए, यह तरीका अपनाएं:
- सेटिंग ऐप्लिकेशन खोलें और सुलभता > डिसप्ले साइज़ और टेक्स्ट पर जाएं.
- फ़ॉन्ट का साइज़ विकल्प के लिए, प्लस (+) आइकॉन पर तब तक टैप करें, जब तक फ़ॉन्ट के सबसे बड़े साइज़ की सेटिंग चालू न हो जाए. इस सेक्शन के साथ दी गई इमेज में यह दिखाया गया है.
टेक्स्ट के साइज़ के लिए, स्केल किए गए पिक्सल (एसपी) यूनिट का इस्तेमाल करना
हमेशा टेक्स्ट के साइज़ को एसपी यूनिट में तय करें. जब आपका ऐप्लिकेशन sp यूनिट का इस्तेमाल करता है, तो Android, उपयोगकर्ता की पसंद के टेक्स्ट साइज़ को लागू कर सकता है और उसे सही तरीके से स्केल कर सकता है.
पैडिंग के लिए एसपी यूनिट का इस्तेमाल न करें या व्यू की ऊंचाई तय करते समय, पैडिंग को शामिल न करें: नॉनलीनियर फ़ॉन्ट स्केलिंग के साथ, एसपी डाइमेंशन आनुपातिक नहीं हो सकते. इसलिए, 4sp + 20sp, 24sp के बराबर नहीं हो सकता.
स्केल्ड पिक्सल (sp) यूनिट को बदलना
sp यूनिट को पिक्सल में बदलने के लिए, TypedValue.applyDimension() का इस्तेमाल करें. साथ ही, पिक्सल को sp में बदलने के लिए, TypedValue.deriveDimension() का इस्तेमाल करें. इन तरीकों से, सही नॉनलीनियर स्केलिंग कर्व अपने-आप लागू हो जाता है.
Configuration.fontScale या
DisplayMetrics.scaledDensity का इस्तेमाल करके, इक्वेशन को हार्डकोड करने से बचें. फ़ॉन्ट का साइज़ बढ़ाने की सुविधा नॉनलीनियर होती है. इसलिए, scaledDensity फ़ील्ड अब सटीक नहीं है. fontScale फ़ील्ड का इस्तेमाल सिर्फ़ जानकारी देने के मकसद से किया जाना चाहिए. ऐसा इसलिए, क्योंकि अब फ़ॉन्ट को किसी एक स्केलर वैल्यू के हिसाब से नहीं बढ़ाया जाता.
लाइनहाइट के लिए sp यूनिट का इस्तेमाल करना
हमेशा android:lineHeight को dp के बजाय sp यूनिट का इस्तेमाल करके तय करें, ताकि लाइन की ऊंचाई आपके टेक्स्ट के साथ स्केल हो सके. इसके अलावा, अगर आपका टेक्स्ट sp में है, लेकिन आपका lineHeight dp या px में है, तो यह स्केल नहीं होता और छोटा दिखता है.
TextView, lineHeight को अपने-आप ठीक कर देता है, ताकि आपके तय किए गए अनुपात बने रहें. हालांकि, ऐसा सिर्फ़ तब होता है, जब textSize और lineHeight दोनों को sp यूनिट में तय किया गया हो.
कैमरा और मीडिया
इमेज के लिए अल्ट्रा एचडीआर की सुविधा
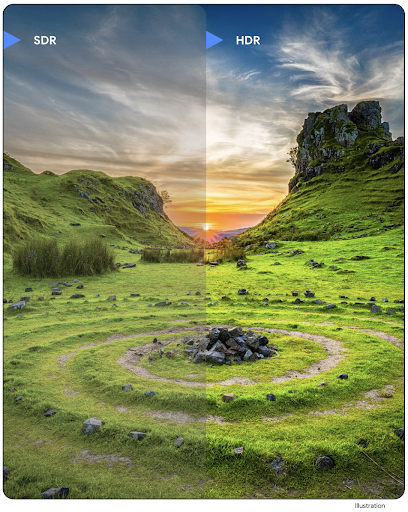
Android 14 में हाई डाइनैमिक रेंज (एचडीआर) इमेज की सुविधा जोड़ी गई है. इससे फ़ोटो खींचते समय, सेंसर से ज़्यादा जानकारी मिलती है. इससे फ़ोटो में ज़्यादा आकर्षक रंग और बेहतर कंट्रास्ट दिखता है. Android, अल्ट्रा एचडीआर फ़ॉर्मैट का इस्तेमाल करता है. यह फ़ॉर्मैट, JPEG इमेज के साथ पूरी तरह से काम करता है. इसकी मदद से, ऐप्लिकेशन आसानी से एचडीआर इमेज के साथ काम कर सकते हैं और ज़रूरत के हिसाब से उन्हें स्टैंडर्ड डाइनैमिक रेंज (एसडीआर) में दिखा सकते हैं.
जब आपका ऐप्लिकेशन अपनी गतिविधि विंडो के लिए एचडीआर यूआई का इस्तेमाल करने के लिए ऑप्ट-इन करता है, तो फ़्रेमवर्क इन इमेज को यूआई में एचडीआर में अपने-आप रेंडर कर देता है. ऐसा, मैनफ़ेस्ट एंट्री के ज़रिए या रनटाइम पर Window.setColorMode() को कॉल करके किया जाता है. साथ ही, जिन डिवाइसों पर यह सुविधा काम करती है उन पर कंप्रेस की गई अल्ट्रा एचडी स्टिल इमेज भी कैप्चर की जा सकती हैं. सेंसर से ज़्यादा रंगों को रिकॉर्ड करने की सुविधा की मदद से, फ़ोटो में बदलाव करना आसान हो जाता है. अल्ट्रा एचडीआर इमेज से जुड़े Gainmap का इस्तेमाल, इन्हें OpenGL या Vulkan का इस्तेमाल करके रेंडर करने के लिए किया जा सकता है.
कैमरा एक्सटेंशन में ज़ूम, फ़ोकस, पोस्टव्यू वगैरह की सुविधा
Android 14 में कैमरा एक्सटेंशन को अपग्रेड और बेहतर बनाया गया है. इससे ऐप्लिकेशन, प्रोसेसिंग में लगने वाले लंबे समय को मैनेज कर पाते हैं. साथ ही, कम रोशनी में फ़ोटोग्राफ़ी जैसी सुविधाओं के लिए, ज़्यादा कंप्यूटिंग की ज़रूरत वाले एल्गोरिदम का इस्तेमाल करके बेहतर इमेज ली जा सकती हैं. इन सुविधाओं की मदद से, कैमरे की एक्सटेंशन सुविधाओं का इस्तेमाल करने पर, उपयोगकर्ताओं को बेहतर अनुभव मिलता है. इन सुधारों के उदाहरणों में ये शामिल हैं:
- डाइनैमिक स्टिल कैप्चर प्रोसेसिंग में लगने वाले समय का अनुमान, मौजूदा सीन और आस-पास के माहौल के हिसाब से, स्टिल कैप्चर में लगने वाले समय का ज़्यादा सटीक अनुमान देता है.
StillCaptureLatencyऑब्जेक्ट पाने के लिए,CameraExtensionSession.getRealtimeStillCaptureLatency()को कॉल करें. इस ऑब्जेक्ट में, इंतज़ार का अनुमान लगाने के दो तरीके होते हैं.getCaptureLatency()वाला तरीका,onCaptureStartedऔरonCaptureProcessStarted()के बीच के अनुमानित इंतज़ार का समय दिखाता है. वहीं,getProcessingLatency()वाला तरीका,onCaptureProcessStarted()और प्रोसेस किए गए आखिरी फ़्रेम के उपलब्ध होने के बीच के अनुमानित इंतज़ार का समय दिखाता है. - कैप्चर की प्रोग्रेस के कॉलबैक के लिए सहायता, ताकि ऐप्लिकेशन लंबे समय तक चलने वाले, स्टिल कैप्चर प्रोसेसिंग ऑपरेशन की मौजूदा प्रोग्रेस दिखा सकें. यह देखा जा सकता है कि यह सुविधा
CameraExtensionCharacteristics.isCaptureProcessProgressAvailableके साथ उपलब्ध है या नहीं. अगर यह उपलब्ध है, तोonCaptureProcessProgressed()कॉलबैक लागू करें. इसमें प्रोग्रेस (0 से 100) को पैरामीटर के तौर पर पास किया जाता है. एक्सटेंशन से जुड़ा मेटाडेटा. जैसे,
CaptureRequest.EXTENSION_STRENGTH, जिसका इस्तेमाल करके एक्सटेंशन के इफ़ेक्ट की मात्रा तय की जाती है. जैसे,EXTENSION_BOKEHकी मदद से बैकग्राउंड को धुंधला करने की मात्रा तय करना.कैमरा एक्सटेंशन में, फ़ोटो खींचने के बाद इमेज देखने की सुविधा. इससे फ़ाइनल इमेज के मुकाबले, कम प्रोसेस की गई इमेज तुरंत मिलती है. अगर किसी एक्सटेंशन की वजह से, प्रोसेसिंग में लगने वाला समय बढ़ जाता है, तो यूज़र एक्सपीरियंस को बेहतर बनाने के लिए, पोस्टव्यू इमेज को प्लेसहोल्डर के तौर पर दिया जा सकता है. बाद में, इसे फ़ाइनल इमेज से बदला जा सकता है.
CameraExtensionCharacteristics.isPostviewAvailableकी मदद से यह देखा जा सकता है कि यह सुविधा उपलब्ध है या नहीं. इसके बाद,ExtensionSessionConfiguration.setPostviewOutputConfigurationकोOutputConfigurationपास किया जा सकता है.SurfaceViewके लिए सहायता, जिससे झलक को रेंडर करने के पाथ को ज़्यादा ऑप्टिमाइज़ किया जा सकता है और कम बिजली खर्च की जा सकती है.एक्सटेंशन के इस्तेमाल के दौरान, फ़ोकस करने और ज़ूम करने के लिए टैप करने की सुविधा.
इन-सेंसर ज़ूम की सुविधा
जब CameraCharacteristics में REQUEST_AVAILABLE_CAPABILITIES_STREAM_USE_CASE में SCALER_AVAILABLE_STREAM_USE_CASES_CROPPED_RAW शामिल होता है, तो आपका ऐप्लिकेशन बेहतर सेंसर की सुविधाओं का इस्तेमाल करके, काटी गई आरएडब्ल्यू स्ट्रीम को पूरे फ़ील्ड ऑफ़ व्यू के बराबर पिक्सल दे सकता है. इसके लिए, CaptureRequest का इस्तेमाल किया जाता है. साथ ही, आरएडब्ल्यू टारगेट के साथ स्ट्रीम के इस्तेमाल का उदाहरण CameraMetadata.SCALER_AVAILABLE_STREAM_USE_CASES_CROPPED_RAW पर सेट किया जाता है.
अनुरोध को बदलने की सुविधा लागू करने पर, अपडेट किए गए कैमरे में उपयोगकर्ताओं को कैमरे के अन्य कंट्रोल तैयार होने से पहले ही, ज़ूम कंट्रोल मिल जाता है.
बिना डेटा लॉस वाले यूएसबी ऑडियो की सुविधा
Android 14 में, USB वायर वाले हेडसेट से बेहतर ऑडियो अनुभव पाने के लिए, लॉसलेस ऑडियो फ़ॉर्मैट का इस्तेमाल किया जा सकता है. यूएसबी डिवाइस के पसंदीदा मिक्सर एट्रिब्यूट के लिए क्वेरी की जा सकती है. साथ ही, पसंदीदा मिक्सर एट्रिब्यूट में होने वाले बदलावों के लिए, किसी लिसनर को रजिस्टर किया जा सकता है. इसके अलावा, AudioMixerAttributes क्लास का इस्तेमाल करके, मिक्सर एट्रिब्यूट को कॉन्फ़िगर किया जा सकता है. यह क्लास, चैनल मास्क, सैंपल रेट, और ऑडियो मिक्सर के व्यवहार जैसे फ़ॉर्मैट को दिखाती है. इस क्लास की मदद से, ऑडियो को सीधे भेजा जा सकता है. इसके लिए, ऑडियो को मिक्स करने, वॉल्यूम अडजस्ट करने या इफ़ेक्ट प्रोसेस करने की ज़रूरत नहीं होती.
डेवलपर के काम करने की क्षमता और टूल
Credential Manager
Android 14 में, Credential Manager को प्लैटफ़ॉर्म एपीआई के तौर पर जोड़ा गया है. साथ ही, Google Play services का इस्तेमाल करने वाली Jetpack Library की मदद से, Android 4.4 (एपीआई लेवल 19) वाले डिवाइसों पर भी यह सुविधा उपलब्ध है. Credential Manager का मकसद, उपयोगकर्ताओं के लिए साइन-इन की प्रोसेस को आसान बनाना है. इसके लिए, ऐसे एपीआई उपलब्ध कराए जाते हैं जो उपयोगकर्ता के कॉन्फ़िगर किए गए क्रेडेंशियल देने वाले प्लैटफ़ॉर्म से क्रेडेंशियल वापस पाते हैं और उन्हें सेव करते हैं. Credential Manager, एक ही एपीआई में साइन-इन के कई तरीकों के साथ काम करता है. इनमें उपयोगकर्ता नाम और पासवर्ड, पासकी, और फ़ेडरेटेड साइन-इन के समाधान (जैसे, 'Google से साइन इन करें') शामिल हैं.
पासकी के कई फ़ायदे हैं. उदाहरण के लिए, पासकी इंडस्ट्री के मानकों के हिसाब से बनाई जाती हैं. इनका इस्तेमाल अलग-अलग ऑपरेटिंग सिस्टम और ब्राउज़र ईकोसिस्टम में किया जा सकता है. साथ ही, वेबसाइटों और ऐप्लिकेशन, दोनों के लिए पासकी इस्तेमाल की जा सकती हैं.
ज़्यादा जानकारी के लिए, Credential Manager और पासकी से जुड़ा दस्तावेज़ और Credential Manager और पासकी के बारे में ब्लॉग पोस्ट देखें.
Health Connect
Health Connect, उपयोगकर्ता की सेहत और फ़िटनेस से जुड़े डेटा का डिवाइस पर मौजूद डेटाबेस है. इसकी मदद से, उपयोगकर्ता अपने पसंदीदा ऐप्लिकेशन के बीच डेटा शेयर कर सकते हैं. साथ ही, एक ही जगह से यह कंट्रोल किया जा सकता है कि उन्हें इन ऐप्लिकेशन के साथ कौनसा डेटा शेयर करना है.
Android 14 से पहले के वर्शन वाले डिवाइसों पर, Health Connect को ऐप्लिकेशन के तौर पर डाउनलोड किया जा सकता है. इसके लिए, आपको Google Play Store पर जाना होगा. Android 14 से, Health Connect इस प्लैटफ़ॉर्म का हिस्सा है. साथ ही, इसे Google Play के सिस्टम अपडेट के ज़रिए अपडेट किया जाता है. इसके लिए, इसे अलग से डाउनलोड करने की ज़रूरत नहीं होती. इसकी मदद से, Health Connect को बार-बार अपडेट किया जा सकता है. साथ ही, आपके ऐप्लिकेशन इस बात पर भरोसा कर सकते हैं कि Health Connect, Android 14 या इसके बाद के वर्शन वाले डिवाइसों पर उपलब्ध है. उपयोगकर्ता अपने डिवाइस की सेटिंग में जाकर, Health Connect को ऐक्सेस कर सकते हैं. साथ ही, सिस्टम की सेटिंग में निजता सेटिंग भी इंटिग्रेट की गई हैं.
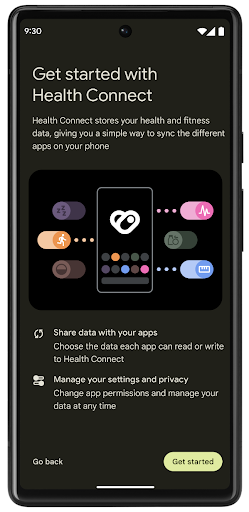
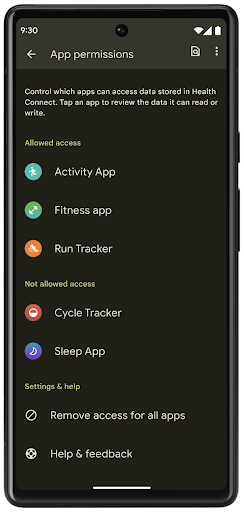
Android 14 में Health Connect में कई नई सुविधाएं शामिल हैं. जैसे, कसरत के लिए रास्ते की जानकारी. इससे उपयोगकर्ता, कसरत के लिए चुने गए रास्ते की जानकारी शेयर कर सकते हैं. इस जानकारी को मैप पर देखा जा सकता है. रास्ते को, किसी समयावधि में सेव की गई जगहों की सूची के तौर पर परिभाषित किया जाता है. आपका ऐप्लिकेशन, गतिविधि के सेशन में रास्ते जोड़ सकता है और उन्हें एक साथ जोड़ सकता है. यह पक्का करने के लिए कि उपयोगकर्ताओं के पास इस संवेदनशील डेटा पर पूरा कंट्रोल हो, उपयोगकर्ताओं को दूसरे ऐप्लिकेशन के साथ अलग-अलग रास्तों को शेयर करने की अनुमति देनी होगी.
ज़्यादा जानकारी के लिए, Health Connect का दस्तावेज़ और Android Health में नया क्या है ब्लॉग पोस्ट देखें.
OpenJDK 17 के अपडेट
Android 14 में, Android की मुख्य लाइब्रेरी को अपडेट करने की प्रोसेस जारी है, ताकि इसे OpenJDK LTS के नए वर्शन की सुविधाओं के साथ अलाइन किया जा सके. इसमें, ऐप्लिकेशन और प्लैटफ़ॉर्म डेवलपर के लिए, लाइब्रेरी के अपडेट और Java 17 भाषा की सहायता, दोनों शामिल हैं.
इसमें ये सुविधाएं और सुधार शामिल हैं:
- करीब 300
java.baseक्लास को Java 17 के साथ काम करने के लिए अपडेट किया गया. - टेक्स्ट ब्लॉक, जो Java प्रोग्रामिंग लैंग्वेज में मल्टी-लाइन स्ट्रिंग लिटरल का इस्तेमाल करते हैं.
- instanceof के लिए पैटर्न मैचिंग, जिसकी मदद से किसी ऑब्जेक्ट को
instanceofमें किसी खास टाइप के तौर पर माना जा सकता है. इसके लिए, किसी और वैरिएबल की ज़रूरत नहीं होती. - सील की गई क्लास, जिनकी मदद से यह तय किया जा सकता है कि कौनसी क्लास और इंटरफ़ेस उन्हें एक्सटेंड या लागू कर सकते हैं.
Google Play के सिस्टम अपडेट (Project Mainline) की मदद से, 600 करोड़ से ज़्यादा डिवाइसों पर Android Runtime (ART) के नए अपडेट मिल सकते हैं. इन अपडेट में ये बदलाव शामिल हैं. हम ऐप्लिकेशन को सभी डिवाइसों पर एक जैसा और सुरक्षित माहौल देने के लिए प्रतिबद्ध हैं. साथ ही, हम प्लैटफ़ॉर्म के रिलीज़ से अलग, उपयोगकर्ताओं को नई सुविधाएं और क्षमताएं देने के लिए भी काम कर रहे हैं.
Java और OpenJDK, Oracle और/या इससे जुड़ी हुई कंपनियों के ट्रेडमार्क या रजिस्टर किए हुए ट्रेडमार्क हैं.
ऐप्लिकेशन स्टोर के लिए सुधार
Android 14 में कई PackageInstaller एपीआई जोड़े गए हैं. इनकी मदद से, ऐप्लिकेशन स्टोर अपने उपयोगकर्ताओं के अनुभव को बेहतर बना सकते हैं.
डाउनलोड करने से पहले, इंस्टॉल करने की अनुमति का अनुरोध करना
किसी ऐप्लिकेशन को इंस्टॉल या अपडेट करने के लिए, उपयोगकर्ता की अनुमति लेनी पड़ सकती है.
उदाहरण के लिए, जब कोई इंस्टॉलर REQUEST_INSTALL_PACKAGES अनुमति का इस्तेमाल करके नया ऐप्लिकेशन इंस्टॉल करने की कोशिश करता है. Android के पुराने वर्शन में, ऐप्लिकेशन स्टोर सिर्फ़ इसके बाद उपयोगकर्ता की अनुमति का अनुरोध कर सकते हैं, जब APK, इंस्टॉल सेशन में लिखे जाते हैं और सेशन पूरा हो जाता है.
Android 14 से, requestUserPreapproval()
तरीके की मदद से इंस्टॉलर, इंस्टॉलेशन सेशन को शुरू करने से पहले उपयोगकर्ता की अनुमति मांग सकते हैं. इस सुधार की मदद से, ऐप स्टोर किसी भी APK को तब तक डाउनलोड नहीं करेगा, जब तक उपयोगकर्ता ने इंस्टॉल करने की अनुमति नहीं दी है. इसके अलावा, जब कोई उपयोगकर्ता ऐप्लिकेशन इंस्टॉल करने की अनुमति देता है, तो ऐप्लिकेशन स्टोर, उपयोगकर्ता को परेशान किए बिना बैकग्राउंड में ऐप्लिकेशन को डाउनलोड और इंस्टॉल कर सकता है.
आने वाले समय में होने वाले अपडेट की ज़िम्मेदारी का दावा करना
setRequestUpdateOwnership() तरीके से, इंस्टॉलर को सिस्टम को यह बताने की अनुमति मिलती है कि वह इंस्टॉल किए जा रहे ऐप्लिकेशन के आने वाले समय में होने वाले अपडेट के लिए ज़िम्मेदार है. इस सुविधा से, अपडेट के मालिकाना हक को लागू करने की सुविधा चालू होती है. इसका मतलब है कि ऐप्लिकेशन में अपने-आप अपडेट होने की सुविधा को सिर्फ़ अपडेट के मालिक के पास इंस्टॉल करने की अनुमति होती है. अपडेट के मालिकाना हक को लागू करने की सुविधा से यह पक्का करने में मदद मिलती है कि उपयोगकर्ताओं को सिर्फ़ उस ऐप्लिकेशन स्टोर से अपडेट मिलें जिस पर ऐप्लिकेशन उपलब्ध है.
अपडेट इंस्टॉल करने के लिए, किसी भी इंस्टॉलर को उपयोगकर्ता की साफ़ तौर पर अनुमति लेनी होगी. इसमें, INSTALL_PACKAGES अनुमति का इस्तेमाल करने वाले इंस्टॉलर भी शामिल हैं. अगर कोई उपयोगकर्ता किसी दूसरे सोर्स से अपडेट करने का फ़ैसला करता है, तो अपडेट का मालिकाना हक खत्म हो जाता है.
ऐप्लिकेशन को कम रुकावट वाले समय पर अपडेट करना
आम तौर पर, ऐप्लिकेशन स्टोर किसी ऐसे ऐप्लिकेशन को अपडेट नहीं करना चाहते जो इस्तेमाल में है. ऐसा इसलिए, क्योंकि इससे ऐप्लिकेशन की चल रही प्रोसेस बंद हो जाती हैं. इससे, उपयोगकर्ता के काम में रुकावट आ सकती है.
Android 14 से, InstallConstraints एपीआई की मदद से, ऐप्लिकेशन इंस्टॉल करने वाले लोग यह पक्का कर सकते हैं कि उनके ऐप्लिकेशन सही समय पर अपडेट हों. उदाहरण के लिए, कोई ऐप्लिकेशन स्टोर, commitSessionAfterInstallConstraintsAreMet() तरीके का इस्तेमाल करके यह पक्का कर सकता है कि अपडेट सिर्फ़ तब लागू किया जाए, जब उपयोगकर्ता उस ऐप्लिकेशन का इस्तेमाल न कर रहा हो.
आसानी से वैकल्पिक स्प्लिट इंस्टॉल करना
स्प्लिट APK की मदद से, किसी ऐप्लिकेशन की सुविधाओं को एक ही APK के बजाय अलग-अलग APK फ़ाइलों में डिलीवर किया जा सकता है. अलग-अलग APK की मदद से, ऐप्लिकेशन स्टोर अलग-अलग ऐप्लिकेशन कॉम्पोनेंट की डिलीवरी को ऑप्टिमाइज़ कर सकते हैं. उदाहरण के लिए, ऐप्लिकेशन स्टोर, टारगेट किए गए डिवाइस की प्रॉपर्टी के आधार पर ऑप्टिमाइज़ हो सकते हैं. PackageInstaller एपीआई, एपीआई लेवल 22 में लॉन्च होने के बाद से ही, स्प्लिट की सुविधा के साथ काम करता है.
Android 14 में, setDontKillApp() तरीके की मदद से इंस्टॉलर यह बता सकता है कि नए स्प्लिट इंस्टॉल होने पर, ऐप्लिकेशन की चल रही प्रोसेस को बंद नहीं किया जाना चाहिए. ऐप्लिकेशन स्टोर इस सुविधा का इस्तेमाल करके, उपयोगकर्ता के ऐप्लिकेशन इस्तेमाल करते समय, ऐप्लिकेशन की नई सुविधाओं को आसानी से इंस्टॉल कर सकते हैं.
ऐप्लिकेशन के मेटाडेटा बंडल
Android 14 में, Android पैकेज इंस्टॉलर की मदद से, ऐप्लिकेशन का मेटाडेटा दिया जा सकता है. जैसे, डेटा की सुरक्षा के तरीके. इससे, Google Play जैसे ऐप्लिकेशन स्टोर के पेजों पर यह जानकारी शामिल की जा सकती है.
यह पता लगाना कि उपयोगकर्ता डिवाइस के स्क्रीनशॉट कब लेते हैं
स्क्रीनशॉट का पता लगाने की सुविधा को ज़्यादा स्टैंडर्ड बनाने के लिए, Android 14 में निजता बनाए रखने वाला स्क्रीनशॉट का पता लगाने वाला एपीआई लॉन्च किया गया है. इस एपीआई की मदद से, ऐप्लिकेशन हर गतिविधि के हिसाब से कॉलबैक रजिस्टर कर सकते हैं. जब उपयोगकर्ता को गतिविधि दिख रही होती है और वह स्क्रीनशॉट लेता है, तब इन कॉलबैक को लागू किया जाता है. साथ ही, उपयोगकर्ता को इसकी सूचना दी जाती है.
उपयोगकर्ता अनुभव
शेयरशीट के लिए कस्टम कार्रवाइयां और बेहतर रैंकिंग
Android 14 में सिस्टम की शेयरशीट को अपडेट किया गया है, ताकि उपयोगकर्ताओं को कस्टम ऐप्लिकेशन ऐक्शन और ज़्यादा जानकारी देने वाली झलक के नतीजे दिखाए जा सकें.
कस्टम ऐक्शन जोड़ना
Android 14 में, आपका ऐप्लिकेशन सिस्टम शेयरशीट में कस्टम ऐक्शन जोड़ सकता है.
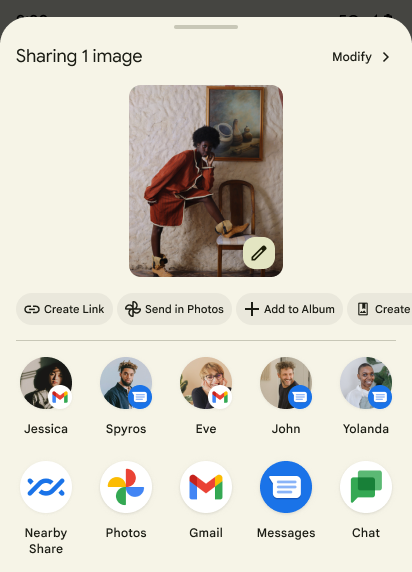
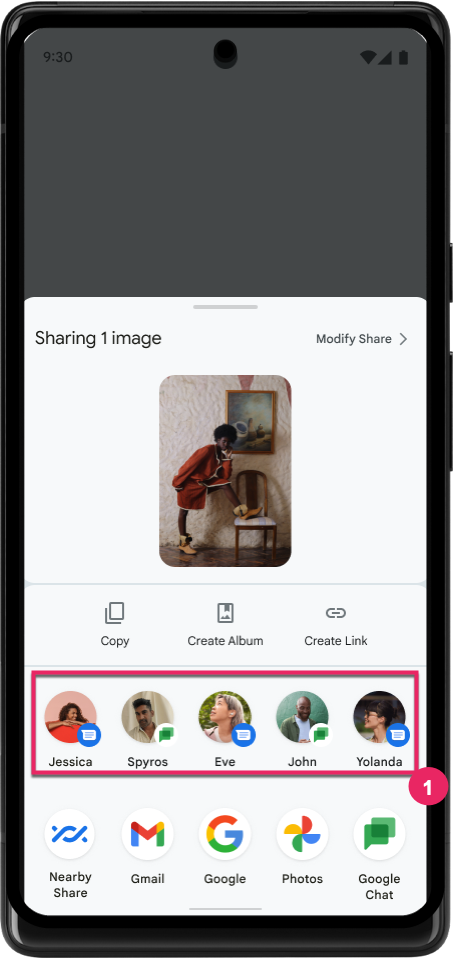
डायरेक्ट शेयर टारगेट की रैंकिंग को बेहतर बनाना
Android 14, डायरेक्ट शेयर टारगेट की रैंकिंग तय करने के लिए, ऐप्लिकेशन से ज़्यादा सिग्नल का इस्तेमाल करता है. इससे उपयोगकर्ता को ज़्यादा मददगार नतीजे मिलते हैं. रैंकिंग के लिए सबसे काम का सिग्नल देने के लिए, डायरेक्ट शेयर टारगेट की रैंकिंग को बेहतर बनाने के लिए दिए गए दिशा-निर्देशों का पालन करें. कम्यूनिकेशन ऐप्लिकेशन, भेजे और पाए गए मैसेज के लिए, शॉर्टकट के इस्तेमाल की रिपोर्ट भी कर सकते हैं.
पीछे जाने पर झलक दिखाने वाले हाथ के जेस्चर के लिए, पहले से मौजूद और कस्टम ऐनिमेशन की सुविधा
Android 13 में, डेवलपर के विकल्प के पीछे, होम स्क्रीन पर वापस जाने के लिए प्रिडिक्टिव ऐनिमेशन की सुविधा जोड़ी गई है. अगर इस सुविधा का इस्तेमाल, डेवलपर के विकल्प के साथ काम करने वाले ऐप्लिकेशन में किया जाता है, तो पीछे की ओर स्वाइप करने पर एक ऐनिमेशन दिखता है. इससे पता चलता है कि पिछले पेज पर जाने के जेस्चर से, ऐप्लिकेशन से बाहर निकलकर होम स्क्रीन पर पहुंचा जा सकता है.
Android 14 में, अनुमानित तरीके से वापस जाने की सुविधा के लिए कई सुधार और नए दिशा-निर्देश शामिल किए गए हैं:
- पूरे ऐप्लिकेशन के बजाय, हर गतिविधि के लिए, प्रिडिक्टिव बैक सिस्टम ऐनिमेशन के लिए ऑप्ट इन करने के लिए,
android:enableOnBackInvokedCallback=trueको सेट किया जा सकता है. - हमने Android 13 में, होम स्क्रीन पर वापस जाने के ऐनिमेशन के साथ-साथ नए सिस्टम ऐनिमेशन जोड़े हैं. नए सिस्टम ऐनिमेशन, अलग-अलग गतिविधियों और टास्क के लिए होते हैं. ये प्रिडिक्टिव बैक पर माइग्रेट करने के बाद, अपने-आप चालू हो जाते हैं.
- हमने बॉटम शीट, साइड शीट, और खोज के लिए, मटीरियल कॉम्पोनेंट के नए ऐनिमेशन जोड़े हैं.
- हमने ऐप्लिकेशन में कस्टम ऐनिमेशन और ट्रांज़िशन बनाने के लिए, डिज़ाइन से जुड़े दिशा-निर्देश बनाए हैं.
- हमने कस्टम इन-ऐप्लिकेशन ट्रांज़िशन ऐनिमेशन के साथ काम करने के लिए, नए एपीआई जोड़े हैं:
handleOnBackStarted,handleOnBackProgressed,handleOnBackCancelledinOnBackPressedCallbackonBackStarted,onBackProgressed,onBackCancelledinOnBackAnimationCallback- उपयोगकर्ता के वापस स्वाइप करने पर ट्रांज़िशन करने के लिए,
overridePendingTransitionके बजायoverrideActivityTransitionका इस्तेमाल करें.
Android 14 के इस रिलीज़ में, अनुमानित बैक की सभी सुविधाएं, डेवलपर के विकल्प के तौर पर ही उपलब्ध हैं. अपने ऐप्लिकेशन को अनुमानित बैक ट्रांज़िशन पर माइग्रेट करने के लिए डेवलपर गाइड देखें. साथ ही, ऐप्लिकेशन में कस्टम ट्रांज़िशन बनाने के लिए डेवलपर गाइड देखें.
बड़ी स्क्रीन वाले डिवाइस बनाने वाली कंपनियों के लिए, हर ऐप्लिकेशन के हिसाब से ओवरराइड की सुविधा
हर ऐप्लिकेशन के लिए बदलाव करने की सुविधा की मदद से, डिवाइस बनाने वाली कंपनियां बड़ी स्क्रीन वाले डिवाइसों पर ऐप्लिकेशन के काम करने के तरीके में बदलाव कर सकती हैं. उदाहरण के लिए, FORCE_RESIZE_APP ओवरराइड सिस्टम को डिसप्ले डाइमेंशन के हिसाब से ऐप्लिकेशन का साइज़ बदलने का निर्देश देता है, ताकि ऐप्लिकेशन के मेनिफ़ेस्ट में resizeableActivity="false" सेट हो. हालांकि, साइज़ के साथ काम करने वाले मोड का इस्तेमाल नहीं किया जाता.
ओवरराइड का मकसद, बड़ी स्क्रीन पर उपयोगकर्ता अनुभव को बेहतर बनाना है.
नई मेनिफ़ेस्ट प्रॉपर्टी की मदद से, डिवाइस बनाने वाली कुछ कंपनियों के बदलावों को अपने ऐप्लिकेशन के लिए बंद किया जा सकता है.
बड़ी स्क्रीन वाले उपयोगकर्ताओं के लिए, हर ऐप्लिकेशन के हिसाब से ओवरराइड की सुविधा
हर ऐप्लिकेशन के लिए बदलाव करने की सुविधा, बड़ी स्क्रीन वाले डिवाइसों पर ऐप्लिकेशन के काम करने के तरीके में बदलाव करती है. उदाहरण के लिए, डिवाइस बनाने वाली कंपनी OVERRIDE_MIN_ASPECT_RATIO_LARGE, ऐप्लिकेशन के आसपेक्ट रेशियो को 16:9 पर सेट कर देती है. भले ही, ऐप्लिकेशन का कॉन्फ़िगरेशन कुछ भी हो.
Android 14 QPR1 की मदद से, उपयोगकर्ता बड़ी स्क्रीन वाले डिवाइसों पर नए सेटिंग मेन्यू का इस्तेमाल करके, हर ऐप्लिकेशन के लिए बदलाव लागू कर सकते हैं.
ऐप्लिकेशन की स्क्रीन शेयर करने की सुविधा
ऐप्लिकेशन की स्क्रीन शेयर करने की सुविधा की मदद से, उपयोगकर्ता स्क्रीन कॉन्टेंट रिकॉर्ड करते समय, डिवाइस की पूरी स्क्रीन के बजाय, ऐप्लिकेशन की विंडो शेयर कर सकते हैं.
ऐप्लिकेशन की स्क्रीन शेयर करने की सुविधा का इस्तेमाल करने पर, स्टेटस बार, नेविगेशन बार, सूचनाएं, और सिस्टम के अन्य यूज़र इंटरफ़ेस (यूआई) एलिमेंट शेयर किए गए डिसप्ले में शामिल नहीं होते. सिर्फ़ चुने गए ऐप्लिकेशन का कॉन्टेंट शेयर किया जाता है.
ऐप्लिकेशन की स्क्रीन शेयर करने की सुविधा से, उपयोगकर्ताओं की प्रोडक्टिविटी और निजता बेहतर होती है. इसकी मदद से, वे एक से ज़्यादा ऐप्लिकेशन चला सकते हैं. हालांकि, कॉन्टेंट शेयर करने की सुविधा सिर्फ़ एक ऐप्लिकेशन के लिए उपलब्ध होती है.
Pixel 8 Pro पर Gboard में, एलएलएम की मदद से स्मार्ट जवाब की सुविधा
Pixel 8 Pro डिवाइसों पर, दिसंबर में लॉन्च की गई सुविधाओं के साथ, डेवलपर Gboard में बेहतर क्वालिटी के स्मार्ट जवाबों को आज़मा सकते हैं. ये जवाब, Google Tensor पर चलने वाले डिवाइस पर मौजूद लार्ज लैंग्वेज मॉडल (एलएलएम) की मदद से जनरेट होते हैं.
यह सुविधा, WhatsApp, Line, और KakaoTalk में अमेरिकन इंग्लिश के लिए, सीमित तौर पर झलक के तौर पर उपलब्ध है. इसके लिए, Pixel 8 Pro डिवाइस का इस्तेमाल करना ज़रूरी है. साथ ही, Gboard को कीबोर्ड के तौर पर इस्तेमाल करना होगा.
इसे आज़माने के लिए, पहले सेटिंग > डेवलपर के लिए विकल्प > AICore की सेटिंग > 'AICore की सेटिंग हमेशा चालू रखें' को चालू करें.
इसके बाद, किसी ऐसे ऐप्लिकेशन में बातचीत खोलें जिसमें यह सुविधा काम करती है. इससे, आपको Gboard की सुझाव पट्टी में, आने वाले मैसेज के जवाब में एलएलएम की मदद से मिलने वाले स्मार्ट जवाब दिखेंगे.
ग्राफ़िक
पाथ को क्वेरी किया जा सकता है और इंटरपोलेट किया जा सकता है
Android का Path एपीआई, वेक्टर ग्राफ़िक बनाने और रेंडर करने का एक बेहतरीन और सुविधाजनक तरीका है. इसमें पाथ को स्ट्रोक करने या भरने, लाइन सेगमेंट या क्वाड्रेटिक या क्यूबिक कर्व से पाथ बनाने, ज़्यादा जटिल आकार या इन सभी को एक साथ पाने के लिए बूलियन ऑपरेशन करने की सुविधा है. एक सीमा यह पता लगाने की क्षमता है कि असल में पाथ ऑब्जेक्ट में क्या है; बनाने के बाद ऑब्जेक्ट के अंदरूनी हिस्से, कॉलर को नहीं दिखते.
Path बनाने के लिए, पाथ सेगमेंट जोड़ने के लिए, moveTo(), lineTo(), और cubicTo() जैसे तरीकों को कॉल किया जाता है. हालांकि, उस पाथ से यह पूछने का कोई तरीका नहीं है कि सेगमेंट क्या हैं. इसलिए, आपको उस जानकारी को बनाने के समय सेव रखना होगा.
Android 14 में पाथ में क्या मौजूद है, यह जानने के लिए पाथ में क्वेरी की जा सकती है.
सबसे पहले, आपको Path.getPathIterator एपीआई का इस्तेमाल करके, PathIterator ऑब्जेक्ट हासिल करना होगा:
Kotlin
val path = Path().apply {
    moveTo(1.0f, 1.0f)
    lineTo(2.0f, 2.0f)
    close()
}
val pathIterator = path.pathIterator
Java
Path path = new Path();
path.moveTo(1.0F, 1.0F);
path.lineTo(2.0F, 2.0F);
path.close();
PathIterator pathIterator = path.getPathIterator();
इसके बाद, PathIterator को कॉल करके, हर सेगमेंट के लिए ज़रूरी डेटा को एक-एक करके पाया जा सकता है. इस उदाहरण में, PathIterator.Segment ऑब्जेक्ट का इस्तेमाल किया गया है, जो आपके लिए डेटा को पैकेज करता है:
Kotlin
for (segment in pathIterator) {
    println("segment: ${segment.verb}, ${segment.points}")
}
Java
while (pathIterator.hasNext()) {
    PathIterator.Segment segment = pathIterator.next();
    Log.i(LOG_TAG, "segment: " + segment.getVerb() + ", " + segment.getPoints());
}
PathIterator में next() का ऐसा वर्शन भी होता है जिसमें पॉइंट डेटा को सेव करने के लिए बफ़र को पास किया जा सकता है.
Path डेटा के बारे में क्वेरी करने के इस्तेमाल के उदाहरणों में से एक है इंटरपोलेशन. उदाहरण के लिए, हो सकता है कि आप दो अलग-अलग पाथ के बीच ऐनिमेट (या मॉर्फ़) करना चाहें. इस्तेमाल के इस उदाहरण को और आसान बनाने के लिए, Android 14 में Path पर interpolate() तरीका भी शामिल किया गया है. यह मानते हुए कि दोनों पाथ का इंटरनल स्ट्रक्चर एक जैसा है, interpolate() वाला तरीका इंटरपोलेट किए गए नतीजे के साथ एक नया Path बनाता है. इस उदाहरण में, path और otherPath के बीच आधा (.5 का लीनियर इंटरपोलेशन) आकार वाला पाथ दिखता है:
Kotlin
val interpolatedResult = Path()
if (path.isInterpolatable(otherPath)) {
    path.interpolate(otherPath, .5f, interpolatedResult)
}
Java
Path interpolatedResult = new Path();
if (path.isInterpolatable(otherPath)) {
    path.interpolate(otherPath, 0.5F, interpolatedResult);
}
Jetpack graphics-path लाइब्रेरी Android के पुराने वर्शन के लिए भी मिलते-जुलते एपीआई चालू करती है.
वर्टेक्स और फ़्रैगमेंट शेडर वाले कस्टम मेश
Android में, कस्टम शेडिंग के साथ ट्राएंगल मेश बनाने की सुविधा लंबे समय से उपलब्ध है. हालांकि, इनपुट मेश फ़ॉर्मैट में पहले से तय किए गए कुछ एट्रिब्यूट कॉम्बिनेशन ही इस्तेमाल किए जा सकते हैं. Android 14 में कस्टम मेश के लिए सहायता जोड़ी गई है. इन्हें त्रिकोण या त्रिकोण के स्ट्रिप के तौर पर परिभाषित किया जा सकता है. साथ ही, इन्हें इंडेक्स भी किया जा सकता है. इन मेश को कस्टम एट्रिब्यूट, वर्टिक्स स्ट्राइड, वैरिएंट, और वर्टिक्स और फ़्रैगमेंट शेडर के साथ AGSL में लिखकर तय किया जाता है.
वर्टिक्स शेडर, पोज़िशन और रंग जैसे वैरिएशन तय करता है. वहीं, फ़्रेगमेंट शेडर, वैकल्पिक तौर पर पिक्सल के लिए रंग तय कर सकता है. आम तौर पर, ऐसा वर्टिक्स शेडर से बनाए गए वैरिएशन का इस्तेमाल करके किया जाता है. अगर कलर, फ़्रेगमेंट शेडर से दिया जाता है, तो इसे मेश बनाते समय चुने गए ब्लेंड मोड का इस्तेमाल करके, मौजूदा Paint रंग के साथ ब्लेंड किया जाता है. ज़्यादा सुविधाओं के लिए, यूनिफ़ॉर्म को फ़्रैगमेंट और वर्टिक्स शेडर में पास किया जा सकता है.
Canvas के लिए हार्डवेयर बफ़र रेंडरर
Android 14 में HardwareBufferRenderer को शामिल किया गया है. इससे, HardwareBuffer में हार्डवेयर ऐक्सेलरेशन की मदद से ड्रॉ करने के लिए, Android के Canvas एपीआई का इस्तेमाल करने में मदद मिलती है. यह एपीआई, कम इंतज़ार के साथ ड्रॉइंग के लिए, SurfaceControl के ज़रिए सिस्टम कंपोजिटर के साथ कम्यूनिकेशन करने के लिए, खास तौर पर तब फ़ायदेमंद होता है, जब आपके इस्तेमाल के उदाहरण में यह शामिल हो.