
Macrobenchmark 库适用于测试应用的较大用例,包括应用启动和复杂的界面操作,例如滚动 RecyclerView 或运行动画。如要您想要测试较小的代码区域,请参阅 Microbenchmark 库。本页介绍了如何设置 Macrobenchmark 库。
该库会将基准测试结果输出到 Android Studio 控制台,还会生成一个包含更多详细信息的 JSON 文件。此外,它还提供轨迹文件,您可以在 Android Studio 中加载和分析这些文件。
您可以在持续集成 (CI) 环境中使用 Macrobenchmark 库,如持续集成环境中的基准测试所述。
您可以使用 Macrobenchmark 生成基准配置文件。首先,设置 Macrobenchmark 库,然后创建基准配置文件。
项目设置
我们建议您将 Macrobenchmark 与最新版本的 Android Studio 搭配使用,以使用可与 Macrobenchmark 集成的 IDE 功能。
设置 Macrobenchmark 模块
Macrobenchmark 需要一个独立于应用代码的 com.android.test 模块来负责运行衡量应用的测试。
在 Android Studio 中,我们提供了一个模板来简化 Macrobenchmark 模块设置。基准测试模块模板会自动在项目中创建一个模块(包含一个示例启动基准),用于衡量通过应用模块构建的应用。
如需使用模块模板创建新模块,请执行以下操作:
在 Android Studio 的 Project 面板中右键点击您的项目或模块,然后依次选择 New > Module。
从 Templates 窗格中选择 Benchmark。您可以自定义目标应用(要进行基准测试的应用),以及新的 Macrobenchmark 模块的软件包和模块名称。
点击完成。

图 1. 基准模块模板。
设置应用
若要对应用(称为该 Macrobenchmark 的目标)进行基准测试,该应用必须 profileable,这样系统才能读取详细的轨迹信息,而不会影响性能。模块向导会自动将 <profileable> 标记添加到应用的 AndroidManifest.xml 文件中。
确保目标应用包含 ProfilerInstaller 1.3 或更高版本,Macrobenchmark 库需要启用配置文件捕获和重置以及着色器缓存清除功能。
尽可能将进行基准测试的应用配置为接近发布版本或正式版。将其设置为不可调试,最好开启“缩减大小”功能,以提高性能。通常,您可以通过创建发布变体的副本来实现此目的,该副本具有相同的性能,但由开发人员使用调试密钥进行本地签名。或者,您也可以使用 initWith 指示 Gradle 为您执行此操作:
Kotlin
buildTypes {
    getByName("release") {
        isMinifyEnabled = true
        isShrinkResources = true
        proguardFiles(getDefaultProguardFile("proguard-android-optimize.txt"))
    }

    create("benchmark") {
        initWith(getByName("release"))
        signingConfig = signingConfigs.getByName("debug")
    }
}
Groovy
buildTypes { release { isMinifyEnabled = true isShrinkResources = true proguardFiles( getDefaultProguardFile("proguard-android-optimize.txt"), "keep-rules.pro" ) // In real app, this would use its own release keystore signingConfig = signingConfigs.getByName("debug") baselineProfile.automaticGenerationDuringBuild = true } }
为了确保在运行基准测试时构建并测试应用的正确变体(如图 2 所示),请执行以下操作:
- 执行 Gradle 同步。
- 打开 Build Variants 面板。
- 选择应用和 Macrobenchmark 模块的基准测试变体。

图 2. 选择基准测试变体。
(可选)设置多模块应用
如果您的应用有多个 Gradle 模块,请确保 build 脚本知道要编译哪个 build 变体。将 matchingFallbacks 属性添加到 :macrobenchmark 和 :app 模块的 benchmark build 类型中。其余 Gradle 模块可以保留原有的配置。
Kotlin
create("benchmark") {
    initWith(getByName("release"))
    signingConfig = signingConfigs.getByName("debug")

    matchingFallbacks += listOf("release")
 }
Groovy
benchmark {
    initWith buildTypes.release
    signingConfig signingConfigs.debug

    matchingFallbacks = ['release']
 }
如果缺少这项设置,新添加的 benchmark build 类型会导致构建失败,并显示以下错误消息:
> Could not resolve project :shared.
     Required by:
         project :app
      > No matching variant of project :shared was found.
      ...
在项目中选择 build 变体时,请为 :app 和 :macrobenchmark 模块选择 benchmark,为应用中的任何其他模块选择 release,如图 3 所示:

图 3. 多模块项目的基准测试变体,选择了 release 和 benchmark 作为 build 类型
如需了解详情,请参阅使用变体感知型依赖项管理。
(可选)设置产品变种
如果您的应用中设置了多个产品变种,请配置 :macrobenchmark 模块,使其了解要构建应用的哪个产品变种并对其进行基准测试。
本页中的示例使用 :app 模块中的两个产品变种 demo 和 production,如以下代码段所示:
Kotlin
flavorDimensions += "environment"
productFlavors {
    create("demo") {
        dimension = "environment"
        // ...
    }
    create("production") {
        dimension = "environment"
        // ...
    }
}
Groovy
flavorDimensions 'environment'
productFlavors {
    demo {
        dimension 'environment'
        // ...
    }

    production {
        dimension 'environment'
        // ...
    }
}
如果不进行此配置,您可能会收到与使用多个 Gradle 模块时类似的构建错误:
Could not determine the dependencies of task ':macrobenchmark:connectedBenchmarkAndroidTest'.
> Could not determine the dependencies of null.
   > Could not resolve all task dependencies for configuration ':macrobenchmark:benchmarkTestedApks'.
      > Could not resolve project :app.
        Required by:
            project :macrobenchmark
         > The consumer was configured to find a runtime of a component, as well as attribute 'com.android.build.api.attributes.BuildTypeAttr' with value 'benchmark', attribute 'com.android.build.api.attributes.AgpVersionAttr' with value '7.3.0'. However we cannot choose between the following variants of project :app:
             -   demoBenchmarkRuntimeElements
             -   productionBenchmarkRuntimeElements
           All of them match the consumer attributes:
           ...
以下两部分介绍了如何配置具有多个产品变种的基准测试。
使用 missingDimensionStrategy
在 :macrobenchmark 模块的 defaultConfig 中指定 missingDimensionStrategy 会指示构建系统回退到相应变种维度。如果在模块中找不到相应维度,请指定要使用的维度。以下示例中使用 production 变种作为默认维度:
Kotlin
defaultConfig {
    missingDimensionStrategy("environment", "production")
}
Groovy
defaultConfig {
    missingDimensionStrategy "environment", "production"
}
这样一来,:macrobenchmark 模块就可以仅构建指定的产品变种并对其进行基准测试;如果只有一个产品变种的配置符合基准测试要求,这种方式会非常有用。
在 :macrobenchmark 模块中定义产品变种
如果您想要构建其他产品变种并对其进行基准测试,请在 :macrobenchmark 模块中定义它们。请以与 :app 模块中类似的方式进行指定,但仅将 productFlavors 分配给 dimension,而无需进行其他设置:
Kotlin
flavorDimensions += "environment"
productFlavors {
    create("demo") {
        dimension = "environment"
    }
    create("production") {
        dimension = "environment"
    }
}
Groovy
flavorDimensions 'environment'
productFlavors {
    demo {
        dimension 'environment'
    }

    production {
        dimension 'environment'
    }
}
定义并同步项目后,从 Build Variants 窗格中选择相关的 build 变体,如图 4 所示:
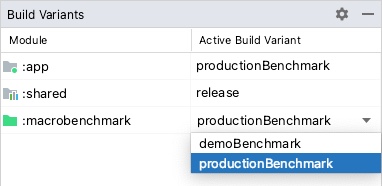
图 4. 项目的基准测试变体,选择了“productionBenchmark”和“release”作为产品变种。
如需了解详情,请参阅解决与变体匹配相关的构建错误。
创建 Macrobenchmark 类
基准测试通过 Macrobenchmark 库中的 MacrobenchmarkRule JUnit4 规则 API 提供。它包含 measureRepeated 方法,用于指定有关运行目标应用并对其进行基准测试的各种条件。
您至少需要指定目标应用的 packageName、您要衡量的 metrics 以及基准测试必须运行的 iterations 次数。
Kotlin
@LargeTest @RunWith(AndroidJUnit4::class) class SampleStartupBenchmark { @get:Rule val benchmarkRule = MacrobenchmarkRule() @Test fun startup() = benchmarkRule.measureRepeated( packageName = TARGET_PACKAGE, metrics = listOf(StartupTimingMetric()), iterations = DEFAULT_ITERATIONS, ) { // starts default launch activity uiAutomator { startApp(TARGET_PACKAGE) } } }
Java
@LargeTest
@RunWith(AndroidJUnit4.class)
public class SampleStartupBenchmark {
    @Rule
    public MacrobenchmarkRule benchmarkRule = new MacrobenchmarkRule();

    @Test
    public void startup() {
        benchmarkRule.measureRepeated(
            /* packageName */ TARGET_PACKAGE,
            /* metrics */ Arrays.asList(new StartupTimingMetric()),
            /* iterations */ 5,
            /* measureBlock */ scope -> {
                // starts default launch activity
                scope.startActivityAndWait();
                return Unit.INSTANCE;
            }
        );
    }
}
如需了解自定义基准测试的所有选项,请参阅自定义基准测试部分。
运行基准测试
在 Android Studio 中运行测试,以衡量应用在设备上的性能。您可以像运行任何其他 @Test 一样,使用测试类或方法旁边的边线操作运行基准测试,如图 5 所示。

图 5. 使用测试类旁边的边线操作运行 Macrobenchmark
您也可以执行 connectedCheck 命令,从命令行运行 Gradle 模块中的所有基准测试:
./gradlew :macrobenchmark:connectedCheck您可通过执行以下命令来运行单个测试:
./gradlew :macrobenchmark:connectedCheck -P android.testInstrumentationRunnerArguments.class=com.example.macrobenchmark.startup.SampleStartupBenchmark#startup如需了解如何在持续集成环境中运行和监控基准测试,请参阅在持续集成环境中运行基准测试。
基准测试结果
基准测试运行成功后,指标会直接显示在 Android Studio 中,并以 JSON 文件形式输出以供 CI 环境使用。每次衡量迭代均会捕获单独的系统轨迹。点击 Test Results 窗格中的链接可以打开这些轨迹结果,如图 6 所示:

图 6. Macrobenchmark 启动结果
轨迹文件加载完成后,Android Studio 会提示您选择要分析的进程。系统会预先填充目标应用进程,如图 7 所示:

图 7. Studio 轨迹进程选择界面。
轨迹文件加载完成后,Studio 将在 CPU 性能分析器工具中显示结果:

图 8. Studio 轨迹界面。
JSON 报告和所有性能分析轨迹也会从设备自动复制到主机。这些数据将写入主机上的以下位置:
project_root/module/build/outputs/connected_android_test_additional_output/debugAndroidTest/connected/device_id/
手动访问跟踪文件
如果要使用 Perfetto 工具分析轨迹文件,还需要执行几个额外的步骤。Perfetto 可以检查轨迹记录期间整个设备上发生的所有进程,而 Android Studio 的 CPU 性能分析器只能检查单个进程。
如果您从 Android Studio 或从 Gradle 命令行调用测试,系统会自动将轨迹文件从设备复制到主机。这些数据将写入主机上的以下位置:
project_root/module/build/outputs/connected_android_test_additional_output/debugAndroidTest/connected/device_id/TrivialStartupBenchmark_startup[mode=COLD]_iter002.perfetto-trace
将轨迹文件复制到主机系统后,您可以在 Android Studio 中依次点击 File > Open 菜单来打开该轨迹文件。此时系统会显示上一部分中显示的性能分析器工具视图。
配置错误
如果应用配置有误(可调试或不可分析),Macrobenchmark 就会返回错误,而不会报告不正确或不完整的衡量结果。您可以使用 androidx.benchmark.suppressErrors 参数抑制这些错误。
如果尝试衡量模拟器,或在电量不足的设备上进行衡量,Macrobenchmark 也会返回错误,这些情况可能会影响核心可用性和时钟速度。
自定义基准测试
measureRepeated 函数接受各种参数,这些参数会影响库收集的指标、应用的启动和编译方式或基准测试将运行的迭代次数。
捕获指标
指标是指从基准测试中提取的主要信息类型。您可以查看以下指标:
如需详细了解指标,请参阅捕获 Macrobenchmark 指标。
利用自定义事件改进轨迹数据
利用自定义轨迹事件进行应用插桩非常有用,这些事件会与轨迹报告的其余部分一起显示,有助于找出应用特有的问题。如需详细了解如何创建自定义轨迹事件,请参阅定义自定义事件。
CompilationMode
Macrobenchmark 可以指定 CompilationMode,用于定义必须将应用的多大部分从 DEX 字节码(APK 中的字节码格式)预编译为机器代码(类似于预编译的 C++)。
默认情况下,系统会使用 CompilationMode.DEFAULT 运行 Macrobenchmark,这会在 Android 7(API 级别 24)及更高版本上安装基准配置文件(如果有)。如果您使用的是 Android 6(API 级别 23)或更低版本,编译模式会将 APK 完全编译为默认系统行为。
如果目标应用同时包含基准配置文件和 ProfileInstaller 库,您可以安装基准配置文件。
在 Android 7 及更高版本中,您可以自定义 CompilationMode 以影响设备上的预编译量,从而模拟不同级别的预先 (AOT) 编译或 JIT 缓存。请参阅 CompilationMode.Full、CompilationMode.Partial、CompilationMode.None 和 CompilationMode.Ignore。
此功能基于 ART 编译命令构建而成。每次基准测试都会在开始之前清除分析数据,确保基准测试之间互不干扰。
StartupMode
如需执行 activity 启动,您可以传递下列某一种预定义的启动模式:COLD、WARM 或 HOT。此参数会更改 activity 的启动方式,以及测试开始时的进程状态。
如需详细了解启动类型,请参阅应用启动时间。
示例
GitHub 上提供了一个示例项目,该项目位于 Macrobenchmark 示例代码库中。
提供反馈
如需针对 Jetpack Macrobenchmark 报告问题或提交功能请求,请参阅公开问题跟踪器。
为您推荐
- 注意:当 JavaScript 处于关闭状态时,系统会显示链接文字
- 捕获 Macrobenchmark 指标
- 创建基准配置文件 {:#creating-profile-rules}
- 使用 Macrobenchmark 库 {:#measuring-optimize} 自动进行衡量