
Dokumen ini menjelaskan cara menyiapkan berbagai pengujian Espresso umum.
Mencocokkan tampilan di sebelah tampilan lain
Tata letak dapat berisi tampilan tertentu yang tidak unik dengan sendirinya. Sebagai
misalnya, tombol panggilan berulang di tabel kontak bisa memiliki
R.id, berisi teks yang sama, dan memiliki properti yang sama dengan panggilan lainnya
di dalam hierarki tampilan.
Misalnya, dalam aktivitas ini, tampilan dengan teks "7" berulang di beberapa
baris:
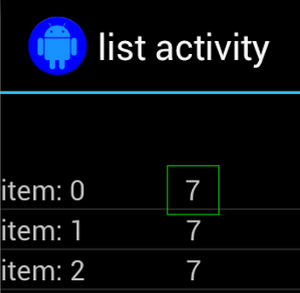
Sering kali, tampilan non-unik akan dipasangkan dengan beberapa label unik yang ditemukan
di sampingnya, seperti nama kontak di samping tombol panggil. Dalam kasus ini,
Anda dapat menggunakan pencocok hasSibling() untuk mempersempit pilihan:
Kotlin
onView(allOf(withText("7"), hasSibling(withText("item: 0"))))
    .perform(click())
Java
onView(allOf(withText("7"), hasSibling(withText("item: 0"))))
    .perform(click());
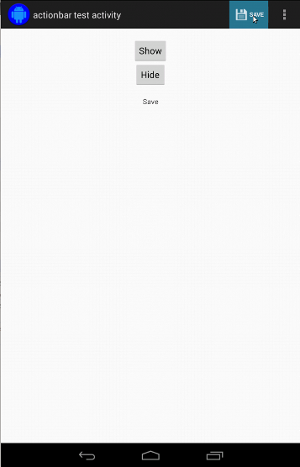
Mencocokkan tampilan yang ada di dalam panel tindakan
ActionBarTestActivity memiliki dua panel tindakan yang berbeda: panel tindakan normal
{i>action-bar<i} dan {i>action-bar<i} kontekstual yang
dibuat dari menu opsi. Keduanya
bilah tindakan memiliki satu item yang selalu terlihat dan dua item yang hanya
terlihat di menu tambahan. Ketika sebuah item diklik, hal ini akan mengubah TextView menjadi
konten item yang diklik.
Mencocokkan ikon yang terlihat di kedua bilah tindakan sangat mudah, seperti yang ditunjukkan dalam cuplikan kode berikut:
Kotlin
fun testClickActionBarItem() {
    // We make sure the contextual action bar is hidden.
    onView(withId(R.id.hide_contextual_action_bar))
        .perform(click())

    // Click on the icon - we can find it by the r.Id.
    onView(withId(R.id.action_save))
        .perform(click())

    // Verify that we have really clicked on the icon
    // by checking the TextView content.
    onView(withId(R.id.text_action_bar_result))
        .check(matches(withText("Save")))
}
Java
public void testClickActionBarItem() {
    // We make sure the contextual action bar is hidden.
    onView(withId(R.id.hide_contextual_action_bar))
        .perform(click());

    // Click on the icon - we can find it by the r.Id.
    onView(withId(R.id.action_save))
        .perform(click());

    // Verify that we have really clicked on the icon
    // by checking the TextView content.
    onView(withId(R.id.text_action_bar_result))
        .check(matches(withText("Save")));
}
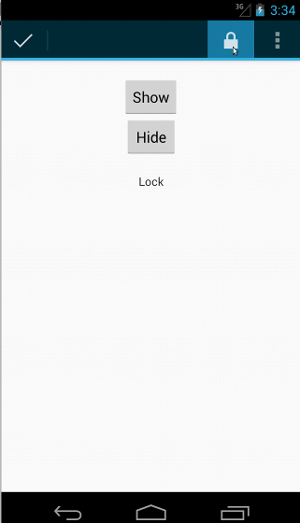
Kode terlihat identik untuk panel tindakan kontekstual:
Kotlin
fun testClickActionModeItem() {
    // Make sure we show the contextual action bar.
    onView(withId(R.id.show_contextual_action_bar))
        .perform(click())

    // Click on the icon.
    onView((withId(R.id.action_lock)))
        .perform(click())

    // Verify that we have really clicked on the icon
    // by checking the TextView content.
    onView(withId(R.id.text_action_bar_result))
        .check(matches(withText("Lock")))
}
Java
public void testClickActionModeItem() {
    // Make sure we show the contextual action bar.
    onView(withId(R.id.show_contextual_action_bar))
        .perform(click());

    // Click on the icon.
    onView((withId(R.id.action_lock)))
        .perform(click());

    // Verify that we have really clicked on the icon
    // by checking the TextView content.
    onView(withId(R.id.text_action_bar_result))
        .check(matches(withText("Lock")));
}
Mengklik item di menu tambahan sedikit lebih sulit untuk tindakan normal karena beberapa perangkat memiliki tombol menu tambahan perangkat keras, yang membuka item tambahan di menu opsi, dan beberapa perangkat memiliki tambahan tombol menu, yang membuka menu tambahan normal. Untungnya, Espresso dapat menanganinya kepada kami.
Untuk panel tindakan normal:
Kotlin
fun testActionBarOverflow() {
    // Make sure we hide the contextual action bar.
    onView(withId(R.id.hide_contextual_action_bar))
        .perform(click())

    // Open the options menu OR open the overflow menu, depending on whether
    // the device has a hardware or software overflow menu button.
    openActionBarOverflowOrOptionsMenu(
            ApplicationProvider.getApplicationContext<Context>())

    // Click the item.
    onView(withText("World"))
        .perform(click())

    // Verify that we have really clicked on the icon by checking
    // the TextView content.
    onView(withId(R.id.text_action_bar_result))
        .check(matches(withText("World")))
}
Java
public void testActionBarOverflow() {
    // Make sure we hide the contextual action bar.
    onView(withId(R.id.hide_contextual_action_bar))
        .perform(click());

    // Open the options menu OR open the overflow menu, depending on whether
    // the device has a hardware or software overflow menu button.
    openActionBarOverflowOrOptionsMenu(
            ApplicationProvider.getApplicationContext());

    // Click the item.
    onView(withText("World"))
        .perform(click());

    // Verify that we have really clicked on the icon by checking
    // the TextView content.
    onView(withId(R.id.text_action_bar_result))
        .check(matches(withText("World")));
}
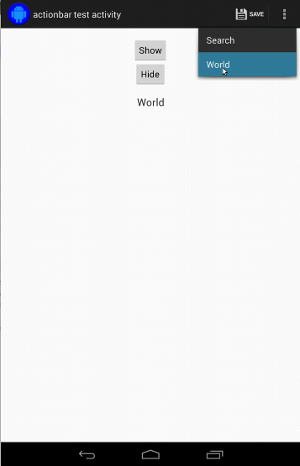
Ini adalah tampilan pada perangkat dengan tombol menu tambahan hardware:

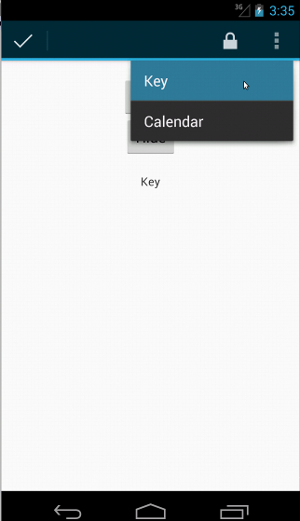
Untuk panel tindakan kontekstual, sangatlah mudah, cukup:
Kotlin
fun testActionModeOverflow() {
    // Show the contextual action bar.
    onView(withId(R.id.show_contextual_action_bar))
        .perform(click())

    // Open the overflow menu from contextual action mode.
    openContextualActionModeOverflowMenu()

    // Click on the item.
    onView(withText("Key"))
        .perform(click())

    // Verify that we have really clicked on the icon by
    // checking the TextView content.
    onView(withId(R.id.text_action_bar_result))
        .check(matches(withText("Key")))
    }
}
Java
public void testActionModeOverflow() {
    // Show the contextual action bar.
    onView(withId(R.id.show_contextual_action_bar))
        .perform(click());

    // Open the overflow menu from contextual action mode.
    openContextualActionModeOverflowMenu();

    // Click on the item.
    onView(withText("Key"))
        .perform(click());

    // Verify that we have really clicked on the icon by
    // checking the TextView content.
    onView(withId(R.id.text_action_bar_result))
        .check(matches(withText("Key")));
    }
}
Untuk melihat kode lengkap untuk contoh ini, lihat
Contoh ActionBarTest.java di GitHub.
Menyatakan bahwa tampilan tidak ditampilkan
Setelah melakukan serangkaian tindakan, Anda pasti ingin
status UI yang sedang diuji. Terkadang, ini bisa menjadi
kasus negatif, seperti ketika
sesuatu tidak terjadi. Ingatlah bahwa Anda dapat
mengubah tampilan hamcrest
menjadi ViewAssertion dengan menggunakan ViewAssertions.matches().
Pada contoh di bawah, kami mengambil pencocok isDisplayed() dan membalikkannya menggunakan
pencocok not() standar:
Kotlin
import androidx.test.espresso.Espresso.onView
import androidx.test.espresso.assertion.ViewAssertions.matches
import androidx.test.espresso.matcher.ViewMatchers.isDisplayed
import androidx.test.espresso.matcher.ViewMatchers.withId
import org.hamcrest.Matchers.not

onView(withId(R.id.bottom_left))
    .check(matches(not(isDisplayed())))
Java
import static androidx.test.espresso.Espresso.onView;
import static androidx.test.espresso.assertion.ViewAssertions.matches;
import static androidx.test.espresso.matcher.ViewMatchers.isDisplayed;
import static androidx.test.espresso.matcher.ViewMatchers.withId;
import static org.hamcrest.Matchers.not;

onView(withId(R.id.bottom_left))
    .check(matches(not(isDisplayed())));
Pendekatan di atas berfungsi jika tampilan masih menjadi bagian dari hierarki. Jika ya
tidak, Anda akan mendapatkan NoMatchingViewException dan harus menggunakan
ViewAssertions.doesNotExist().
Menyatakan bahwa tampilan tidak ada
Jika tampilan hilang dari hierarki tampilan—yang dapat terjadi saat
menyebabkan transisi ke aktivitas lain—Anda harus menggunakan
ViewAssertions.doesNotExist():
Kotlin
import androidx.test.espresso.Espresso.onView
import androidx.test.espresso.assertion.ViewAssertions.doesNotExist
import androidx.test.espresso.matcher.ViewMatchers.withId

onView(withId(R.id.bottom_left))
    .check(doesNotExist())
Java
import static androidx.test.espresso.Espresso.onView;
import static androidx.test.espresso.assertion.ViewAssertions.doesNotExist;
import static androidx.test.espresso.matcher.ViewMatchers.withId;

onView(withId(R.id.bottom_left))
    .check(doesNotExist());
Menyatakan bahwa item data tidak ada dalam adapter
Untuk membuktikan item data tertentu tidak berada dalam AdapterView, Anda harus melakukan
sedikit berbeda. Kita harus menemukan AdapterView yang diminati
dan menginterogasi
data yang ada di dalamnya. Kita tidak perlu menggunakan onData().
Sebagai gantinya, kita menggunakan onView() untuk menemukan AdapterView, lalu menggunakan ID lain
untuk mengerjakan data di dalam tampilan.
Pertama, matcher-nya:
Kotlin
private fun withAdaptedData(dataMatcher: Matcher<Any>): Matcher<View> {
    return object : TypeSafeMatcher<View>() {

        override fun describeTo(description: Description) {
            description.appendText("with class name: ")
            dataMatcher.describeTo(description)
        }

        public override fun matchesSafely(view: View) : Boolean {
            if (view !is AdapterView<*>) {
                return false
            }

            val adapter = view.adapter
            for (i in 0 until adapter.count) {
                if (dataMatcher.matches(adapter.getItem(i))) {
                    return true
                }
            }

            return false
        }
    }
}
Java
private static Matcher<View> withAdaptedData(final Matcher<Object> dataMatcher) {
    return new TypeSafeMatcher<View>() {

        @Override
        public void describeTo(Description description) {
            description.appendText("with class name: ");
            dataMatcher.describeTo(description);
        }

        @Override
        public boolean matchesSafely(View view) {
            if (!(view instanceof AdapterView)) {
                return false;
            }

            @SuppressWarnings("rawtypes")
            Adapter adapter = ((AdapterView) view).getAdapter();
            for (int i = 0; i < adapter.getCount(); i++) {
                if (dataMatcher.matches(adapter.getItem(i))) {
                    return true;
                }
            }

            return false;
        }
    };
}
Selanjutnya, yang kita butuhkan adalah onView() untuk menemukan AdapterView:
Kotlin
fun testDataItemNotInAdapter() {
    onView(withId(R.id.list))
          .check(matches(not(withAdaptedData(withItemContent("item: 168")))))
    }
}
Java
@SuppressWarnings("unchecked")
public void testDataItemNotInAdapter() {
    onView(withId(R.id.list))
          .check(matches(not(withAdaptedData(withItemContent("item: 168")))));
    }
}
Kita juga memiliki pernyataan yang akan gagal jika item sama dengan "item: 168" ada di tampilan adaptor dengan daftar ID.
Untuk contoh lengkap, lihat metode testDataItemNotInAdapter() dalam
AdapterViewTest.java
di GitHub.
Menggunakan pengendali kegagalan kustom
Mengganti FailureHandler default di Espresso dengan yang kustom memungkinkan
penanganan error tambahan atau yang berbeda, seperti mengambil screenshot atau meneruskan
beserta informasi debug tambahan.
Contoh CustomFailureHandlerTest menunjukkan cara menerapkan
pengendali kegagalan:
Kotlin
private class CustomFailureHandler(targetContext: Context) : FailureHandler {
    private val delegate: FailureHandler

    init {
        delegate = DefaultFailureHandler(targetContext)
    }

    override fun handle(error: Throwable, viewMatcher: Matcher<View>) {
        try {
            delegate.handle(error, viewMatcher)
        } catch (e: NoMatchingViewException) {
            throw MySpecialException(e)
        }

    }
}
Java
private static class CustomFailureHandler implements FailureHandler {
    private final FailureHandler delegate;

    public CustomFailureHandler(Context targetContext) {
        delegate = new DefaultFailureHandler(targetContext);
    }

    @Override
    public void handle(Throwable error, Matcher<View> viewMatcher) {
        try {
            delegate.handle(error, viewMatcher);
        } catch (NoMatchingViewException e) {
            throw new MySpecialException(e);
        }
    }
}
Pengendali kegagalan ini menampilkan MySpecialException, bukan
NoMatchingViewException dan mendelegasikan semua kegagalan lainnya ke
DefaultFailureHandler. CustomFailureHandler dapat didaftarkan dengan
Espresso dalam metode setUp() pengujian:
Kotlin
@Throws(Exception::class)
override fun setUp() {
    super.setUp()
    getActivity()
    setFailureHandler(CustomFailureHandler(
            ApplicationProvider.getApplicationContext<Context>()))
}
Java
@Override
public void setUp() throws Exception {
    super.setUp();
    getActivity();
    setFailureHandler(new CustomFailureHandler(
            ApplicationProvider.getApplicationContext()));
}
Untuk informasi selengkapnya, lihat
FailureHandler
dan
Espresso.setFailureHandler().
Menargetkan jendela non-default
Android mendukung banyak jendela. Biasanya, ini bersifat
transparan bagi pengguna
dan pengembang aplikasi, namun dalam kasus tertentu
terlihat beberapa jendela, seperti
seperti ketika jendela pelengkapan otomatis digambar di atas jendela aplikasi utama di
widget penelusuran. Untuk menyederhanakan banyak hal, secara default Espresso menggunakan heuristik untuk
menebak Window mana yang ingin Anda gunakan. Heuristik ini hampir
selalu cukup baik; Namun, dalam kasus yang jarang terjadi, Anda harus menentukan periode
harus ditargetkan oleh interaksi. Anda dapat melakukannya dengan menyediakan jendela root Anda sendiri
matcher, atau matcher Root:
Kotlin
onView(withText("South China Sea"))
    .inRoot(withDecorView(not(`is`(getActivity().getWindow().getDecorView()))))
    .perform(click())
Java
onView(withText("South China Sea"))
    .inRoot(withDecorView(not(is(getActivity().getWindow().getDecorView()))))
    .perform(click());
Seperti halnya pada
ViewMatchers,
kami menyediakan set data bawaan
RootMatchers.
Tentu saja, Anda dapat selalu menjalankan objek Matcher Anda sendiri.
Lihat alat MultipleWindowTest contoh di GitHub.
Mencocokkan header atau footer dalam tampilan daftar
Header dan footer ditambahkan ke ListViews menggunakan addHeaderView() dan
Metode addFooterView(). Untuk memastikan Espresso.onData() mengetahui objek data apa
agar cocok, pastikan untuk meneruskan nilai objek data preset sebagai parameter kedua
ke addHeaderView() dan addFooterView(). Contoh:
Kotlin
const val FOOTER = "FOOTER"
...
val footerView = layoutInflater.inflate(R.layout.list_item, listView, false)
footerView.findViewById<TextView>(R.id.item_content).text = "count:"
footerView.findViewById<TextView>(R.id.item_size).text
        = data.size.toString
listView.addFooterView(footerView, FOOTER, true)
Java
public static final String FOOTER = "FOOTER";
...
View footerView = layoutInflater.inflate(R.layout.list_item, listView, false);
footerView.findViewById<TextView>(R.id.item_content).setText("count:");
footerView.findViewById<TextView>(R.id.item_size).setText(String.valueOf(data.size()));
listView.addFooterView(footerView, FOOTER, true);
Kemudian, Anda dapat menulis matcher untuk footer:
Kotlin
import org.hamcrest.Matchers.allOf
import org.hamcrest.Matchers.instanceOf
import org.hamcrest.Matchers.`is`

fun isFooter(): Matcher<Any> {
    return allOf(`is`(instanceOf(String::class.java)),
            `is`(LongListActivity.FOOTER))
}
Java
import static org.hamcrest.Matchers.allOf;
import static org.hamcrest.Matchers.instanceOf;
import static org.hamcrest.Matchers.is;

@SuppressWarnings("unchecked")
public static Matcher<Object> isFooter() {
    return allOf(is(instanceOf(String.class)), is(LongListActivity.FOOTER));
}
Selanjutnya, memuat tampilan dalam pengujian adalah hal yang sepele:
Kotlin
import androidx.test.espresso.Espresso.onData
import androidx.test.espresso.action.ViewActions.click
import androidx.test.espresso.sample.LongListMatchers.isFooter

fun testClickFooter() {
    onData(isFooter())
        .perform(click())

    // ...
}
Java
import static androidx.test.espresso.Espresso.onData;
import static androidx.test.espresso.action.ViewActions.click;
import static androidx.test.espresso.sample.LongListMatchers.isFooter;

public void testClickFooter() {
    onData(isFooter())
        .perform(click());

    // ...
}
Lihat contoh kode lengkap, yang ditemukan dalam metode testClickFooter()
AdapterViewTest.java
di GitHub.