
このドキュメントでは、各種の一般的な Espresso テストのセットアップ方法について説明します。
隣あったビューによるビューのマッチング
レイアウトには、同一のビューを複数含めることができます。対象
たとえば、連絡先の表にある [繰り返し通話] ボタンに、同じ [繰り返し通話] ボタンを設定できます。
R.id。同じテキストが含まれ、他の呼び出しと同じプロパティを持ちます。
ビュー階層内のボタンです。
たとえば、このアクティビティでは、テキスト "7" を含むビューが複数にわたって繰り返されています。
rows:
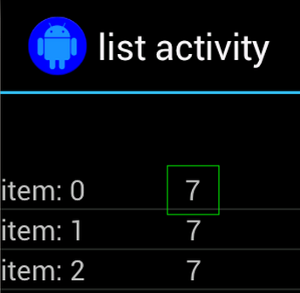
多くの場合、一意でないビューは、場所に配置されている一意のラベルと
連絡先の名前などが表示されます。この例では
hasSibling() マッチャーを使用すると、選択範囲を絞り込むことができます。
Kotlin
onView(allOf(withText("7"), hasSibling(withText("item: 0"))))
    .perform(click())
Java
onView(allOf(withText("7"), hasSibling(withText("item: 0"))))
    .perform(click());
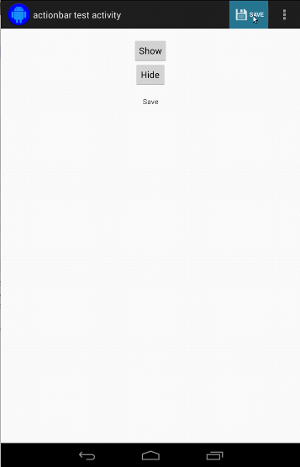
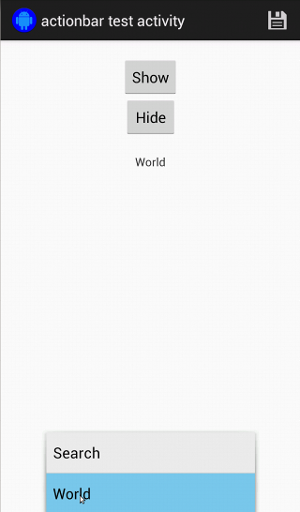
アクションバー内のビューのマッチング
ActionBarTestActivity には、2 種類のアクションバー(通常のアクションバー)があります。
アクションバーと、オプション メニューから作成されるコンテキスト アクションバーです。両方
アクションバーには、常に表示される項目が 1 つと、表示される項目が 2 つあります。
オーバーフローメニューに表示されます項目をクリックすると、TextView が
クリックされたアイテムのコンテンツです。
図に示すように、両方のアクションバーに表示されるアイコンを一致させるのは簡単です。 これを次のコード スニペットに示します。
Kotlin
fun testClickActionBarItem() {
    // We make sure the contextual action bar is hidden.
    onView(withId(R.id.hide_contextual_action_bar))
        .perform(click())

    // Click on the icon - we can find it by the r.Id.
    onView(withId(R.id.action_save))
        .perform(click())

    // Verify that we have really clicked on the icon
    // by checking the TextView content.
    onView(withId(R.id.text_action_bar_result))
        .check(matches(withText("Save")))
}
Java
public void testClickActionBarItem() {
    // We make sure the contextual action bar is hidden.
    onView(withId(R.id.hide_contextual_action_bar))
        .perform(click());

    // Click on the icon - we can find it by the r.Id.
    onView(withId(R.id.action_save))
        .perform(click());

    // Verify that we have really clicked on the icon
    // by checking the TextView content.
    onView(withId(R.id.text_action_bar_result))
        .check(matches(withText("Save")));
}
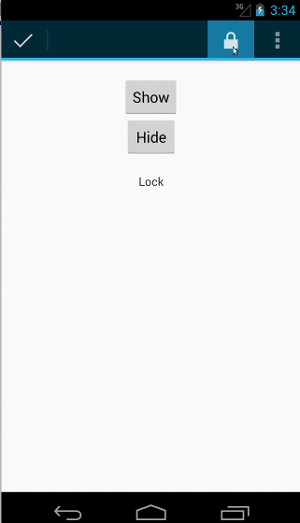
コンテキスト アクションバー用のコードも同様で、次のようになります。
Kotlin
fun testClickActionModeItem() {
    // Make sure we show the contextual action bar.
    onView(withId(R.id.show_contextual_action_bar))
        .perform(click())

    // Click on the icon.
    onView((withId(R.id.action_lock)))
        .perform(click())

    // Verify that we have really clicked on the icon
    // by checking the TextView content.
    onView(withId(R.id.text_action_bar_result))
        .check(matches(withText("Lock")))
}
Java
public void testClickActionModeItem() {
    // Make sure we show the contextual action bar.
    onView(withId(R.id.show_contextual_action_bar))
        .perform(click());

    // Click on the icon.
    onView((withId(R.id.action_lock)))
        .perform(click());

    // Verify that we have really clicked on the icon
    // by checking the TextView content.
    onView(withId(R.id.text_action_bar_result))
        .check(matches(withText("Lock")));
}
オーバーフロー メニューのアイテムをクリックすることは、通常の操作には少し注意が必要です。 デバイスによっては、ハードウェアのオーバーフロー メニュー ボタンがあり、このボタンを使って オプション メニューで項目がオーバーフローしたり、一部のデバイスでソフトウェア オーバーフローが発生したりします。 メニューボタン: 通常のオーバーフロー メニューが開きます。幸いなことに Espresso は 提供します
通常のアクションバーの場合は、次のようにします。
Kotlin
fun testActionBarOverflow() {
    // Make sure we hide the contextual action bar.
    onView(withId(R.id.hide_contextual_action_bar))
        .perform(click())

    // Open the options menu OR open the overflow menu, depending on whether
    // the device has a hardware or software overflow menu button.
    openActionBarOverflowOrOptionsMenu(
            ApplicationProvider.getApplicationContext<Context>())

    // Click the item.
    onView(withText("World"))
        .perform(click())

    // Verify that we have really clicked on the icon by checking
    // the TextView content.
    onView(withId(R.id.text_action_bar_result))
        .check(matches(withText("World")))
}
Java
public void testActionBarOverflow() {
    // Make sure we hide the contextual action bar.
    onView(withId(R.id.hide_contextual_action_bar))
        .perform(click());

    // Open the options menu OR open the overflow menu, depending on whether
    // the device has a hardware or software overflow menu button.
    openActionBarOverflowOrOptionsMenu(
            ApplicationProvider.getApplicationContext());

    // Click the item.
    onView(withText("World"))
        .perform(click());

    // Verify that we have really clicked on the icon by checking
    // the TextView content.
    onView(withId(R.id.text_action_bar_result))
        .check(matches(withText("World")));
}
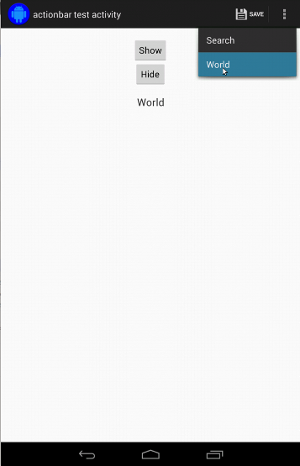
次の図は、ハードウェア オーバーフロー メニューボタンを持つデバイスでの表示を示しています。
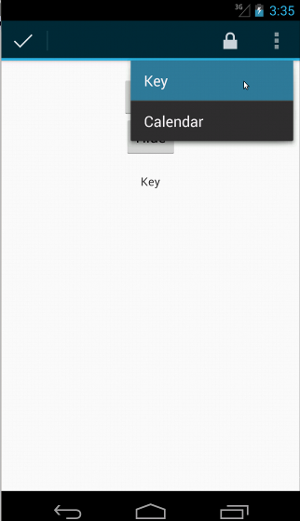
コンテキスト アクションバーの場合も、次のように簡単に処理できます。
Kotlin
fun testActionModeOverflow() {
    // Show the contextual action bar.
    onView(withId(R.id.show_contextual_action_bar))
        .perform(click())

    // Open the overflow menu from contextual action mode.
    openContextualActionModeOverflowMenu()

    // Click on the item.
    onView(withText("Key"))
        .perform(click())

    // Verify that we have really clicked on the icon by
    // checking the TextView content.
    onView(withId(R.id.text_action_bar_result))
        .check(matches(withText("Key")))
    }
}
Java
public void testActionModeOverflow() {
    // Show the contextual action bar.
    onView(withId(R.id.show_contextual_action_bar))
        .perform(click());

    // Open the overflow menu from contextual action mode.
    openContextualActionModeOverflowMenu();

    // Click on the item.
    onView(withText("Key"))
        .perform(click());

    // Verify that we have really clicked on the icon by
    // checking the TextView content.
    onView(withId(R.id.text_action_bar_result))
        .check(matches(withText("Key")));
    }
}
これらのサンプルの完全なコードについては、
GitHub の ActionBarTest.java サンプル
ビューが表示されない場合のアサーション
一連のアクションを実行したら、そのデータを
状態を定義します。場合によっては否定的なこともあります。
なんらかの問題が発生しています。どのハムクレストビューでも
ViewAssertion を使って ViewAssertions.matches() を使用します。
以下の例では、isDisplayed() マッチャーを取得し、
次のように、標準の not() マッチャーを使用します。
Kotlin
import androidx.test.espresso.Espresso.onView
import androidx.test.espresso.assertion.ViewAssertions.matches
import androidx.test.espresso.matcher.ViewMatchers.isDisplayed
import androidx.test.espresso.matcher.ViewMatchers.withId
import org.hamcrest.Matchers.not

onView(withId(R.id.bottom_left))
    .check(matches(not(isDisplayed())))
Java
import static androidx.test.espresso.Espresso.onView;
import static androidx.test.espresso.assertion.ViewAssertions.matches;
import static androidx.test.espresso.matcher.ViewMatchers.isDisplayed;
import static androidx.test.espresso.matcher.ViewMatchers.withId;
import static org.hamcrest.Matchers.not;

onView(withId(R.id.bottom_left))
    .check(matches(not(isDisplayed())));
ビューがビュー階層に存在している限り、この方法でうまくいきます。もし
そうでない場合は、NoMatchingViewException が返されるため、使用する必要があります。
ViewAssertions.doesNotExist()。
ビューが存在しない場合のアサーション
ビューがビュー階層から削除された場合。これは、なんらかの理由で
別のアクティビティに移行する場合は、
ViewAssertions.doesNotExist():
Kotlin
import androidx.test.espresso.Espresso.onView
import androidx.test.espresso.assertion.ViewAssertions.doesNotExist
import androidx.test.espresso.matcher.ViewMatchers.withId

onView(withId(R.id.bottom_left))
    .check(doesNotExist())
Java
import static androidx.test.espresso.Espresso.onView;
import static androidx.test.espresso.assertion.ViewAssertions.doesNotExist;
import static androidx.test.espresso.matcher.ViewMatchers.withId;

onView(withId(R.id.bottom_left))
    .check(doesNotExist());
アダプターにデータ項目がない場合のアサーション
特定のデータアイテムが AdapterView 内にないことを証明する必要があります。
少し違って見えるかもしれません関心がある AdapterView を見つける必要があります
保持しているデータを詳しく調べることができます。onData() を使用する必要はありません。
代わりに、onView() を使用して AdapterView を見つけ、別のものを使用します。
ビュー内のデータを操作できます
まず、次のようにしてマッチャーを準備します。
Kotlin
private fun withAdaptedData(dataMatcher: Matcher<Any>): Matcher<View> {
    return object : TypeSafeMatcher<View>() {

        override fun describeTo(description: Description) {
            description.appendText("with class name: ")
            dataMatcher.describeTo(description)
        }

        public override fun matchesSafely(view: View) : Boolean {
            if (view !is AdapterView<*>) {
                return false
            }

            val adapter = view.adapter
            for (i in 0 until adapter.count) {
                if (dataMatcher.matches(adapter.getItem(i))) {
                    return true
                }
            }

            return false
        }
    }
}
Java
private static Matcher<View> withAdaptedData(final Matcher<Object> dataMatcher) {
    return new TypeSafeMatcher<View>() {

        @Override
        public void describeTo(Description description) {
            description.appendText("with class name: ");
            dataMatcher.describeTo(description);
        }

        @Override
        public boolean matchesSafely(View view) {
            if (!(view instanceof AdapterView)) {
                return false;
            }

            @SuppressWarnings("rawtypes")
            Adapter adapter = ((AdapterView) view).getAdapter();
            for (int i = 0; i < adapter.getCount(); i++) {
                if (dataMatcher.matches(adapter.getItem(i))) {
                    return true;
                }
            }

            return false;
        }
    };
}
次に必要なのは、onView() を使用して AdapterView を見つけることです。
Kotlin
fun testDataItemNotInAdapter() {
    onView(withId(R.id.list))
          .check(matches(not(withAdaptedData(withItemContent("item: 168")))))
    }
}
Java
@SuppressWarnings("unchecked")
public void testDataItemNotInAdapter() {
    onView(withId(R.id.list))
          .check(matches(not(withAdaptedData(withItemContent("item: 168")))));
    }
}
また、item が「item: 168」に等しい場合に失敗するアサーションもあります。 ID リストを持つアダプター ビューに存在する。
完全なサンプルについては、testDataItemNotInAdapter()
AdapterViewTest.java
クラスをご覧ください。
カスタム障害ハンドラの使用
Espresso のデフォルトの FailureHandler をカスタムに置き換えると、以下のことが可能になります。
追加または異なるエラー処理(例: スクリーンショットの撮影や
追加のデバッグ情報を表示できます。
CustomFailureHandlerTest の例は、カスタム イメージを実装する方法を示しています。
失敗ハンドラ:
Kotlin
private class CustomFailureHandler(targetContext: Context) : FailureHandler {
    private val delegate: FailureHandler

    init {
        delegate = DefaultFailureHandler(targetContext)
    }

    override fun handle(error: Throwable, viewMatcher: Matcher<View>) {
        try {
            delegate.handle(error, viewMatcher)
        } catch (e: NoMatchingViewException) {
            throw MySpecialException(e)
        }

    }
}
Java
private static class CustomFailureHandler implements FailureHandler {
    private final FailureHandler delegate;

    public CustomFailureHandler(Context targetContext) {
        delegate = new DefaultFailureHandler(targetContext);
    }

    @Override
    public void handle(Throwable error, Matcher<View> viewMatcher) {
        try {
            delegate.handle(error, viewMatcher);
        } catch (NoMatchingViewException e) {
            throw new MySpecialException(e);
        }
    }
}
この失敗ハンドラは、代わりに MySpecialException をスローします。
NoMatchingViewException を実行し、他のすべての障害を
DefaultFailureHandler。CustomFailureHandler は次のサービスで登録できます。
テストの setUp() メソッド内の Espresso:
Kotlin
@Throws(Exception::class)
override fun setUp() {
    super.setUp()
    getActivity()
    setFailureHandler(CustomFailureHandler(
            ApplicationProvider.getApplicationContext<Context>()))
}
Java
@Override
public void setUp() throws Exception {
    super.setUp();
    getActivity();
    setFailureHandler(new CustomFailureHandler(
            ApplicationProvider.getApplicationContext()));
}
詳しくは、
FailureHandler
インターフェースと
Espresso.setFailureHandler()。
デフォルト以外のウィンドウを対象に指定する
Android では複数のウィンドウがサポートされます。通常、この情報はユーザーが認識することはありません
表示されても、状況によっては複数のウィンドウが表示される場合があります。
予測入力ウィンドウがメインのアプリケーション ウィンドウの上に描画されるときのように、
検索できます。簡便化のため、Espresso のデフォルトではヒューリスティックを使用して
操作しようとしている Window を推測します。このヒューリスティックは、
常に十分です。ただしまれに、Google のサーバーからの
インタラクションのターゲットを設定しますこれを行うには、独自のルート ウィンドウを指定します。
Root マッチャーのいずれかを使用します。
Kotlin
onView(withText("South China Sea"))
    .inRoot(withDecorView(not(`is`(getActivity().getWindow().getDecorView()))))
    .perform(click())
Java
onView(withText("South China Sea"))
    .inRoot(withDecorView(not(is(getActivity().getWindow().getDecorView()))))
    .perform(click());
Chronicle の
ViewMatchers
あらかじめ用意されている
RootMatchers。
もちろん、独自の Matcher オブジェクトを実装することも可能です。
詳細については、MultipleWindowTest ツール サンプル ご覧ください。
リストビュー内のヘッダーまたはフッターのマッチング
ヘッダーとフッターは ListViews にaddHeaderView() と
addFooterView() メソッド。Espresso.onData() がどのデータ オブジェクトを認識するか
2 番目のパラメータとしてプリセット データ オブジェクト値を渡すようにしてください。
addHeaderView() と addFooterView() にマッピング。例:
Kotlin
const val FOOTER = "FOOTER"
...
val footerView = layoutInflater.inflate(R.layout.list_item, listView, false)
footerView.findViewById<TextView>(R.id.item_content).text = "count:"
footerView.findViewById<TextView>(R.id.item_size).text
        = data.size.toString
listView.addFooterView(footerView, FOOTER, true)
Java
public static final String FOOTER = "FOOTER";
...
View footerView = layoutInflater.inflate(R.layout.list_item, listView, false);
footerView.findViewById<TextView>(R.id.item_content).setText("count:");
footerView.findViewById<TextView>(R.id.item_size).setText(String.valueOf(data.size()));
listView.addFooterView(footerView, FOOTER, true);
その後、次のようにしてフッターのマッチャーを作成します。
Kotlin
import org.hamcrest.Matchers.allOf
import org.hamcrest.Matchers.instanceOf
import org.hamcrest.Matchers.`is`

fun isFooter(): Matcher<Any> {
    return allOf(`is`(instanceOf(String::class.java)),
            `is`(LongListActivity.FOOTER))
}
Java
import static org.hamcrest.Matchers.allOf;
import static org.hamcrest.Matchers.instanceOf;
import static org.hamcrest.Matchers.is;

@SuppressWarnings("unchecked")
public static Matcher<Object> isFooter() {
    return allOf(is(instanceOf(String.class)), is(LongListActivity.FOOTER));
}
また、テストでのビューの読み込みは次のように簡単に行えます。
Kotlin
import androidx.test.espresso.Espresso.onData
import androidx.test.espresso.action.ViewActions.click
import androidx.test.espresso.sample.LongListMatchers.isFooter

fun testClickFooter() {
    onData(isFooter())
        .perform(click())

    // ...
}
Java
import static androidx.test.espresso.Espresso.onData;
import static androidx.test.espresso.action.ViewActions.click;
import static androidx.test.espresso.sample.LongListMatchers.isFooter;

public void testClickFooter() {
    onData(isFooter())
        .perform(click());

    // ...
}
コードサンプルの全文は、次の testClickFooter() メソッドにあります。
AdapterViewTest.java
ご覧ください。