
Tài liệu này mô tả cách thiết lập nhiều quy trình kiểm thử Espresso phổ biến.
Khớp một chế độ xem với một chế độ xem khác
Bố cục có thể chứa một số khung hiển thị không phải là duy nhất. Cho
ví dụ: nút cuộc gọi lặp lại trong bảng liên hệ có thể có cùng
R.id, chứa cùng văn bản và có cùng thuộc tính với lệnh gọi khác
trong hệ phân cấp khung hiển thị.
Ví dụ: trong hoạt động này, thành phần hiển thị có văn bản "7" lặp lại trên nhiều
hàng:
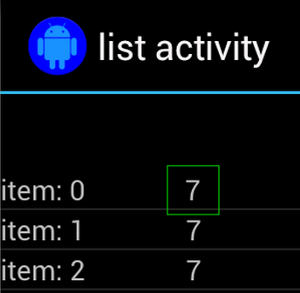
Thông thường, chế độ xem không phải duy nhất sẽ đi kèm với một số nhãn duy nhất được
bên cạnh số điện thoại đó, chẳng hạn như tên của người liên hệ cạnh nút gọi. Trong trường hợp này,
bạn có thể sử dụng trình so khớp hasSibling() để thu hẹp lựa chọn của mình:
Kotlin
onView(allOf(withText("7"), hasSibling(withText("item: 0"))))
    .perform(click())
Java
onView(allOf(withText("7"), hasSibling(withText("item: 0"))))
    .perform(click());
Khớp với một thành phần hiển thị nằm bên trong thanh thao tác
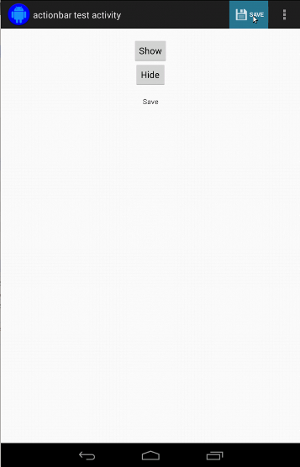
ActionBarTestActivity có hai thanh thao tác khác nhau: một thanh thao tác chuẩn
thanh tác vụ và thanh tác vụ theo ngữ cảnh được tạo từ trình đơn tuỳ chọn. Cả hai
thanh hành động có một mục luôn hiển thị và hai mục chỉ
hiển thị trong trình đơn mục bổ sung. Khi người dùng nhấp vào một mục, Chế độ xem văn bản sẽ thay đổi thành
nội dung của mục được nhấp vào.
Việc so khớp các biểu tượng hiển thị trên cả hai thanh thao tác rất đơn giản, như minh hoạ trong đoạn mã sau:
Kotlin
fun testClickActionBarItem() {
    // We make sure the contextual action bar is hidden.
    onView(withId(R.id.hide_contextual_action_bar))
        .perform(click())

    // Click on the icon - we can find it by the r.Id.
    onView(withId(R.id.action_save))
        .perform(click())

    // Verify that we have really clicked on the icon
    // by checking the TextView content.
    onView(withId(R.id.text_action_bar_result))
        .check(matches(withText("Save")))
}
Java
public void testClickActionBarItem() {
    // We make sure the contextual action bar is hidden.
    onView(withId(R.id.hide_contextual_action_bar))
        .perform(click());

    // Click on the icon - we can find it by the r.Id.
    onView(withId(R.id.action_save))
        .perform(click());

    // Verify that we have really clicked on the icon
    // by checking the TextView content.
    onView(withId(R.id.text_action_bar_result))
        .check(matches(withText("Save")));
}
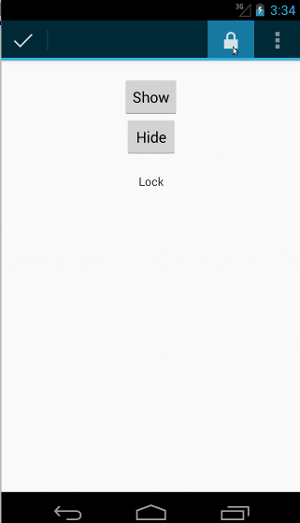
Mã này trông giống hệt với thanh thao tác theo ngữ cảnh:
Kotlin
fun testClickActionModeItem() {
    // Make sure we show the contextual action bar.
    onView(withId(R.id.show_contextual_action_bar))
        .perform(click())

    // Click on the icon.
    onView((withId(R.id.action_lock)))
        .perform(click())

    // Verify that we have really clicked on the icon
    // by checking the TextView content.
    onView(withId(R.id.text_action_bar_result))
        .check(matches(withText("Lock")))
}
Java
public void testClickActionModeItem() {
    // Make sure we show the contextual action bar.
    onView(withId(R.id.show_contextual_action_bar))
        .perform(click());

    // Click on the icon.
    onView((withId(R.id.action_lock)))
        .perform(click());

    // Verify that we have really clicked on the icon
    // by checking the TextView content.
    onView(withId(R.id.text_action_bar_result))
        .check(matches(withText("Lock")));
}
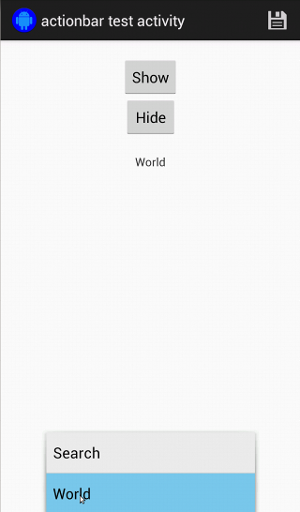
Thao tác nhấp vào các mục trong trình đơn mục bổ sung sẽ phức tạp hơn một chút đối với thao tác thông thường vì một số thiết bị có nút trình đơn mục bổ sung phần cứng, nút này mở ra tràn các mục trong trình đơn tuỳ chọn và một số thiết bị bị tràn phần mềm nút này sẽ mở một trình đơn mục bổ sung thông thường. Thật may là Espresso xử lý các cho chúng tôi.
Đối với thanh thao tác thông thường:
Kotlin
fun testActionBarOverflow() {
    // Make sure we hide the contextual action bar.
    onView(withId(R.id.hide_contextual_action_bar))
        .perform(click())

    // Open the options menu OR open the overflow menu, depending on whether
    // the device has a hardware or software overflow menu button.
    openActionBarOverflowOrOptionsMenu(
            ApplicationProvider.getApplicationContext<Context>())

    // Click the item.
    onView(withText("World"))
        .perform(click())

    // Verify that we have really clicked on the icon by checking
    // the TextView content.
    onView(withId(R.id.text_action_bar_result))
        .check(matches(withText("World")))
}
Java
public void testActionBarOverflow() {
    // Make sure we hide the contextual action bar.
    onView(withId(R.id.hide_contextual_action_bar))
        .perform(click());

    // Open the options menu OR open the overflow menu, depending on whether
    // the device has a hardware or software overflow menu button.
    openActionBarOverflowOrOptionsMenu(
            ApplicationProvider.getApplicationContext());

    // Click the item.
    onView(withText("World"))
        .perform(click());

    // Verify that we have really clicked on the icon by checking
    // the TextView content.
    onView(withId(R.id.text_action_bar_result))
        .check(matches(withText("World")));
}
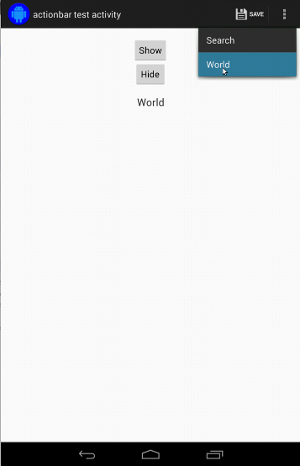
Đây là giao diện của định dạng này trên các thiết bị có nút trình đơn mục bổ sung phần cứng:
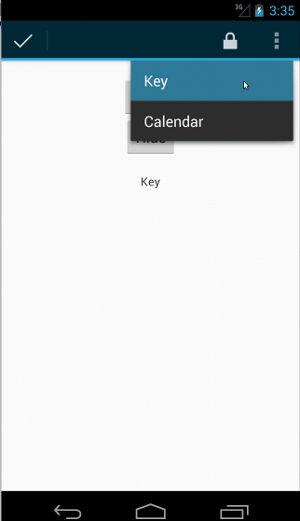
Đối với thanh tác vụ theo ngữ cảnh, việc này thực sự dễ dàng một lần nữa:
Kotlin
fun testActionModeOverflow() {
    // Show the contextual action bar.
    onView(withId(R.id.show_contextual_action_bar))
        .perform(click())

    // Open the overflow menu from contextual action mode.
    openContextualActionModeOverflowMenu()

    // Click on the item.
    onView(withText("Key"))
        .perform(click())

    // Verify that we have really clicked on the icon by
    // checking the TextView content.
    onView(withId(R.id.text_action_bar_result))
        .check(matches(withText("Key")))
    }
}
Java
public void testActionModeOverflow() {
    // Show the contextual action bar.
    onView(withId(R.id.show_contextual_action_bar))
        .perform(click());

    // Open the overflow menu from contextual action mode.
    openContextualActionModeOverflowMenu();

    // Click on the item.
    onView(withText("Key"))
        .perform(click());

    // Verify that we have really clicked on the icon by
    // checking the TextView content.
    onView(withId(R.id.text_action_bar_result))
        .check(matches(withText("Key")));
    }
}
Để xem mã đầy đủ cho các mẫu này, hãy xem
Mẫu ActionBarTest.java trên GitHub.
Xác nhận rằng một khung hiển thị không xuất hiện
Sau khi thực hiện một loạt hành động, chắc chắn bạn sẽ muốn xác nhận
trạng thái của giao diện người dùng đang được kiểm thử. Đôi khi, đây có thể là một trường hợp tiêu cực, chẳng hạn như khi
điều gì đó đang không xảy ra. Xin lưu ý rằng bạn có thể bật bất kỳ chế độ xem hamcrest nào
trình so khớp vào ViewAssertion bằng cách sử dụng ViewAssertions.matches().
Trong ví dụ bên dưới, chúng ta sử dụng trình so khớp isDisplayed() và đảo ngược nó bằng cách sử dụng
trình so khớp not() chuẩn:
Kotlin
import androidx.test.espresso.Espresso.onView
import androidx.test.espresso.assertion.ViewAssertions.matches
import androidx.test.espresso.matcher.ViewMatchers.isDisplayed
import androidx.test.espresso.matcher.ViewMatchers.withId
import org.hamcrest.Matchers.not

onView(withId(R.id.bottom_left))
    .check(matches(not(isDisplayed())))
Java
import static androidx.test.espresso.Espresso.onView;
import static androidx.test.espresso.assertion.ViewAssertions.matches;
import static androidx.test.espresso.matcher.ViewMatchers.isDisplayed;
import static androidx.test.espresso.matcher.ViewMatchers.withId;
import static org.hamcrest.Matchers.not;

onView(withId(R.id.bottom_left))
    .check(matches(not(isDisplayed())));
Cách tiếp cận trên có tác dụng nếu khung hiển thị vẫn thuộc hệ phân cấp. Nếu có
không, bạn sẽ nhận được một NoMatchingViewException và bạn cần dùng
ViewAssertions.doesNotExist()
Xác nhận rằng không có một khung hiển thị
Nếu khung hiển thị biến mất khỏi hệ phân cấp khung hiển thị – điều này có thể xảy ra khi
đã tạo ra sự chuyển đổi sang một hoạt động khác. Bạn nên sử dụng
ViewAssertions.doesNotExist():
Kotlin
import androidx.test.espresso.Espresso.onView
import androidx.test.espresso.assertion.ViewAssertions.doesNotExist
import androidx.test.espresso.matcher.ViewMatchers.withId

onView(withId(R.id.bottom_left))
    .check(doesNotExist())
Java
import static androidx.test.espresso.Espresso.onView;
import static androidx.test.espresso.assertion.ViewAssertions.doesNotExist;
import static androidx.test.espresso.matcher.ViewMatchers.withId;

onView(withId(R.id.bottom_left))
    .check(doesNotExist());
Xác nhận rằng một mục dữ liệu không có trong bộ chuyển đổi
Để chứng minh một mục dữ liệu cụ thể không nằm trong AdapterView, bạn phải thực hiện
mọi thứ khác một chút. Chúng ta phải tìm AdapterView mà mình quan tâm
và thẩm vấn dữ liệu mà nó nắm giữ. Chúng ta không cần sử dụng onData().
Thay vào đó, chúng ta sẽ sử dụng onView() để tìm AdapterView rồi sử dụng một đối tượng khác
so khớp để làm việc với dữ liệu bên trong khung hiển thị.
Trước tiên là trình so khớp:
Kotlin
private fun withAdaptedData(dataMatcher: Matcher<Any>): Matcher<View> {
    return object : TypeSafeMatcher<View>() {

        override fun describeTo(description: Description) {
            description.appendText("with class name: ")
            dataMatcher.describeTo(description)
        }

        public override fun matchesSafely(view: View) : Boolean {
            if (view !is AdapterView<*>) {
                return false
            }

            val adapter = view.adapter
            for (i in 0 until adapter.count) {
                if (dataMatcher.matches(adapter.getItem(i))) {
                    return true
                }
            }

            return false
        }
    }
}
Java
private static Matcher<View> withAdaptedData(final Matcher<Object> dataMatcher) {
    return new TypeSafeMatcher<View>() {

        @Override
        public void describeTo(Description description) {
            description.appendText("with class name: ");
            dataMatcher.describeTo(description);
        }

        @Override
        public boolean matchesSafely(View view) {
            if (!(view instanceof AdapterView)) {
                return false;
            }

            @SuppressWarnings("rawtypes")
            Adapter adapter = ((AdapterView) view).getAdapter();
            for (int i = 0; i < adapter.getCount(); i++) {
                if (dataMatcher.matches(adapter.getItem(i))) {
                    return true;
                }
            }

            return false;
        }
    };
}
Tiếp theo, chúng ta chỉ cần onView() để tìm AdapterView:
Kotlin
fun testDataItemNotInAdapter() {
    onView(withId(R.id.list))
          .check(matches(not(withAdaptedData(withItemContent("item: 168")))))
    }
}
Java
@SuppressWarnings("unchecked")
public void testDataItemNotInAdapter() {
    onView(withId(R.id.list))
          .check(matches(not(withAdaptedData(withItemContent("item: 168")))));
    }
}
Đồng thời, chúng ta có lời khẳng định sẽ không thành công nếu một mục bằng "item: 168" tồn tại trong chế độ xem bộ chuyển đổi cùng với danh sách mã nhận dạng.
Để xem mẫu đầy đủ, hãy xem phương thức testDataItemNotInAdapter() trong
AdapterViewTest.java
trên GitHub.
Sử dụng trình xử lý lỗi tuỳ chỉnh
Việc thay thế FailureHandler mặc định trong Espresso bằng một tuỳ chỉnh cho phép
xử lý lỗi bổ sung hoặc cách xử lý lỗi khác, chẳng hạn như chụp ảnh màn hình hoặc chuyển tệp
cùng với thông tin gỡ lỗi bổ sung.
Ví dụ về CustomFailureHandlerTest minh hoạ cách triển khai một tuỳ chỉnh
trình xử lý lỗi:
Kotlin
private class CustomFailureHandler(targetContext: Context) : FailureHandler {
    private val delegate: FailureHandler

    init {
        delegate = DefaultFailureHandler(targetContext)
    }

    override fun handle(error: Throwable, viewMatcher: Matcher<View>) {
        try {
            delegate.handle(error, viewMatcher)
        } catch (e: NoMatchingViewException) {
            throw MySpecialException(e)
        }

    }
}
Java
private static class CustomFailureHandler implements FailureHandler {
    private final FailureHandler delegate;

    public CustomFailureHandler(Context targetContext) {
        delegate = new DefaultFailureHandler(targetContext);
    }

    @Override
    public void handle(Throwable error, Matcher<View> viewMatcher) {
        try {
            delegate.handle(error, viewMatcher);
        } catch (NoMatchingViewException e) {
            throw new MySpecialException(e);
        }
    }
}
Trình xử lý lỗi này sẽ gửi một MySpecialException thay vì
NoMatchingViewException và uỷ quyền tất cả lỗi khác cho
DefaultFailureHandler. Bạn có thể đăng ký CustomFailureHandler bằng
Espresso trong phương thức setUp() của kiểm thử:
Kotlin
@Throws(Exception::class)
override fun setUp() {
    super.setUp()
    getActivity()
    setFailureHandler(CustomFailureHandler(
            ApplicationProvider.getApplicationContext<Context>()))
}
Java
@Override
public void setUp() throws Exception {
    super.setUp();
    getActivity();
    setFailureHandler(new CustomFailureHandler(
            ApplicationProvider.getApplicationContext()));
}
Để biết thêm thông tin, hãy xem
FailureHandler
giao diện và
Espresso.setFailureHandler().
Nhắm đến cửa sổ không phải cửa sổ mặc định
Android hỗ trợ nhiều cửa sổ. Thông thường, thông tin này minh bạch đối với người dùng
nhà phát triển ứng dụng, nhưng trong một số trường hợp, nhiều cửa sổ có thể hiển thị, chẳng hạn như
giống như khi một cửa sổ tự động hoàn tất được vẽ trên cửa sổ chính của ứng dụng trong
tiện ích tìm kiếm. Để đơn giản hoá mọi thứ, theo mặc định, Espresso sử dụng phương pháp suy nghiệm để
đoán xem bạn định tương tác với Window nào. Suy nghiệm này gần như
luôn đủ tốt; tuy nhiên, trong một số ít trường hợp, bạn sẽ cần chỉ định cửa sổ
tương tác nên nhắm đến. Bạn có thể thực hiện việc này bằng cách cung cấp cửa sổ gốc của riêng mình
trình so khớp hoặc trình so khớp Root:
Kotlin
onView(withText("South China Sea"))
    .inRoot(withDecorView(not(`is`(getActivity().getWindow().getDecorView()))))
    .perform(click())
Java
onView(withText("South China Sea"))
    .inRoot(withDecorView(not(is(getActivity().getWindow().getDecorView()))))
    .perform(click());
Như trường hợp với
ViewMatchers!
chúng tôi sẽ cung cấp một tập hợp
RootMatchers.
Tất nhiên, bạn luôn có thể triển khai đối tượng Matcher của riêng mình.
Hãy xem hàm MultipleWindowTest mẫu trên GitHub.
Khớp đầu trang hoặc chân trang trong chế độ xem danh sách
Đầu trang và chân trang được thêm vào ListViews bằng addHeaderView() và
addFooterView(). Để đảm bảo Espresso.onData() biết đối tượng dữ liệu nào
để khớp, hãy nhớ truyền một giá trị đối tượng dữ liệu đặt trước làm tham số thứ hai
đến addHeaderView() và addFooterView(). Ví dụ:
Kotlin
const val FOOTER = "FOOTER"
...
val footerView = layoutInflater.inflate(R.layout.list_item, listView, false)
footerView.findViewById<TextView>(R.id.item_content).text = "count:"
footerView.findViewById<TextView>(R.id.item_size).text
        = data.size.toString
listView.addFooterView(footerView, FOOTER, true)
Java
public static final String FOOTER = "FOOTER";
...
View footerView = layoutInflater.inflate(R.layout.list_item, listView, false);
footerView.findViewById<TextView>(R.id.item_content).setText("count:");
footerView.findViewById<TextView>(R.id.item_size).setText(String.valueOf(data.size()));
listView.addFooterView(footerView, FOOTER, true);
Sau đó, bạn có thể viết trình so khớp cho chân trang:
Kotlin
import org.hamcrest.Matchers.allOf
import org.hamcrest.Matchers.instanceOf
import org.hamcrest.Matchers.`is`

fun isFooter(): Matcher<Any> {
    return allOf(`is`(instanceOf(String::class.java)),
            `is`(LongListActivity.FOOTER))
}
Java
import static org.hamcrest.Matchers.allOf;
import static org.hamcrest.Matchers.instanceOf;
import static org.hamcrest.Matchers.is;

@SuppressWarnings("unchecked")
public static Matcher<Object> isFooter() {
    return allOf(is(instanceOf(String.class)), is(LongListActivity.FOOTER));
}
Và việc tải chế độ xem trong kiểm thử là không quan trọng:
Kotlin
import androidx.test.espresso.Espresso.onData
import androidx.test.espresso.action.ViewActions.click
import androidx.test.espresso.sample.LongListMatchers.isFooter

fun testClickFooter() {
    onData(isFooter())
        .perform(click())

    // ...
}
Java
import static androidx.test.espresso.Espresso.onData;
import static androidx.test.espresso.action.ViewActions.click;
import static androidx.test.espresso.sample.LongListMatchers.isFooter;

public void testClickFooter() {
    onData(isFooter())
        .perform(click());

    // ...
}
Hãy xem mã mẫu đầy đủ, được tìm thấy trong phương thức testClickFooter() của
AdapterViewTest.java
trên GitHub.