
AndroidJUnitRunner クラスは、Android デバイス上でインストルメンテーションされた JUnit 4 テストを実行するための JUnit テストランナーです。Espresso、UI Automator、Compose テスト フレームワークを使用している場合も利用できます。
テストランナーは、テスト パッケージとテスト対象のアプリをデバイスに読み込み、テストを実行して、テスト結果をレポートする処理を行います。
このテストランナーは、次のようないくつかの一般的なテストタスクをサポートします。
JUnit テストを作成する
次のコード スニペットは、ChangeTextBehavior クラスの changeText の操作が正常に機能することを検証するために、インストゥルメント化された JUnit 4 テストを作成する方法を示しています。
Kotlin
@RunWith(AndroidJUnit4::class)
@LargeTest // Optional runner annotation
class ChangeTextBehaviorTest {
 val stringToBeTyped = "Espresso"
 // ActivityTestRule accesses context through the runner
 @get:Rule
 val activityRule = ActivityTestRule(MainActivity::class.java)

 @Test fun changeText_sameActivity() {
 // Type text and then press the button.
 onView(withId(R.id.editTextUserInput))
 .perform(typeText(stringToBeTyped), closeSoftKeyboard())
 onView(withId(R.id.changeTextBt)).perform(click())

 // Check that the text was changed.
 onView(withId(R.id.textToBeChanged))
 .check(matches(withText(stringToBeTyped)))
 }
}
Java
@RunWith(AndroidJUnit4.class)
@LargeTest // Optional runner annotation
public class ChangeTextBehaviorTest {

    private static final String stringToBeTyped = "Espresso";

    @Rule
    public ActivityTestRule<MainActivity>; activityRule =
            new ActivityTestRule<>;(MainActivity.class);

    @Test
    public void changeText_sameActivity() {
        // Type text and then press the button.
        onView(withId(R.id.editTextUserInput))
                .perform(typeText(stringToBeTyped), closeSoftKeyboard());
        onView(withId(R.id.changeTextBt)).perform(click());

        // Check that the text was changed.
        onView(withId(R.id.textToBeChanged))
                .check(matches(withText(stringToBeTyped)));
    }
}
アプリケーションのコンテキストにアクセスする
AndroidJUnitRunner を使用してテストを実行する場合は、静的 ApplicationProvider.getApplicationContext() メソッドを呼び出して、テスト対象のアプリのコンテキストにアクセスできます。アプリで Application のカスタム サブクラスを作成した場合、このメソッドによりカスタム サブクラスのコンテキストが返されます。
ツールを実装していれば、InstrumentationRegistry クラスを使用して低レベルのテスト API が利用できます。このクラスには、Instrumentation オブジェクト、ターゲット アプリの Context オブジェクト、テストアプリの Context オブジェクト、テストに渡されたコマンドライン引数が含まれています。
テストをフィルタリングする
JUnit 4.x テストでは、アノテーションを使用して実行するテストを構成できます。この機能により、テストに追加する必要があるボイラープレート コードと条件付きコードを最小限に抑えられます。JUnit 4 でサポートされている標準のアノテーションに加えて、テストランナーは次のような Android 固有のアノテーションもサポートします。
@RequiresDevice: エミュレータではなく物理デバイスでのみテストを実行するように指定します。@SdkSuppress: 指定したレベルより低いレベルで Android API を実行するテストを制限します。たとえば、23 未満の API レベルでのテストを制限するには、@SDKSuppress(minSdkVersion=23)アノテーションを使用します。@SmallTest、@MediumTest、@LargeTest: テストの実行時間を指定します。結果的に、テストの実行頻度も指定されます。このアノテーションを使用して、実行するテストをフィルタし、android.testInstrumentationRunnerArguments.sizeプロパティを設定できます。
-Pandroid.testInstrumentationRunnerArguments.size=small
テストをシャーディングする
テストの実行を並列化し、複数のサーバー間で共有して実行速度を上げたい場合は、テストをグループ(シャード)に分割できます。テストランナーは 1 つのテストを複数のシャードに分割できるので、同じシャードに属するテストを 1 つのグループとして簡単に実行できます。各シャードはインデックス番号で識別されます。テストを実行する際は、作成するシャードの数を -e numShards オプションで指定し、どのシャードを実行するかを -e shardIndex オプションで指定します。
たとえば、テストスイートを 10 個のシャードに分割して、2 番目のシャードにグループ化されたテストだけを実行したい場合は、次の adb コマンドを使用します。
adb shell am instrument -w -e numShards 10 -e shardIndex 2
Android Test Orchestrator を使用する
Android Test Orchestrator を使用すると、アプリのテストをそれぞれが呼び出した Instrumentation 内で実行できます。AndroidJUnitRunner バージョン 1.0 以上を使用する場合は、Android Test Orchestrator を利用できます。
Android Test Orchestrator を使用すると、テスト環境で以下のメリットが得られます。
- 共有される状態を最小限に抑えます。各テストは独自の
Instrumentationインスタンスで実行されます。したがって、複数のテストでアプリの状態が共有される場合、テストの終了後に、共有された状態のほとんどがデバイスの CPU やメモリから削除されます。テスト後に、デバイスの CPU およびメモリで共有された状態をすべて削除するには、clearPackageDataフラグを使用します。例については、Gradle から有効にするをご覧ください。 - クラッシュが分離される: 1 つのテストがクラッシュしても、そのテストの
Instrumentationインスタンスのみが停止します。つまり、スイートの他のテストは引き続き実行され、完全なテスト結果が得られます。
この分離により、Android Test Orchestrator が各テストの後にアプリケーションを再起動するため、テスト実行時間が長くなる可能性があります。
Android Test Orchestrator は Android Studio と Firebase Test Lab の両方にプリインストールされていますが、Android Studio で機能を有効にする必要があります。
Gradle から有効にする
Gradle コマンドライン ツールを使用して Android Test Orchestrator を有効にするには、次の手順を完了します。
- ステップ 1: Gradle ファイルを変更します。プロジェクトの
build.gradleファイルに次のステートメントを追加します。
android {
 defaultConfig {
  ...
  testInstrumentationRunner "androidx.test.runner.AndroidJUnitRunner"

  // The following argument makes the Android Test Orchestrator run its
  // "pm clear" command after each test invocation. This command ensures
  // that the app's state is completely cleared between tests.
  testInstrumentationRunnerArguments clearPackageData: 'true'
 }

 testOptions {
  execution 'ANDROIDX_TEST_ORCHESTRATOR'
 }
}

dependencies {
 androidTestImplementation 'androidx.test:runner:1.1.0'
 androidTestUtil 'androidx.test:orchestrator:1.1.0'
}
- ステップ 2: 次のコマンドを実行して、Android Test Orchestrator を実行します。
./gradlew connectedCheck
Android Studio から有効にする
Android Studio で Android Test Orchestrator を有効にするには、Gradle から有効にするで示されているステートメントをアプリの build.gradle ファイルに追加します。
コマンドラインから有効にする
コマンドラインで Android Test Orchestrator を使用するには、ターミナル ウィンドウで以下のコマンドを実行します。
DEVICE_API_LEVEL=$(adb shell getprop ro.build.version.sdk)

FORCE_QUERYABLE_OPTION=""
if [[ $DEVICE_API_LEVEL -ge 30 ]]; then
   FORCE_QUERYABLE_OPTION="--force-queryable"
fi

# uninstall old versions
adb uninstall androidx.test.services
adb uninstall androidx.test.orchestrator

# Install the test orchestrator.
adb install $FORCE_QUERYABLE_OPTION -r path/to/m2repository/androidx/test/orchestrator/1.4.2/orchestrator-1.4.2.apk

# Install test services.
adb install $FORCE_QUERYABLE_OPTION -r path/to/m2repository/androidx/test/services/test-services/1.4.2/test-services-1.4.2.apk

# Replace "com.example.test" with the name of the package containing your tests.
# Add "-e clearPackageData true" to clear your app's data in between runs.
adb shell 'CLASSPATH=$(pm path androidx.test.services) app_process / \
 androidx.test.services.shellexecutor.ShellMain am instrument -w -e \
 targetInstrumentation com.example.test/androidx.test.runner.AndroidJUnitRunner \
 androidx.test.orchestrator/.AndroidTestOrchestrator'
コマンド構文が示しているように、Android Test Orchestrator をインストールした後、直接使用します。
adb shell pm list instrumentation
異なる toolchain を使用する
別のツールチェーンを使用してアプリをテストする場合でも、次の手順に従えば Android Test Orchestrator を使用できます。
アーキテクチャ
Orchestrator サービス APK は、テスト APK とテスト対象アプリの APK とは別のプロセスに格納されます。
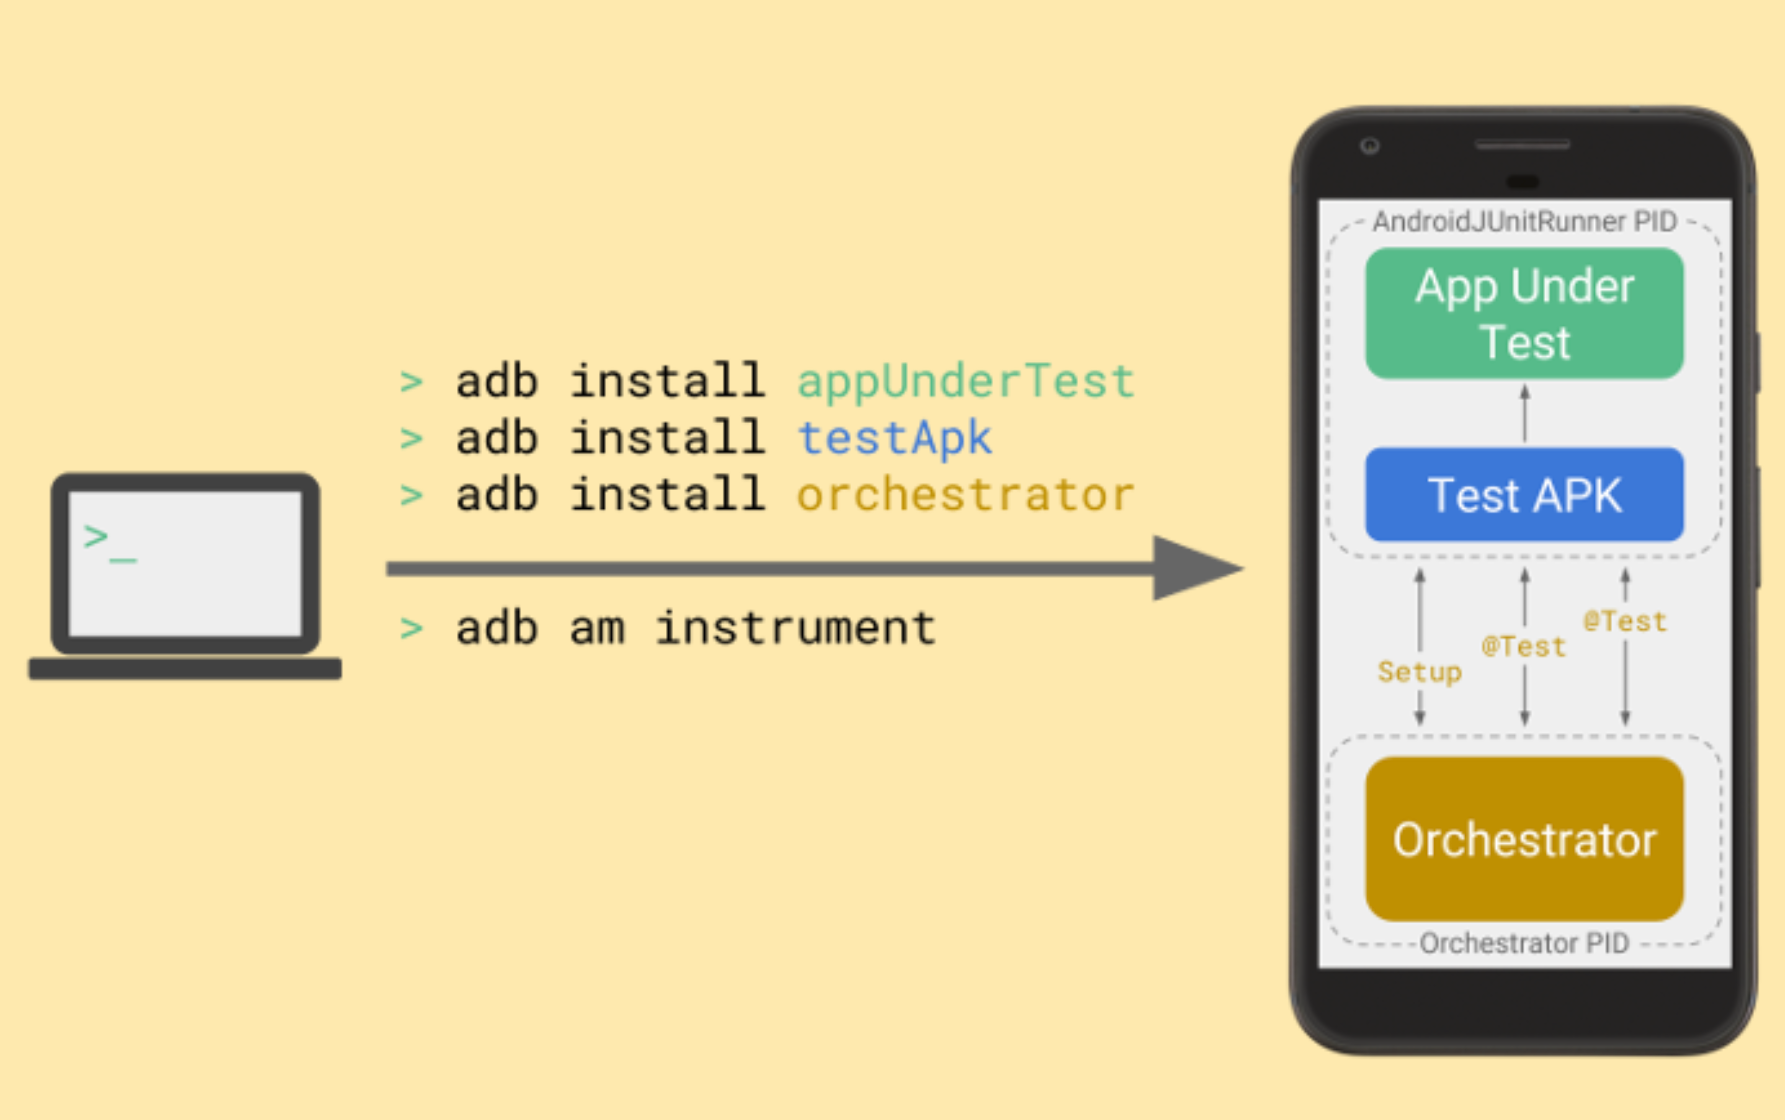
Android Test Orchestrator は、テストスイートの実行の開始時に JUnit テストを収集しますが、テストごとに固有の Instrumentation インスタンスを実行します。
詳細
AndroidJUnitRunner の使用方法の詳細については、API リファレンスをご覧ください。
参考情報
AndroidJUnitRunner の使用について詳しくは、次のリソースをご覧ください。
サンプル
- AndroidJunitRunnerSample: テスト アノテーション、パラメータ化されたテスト、テストスイートの作成方法を示します。