
Lưu ý: Trang này đề cập đến gói Camera2. Trừ phi ứng dụng của bạn yêu cầu các tính năng cụ thể ở cấp độ thấp từ Camera2, bạn nên sử dụng CameraX. Cả CameraX và Camera2 đều hỗ trợ Android 5.0 (API cấp 21) trở lên.
Tính năng nhiều camera được ra mắt trên Android 9 (API cấp 28). Kể từ khi phát hành, đã ra mắt trên thị trường có hỗ trợ API này. Nhiều trường hợp sử dụng nhiều camera được kết hợp chặt chẽ với một cấu hình phần cứng cụ thể. Nói cách khác, không tất cả các trường hợp sử dụng đều tương thích với mọi thiết bị, điều này giúp mô tả ứng viên phù hợp cho Tính năng của Play Phân phối.
Sau đây là một số trường hợp sử dụng thường gặp:
- Thu phóng: chuyển đổi giữa các máy ảnh theo vùng bị cắt hoặc tiêu điểm mong muốn thời lượng.
- Độ sâu: sử dụng nhiều máy ảnh để tạo bản đồ độ sâu.
- Bokeh: sử dụng thông tin chiều sâu suy luận để mô phỏng ống kính hẹp giống như DSLR phạm vi lấy nét.
Sự khác biệt giữa camera logic và camera thực
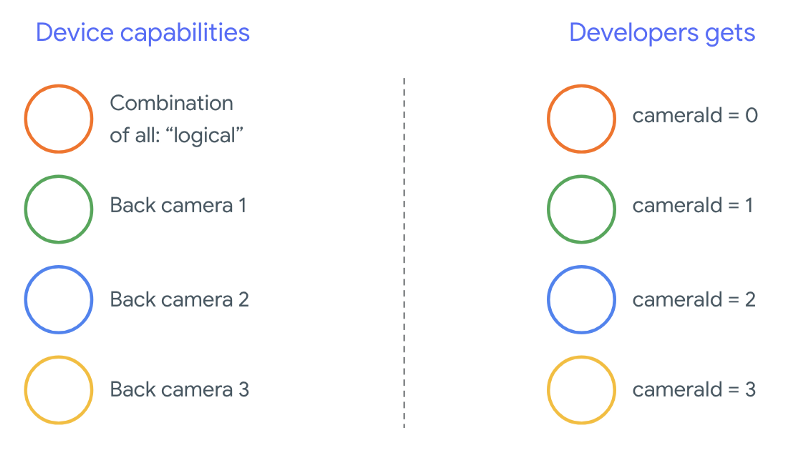
Để hiểu về API nhiều camera, bạn cần hiểu sự khác biệt giữa camera logic và camera thực. Để tham khảo, hãy xem xét một thiết bị có 3 camera mặt sau. Trong ví dụ này, mỗi camera sau được coi là camera vật lý. Tiếp đến, camera logic là một nhóm gồm hai hoặc nhiều của những máy ảnh thực đó. Đầu ra của thuộc tính logic camera có thể là một luồng xuất phát từ một trong các camera thực bên dưới, hoặc một luồng kết hợp phát ra từ nhiều camera thực bên dưới đồng thời. Dù bằng cách nào thì luồng cũng do Phần cứng máy ảnh xử lý Lớp trừu tượng (HAL).
Nhiều nhà sản xuất điện thoại phát triển các ứng dụng máy ảnh của bên thứ nhất, các ứng dụng này thường được cài đặt sẵn trên thiết bị của họ. Để sử dụng tất cả các tính năng của phần cứng, họ có thể dùng các API riêng tư/bị ẩn hoặc được đối xử đặc biệt từ quá trình triển khai trình điều khiển mà các ứng dụng khác không có quyền truy cập vào. Hơi nhiều các thiết bị triển khai khái niệm camera logic bằng cách cung cấp luồng kết hợp khung hình từ các máy ảnh vật lý khác nhau nhưng chỉ với một số máy ảnh có đặc quyền . Thông thường, chỉ một trong các camera thực tiếp xúc với khung. Tình hình của các nhà phát triển bên thứ ba trước Android 9 là được minh hoạ trong biểu đồ sau:

Kể từ Android 9, chúng tôi sẽ không cho phép API riêng tư trong các ứng dụng Android nữa. Với việc hỗ trợ nhiều camera trong khung, Android tốt nhất các nhà sản xuất điện thoại nên sử dụng máy ảnh hợp lý đối với tất cả các máy ảnh thực hướng theo cùng một hướng. Sau đây là những gì các nhà phát triển bên thứ ba thường thấy trên thiết bị chạy Android 9 và cao hơn:
Những gì camera logic cung cấp hoàn toàn phụ thuộc vào việc triển khai OEM của HAL của máy ảnh. Ví dụ: một thiết bị như Pixel 3 triển khai logic camera theo cách chọn một trong các camera vật lý dựa trên tiêu cự và vùng cắt được yêu cầu.
API nhiều camera
API mới sẽ thêm các hằng số, lớp và phương thức mới sau đây:
CameraMetadata.REQUEST_AVAILABLE_CAPABILITIES_LOGICAL_MULTI_CAMERACameraCharacteristics.getPhysicalCameraIds()CameraCharacteristics.getAvailablePhysicalCameraRequestKeys()CameraDevice.createCaptureSession(SessionConfiguration config)CameraCharacteritics.LOGICAL_MULTI_CAMERA_SENSOR_SYNC_TYPEOutputConfigurationvàSessionConfiguration
Do các thay đổi đối với Tài liệu định nghĩa về khả năng tương thích (CDD) với Android), API nhiều camera cũng đi kèm với những kỳ vọng nhất định của nhà phát triển. Thiết bị có camera kép tồn tại trước Android 9 nhưng mở nhiều hơn một camera gồm có thử nghiệm và sai sót đồng thời. Trên Android 9 trở lên, có thể dùng tính năng nhiều camera đưa ra một tập hợp các quy tắc để xác định khi nào có thể mở một cặp camera thuộc cùng một camera logic.
Trong hầu hết trường hợp, các thiết bị chạy Android 9 trở lên hiển thị mọi thông tin camera (ngoại trừ có thể là các loại cảm biến ít phổ biến hơn như hồng ngoại) cùng với một camera hợp lý dễ sử dụng hơn. Đối với mỗi tổ hợp sự kiện phát trực tiếp đảm bảo hoạt động, một luồng thuộc về camera logic có thể được thay thế bằng hai luồng từ các camera thực bên dưới.
Phát trực tuyến đồng thời
Sử dụng đồng thời nhiều luồng máy ảnh
đề cập đến các quy tắc dùng nhiều luồng cùng lúc trong một máy ảnh.
Với một bổ sung đáng chú ý, các quy tắc tương tự sẽ áp dụng cho nhiều camera.
CameraMetadata.REQUEST_AVAILABLE_CAPABILITIES_LOGICAL_MULTI_CAMERA
giải thích cách thay thế YUV_420_888 logic hoặc luồng thô bằng hai
luồng vật lý. Tức là có thể thay thế mỗi luồng thuộc loại YUV hoặc RAW bằng
hai luồng có cùng loại và kích thước. Bạn có thể bắt đầu bằng một luồng camera
cấu hình được đảm bảo sau đây dành cho thiết bị chỉ có camera đơn:
- Luồng 1: Loại YUV, kích thước
MAXIMUMtừ máy ảnh logicid = 0
Sau đó, một thiết bị hỗ trợ nhiều camera cho phép bạn tạo một phiên thay thế luồng YUV logic đó bằng hai luồng thực:
- Luồng 1: Loại YUV, kích thước
MAXIMUMtừ máy ảnh thựcid = 1 - Luồng 2: Loại YUV, kích thước
MAXIMUMtừ máy ảnh thựcid = 2
Bạn có thể thay thế một luồng YUV hoặc RAW bằng hai luồng tương đương khi và chỉ khi
hai camera đó là một phần của nhóm camera logic, được liệt kê trong
CameraCharacteristics.getPhysicalCameraIds().
Các đảm bảo mà khuôn khổ này đưa ra chỉ là mức tối thiểu cần thiết để nhận đồng thời khung hình từ nhiều máy ảnh thực. Luồng khác được hỗ trợ trên hầu hết các thiết bị, thậm chí đôi khi cho phép mở nhiều thiết bị các thiết bị camera độc lập. Vì đây không phải là điều đảm bảo chắc chắn để thực hiện điều đó đòi hỏi phải kiểm tra và điều chỉnh trên từng thiết bị bằng cách sử dụng phương pháp thử và sai.
Tạo một phiên có nhiều máy ảnh thực
Khi sử dụng máy ảnh vật lý trên một thiết bị hỗ trợ nhiều máy ảnh, hãy mở một máy ảnh
CameraDevice (máy ảnh logic) và tương tác với máy ảnh này trong một máy ảnh duy nhất
phiên hoạt động. Tạo một phiên hoạt động bằng API
CameraDevice.createCaptureSession(SessionConfiguration config), là
được thêm vào API cấp 28. Cấu hình phiên có một số dữ liệu đầu ra
các cấu hình, mỗi cấu hình có một tập hợp các mục tiêu đầu ra và tuỳ chọn
mã máy ảnh thực mong muốn.
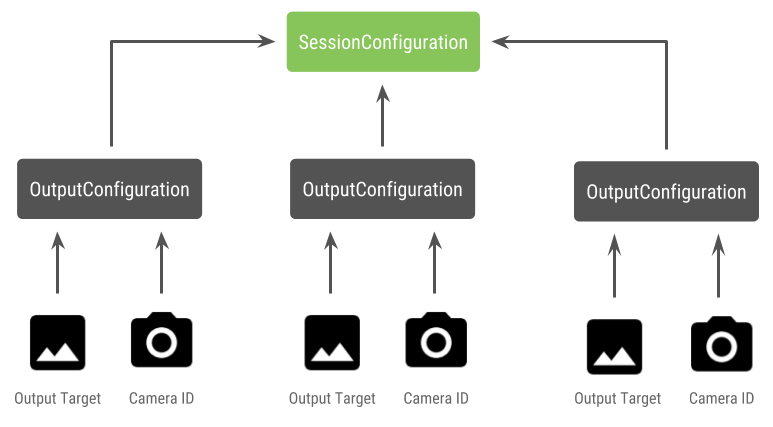
Các yêu cầu chụp có mục tiêu đầu ra được liên kết với chúng. Khung xác định máy ảnh vật lý (hoặc logic) nào mà yêu cầu được gửi đến dựa trên mục tiêu đầu ra nào được đính kèm. Nếu mục tiêu đầu ra tương ứng với một trong các mục tiêu đầu ra được gửi dưới dạng cấu hình đầu ra cùng với camera ID, sau đó camera thực đó sẽ nhận và xử lý yêu cầu.
Sử dụng cặp máy ảnh thực
Một bổ sung khác cho các API máy ảnh cho nhiều máy ảnh là khả năng xác định camera hợp lý và tìm camera thực phía sau chúng. Bạn có thể xác định giúp xác định các cặp camera vật lý tiềm năng mà bạn có thể dùng để thay thế một trong các luồng camera logic:
Kotlin
/** * Helper class used to encapsulate a logical camera and two underlying * physical cameras */ data class DualCamera(val logicalId: String, val physicalId1: String, val physicalId2: String) fun findDualCameras(manager: CameraManager, facing: Int? = null): List{ val dualCameras = MutableList () // Iterate over all the available camera characteristics manager.cameraIdList.map { Pair(manager.getCameraCharacteristics(it), it) }.filter { // Filter by cameras facing the requested direction facing == null || it.first.get(CameraCharacteristics.LENS_FACING) == facing }.filter { // Filter by logical cameras // CameraCharacteristics.REQUEST_AVAILABLE_CAPABILITIES_LOGICAL_MULTI_CAMERA requires API >= 28 it.first.get(CameraCharacteristics.REQUEST_AVAILABLE_CAPABILITIES)!!.contains( CameraCharacteristics.REQUEST_AVAILABLE_CAPABILITIES_LOGICAL_MULTI_CAMERA) }.forEach { // All possible pairs from the list of physical cameras are valid results // NOTE: There could be N physical cameras as part of a logical camera grouping // getPhysicalCameraIds() requires API >= 28 val physicalCameras = it.first.physicalCameraIds.toTypedArray() for (idx1 in 0 until physicalCameras.size) { for (idx2 in (idx1 + 1) until physicalCameras.size) { dualCameras.add(DualCamera( it.second, physicalCameras[idx1], physicalCameras[idx2])) } } } return dualCameras }
Java
/** * Helper class used to encapsulate a logical camera and two underlying * physical cameras */ final class DualCamera { final String logicalId; final String physicalId1; final String physicalId2; DualCamera(String logicalId, String physicalId1, String physicalId2) { this.logicalId = logicalId; this.physicalId1 = physicalId1; this.physicalId2 = physicalId2; } } ListfindDualCameras(CameraManager manager, Integer facing) { List dualCameras = new ArrayList<>(); List cameraIdList; try { cameraIdList = Arrays.asList(manager.getCameraIdList()); } catch (CameraAccessException e) { e.printStackTrace(); cameraIdList = new ArrayList<>(); } // Iterate over all the available camera characteristics cameraIdList.stream() .map(id -> { try { CameraCharacteristics characteristics = manager.getCameraCharacteristics(id); return new Pair<>(characteristics, id); } catch (CameraAccessException e) { e.printStackTrace(); return null; } }) .filter(pair -> { // Filter by cameras facing the requested direction return (pair != null) && (facing == null || pair.first.get(CameraCharacteristics.LENS_FACING).equals(facing)); }) .filter(pair -> { // Filter by logical cameras // CameraCharacteristics.REQUEST_AVAILABLE_CAPABILITIES_LOGICAL_MULTI_CAMERA requires API >= 28 IntPredicate logicalMultiCameraPred = arg -> arg == CameraCharacteristics.REQUEST_AVAILABLE_CAPABILITIES_LOGICAL_MULTI_CAMERA; return Arrays.stream(pair.first.get(CameraCharacteristics.REQUEST_AVAILABLE_CAPABILITIES)) .anyMatch(logicalMultiCameraPred); }) .forEach(pair -> { // All possible pairs from the list of physical cameras are valid results // NOTE: There could be N physical cameras as part of a logical camera grouping // getPhysicalCameraIds() requires API >= 28 String[] physicalCameras = pair.first.getPhysicalCameraIds().toArray(new String[0]); for (int idx1 = 0; idx1 < physicalCameras.length; idx1++) { for (int idx2 = idx1 + 1; idx2 < physicalCameras.length; idx2++) { dualCameras.add( new DualCamera(pair.second, physicalCameras[idx1], physicalCameras[idx2])); } } }); return dualCameras; }
Khả năng xử lý trạng thái của camera thực do camera logic kiểm soát. Người nhận mở "máy ảnh kép" mở camera logic tương ứng với camera:
Kotlin
fun openDualCamera(cameraManager: CameraManager,
                       dualCamera: DualCamera,
        // AsyncTask is deprecated beginning API 30
                       executor: Executor = AsyncTask.SERIAL_EXECUTOR,
                       callback: (CameraDevice) -> Unit) {

        // openCamera() requires API >= 28
        cameraManager.openCamera(
            dualCamera.logicalId, executor, object : CameraDevice.StateCallback() {
                override fun onOpened(device: CameraDevice) = callback(device)
                // Omitting for brevity...
                override fun onError(device: CameraDevice, error: Int) = onDisconnected(device)
                override fun onDisconnected(device: CameraDevice) = device.close()
            })
    }
Java
void openDualCamera(CameraManager cameraManager,
                        DualCamera dualCamera,
                        Executor executor,
                        CameraDeviceCallback cameraDeviceCallback
    ) {

        // openCamera() requires API >= 28
        cameraManager.openCamera(dualCamera.logicalId, executor, new CameraDevice.StateCallback() {
            @Override
            public void onOpened(@NonNull CameraDevice cameraDevice) {
               cameraDeviceCallback.callback(cameraDevice);
            }

            @Override
            public void onDisconnected(@NonNull CameraDevice cameraDevice) {
                cameraDevice.close();
            }

            @Override
            public void onError(@NonNull CameraDevice cameraDevice, int i) {
                onDisconnected(cameraDevice);
            }
        });
    }
Ngoài việc chọn máy ảnh để mở, quy trình này cũng giống như mở camera trong các phiên bản Android trước đây. Tạo phiên chụp bằng API cấu hình phiên yêu cầu khung liên kết một số mục tiêu nhất định với ID camera vật lý cụ thể:
Kotlin
/**
 * Helper type definition that encapsulates 3 sets of output targets:
 *
 *   1. Logical camera
 *   2. First physical camera
 *   3. Second physical camera
 */
typealias DualCameraOutputs =
        Triple<MutableList?, MutableList?, MutableList?>

fun createDualCameraSession(cameraManager: CameraManager,
                            dualCamera: DualCamera,
                            targets: DualCameraOutputs,
                            // AsyncTask is deprecated beginning API 30
                            executor: Executor = AsyncTask.SERIAL_EXECUTOR,
                            callback: (CameraCaptureSession) -> Unit) {

    // Create 3 sets of output configurations: one for the logical camera, and
    // one for each of the physical cameras.
    val outputConfigsLogical = targets.first?.map { OutputConfiguration(it) }
    val outputConfigsPhysical1 = targets.second?.map {
        OutputConfiguration(it).apply { setPhysicalCameraId(dualCamera.physicalId1) } }
    val outputConfigsPhysical2 = targets.third?.map {
        OutputConfiguration(it).apply { setPhysicalCameraId(dualCamera.physicalId2) } }

    // Put all the output configurations into a single flat array
    val outputConfigsAll = arrayOf(
        outputConfigsLogical, outputConfigsPhysical1, outputConfigsPhysical2)
        .filterNotNull().flatMap { it }

    // Instantiate a session configuration that can be used to create a session
    val sessionConfiguration = SessionConfiguration(
        SessionConfiguration.SESSION_REGULAR,
        outputConfigsAll, executor, object : CameraCaptureSession.StateCallback() {
            override fun onConfigured(session: CameraCaptureSession) = callback(session)
            // Omitting for brevity...
            override fun onConfigureFailed(session: CameraCaptureSession) = session.device.close()
        })

    // Open the logical camera using the previously defined function
    openDualCamera(cameraManager, dualCamera, executor = executor) {

        // Finally create the session and return via callback
        it.createCaptureSession(sessionConfiguration)
    }
}
Java
/** * Helper class definition that encapsulates 3 sets of output targets: ** 1. Logical camera * 2. First physical camera * 3. Second physical camera */ final class DualCameraOutputs { private final List
logicalCamera; private final List firstPhysicalCamera; private final List secondPhysicalCamera; public DualCameraOutputs(List logicalCamera, List firstPhysicalCamera, List third) { this.logicalCamera = logicalCamera; this.firstPhysicalCamera = firstPhysicalCamera; this.secondPhysicalCamera = third; } public List getLogicalCamera() { return logicalCamera; } public List getFirstPhysicalCamera() { return firstPhysicalCamera; } public List getSecondPhysicalCamera() { return secondPhysicalCamera; } } interface CameraCaptureSessionCallback { void callback(CameraCaptureSession cameraCaptureSession); } void createDualCameraSession(CameraManager cameraManager, DualCamera dualCamera, DualCameraOutputs targets, Executor executor, CameraCaptureSessionCallback cameraCaptureSessionCallback) { // Create 3 sets of output configurations: one for the logical camera, and // one for each of the physical cameras. List outputConfigsLogical = targets.getLogicalCamera().stream() .map(OutputConfiguration::new) .collect(Collectors.toList()); List outputConfigsPhysical1 = targets.getFirstPhysicalCamera().stream() .map(s -> { OutputConfiguration outputConfiguration = new OutputConfiguration(s); outputConfiguration.setPhysicalCameraId(dualCamera.physicalId1); return outputConfiguration; }) .collect(Collectors.toList()); List outputConfigsPhysical2 = targets.getSecondPhysicalCamera().stream() .map(s -> { OutputConfiguration outputConfiguration = new OutputConfiguration(s); outputConfiguration.setPhysicalCameraId(dualCamera.physicalId2); return outputConfiguration; }) .collect(Collectors.toList()); // Put all the output configurations into a single flat array List outputConfigsAll = Stream.of( outputConfigsLogical, outputConfigsPhysical1, outputConfigsPhysical2 ) .filter(Objects::nonNull) .flatMap(Collection::stream) .collect(Collectors.toList()); // Instantiate a session configuration that can be used to create a session SessionConfiguration sessionConfiguration = new SessionConfiguration( SessionConfiguration.SESSION_REGULAR, outputConfigsAll, executor, new CameraCaptureSession.StateCallback() { @Override public void onConfigured(@NonNull CameraCaptureSession cameraCaptureSession) { cameraCaptureSessionCallback.callback(cameraCaptureSession); } // Omitting for brevity... @Override public void onConfigureFailed(@NonNull CameraCaptureSession cameraCaptureSession) { cameraCaptureSession.getDevice().close(); } }); // Open the logical camera using the previously defined function openDualCamera(cameraManager, dualCamera, executor, (CameraDevice c) -> // Finally create the session and return via callback c.createCaptureSession(sessionConfiguration)); }
Xem
createCaptureSession
để biết thông tin về tổ hợp luồng nào được hỗ trợ. Kết hợp các luồng phát
dành cho nhiều luồng trên một camera logic duy nhất. Khả năng tương thích mở rộng cho
sử dụng cùng một cấu hình và thay thế một trong hai luồng đó bằng hai luồng
từ 2 camera vật lý thuộc cùng một camera logic.
Với phiên quay video sẵn sàng, gửi đi yêu cầu chụp. Một mục tiêu của yêu cầu chụp sẽ nhận dữ liệu từ camera (nếu có) đang được sử dụng hoặc quay lại sử dụng camera hợp lý.
Ví dụ về trường hợp sử dụng Zoom
Bạn có thể sử dụng việc hợp nhất các camera thực thành một luồng duy nhất để người dùng có thể chuyển đổi giữa các máy ảnh vật lý khác nhau để trải nghiệm trường nhìn khác nhau, giúp chụp ảnh "mức độ thu phóng" khác một cách hiệu quả.

Bắt đầu bằng cách chọn cặp camera vật lý để cho phép người dùng chuyển đổi ở giữa. Để có hiệu ứng tối đa, bạn có thể chọn cặp camera cung cấp tiêu cự tối thiểu và tối đa hiện có.
Kotlin
fun findShortLongCameraPair(manager: CameraManager, facing: Int? = null): DualCamera? {

    return findDualCameras(manager, facing).map {
        val characteristics1 = manager.getCameraCharacteristics(it.physicalId1)
        val characteristics2 = manager.getCameraCharacteristics(it.physicalId2)

        // Query the focal lengths advertised by each physical camera
        val focalLengths1 = characteristics1.get(
            CameraCharacteristics.LENS_INFO_AVAILABLE_FOCAL_LENGTHS) ?: floatArrayOf(0F)
        val focalLengths2 = characteristics2.get(
            CameraCharacteristics.LENS_INFO_AVAILABLE_FOCAL_LENGTHS) ?: floatArrayOf(0F)

        // Compute the largest difference between min and max focal lengths between cameras
        val focalLengthsDiff1 = focalLengths2.maxOrNull()!! - focalLengths1.minOrNull()!!
        val focalLengthsDiff2 = focalLengths1.maxOrNull()!! - focalLengths2.minOrNull()!!

        // Return the pair of camera IDs and the difference between min and max focal lengths
        if (focalLengthsDiff1 < focalLengthsDiff2) {
            Pair(DualCamera(it.logicalId, it.physicalId1, it.physicalId2), focalLengthsDiff1)
        } else {
            Pair(DualCamera(it.logicalId, it.physicalId2, it.physicalId1), focalLengthsDiff2)
        }

        // Return only the pair with the largest difference, or null if no pairs are found
    }.maxByOrNull { it.second }?.first
}
Java
// Utility functions to find min/max value in float[]
    float findMax(float[] array) {
        float max = Float.NEGATIVE_INFINITY;
        for(float cur: array)
            max = Math.max(max, cur);
        return max;
    }
    float findMin(float[] array) {
        float min = Float.NEGATIVE_INFINITY;
        for(float cur: array)
            min = Math.min(min, cur);
        return min;
    }

DualCamera findShortLongCameraPair(CameraManager manager, Integer facing) {
        return findDualCameras(manager, facing).stream()
                .map(c -> {
                    CameraCharacteristics characteristics1;
                    CameraCharacteristics characteristics2;
                    try {
                        characteristics1 = manager.getCameraCharacteristics(c.physicalId1);
                        characteristics2 = manager.getCameraCharacteristics(c.physicalId2);
                    } catch (CameraAccessException e) {
                        e.printStackTrace();
                        return null;
                    }

                    // Query the focal lengths advertised by each physical camera
                    float[] focalLengths1 = characteristics1.get(
                            CameraCharacteristics.LENS_INFO_AVAILABLE_FOCAL_LENGTHS);
                    float[] focalLengths2 = characteristics2.get(
                            CameraCharacteristics.LENS_INFO_AVAILABLE_FOCAL_LENGTHS);

                    // Compute the largest difference between min and max focal lengths between cameras
                    Float focalLengthsDiff1 = findMax(focalLengths2) - findMin(focalLengths1);
                    Float focalLengthsDiff2 = findMax(focalLengths1) - findMin(focalLengths2);

                    // Return the pair of camera IDs and the difference between min and max focal lengths
                    if (focalLengthsDiff1 < focalLengthsDiff2) {
                        return new Pair<>(new DualCamera(c.logicalId, c.physicalId1, c.physicalId2), focalLengthsDiff1);
                    } else {
                        return new Pair<>(new DualCamera(c.logicalId, c.physicalId2, c.physicalId1), focalLengthsDiff2);
                    }

                }) // Return only the pair with the largest difference, or null if no pairs are found
                .max(Comparator.comparing(pair -> pair.second)).get().first;
    }
Một cấu trúc hợp lý cho việc này là có hai
SurfaceViews — một mã cho mỗi sự kiện phát trực tiếp.
Những SurfaceViews này được hoán đổi dựa trên tương tác của người dùng để chỉ có một
hiển thị tại bất kỳ thời điểm cụ thể nào.
Mã sau đây cho biết cách mở máy ảnh hợp lý, định cấu hình máy ảnh đầu ra, tạo một phiên máy ảnh và bắt đầu hai luồng xem trước:
Kotlin
val cameraManager: CameraManager = ...

// Get the two output targets from the activity / fragment
val surface1 = ...  // from SurfaceView
val surface2 = ...  // from SurfaceView

val dualCamera = findShortLongCameraPair(manager)!!
val outputTargets = DualCameraOutputs(
    null, mutableListOf(surface1), mutableListOf(surface2))

// Here you open the logical camera, configure the outputs and create a session
createDualCameraSession(manager, dualCamera, targets = outputTargets) { session ->

  // Create a single request which has one target for each physical camera
  // NOTE: Each target receive frames from only its associated physical camera
  val requestTemplate = CameraDevice.TEMPLATE_PREVIEW
  val captureRequest = session.device.createCaptureRequest(requestTemplate).apply {
    arrayOf(surface1, surface2).forEach { addTarget(it) }
  }.build()

  // Set the sticky request for the session and you are done
  session.setRepeatingRequest(captureRequest, null, null)
}
Java
CameraManager manager = ...;

        // Get the two output targets from the activity / fragment
        Surface surface1 = ...;  // from SurfaceView
        Surface surface2 = ...;  // from SurfaceView

        DualCamera dualCamera = findShortLongCameraPair(manager, null);
                DualCameraOutputs outputTargets = new DualCameraOutputs(
                null, Collections.singletonList(surface1), Collections.singletonList(surface2));

        // Here you open the logical camera, configure the outputs and create a session
        createDualCameraSession(manager, dualCamera, outputTargets, null, (session) -> {
            // Create a single request which has one target for each physical camera
            // NOTE: Each target receive frames from only its associated physical camera
            CaptureRequest.Builder captureRequestBuilder;
            try {
                captureRequestBuilder = session.getDevice().createCaptureRequest(CameraDevice.TEMPLATE_PREVIEW);
                Arrays.asList(surface1, surface2).forEach(captureRequestBuilder::addTarget);

                // Set the sticky request for the session and you are done
                session.setRepeatingRequest(captureRequestBuilder.build(), null, null);
            } catch (CameraAccessException e) {
                e.printStackTrace();
            }
        });
Tất cả những gì còn lại là cung cấp giao diện người dùng để người dùng chuyển đổi giữa hai
nền tảng, chẳng hạn như một nút hoặc nhấn đúp vào SurfaceView. Bạn thậm chí có thể
thực hiện một số dạng phân tích cảnh và chuyển đổi giữa hai luồng
tự động.
Biến dạng ống kính
Tất cả các ống kính đều tạo ra một mức độ biến dạng nhất định. Trong Android, bạn có thể truy vấn
biến dạng do ống kính tạo ra
CameraCharacteristics.LENS_DISTORTION!
thay thế cho các thẻ không được dùng nữa
CameraCharacteristics.LENS_RADIAL_DISTORTION.
Đối với camera logic, độ méo hình là rất nhỏ và ứng dụng của bạn có thể sử dụng
số khung hình nhiều hơn hoặc ít hơn
từ máy ảnh. Đối với camera thực,
có khả năng có các cấu hình ống kính rất khác nhau, đặc biệt là trên ống kính rộng
ống kính.
Một số thiết bị có thể triển khai tính năng tự động sửa méo hình thông qua
CaptureRequest.DISTORTION_CORRECTION_MODE.
Tính năng này mặc định bật cho hầu hết các thiết bị.
Kotlin
val cameraSession: CameraCaptureSession = ...

        // Use still capture template to build the capture request
        val captureRequest = cameraSession.device.createCaptureRequest(
            CameraDevice.TEMPLATE_STILL_CAPTURE
        )

        // Determine if this device supports distortion correction
        val characteristics: CameraCharacteristics = ...
        val supportsDistortionCorrection = characteristics.get(
            CameraCharacteristics.DISTORTION_CORRECTION_AVAILABLE_MODES
        )?.contains(
            CameraMetadata.DISTORTION_CORRECTION_MODE_HIGH_QUALITY
        ) ?: false

        if (supportsDistortionCorrection) {
            captureRequest.set(
                CaptureRequest.DISTORTION_CORRECTION_MODE,
                CameraMetadata.DISTORTION_CORRECTION_MODE_HIGH_QUALITY
            )
        }

        // Add output target, set other capture request parameters...

        // Dispatch the capture request
        cameraSession.capture(captureRequest.build(), ...)
Java
CameraCaptureSession cameraSession = ...;

        // Use still capture template to build the capture request
        CaptureRequest.Builder captureRequestBuilder = null;
        try {
            captureRequestBuilder = cameraSession.getDevice().createCaptureRequest(
                    CameraDevice.TEMPLATE_STILL_CAPTURE
            );
        } catch (CameraAccessException e) {
            e.printStackTrace();
        }

        // Determine if this device supports distortion correction
        CameraCharacteristics characteristics = ...;
        boolean supportsDistortionCorrection = Arrays.stream(
                        characteristics.get(
                                CameraCharacteristics.DISTORTION_CORRECTION_AVAILABLE_MODES
                        ))
                .anyMatch(i -> i == CameraMetadata.DISTORTION_CORRECTION_MODE_HIGH_QUALITY);
        if (supportsDistortionCorrection) {
            captureRequestBuilder.set(
                    CaptureRequest.DISTORTION_CORRECTION_MODE,
                    CameraMetadata.DISTORTION_CORRECTION_MODE_HIGH_QUALITY
            );
        }

        // Add output target, set other capture request parameters...

        // Dispatch the capture request
        cameraSession.capture(captureRequestBuilder.build(), ...);
Việc đặt yêu cầu chụp ở chế độ này có thể ảnh hưởng đến tốc độ khung hình mà do máy ảnh tạo ra. Bạn có thể chọn chỉ đặt tính năng chỉnh sửa méo chụp ảnh tĩnh.