השימוש בסוללה של הפרופיל באמצעות הסוללהstats ו'היסטורית הסוללה'
קל לארגן דפים בעזרת אוספים
אפשר לשמור ולסווג תוכן על סמך ההעדפות שלך.
במסמך הזה מוצגים שלבי ההגדרה הבסיסיים ותהליך העבודה של הכלי נכונה ל-Bearstats
והסקריפט של 'היסטוריית הסוללה'. כדי ללמוד איך להשתמש ב'היסטוריית הסוללה':
לבדיקת דפוסי צריכת הסוללה, אפשר לעיין במאמר ניתוח השימוש בסוללה באמצעות סוללה
היסטוריון.
ניצול הסוללה הוא כלי שכלול במסגרת של Android שאוספת נתוני סוללה
במכשיר שלכם. אפשר להשתמש ב-adb כדי להשליך את
שאספו נתוני סוללה למכונת הפיתוח שלך ויוצרים דוח שאפשר
לנתח באמצעות 'היסטוריית סוללה'. התכונה 'היסטוריית סוללה' ממירה את הדוח מ-
נתוני סוללה להדמיה של HTML שניתנת להצגה בדפדפן.
נתונים של 'סוללה' ו'היסטוריית סוללה' שימושיים לצרכים הבאים:
מראה לך איפה ואיך התהליכים שולפים את הסוללה מהסוללה.
לזהות משימות באפליקציה שאפשר לדחות או להסיר כדי לשפר אותן
חיי הסוללה.
התקנת היסטוריית סוללה
אפשר להשתמש ב-Docker כדי להתקין את הגדרת סוללה. להתקנה חלופית
כולל בנייה ממקור,
README ב-
בדף של הפרויקט ב-GitHub. כדי להתקין באמצעות Docker, מבצעים את הפעולות הבאות:
מתקינים את Docker לפי ההוראות
אתר Docker. כלשהו
סוג המינוי ל-subscription עובד,
כולל מינוי אישי בחינם.
כדי לוודא ש-Docker מותקן כראוי, פותחים את שורת הפקודה ו
מזינים את הפקודה הבאה:
docker run hello-world
אם Docker מותקן כראוי, הוא מציג פלט כזה:
Unable to find image 'hello-world:latest' locally
latest: Pulling from library/hello-world
78445dd45222: Pull complete
Digest:
sha256:c5515758d4c5e1e838e9cd307f6c6a0d620b5e07e6f927b07d05f6d12a1ac8d7
Status: Downloaded newer image for hello-world:latest
Hello from Docker!
This message shows that your installation appears to be working correctly.
To generate this message, Docker took the following steps:
1. The Docker client contacted the Docker daemon.
2. The Docker daemon pulled the "hello-world" image from the Docker Hub.
3. The Docker daemon created a new container from that image which runs the
executable that produces the output you are currently reading.
4. The Docker daemon streamed that output to the Docker client, which sent it to your terminal
מפעילים את אפליקציית Docker Desktop – חזית GUI של Docker – לפני
שמריצים את התמונה של היסטוריית הסוללה. הרצת הפקודה הזו מפעילה את ה-Docker
הכלים שלנו. היסטוריית הסוללה תפעל רק אחרי שמבצעים את הפעולה הזו לפחות פעם אחת.
הרצת היסטוריית הסוללה משורת הפקודה כשמריצים אותה בפעם הראשונה
בזמן האימון. אפליקציית Docker Desktop לא מאפשרת לציין את היציאה להפעלת האינטרנט
השרת מופעל. אפשר לעשות את זה רק משורת הפקודה. אבל אחרי
להריץ את הקונטיינר משורת הפקודה, נוצרת רשומה ב-
Docker Desktop, ולאחר מכן אפשר להפעיל אותו באמצעות אותה יציאת Listener
מ-Docker Desktop.
מריצים את קובץ האימג' של 'היסטוריית הסוללה' באמצעות הפקודה הבאה:
docker run -p port_number:9999 gcr.io/android-battery-historian/stable:3.1 --port 9999
התכונה 'היסטוריי סוללה' משתמשת ביציאה שבחרת, כפי שצוין באמצעות
port_number
צריך לעבור אל 'היסטוריית הסוללה' בדפדפן כדי לוודא שהיא פועלת.
הכתובת משתנה בהתאם למערכת ההפעלה שלך:
ב-Linux וב-Mac
השירות 'היסטורית סוללה' של
זמין בשעה
http://localhost:port_number.
ל-Windows
אחרי שמפעילים את Docker, הוא מציין את כתובת ה-IP של המכונה
בשימוש. לדוגמה, אם כתובת ה-IP היא 123.456.78.90, סוללה
היסטוריית הנתונים זמינה בכתובת
http://123.456.78.90:port_number
לאחר מכן מוצג דף ההתחלה של היסטוריית הסוללה, שבו אפשר להעלות וגם
להציג את הנתונים הסטטיסטיים של הסוללה.
איור 1. דף הפתיחה של הסוללה
היסטוריון.
איסוף נתונים באמצעות הסוללהstats
כדי לאסוף נתונים מהמכשיר באמצעות הסוללהstats ולפתוח אותם במצב 'סוללה'
היסטורי, מבצעים את הפעולות הבאות:
מחברים את המכשיר הנייד למחשב.
מחלון טרמינל, משביתים את שרת adb הפעיל על ידי הרצת
הפקודה הבאה:
adb kill-server
צריך להפעיל מחדש את adb ולבדוק אם יש מכשירים מחוברים על ידי הרצת השלבים הבאים
הפקודה.
adb devices
היא מציגה את רשימת המכשירים שלכם, בדומה לפלט לדוגמה הבא.
איור 2. הפלט של adb devices,
מוצג מכשיר מחובר אחד
אם לא מופיעים מכשירים, צריך לוודא שהטלפון מחובר וב-USB
ניפוי באגים מופעל,
צריך להפסיק ולהפעיל מחדש את adb.
כדי לאפס את איסוף נתוני הסוללה, מריצים את הפקודה הבאה:
adb shell dumpsys batterystats --reset
המכשיר תמיד אוסף נתוני סוללה ומידע אחר על ניפוי באגים
ברקע. איפוס מוחק את הנתונים הקודמים של איסוף הסוללה. אם
לא תאפס, הפלט עלול להיות גדול מאוד.
נתקו את המכשיר מהמחשב כדי שתוכלו רק לשרטט
מסוללת המכשיר.
משתמשים באפליקציה ומבצעים פעולות שעבורן רוצים לאסוף נתונים. עבור
לדוגמה: התנתקות מה-Wi-Fi ושליחת נתונים לענן.
מחברים מחדש את הטלפון.
ודאו שהטלפון שלכם מזוהה ומריצים את הפקודה הבאה:
adb devices
מוחקים את כל נתוני הסוללה על ידי הרצת הפקודה הבאה. הפעולה הזו עשויה להימשך
בזמן הזה.
הקובץ batterystats.txt נוצר בספרייה שציינתם באמצעות
את ארגומנט הנתיב האופציונלי. אם לא תציינו נתיב, הקובץ
שנוצרו בספריית הבית שלכם.
יצירת דוח מנתונים גולמיים.
במכשירים עם Android מגרסה 7.0 ואילך:
adb bugreport [path/]bugreport.zip
במכשירים עם Android מגרסה 6.0 ומטה:
adb bugreport [path/]bugreport.txt
מילוי הדוח על הבאג עשוי להימשך כמה דקות. אל תנתקו את
במכשיר או לבטל את התהליך עד לסיום.
בדומה ל-batterystats.txt, הקבצים האלה נוצרים בספרייה
לציין באמצעות הארגומנט האופציונלי path. אם
לא מציינים נתיב, הם נוצרים בספריית הבית שלכם.
אם היא עדיין לא פועלת, מריצים את התכונה 'היסטוריית סוללה' באמצעות
הפקודה:
docker run -p port_number:9999 gcr.io/android-battery-historian/stable:3.1 --port 9999
כדי להציג את הנתונים ב'היסטוריית הסוללה', צריך לפתוח את 'היסטוריית הסוללה' ב
בדפדפן. ב-Mac וב-Linux, היסטוריית הסוללה פועלת ב-
http://localhost:port_number ב-Windows, סוללה
היסטוריון רץ ב-
http://your_IP_address:port_number
לוחצים על עיון ובוחרים את קובץ הדוח על הבאג שיצרתם.
לוחצים על שליחה. התכונה 'היסטוריית סוללה' פותחת תרשים שנוצר
נתוני סוללה.
הצגת נתונים באמצעות תרשימים של היסטוריית הסוללה
התרשים 'היסטוריית הסוללה' מציג אירועים רלוונטיים לצריכת חשמל לאורך זמן.
כל שורה מציגה פלח עמודות צבעוני כשרכיב מערכת פעיל,
הרשאה לזרם של הסוללה. בתרשים לא מוצגת רמת הטעינה של הסוללה
משמש את הרכיב – רק אם האפליקציה פעילה. התרשימים מאורגנים לפי
קטגוריה, שמציגה סרגל לכל קטגוריה לאורך זמן, כפי שמוצג בדף
וציר x בתרשים.
איור 3. דוגמה להיסטוריית סוללות
תרשים.
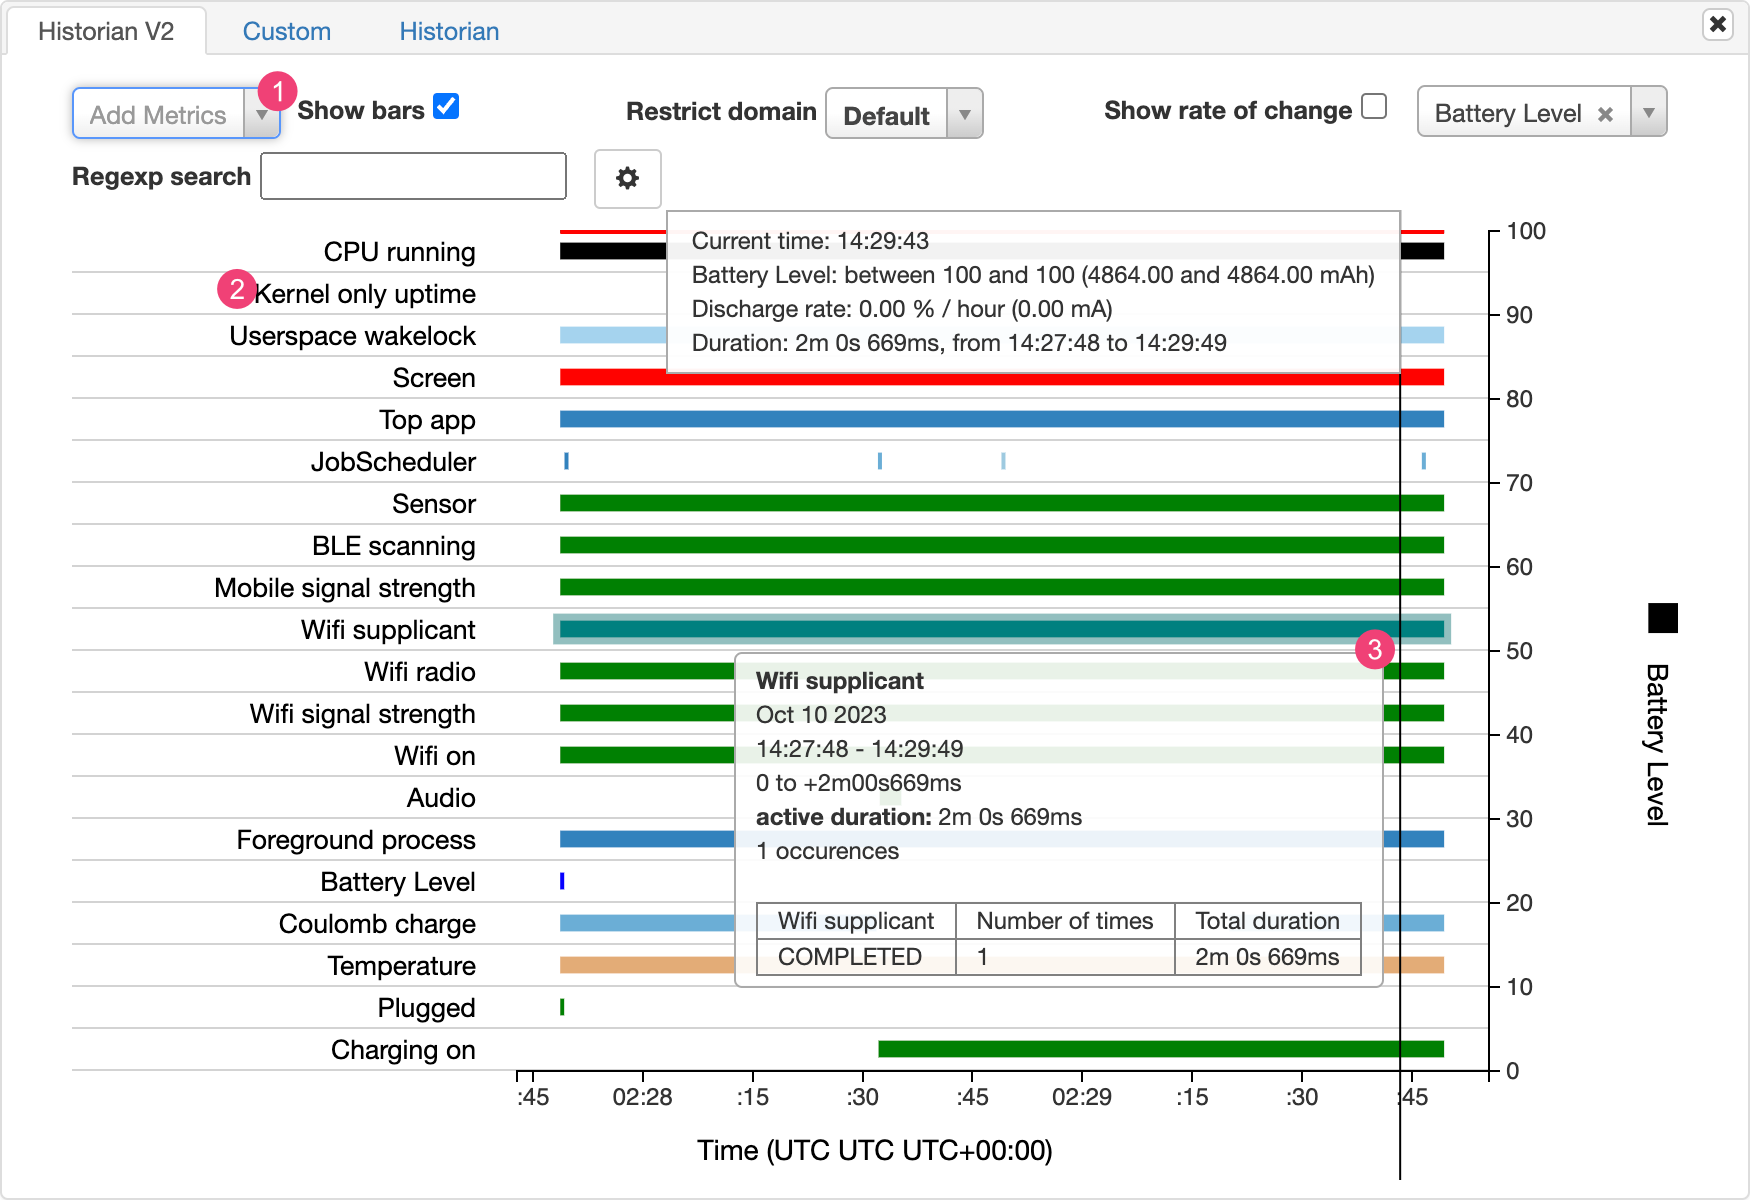
מוסיפים מדדים מהרשימה הנפתחת.
מעבירים את העכבר מעל שם המדד כדי לראות מידע נוסף על
כל מדד, כולל מפתח לצבעים של התרשים.
מעבירים את הסמן מעל לעמודה כדי לראות מידע מפורט יותר על הנושא
ואת הנתונים הסטטיסטיים של הסוללה בנקודה ספציפית בציר הזמן.
פלט נוסף של Budgetstats
אפשר להציג מידע נוסף מהקובץ batterystats.txt ב
של הנתונים הסטטיסטיים שאחרי התרשים של היסטוריית הסוללה.
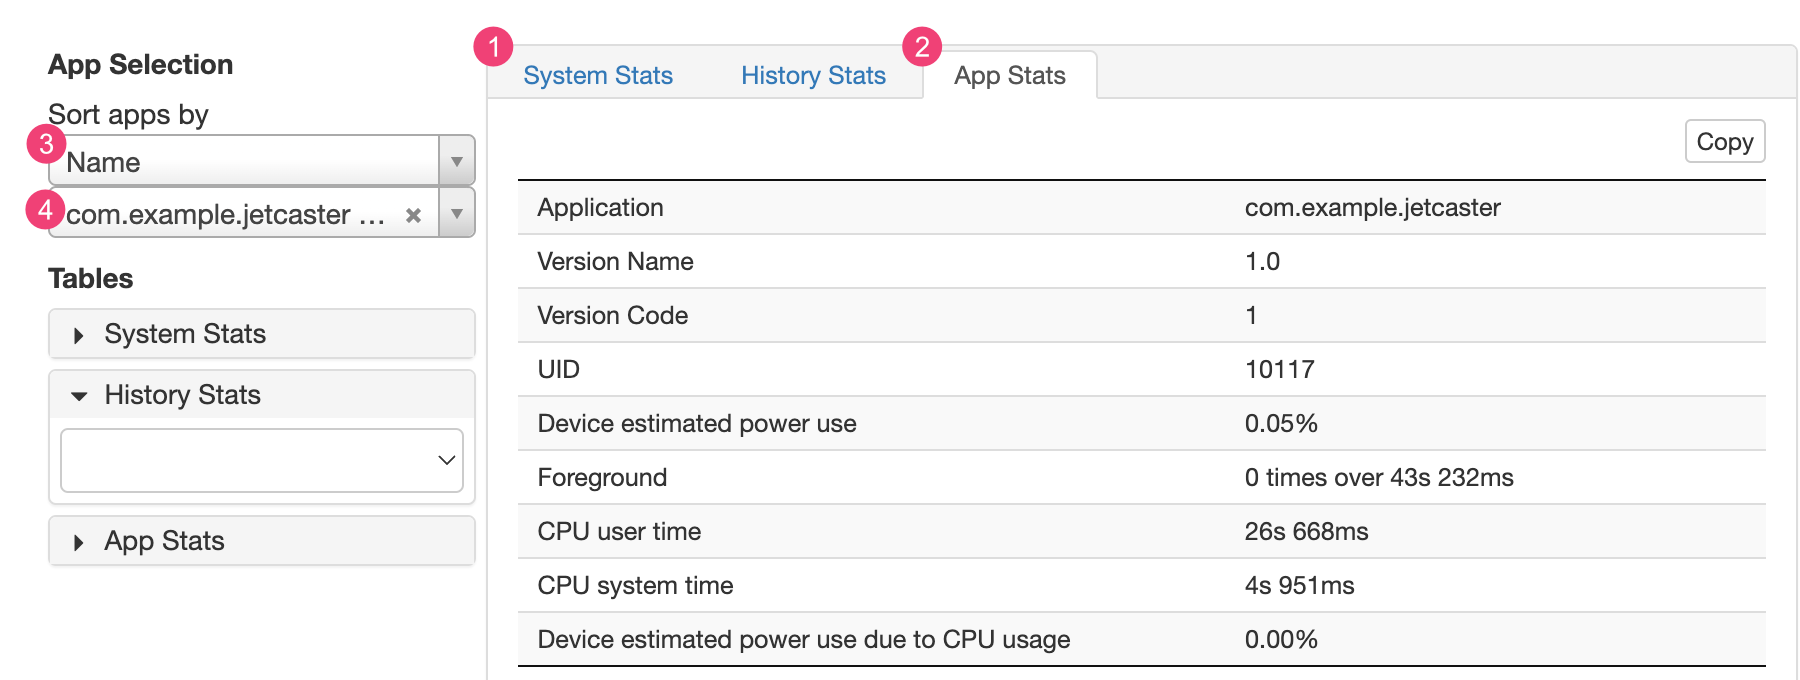
איור 4. קטע הנתונים הסטטיסטיים של הסוללה
היסטוריון.
הכרטיסייה 1נתונים סטטיסטיים של המערכת כוללת את כל המערכת
נתונים סטטיסטיים, כמו רמות האות הסלולרי ובהירות המסך. המידע הזה
מספקת תמונה כללית של מה שקורה במכשיר. הדבר
שימושי במיוחד כדי לוודא שאין אירועים חיצוניים שמשפיעים על הבדיקה.
הכרטיסייה 2נתונים סטטיסטיים של אפליקציות כוללת מידע על
באפליקציות ספציפיות. אפשר למיין את רשימת האפליקציות באמצעות 3
ברשימה הנפתחת מיון אפליקציות לפי בחלונית בחירת האפליקציות. שלך
הם יכולים לבחור אפליקציה ספציפית כדי לראות נתונים סטטיסטיים לגבי השימוש
רשימה נפתחת של 4 אפליקציות.
דוגמאות התוכן והקוד שבדף הזה כפופות לרישיונות המפורטים בקטע רישיון לתוכן. Java ו-OpenJDK הם סימנים מסחריים או סימנים מסחריים רשומים של חברת Oracle ו/או של השותפים העצמאיים שלה.
עדכון אחרון: 2025-07-27 (שעון UTC).
[null,null,["עדכון אחרון: 2025-07-27 (שעון UTC)."],[],[],null,["# Profile battery usage with Batterystats and Battery Historian\n\n| **Warning:** Battery Historian is no longer actively maintained; if possible, consider using [system tracing](/topic/performance/tracing), the [Macrobenchmark power metric](/topic/performance/benchmarking/macrobenchmark-metrics#power), or the [Power Profiler](/studio/profile/power-profiler) to get insights into battery performance.\n\nThis document shows the basic setup steps and workflow for the Batterystats tool\nand the Battery Historian script. To learn how to use Battery Historian to\ninspect battery consumption patterns, see [Analyze power use with Battery\nHistorian](/topic/performance/power/battery-historian).\n\nBatterystats is a tool included in the Android framework that collects battery\ndata on your device. You can use [`adb`](/studio/command-line/adb) to dump the\ncollected battery data to your development machine and create a report you can\nanalyze using Battery Historian. Battery Historian converts the report from\nBatterystats into an HTML visualization that you can view in your browser.\n\nBatterystats and Battery Historian are useful for the following:\n\n- Showing you where and how processes are drawing current from the battery.\n- Identifying tasks in your app that can be deferred or removed to improve battery life.\n\n| **Note:** To use Batterystats and Battery Historian, you need a mobile device with [USB debugging](/studio/debug/dev-options) enabled.\n\nInstall Battery Historian\n-------------------------\n\nYou can use Docker to install Battery Historian. For alternative installation\nmethods, including building from source, see the\n[README](https://github.com/google/battery-historian) on the\nproject's GitHub page. To install using Docker, do the following:\n\n1. Install Docker by following the instructions on the\n [Docker website](https://docs.docker.com/desktop). Any\n [subscription](https://docker.com/pricing) type works,\n including a free Personal subscription.\n\n2. To confirm Docker is correctly installed, open the command line and\n enter the following command:\n\n docker run hello-world\n\n If Docker is correctly installed, it displays an output like this: \n\n Unable to find image 'hello-world:latest' locally\n latest: Pulling from library/hello-world\n 78445dd45222: Pull complete\n Digest:\n sha256:c5515758d4c5e1e838e9cd307f6c6a0d620b5e07e6f927b07d05f6d12a1ac8d7\n Status: Downloaded newer image for hello-world:latest\n\n Hello from Docker!\n This message shows that your installation appears to be working correctly.\n\n To generate this message, Docker took the following steps:\n 1. The Docker client contacted the Docker daemon.\n 2. The Docker daemon pulled the \"hello-world\" image from the Docker Hub.\n 3. The Docker daemon created a new container from that image which runs the\n executable that produces the output you are currently reading.\n 4. The Docker daemon streamed that output to the Docker client, which sent it to your terminal\n\n3. Launch the Docker Desktop app---which is a GUI frontend for Docker---before\n you run the Battery Historian image. Running this initializes the Docker\n tools. Battery Historian doesn't run until you do this at least once.\n\n4. Run Battery Historian from the command line when running it for the first\n time. The Docker Desktop app doesn't let you specify the port to run the web\n server on. You can only do this from the command line. However, after you\n successfully run the container from the command line, an entry is created in\n Docker Desktop, and then you can launch it using the same listener port\n from Docker Desktop.\n\n5. Run the Battery Historian image using the following command:\n\n ```\n docker run -p port_number:9999 gcr.io/android-battery-historian/stable:3.1 --port 9999\n ```\n\n Battery Historian uses the port of your choice, as specified using\n \u003cvar translate=\"no\"\u003eport_number\u003c/var\u003e.\n | **Note:** If you're using a Windows machine, you might need to enable virtualization in your BIOS. Check the documentation for your motherboard for more information about how to enable virtualization. If you can run the [Android Emulator](/studio/run/emulator), then virtualization is already enabled.\n6. Navigate to Battery Historian in your browser to confirm it's running. The\n address varies depending on your operating system:\n\n For Linux and Mac\n : Battery Historian is available at\n `http://localhost:`\u003cvar translate=\"no\"\u003eport_number\u003c/var\u003e.\n\n For Windows\n : After you start Docker, it tells you the IP address of the machine it\n is using. For example, if the IP address is 123.456.78.90, Battery\n Historian is available at\n `http://123.456.78.90:`\u003cvar translate=\"no\"\u003eport_number\u003c/var\u003e.\n\n \u003cbr /\u003e\n\n It then displays the Battery Historian start page, where you can upload and\n view battery statistics.\n **Figure 1.** The start page for Battery Historian.\n\nGather data with Batterystats\n-----------------------------\n\nTo collect data from your device using Batterystats and open it in Battery\nHistorian, do the following:\n\n1. Connect your mobile device to your computer.\n\n2. From a Terminal window, shut down your running `adb` server by running the\n following command:\n\n adb kill-server\n\n3. Restart `adb` and check for connected devices by running the following\n command.\n\n adb devices\n\n It lists your device, similar to the following example output.\n **Figure 2.** The output of `adb devices`, showing one connected device\n\n If it doesn't list any devices, make sure your phone is connected and [USB\n debugging](/studio/debug/dev-options#Enable-debugging) is enabled, and then\n stop and restart `adb`.\n4. Reset battery data gathering by running the following command:\n\n adb shell dumpsys batterystats --reset\n\n The device is always collecting Batterystats and other debugging information\n in the background. Resetting erases previous battery collection data. If you\n don't reset, the output can be very large.\n5. Disconnect your device from your computer so that you are only drawing\n current from the device's battery.\n\n6. Use your app and perform actions for which you want to collect data for. For\n example, disconnect from Wi-Fi and send data to the cloud.\n\n7. Reconnect your phone.\n\n8. Make sure your phone is recognized and run the following command:\n\n adb devices\n\n9. Dump all battery data by running the following command. This can take a\n while.\n\n ```\n adb shell dumpsys batterystats \u003e [path/]batterystats.txt\n ```\n\n The `batterystats.txt` file is created in the directory you specify using\n the optional path argument. If you don't specify a path, the file is\n created in your home directory.\n10. Create a report from raw data.\n\n For devices running Android 7.0 and higher:\n :\n\n ```\n adb bugreport [path/]bugreport.zip\n ```\n\n For devices running Android 6.0 and lower:\n :\n\n ```\n adb bugreport [path/]bugreport.txt\n ```\n\n \u003cbr /\u003e\n\n Bugreport can take several minutes to complete. Don't disconnect your\n device or cancel the process until it's complete.\n\n As with `batterystats.txt`, these files are created in the directory you\n specify using the optional \u003cvar translate=\"no\"\u003epath\u003c/var\u003e argument. If you\n don't specify a path, they are created in your home directory.\n\n If it's not already running, run Battery Historian using the following\n command: \n\n ```\n docker run -p port_number:9999 gcr.io/android-battery-historian/stable:3.1 --port 9999\n ```\n11. To view your data in Battery Historian, open the Battery Historian in your\n browser. For Mac and Linux, Battery Historian runs at\n `http://localhost:`\u003cvar translate=\"no\"\u003eport_number\u003c/var\u003e. For Windows, Battery\n Historian runs at\n `http://`\u003cvar translate=\"no\"\u003eyour_IP_address\u003c/var\u003e`:`\u003cvar translate=\"no\"\u003eport_number\u003c/var\u003e.\n\n12. Click **Browse** and then choose the bugreport file you created.\n\n13. Click **Submit**. Battery Historian opens a chart created from your\n Batterystats data.\n\nView data with Battery Historian charts\n---------------------------------------\n\nThe Battery Historian chart graphs power-relevant events over time.\n\nEach row shows a colored bar segment when a system component is active and thus\ndrawing current from the battery. The chart doesn't show how much battery is\nused by the component---only whether the app is active. Charts are organized by\ncategory, showing a bar for each category over time, as displayed on the\n*x*-axis of the chart.\n**Figure 3.** Example of a Battery Historian chart.\n\n1. Add additional metrics from the drop-down list.\n2. Hold the pointer over the metric name to see more information about each metric, including a key for the colors used in the chart.\n3. Hold the pointer over a bar to see more detailed information about that metric and the battery stats at a specific point on the timeline.\n\nAdditional Batterystats output\n------------------------------\n\nYou can view additional information from the `batterystats.txt` file in the\nstats section after the Battery Historian chart.\n**Figure 4.** The stats section of Battery Historian.\n\nThe 1 **System Stats** tab includes system-wide\nstatistics, such as cell signal levels and screen brightness. This information\nprovides an overall picture of what's happening with the device. This is\nespecially useful to make sure no external events are affecting your test.\n\nThe 2 **App Stats** tab includes information about\nspecific apps. Sort the list of apps using the 3\n**Sort apps by** drop-down list in the **App Selection** pane. You\ncan select a specific app to view stats for using the\n4 apps drop-down list."]]