
Используйте шаги, описанные в этом руководстве, для доступа к пакетам ресурсов вашего приложения из кода C и C++.
Пример кода интеграции доступен на GitHub.
Сборка для нативных
Используйте следующие шаги для встраивания Play Asset Delivery в Android App Bundle вашего проекта. Вам не нужно использовать Android Studio для выполнения этих шагов.
Обновите версию плагина Android Gradle в файле
build.gradleвашего проекта до4.0.0или более поздней.В каталоге верхнего уровня вашего проекта создайте каталог для пакета ресурсов. Это имя каталога используется в качестве имени пакета ресурсов. Имена пакетов ресурсов должны начинаться с буквы и могут содержать только буквы, цифры и подчеркивания.
В каталоге пакета ресурсов создайте файл
build.gradleи добавьте следующий код. Обязательно укажите имя пакета ресурсов и только один тип доставки:// In the asset pack’s build.gradle file: plugins { id 'com.android.asset-pack' } assetPack { packName = "asset-pack-name" // Directory name for the asset pack dynamicDelivery { deliveryType = "[ install-time | fast-follow | on-demand ]" } }
В файле проекта app
build.gradleдобавьте имя каждого пакета ресурсов в вашем проекте, как показано ниже:// In the app build.gradle file: android { ... assetPacks = [":asset-pack-name", ":asset-pack2-name"] }
В файле
settings.gradleпроекта включите все пакеты ресурсов вашего проекта, как показано ниже:// In the settings.gradle file: include ':app' include ':asset-pack-name' include ':asset-pack2-name'
В каталоге пакета ресурсов создайте следующий подкаталог:
src/main/assets.Поместите активы в каталог
src/main/assets. Вы также можете создавать подкаталоги здесь. Структура каталогов для вашего приложения теперь должна выглядеть следующим образом:-
build.gradle -
settings.gradle -
app/ -
asset-pack-name /build.gradle -
asset-pack-name /src/main/assets/ your-asset-directories
-
Создайте Android App Bundle с помощью Gradle . В сгенерированном app bundle корневой каталог теперь включает следующее:
-
asset-pack-name /manifest/AndroidManifest.xml: настраивает идентификатор и режим доставки пакета ресурсов -
asset-pack-name /assets/ your-asset-directories: Каталог, содержащий все активы, поставляемые как часть пакета активов
Gradle генерирует манифест для каждого пакета ресурсов и выводит для вас каталог
assets/.-
(Необязательно) Настройте пакет приложений для поддержки различных форматов сжатия текстур .
Интеграция с библиотекой доставки Play Asset
Вы реализуете этот API в соответствии с типом доставки пакета активов, к которому вы хотите получить доступ. Эти шаги показаны на следующей блок-схеме.
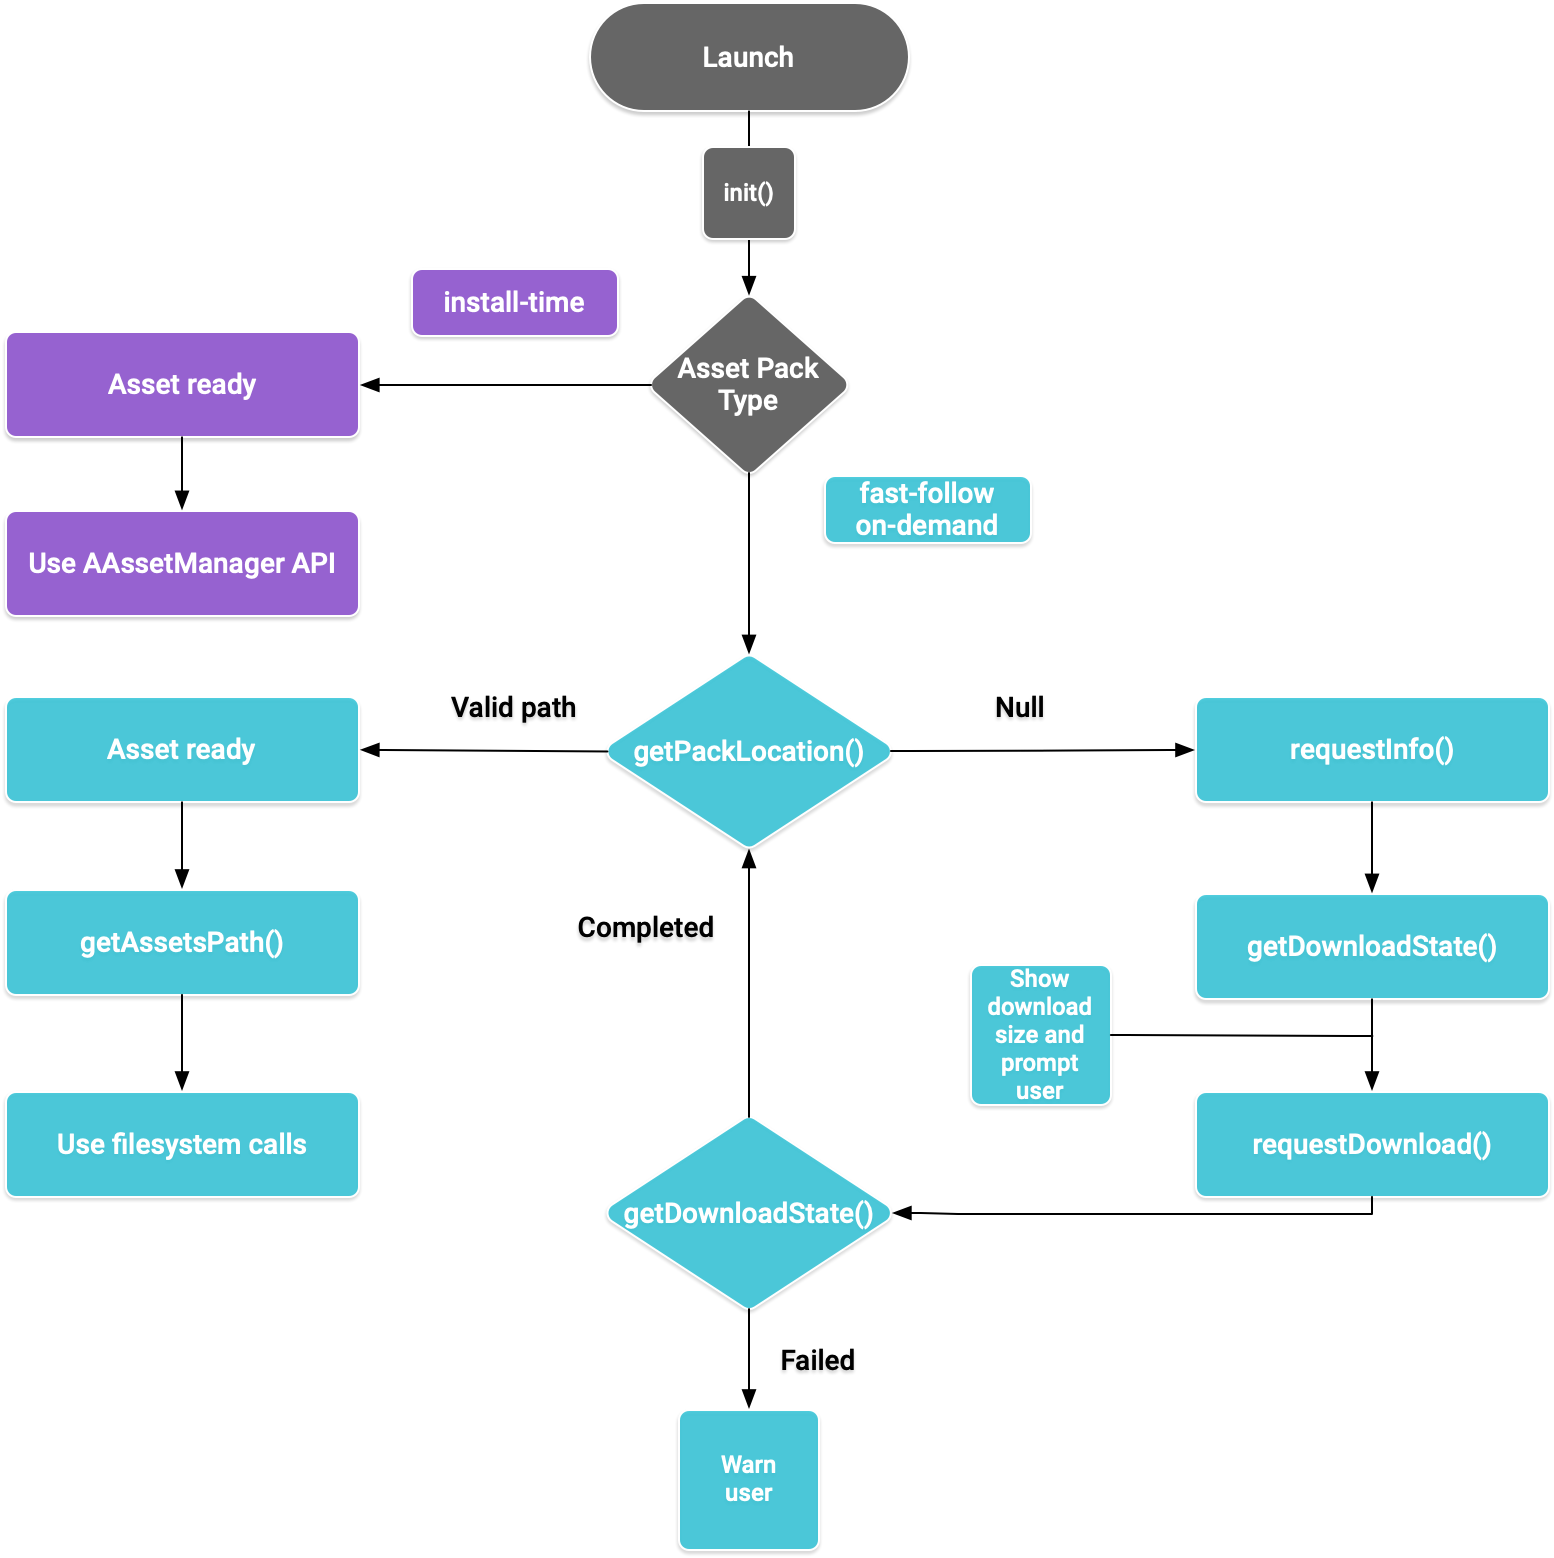
Рисунок 1. Схема доступа к пакетам активов
Play Core Native SDK предоставляет заголовочный файл C play/asset_pack.h для запроса пакетов ресурсов, управления загрузками и доступа к ресурсам.
Настройте среду разработки для Play Core Native SDK
Скачать Play Core Native SDK
Перед загрузкой вы должны согласиться со следующими условиями.
Условия и положения
Last modified: September 24, 2020- By using the Play Core Software Development Kit, you agree to these terms in addition to the Google APIs Terms of Service ("API ToS"). If these terms are ever in conflict, these terms will take precedence over the API ToS. Please read these terms and the API ToS carefully.
- For purposes of these terms, "APIs" means Google's APIs, other developer services, and associated software, including any Redistributable Code.
- “Redistributable Code” means Google-provided object code or header files that call the APIs.
- Subject to these terms and the terms of the API ToS, you may copy and distribute Redistributable Code solely for inclusion as part of your API Client. Google and its licensors own all right, title and interest, including any and all intellectual property and other proprietary rights, in and to Redistributable Code. You will not modify, translate, or create derivative works of Redistributable Code.
- Google may make changes to these terms at any time with notice and the opportunity to decline further use of the Play Core Software Development Kit. Google will post notice of modifications to the terms at https://developer.android.com/guide/playcore/license. Changes will not be retroactive.
Выполните одно из следующих действий:
- Установите Android Studio версии 4.0 или выше. Используйте пользовательский интерфейс SDK Manager для установки Android SDK Platform версии 10.0 (API уровня 29).
- Установите инструменты командной строки Android SDK и используйте
sdkmanagerдля установки Android SDK Platform версии 10.0 (API уровня 29).
Подготовьте Android Studio для нативной разработки, используя SDK Manager для установки последней версии CMake и Android Native Development Kit (NDK). Для получения дополнительной информации о создании или импорте нативных проектов см. раздел Начало работы с NDK .
Загрузите zip-файл и распакуйте его вместе с вашим проектом.
Ссылка для скачивания Размер Контрольная сумма SHA-256 37,8 МБ 9db60185185342f28d2c278b60222333608c67bc022e458a25224eaea8c4c4b7 Обновите файл
build.gradleвашего приложения, как показано ниже:Круто
    // App build.gradle

    plugins {
      id 'com.android.application'
    }

    // Define a path to the extracted Play Core SDK files.
    // If using a relative path, wrap it with file() since CMake requires absolute paths.
    def playcoreDir = file('../path/to/playcore-native-sdk')

    android {
        defaultConfig {
            ...
            externalNativeBuild {
                cmake {
                    // Define the PLAYCORE_LOCATION directive.
                    arguments "-DANDROID_STL=c++_static",
                              "-DPLAYCORE_LOCATION=$playcoreDir"
                }
            }
            ndk {
                // Skip deprecated ABIs. Only required when using NDK 16 or earlier.
                abiFilters 'armeabi-v7a', 'arm64-v8a', 'x86', 'x86_64'
            }
        }
        buildTypes {
            release {
                // Include Play Core Library proguard config files to strip unused code while retaining the Java symbols needed for JNI.
                proguardFile '$playcoreDir/proguard/common.pgcfg'
                proguardFile '$playcoreDir/proguard/gms_task.pgcfg'
                proguardFile '$playcoreDir/proguard/per-feature-proguard-files'
                ...
            }
            debug {
                ...
            }
        }
        externalNativeBuild {
            cmake {
                path 'src/main/CMakeLists.txt'
            }
        }
    }

    dependencies {
        // Import these feature-specific AARs for each Google Play Core library.
        implementation 'com.google.android.play:app-update:2.1.0'
        implementation 'com.google.android.play:asset-delivery:2.3.0'
        implementation 'com.google.android.play:integrity:1.4.0'
        implementation 'com.google.android.play:review:2.0.2'

        // Import these common dependencies.
        implementation 'com.google.android.gms:play-services-tasks:18.0.2'
        implementation files("$playcoreDir/playcore-native-metadata.jar")
        ...
    }
Котлин
// App build.gradle

plugins {
    id("com.android.application")
}

// Define a path to the extracted Play Core SDK files.
// If using a relative path, wrap it with file() since CMake requires absolute paths.
val playcoreDir = file("../path/to/playcore-native-sdk")

android {
    defaultConfig {
        ...
        externalNativeBuild {
            cmake {
                // Define the PLAYCORE_LOCATION directive.
                arguments += listOf("-DANDROID_STL=c++_static", "-DPLAYCORE_LOCATION=$playcoreDir")
            }
        }
        ndk {
            // Skip deprecated ABIs. Only required when using NDK 16 or earlier.
            abiFilters.clear()
            abiFilters += listOf("armeabi-v7a", "arm64-v8a", "x86", "x86_64")
        }
    }
    buildTypes {
        release {
            // Include Play Core Library proguard config files to strip unused code while retaining the Java symbols needed for JNI.
            proguardFile("$playcoreDir/proguard/common.pgcfg")
            proguardFile("$playcoreDir/proguard/gms_task.pgcfg")
            proguardFile("$playcoreDir/proguard/per-feature-proguard-files")
            ...
        }
        debug {
            ...
        }
    }
    externalNativeBuild {
        cmake {
            path = "src/main/CMakeLists.txt"
        }
    }
}

dependencies {
    // Import these feature-specific AARs for each Google Play Core library.
    implementation("com.google.android.play:app-update:2.1.0")
    implementation("com.google.android.play:asset-delivery:2.3.0")
    implementation("com.google.android.play:integrity:1.4.0")
    implementation("com.google.android.play:review:2.0.2")

    // Import these common dependencies.
    implementation("com.google.android.gms:play-services-tasks:18.0.2")
    implementation(files("$playcoreDir/playcore-native-metadata.jar"))
    ...
}
Обновите файлы
CMakeLists.txtвашего приложения, как показано ниже:cmake_minimum_required(VERSION 3.6) ... # Add a static library called “playcore” built with the c++_static STL. include(${PLAYCORE_LOCATION}/playcore.cmake) add_playcore_static_library() // In this example “main” is your native code library, i.e. libmain.so. add_library(main SHARED ...) target_include_directories(main PRIVATE ${PLAYCORE_LOCATION}/include ...) target_link_libraries(main android playcore ...)
Сбор данных
Play Core Native SDK может собирать данные, связанные с версией, чтобы позволить Google улучшить продукт, включая:
- Имя пакета приложения
- Версия пакета приложения
- Версия Play Core Native SDK
Эти данные будут собираться при загрузке пакета приложения в Play Console. Чтобы отказаться от этого процесса сбора данных, удалите импорт $playcoreDir/playcore-native-metadata.jar в файле build.gradle.
Обратите внимание, что сбор данных, связанных с использованием вами Play Core Native SDK и использованием собранных данных компанией Google, осуществляется отдельно и независимо от сбора Google зависимостей библиотек, объявленных в Gradle при загрузке пакета приложения в Play Console.
Доставка во время установки
Пакеты ресурсов, настроенные как install-time доступны сразу при запуске приложения. Используйте API NDK AAssetManager для доступа к ресурсам, обслуживаемым в этом режиме:
#include <android/asset_manager.h>
#include <android_native_app_glue.h>
...
AAssetManager* assetManager = app->activity->assetManager;
AAsset* asset = AAssetManager_open(assetManager, "asset-name", AASSET_MODE_BUFFER);
size_t assetLength = AAsset_getLength(asset);
char* buffer = (char*) malloc(assetLength + 1);
AAsset_read(asset, buffer, assetLength);
Быстрая доставка и доставка по требованию
В следующих разделах показано, как инициализировать API, как получить информацию о пакетах ресурсов перед их загрузкой, как вызвать API для начала загрузки и как получить доступ к загруженным пакетам. Эти разделы применяются к пакетам ресурсов fast-follow и on-demand .
Запуск приложения
Всегда вызывайте AssetPackManager_init() для инициализации API пакета активов перед вызовом любой другой функции. Проверьте наличие кодов ошибок пакета активов .
#include "play/asset_pack.h"
...
AssetPackErrorCode AssetPackManager_init(JavaVM* jvm, jobject android_context);
Также обязательно вызовите следующие функции в onPause() и onResume() ANativeActivityCallbacks :
Получить информацию о загрузке пакетов ресурсов
Приложения должны раскрывать размер загрузки перед извлечением пакета ресурсов. Используйте функцию AssetPackManager_requestInfo() , чтобы начать асинхронный запрос размера загрузки и того, загружается ли пакет. Затем используйте AssetPackManager_getDownloadState() чтобы опросить состояние загрузки (например, вызывайте эту функцию один раз за кадр в игровом цикле). Если запрос не выполнен, проверьте коды ошибок пакета ресурсов .
AssetPackErrorCode AssetPackManager_requestInfo();      // Call once
AssetPackErrorCode AssetPackManager_getDownloadState(); // Call once per frame in your game loop
Функция AssetPackManager_getDownloadState() возвращает непрозрачный тип AssetPackDownloadState как выходной указатель. Используйте этот указатель для вызова следующих функций:
AssetPackDownloadState* state;
AssetPackErrorCode error_code = AssetPackManager_getDownloadState(asset-pack-name, &state);
AssetPackDownloadStatus status = AssetPackDownloadState_getStatus(state);
uint64_t downloadedBytes = AssetPackDownloadState_getBytesDownloaded(state);
uint64_t totalBytes = AssetPackDownloadState_getTotalBytesToDownload(state));
AssetPackDownloadState_destroy(state);
Установить
Используйте AssetPackManager_requestDownload() , чтобы начать загрузку пакета ресурсов в первый раз или запросить обновление пакета ресурсов для завершения:
AssetPackErrorCode AssetPackManager_requestDownload();  // Call once
AssetPackErrorCode AssetPackManager_getDownloadState(); // Call once per frame in your game loop
Функция AssetPackManager_getDownloadState() возвращает непрозрачный тип AssetPackDownloadState . Информацию об использовании этого типа см. в разделе Получение информации о загрузке .
Большие загрузки
Если загрузка превышает 200 МБ и пользователь не подключен к Wi-Fi, загрузка не начнется, пока пользователь явно не даст свое согласие на продолжение загрузки с использованием мобильного подключения к данным. Аналогично, если загрузка большая и пользователь теряет Wi-Fi, загрузка приостанавливается, и для продолжения с использованием мобильного подключения к данным требуется явное согласие. Приостановленный пакет имеет состояние WAITING_FOR_WIFI . Чтобы запустить поток пользовательского интерфейса для запроса согласия пользователя, используйте следующее:
Требуется подтверждение пользователя
Если пакет имеет статус REQUIRES_USER_CONFIRMATION , загрузка не будет продолжена, пока пользователь не примет диалог, показанный с помощью AssetPackManager_showConfirmationDialog() . Этот статус может возникнуть, если приложение не распознано Play. Обратите внимание, что вызов AssetPackManager_showConfirmationDialog() в этом случае приводит к обновлению приложения. После обновления снова запросите ресурсы.
Доступ к пакетам активов
Вы можете получить доступ к пакету ресурсов с помощью вызовов файловой системы после того, как запрос на загрузку достигнет состояния COMPLETED . Каждый пакет ресурсов хранится в отдельном каталоге во внутреннем хранилище приложения. Используйте AssetPackManager_getAssetPackLocation() , чтобы получить AssetPackLocation для указанного пакета ресурсов. Используйте AssetPackLocation_getStorageMethod() в этом месте, чтобы определить метод хранения:
-
ASSET_PACK_STORAGE_APK: Пакет активов устанавливается как APK. См. Доставка во время установки для доступа к этим активам. -
ASSET_PACK_STORAGE_FILES: ИспользуйтеAssetPackLocation_getAssetsPath()для получения пути к файлу каталога, содержащего активы, или null, если активы не были загружены. Не изменяйте загруженные файлы в этом пути к файлу.
AssetPackLocation* location;

AssetPackErrorCode error_code = AssetPackManager_getAssetPackLocation(asset-pack-name, &location);

if (error_code == ASSET_PACK_NO_ERROR) {
    AssetPackStorageMethod storage_method = AssetPackLocation_getStorageMethod(location);
    const char* assets_path = AssetPackLocation_getAssetsPath(location);
    AssetPackLocation_destroy(location);
}
После того, как вы обнаружите активы, используйте такие функции, как fopen или ifstream для доступа к файлам.
Другие методы API Play Core
Ниже приведены некоторые дополнительные методы API, которые вы можете использовать в своем приложении.
Отменить запрос
Используйте AssetPackManager_cancelDownload() для отмены активного запроса пакета активов. Обратите внимание, что этот запрос является операцией наилучшего усилия.
Запрос на удаление
Используйте AssetPackManager_requestRemoval() для планирования удаления пакета ресурсов.
Следующие шаги
Протестируйте Play Asset Delivery локально и из Google Play.