
Android Studio 支援 tools 命名空間中的多種 XML 屬性,這些屬性可啟用設計期間的功能 (例如要在片段中顯示哪個版面配置),或者編譯期間的行為 (比如要將哪種縮減模式套用至 XML 資源)。當您建構應用程式時,建構工具會移除這些屬性,因此不會對 APK 大小或執行階段行為造成任何影響。
如要在 XML 檔案中使用這些屬性,請在各 XML 檔案的根元素中新增 tools 命名空間,如下所示:
<RootTag xmlns:android="http://schemas.android.com/apk/res/android"
    xmlns:tools="http://schemas.android.com/tools" >
錯誤處理屬性
下列屬性有助於隱藏 Lint 警告訊息:
tools:ignore
適用於:任何元素
使用這項屬性的工具:Lint
這個屬性接受半形逗號分隔的清單,當中列出您希望工具在這個元素或其子系上忽略的 Lint 問題 ID。
舉例來說,您可以指示工具忽略 MissingTranslation 錯誤:
<string name="show_all_apps" tools:ignore="MissingTranslation">All</string>
tools:targetApi
適用於:任何元素
使用這項屬性的工具:Lint
這個屬性的運作方式與 Java 程式碼中的 @TargetApi 註解相同,可讓您指定支援這個元素的 API 級別 (可以是整數或程式碼名稱)。
此屬性可讓工具瞭解,您認為只會在指定 API 級別以上版本中使用這個元素和任何子項。如果在您指定為 minSdkVersion 的 API 級別中無法使用該元素或其屬性,此屬性也能讓 Lint 不再傳送警告給您。
舉例來說,GridLayout 只適用於 API 級別 14 以上版本,但您知道這個版面配置並未在任何較低版本的程式碼中使用,因此即可使用這個屬性:
<GridLayout xmlns:android="http://schemas.android.com/apk/res/android"
    xmlns:tools="http://schemas.android.com/tools"
    tools:targetApi="14" >
但請注意,我們仍建議您改用支援資料庫中的 GridLayout。
tools:locale
適用於:<resources>
使用這項屬性的工具:Lint、Android Studio 編輯器
這個屬性可讓工具瞭解指定 <resources> 元素中各項資源的預設語言或語言代碼,以免拼字檢查工具發出警告。如果沒有此屬性,工具會假設語言為英文。
屬性值必須是有效的語言代碼限定詞。
舉例來說,您可以將這個屬性加入預設 values/strings.xml 檔案,表示預設字串使用的語言是西班牙文,而非英文:
<resources xmlns:tools="http://schemas.android.com/tools"
    tools:locale="es">
設計期間檢視畫面屬性
下列屬性定義了可見的版面配置特性 這是 Android Studio 版面配置預覽中的全套功能
tools: 取代 android:
適用於:<View>
使用這項屬性的工具:Android Studio 版面配置編輯器
您可以將 tools: 前置字元 (而非 android:) 與 Android 架構中的任何 <View> 屬性搭配使用,在版面配置預覽畫面中插入範例資料。如果您要等到執行階段才填入屬性值,而且想在版面配置預覽畫面中查看效果,這項功能就很實用。
舉例來說,若您在執行階段設定 android:text 屬性值,或者希望查看有別於預設值的版面配置,可以添加 tools:text,指定僅在版面配置預覽畫面中顯示的文字。
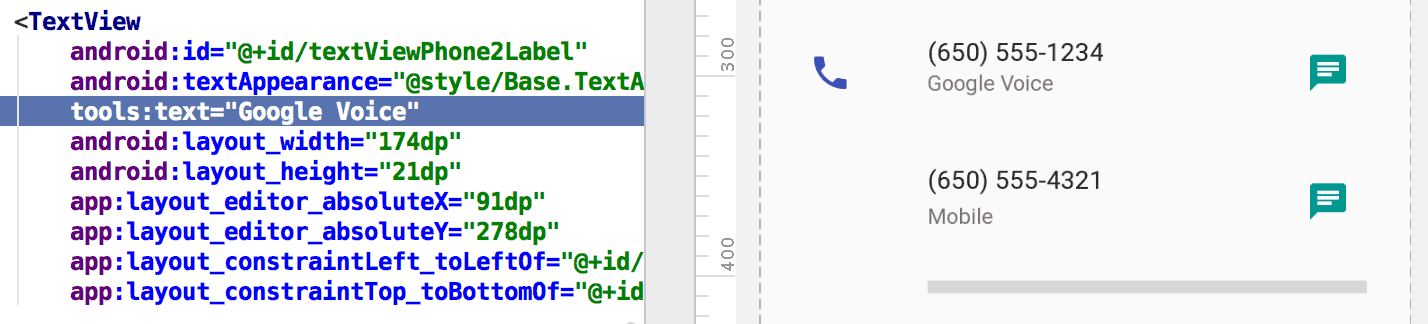
tools:text 屬性將「Google Voice」設為版面配置預覽畫面顯示的值。您可以新增 android: 命名空間屬性和相符的 tools: 屬性,前者會在執行階段使用,而後者只會覆寫版面配置預覽畫面中的執行階段屬性。
此外,如果您只想復原版面配置預覽畫面的屬性設定,也可以使用 tools: 屬性。舉例來說,如果您的 FrameLayout 含有兩個子項,但您希望版面配置預覽畫面只顯示一個子項,可以將其中一個子項設為在版面配置預覽畫面中隱藏,如下所示:
<Button
    android:id="@+id/button"
    android:layout_width="wrap_content"
    android:layout_height="wrap_content"
    android:text="First" />

<Button
    android:id="@+id/button2"
    android:layout_width="wrap_content"
    android:layout_height="wrap_content"
    android:text="Second"
    tools:visibility="invisible"  />
在設計檢視畫面中使用版面配置編輯器時,您可以透過「Properties」視窗編輯某些設計期間檢視畫面屬性。每個設計期間屬性的名稱旁邊都會顯示「扳手」圖示  ,以便與相同名稱的實際屬性有所區別。
tools:context
適用於:任何根 <View>
使用這項屬性的工具:Lint、Android Studio 版面配置編輯器
根據預設,此屬性宣告了與這個版面配置相關聯的活動。這會在編輯器或版面配置預覽畫面中啟用需要瞭解活動資訊的功能,這些資訊包括預覽畫面中的版面配置主題為何,以及要在哪裡插入 Quickfix 產生的 onClick 處理常式 (如圖 2 所示)。
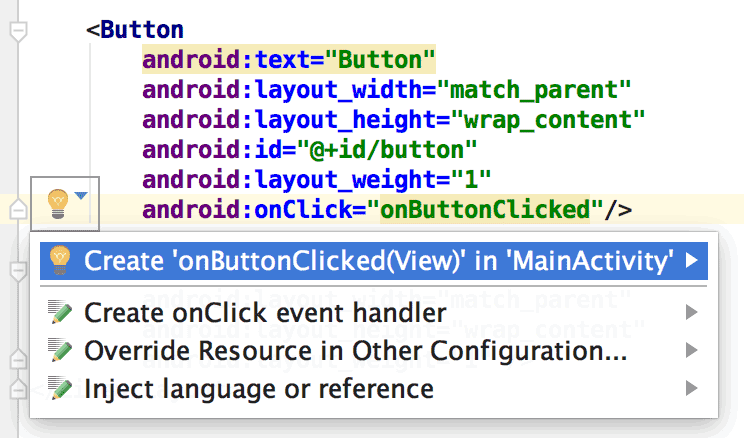
tools:context,onClick 屬性的 Quickfix 才能正常運作。您可以使用資訊清單檔案中的點前置字元 (不含完整套件名稱),指定活動類別名稱。
例如:
<android.support.constraint.ConstraintLayout
    xmlns:android="http://schemas.android.com/apk/res/android"
    xmlns:tools="http://schemas.android.com/tools"
    tools:context=".MainActivity" >
tools:itemCount
適用於:<RecyclerView>
使用這項屬性的工具:Android Studio 版面配置編輯器
針對指定的
RecyclerView,這個屬性明示了版面配置編輯器應在「Preview」視窗中轉譯的項目數量。
例如:
<androidx.recyclerview.widget.RecyclerView
    android:id="@+id/recyclerView"
    android:layout_width="match_parent"
    android:layout_height="match_parent"
    tools:itemCount="3"/>
tools:layout
適用於:<fragment>
使用這項屬性的工具:Android Studio 版面配置編輯器
這個屬性宣告了您希望版面配置預覽畫面在片段中繪製的版面配置類型,因為版面配置預覽畫面無法執行在一般情況下套用版面配置的活動程式碼。
例如:
<fragment android:name="com.example.main.ItemListFragment"
    tools:layout="@layout/list_content" />
tools:listitem、tools:listheader、tools:listfooter
適用於:<AdapterView> (以及 <ListView> 等子類別)
使用這項屬性的工具:Android Studio 版面配置編輯器
這些屬性可指定要在清單項目、標頭和頁尾的版面配置預覽畫面中顯示哪種版面配置。版面配置中的所有資料欄位都會填入數值內容 (例如「Item 1」),因此清單項目不會重複。
例如:
<ListView xmlns:android="http://schemas.android.com/apk/res/android"
    xmlns:tools="http://schemas.android.com/tools"
    android:id="@android:id/list"
    android:layout_width="match_parent"
    android:layout_height="match_parent"
    tools:listitem="@layout/sample_list_item"
    tools:listheader="@layout/sample_list_header"
    tools:listfooter="@layout/sample_list_footer" />
tools:showIn
適用於:<include> 所參照版面配置中的任何根 <View>
使用這項屬性的工具:Android Studio 版面配置編輯器
這個屬性可讓您指向透過 <include> 使用此版面配置的版面配置,因此您可以依照這個檔案嵌入上層布局時的顯示情形,預覽與編輯該檔案。
例如:
<TextView xmlns:android="http://schemas.android.com/apk/res/android"
    xmlns:tools="http://schemas.android.com/tools"
    android:text="@string/hello_world"
    android:layout_width="wrap_content"
    android:layout_height="wrap_content"
    tools:showIn="@layout/activity_main" />
現在,版面配置預覽畫面會顯示此 TextView 版面配置在
activity_main 版面配置。
tools:menu
適用於:任何根 <View>
使用這項屬性的工具:Android Studio 版面配置編輯器
這個屬性指定了版面配置預覽畫面在應用程式列中顯示的選單。屬性值可以是一或多個選單 ID (以半形逗號分隔),不含 @menu/ 或任何此類 ID 前置字元,也不含 .xml 副檔名。
例如:
<?xml version="1.0" encoding="utf-8"?>
<LinearLayout xmlns:android="http://schemas.android.com/apk/res/android"
    xmlns:tools="http://schemas.android.com/tools"
    android:orientation="vertical"
    android:layout_width="match_parent"
    android:layout_height="match_parent"
    tools:menu="menu1,menu2" />
tools:minValue、tools:maxValue
適用於:<NumberPicker>
使用這項屬性的工具:Android Studio 版面配置編輯器
這些屬性可設定 NumberPicker 檢視畫面的最小值和最大值。
例如:
<NumberPicker xmlns:android="http://schemas.android.com/apk/res/android"
    xmlns:tools="http://schemas.android.com/tools"
    android:id="@+id/numberPicker"
    android:layout_width="match_parent"
    android:layout_height="wrap_content"
    tools:minValue="0"
    tools:maxValue="10" />
tools:openDrawer
適用於:<DrawerLayout>
使用這項屬性的工具:Android Studio 版面配置編輯器
這個屬性可讓您在預覽畫面中開啟
DrawerLayout。
您也可以傳遞下列其中一個值,修改版面配置編輯器轉譯版面配置的方式:
表 1. 這些值可用於修改版面配置編輯器如何轉譯 DrawerLayout
| 常數 | 值 | 說明 |
|---|---|---|
end | 800005 | 將物件推送到容器的結尾,而不變更其大小。 |
left | 3 | 將物件推送到容器的左側,而不變更其大小。 |
right | 5 | 將物件推送到容器的右側,而不變更其大小。 |
start | 800003 | 將物件推送到容器的起點,而不變更其大小。 |
例如:
<androidx.drawerlayout.widget.DrawerLayout
    xmlns:android="http://schemas.android.com/apk/res/android"
    xmlns:tools="http://schemas.android.com/tools"
    android:id="@+id/drawer_layout"
    android:layout_width="match_parent"
    android:layout_height="match_parent"
    tools:openDrawer="start" />
"@tools:sample/*" 資源
適用於:支援 UI 文字或圖片的任何檢視畫面
使用這項屬性的工具:Android Studio 版面配置編輯器
這個屬性可讓您在檢視畫面中插入預留位置資料或圖片。舉例來說,如果想測試版面配置搭配文字的運作情形,但尚未針對應用程式提供最終 UI 文字,您可以使用預留位置文字,如下所示:
<TextView xmlns:android="http://schemas.android.com/apk/res/android"
    xmlns:tools="http://schemas.android.com/tools"
    android:layout_width="wrap_content"
    android:layout_height="wrap_content"
    tools:text="@tools:sample/lorem" />
下表說明可插入版面配置的預留位置資料類型:
表 2. 版面配置的預留位置資料
| 屬性值 | 預留位置資料的說明 |
|---|---|
@tools:sample/full_names |
從 @tools:sample/first_names 和 @tools:sample/last_names 組合隨機產生的完整名稱 |
@tools:sample/first_names |
常見的名字 |
@tools:sample/last_names |
常見的姓氏 |
@tools:sample/cities |
世界各地城市的名稱 |
@tools:sample/us_zipcodes |
隨機產生的美國郵遞區號 |
@tools:sample/us_phones |
隨機產生的電話號碼,格式如下:(800) 555-xxxx |
@tools:sample/lorem |
以拉丁文表示的預留位置文字 |
@tools:sample/date/day_of_week |
指定格式的隨機日期和時間 |
@tools:sample/date/ddmmyy | |
@tools:sample/date/mmddyy | |
@tools:sample/date/hhmm | |
@tools:sample/date/hhmmss | |
@tools:sample/avatars |
可當做個人資料顯示圖片的向量可繪項目 |
@tools:sample/backgrounds/scenic |
可當做背景的圖片 |
資源縮減屬性
透過下列屬性,您可以在使用資源縮減功能時啟用嚴格的參照檢查,並宣告是否要保留或捨棄特定資源。
如要啟用資源縮減功能,請將 build.gradle 檔案中的 shrinkResources 屬性 (以及用於程式碼縮減的 minifyEnabled) 設為 true。
例如:
Groovy
android {
    ...
    buildTypes {
        release {
            shrinkResources true
            minifyEnabled true
            proguardFiles getDefaultProguardFile('proguard-android.txt'),
                    'proguard-rules.pro'
        }
    }
}
Kotlin
android {
    ...
    buildTypes {
        getByName("release") {
            isShrinkResources = true
            isMinifyEnabled = true
            proguardFiles(
                getDefaultProguardFile("proguard-android.txt"),
                "proguard-rules.pro"
            )
        }
    }
}
tools:shrinkMode
適用於:<resources>
使用這項屬性的工具:具有資源縮減功能的建構工具
這個屬性可讓您指定建構工具是否應使用下列模式:
- 安全模式:保留所有已明確引用,且「可能」透過呼叫
Resources.getIdentifier()動態參照的資源。 - 嚴格模式:僅保留程式碼或其他資源中明確引用的資源。
系統預設會使用安全模式 (shrinkMode="safe")。如要改用嚴格模式,請在 <resources> 標記中加入 shrinkMode="strict",如下所示:
<?xml version="1.0" encoding="utf-8"?>
<resources xmlns:tools="http://schemas.android.com/tools"
    tools:shrinkMode="strict" />
啟用嚴格模式時,您可能需要使用 tools:keep 保留已移除但實際需要的資源,以及使用 tools:discard 明確移除更多資源。
詳情請參閱「縮減資源」一節。
tools:keep
適用於:<resources>
使用這項屬性的工具:具有資源縮減功能的建構工具
使用資源縮減功能移除未使用的資源時,此屬性可讓您指定要保留的資源,這通常是因為這些資源在執行階段會以間接方式參照,例如將動態產生的資源名稱傳遞至 Resources.getIdentifier()。
如要使用,請在資源目錄中建立包含 <resources> 標記的 XML 檔案 (例如 res/raw/keep.xml),並以半形逗號分隔的清單指定要在 tools:keep 屬性中保留的各項資源。您可以使用星號字元做為萬用字元。
例如:
<?xml version="1.0" encoding="utf-8"?>
<resources xmlns:tools="http://schemas.android.com/tools"
    tools:keep="@layout/used_1,@layout/used_2,@layout/*_3" />
詳情請參閱「縮減資源」一節。
tools:discard
適用於:<resources>
使用這項屬性的工具:具有資源縮減功能的建構工具
使用資源縮減功能移除未使用的資源時,此屬性可讓您指定要手動捨棄的資源,這通常是因為參照資源的方式不會影響應用程式,或者 Gradle 外掛程式誤將資源視為已參照。
如要使用,請在資源目錄中建立包含 <resources> 標記的 XML 檔案 (例如 res/raw/keep.xml),並以半形逗號分隔的清單指定要在 tools:discard 屬性中捨棄的各項資源。您可以使用星號字元做為萬用字元。
例如:
<?xml version="1.0" encoding="utf-8"?>
<resources xmlns:tools="http://schemas.android.com/tools"
    tools:discard="@layout/unused_1" />
詳情請參閱「縮減資源」一節。