
若要查看应用在设备上的外观和行为,您需要构建并运行该应用。Android Studio 会设置新的项目,这样您只需点击几下,就能将应用部署到虚拟设备或实体设备。
本概览重点介绍如何使用 Android Studio 构建和运行应用,以便进行测试和调试。如需了解如何使用 Android Studio 构建可向用户发布的应用,请参阅构建应用以向用户发布。如需详细了解如何管理和自定义 build(无论是否使用 Android Studio),请参阅配置 build。
基本构建和运行
如需构建和运行应用,请按以下步骤操作:
- 在工具栏中,从运行配置菜单中选择您的应用。
从目标设备菜单中,选择要用来运行应用的设备。

如果您未配置任何设备,则需要创建 Android 虚拟设备以便使用 Android 模拟器,或连接实体设备。
点击 Run 按钮
 。
。
如果尝试将项目启动到存在相关错误或警告的设备,Android Studio 会发出警告。图标和样式的变更分成了错误(导致配置失败的设备选择)和警告(可能导致意外行为但仍可运行的设备选择)。
监控构建流程
如需查看有关构建流程的详细信息,请依次选择 View > Tool Windows > Build,或点击工具窗口栏中的 Build 图标  。Build 工具窗口会显示 Gradle 为构建应用而执行的任务,如图 1 所示。
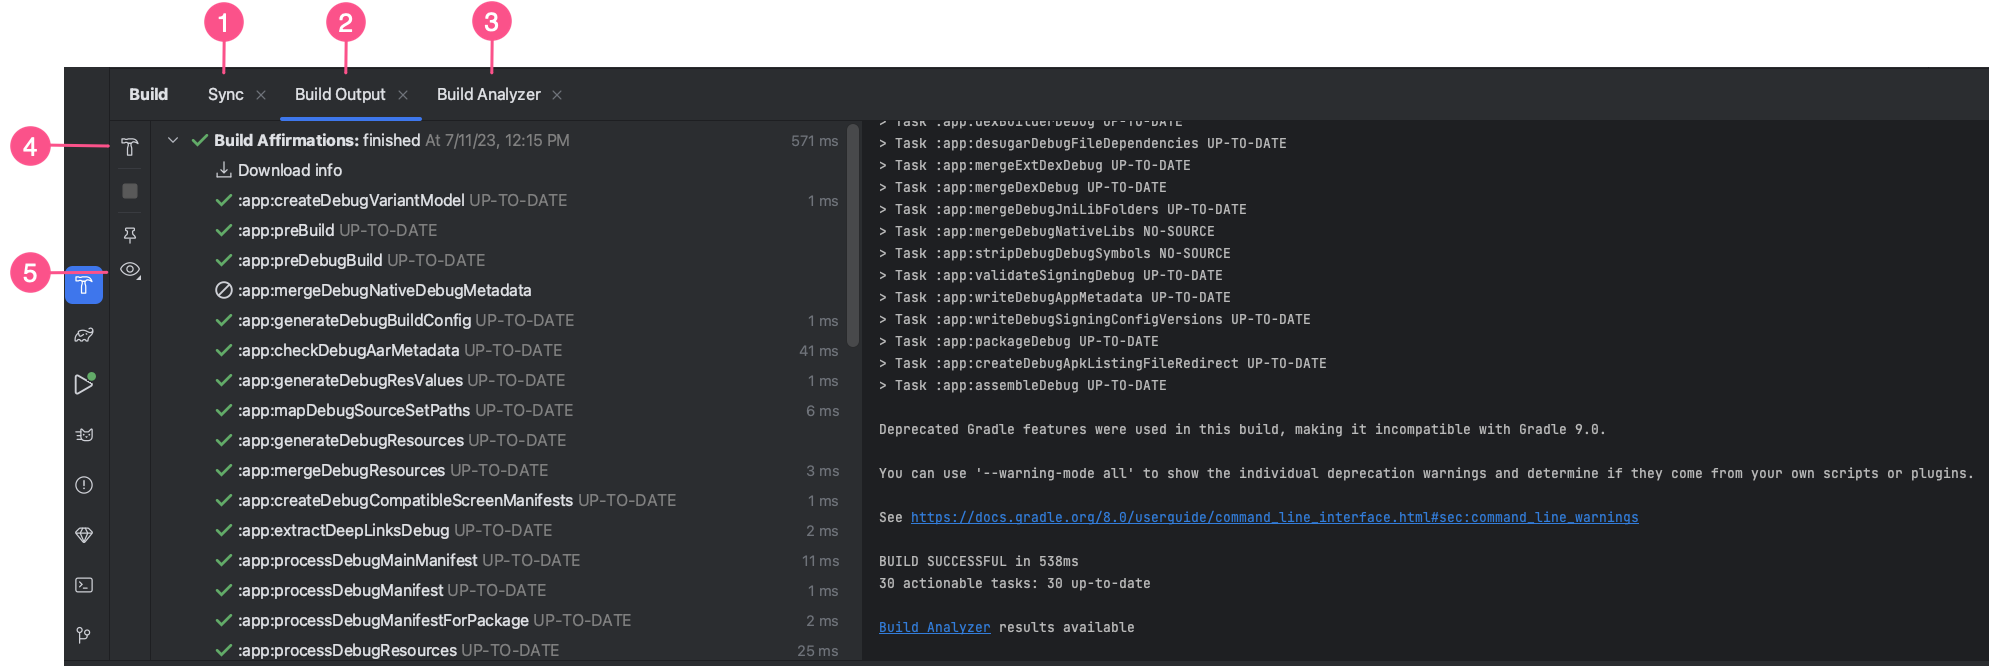
- “Sync”标签页:显示 Gradle 为与项目文件同步而执行的任务。与 Build Output 标签页类似,如果您遇到同步错误,可以在树中选择元素来获取有关错误的更多信息。此外,该标签页还会显示下载影响的摘要,以确定依赖项下载是否会对 build 产生负面影响。
- “Build Output”标签页:以树状显示 Gradle 执行的任务,其中每个节点表示一个构建阶段或一组任务依赖项。如果您收到构建时错误或编译时错误,可以检查该树并选择一个元素来查看错误输出,如图 2 所示。

图 2. 在 Build Output 标签页中检查错误消息。 - “Build Analyzer”标签页:提供有关 build 的构建性能分析信息。如需了解详情,请参阅使用 Build Analyzer 排查构建性能问题。
- Restart:再次执行上次构建操作。如果上次运行的是 Build > Make Selected Module,系统就会构建当前模块。如果上次运行的是 Build > Make Project,系统会为项目中的所有模块生成中间构建文件。
- Filters:过滤掉已成功完成的警告和/或任务。这样可以更轻松地在输出结果中找出相应问题。
如果您的 build 变体使用产品变种,Gradle 也会调用任务来构建这些产品变种。如需查看所有可用构建任务的列表,请依次点击 View > Tool Windows > Gradle,或点击工具窗口栏中的 Gradle 图标  。
。
如果在构建流程中出现错误,Gradle 可能会向您推荐一些命令行选项来帮助您解决问题,如 --stacktrace 或 --debug。如需在构建流程中使用命令行选项,请执行以下操作:
- 打开 Settings 或 Preferences 对话框:
- 在 Windows 或 Linux 上,从菜单栏中依次选择 File > Settings。
- 在 macOS 上,从菜单栏中依次选择 Android Studio > Preferences。
- 依次转到 Build, Execution, Deployment > Compiler。
- 在“Command-line Options”旁边的文本字段中,输入您的命令行选项。
- 点击 OK 保存,然后退出。
当您下次尝试构建应用时,Gradle 会应用这些命令行选项。
使用 AI 代理构建和运行
Android Studio 中的 AI 代理可以使用相关工具来构建和部署您的应用,然后代表您验证应用的状态。使用 Agent Mode 时,代理可以执行以下任务:
- 将应用部署到已连接的实体设备或模拟器。
- 检查屏幕并拍摄屏幕截图,以验证界面变化。
- 检查 Logcat 是否有运行时错误或特定日志消息。
- 使用
adb shell命令与应用互动,以进行导航或输入数据。
使用 AI 代理构建和运行应用对于多阶段任务非常有用,因为在这些任务中,代理需要迭代地进行更改并验证这些更改是否按预期运行。
高级构建和运行功能
在 Android Studio 中构建和运行应用的默认方式应该足以测试简单的应用。不过,您可以将这些构建和运行功能用于更高级的用例:
如需在调试模式下部署应用,请点击 Debug 图标
 。在调试模式下运行应用,您就可以在代码中设置断点、在运行时检查变量和对表达式求值,以及运行调试工具。如需了解详情,请参阅调试应用。
如果您的应用较大且较复杂,请使用 Apply Changes,而不是点击 Run 图标
。这样就不必在每次部署更改时重启应用,从而节省时间。如需详细了解 Apply Changes,请参阅使用 Apply Changes 进行增量部署部分。如果您使用的是 Jetpack Compose,实时编辑是一项实验性功能,可让您实时更新可组合项,而无需重复点击 Run 图标
。这样一来,您就可以集中精力编写界面代码,最大限度地减少中断。如需了解详情,请参阅实时编辑(实验性)部分。如果您的应用有多个 build 变体或版本,您可以使用 Build Variants 工具窗口选择要部署的 build 变体。如需详细了解如何运行特定 build 变体,请参阅更改 build 变体部分。
若要调整应用安装、启动和测试选项,您可以更改运行/调试配置。如需详细了解如何创建自定义运行/调试配置,请参阅创建运行/调试配置部分。
我们建议您使用 Android Studio 来满足开发需求,但您也可以通过命令行将应用部署到虚拟设备或实体设备。如需了解详情,请参阅从命令行构建您的应用。
使用 Apply Changes 进行增量部署
在 Android Studio 3.5 及更高版本中,Apply Changes 可让您将代码和资源更改推送给正在运行的应用,而无需重启应用(在某些情况下,甚至无需重启当前的 activity)。当您要部署和测试小范围的增量更改,同时保持设备的当前状态时,这种灵活性可帮助您控制应用的重启范围。
Apply Changes 使用搭载 Android 8.0(API 级别 26)或更高版本的设备上支持的 Android JVMTI 实现中的功能。如需详细了解 Apply Changes 的运作方式,请参阅 Android Studio Project Marble:Apply Changes。
要求
Apply Changes 操作仅在满足以下条件时可用:
- 您使用调试 build 变体来构建应用的 APK。
- 您将应用部署到搭载 Android 8.0(API 级别 26)或更高版本的目标设备或模拟器上。
使用 Apply Changes
如果要将更改部署到兼容设备,请使用以下选项:
Apply Changes and Restart Activity 图标  :尝试通过重启 activity 但不重启应用来应用资源和代码更改。通常,如果您修改了方法正文中的代码或修改了现有资源,可以使用此选项。
您还可以按 Ctrl + Alt + F10(在 macOS 上,按 Ctrl + Command + Shift + R)来执行此操作。
Apply Code Changes 图标  :尝试仅应用代码更改,而不重启任何内容。通常,如果您修改了方法正文中的代码,但没有修改任何资源,可以使用此选项。如果您既修改了代码,又修改了资源,则应改用 Apply Changes and Restart Activity。
您还可以按 Ctrl + F10(在 macOS 上,按 Ctrl + Command + R)来执行此操作。
Run 图标 :部署所有更改并重启应用。如果使用哪个 Apply Changes 选项都无法应用您所做的更改,请使用此选项。如需详细了解哪些类型的更改需要重启应用,请参阅 Apply Changes 的限制部分。
为 Apply Changes 启用运行回退机制
在您点击 Apply Changes and Restart Activity 或 Apply Code Changes 后,Android Studio 会构建新 APK 并确定是否可以应用更改。如果无法应用更改并且会导致 Apply Changes 失败,则 Android Studio 会改为提示您重新运行您的应用(通过点击 Run 图标 )。
如果您不想在每次发生这种情况时都收到提示,则可以将 Android Studio 配置为在无法应用更改时自动重新运行您的应用。如需启用此行为,请按以下步骤操作:
打开 Settings 或 Preferences 对话框:
- 在 Windows 或 Linux 上,从菜单中依次选择 File > Settings。
- 在 macOS 上,从菜单中依次选择 Android Studio > Preferences。
依次前往 Build, Execution, Deployment > Deployment。
选中复选框以针对任一 Apply Changes 操作启用自动运行回退机制。
点击 OK。
依赖于平台的更改
Apply Changes 的某些功能依赖于 Android 平台的特定版本。如要应用这些类型的更改,您的应用必须部署到搭载相应 Android 版本(或更高版本)的设备上。例如,添加方法需要 Android 11 或更高版本。
Apply Changes 的限制
Apply Changes 旨在加快应用部署流程。不过,该功能的使用时机存在一些限制。
需要重启应用才能实现的代码更改
某些代码和资源更改必须在重启应用之后才能应用,其中包括以下更改:
- 添加或移除字段
- 移除方法
- 更改方法签名
- 更改方法或类的修饰符
- 更改类继承行为
- 更改枚举中的值
- 添加或移除资源
- 更改应用清单
- 更改原生库(SO 文件)
库和插件
某些库和插件会自动更改应用的清单文件或清单中引用的资源。这些自动更新可能会通过以下方式干扰 Apply Changes:
- 如果库或插件更改应用的清单,您不能使用 Apply Changes。您必须重启应用才能看到更改。
- 如果库或插件更改应用的资源文件,您不能使用 Apply Code Changes 图标 。您必须使用 Apply Changes and Restart Activity 图标 (或重启应用)才能看到相应更改。
若要避免受到这些限制的影响,不妨为调试 build 变体停用所有自动更新。
例如,Firebase Crashlytics 在每次构建过程中都会使用唯一的 build ID 来更新应用资源,让您无法使用 Apply Code Changes 图标 ,因此您需要重启应用的 activity 才能看到相应更改。您只需停用此行为,便可搭配调试 build 使用 Apply Code Changes 和 Crashlytics。
直接引用已安装 APK 中的内容的代码
如果您的代码直接引用已在设备上安装的应用 APK 中的内容,在您点击 Apply Code Changes 图标 后,该代码可能会导致崩溃或出现异常。之所以发生这种行为,是因为您点击 Apply Code Changes 后,设备上的底层 APK 会在安装过程中遭到替换。在这些情况下,您可以改为点击 Apply Changes and Restart Activity 图标 或 Run 图标 。
如果您在使用 Apply Changes 时遇到任何其他问题,请提交 bug。
实时编辑
实时编辑是 Android Studio 中的一项实验性功能,可让您实时更新模拟器和实体设备中的可组合项。此功能可最大限度地减少编写应用与构建应用之间的上下文切换,从而减少中断,让您有更多时间专注于代码编写。
更改 build 变体
默认情况下,在您点击 Run 图标  后,Android Studio 会构建应用的调试版本,不过这只能在开发期间使用。
如需更改 Android Studio 使用的 build 变体,请执行以下操作之一:
- 在菜单中依次选择 Build > Select Build Variant。
- 在菜单中依次选择 View > Tool Windows > Build Variants。
- 点击工具窗口栏上的 Build Variants 标签页。
对于不含原生/C++ 代码的项目,Build Variants 面板有两列:Module 和 Active Build Variant。模块的 Active Build Variant 值决定了 IDE 部署到连接的设备并显示在编辑器中的 build 变体。

图 9. 对于不含原生/C++ 代码的项目,Build Variants 面板有两列。
如需在变体之间切换,请点击模块的 Active Build Variant 单元格,然后从列表中选择所需的变体。
对于含有原生/C++ 代码的项目,Build Variants 面板包含三列:
- Module
- Active Build Variant
- Active ABI
模块的 Active Build Variant 值决定了 IDE 部署到设备并显示在编辑器中的 build 变体。对于原生模块,Active ABI 值决定了编辑器使用的 ABI,但不会影响部署的内容。

图 10. 对于含有原生/C++ 代码的项目,Build Variants 面板增加了 Active ABI 列。
如要更改 build 变体或 ABI,请点击 Active Build Variant 或 Active ABI 列的单元格,然后从列表中选择所需的变体或 ABI。您更改选择后,IDE 会自动同步您的项目。更改应用或库模块的任一列都会将更改应用于所有依赖行。
默认情况下,新项目设有两个 build 变体:调试变体和发布变体。您需要构建发布变体来为应用的公开发布做好准备。若要根据不同的功能或设备要求来定义应用的其他变体,您可以定义其他 build 变体。
Android Studio 的“Build Variants”对话框中的冲突
在 Android Studio 的 Build Variants 对话框中,您可能会看到一些错误消息,指出 build 变体之间存在冲突,示例如下:
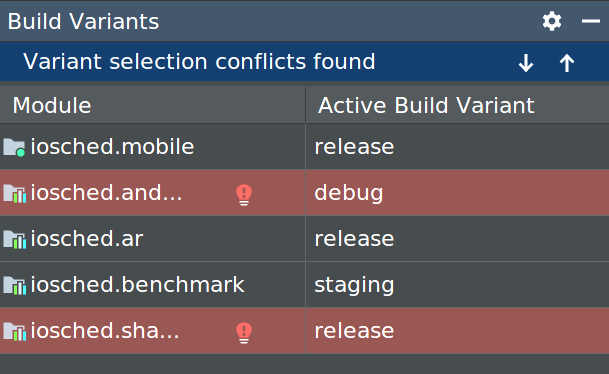
此错误并不表示 Gradle 存在构建问题,而是代表 Android Studio IDE 无法解析所选模块的变体之间的符号。
例如,如果您的模块 M1 依赖于模块 M2 的变体 v1,但在 IDE 中选定了 M2 的变体 v2,那么 IDE 中就会有未解析的符号。假设 M1 依赖于仅在 v1 中提供的类;如果 v2 被选定,IDE 就无法识别该类,因而无法解析该类名称,进而在 M1 模块的代码中显示错误。
之所以显示这些错误消息,是因为 IDE 无法同时加载多个变体的代码。不过,在应用的 build 方面,此对话框中选定的变体不会产生任何影响;因为在构建您的应用时,Gradle 使用的是您的 Gradle 构建方案中指定的源代码,而不是基于 IDE 中当前已加载的代码。
更改运行/调试配置
当您首次运行应用时,Android Studio 会使用默认运行配置。运行配置用于指定要通过 APK 还是 Android App Bundle 部署您的应用、要运行的模块、要部署的软件包、要启动的 activity、目标设备、模拟器设置、Logcat 选项,等等。
默认运行/调试配置会构建 APK,启动默认项目 activity,并使用 Select Deployment Target 对话框选择目标设备。如果默认设置不适合您的项目或模块,您可以自定义运行/调试配置,也可以在项目、默认和模块级别创建新配置。
如要修改运行/调试配置,请依次选择 Run > Edit Configurations。如需了解详情,请参阅创建和修改运行/调试配置。