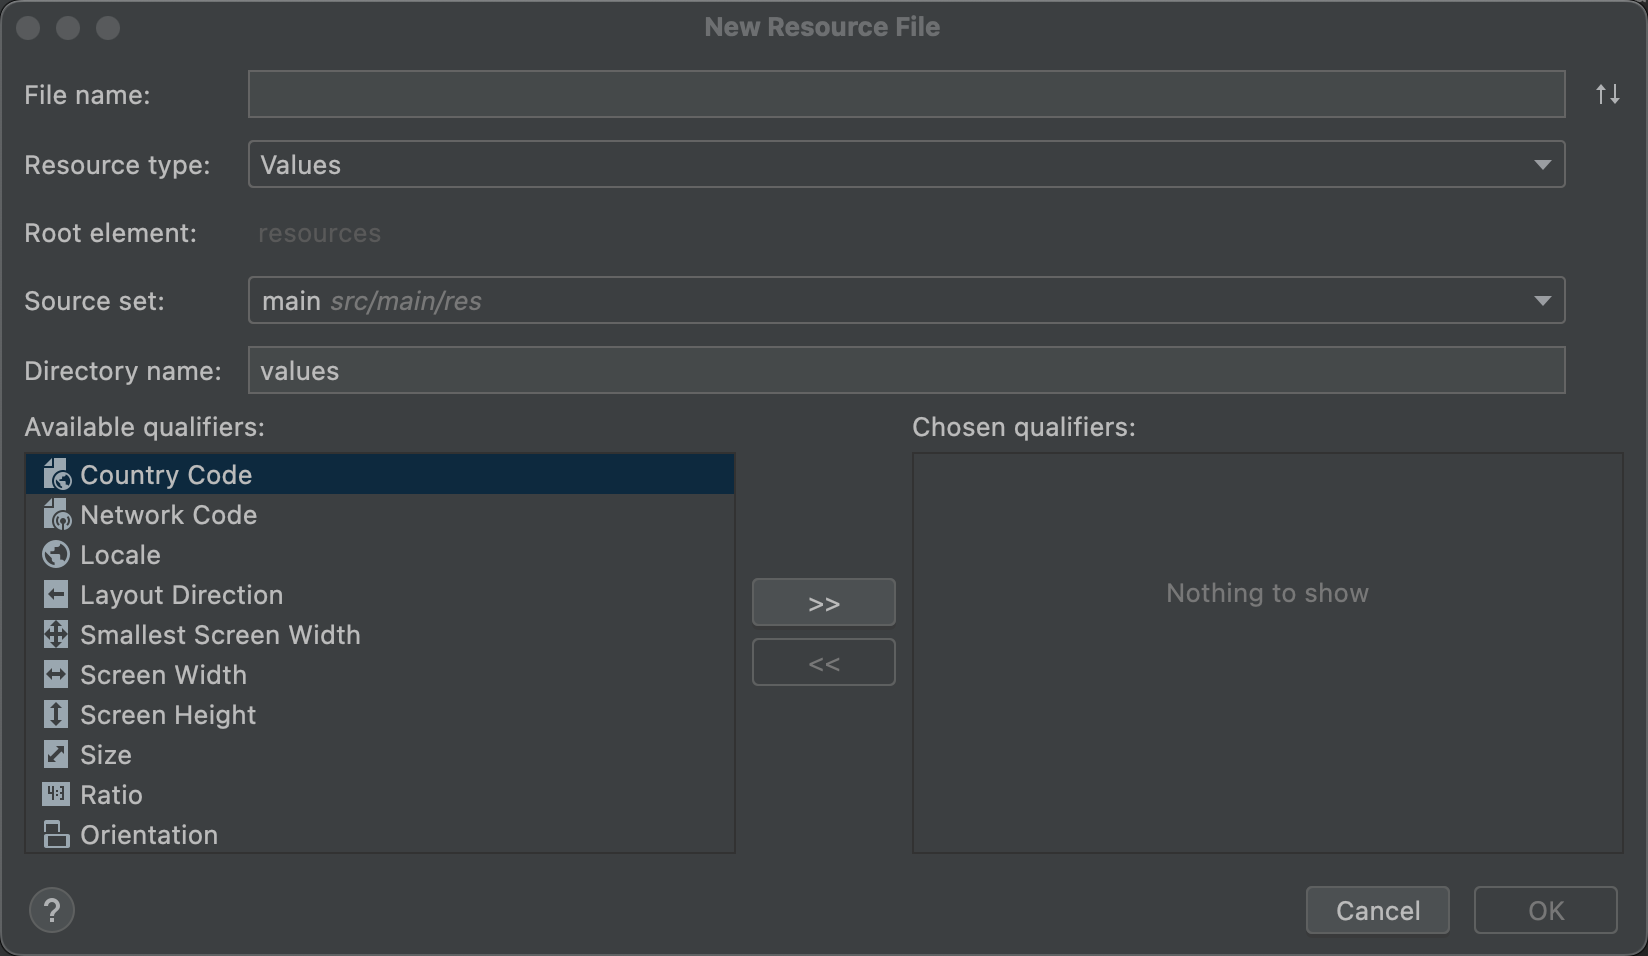
Directory name:目录命名方式必须特定于资源类型和配置限定符。请勿修改此字段,除非您想手动将配置限定符添加到目录名称(需改用 Available qualifiers)。
Available qualifiers:若要向目录名称添加所需配置限定符,您可从列表中选择它们并点击添加图标 ,而不必手动将它们添加到目录名称。
添加完所需的所有限定符之后,点击 OK。
提示:如需打开与您所需资源类型对应的简化版 New Resource File 对话框,请在 res 文件夹内右键点击现有资源目录,然后依次选择 New > type-name resource file。
内嵌复杂的 XML 资源
提示:某些复杂的资源需要多个 XML 资源文件。例如,动画矢量可绘制对象有一个矢量可绘制对象和一个动画对象,并且需要至少 3 个 XML 文件。
在此示例中,如需重复使用这 3 个不同的 XML 文件中的一个或多个,您可创建并保留这些文件。但是,如果这些 XML 文件仅用于这个动画矢量可绘制对象,您便可改用 Android 资源打包工具 (AAPT) 中提供的内嵌资源格式。借助 AAPT,您可在同一个 XML 文件中定义所有这 3 种资源。如需了解详情,请参阅内嵌复杂的 XML 资源。
添加资源目录
如需添加新的资源目录,请按照以下步骤操作:
点击 Project 窗口中的目标应用模块。
依次选择 File > New > Android resource directory。
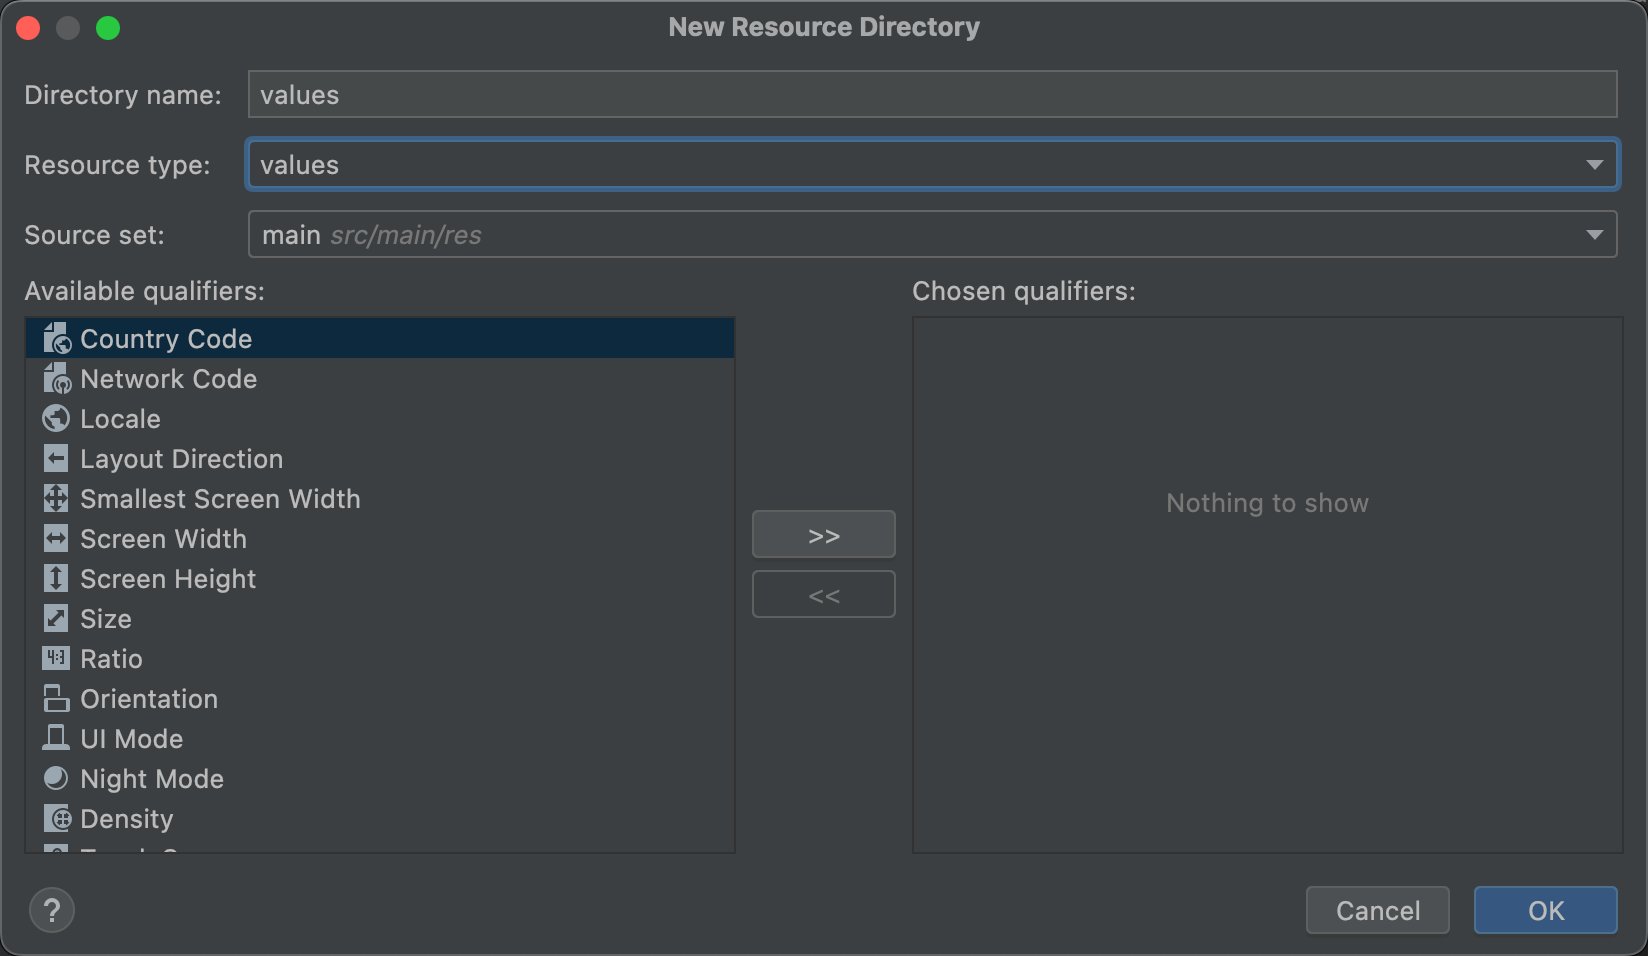
图 2.New Resource Directory 对话框。
在对话框中填写详细信息:
Directory name:目录命名方式必须特定于资源类型以及配置限定符的组合。请勿修改此字段,除非您想手动将配置限定符添加到目录名称(需改用 Available qualifiers)。
Resource type:选择您希望目录包含的资源的类型。
Source set:选择要将目录保存到哪个源代码集。
Available qualifiers:若要向目录名称添加所需配置限定符,您可从列表中选择它们并点击添加图标 ,而不必手动将它们添加到目录名称。
[null,null,["最后更新时间 (UTC):2025-07-27。"],[],[],null,["# Add app resources\n\nApp resources, such as bitmaps and layouts, are organized into type-specific\ndirectories inside each module's `res/` directory. You can also add alternative\nversions of each file that are optimized for different device\nconfigurations, such as a high-res version of a bitmap for high-density\nscreens.\n\nAndroid Studio helps you add new resources and alternative resources in several\nways, depending on the type of resource you want to add. This page describes how\nto add basic resource files, how to change the location of your resources, and\nhow resource merging works.\n\nSee the following pages for details about how to create\nspecific resource types:\n\n- To add layout files, see [Build a UI with Layout Editor](/studio/write/layout-editor).\n- To add string files, see [Localize the UI with Translations Editor](/studio/write/translations-editor).\n- To add bitmaps, see [Create app icons with Image Asset Studio](/studio/write/image-asset-studio).\n- To add SVG files, see [Add multi-density vector graphics](/studio/write/vector-asset-studio).\n\nFor information about how to reference the resources from your app\ncode, see\n[App resources overview](/guide/topics/resources/providing-resources).\n\nAdd an XML resource file\n------------------------\n\nAlthough the preceding page links describe workflows that are customized to each\ntype of resource, you can add any XML resource file by following these\nsteps:\n\n1. Click the target app module in the **Project** window in either\n the **Android** or **Project** view.\n\n2. Select **File \\\u003e New \\\u003e\n Android resource file** .\n\n \u003cbr /\u003e\n\n\n **Figure 1.** **New Resource File** dialog.\n3. Fill out the details in the dialog:\n - **File name** : Enter the name for the XML file (this doesn't require the `.xml` suffix).\n - **Resource type**: Select the type of resource you want to create.\n - **Root element**: If applicable, select the root XML element for the file. Some resource types support only one type of root element. Depending on the resource type selected, this might not be editable.\n - **Source set** : Select the [source set](/studio/build#sourcesets) where you want to save the file.\n - **Directory name** : The directory must be named in a way that's specific to the resource type and configuration qualifiers. Don't edit this unless you want to add configuration qualifiers to the directory name manually (use **Available qualifiers** instead).\n - **Available qualifiers** : Instead of manually including configuration qualifiers in your directory name, you can add them by selecting a qualifier from the list and clicking **Add** .\n4. Once you've added all the qualifiers you want, click **OK**.\n\n\n**Tip:** To open a simplified version of the **New Resource File** dialog\nthat's specific to the resource type you want to add, right-click an existing\nresource directory within the **res** folder and select\n**New \\\u003e \u003cvar translate=\"no\"\u003etype-name\u003c/var\u003e resource file**.\n\n### Inline complex XML resources\n\nSome complex resources require multiple XML resource files. For example, an\nanimated vector drawable has a vector drawable object and an animation object\nand requires at least three XML files.\n\nIn this example, you can create and keep the three separate XML files if you need to reuse one or more of\nthem. But if the XML files are used only for this animated vector drawable,\nyou can instead use the inline resource format provided in the Android Asset\nPackaging Tool (AAPT). With AAPT, you can define all three resources in one XML\nfile. For more information, see [Inline complex XML\nresources](/guide/topics/resources/complex-xml-resources).\n| **Note:** Autocompletion isn't supported for inline resources. When developing new complex resources it can be easier to create them using separate resources and combine them into a single inline file once the resource is working as intended.\n\nAdd a resource directory\n------------------------\n\nTo add a new resource directory, follow these steps:\n\n1. Click the target app module in the **Project** window.\n\n2. Select **File \\\u003e New \\\u003e Android resource directory** .\n\n \u003cbr /\u003e\n\n\n **Figure 2.** **New Resource Directory** dialog.\n3. Fill in the details in the dialog:\n - **Directory name** : The directory must be named in a way that's specific to the resource type and combination of configuration qualifiers. Don't edit this unless you want to add configuration qualifiers to the directory name manually (use **Available qualifiers** instead).\n - **Resource type:** Select the type of resource you want the directory to contain.\n - **Source set:** Select the source set where you want the directory.\n - **Available qualifiers:** Instead of manually including configuration qualifiers in your directory name, you can add them by selecting a qualifier from the list and clicking **Add** .\n4. Once you've added all the qualifiers you want, click **OK**.\n\nChange your resource directory\n------------------------------\n\nBy default, your resources are located in\n\u003cvar translate=\"no\"\u003emodule-name\u003c/var\u003e`/src/`\u003cvar translate=\"no\"\u003esource-set-name\u003c/var\u003e`/res/`.\nFor example, resources for your module's main source set are in `src/main/res/`,\nand resources for the debug source set are in `src/debug/res/`.\n\nHowever, you can change these paths to any other\nlocation (relative to the `build.gradle` file) with the `res.srcDirs` property\nin the `sourceSets` block. For example: \n\n### Groovy\n\n```groovy\nandroid {\n sourceSets {\n main {\n res.srcDirs = ['resources/main']\n }\n debug {\n res.srcDirs = ['resources/debug']\n }\n }\n}\n```\n\n### Kotlin\n\n```kotlin\nandroid {\n sourceSets {\n getByName(\"main\") {\n res.srcDirs(\"resources/main\")\n }\n getByName(\"debug\") {\n res.srcDirs(\"resources/debug\")\n }\n }\n}\n```\n\nYou can also specify multiple resource directories for one source set, and then\nthe build tools merge them together. For example: \n\n### Groovy\n\n```groovy\nandroid {\n sourceSets {\n main {\n res.srcDirs = ['res1', 'res2']\n }\n }\n}\n```\n\n### Kotlin\n\n```kotlin\nandroid {\n sourceSets {\n main {\n res.srcDirs(\"res1\", \"res2\")\n }\n }\n}\n```\n| **Note:** If two or more resource directories contain the same resource file, an error occurs during resource merging.\n\nFor more information, read about\n[source sets](/studio/build/build-variants#sourcesets).\n\nResource merging\n----------------\n\nResources in your final app file can come from three sources:\n\n- The main source set (generally located in `src/main/res/`)\n- [Build variant](/studio/build/build-variants) source sets\n- Android libraries (AARs)\n\nWhen all resources from each source set or library are unique, they're all\nadded into the final app. A resource is considered unique if its filename is\nunique within both its\n[resource type](/guide/topics/resources/available-resources) directory\nand the\n[resource qualifier](/guide/topics/resources/providing-resources#AlternativeResources)\n(if defined).\n\nIf there are two or more matching versions of the same resource,\nthen only one version is included in the final app. The build tools select\nwhich version to keep based on the following priority order (highest priority\non the left):\n\u003e build variant \\\u003e build type \\\u003e product flavor \\\u003e main source set \\\u003e library dependencies\n\nFor example, if the main source set contains:\n\n- `res/layout/example.xml`\n- `res/layout-land/example.xml`\n\nAnd the debug build type contains:\n\n- `res/layout/example.xml`\n\nThen the final app includes `res/layout/example.xml` from the debug build type and\n`res/layout-land/example.xml` from the main source set.\n\nHowever, if your build configuration specifies\n[multiple resource folders](#change_your_resource_directory) for\na given source set and there are conflicts between those sources, an error\noccurs and the merge fails because each resource directory has the same\npriority."]]