
WebP 是 Google 的一种可以同时提供有损压缩(像 JPEG 一样)和透明度(像 PNG 一样)的图片文件格式,不过与 JPEG 或 PNG 相比,这种格式可以提供更好的压缩。Android 4.0(API 级别 14)及更高版本支持有损 WebP 图片,Android 4.3(API 级别 18)及更高版本支持无损且透明的 WebP 图片。此页面介绍了如何将图片转换为 WebP 格式,以及如何将 WebP 图片转换为 PNG 格式。
如需详细了解如何选择正确的图片格式以提高下载速度,请参阅缩减图片下载大小。
将图片转换为 WebP 格式
Android Studio 可以将 PNG、JPG、BMP 或静态 GIF 图片转换为 WebP 格式。您可以转换单张图片,也可以转换包含多张图片的文件夹。
若要转换某张图片或包含多张图片的文件夹,请按照下列步骤操作:
- 右键点击某个图片文件或包含一些图片文件的文件夹,然后点击 Convert to WebP。
Converting Images to WebP 对话框随即打开。默认设置取决于当前模块的
minSdkVersion设置。

图 1. “Converting Images to WebP”对话框。 -
选择有损或无损编码。
无损编码仅在您的minSdkVersion设置为 18 或更高时可用。如果选择有损编码,请设置编码质量,并选择是否在保存之前查看每张转换后图片的预览效果。
您还可以选择跳过编码后版本大于原始版本的所有文件,或所有具有透明度通道或 Alpha 通道的文件。由于 Android Studio 仅允许您在
minSdkVersion设置为 18 或更高时创建透明的 WebP 图片,因此,如果minSdkVersion低于 18,系统会自动选中 Skip images with transparency/alpha channel 复选框。注意:9-patch 文件无法转换为 WebP 图片。转换器工具总是会自动跳过 9-patch 图片。
-
点击 OK 以开始转换。
如果要转换多张图片,只需一步即可完成转换操作,并且可以撤消转换操作以便一次性还原已转换的所有图片。
如果您选择了无损转换,系统会立即进行转换。图片会在原始位置进行转换。如果您选择了有损转换,请继续执行下一步。
-
如果您选择了有损转换,并且选择在保存之前查看每张转换后图片的预览效果,那么 Android Studio 会在转换过程中显示每张图片,以便您检查转换结果。在预览步骤中,您可以单独调整每张图片的质量设置,如图 2 所示。
如果您未选择预览转换后的图片,Android Studio 会跳过此步骤,并立即转换图片。
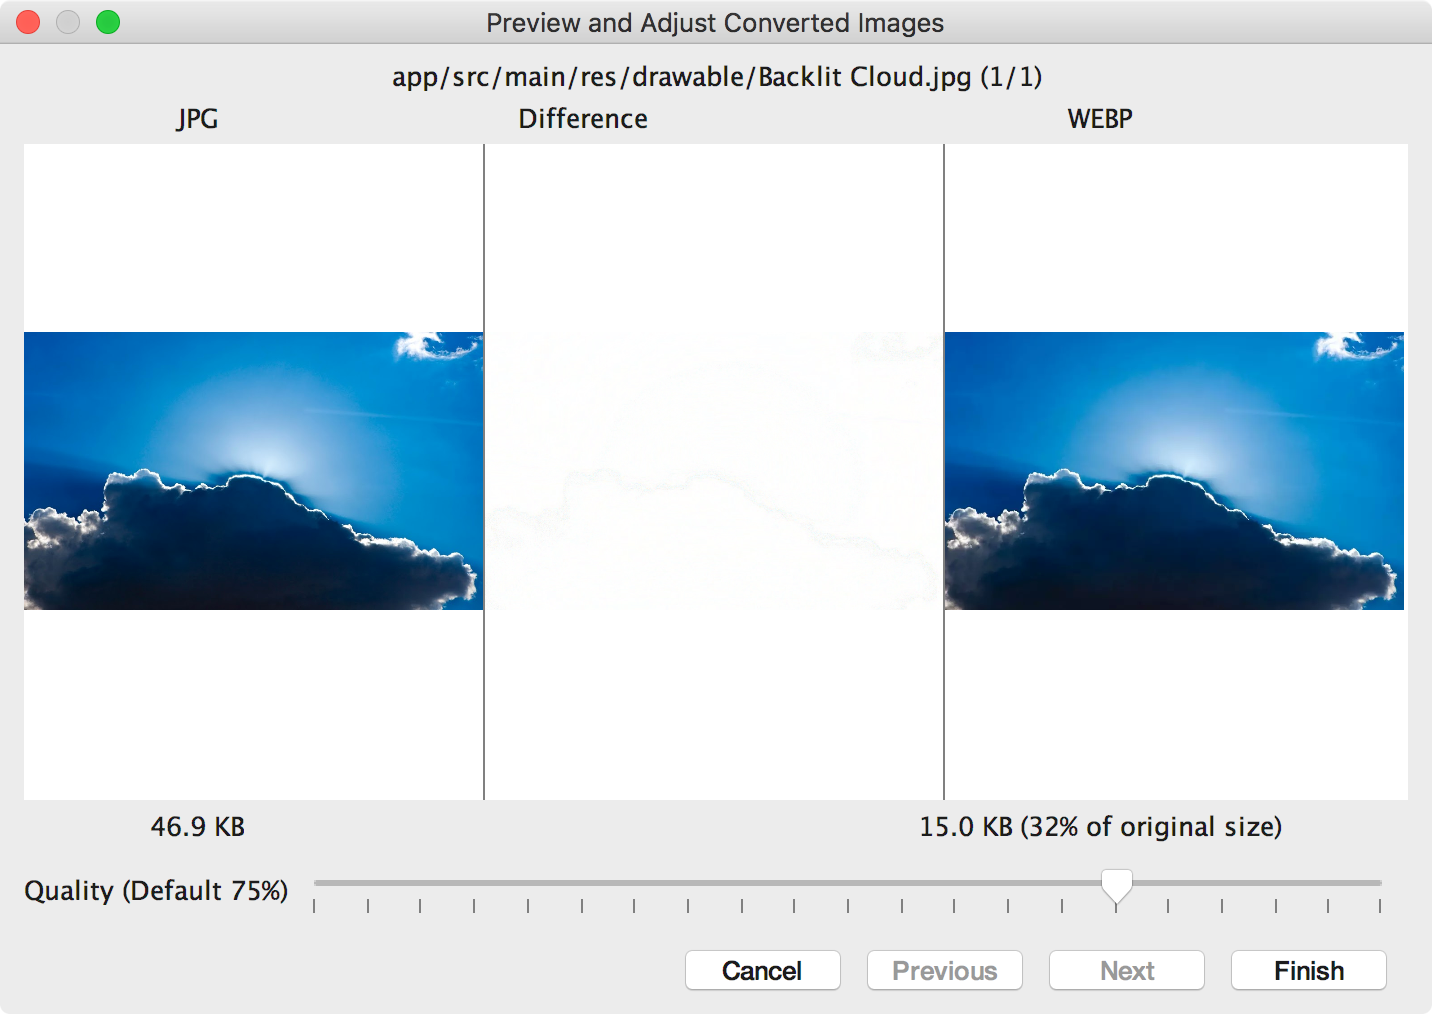
图 2. 预览转为 WebP 格式(质量为 75%)的 JPG 图片的转换效果。 在图 2 中,左侧是原始 JPG 图片,右侧是有损编码 WebP 图片。对话框中显示了原始图片和转换后图片的文件大小。您可以向左或向右拖动滑块以更改质量设置,并能够立即看到编码图片的效果和文件大小。
中间区域显示了原始图片和编码后图片的哪些像素存在差异。在图 2 中,由于质量设置为 75%,因此这两种图片之间几乎没有任何差异。图 3 显示了质量设置为 0% 的同一编码图片。

图 3. 预览转为 WebP 格式(质量为 0%)的 JPG 图片的转换效果。 注意:如果将质量设置为 100% 并且
minSdkVersion设置为 18 或更高,则 Android Studio 会自动切换为无损编码。为您查看的每张图片选择一个质量设置。如果您要转换多张图片,请点击 Next 跳转到下一张图片。
- 点击 Finish。图片会在原始位置进行转换。
将 WebP 图片转换为 PNG 格式
如果您要将项目中的 WebP 图片用于其他目的(例如,对于需要在不支持 WebP 的浏览器中正确显示图片的网页),可以使用 Android Studio 将 WebP 图片转换为 PNG 格式。
若要将 WebP 图片转换为 PNG 格式,请按照下列步骤操作:
- 在 Android Studio 中右键点击相应 WebP 图片,然后点击 Convert to PNG。
系统会显示一个对话框,询问您是要在转换后删除原始 WebP 文件,还是保留原始 WebP 文件以及新的 PNG 文件。
若要删除原始 WebP 文件,请点击 Yes;若要保留 WebP 文件以及 PNG 文件,请点击 No。图片会立即转换。