
使用 BluetoothAdapter,您可以通过设备发现或查询已配对设备列表来查找远程蓝牙设备。
在尝试查找蓝牙设备之前,请确保您已获得适当的蓝牙权限并为应用设置蓝牙。
设备发现是一种扫描过程,用于搜索本地区域内支持蓝牙的设备,并请求获取每台设备的部分信息。此过程有时也称为发现、查询或扫描。只有当附近的蓝牙设备当前处于可检测状态,才会响应发现请求。如果设备可检测到,则会通过分享一些信息(例如设备名称、类别和唯一 MAC 地址)来响应发现请求。然后,执行发现过程的设备可以使用这些信息选择与发现的设备建立连接。
由于可检测到的设备可能会泄露用户位置信息,因此设备发现流程需要位置信息访问权限。如果您的应用是在搭载 Android 8.0(API 级别 26)或更高版本的设备上使用,不妨改用 Companion Device Manager API。此 API 会代表您的应用执行设备发现,因此您的应用无需请求位置信息权限。
首次与远程设备建立连接后,系统会自动向用户显示配对请求。配对设备后,系统会保存该设备的基本信息(例如设备的名称、类别和 MAC 地址),并且可以使用蓝牙 API 读取这些信息。使用远程设备的已知 MAC 地址,可以随时与其建立连接,而无需执行发现操作(假设设备仍在范围内)。
请注意,被配对与被连接之间存在区别:
- 配对表示两部设备相互知晓,具有可用于身份验证的共享链接密钥,并且能够相互建立加密连接。
- 已连接表示设备目前共用一个 RFCOMM 通道,并且能够相互传输数据。当前的蓝牙 API 要求设备先配对,然后才能建立 RFCOMM 连接。当您使用蓝牙 API 发起加密连接时,系统会自动执行配对。
以下部分介绍了如何查找已配对的设备,以及如何使用设备发现功能发现新设备。
查询已配对设备
在执行设备发现之前,不妨查询一组已配对的设备,看看是否已知所需的设备。为此,请调用 getBondedDevices()。这会返回一组代表已配对设备的 BluetoothDevice 对象。例如,您可以查询所有已配对的设备,并获取每个设备的名称和 MAC 地址,如以下代码段所示:
Kotlin
val pairedDevices: Set<BluetoothDevice>? = bluetoothAdapter?.bondedDevices
pairedDevices?.forEach { device ->
   val deviceName = device.name
   val deviceHardwareAddress = device.address // MAC address
}
Java
Set<BluetoothDevice> pairedDevices = bluetoothAdapter.getBondedDevices();

if (pairedDevices.size() > 0) {
   // There are paired devices. Get the name and address of each paired device.
   for (BluetoothDevice device : pairedDevices) {
       String deviceName = device.getName();
       String deviceHardwareAddress = device.getAddress(); // MAC address
   }
}
如需与蓝牙设备建立连接,您只需从关联的 BluetoothDevice 对象中获取 MAC 地址,您可以通过调用 getAddress() 来检索该地址。如需详细了解如何创建连接,请参阅连接蓝牙设备。
发现设备
如需开始发现设备,请调用 startDiscovery()。该过程是异步的,并会返回一个布尔值,指示是否已成功启动发现。发现过程通常涉及大约 12 秒的查询扫描,然后对找到的每台设备进行页面扫描以检索其蓝牙名称。
如需接收有关发现的每部设备的信息,您的应用必须为 ACTION_FOUND intent 注册 BroadcastReceiver。系统会针对每台设备广播此 intent。intent 包含额外的字段 EXTRA_DEVICE 和 EXTRA_CLASS,它们分别包含 BluetoothDevice 和 BluetoothClass。以下代码段展示了如何注册以在发现设备时处理广播:
Kotlin
override fun onCreate(savedInstanceState: Bundle?) {
   ...

   // Register for broadcasts when a device is discovered.
   val filter = IntentFilter(BluetoothDevice.ACTION_FOUND)
   registerReceiver(receiver, filter)
}

// Create a BroadcastReceiver for ACTION_FOUND.
private val receiver = object : BroadcastReceiver() {

   override fun onReceive(context: Context, intent: Intent) {
       val action: String = intent.action
       when(action) {
           BluetoothDevice.ACTION_FOUND -> {
               // Discovery has found a device. Get the BluetoothDevice
               // object and its info from the Intent.
               val device: BluetoothDevice =
                       intent.getParcelableExtra(BluetoothDevice.EXTRA_DEVICE)
               val deviceName = device.name
               val deviceHardwareAddress = device.address // MAC address
           }
       }
   }
}

override fun onDestroy() {
   super.onDestroy()
   ...

   // Don't forget to unregister the ACTION_FOUND receiver.
   unregisterReceiver(receiver)
}
Java
@Override
protected void onCreate(Bundle savedInstanceState) {
   ...

   // Register for broadcasts when a device is discovered.
   IntentFilter filter = new IntentFilter(BluetoothDevice.ACTION_FOUND);
   registerReceiver(receiver, filter);
}

// Create a BroadcastReceiver for ACTION_FOUND.
private final BroadcastReceiver receiver = new BroadcastReceiver() {
   public void onReceive(Context context, Intent intent) {
       String action = intent.getAction();
       if (BluetoothDevice.ACTION_FOUND.equals(action)) {
           // Discovery has found a device. Get the BluetoothDevice
           // object and its info from the Intent.
           BluetoothDevice device = intent.getParcelableExtra(BluetoothDevice.EXTRA_DEVICE);
           String deviceName = device.getName();
           String deviceHardwareAddress = device.getAddress(); // MAC address
       }
   }
};

@Override
protected void onDestroy() {
   super.onDestroy();
   ...

   // Don't forget to unregister the ACTION_FOUND receiver.
   unregisterReceiver(receiver);
}
如需与蓝牙设备建立连接,您需要对 BluetoothDevice 调用 getAddress() 以检索关联的 MAC 地址。
启用可检测性
如需让本地设备可被其他设备发现,请使用 ACTION_REQUEST_DISCOVERABLE intent 调用 startActivityForResult(Intent, int)。这会发出请求来启用系统的可检测到模式,而无需前往“设置”应用(这会停止您自己的应用)。默认情况下,设备会在两分钟内处于可检测到模式。您可以通过添加 EXTRA_DISCOVERABLE_DURATION 额外内容来定义不同的时长(最长五分钟)。
以下代码段将设备设置为在五分钟内可被发现:
Kotlin
val requestCode = 1;
val discoverableIntent: Intent = Intent(BluetoothAdapter.ACTION_REQUEST_DISCOVERABLE).apply {
   putExtra(BluetoothAdapter.EXTRA_DISCOVERABLE_DURATION, 300)
}
startActivityForResult(discoverableIntent, requestCode)
Java
int requestCode = 1;
Intent discoverableIntent =
       new Intent(BluetoothAdapter.ACTION_REQUEST_DISCOVERABLE);
discoverableIntent.putExtra(BluetoothAdapter.EXTRA_DISCOVERABLE_DURATION, 300);
startActivityForResult(discoverableIntent, requestCode);
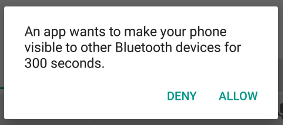
图 2:启用可检测性对话框。
系统会显示一个对话框,请求用户授予使设备可检测到的权限,如图 2 所示。如果用户回复“允许”,则设备将在指定的时间段内处于可检测状态。然后,您的 activity 会收到对 onActivityResult() 回调的调用,其中结果代码等于设备可检测到的时长。如果用户回复“拒绝”,或者发生错误,则结果代码为 RESULT_CANCELED。
设备会在分配的时间内静默保持在可检测到模式。如需在可检测到的模式发生变化时收到通知,请为 ACTION_SCAN_MODE_CHANGED intent 注册 BroadcastReceiver。此 intent 包含 extra 字段 EXTRA_SCAN_MODE 和 EXTRA_PREVIOUS_SCAN_MODE,分别提供新扫描模式和旧扫描模式。每个 extra 的可能值如下:
SCAN_MODE_CONNECTABLE_DISCOVERABLE- 设备处于可检测到模式。
SCAN_MODE_CONNECTABLE- 设备未处于可检测到模式,但仍可接收连接。
SCAN_MODE_NONE- 设备未处于可检测到模式,无法接收连接。
如果您要发起与远程设备的连接,则无需启用设备可检测性。只有当您希望应用托管接受传入连接的服务器套接字时,才需要启用可检测性,因为远程设备必须能够发现其他设备,然后才能发起与这些其他设备的连接。