
Wear OS 应用应独立于手机运行。不过,如果您的 Wear OS 应用依赖于移动应用,请参阅以下有关将模拟手表或实体手表连接到手机的信息。
将设备与手表模拟器配对
您可以通过手动方式或使用 Wear OS 模拟器配对助理将设备与手表 Android 虚拟设备 (AVD) 或模拟器配对。
使用 Wear OS 模拟器配对助理
借助 Wear OS 模拟器配对助理,您可以更轻松地管理和连接 Wear 模拟器。您可以将多部 Wear 设备与一部虚拟或实体手机配对。Android Studio 会保存之前配对过的设备,并在您启动此类设备时重新配对。
如需将两部设备配对,请按以下步骤操作:
创建 Wear 模拟器(如果尚未创建)。
在设备管理器中,点击要配对的设备旁边的溢出菜单图标,然后选择 Pair Wearable。
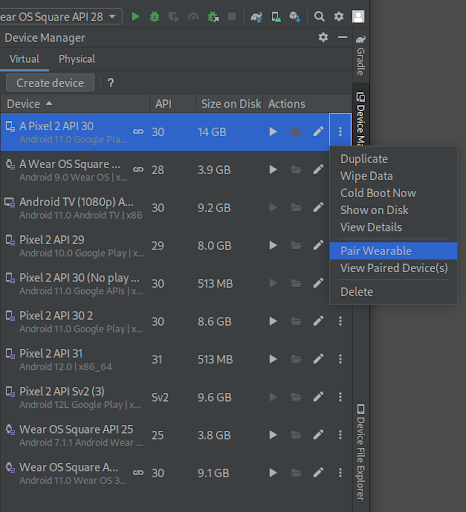
图 1:可与 Wear 模拟器配对的设备的溢出菜单。 此操作会启动 Wear OS 模拟器配对助理。如果您在手机的条目上选择了 Pair Wearable,则会看到一个可用 Wear 设备的列表。如果您是从 Wear 设备入手,则会看到一个可用手机的列表。选择要配对的设备,然后点按下一步。
Android Studio 可能需要几分钟时间才能启动并准备好相应设备。如果您的手机尚未安装 Wear OS 配套应用,请按照提示登录 Play 商店,然后安装并设置该应用。
如需在手机上的 Wear OS 应用中配对设备,请点按溢出菜单,然后选择与模拟器配对。
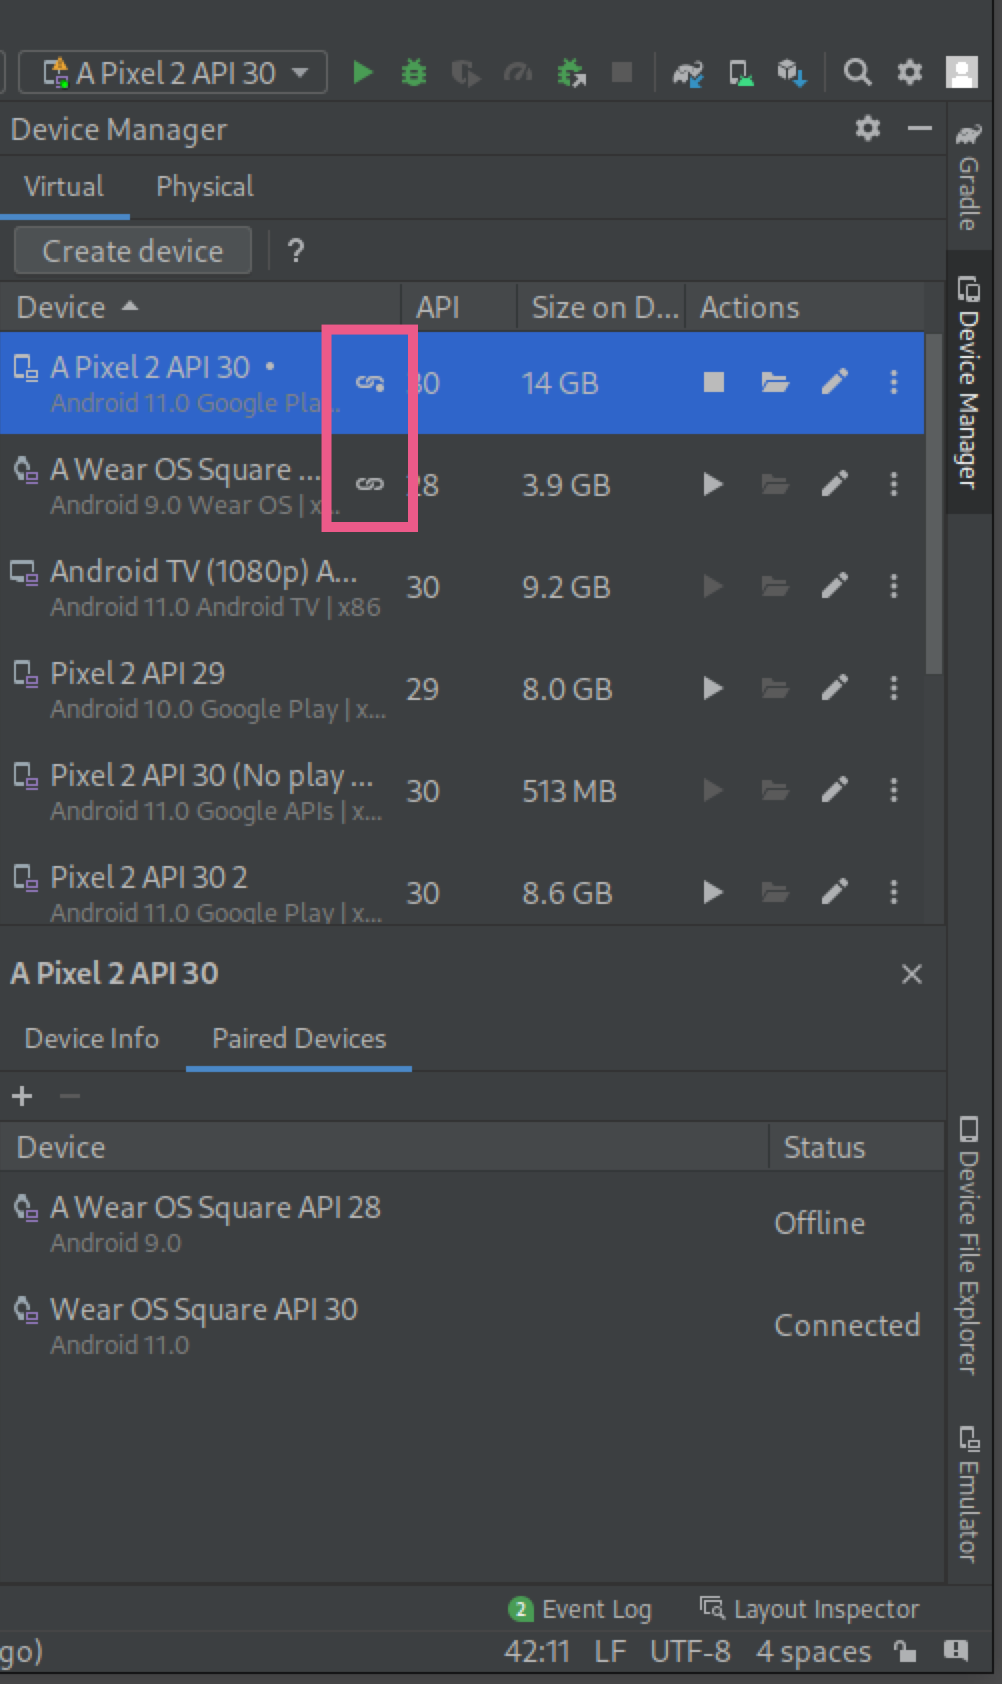
设备成功配对后,设备管理器会在已配对的设备旁边显示小图标。您也可以点按溢出下拉菜单,然后选择 View Details 以查看已配对设备的列表。
将手机与手表 AVD 配对
如需在手表 AVD 上添加一个 Google 账号以进行开发,请将手机与手表 AVD 配对,然后同步 Google 账号。接下来,按照下列步骤操作:
按照相关步骤设置手机。
在手机上,启用开发者选项和 USB 调试。
通过 USB 将手机连接到计算机。
在每次连接手机时,使用以下命令将 AVD 的通信端口转接到连接的手机:
adb -d forward tcp:5601
tcp:5601
在手机上的 Wear OS 配套应用中,开始执行标准配对过程。例如,在欢迎界面上,点按设置按钮。或者,如果已配对某个现有手表,请点按添加新手表。
在手机上的 Wear OS 配套应用中,点按溢出菜单,然后点按与模拟器配对。
点按设置图标。
在设备设置下方,点按模拟器。
点按账号,然后选择一个 Google 账号。按照向导中的步骤将账号与模拟器同步。必要时,输入屏幕锁定设备密码和 Google 账号密码,以开始账号同步。
将手机连接到多部 Wear OS 设备
如需将另一部 Wear 设备连接到虚拟或实体手机,请按照与初始配对相同的步骤操作:在设备管理器中找到要配对的手机或 Wear 设备,点击溢出菜单,然后点击 Pair Wearable。
设置手机
本部分介绍了如何为手机设置 Wear OS 配套应用。
使用配套应用的 Android 版本
在 Android 手机上,前往 Wear OS by Google 谷歌智能手表应用详情。 点按更新以下载并安装应用。安装后,确认已为应用选择自动更新。请参阅更新下载的应用的“如何自动更新个别 Android 应用”部分。 点按打开以启动应用。
将 Android 手机与手表配对
在手机上安装配套应用后,如有必要,可取消任何过时的手表配对。然后,将手机与安装了新映像的手表进行配对。为此,请完成以下步骤:
在手机上,从设备列表中选择您的手表设备名称。手机和手表上都会显示配对码。检查配对码是否一致。
点按配对继续配对过程。手表连接到手机后,系统会显示一条确认消息。确认后,手机上会显示账号列表。
选择要添加的 Google 账号并同步到您的手表。
确认屏幕锁定,然后输入密码,开始将账号从手机同步到手表。
按照向导中的说明完成配对过程。