
ঘড়ির বিজ্ঞপ্তিগুলি একই API ব্যবহার করে এবং ফোনের বিজ্ঞপ্তিগুলির মতো একই কাঠামোর হয়।
ঘড়িতে বিজ্ঞপ্তি দুটি উপায়ে প্রদর্শিত হতে পারে:
- একটি মোবাইল অ্যাপ একটি বিজ্ঞপ্তি তৈরি করে এবং সিস্টেমটি স্বয়ংক্রিয়ভাবে সেই বিজ্ঞপ্তিটি ঘড়ির সাথে সংযুক্ত করে ।
- একটি পরিধেয় অ্যাপ একটি বিজ্ঞপ্তি তৈরি করে।
উভয় পরিস্থিতিতে, বিজ্ঞপ্তি তৈরি করতে NotificationCompat.Builder ক্লাস ব্যবহার করুন। যখন আপনি বিল্ডার ক্লাসের সাথে বিজ্ঞপ্তি তৈরি করেন, তখন সিস্টেমটি সঠিকভাবে বিজ্ঞপ্তি প্রদর্শনের যত্ন নেয়। উদাহরণস্বরূপ, যখন আপনি আপনার মোবাইল অ্যাপ থেকে একটি বিজ্ঞপ্তি জারি করেন, তখন প্রতিটি বিজ্ঞপ্তি নোটিফিকেশন স্ট্রিমে একটি কার্ড হিসাবে উপস্থিত হয়।
বিজ্ঞপ্তিগুলি কীভাবে প্রদর্শিত হয় তা দেখতে নিম্নলিখিত উদাহরণটি পর্যালোচনা করুন।
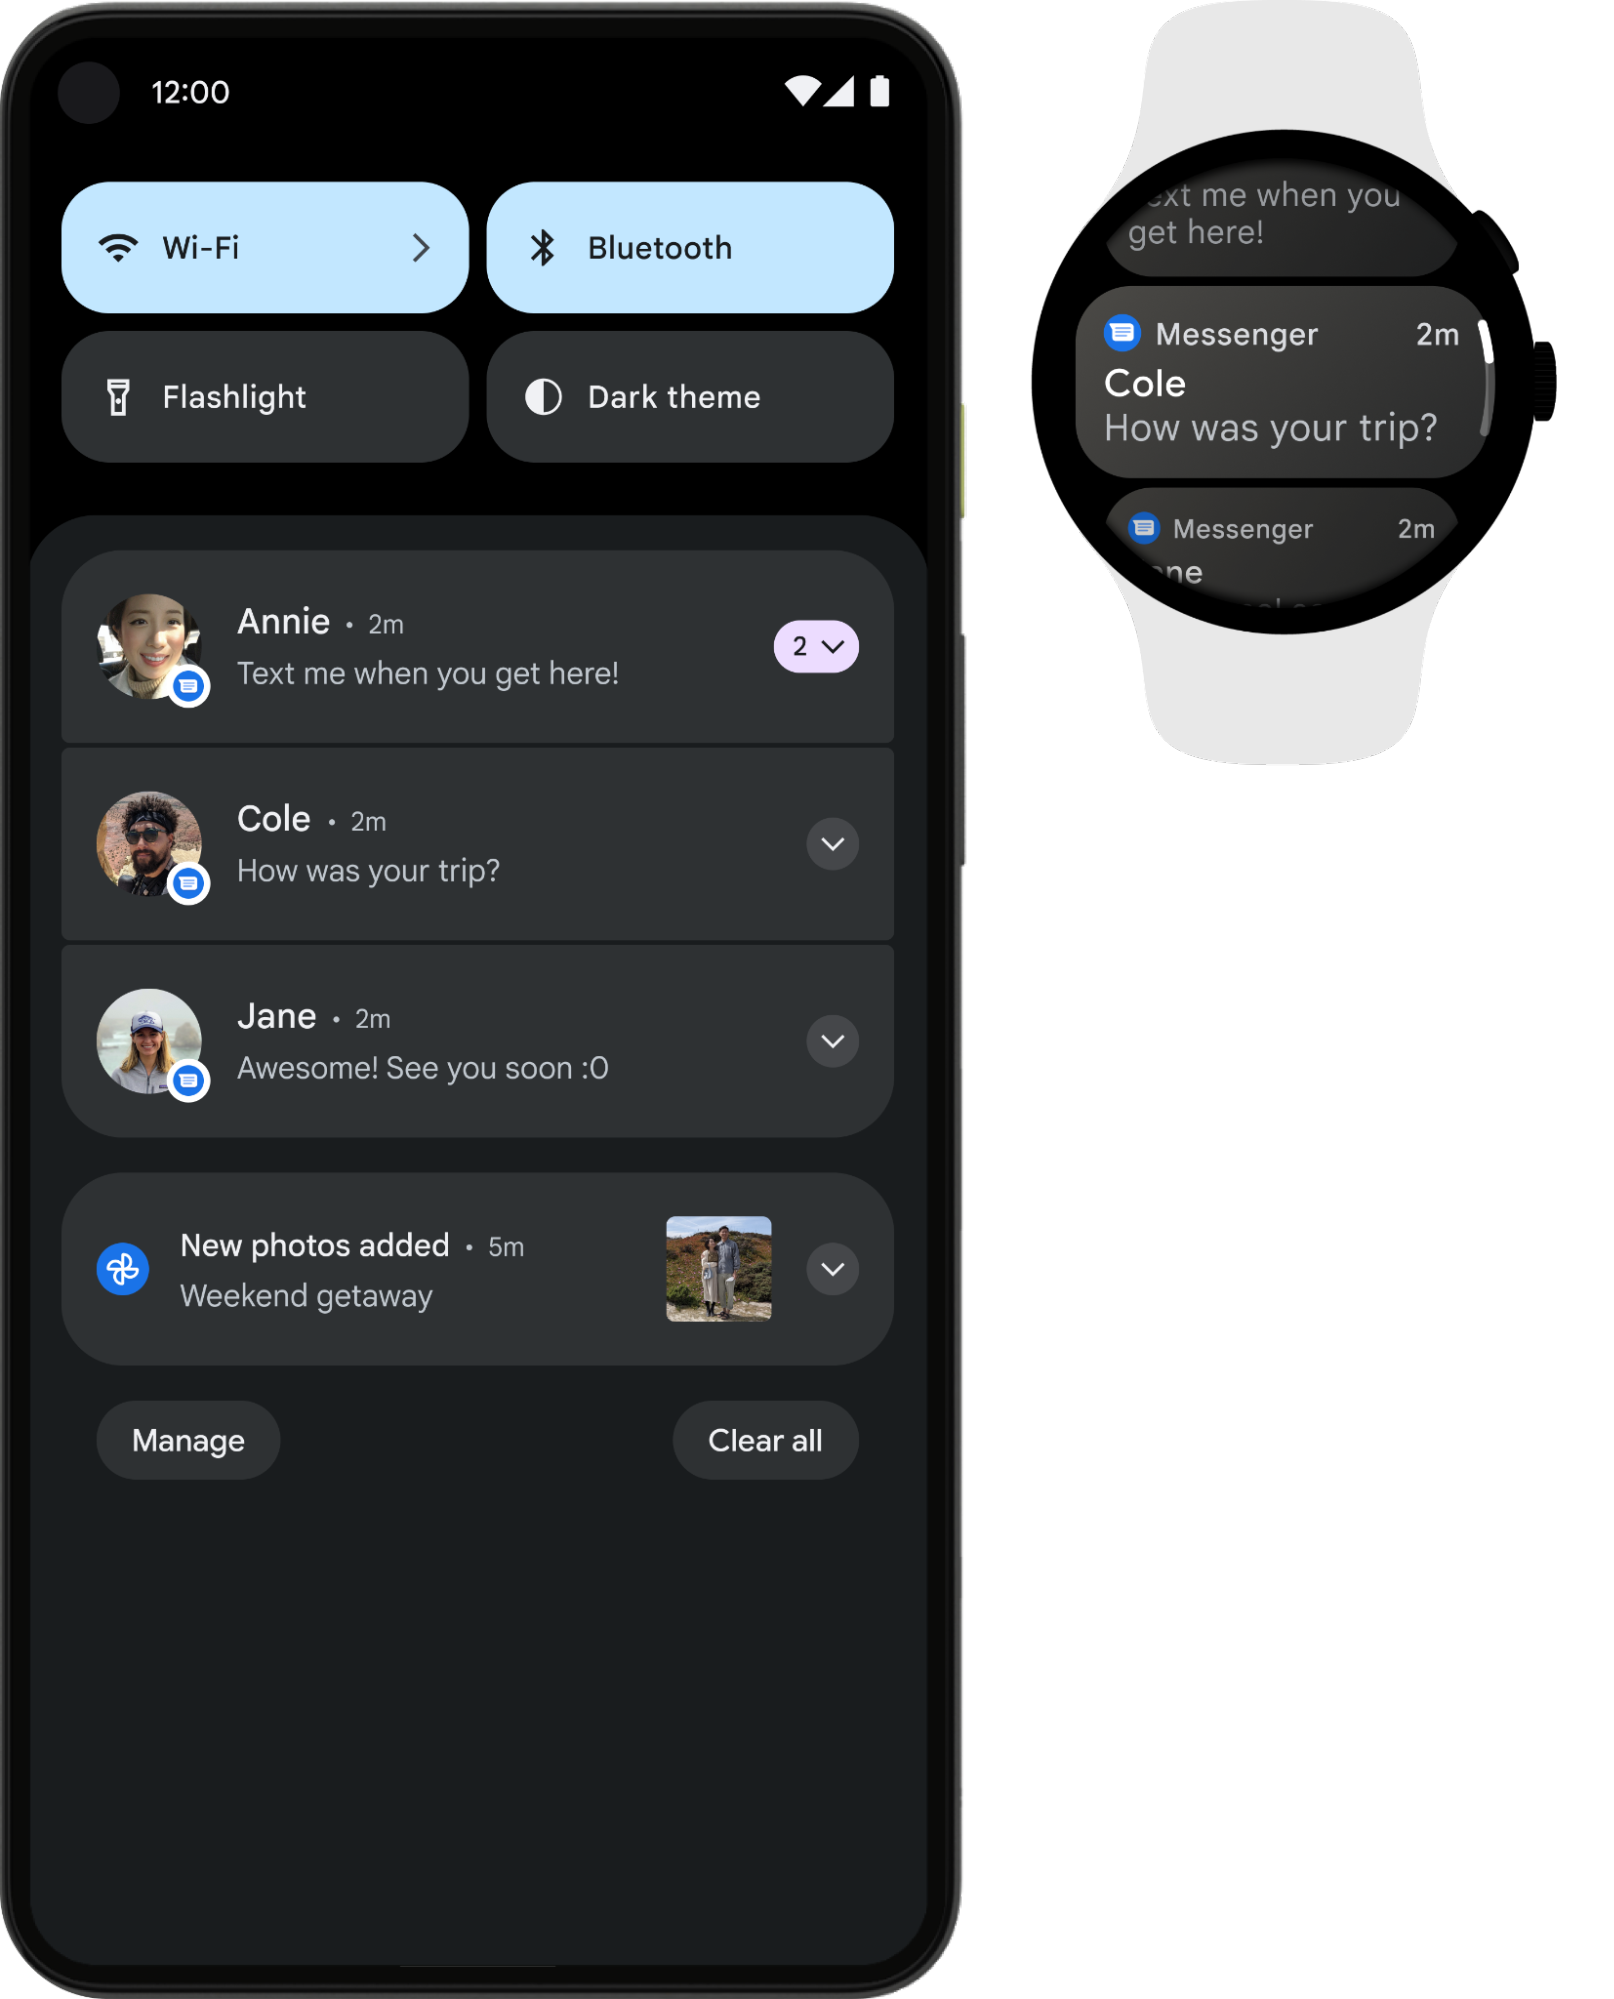
চিত্র ১। ফোন এবং ঘড়িতে একই বিজ্ঞপ্তি প্রদর্শিত হচ্ছে।
সেরা ফলাফলের জন্য NotificationCompat.Style সাবক্লাসগুলির একটি ব্যবহার করুন।
দ্রষ্টব্য: RemoteViews ব্যবহার করলে কাস্টম লেআউটের বিজ্ঞপ্তি বন্ধ হয়ে যায় এবং পরিধেয় ডিভাইসটি কেবল টেক্সট এবং আইকন প্রদর্শন করে।
পরিধেয় ডিভাইসের জন্য প্রস্তাবিত বিজ্ঞপ্তি
সকল বিজ্ঞপ্তির জন্য প্রসারণযোগ্য বিজ্ঞপ্তিগুলিকে সূচনা বিন্দু হিসেবে ব্যবহার করুন, কারণ এগুলি পরিধেয় ব্যবহারকারীদের সাথে যুক্ত করার একটি দুর্দান্ত উপায়। সংক্ষিপ্ত, নজরে পড়ার অভিজ্ঞতার জন্য বিজ্ঞপ্তি ট্রেতে ধীর অবস্থা প্রদর্শিত হয়। ব্যবহারকারী যদি এটিতে ট্যাপ করেন, তাহলে বিজ্ঞপ্তিটি প্রসারিত হয়, অতিরিক্ত সামগ্রী এবং ক্রিয়াকলাপের একটি নিমজ্জিত, স্ক্রোলযোগ্য অভিজ্ঞতা প্রকাশ করে।
আপনি NotificationCompat.Style সাবক্লাস ব্যবহার করে মোবাইলের মতোই একটি এক্সপেন্ডেবল নোটিফিকেশন তৈরি করতে পারেন। উদাহরণস্বরূপ, NotificationCompat.MessagingStyle ব্যবহার করে একটি স্ট্যান্ডার্ড নোটিফিকেশন দেখতে এরকম দেখাচ্ছে:
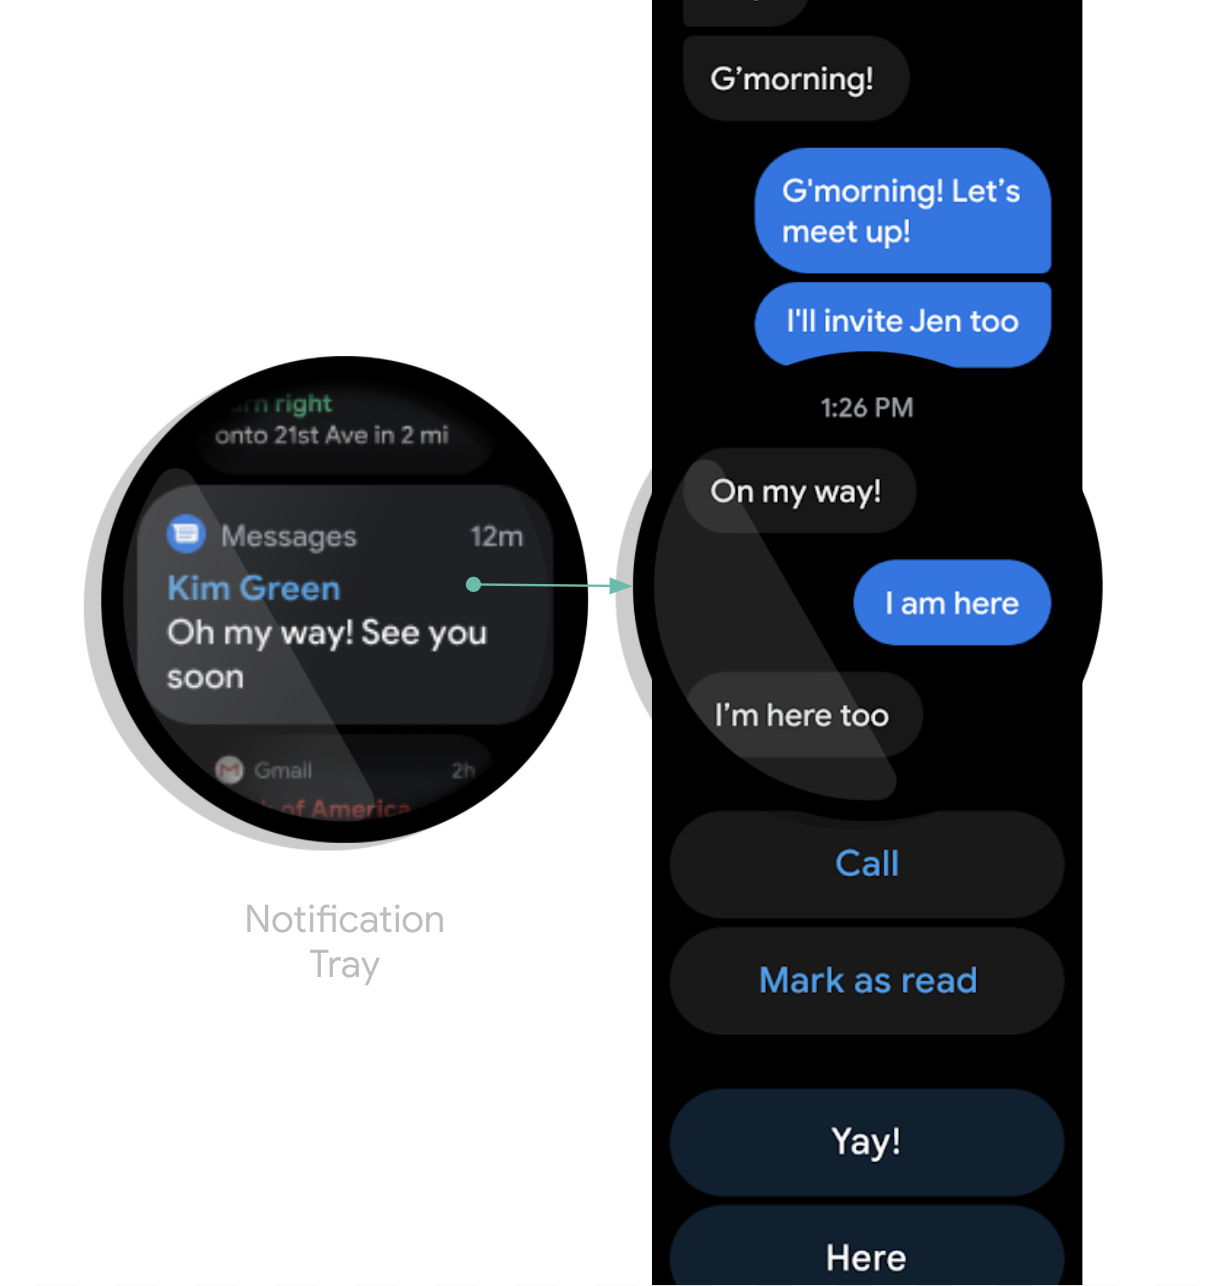
চিত্র ২। Wear OS-এ একটি MessagingStyle বিজ্ঞপ্তির উদাহরণ।
আপনি দেখতে পাচ্ছেন যে বিজ্ঞপ্তিতে প্রসারিত অবস্থার নীচে একাধিক ক্রিয়া স্ট্যাক করা আছে।
টিপস: যদি আপনার বিজ্ঞপ্তিতে "উত্তর" ক্রিয়া থাকে, যেমন কোনও মেসেজিং অ্যাপের জন্য, তাহলে আপনি বিজ্ঞপ্তির আচরণ উন্নত করতে পারেন। উদাহরণস্বরূপ, আপনি setChoices() ব্যবহার করে পরিধেয় বা পূর্বনির্ধারিত টেক্সট প্রতিক্রিয়া থেকে সরাসরি ভয়েস ইনপুট উত্তর সক্ষম করতে পারেন। আরও তথ্যের জন্য, উত্তর যোগ করুন বোতামটি পড়ুন।
ডুপ্লিকেট বিজ্ঞপ্তি এড়িয়ে চলুন
ডিফল্টরূপে, বিজ্ঞপ্তিগুলি একটি কম্প্যানিয়ন ফোন অ্যাপ থেকে যেকোনো জোড়া ঘড়িতে ব্রিজ করা হয়। যদি আপনার কোনও পরিধেয় অ্যাপ ইনস্টল না থাকে তবে এটি একটি দুর্দান্ত বিকল্প।
তবে, যদি আপনি একটি স্বতন্ত্র ঘড়ি অ্যাপ এবং একটি সহযোগী ফোন অ্যাপ তৈরি করেন, তাহলে অ্যাপগুলি ডুপ্লিকেট বিজ্ঞপ্তি তৈরি করবে।
Wear OS Bridging API-এর মাধ্যমে ডুপ্লিকেট বিজ্ঞপ্তি বন্ধ করার একটি উপায় প্রদান করে। Wear OS 5 বা তার উচ্চতর সংস্করণ চালিত ডিভাইসের অ্যাপগুলির জন্য এটি বিশেষভাবে গুরুত্বপূর্ণ, কারণ মোবাইল ডিভাইসে খারিজ করা যায় এমন কিছু বিজ্ঞপ্তি Wear OS ডিভাইসে খারিজ করা যায় না। আরও তথ্যের জন্য, বিজ্ঞপ্তিগুলির জন্য Bridging বিকল্পগুলি পড়ুন।
একটি বিজ্ঞপ্তিতে পরিধেয়-নির্দিষ্ট বৈশিষ্ট্য যোগ করুন
যদি আপনার কোনও বিজ্ঞপ্তিতে পরিধেয়-নির্দিষ্ট বৈশিষ্ট্য যুক্ত করার প্রয়োজন হয়, তাহলে আপনি বিকল্পগুলি নির্দিষ্ট করতে NotificationCompat.WearableExtender ক্লাস ব্যবহার করতে পারেন। এই API ব্যবহার করতে, নিম্নলিখিতগুলি করুন:
দ্রষ্টব্য: আপনি যদি ফ্রেমওয়ার্কের NotificationManager ব্যবহার করেন, তাহলে NotificationCompat.WearableExtender এর কিছু বৈশিষ্ট্য কাজ করে না, তাই NotificationCompat ব্যবহার করতে ভুলবেন না।
এই উদাহরণে দেখানো হয়েছে কিভাবে বিজ্ঞপ্তিতে Wear-নির্দিষ্ট অ্যাকশন সেট করতে হয় এবং ডিসমিসাল আইডিও সেট করতে হয়। যখন বিজ্ঞপ্তিটি খারিজ করা হয়, তখন একই ডিসমিসাল আইডি সহ অন্যান্য সমস্ত বিজ্ঞপ্তি ওয়াচ এবং কম্প্যানিয়ন ফোনে খারিজ করা হয়। ডিসমিসাল আইডি পুনরুদ্ধার করতে, getDismissalId() ব্যবহার করুন।
// This intent will be fired as a result of the user clicking the "Open on watch" action. // However, it executes on the phone, not on the watch. Typically, the Activity should then use // RemoteActivityHelper to then launch the correct activity on the watch. val intent = Intent(context, LaunchOnWearActivity::class.java) val wearPendingIntent = PendingIntent.getActivity( context, wearRequestCode, intent, PendingIntent.FLAG_UPDATE_CURRENT or PendingIntent.FLAG_IMMUTABLE ) val openOnWatchAction = NotificationCompat.Action.Builder( R.drawable.watch, "Open on watch", wearPendingIntent ) .build() val wearableExtender = NotificationCompat.WearableExtender() // This action will only be shown on the watch, not on the phone. // Actions added to the Notification builder directly will not be shown on the watch, // because one or more actions are defined in the WearableExtender. .addAction(openOnWatchAction) // This synchronizes dismissals between watch and phone. .setDismissalId(chatId) val notification = NotificationCompat.Builder(context, channelId) // ... set other fields ... .extend(wearableExtender) .build()
একটি পরিধেয় ডিভাইস থেকে আপনার ফোন অ্যাপ চালু করুন
আপনি যদি ব্রিজড নোটিফিকেশন ব্যবহার করেন, তাহলে যেকোনো নোটিফিকেশনে স্বয়ংক্রিয়ভাবে ফোনে অ্যাপটি চালু করার জন্য একটি বোতাম অন্তর্ভুক্ত থাকে। তবে, যদি আপনি ঘড়িতে তৈরি স্থানীয় নোটিফিকেশন ব্যবহার করেন, তাহলে ফোনে অ্যাপটি চালু করার জন্য একটি বোতাম তৈরি করতে নিম্নলিখিত পদক্ষেপগুলি ব্যবহার করুন:
- একটি নতুন
Activityতৈরি করুন যাConfirmationActivityপ্রসারিত করে। - ফোন অ্যাপটি চালু করতে নতুন
ActivityRemoteActivityHelperব্যবহার করুন। - বিজ্ঞপ্তি থেকে
Activityচালু করার জন্যIntentতৈরি করার সময়,EXTRA_ANIMATION_TYPEঅতিরিক্তটিOPEN_ON_PHONE_ANIMATIONএ সেট করুন।
দ্রষ্টব্য: আপনি বিজ্ঞপ্তি কর্মের লক্ষ্য হিসাবে BroadcastReceiver ব্যবহার করতে পারবেন না।