

借助 Gemini Developer API,您可以访问 Google 的 Gemini 模型,从而在 Android 应用中构建先进的生成式 AI 功能,包括对话式聊天、图片生成(使用 Nano Banana)以及基于文本、图片、音频和视频输入的文本生成。
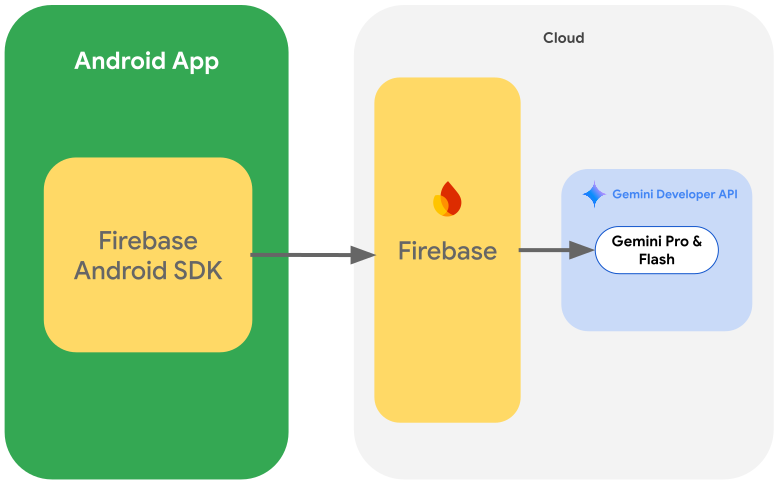
如需访问 Gemini Pro 和 Flash 模型,您可以将 Gemini Developer API 与 Firebase AI Logic 搭配使用。您无需提供付款方式(例如信用卡)即可开始使用,并且可以享受宽裕的免费层级。在小部分用户群体中验证集成后,您可以升级到付费层级,从而扩大规模。
使用入门
在直接从应用中与 Gemini API 互动之前,您需要先完成一些操作,包括熟悉提示以及设置 Firebase 和应用以使用 SDK。
使用提示进行实验
通过实验提示,您可以为 Android 应用找到最佳措辞、内容和格式。Google AI Studio 是一种集成开发环境 (IDE),您可以使用它为应用的使用情形设计提示并制作原型。
为您的使用情形创建有效的提示需要进行广泛的实验,这是该流程的关键环节。如需详细了解提示,请参阅 Firebase 文档。
对提示感到满意后,点击 <> 按钮即可获取可添加到代码中的代码段。
设置 Firebase 项目并将应用连接到 Firebase
准备好从应用中调用 API 后,请按照 Firebase AI Logic 入门指南的“第 1 步”中的说明设置 Firebase 并启用所需的 API 和服务。
添加 Gradle 依赖项
将以下 Gradle 依赖项添加到您的应用模块:
Kotlin
dependencies {
  // ... other androidx dependencies

  // Import the BoM for the Firebase platform
  implementation(platform("com.google.firebase:firebase-bom:34.17.0"))

  // Add the dependencies for the Firebase AI Logic and App Check libraries
  // When using the BoM, you don't specify versions in Firebase library dependencies
  implementation("com.google.firebase:firebase-ai")
  implementation("com.google.firebase:firebase-appcheck-debug")
}
Java
dependencies {
  // Import the BoM for the Firebase platform
  implementation(platform("com.google.firebase:34.17.0"))

  // Add the dependencies for the Firebase AI Logic and App Check libraries
  // When using the BoM, you don't specify versions in Firebase library dependencies
  implementation("com.google.firebase:firebase-ai")
  implementation("com.google.firebase:firebase-appcheck-debug")

  // Required for one-shot operations (to use `ListenableFuture` from Guava Android)
  implementation("com.google.guava:guava:31.0.1-android")

  // Required for streaming operations (to use `Publisher` from Reactive Streams)
  implementation("org.reactivestreams:reactive-streams:1.0.4")
}
为本地开发配置 App Check 调试提供程序
自 2026 年 7 月初起,在 Firebase 控制台中针对 AI Logic 的引导式设置工作流程中,系统会自动强制执行 Firebase App Check,以保护 Gemini API。对于本地开发,您需要配置 App Check 调试提供程序,以便在绕过证明的同时,仍能保持 App Check 的强制执行。
在调试 build 中,将 App Check 配置为使用调试提供程序工厂:
Kotlin
Firebase.initialize(context = this)
Firebase.appCheck.installAppCheckProviderFactory(
    DebugAppCheckProviderFactory.getInstance(),
)
Java
FirebaseApp.initializeApp(/*context=*/ this);
FirebaseAppCheck firebaseAppCheck = FirebaseAppCheck.getInstance();
firebaseAppCheck.installAppCheckProviderFactory(
        DebugAppCheckProviderFactory.getInstance());
获取调试令牌:
在模拟器中或在测试设备上运行应用。
在日志中查找 App Check 调试令牌。例如:
D DebugAppCheckProvider: Enter this debug secret into the allow list
in the Firebase Console for your project: 123a4567-b89c-12d3-e456-789012345678
复制令牌(例如
123a4567-b89c-12d3-e456-789012345678)。
向 App Check 注册调试令牌:
在 Firebase 控制台中,依次前往安全性 > App Check > 应用标签页。
找到您的应用,点击溢出菜单 (),然后选择管理调试令牌。
按照屏幕上的说明注册调试令牌。
如需详细了解调试提供程序(包括如何获取新的调试令牌),请参阅 App Check 官方文档。
初始化生成模型
首先,实例化 GenerativeModel 并指定模型名称:
Kotlin
// Start by instantiating a GenerativeModel and specifying the model name: val model = Firebase.ai(backend = GenerativeBackend.googleAI()) .generativeModel("gemini-3.5-flash")
Java
GenerativeModel firebaseAI = FirebaseAI.getInstance(GenerativeBackend.googleAI()) .generativeModel("gemini-3.5-flash"); GenerativeModelFutures model = GenerativeModelFutures.from(firebaseAI);
详细了解可与 Gemini Developer API 搭配使用的可用模型。您还可以详细了解如何配置模型参数。
从应用中与 Gemini Developer API 交互
现在,您已设置 Firebase 和应用以使用该 SDK,接下来就可以通过应用与 Gemini Developer API 进行互动了。
生成文本
如需生成文本回答,请使用提示调用 generateContent()。
Kotlin
scope.launch { val response = model.generateContent("Write a story about a magic backpack.") }
Java
Content prompt = new Content.Builder() .addText("Write a story about a magic backpack.") .build(); ListenableFuture<GenerateContentResponse> response = model.generateContent(prompt); Futures.addCallback(response, new FutureCallback<GenerateContentResponse>() { @Override public void onSuccess(GenerateContentResponse result) { String resultText = result.getText(); } @Override public void onFailure(Throwable t) { t.printStackTrace(); } }, executor);
根据图片和其他媒体内容生成文本
您还可以根据包含文字、图片或其他媒体内容的提示生成文本。调用 generateContent() 时,您可以将媒体作为内嵌数据传递。
例如,如需使用位图,请使用 image 内容类型:
Kotlin
scope.launch { val response = model.generateContent( content { image(bitmap) text("what is the object in the picture?") } ) }
Java
Content content = new Content.Builder() .addImage(bitmap) .addText("what is the object in the picture?") .build(); ListenableFuture<GenerateContentResponse> response = model.generateContent(content); Futures.addCallback(response, new FutureCallback<GenerateContentResponse>() { @Override public void onSuccess(GenerateContentResponse result) { String resultText = result.getText(); } @Override public void onFailure(Throwable t) { t.printStackTrace(); } }, executor);
如需传递音频文件,请使用 inlineData 内容类型:
Kotlin
scope.launch { val contentResolver = applicationContext.contentResolver contentResolver.openInputStream(audioUri).use { stream -> stream?.let { val bytes = it.readBytes() val prompt = content { inlineData(bytes, "audio/mpeg") // Specify the appropriate audio MIME type text("Transcribe this audio recording.") } val response = model.generateContent(prompt) } } }
Java
ContentResolver resolver = applicationContext.getContentResolver(); try (InputStream stream = resolver.openInputStream(audioUri)) { File audioFile = new File(new URI(audioUri.toString())); int audioSize = (int) audioFile.length(); byte[] audioBytes = new byte[audioSize]; if (stream != null) { stream.read(audioBytes, 0, audioBytes.length); stream.close(); // Provide a prompt that includes audio specified earlier and text Content prompt = new Content.Builder() .addInlineData(audioBytes, "audio/mpeg") // Specify the appropriate audio MIME type .addText("Transcribe what's said in this audio recording.") .build(); // To generate text output, call `generateContent` with the prompt ListenableFuture<GenerateContentResponse> response = model.generateContent(prompt); Futures.addCallback(response, new FutureCallback<GenerateContentResponse>() { @Override public void onSuccess(GenerateContentResponse result) { String text = result.getText(); Log.d(TAG, (text == null) ? "" : text); } @Override public void onFailure(Throwable t) { Log.e(TAG, "Failed to generate a response", t); } }, executor); } else { Log.e(TAG, "Error getting input stream for file."); // Handle the error appropriately } } catch (IOException e) { Log.e(TAG, "Failed to read the audio file", e); } catch (URISyntaxException e) { Log.e(TAG, "Invalid audio file", e); }
如需提供视频文件,请继续使用 inlineData 内容类型:
Kotlin
scope.launch { val contentResolver = applicationContext.contentResolver contentResolver.openInputStream(videoUri).use { stream -> stream?.let { val bytes = it.readBytes() val prompt = content { inlineData(bytes, "video/mp4") // Specify the appropriate video MIME type text("Describe the content of this video") } val response = model.generateContent(prompt) } } }
Java
ContentResolver resolver = applicationContext.getContentResolver(); try (InputStream stream = resolver.openInputStream(videoUri)) { File videoFile = new File(new URI(videoUri.toString())); int videoSize = (int) videoFile.length(); byte[] videoBytes = new byte[videoSize]; if (stream != null) { stream.read(videoBytes, 0, videoBytes.length); stream.close(); // Provide a prompt that includes video specified earlier and text Content prompt = new Content.Builder() .addInlineData(videoBytes, "video/mp4") .addText("Describe the content of this video") .build(); // To generate text output, call generateContent with the prompt ListenableFuture<GenerateContentResponse> response = model.generateContent(prompt); Futures.addCallback(response, new FutureCallback<GenerateContentResponse>() { @Override public void onSuccess(GenerateContentResponse result) { String resultText = result.getText(); System.out.println(resultText); } @Override public void onFailure(Throwable t) { t.printStackTrace(); } }, executor); } } catch (IOException e) { e.printStackTrace(); } catch (URISyntaxException e) { e.printStackTrace(); }
同样,您也可以通过传递 PDF (application/pdf) 和纯文本 (text/plain) 文档各自的 MIME 类型作为参数来传递这些文档。
多轮聊天
您还可以支持多轮对话。使用 startChat() 函数初始化聊天。您可以选择性地向模型提供消息历史记录。然后调用 sendMessage() 函数来发送聊天消息。
Kotlin
val chat = model.startChat( history = listOf( content(role = "user") { text("Hello, I have 2 dogs in my house.") }, content(role = "model") { text("Great to meet you. What would you like to know?") } ) ) scope.launch { val response = chat.sendMessage("How many paws are in my house?") }
Java
Content.Builder userContentBuilder = new Content.Builder(); userContentBuilder.setRole("user"); userContentBuilder.addText("Hello, I have 2 dogs in my house."); Content userContent = userContentBuilder.build(); Content.Builder modelContentBuilder = new Content.Builder(); modelContentBuilder.setRole("model"); modelContentBuilder.addText("Great to meet you. What would you like to know?"); Content modelContent = modelContentBuilder.build(); List<Content> history = Arrays.asList(userContent, modelContent); // Initialize the chat ChatFutures chat = model.startChat(history); // Create a new user message Content.Builder messageBuilder = new Content.Builder(); messageBuilder.setRole("user"); messageBuilder.addText("How many paws are in my house?"); Content message = messageBuilder.build(); // Send the message ListenableFuture<GenerateContentResponse> response = chat.sendMessage(message); Futures.addCallback(response, new FutureCallback<GenerateContentResponse>() { @Override public void onSuccess(GenerateContentResponse result) { String resultText = result.getText(); System.out.println(resultText); } @Override public void onFailure(Throwable t) { t.printStackTrace(); } }, executor);
在 Android 设备上使用 Nano Banana 生成图片
Gemini Image 模型(又称 Nano Banana 模型)可以利用世界知识和推理能力生成和编辑图片。它们会生成与上下文相关的图片,并无缝融合或交织文本和图片输出。 它们还能生成包含长文本序列的准确视觉内容,并支持在保持上下文的同时进行对话式图片编辑。
本指南介绍了如何使用适用于 Android 的 Firebase AI Logic SDK 来使用 Gemini Image 模型(Nano Banana 模型)。如需详细了解如何使用 Gemini 生成图片,请参阅 Firebase 文档。

初始化生成模型
实例化 GenerativeModel 并指定 Gemini 图片模型名称(例如 gemini-3.1-flash-image)。然后,配置 responseModalities 以同时包含 TEXT 和 IMAGE,从而生成交织的文本和图片。如果您排除 TEXT,模型将仅返回图片。
Kotlin
val model = Firebase.ai(backend = GenerativeBackend.googleAI()).generativeModel( modelName = "gemini-3.5-flash-image-preview", // Configure the model to respond with text and images (required) generationConfig = generationConfig { responseModalities = listOf( ResponseModality.TEXT, ResponseModality.IMAGE ) } )
Java
GenerativeModel ai = FirebaseAI.getInstance(GenerativeBackend.googleAI()).generativeModel( "gemini-3.5-flash-image-preview", // Configure the model to respond with text and images (required) new GenerationConfig.Builder() .setResponseModalities(Arrays.asList(ResponseModality.TEXT, ResponseModality.IMAGE)) .build() ); GenerativeModelFutures model = GenerativeModelFutures.from(ai);
生成图片(仅限文本输入)
您可以通过提供纯文本提示来指示 Gemini 模型生成图片:
Kotlin
scope.launch { // Provide a text prompt instructing the model to generate an image val prompt = "A hyper realistic picture of a t-rex with a blue bag pack roaming a pre-historic forest." // To generate image output, call `generateContent` with the text input val generatedImageAsBitmap: Bitmap? = model.generateContent(prompt) .candidates.first().content.parts.filterIsInstance<ImagePart>() .firstOrNull()?.image }
Java
// Provide a text prompt instructing the model to generate an image Content prompt = new Content.Builder() .addText("Generate an image of the Eiffel Tower with fireworks in the background.") .build(); // To generate an image, call `generateContent` with the text input ListenableFuture<GenerateContentResponse> response = model.generateContent(prompt); Futures.addCallback(response, new FutureCallback<GenerateContentResponse>() { @Override public void onSuccess(GenerateContentResponse result) { // iterate over all the parts in the first candidate in the result object for (Part part : result.getCandidates().get(0).getContent().getParts()) { if (part instanceof ImagePart) { ImagePart imagePart = (ImagePart) part; // The returned image as a bitmap Bitmap generatedImageAsBitmap = imagePart.getImage(); break; } } } @Override public void onFailure(Throwable t) { t.printStackTrace(); } }, executor);
修改图片(文本和图片输入)
您可以在提示中同时提供文本和一张或多张图片,让 Gemini 模型修改现有图片:
Kotlin
scope.launch { // Provide a text prompt instructing the model to edit the image val prompt = content { image(bitmap) text("Edit this image to make it look like a cartoon") } // To edit the image, call `generateContent` with the prompt (image and text input) val generatedImageAsBitmap: Bitmap? = model.generateContent(prompt) .candidates.first().content.parts.filterIsInstance<ImagePart>().firstOrNull()?.image // Handle the generated text and image }
Java
// Provide an image for the model to edit Bitmap bitmap = BitmapFactory.decodeResource(resources, R.drawable.scones); // Provide a text prompt instructing the model to edit the image Content promptcontent = new Content.Builder() .addImage(bitmap) .addText("Edit this image to make it look like a cartoon") .build(); // To edit the image, call `generateContent` with the prompt (image and text input) ListenableFuture<GenerateContentResponse> response = model.generateContent(promptcontent); Futures.addCallback(response, new FutureCallback<GenerateContentResponse>() { @Override public void onSuccess(GenerateContentResponse result) { // iterate over all the parts in the first candidate in the result object for (Part part : result.getCandidates().get(0).getContent().getParts()) { if (part instanceof ImagePart) { ImagePart imagePart = (ImagePart) part; Bitmap generatedImageAsBitmap = imagePart.getImage(); break; } } } @Override public void onFailure(Throwable t) { t.printStackTrace(); } }, executor);
通过多轮对话迭代和修改图片
如需以对话方式修改图片,您可以使用多轮对话。 这样一来,您无需重新发送原始图片,即可通过后续请求来优化修改。
首先,使用 startChat() 初始化聊天,可以选择性地提供消息历史记录。然后,使用 sendMessage() 发送后续消息:
Kotlin
scope.launch { // Create the initial prompt instructing the model to edit the image val prompt = content { image(bitmap) text("Edit this image to make it look like a cartoon") } // Initialize the chat val chat = model.startChat() // To generate an initial response, send a user message with the image and text prompt var response = chat.sendMessage(prompt) // Inspect the returned image var generatedImageAsBitmap: Bitmap? = response .candidates.first().content.parts.filterIsInstance<ImagePart>().firstOrNull()?.image // Follow up requests do not need to specify the image again response = chat.sendMessage("But make it old-school line drawing style") generatedImageAsBitmap = response .candidates.first().content.parts.filterIsInstance<ImagePart>().firstOrNull()?.image }
Java
// Provide an image for the model to edit Bitmap bitmap = BitmapFactory.decodeResource(resources, R.drawable.scones); // Initialize the chat ChatFutures chat = model.startChat(); // Create the initial prompt instructing the model to edit the image Content prompt = new Content.Builder() .setRole("user") .addImage(bitmap) .addText("Edit this image to make it look like a cartoon") .build(); // To generate an initial response, send a user message with the image and text prompt ListenableFuture<GenerateContentResponse> response = chat.sendMessage(prompt); // Extract the image from the initial response ListenableFuture<Bitmap> initialRequest = Futures.transform(response, result -> { for (Part part : result.getCandidates().get(0).getContent().getParts()) { if (part instanceof ImagePart) { ImagePart imagePart = (ImagePart) part; return imagePart.getImage(); } } return null; }, executor); // Follow up requests do not need to specify the image again ListenableFuture<GenerateContentResponse> modelResponseFuture = Futures.transformAsync( initialRequest, generatedImage -> { Content followUpPrompt = new Content.Builder() .addText("But make it old-school line drawing style") .build(); return chat.sendMessage(followUpPrompt); }, executor); // Add a final callback to check the reworked image Futures.addCallback(modelResponseFuture, new FutureCallback<GenerateContentResponse>() { @Override public void onSuccess(GenerateContentResponse result) { for (Part part : result.getCandidates().get(0).getContent().getParts()) { if (part instanceof ImagePart) { ImagePart imagePart = (ImagePart) part; Bitmap generatedImageAsBitmap = imagePart.getImage(); break; } } } @Override public void onFailure(Throwable t) { t.printStackTrace(); } }, executor);
注意事项和限制
请注意以下注意事项和限制:
- 输出格式:生成的图片为 PNG 格式,最大尺寸为 1024 像素。
- 输入类型:模型不支持音频或视频输入来生成图片。
- 语言支持:为获得最佳性能,请使用以下语言:英语 (
en)、墨西哥西班牙语 (es-mx)、日语 (ja-jp)、简体中文 (zh-cn) 和印地语 (hi-in)。 - 生成问题:
- 图片生成可能不会始终触发,有时会导致输出仅包含文字。尝试明确要求生成图片输出(例如,“生成图片”“在您操作过程中提供图片”“更新图片”)。
- 模型可能会中途停止生成。请重试或尝试使用其他提示。
- 模型可能会以图片形式生成文本。尝试明确要求文本输出(例如,“生成叙事文本及插图”)。
如需了解详情,请参阅 Firebase 文档。
后续步骤
设置应用后,请考虑执行以下后续步骤:
- 查看 GitHub 上的 Android 快速入门 Firebase 示例应用和 Android AI 示例目录。
- 准备将应用用于生产环境,包括设置 Firebase App Check 以保护 Gemini API 免遭未经授权的客户端滥用。
- 如需详细了解 Firebase AI Logic,请参阅 Firebase 文档。