

คู่มือนี้จะอธิบายวิธีใช้ DigitalCredential API เพื่อรับหมายเลขโทรศัพท์ที่ยืนยันแล้วสำหรับผู้ใช้ กระบวนการนี้มี 2 ขั้นตอนดังนี้
- การตรวจสอบล่วงหน้า: ตรวจสอบว่าผู้ให้บริการของผู้ใช้รองรับ API นี้หรือไม่โดยค้นหา Android Telephony API หากผู้ให้บริการไม่รองรับ ให้กลับไปใช้ขั้นตอน SMS ปกติ
- ขอ
TS.43 token: แอปไคลเอ็นต์ ("ผู้ตรวจสอบ") จะขอโทเค็น TS.43 ชั่วคราวจากอุปกรณ์ของผู้ใช้TS.43 tokenคือข้อมูลเข้าสู่ระบบที่ผู้ให้บริการออกให้ซึ่งแสดงถึงข้อมูลประจำตัวของผู้ใช้ - แลกเปลี่ยนโทเค็นเป็นหมายเลขโทรศัพท์: แบ็กเอนด์ของแอปจะแลกเปลี่ยน
TS.43 tokenกับผู้รวบรวมข้อมูลหรือผู้ให้บริการเพื่อรับหมายเลขโทรศัพท์ที่ยืนยันแล้วของผู้ใช้
ความเข้ากันได้กับเวอร์ชัน Android
API การยืนยันหมายเลขโทรศัพท์รองรับใน Android 10 (ระดับ API 29) ขึ้นไป
สิ่งที่ต้องมีก่อน
หากต้องการใช้การยืนยันหมายเลขโทรศัพท์ด้วย DigitalCredential API คุณต้องมีบัญชีกับผู้รวบรวมข้อมูลหรือผู้ให้บริการเครือข่ายมือถือ ผู้รวบรวมข้อมูลจะโต้ตอบกับผู้ให้บริการและจัดเตรียมแพลตฟอร์ม API ที่จำเป็นสำหรับแอปของคุณ ซึ่งโดยปกติจะเป็นปลายทาง Cloud API ที่เรียกเก็บเงินได้ ในคู่มือนี้ เราจะเรียกรวมทั้งผู้รวบรวมข้อมูลและผู้ให้บริการขนส่งว่าผู้รวบรวมข้อมูล
นอกจากนี้ คุณยังต้องเพิ่มทรัพยากร Dependency ต่อไปนี้ลงในสคริปต์บิลด์ Gradle ด้วย
Kotlin
dependencies {
    implementation("androidx.credentials:credentials:1.7.0-alpha02")
    implementation("androidx.credentials:credentials-play-services-auth:1.7.0-alpha02")
}
Groovy
dependencies {
    implementation "androidx.credentials:credentials:1.7.0-alpha02"
    implementation "androidx.credentials:credentials-play-services-auth:1.7.0-alpha02"
}
การใช้งาน
ก่อนเรียกใช้ Digital Credentials API ให้ตรวจสอบว่าผู้ให้บริการของผู้ใช้รองรับฟีเจอร์นี้หรือไม่โดยใช้ Android Telephony API
เพิ่มสิทธิ์ READ_PHONE_STATE ลงในไฟล์ AndroidManifest.xml
val telephonyManager = context.getSystemService(Context.TELEPHONY_SERVICE) as TelephonyManager
val carrierId = telephonyManager.getSimCarrierId()
ใช้รหัสนี้เพื่อยืนยันการรองรับ TS.43 กับแบ็กเอนด์ของผู้รวบรวมข้อมูล หากไม่รองรับผู้ให้บริการของผู้ใช้รายนี้ คุณสามารถเปลี่ยนไปใช้วิธีอื่น เช่น SMS ได้ เนื่องจากการเรียกใช้ Digital Credentials API จะแสดงผลลัพธ์ที่ว่างเปล่า หากไม่ต้องการ ให้ดำเนินการต่อด้วยขั้นตอนการใช้เอกสารรับรองดิจิทัล
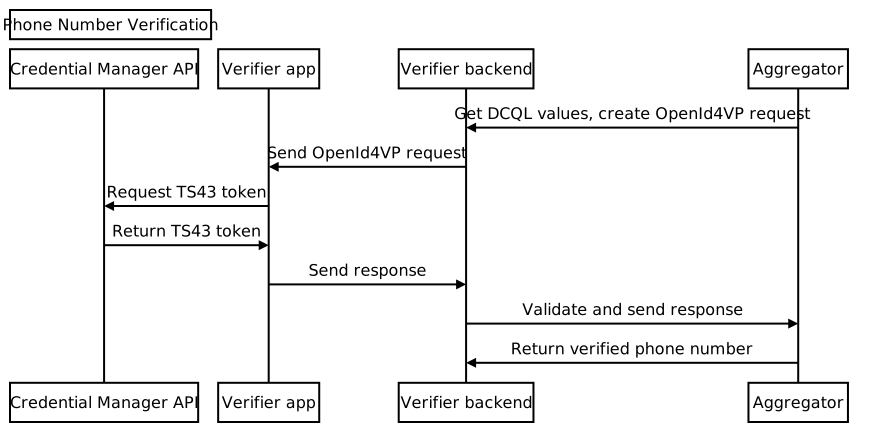
โดยทั่วไปแล้ว กระบวนการตั้งแต่ต้นจนจบจะเป็นไปตามขั้นตอนต่อไปนี้
- ขอพารามิเตอร์ DCQL (Digital Credential Query Language) จาก Aggregator: เรียกใช้ Aggregator อย่างน้อย 1 รายการและขอชุดพารามิเตอร์ DCQL DCQL ช่วยให้คุณระบุข้อมูลเข้าสู่ระบบดิจิทัลที่ต้องการจากผู้รวบรวมข้อมูลแต่ละรายได้อย่างแม่นยำ
สร้างคำขอ OpenID4VP: สร้างคำขอ OpenID4VP จากแบ็กเอนด์ของแอป โดยรวมพารามิเตอร์ DCQL จาก Aggregator ไว้ด้วย จากนั้นส่งคำขอ OpenID4VP ไปยังแอปไคลเอ็นต์
เรียกใช้ Credential Manager API: ในแอปไคลเอ็นต์ ให้ใช้ Credential Manager API เพื่อส่งคำขอ OpenID4VP ไปยังระบบปฏิบัติการ คุณจะได้รับออบเจ็กต์การตอบกลับ OpenID4VP ที่มี
TS.43 Digital Credentialเป็นการตอบกลับ ข้อมูลเข้าสู่ระบบนี้ได้รับการเข้ารหัสและมีเพียงผู้รวบรวมข้อมูลที่เกี่ยวข้องเท่านั้นที่ถอดรหัสได้ หลังจากได้รับโทเค็นของผู้ให้บริการแล้ว ให้ส่งการตอบกลับจากแอปไคลเอ็นต์ไปยังแบ็กเอนด์ของแอปตรวจสอบการตอบกลับ: ตรวจสอบการตอบกลับ OpenID4VP ในแบ็กเอนด์ของแอป
แลกเปลี่ยนเป็นหมายเลขโทรศัพท์: ส่ง
TS.43 Digital Credentialไปยังผู้รวบรวมข้อมูลจากแบ็กเอนด์ของแอป ผู้รวบรวมข้อมูลจะตรวจสอบข้อมูลเข้าสู่ระบบและแสดงหมายเลขโทรศัพท์ที่ยืนยันแล้ว
ขอพารามิเตอร์ DCQL จากผู้รวบรวมข้อมูล
จากแบ็กเอนด์ของแอป ให้ส่งคำขอไปยังผู้รวบรวมข้อมูลเพื่อขอออบเจ็กต์ข้อมูลเข้าสู่ระบบ Digital Credential Query Language (DCQL) อย่าลืมระบุ Nonce และรหัสคำขอในคำขอ Aggregator จะแสดงผลออบเจ็กต์ข้อมูลเข้าสู่ระบบ DCQL ซึ่งมีโครงสร้างคล้ายกับต่อไปนี้
{
  // The credential ID is mapped to the request ID that is sent in your request to the aggregator.
  "id": "aggregator1",
  "format": "dc-authorization+sd-jwt",
  "meta": {
    "vct_values": [
      "number-verification/device-phone-number/ts43"
    ],
    "credential_authorization_jwt": "..."
  },
  "claims": [
    {
      "path": ["subscription_hint"],
      "values": [1]
    },
    {
      "path": ["phone_number_hint"],
      "values": ["+14155552671"]
    }
  ]
}
สร้างคำขอ OpenID4VP
ก่อนอื่น ให้สร้างออบเจ็กต์ dcql_query จากแบ็กเอนด์ของแอปโดยวางออบเจ็กต์ข้อมูลเข้าสู่ระบบ DCQL ในอาร์เรย์ credentials ที่ฝังอยู่ภายในออบเจ็กต์ dcql_query ดังตัวอย่างต่อไปนี้
"dcql_query": {
  "credentials": [
      "id": "aggregator1",
      "format": "dc-authorization+sd-jwt",
      "meta": {
        "vct_values": [
          "number-verification/device-phone-number/ts43"
        ],
        "credential_authorization_jwt": "..."
      },
      "claims": [
        {
          "path": ["subscription_hint"],
          "values": [1]
        },
        {
          "path": ["phone_number_hint"],
          "values": ["+14155552671"]
        }
      ]
  ]
}
จากนั้นสร้างคำขอ OpenID4VP ที่มีโครงสร้างต่อไปนี้
{
  "protocol": "openid4vp-v1-unsigned",
  "data": {
    "response_type": "vp_token",
    "response_mode": "dc_api",
    "nonce": "...",
    "dcql_query": { ... }
  }
}
protocol: ต้องตั้งค่าเป็นopenid4vp-v1-unsignedสำหรับคำขอการยืนยันหมายเลขโทรศัพท์response_typeและresponse_mode: ค่าคงที่ที่แสดงรูปแบบของคำขอที่มีค่าคงที่vp_tokenและdc_apiตามลำดับnonce: ค่าที่ไม่ซ้ำกันซึ่งสร้างโดยแบ็กเอนด์สำหรับคำขอแต่ละรายการ Nonce ในออบเจ็กต์ข้อมูลเข้าสู่ระบบ DCQL ของผู้รวบรวมข้อมูลต้องตรงกับ Nonce นี้dcql_query: ในกรณีนี้ ให้ใช้dcql_queryเพื่อระบุว่ามีการขอTS.43 Digital Credentialนอกจากนี้ คุณยังขอข้อมูลเข้าสู่ระบบดิจิทัลอื่นๆ ได้ที่นี่
จากนั้นรวมคำขอ OpenID4VP ไว้ในออบเจ็กต์คำขอ DigitalCredential API แล้วส่งไปยังแอปไคลเอ็นต์
{
  "requests":
    [
      {
        "protocol": "openid4vp-v1-unsigned",
        "data": {
          "response_type": "vp_token",
          "response_mode": "dc_api",
          "nonce": "...",
          "dcql_query": { ... }
        }
      }
    ]
}
ข้อมูลโค้ดต่อไปนี้แสดงวิธีสร้างคำขอ DigitalCredential API
def GenerateDCRequest():
    credentials = []
    aggregator1_dcql = call_aggregator_endpoint(nonce, "aggregator1", additional_params)
    credentials.append(aggregator1_dcql) # You can optionally work with multiple
    # aggregators, or request other types of credentials

    val dc_request =
    {
      "requests":
        [
          {
            "protocol": "openid4vp-v1-unsigned",
            "data": {
              "response_type": "vp_token",
              "response_mode": "dc_api",
              "nonce": "...",
              "dcql_query": {"credentials": credentials}
            }
          }
        ]
    }
    return dc_request
เรียกใช้ Credential Manager API
ในแอปไคลเอ็นต์ ให้เรียกใช้ Credential Manager API โดยใช้คำขอ API DigitalCredential ที่แบ็กเอนด์ของแอปให้มา
val requestJson = generateTs43DigitalCredentialRequestFromServer()
val digiCredOption = GetDigitalCredentialOption(requestJson = requestJson)
val getCredRequest = GetCredentialRequest(
    listOf(digiCredOption)
)

coroutineScope.launch {
  try {
    val response = credentialManager.getCredential(
      context = activityContext,
      request = getCredRequest
    )
    val credential = response.credential
    when (credential) {
      is DigitalCredential -> {
        val responseJson = credential.credentialJson
        validateResponseOnServer(responseJson)
      }
      else -> {
        // Catch any unrecognized credential type here.
        Log.e(TAG, "Unexpected type of credential ${credential.type}")
      }
    }
  } catch (e : GetCredentialException) {
      // If user cancels the operation, the feature isn't available, or the
      // SIM doesn't support the feature, a GetCredentialCancellationException
      // will be returned. Otherwise, a GetCredentialUnsupportedException will
      // be returned with details in the exception message.
      handleFailure(e)
  }
}
การตอบกลับจาก DigitalCredential API มีการตอบกลับจาก OpenID4VP JSON ข้อมูลเข้าสู่ระบบทั่วไปจากผลลัพธ์ DigitalCredential มีดังนี้
{
  "protocol": "openid4vp-v1-unsigned",

  "data": {
    "vp_token": {
      "aggregator1": ["eyJhbGciOiAiRVMy..."] # The encrypted TS.43 Digital
                                             # Credential in an array structure.
    }
  }
}
จากแอปไคลเอ็นต์ ให้ส่งการตอบกลับจาก DigitalCredential API กลับไปยังเซิร์ฟเวอร์แบ็กเอนด์ ซึ่งสามารถตรวจสอบและใช้เพื่อแลกเปลี่ยนหมายเลขโทรศัพท์ที่ยืนยันแล้วกับผู้รวบรวมข้อมูล
ในบางกรณี การตอบกลับอาจมีข้อผิดพลาด TS.43 การตอบกลับข้อผิดพลาดคือออบเจ็กต์ JSON ตามรูปแบบการตอบกลับข้อผิดพลาด OpenID4VP ดังนี้
{
  "protocol": "openid4vp-v1-unsigned",

  "data": {
    "error": "<error_code>",
    "error_description": "<Human-readable description of the error>",
  }
}
ค่า error_code ที่เป็นไปได้มี 2 ค่าดังนี้
invalid_request: ข้อผิดพลาดนี้บ่งชี้ว่าคำขอมีรูปแบบไม่ถูกต้องserver_error: หมายความว่าเกิดข้อผิดพลาดเมื่อประมวลผลคำขอ ซึ่งอาจเป็นข้อผิดพลาดในเครื่องหรือปัญหา TS.43
ช่อง error_description จะให้รายละเอียดเพิ่มเติมเกี่ยวกับปัญหา
ตรวจสอบการตอบกลับของเอกสารรับรองดิจิทัล
ตัวอย่างต่อไปนี้แสดงวิธีแยกวิเคราะห์การตอบกลับและทำตามขั้นตอนการตรวจสอบความถูกต้องในแบ็กเอนด์ของแอป
def processDigitalCredentialsResponse(response):
  # Step 1: Parse out the TS.43 Digital Credential from the response
  openId4VpResponse = response['data']

  ts43_digital_credential = response['vp_token']["aggregator1"][0]

  # Step 2: Perform response validation
  verifyResponse(ts43_digital_credential)

def verifyResponse(ts43_digital_credential):
  # The returned ts43_digital_credential is an SD-JWT-based Verifiable Credentials
  # (SD-JWT VC) as defined in this IETF spec. The section 3.4 of the specification
  # outlines how to validate the credential. At a high level, the steps involves
  # validating (1) the nonce in the response credential matches the one in the
  # request, (2) the integrity of the credential by checking the credential is
  # signed by the trusted issuer Android Telephony, and (3) other validity
  # properties associated with this credential, such as issue time and expiration
  # time

  # In most cases, you can use an SD-JWT VC library to perform these validations.

  # Some aggregators may also perform the validation logic for you. Check with your
  # aggregator to decide the exact scope of the validation required.
แลกเปลี่ยนหมายเลขโทรศัพท์
จากแบ็กเอนด์ของแอป ให้ส่ง TS.43 Digital Credential ที่ตรวจสอบแล้วไปยังปลายทางของผู้รวบรวมข้อมูลเพื่อตรวจสอบข้อมูลเข้าสู่ระบบและรับหมายเลขโทรศัพท์ที่ยืนยันแล้ว
def processDigitalCredentialsResponse(response):
  # ... prior steps

  # Step 3: Call aggregator endpoint to exchange the verified phone number
  callAggregatorPnvEndpoint(ts43_digital_credential)