
注意:本頁面所述是指 Camera2 套件。除非應用程式需要 Camera2 的特定低階功能,否則建議使用 CameraX。CameraX 和 Camera2 均支援 Android 5.0 (API 級別 21) 以上版本。
多機拍攝是 Android 9 (API 級別 28) 所導入。自推出以來 裝置的市場都已成為可支援這個 API 的裝置。多種多鏡頭用途 與特定硬體設定緊密結合也就是說 所有用途都與每款裝置相容 因此多鏡頭功能 特別適合使用 Play 功能 交付。
常見的用途包括:
- 縮放:根據裁剪區域或所需的焦距切換鏡頭 長度。
- 深度圖:使用多個鏡頭製作深度圖。
- 散景:使用推測的深度資訊來模擬類似 DSLR 的狹窄範圍 重點範圍。
邏輯和實體相機的差異
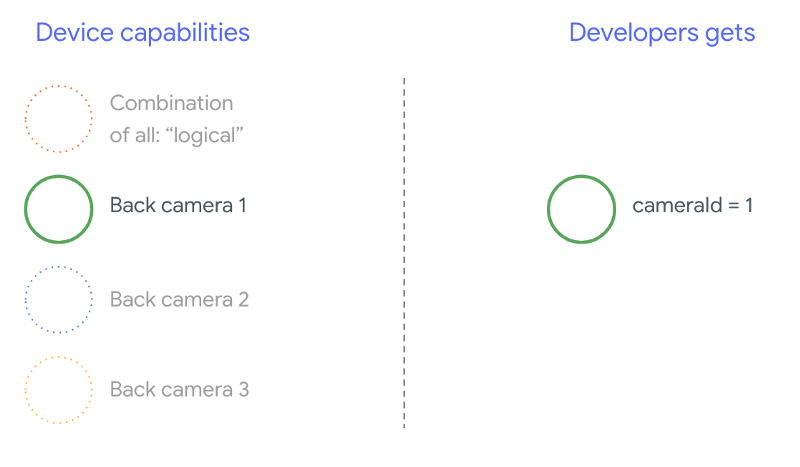
瞭解多鏡頭 API 需要瞭解 有邏輯和實體相機在此提供一個供您參考 後置鏡頭在這個範例中,三個後置鏡頭的每一個都是 我們才會將其視為實體攝影機邏輯相機為兩組以上的相片 實體相機邏輯輸出內容 可以是來自其中一部底層實體攝影機的串流影像 或者融合串流和 融合的串流 。無論你選擇哪一種做法,系統都會透過相機硬體處理串流 抽象層 (HAL)。
許多手機製造商會開發第一方相機應用程式, 都會預先安裝在裝置上。如要使用所有硬體功能 他們可以使用私人或隱藏的 API,或獲得對方的特殊待遇 其他應用程式無法存取的驅動程式實作。只有部分通知 裝置提供整合式的 擷取來自不同實體攝影機的影格,但僅限特定權限 應用程式。通常只有一支實體相機 這個架構的重點在於Android 9 之前的第三方開發人員的情況是 如下圖所示:
從 Android 9 開始,Android 應用程式將無法再使用私人 API。 在架構中納入多鏡頭支援功能後,Android 裝置的最佳選擇 做法極力建議手機製造商提供邏輯相機 。以下是 第三方開發人員應該會看到搭載 Android 9 和 較高:
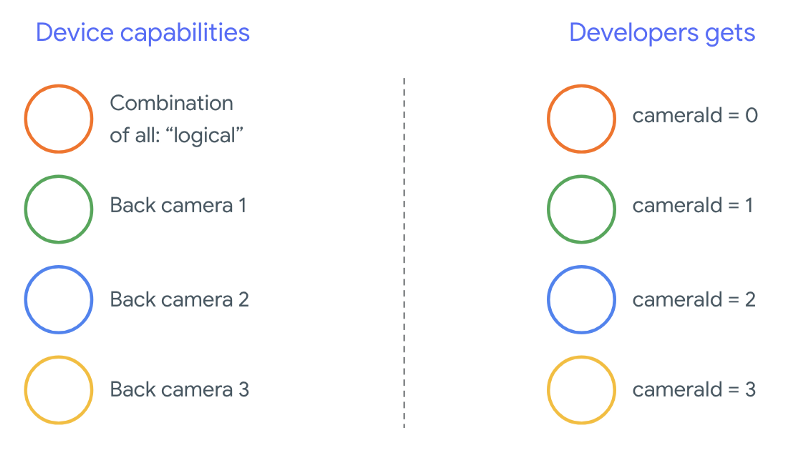
邏輯相機提供的功能完全取決於原始設備製造商 (OEM) 實作項目 相機 HAL舉例來說,Pixel 3 這類裝置的 如此才能根據 要求顯示焦距和裁剪區域。
多鏡頭 API
新版 API 會新增下列常數、類別和方法:
CameraMetadata.REQUEST_AVAILABLE_CAPABILITIES_LOGICAL_MULTI_CAMERACameraCharacteristics.getPhysicalCameraIds()CameraCharacteristics.getAvailablePhysicalCameraRequestKeys()CameraDevice.createCaptureSession(SessionConfiguration config)CameraCharacteritics.LOGICAL_MULTI_CAMERA_SENSOR_SYNC_TYPEOutputConfiguration和SessionConfiguration
由於 Android 相容性定義說明文件 (CDD) 有所異動, 多相機 API 還帶有開發人員的特定期望。裝置數 Android 9 之前推出的雙鏡頭功能,但開啟了多部相機 同時涉及反覆試驗與出錯Android 9 以上版本,多鏡頭 提供一組規則,用來指定何時可能打開一組實體 屬於同一邏輯鏡頭的一部分
在大多數情況下,搭載 Android 9 以上版本的裝置會曝露所有實體 攝影機 (可能不適用於紅外線等較不常見的感應器類型) 更易於使用的邏輯相機適用於 並保證能正常運作,可以使用邏輯相機的單一串流取代 擷取兩個串流分子
同時進行多個串流
同時使用多個相機串流影像
涵蓋在單一相機中同時使用多個串流的規則。
再加上一項值得注意的新增規定,同樣的規則也適用於多部攝影機。
CameraMetadata.REQUEST_AVAILABLE_CAPABILITIES_LOGICAL_MULTI_CAMERA敬上
說明如何將邏輯 YUV_420_888 或原始串流替換成
實體串流。也就是說,無論使用哪一種 YUV 或 RAW 類型的串流,都可以替換成其他的
兩個相同類型和大小的串流。一開始先使用攝影機串流影像
下列保證設定 (適用於單一相機裝置):
- 串流 1:YUV 類型,大小為
MAXIMUM,大小來自邏輯相機id = 0
之後,您可以使用支援多鏡頭的裝置建立工作階段 請將邏輯 YUV 串流替換為兩個實體串流:
- 串流 1:YUV 類型,大小為
MAXIMUM,尺寸為實體相機id = 1 - 串流 2:YUV 類型,大小為
MAXIMUM,尺寸為實體相機id = 2
只有在下列情況中,你才能以兩個同等串流取代 YUV 或 RAW 串流
這兩台攝影機屬於邏輯攝影機分組,
CameraCharacteristics.getPhysicalCameraIds()。
架構提供的保證只是 取得多個實體鏡頭的畫面其他串流 支援大多數的裝置,有時甚至可以開啟 相機裝置。由於從 但若要手動執行個別裝置測試和調整 反覆嘗試,過程中發生了錯誤。
使用多個實體攝影機建立工作階段
在支援多鏡頭功能的裝置上使用實體攝影機時,請打開一部
CameraDevice (邏輯相機),並在單一應用程式中與其互動
會很有幫助使用 API 建立單一工作階段
CameraDevice.createCaptureSession(SessionConfiguration config),之前為
已在 API 級別 28 中新增。這個工作階段設定會提供多項輸出內容
每個設定都有一組輸出目標
所需的實體相機 ID。
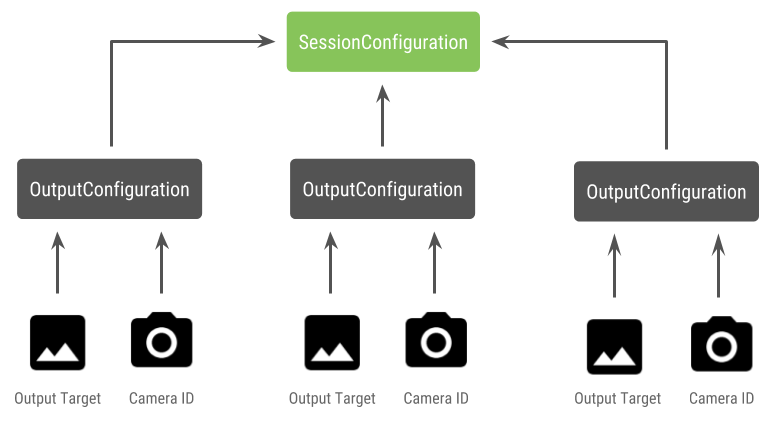
擷取要求有相關聯的輸出目標。架構 會根據 會附加哪些輸出目標如果輸出目標對應至 做為輸出設定傳送的輸出目標 那麼該實體相機會接收並處理要求。
使用一對實體攝影機
多鏡頭相機 API 的另一個額外之處在於 找出邏輯攝影機後方的實體攝影機您可以定義 功能,協助找出可能適用的實體攝影機組合 取代其中一個邏輯相機串流:
Kotlin
/** * Helper class used to encapsulate a logical camera and two underlying * physical cameras */ data class DualCamera(val logicalId: String, val physicalId1: String, val physicalId2: String) fun findDualCameras(manager: CameraManager, facing: Int? = null): List{ val dualCameras = MutableList () // Iterate over all the available camera characteristics manager.cameraIdList.map { Pair(manager.getCameraCharacteristics(it), it) }.filter { // Filter by cameras facing the requested direction facing == null || it.first.get(CameraCharacteristics.LENS_FACING) == facing }.filter { // Filter by logical cameras // CameraCharacteristics.REQUEST_AVAILABLE_CAPABILITIES_LOGICAL_MULTI_CAMERA requires API >= 28 it.first.get(CameraCharacteristics.REQUEST_AVAILABLE_CAPABILITIES)!!.contains( CameraCharacteristics.REQUEST_AVAILABLE_CAPABILITIES_LOGICAL_MULTI_CAMERA) }.forEach { // All possible pairs from the list of physical cameras are valid results // NOTE: There could be N physical cameras as part of a logical camera grouping // getPhysicalCameraIds() requires API >= 28 val physicalCameras = it.first.physicalCameraIds.toTypedArray() for (idx1 in 0 until physicalCameras.size) { for (idx2 in (idx1 + 1) until physicalCameras.size) { dualCameras.add(DualCamera( it.second, physicalCameras[idx1], physicalCameras[idx2])) } } } return dualCameras }
Java
/** * Helper class used to encapsulate a logical camera and two underlying * physical cameras */ final class DualCamera { final String logicalId; final String physicalId1; final String physicalId2; DualCamera(String logicalId, String physicalId1, String physicalId2) { this.logicalId = logicalId; this.physicalId1 = physicalId1; this.physicalId2 = physicalId2; } } ListfindDualCameras(CameraManager manager, Integer facing) { List dualCameras = new ArrayList<>(); List cameraIdList; try { cameraIdList = Arrays.asList(manager.getCameraIdList()); } catch (CameraAccessException e) { e.printStackTrace(); cameraIdList = new ArrayList<>(); } // Iterate over all the available camera characteristics cameraIdList.stream() .map(id -> { try { CameraCharacteristics characteristics = manager.getCameraCharacteristics(id); return new Pair<>(characteristics, id); } catch (CameraAccessException e) { e.printStackTrace(); return null; } }) .filter(pair -> { // Filter by cameras facing the requested direction return (pair != null) && (facing == null || pair.first.get(CameraCharacteristics.LENS_FACING).equals(facing)); }) .filter(pair -> { // Filter by logical cameras // CameraCharacteristics.REQUEST_AVAILABLE_CAPABILITIES_LOGICAL_MULTI_CAMERA requires API >= 28 IntPredicate logicalMultiCameraPred = arg -> arg == CameraCharacteristics.REQUEST_AVAILABLE_CAPABILITIES_LOGICAL_MULTI_CAMERA; return Arrays.stream(pair.first.get(CameraCharacteristics.REQUEST_AVAILABLE_CAPABILITIES)) .anyMatch(logicalMultiCameraPred); }) .forEach(pair -> { // All possible pairs from the list of physical cameras are valid results // NOTE: There could be N physical cameras as part of a logical camera grouping // getPhysicalCameraIds() requires API >= 28 String[] physicalCameras = pair.first.getPhysicalCameraIds().toArray(new String[0]); for (int idx1 = 0; idx1 < physicalCameras.length; idx1++) { for (int idx2 = idx1 + 1; idx2 < physicalCameras.length; idx2++) { dualCameras.add( new DualCamera(pair.second, physicalCameras[idx1], physicalCameras[idx2])); } } }); return dualCameras; }
實體攝影機的狀態處理是由邏輯相機控制。目的地: 開啟「雙鏡頭」開啟與 Google Cloud 裝置 相對應的邏輯相機 攝影機:
Kotlin
fun openDualCamera(cameraManager: CameraManager,
                       dualCamera: DualCamera,
        // AsyncTask is deprecated beginning API 30
                       executor: Executor = AsyncTask.SERIAL_EXECUTOR,
                       callback: (CameraDevice) -> Unit) {

        // openCamera() requires API >= 28
        cameraManager.openCamera(
            dualCamera.logicalId, executor, object : CameraDevice.StateCallback() {
                override fun onOpened(device: CameraDevice) = callback(device)
                // Omitting for brevity...
                override fun onError(device: CameraDevice, error: Int) = onDisconnected(device)
                override fun onDisconnected(device: CameraDevice) = device.close()
            })
    }
Java
void openDualCamera(CameraManager cameraManager,
                        DualCamera dualCamera,
                        Executor executor,
                        CameraDeviceCallback cameraDeviceCallback
    ) {

        // openCamera() requires API >= 28
        cameraManager.openCamera(dualCamera.logicalId, executor, new CameraDevice.StateCallback() {
            @Override
            public void onOpened(@NonNull CameraDevice cameraDevice) {
               cameraDeviceCallback.callback(cameraDevice);
            }

            @Override
            public void onDisconnected(@NonNull CameraDevice cameraDevice) {
                cameraDevice.close();
            }

            @Override
            public void onError(@NonNull CameraDevice cameraDevice, int i) {
                onDisconnected(cameraDevice);
            }
        });
    }
除了選取要開啟的相機外,步驟與開啟程序相同 搭載 Android 舊版本的相機使用新的 工作階段設定 API 就會指示架構 特定的實體相機 ID:
Kotlin
/**
 * Helper type definition that encapsulates 3 sets of output targets:
 *
 *   1. Logical camera
 *   2. First physical camera
 *   3. Second physical camera
 */
typealias DualCameraOutputs =
        Triple<MutableList?, MutableList?, MutableList?>

fun createDualCameraSession(cameraManager: CameraManager,
                            dualCamera: DualCamera,
                            targets: DualCameraOutputs,
                            // AsyncTask is deprecated beginning API 30
                            executor: Executor = AsyncTask.SERIAL_EXECUTOR,
                            callback: (CameraCaptureSession) -> Unit) {

    // Create 3 sets of output configurations: one for the logical camera, and
    // one for each of the physical cameras.
    val outputConfigsLogical = targets.first?.map { OutputConfiguration(it) }
    val outputConfigsPhysical1 = targets.second?.map {
        OutputConfiguration(it).apply { setPhysicalCameraId(dualCamera.physicalId1) } }
    val outputConfigsPhysical2 = targets.third?.map {
        OutputConfiguration(it).apply { setPhysicalCameraId(dualCamera.physicalId2) } }

    // Put all the output configurations into a single flat array
    val outputConfigsAll = arrayOf(
        outputConfigsLogical, outputConfigsPhysical1, outputConfigsPhysical2)
        .filterNotNull().flatMap { it }

    // Instantiate a session configuration that can be used to create a session
    val sessionConfiguration = SessionConfiguration(
        SessionConfiguration.SESSION_REGULAR,
        outputConfigsAll, executor, object : CameraCaptureSession.StateCallback() {
            override fun onConfigured(session: CameraCaptureSession) = callback(session)
            // Omitting for brevity...
            override fun onConfigureFailed(session: CameraCaptureSession) = session.device.close()
        })

    // Open the logical camera using the previously defined function
    openDualCamera(cameraManager, dualCamera, executor = executor) {

        // Finally create the session and return via callback
        it.createCaptureSession(sessionConfiguration)
    }
}
Java
/** * Helper class definition that encapsulates 3 sets of output targets: ** 1. Logical camera * 2. First physical camera * 3. Second physical camera */ final class DualCameraOutputs { private final List
logicalCamera; private final List firstPhysicalCamera; private final List secondPhysicalCamera; public DualCameraOutputs(List logicalCamera, List firstPhysicalCamera, List third) { this.logicalCamera = logicalCamera; this.firstPhysicalCamera = firstPhysicalCamera; this.secondPhysicalCamera = third; } public List getLogicalCamera() { return logicalCamera; } public List getFirstPhysicalCamera() { return firstPhysicalCamera; } public List getSecondPhysicalCamera() { return secondPhysicalCamera; } } interface CameraCaptureSessionCallback { void callback(CameraCaptureSession cameraCaptureSession); } void createDualCameraSession(CameraManager cameraManager, DualCamera dualCamera, DualCameraOutputs targets, Executor executor, CameraCaptureSessionCallback cameraCaptureSessionCallback) { // Create 3 sets of output configurations: one for the logical camera, and // one for each of the physical cameras. List outputConfigsLogical = targets.getLogicalCamera().stream() .map(OutputConfiguration::new) .collect(Collectors.toList()); List outputConfigsPhysical1 = targets.getFirstPhysicalCamera().stream() .map(s -> { OutputConfiguration outputConfiguration = new OutputConfiguration(s); outputConfiguration.setPhysicalCameraId(dualCamera.physicalId1); return outputConfiguration; }) .collect(Collectors.toList()); List outputConfigsPhysical2 = targets.getSecondPhysicalCamera().stream() .map(s -> { OutputConfiguration outputConfiguration = new OutputConfiguration(s); outputConfiguration.setPhysicalCameraId(dualCamera.physicalId2); return outputConfiguration; }) .collect(Collectors.toList()); // Put all the output configurations into a single flat array List outputConfigsAll = Stream.of( outputConfigsLogical, outputConfigsPhysical1, outputConfigsPhysical2 ) .filter(Objects::nonNull) .flatMap(Collection::stream) .collect(Collectors.toList()); // Instantiate a session configuration that can be used to create a session SessionConfiguration sessionConfiguration = new SessionConfiguration( SessionConfiguration.SESSION_REGULAR, outputConfigsAll, executor, new CameraCaptureSession.StateCallback() { @Override public void onConfigured(@NonNull CameraCaptureSession cameraCaptureSession) { cameraCaptureSessionCallback.callback(cameraCaptureSession); } // Omitting for brevity... @Override public void onConfigureFailed(@NonNull CameraCaptureSession cameraCaptureSession) { cameraCaptureSession.getDevice().close(); } }); // Open the logical camera using the previously defined function openDualCamera(cameraManager, dualCamera, executor, (CameraDevice c) -> // Finally create the session and return via callback c.createCaptureSession(sessionConfiguration)); }
詳情請見
createCaptureSession敬上
以瞭解支援的串流組合。合併串流
是針對單一邏輯攝影機上的多個串流。相容性延伸至
並以兩個串流取代其中一個串流
使用屬於同一邏輯相機的兩部實體攝影機。
使用 攝影機工作階段 準備就緒 擷取請求。每項 擷取要求的目標,則會從與其關聯的實體 攝影機 (如果有使用中) 或改回使用邏輯相機
Zoom 應用實例
你可以將實體攝影機合併為單一串流, 讓使用者可以在不同的實體攝影機之間切換 或視野不同,有效擷取不同的「縮放等級」。

請先選取兩部實體攝影機,允許使用者切換 。為求最佳效果,你可以選擇兩部 焦點的最小和最大可焦距
Kotlin
fun findShortLongCameraPair(manager: CameraManager, facing: Int? = null): DualCamera? {

    return findDualCameras(manager, facing).map {
        val characteristics1 = manager.getCameraCharacteristics(it.physicalId1)
        val characteristics2 = manager.getCameraCharacteristics(it.physicalId2)

        // Query the focal lengths advertised by each physical camera
        val focalLengths1 = characteristics1.get(
            CameraCharacteristics.LENS_INFO_AVAILABLE_FOCAL_LENGTHS) ?: floatArrayOf(0F)
        val focalLengths2 = characteristics2.get(
            CameraCharacteristics.LENS_INFO_AVAILABLE_FOCAL_LENGTHS) ?: floatArrayOf(0F)

        // Compute the largest difference between min and max focal lengths between cameras
        val focalLengthsDiff1 = focalLengths2.maxOrNull()!! - focalLengths1.minOrNull()!!
        val focalLengthsDiff2 = focalLengths1.maxOrNull()!! - focalLengths2.minOrNull()!!

        // Return the pair of camera IDs and the difference between min and max focal lengths
        if (focalLengthsDiff1 < focalLengthsDiff2) {
            Pair(DualCamera(it.logicalId, it.physicalId1, it.physicalId2), focalLengthsDiff1)
        } else {
            Pair(DualCamera(it.logicalId, it.physicalId2, it.physicalId1), focalLengthsDiff2)
        }

        // Return only the pair with the largest difference, or null if no pairs are found
    }.maxByOrNull { it.second }?.first
}
Java
// Utility functions to find min/max value in float[]
    float findMax(float[] array) {
        float max = Float.NEGATIVE_INFINITY;
        for(float cur: array)
            max = Math.max(max, cur);
        return max;
    }
    float findMin(float[] array) {
        float min = Float.NEGATIVE_INFINITY;
        for(float cur: array)
            min = Math.min(min, cur);
        return min;
    }

DualCamera findShortLongCameraPair(CameraManager manager, Integer facing) {
        return findDualCameras(manager, facing).stream()
                .map(c -> {
                    CameraCharacteristics characteristics1;
                    CameraCharacteristics characteristics2;
                    try {
                        characteristics1 = manager.getCameraCharacteristics(c.physicalId1);
                        characteristics2 = manager.getCameraCharacteristics(c.physicalId2);
                    } catch (CameraAccessException e) {
                        e.printStackTrace();
                        return null;
                    }

                    // Query the focal lengths advertised by each physical camera
                    float[] focalLengths1 = characteristics1.get(
                            CameraCharacteristics.LENS_INFO_AVAILABLE_FOCAL_LENGTHS);
                    float[] focalLengths2 = characteristics2.get(
                            CameraCharacteristics.LENS_INFO_AVAILABLE_FOCAL_LENGTHS);

                    // Compute the largest difference between min and max focal lengths between cameras
                    Float focalLengthsDiff1 = findMax(focalLengths2) - findMin(focalLengths1);
                    Float focalLengthsDiff2 = findMax(focalLengths1) - findMin(focalLengths2);

                    // Return the pair of camera IDs and the difference between min and max focal lengths
                    if (focalLengthsDiff1 < focalLengthsDiff2) {
                        return new Pair<>(new DualCamera(c.logicalId, c.physicalId1, c.physicalId2), focalLengthsDiff1);
                    } else {
                        return new Pair<>(new DualCamera(c.logicalId, c.physicalId2, c.physicalId1), focalLengthsDiff2);
                    }

                }) // Return only the pair with the largest difference, or null if no pairs are found
                .max(Comparator.comparing(pair -> pair.second)).get().first;
    }
有一個合理的架構
SurfaceViews:每個串流各一個。
這些 SurfaceViews 會根據使用者互動而進行替換,因此只會對一個
以便隨時查看
以下程式碼顯示如何開啟邏輯相機和設定相機 輸出、建立相機工作階段,以及啟動兩個預覽串流:
Kotlin
val cameraManager: CameraManager = ...

// Get the two output targets from the activity / fragment
val surface1 = ...  // from SurfaceView
val surface2 = ...  // from SurfaceView

val dualCamera = findShortLongCameraPair(manager)!!
val outputTargets = DualCameraOutputs(
    null, mutableListOf(surface1), mutableListOf(surface2))

// Here you open the logical camera, configure the outputs and create a session
createDualCameraSession(manager, dualCamera, targets = outputTargets) { session ->

  // Create a single request which has one target for each physical camera
  // NOTE: Each target receive frames from only its associated physical camera
  val requestTemplate = CameraDevice.TEMPLATE_PREVIEW
  val captureRequest = session.device.createCaptureRequest(requestTemplate).apply {
    arrayOf(surface1, surface2).forEach { addTarget(it) }
  }.build()

  // Set the sticky request for the session and you are done
  session.setRepeatingRequest(captureRequest, null, null)
}
Java
CameraManager manager = ...;

        // Get the two output targets from the activity / fragment
        Surface surface1 = ...;  // from SurfaceView
        Surface surface2 = ...;  // from SurfaceView

        DualCamera dualCamera = findShortLongCameraPair(manager, null);
                DualCameraOutputs outputTargets = new DualCameraOutputs(
                null, Collections.singletonList(surface1), Collections.singletonList(surface2));

        // Here you open the logical camera, configure the outputs and create a session
        createDualCameraSession(manager, dualCamera, outputTargets, null, (session) -> {
            // Create a single request which has one target for each physical camera
            // NOTE: Each target receive frames from only its associated physical camera
            CaptureRequest.Builder captureRequestBuilder;
            try {
                captureRequestBuilder = session.getDevice().createCaptureRequest(CameraDevice.TEMPLATE_PREVIEW);
                Arrays.asList(surface1, surface2).forEach(captureRequestBuilder::addTarget);

                // Set the sticky request for the session and you are done
                session.setRepeatingRequest(captureRequestBuilder.build(), null, null);
            } catch (CameraAccessException e) {
                e.printStackTrace();
            }
        });
接下來只要提供使用者介面,可讓使用者在兩者間切換
介面,例如按鈕或輕觸兩下 SurfaceView。您甚至可以
執行某種形式的場景分析,並在兩種串流之間切換
。
鏡頭變形
所有鏡頭都會造成一定程度的變形。在 Android 中,您可以查詢
鏡頭產生的變形圖像
CameraCharacteristics.LENS_DISTORTION、
取代現已淘汰的
CameraCharacteristics.LENS_RADIAL_DISTORTION。
以邏輯相機來說,失真幾乎不會失真,應用程式也能使用
也就是擷取相機傳來的畫面。以實體相機來說
可能是鏡頭的組態設定非常不同
鏡頭。
某些裝置可能會透過
CaptureRequest.DISTORTION_CORRECTION_MODE。
多數裝置預設會啟用變形校正功能。
Kotlin
val cameraSession: CameraCaptureSession = ...

        // Use still capture template to build the capture request
        val captureRequest = cameraSession.device.createCaptureRequest(
            CameraDevice.TEMPLATE_STILL_CAPTURE
        )

        // Determine if this device supports distortion correction
        val characteristics: CameraCharacteristics = ...
        val supportsDistortionCorrection = characteristics.get(
            CameraCharacteristics.DISTORTION_CORRECTION_AVAILABLE_MODES
        )?.contains(
            CameraMetadata.DISTORTION_CORRECTION_MODE_HIGH_QUALITY
        ) ?: false

        if (supportsDistortionCorrection) {
            captureRequest.set(
                CaptureRequest.DISTORTION_CORRECTION_MODE,
                CameraMetadata.DISTORTION_CORRECTION_MODE_HIGH_QUALITY
            )
        }

        // Add output target, set other capture request parameters...

        // Dispatch the capture request
        cameraSession.capture(captureRequest.build(), ...)
Java
CameraCaptureSession cameraSession = ...;

        // Use still capture template to build the capture request
        CaptureRequest.Builder captureRequestBuilder = null;
        try {
            captureRequestBuilder = cameraSession.getDevice().createCaptureRequest(
                    CameraDevice.TEMPLATE_STILL_CAPTURE
            );
        } catch (CameraAccessException e) {
            e.printStackTrace();
        }

        // Determine if this device supports distortion correction
        CameraCharacteristics characteristics = ...;
        boolean supportsDistortionCorrection = Arrays.stream(
                        characteristics.get(
                                CameraCharacteristics.DISTORTION_CORRECTION_AVAILABLE_MODES
                        ))
                .anyMatch(i -> i == CameraMetadata.DISTORTION_CORRECTION_MODE_HIGH_QUALITY);
        if (supportsDistortionCorrection) {
            captureRequestBuilder.set(
                    CaptureRequest.DISTORTION_CORRECTION_MODE,
                    CameraMetadata.DISTORTION_CORRECTION_MODE_HIGH_QUALITY
            );
        }

        // Add output target, set other capture request parameters...

        // Dispatch the capture request
        cameraSession.capture(captureRequestBuilder.build(), ...);
在此模式下設定擷取要求,可能會影響可變動的影格速率 這裡介紹的是相機產生的預測結果您可以只將變形校正設為 靜態圖片擷取