如需了解如何通过向应用代码添加更改来使用 Microbenchmark 库,请参阅快速入门部分。如需了解如何通过对代码库进行更复杂的更改来完成完整设置,请参阅完整的项目设置部分。
快速入门
本部分将介绍如何在无需将代码移到模块中的情况下,尝试执行基准测试以及执行一次性测量。为了获得准确的性能结果,本文中的步骤涉及在应用中停用调试功能,因此请将相关操作结果保留在本地工作副本中,而无需将更改提交至源代码控制系统中。
如需开展一次性基准测试,请执行以下操作:
将该库添加到您模块的
build.gradle或build.gradle.kts文件中:Kotlin
dependencies {
    implementation("androidx.benchmark:benchmark-junit4:1.2.4")
}
Groovy
dependencies {
    implementation 'androidx.benchmark:benchmark-junit4:1.2.4'
}
使用
implementation依赖项,而不是androidTestImplementation依赖项。如果您使用androidTestImplementation,基准测试将无法运行,因为库清单未合并到应用清单中。更新
debugbuild 类型,使其不可调试:Kotlin
android {
    ...
    buildTypes {
        debug {
            isDebuggable = false
        }
    }
}
Groovy
android {
    ...
    buildTypes {
        debug {
            debuggable false
        }
    }
}
将
testInstrumentationRunner更改为AndroidBenchmarkRunner:Kotlin
android {
    ...
    defaultConfig {
        testInstrumentationRunner = "androidx.benchmark.junit4.AndroidBenchmarkRunner"
    }
}
Groovy
android {
    ...
    defaultConfig {
        testInstrumentationRunner "androidx.benchmark.junit4.AndroidBenchmarkRunner"
    }
}
在
androidTest目录下的测试文件中添加BenchmarkRule的实例,以添加您的基准。如需详细了解如何编写基准,请参阅创建 Microbenchmark 类。以下代码段展示了如何将基准添加到插桩测试中:
Kotlin
@RunWith(AndroidJUnit4::class) class SampleBenchmark { @get:Rule val benchmarkRule = BenchmarkRule() @Test fun benchmarkSomeWork() { benchmarkRule.measureRepeated { doSomeWork() } } }
Java
@RunWith(AndroidJUnit4.class)
class SampleBenchmark {
    @Rule
    public BenchmarkRule benchmarkRule = new BenchmarkRule();

    @Test
    public void benchmarkSomeWork() {
            BenchmarkRuleKt.measureRepeated(
                (Function1<BenchmarkRule.Scope, Unit>) scope -> doSomeWork()
            );
       }
    }
}
如需了解如何编写基准,请跳至创建 Microbenchmark 类。
完整的项目设置
如需设置常规基准测试而非一次性基准测试,请将基准分隔到专门的模块中。这有助于确保其配置(例如将 debuggable 设置为 false)与常规测试分开。
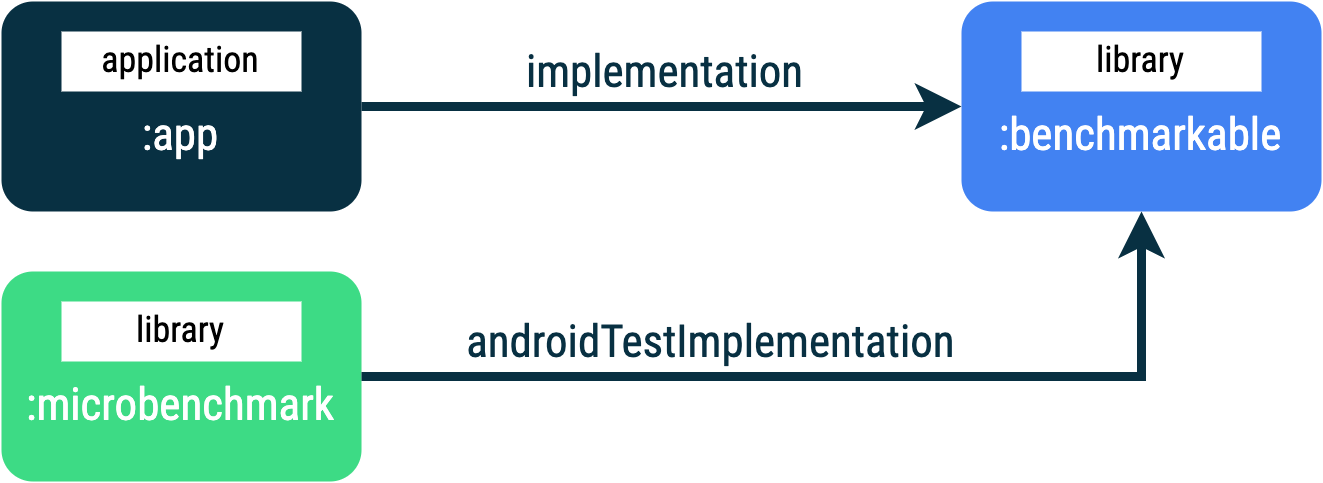
由于 Microbenchmark 会直接运行您的代码,因此请将要进行基准测试的代码放在单独的 Gradle 模块中,并设置对该模块的依赖项,如图 1 所示。

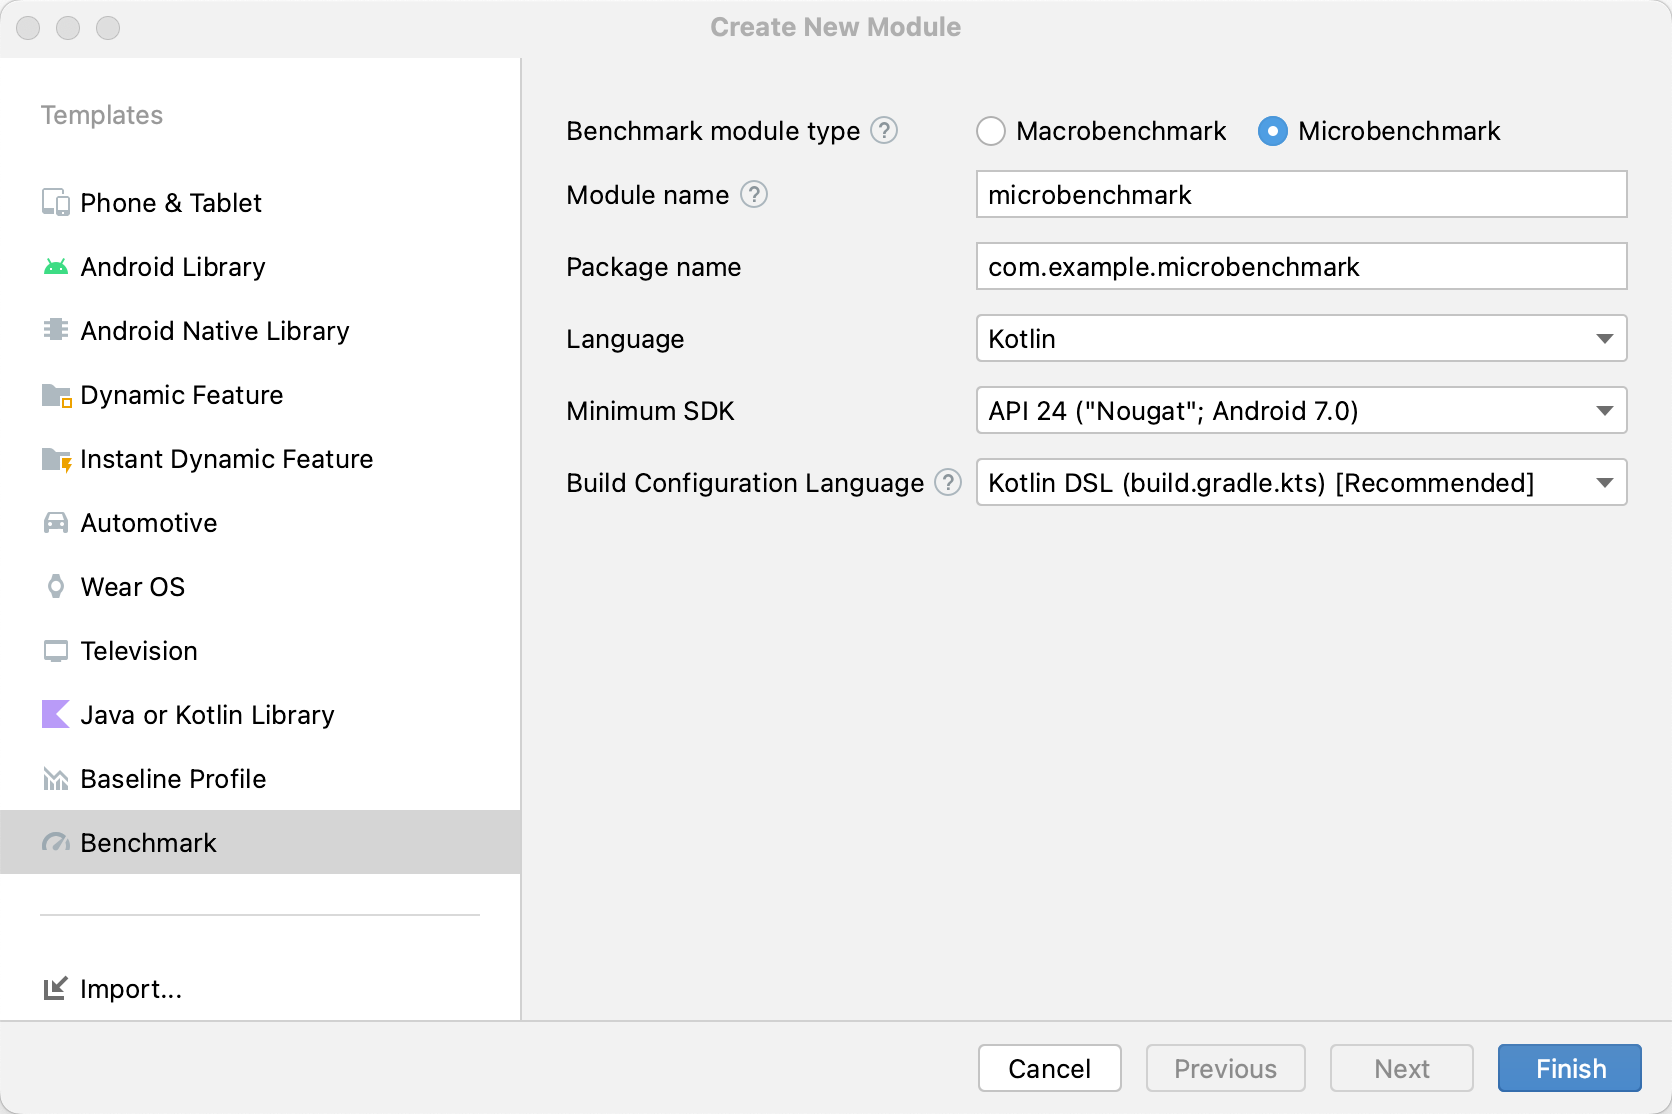
:app、:microbenchmark 和 :benchmarkable Gradle 模块的应用结构,允许 Microbenchmark 对 :benchmarkable 模块中的代码进行基准测试。如需添加新的 Gradle 模块,您可以使用 Android Studio 中的模块向导。该向导会创建一个针对基准测试进行了预先配置的模块,其中添加了基准目录并已将 debuggable 设置为 false。
在 Android Studio 的 Project 面板中右键点击您的项目或模块,然后依次点击 New > Module。
在 Templates 窗格中选择 Benchmark。
选择 Microbenchmark 作为基准模块类型。
输入“microbenchmark”作为模块名称。
点击 Finish。

创建模块后,更改其 build.gradle 或 build.gradle.kts 文件,并将 androidTestImplementation 添加到包含要进行基准测试的代码的模块:
Kotlin
dependencies {
    // The module name might be different.
    androidTestImplementation(project(":benchmarkable"))
}
Groovy
dependencies {
    // The module name might be different.
    androidTestImplementation project(':benchmarkable')
}
创建 Microbenchmark 类
基准是标准的插桩测试。如需创建基准,请使用基准库提供的 BenchmarkRule 类。如需对 activity 进行基准测试,请使用 ActivityScenario 或 ActivityScenarioRule。如需对界面代码进行基准测试,请使用 @UiThreadTest。
以下代码展示了一个示例基准:
Kotlin
@RunWith(AndroidJUnit4::class) class SampleBenchmark { @get:Rule val benchmarkRule = BenchmarkRule() @Test fun benchmarkSomeWork() { benchmarkRule.measureRepeated { doSomeWork() } } }
Java
@RunWith(AndroidJUnit4.class)
class SampleBenchmark {
    @Rule
    public BenchmarkRule benchmarkRule = new BenchmarkRule();

    @Test
    public void benchmarkSomeWork() {
        final BenchmarkState state = benchmarkRule.getState();
        while (state.keepRunning()) {
            doSomeWork();
        }
    }
}
为设置停用计时功能
您可以使用 runWithTimingDisabled{} 代码块对不想测量的代码段停用计时功能。这些代码段通常表示您需要在基准的每次迭代中运行的一些代码。
Kotlin
// using random with the same seed, so that it generates the same data every run private val random = Random(0) // create the array once and just copy it in benchmarks private val unsorted = IntArray(10_000) { random.nextInt() } @Test fun benchmark_quickSort() { // ... benchmarkRule.measureRepeated { // copy the array with timing disabled to measure only the algorithm itself listToSort = runWithTimingDisabled { unsorted.copyOf() } // sort the array in place and measure how long it takes SortingAlgorithms.quickSort(listToSort) } // assert only once not to add overhead to the benchmarks assertTrue(listToSort.isSorted) }
Java
private final int[] unsorted = new int[10000];

public SampleBenchmark() {
    // Use random with the same seed, so that it generates the same data every
    // run.
    Random random = new Random(0);

    // Create the array once and copy it in benchmarks.
    Arrays.setAll(unsorted, (index) -> random.nextInt());
}

@Test
public void benchmark_quickSort() {
    final BenchmarkState state = benchmarkRule.getState();

    int[] listToSort = new int[0];

    while (state.keepRunning()) {

        // Copy the array with timing disabled to measure only the algorithm
        // itself.
        state.pauseTiming();
        listToSort = Arrays.copyOf(unsorted, 10000);
        state.resumeTiming();

        // Sort the array in place and measure how long it takes.
        SortingAlgorithms.quickSort(listToSort);
    }

    // Assert only once, not to add overhead to the benchmarks.
    assertTrue(SortingAlgorithmsKt.isSorted(listToSort));
}
尽量减少在 measureRepeated 代码块和 runWithTimingDisabled 内执行的工作量。measureRepeated 代码块会运行多次,这会影响运行基准所需的总时间。如果您需要验证基准的某些结果,可以断言上一个结果,而不是在基准的每次迭代中执行此操作。
运行基准
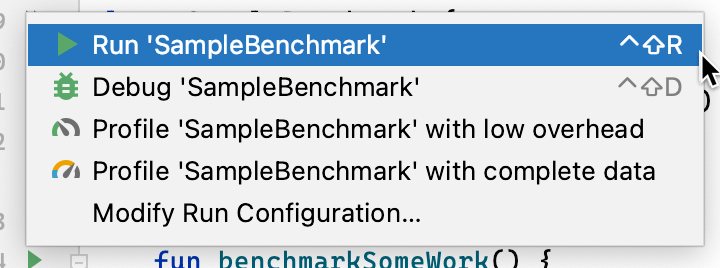
在 Android Studio 中,像使用测试类或方法旁边的边线操作运行任何 @Test 一样运行您的基准,如图 3 所示。

或者,您也可以在命令行中运行 connectedCheck,以运行来自指定 Gradle 模块的所有测试:
./gradlew benchmark:connectedCheck或单个测试:
./gradlew benchmark:connectedCheck -P android.testInstrumentationRunnerArguments.class=com.example.benchmark.SampleBenchmark#benchmarkSomeWork基准结果
Microbenchmark 运行成功后,指标会直接显示在 Android Studio 中,包含额外指标和设备信息的完整基准报告还会以 JSON 格式提供。

JSON 报告和所有性能分析轨迹也会从设备自动复制到主机。这些数据将写入宿主机上的以下位置:
project_root/module/build/outputs/connected_android_test_additional_output/debugAndroidTest/connected/device_id/
默认情况下,JSON 报告会写入设备端磁盘的测试 APK 的外部共享媒体文件夹中,该文件夹通常位于 /storage/emulated/0/Android/media/**app_id**/**app_id**-benchmarkData.json。
配置错误
基准库会检测以下条件是否得到满足,以确保项目和环境设置达到发布性能的要求:
- Debuggable 设置为
false。 - 正在使用的是实体设备,不支持模拟器。
- 如果设备启用了 root 权限,需已锁定时钟。
- 设备的电池电量充足(至少 25%)。
如果上述任一项检查失败,基准将报告错误以避免不准确的测量结果。
如需抑制显示为警告的特定错误类型,同时阻止它们中止基准测试,请将相应错误类型以逗号分隔列表的形式传递给插桩参数 androidx.benchmark.suppressErrors。
您可以通过 Gradle 脚本对此进行设置,如以下示例所示:
Kotlin
android {
    defaultConfig {
       …
      testInstrumentationRunnerArguments["androidx.benchmark.suppressErrors"] = "DEBUGGABLE,LOW-BATTERY"
    }
}
Groovy
android {
    defaultConfig {
       …
      testInstrumentationRunnerArguments["androidx.benchmark.suppressErrors"] = "DEBUGGABLE,LOW-BATTERY"
    }
}
您还可以从命令行抑制错误:
$ ./gradlew :benchmark:connectedCheck -P andoidtestInstrumentationRunnerArguments.androidx.benchmark.supperssErrors=DEBUGGABLE,LOW-BATTERY
抑制错误可让您在配置有误的状态下运行基准,但会导致系统刻意重命名基准的输出(具体方式为在测试名称前附加错误类型)。例如,如果通过上述代码段中的抑制操作运行可调试基准,系统会在测试名称前附加 DEBUGGABLE_。
为您推荐
- 注意:当 JavaScript 处于关闭状态时,系统会显示链接文字
- 编写 Macrobenchmark
- 在不使用 Gradle 的情况下构建 Microbenchmark
- 创建基准配置文件 {:#creating-profile-rules}
