
Android アプリにおいて、手動による依存関係インジェクションやサービス ロケータは、プロジェクトの規模によっては問題になることがあります。Dagger を使用すれば、依存関係を管理することで、プロジェクトの複雑さを抑えられます。
Dagger は、通常は手書きするコードを模倣してコードを自動的に生成します。このコードはコンパイル時に生成されるため、Guice などのリフレクション ベースのソリューションよりも、トレース可能でパフォーマンスが高いものになります。
Dagger を使用するメリット
Dagger は、次のようにして、退屈でエラーが発生しがちなボイラープレート コードの作成からプログラマーを解放します。
手動 DI セクションに手動で実装していた
AppContainerコード(アプリケーション グラフ)を生成します。アプリケーション グラフで使用可能なクラスの Factory を作成します。これにより、依存関係が内部的に満たされます。
依存関係を再利用するか、スコープを使用して新しいインスタンスを作成するかを決定します。
Dagger サブコンポーネントを使用して、前のセクションで扱ったログインフローと同じように、特定のフローのコンテナを作成します。これにより、メモリ内の不要になったオブジェクトを解放できるため、アプリのパフォーマンスが向上します。
Dagger は、アノテーションを使用して、クラスの依存関係を宣言し、依存関係を満たす方法を指定している限り、上記の処理をビルド時に自動的に行います。Dagger は、手動で記述するのと同じようなコードを生成します。内部的には、参照する可能性のあるオブジェクトのグラフを作成して、クラスのインスタンスを提供する方法を見つけます。グラフ内のすべてのクラスに対して、インスタンスを取得するために内部で使用する Factory 型のクラスを生成します。
Dagger は、ビルド時に、コードを参照しながら、次のような処理を行います。
依存関係グラフを作成して、次のことを確認します。
- オブジェクトのすべての依存関係を満たすことができる。これにより、実行時の例外は発生しません。
- 依存関係の循環が存在しない。これにより、無限ループは発生しません。
実際のオブジェクトとその依存関係を作成するのに実行時に使用するクラスを生成します。
Dagger の簡単な使用例: ファクトリの生成
Dagger の使用方法を説明するために、次の図に示す UserRepository クラスの簡単な Factory を作成します。
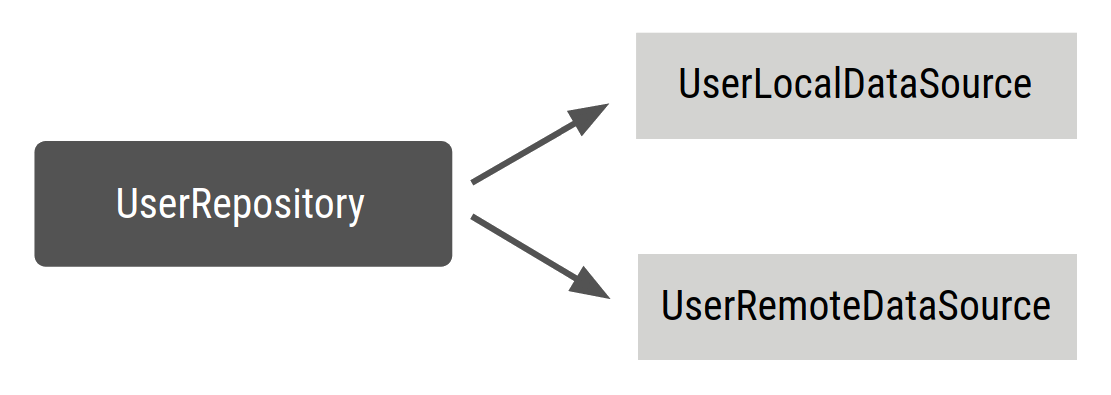
UserRepository を次のように定義します。
Kotlin
class UserRepository(
    private val localDataSource: UserLocalDataSource,
    private val remoteDataSource: UserRemoteDataSource
) { ... }
Java
public class UserRepository {

    private final UserLocalDataSource userLocalDataSource;
    private final UserRemoteDataSource userRemoteDataSource;

    public UserRepository(UserLocalDataSource userLocalDataSource, UserRemoteDataSource userRemoteDataSource) {
        this.userLocalDataSource = userLocalDataSource;
        this.userRemoteDataSource = userRemoteDataSource;
    }

    ...
}
@Inject アノテーションを UserRepository コンストラクタに追加して、Dagger が UserRepository の作成方法を認識できるようにします。
Kotlin
// @Inject lets Dagger know how to create instances of this object
class UserRepository @Inject constructor(
    private val localDataSource: UserLocalDataSource,
    private val remoteDataSource: UserRemoteDataSource
) { ... }
Java
public class UserRepository {

    private final UserLocalDataSource userLocalDataSource;
    private final UserRemoteDataSource userRemoteDataSource;

    // @Inject lets Dagger know how to create instances of this object
    @Inject
    public UserRepository(UserLocalDataSource userLocalDataSource, UserRemoteDataSource userRemoteDataSource) {
        this.userLocalDataSource = userLocalDataSource;
        this.userRemoteDataSource = userRemoteDataSource;
    }
}
上のコード スニペットでは、Dagger に次のことを認識させています。
@Injectアノテーションが付けられたコンストラクタを使用してUserRepositoryのインスタンスを作成する方法。その依存関係が
UserLocalDataSourceとUserRemoteDataSourceであること。
こうして Dagger は、UserRepository のインスタンスの作成方法を認識するようになりますが、その依存関係を作成する方法は認識しません。次のように他のクラスにもアノテーションを付ければ、その作成方法を認識するようになります。
Kotlin
// @Inject lets Dagger know how to create instances of these objects
class UserLocalDataSource @Inject constructor() { ... }
class UserRemoteDataSource @Inject constructor() { ... }
Java
public class UserLocalDataSource {
    @Inject
    public UserLocalDataSource() { }
}

public class UserRemoteDataSource {
    @Inject
    public UserRemoteDataSource() { }
}
Dagger コンポーネント
Dagger は、プロジェクト内に依存関係のグラフを作成します。これを使用して、依存関係が必要なときにどこで取得すべきかを知ることができます。そのためには、インターフェースを作成して、それに @Component アノテーションを付ける必要があります。手動による依存関係インジェクションで行うのと同じように、Dagger がコンテナを作成します。
@Component インターフェースの内部では、必要なクラス(UserRepository)のインスタンスを返す関数を定義します。@Component は、Dagger に対して、公開する型が満たす必要がある依存関係をすべて持ったコンテナの生成を指示します。これは Dagger コンポーネントと呼ばれます。これには、Dagger が提供方法を認識しているオブジェクトと、その依存関係からなるグラフが含まれています。
Kotlin
// @Component makes Dagger create a graph of dependencies
@Component
interface ApplicationGraph {
    // The return type  of functions inside the component interface is
    // what can be provided from the container
    fun repository(): UserRepository
}
Java
// @Component makes Dagger create a graph of dependencies
@Component
public interface ApplicationGraph {
    // The return type  of functions inside the component interface is
    // what can be consumed from the graph
    UserRepository userRepository();
}
プロジェクトをビルドすると、Dagger によって ApplicationGraph インターフェースの実装である DaggerApplicationGraph が生成されます。Dagger は、そのアノテーション プロセッサを使用して、UserRepository インスタンスを取得する 1 つのエントリ ポイントだけを持った、3 つのクラス(UserRepository、UserLocalDatasource、UserRemoteDataSource)間の関係からなる依存関係グラフを作成します。これは次のように使用できます。
Kotlin
// Create an instance of the application graph
val applicationGraph: ApplicationGraph = DaggerApplicationGraph.create()
// Grab an instance of UserRepository from the application graph
val userRepository: UserRepository = applicationGraph.repository()
Java
// Create an instance of the application graph
ApplicationGraph applicationGraph = DaggerApplicationGraph.create();

// Grab an instance of UserRepository from the application graph
UserRepository userRepository = applicationGraph.userRepository();
要求されるたびに UserRepository の新しいインスタンスが作成されます。
Kotlin
val applicationGraph: ApplicationGraph = DaggerApplicationGraph.create()

val userRepository: UserRepository = applicationGraph.repository()
val userRepository2: UserRepository = applicationGraph.repository()

assert(userRepository != userRepository2)
Java
ApplicationGraph applicationGraph = DaggerApplicationGraph.create();

UserRepository userRepository = applicationGraph.userRepository();
UserRepository userRepository2 = applicationGraph.userRepository();

assert(userRepository != userRepository2)
場合によっては、コンテナ内に依存関係の一意のインスタンスが必要になります。これには次のような理由があります。
この型を依存関係として持つ他の型に、同じインスタンスを共有させたい(ログインフローの複数の
ViewModelオブジェクトが同じLoginUserDataを使用している、など)。オブジェクトを作成するコストが高く、依存関係として宣言されるたびに新しいインスタンスを作成したくない(JSON パーサーなど)。
このサンプルでは、グラフ内に UserRepository の一意のインスタンスを持って、UserRepository を要求するたびに常に同じインスタンスが取得されるようにすることが推奨されます。より複雑なアプリケーション グラフを持った実際のアプリケーションでは、UserRepository に依存する複数の ViewModel オブジェクトがあり、UserRepository の提供が必要となるたびに UserLocalDataSource と UserRemoteDataSource の新しいインスタンスを作成するのは好ましくないため、このようにする価値があります。
手動による依存関係インジェクションの場合は、UserRepository の同じインスタンスを ViewModel クラスのコンストラクタに渡すことによってこれを実現します。しかし Dagger の場合は、コードを手動で記述しないため、同じインスタンスを使用することを Dagger に認識させる必要があります。これは、スコープ アノテーションで実現できます。
Dagger を使用したスコープ設定
スコープ アノテーションを使用すると、オブジェクトの存続期間をそのコンポーネントの存続期間に制限できます。つまり、型を提供する必要があるたびに依存関係の同じインスタンスが使用されます。
ApplicationGraph のリポジトリを要求するときに UserRepository の一意のインスタンスを作成するには、@Component インターフェースと UserRepository に同じスコープ アノテーションを使用します。次のように、Dagger が使用する javax.inject パッケージにすでに用意されている @Singleton アノテーションが使用できます。
Kotlin
// Scope annotations on a @Component interface informs Dagger that classes annotated
// with this annotation (i.e. @Singleton) are bound to the life of the graph and so
// the same instance of that type is provided every time the type is requested.
@Singleton
@Component
interface ApplicationGraph {
    fun repository(): UserRepository
}

// Scope this class to a component using @Singleton scope (i.e. ApplicationGraph)
@Singleton
class UserRepository @Inject constructor(
    private val localDataSource: UserLocalDataSource,
    private val remoteDataSource: UserRemoteDataSource
) { ... }
Java
// Scope annotations on a @Component interface informs Dagger that classes annotated
// with this annotation (i.e. @Singleton) are scoped to the graph and the same
// instance of that type is provided every time the type is requested.
@Singleton
@Component
public interface ApplicationGraph {
    UserRepository userRepository();
}

// Scope this class to a component using @Singleton scope (i.e. ApplicationGraph)
@Singleton
public class UserRepository {

    private final UserLocalDataSource userLocalDataSource;
    private final UserRemoteDataSource userRemoteDataSource;

    @Inject
    public UserRepository(UserLocalDataSource userLocalDataSource, UserRemoteDataSource userRemoteDataSource) {
        this.userLocalDataSource = userLocalDataSource;
        this.userRemoteDataSource = userRemoteDataSource;
    }
}
また、カスタムのスコープ アノテーションを作成して使用することもできます。スコープ アノテーションは、次のようにして作成できます。
Kotlin
// Creates MyCustomScope
@Scope
@MustBeDocumented
@Retention(value = AnnotationRetention.RUNTIME)
annotation class MyCustomScope
Java
// Creates MyCustomScope
@Scope
@Retention(RetentionPolicy.RUNTIME)
public @interface MyCustomScope {}
こうすると、次のように前の例と同じように使用できます。
Kotlin
@MyCustomScope
@Component
interface ApplicationGraph {
    fun repository(): UserRepository
}

@MyCustomScope
class UserRepository @Inject constructor(
    private val localDataSource: UserLocalDataSource,
    private val service: UserService
) { ... }
Java
@MyCustomScope
@Component
public interface ApplicationGraph {
    UserRepository userRepository();
}

@MyCustomScope
public class UserRepository {

    private final UserLocalDataSource userLocalDataSource;
    private final UserRemoteDataSource userRemoteDataSource;

    @Inject
    public UserRepository(UserLocalDataSource userLocalDataSource, UserRemoteDataSource userRemoteDataSource) {
        this.userLocalDataSource = userLocalDataSource;
        this.userRemoteDataSource = userRemoteDataSource;
    }
}
どちらの場合も、同じスコープが @Component インターフェースに対するアノテーション付けに使用されて、オブジェクトが提供されます。したがって、applicationGraph.repository() を呼び出すたびに、UserRepository の同じインスタンスが取得されます。
Kotlin
val applicationGraph: ApplicationGraph = DaggerApplicationGraph.create()

val userRepository: UserRepository = applicationGraph.repository()
val userRepository2: UserRepository = applicationGraph.repository()

assert(userRepository == userRepository2)
Java
ApplicationGraph applicationGraph = DaggerApplicationGraph.create();

UserRepository userRepository = applicationGraph.userRepository();
UserRepository userRepository2 = applicationGraph.userRepository();

assert(userRepository == userRepository2)
まとめ
より複雑なシナリオで Dagger を使用する前に、Dagger の利点とその動作の基本を理解することが重要です。
次のページでは、Android アプリに Dagger を追加する方法を説明します。