
Dagger の基本ページでは、Dagger を利用してアプリの依存関係注入(DI)を自動化する方法について説明しました。Dagger を使用すると、単調で間違いが起こりがちなボイラープレート コードの作成が不要になります。
ベスト プラクティスのサマリー
- Dagger のグラフに型を追加する際は、可能な限り
@Injectを付けたコンストラクタ インジェクションを使用します。使用できない場合は、次の方法があります。@Bindsを使用して、インターフェースがどの実装を必要としているかを Dagger に伝えます。@Providesを使用して、プロジェクトが所有していないクラスを提供する方法を Dagger に伝えます。
- モジュールの宣言はコンポーネント内で一度だけにする必要があります。
- スコープ アノテーションには、アノテーションが使用される期間に応じて名前を付けます。名前の例としては、
@ApplicationScope、@LoggedUserScope、@ActivityScopeなどがあります。
依存関係を追加する
プロジェクトで Dagger を使用するには、build.gradle ファイルで下記の依存関係をアプリに追加します。Dagger の最新バージョンは、こちらの GitHub プロジェクトで入手できます。
Kotlin
plugins {
  id 'kotlin-kapt'
}

dependencies {
    implementation 'com.google.dagger:dagger:2.x'
    kapt 'com.google.dagger:dagger-compiler:2.x'
}
Java
dependencies {
    implementation 'com.google.dagger:dagger:2.x'
    annotationProcessor 'com.google.dagger:dagger-compiler:2.x'
}
Android での Dagger
たとえば、図 1 のような依存関係グラフを使用する Android アプリがあるとします。
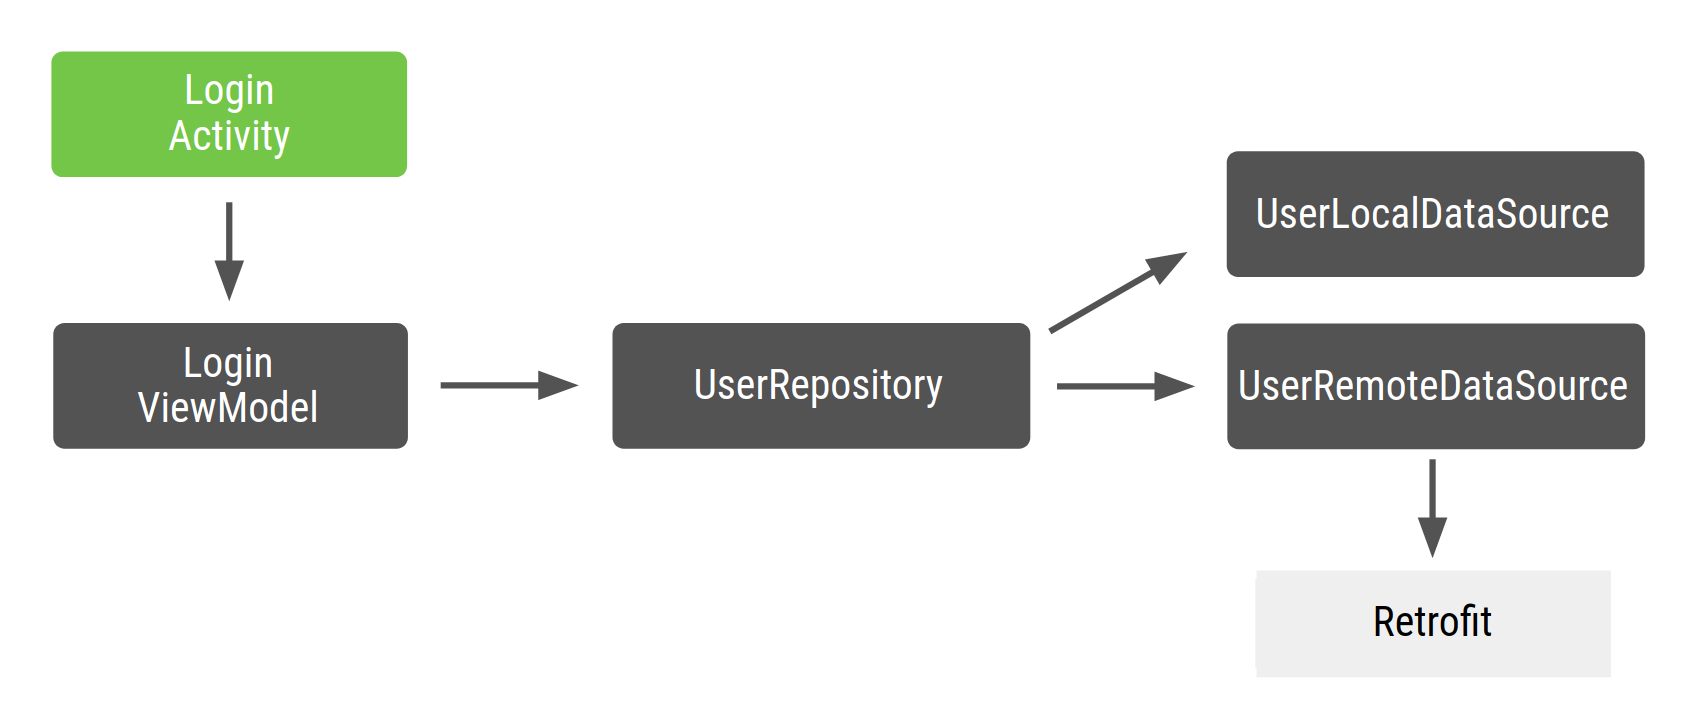
図 1. コード例の依存関係グラフ
Android では、通常、アプリが実行されている間グラフのインスタンスをメモリ内で保持することが望ましいので、アプリクラス内で存続する Dagger グラフを作成します。このようにして、グラフはアプリのライフサイクルに関連付けられます。場合によっては、アプリのコンテキストをグラフ内で利用することもできます。そのためには、グラフも Application クラスに含める必要があります。このアプローチの利点の 1 つは、他の Android フレームワーク クラスでグラフを使用できることです。また、テストでカスタム Application クラスを使用できるため、テストを簡略化できます。
グラフを生成するインターフェースには @Component アノテーションが付けられているので、ApplicationComponent または ApplicationGraph を使用してそれを呼び出すことができます。次のコード スニペットに示すように、一般的にはカスタム Application クラス内にそのコンポーネントのインスタンスを保持し、アプリグラフが必要になるたびにそれを呼び出します。
Kotlin
// Definition of the Application graph
@Component
interface ApplicationComponent { ... }

// appComponent lives in the Application class to share its lifecycle
class MyApplication: Application() {
    // Reference to the application graph that is used across the whole app
    val appComponent = DaggerApplicationComponent.create()
}
Java
// Definition of the Application graph
@Component
public interface ApplicationComponent {
}

// appComponent lives in the Application class to share its lifecycle
public class MyApplication extends Application {

    // Reference to the application graph that is used across the whole app
    ApplicationComponent appComponent = DaggerApplicationComponent.create();
}
アクティビティやフラグメントなど、一部の Android フレームワーク クラスはシステムによってインスタンス化されるため、Dagger はアプリ用にそれらのクラスを作成できません。特にアクティビティの場合は、初期化コードで onCreate() メソッドを使用する必要があります。つまり、前述の例のように、クラスのコンストラクタに @Inject アノテーションを使用すること(コンストラクタ インジェクション)ができません。代わりに、フィールド インジェクションを利用する必要があります。
アクティビティが必要とする依存関係を onCreate() メソッド内で作成するのではなく、依存関係が Dagger によって挿入されるようにする必要があります。フィールド インジェクションでは、Dagger グラフから取得したいフィールドに @Inject アノテーションを適用します。
Kotlin
class LoginActivity: Activity() {
    // You want Dagger to provide an instance of LoginViewModel from the graph
    @Inject lateinit var loginViewModel: LoginViewModel
}
Java
public class LoginActivity extends Activity {

    // You want Dagger to provide an instance of LoginViewModel from the graph
    @Inject
    LoginViewModel loginViewModel;
}
簡単に説明すると、LoginViewModel は Android アーキテクチャ コンポーネントの ViewModel ではありません。これは、ViewModel として機能する通常のクラスです。このようなクラスを注入する方法については、公式の Android Blueprints Dagger 実装(dev-dagger ブランチにあります)のコードをご確認ください。
Dagger を使用する際の考慮事項の 1 つは、注入されたフィールドを非公開にできないことです。上記のコードのように、少なくともパッケージ内では参照できるようにしておく必要があります。
アクティビティを注入する
Dagger は、LoginActivity が必要とする ViewModel を提供するために、このアクティビティがグラフにアクセスする必要があることを認識する必要があります。Dagger の基本ページでは、グラフから取得する結果の戻り値の型を持つ関数を公開し、@Component インターフェースを使用してグラフからオブジェクトを取得しました。この場合、依存関係を注入する必要があるオブジェクト(この例では LoginActivity)の情報を Dagger に伝える必要があります。そのためには、注入を要求するオブジェクトをパラメータとして受け取る関数を公開します。
Kotlin
@Component
interface ApplicationComponent {
    // This tells Dagger that LoginActivity requests injection so the graph needs to
    // satisfy all the dependencies of the fields that LoginActivity is requesting.
    fun inject(activity: LoginActivity)
}
Java
@Component
public interface ApplicationComponent {
    // This tells Dagger that LoginActivity requests injection so the graph needs to
    // satisfy all the dependencies of the fields that LoginActivity is injecting.
    void inject(LoginActivity loginActivity);
}
この関数は、LoginActivity がグラフにアクセスして注入を要求しようとしていることを Dagger に伝えます。Dagger は、LoginActivity が必要とするすべての依存関係(つまり、それ自身の依存関係を持つ LoginViewModel)を充足する必要があります。注入を要求する複数のクラスが存在する場合は、それらの正確な型を含むコンポーネント内ですべての該当クラスを具体的に宣言する必要があります。たとえば、LoginActivity と RegistrationActivity が注入を要求している場合、両方をカバーする汎用メソッドではなく、inject() メソッドを 2 つ使用します。汎用の inject() メソッドは、何を提供する必要があるかを Dagger に伝えません。インターフェース内の関数には任意の名前を付けることができます。ただし Dagger の慣例では、パラメータとして注入するオブジェクトを受け取る場合、inject() という名前にします。
アクティビティにオブジェクトを注入するには、Application クラスで定義された appComponent を使用し、inject() メソッドを呼び出して、注入を要求するアクティビティのインスタンスを渡します。
アクティビティを使用する場合は、フラグメントの復元に関する問題を回避するため、super.onCreate() を呼び出す前に、アクティビティの onCreate() メソッドに Dagger を注入します。super.onCreate() の復元フェーズで、アクティビティがアクティビティ バインディングにアクセスする可能性があるフラグメントをアタッチします。
フラグメントを使用する際は、フラグメントの onAttach() メソッドに Dagger を注入します。この注入は、super.onAttach() を呼び出す前でも後でも行えます。
Kotlin
class LoginActivity: Activity() {
    // You want Dagger to provide an instance of LoginViewModel from the graph
    @Inject lateinit var loginViewModel: LoginViewModel

    override fun onCreate(savedInstanceState: Bundle?) {
        // Make Dagger instantiate @Inject fields in LoginActivity
        (applicationContext as MyApplication).appComponent.inject(this)
        // Now loginViewModel is available

        super.onCreate(savedInstanceState)
    }
}

// @Inject tells Dagger how to create instances of LoginViewModel
class LoginViewModel @Inject constructor(
    private val userRepository: UserRepository
) { ... }
Java
public class LoginActivity extends Activity {

    // You want Dagger to provide an instance of LoginViewModel from the graph
    @Inject
    LoginViewModel loginViewModel;

    @Override
    protected void onCreate(Bundle savedInstanceState) {
        // Make Dagger instantiate @Inject fields in LoginActivity
        ((MyApplication) getApplicationContext()).appComponent.inject(this);
        // Now loginViewModel is available

        super.onCreate(savedInstanceState);
    }
}

public class LoginViewModel {

    private final UserRepository userRepository;

    // @Inject tells Dagger how to create instances of LoginViewModel
    @Inject
    public LoginViewModel(UserRepository userRepository) {
        this.userRepository = userRepository;
    }
}
次のようにして、グラフを作成するために残りの依存関係を提供する方法を Dagger に伝えます。
Kotlin
class UserRepository @Inject constructor(
    private val localDataSource: UserLocalDataSource,
    private val remoteDataSource: UserRemoteDataSource
) { ... }

class UserLocalDataSource @Inject constructor() { ... }
class UserRemoteDataSource @Inject constructor(
    private val loginService: LoginRetrofitService
) { ... }
Java
public class UserRepository {

    private final UserLocalDataSource userLocalDataSource;
    private final UserRemoteDataSource userRemoteDataSource;

    @Inject
    public UserRepository(UserLocalDataSource userLocalDataSource, UserRemoteDataSource userRemoteDataSource) {
        this.userLocalDataSource = userLocalDataSource;
        this.userRemoteDataSource = userRemoteDataSource;
    }
}

public class UserLocalDataSource {

    @Inject
    public UserLocalDataSource() {}
}

public class UserRemoteDataSource {

    private final LoginRetrofitService loginRetrofitService;

    @Inject
    public UserRemoteDataSource(LoginRetrofitService loginRetrofitService) {
        this.loginRetrofitService = loginRetrofitService;
    }
}
Dagger のモジュール
以下の例では、Retrofit ネットワーキング ライブラリを使用します。UserRemoteDataSource は LoginRetrofitService に依存します。しかしながら、LoginRetrofitService のインスタンスを作成する方法は、これまでとは異なります。今回は、クラスをインスタンス化する方法はとりません。それは、Retrofit.Builder() を呼び出して、ログイン サービスを構成する各種のパラメータを渡した結果です。
クラスのインスタンスを提供する方法を Dagger に伝える手段は、@Inject アノテーション以外にもあります。その手段とは、Dagger モジュール内の情報です。Dagger モジュールは、@Module アノテーションが付けられたクラスです。モジュール内で、@Provides アノテーションを使用して依存関係を定義できます。
Kotlin
// @Module informs Dagger that this class is a Dagger Module
@Module
class NetworkModule {

    // @Provides tell Dagger how to create instances of the type that this function
    // returns (i.e. LoginRetrofitService).
    // Function parameters are the dependencies of this type.
    @Provides
    fun provideLoginRetrofitService(): LoginRetrofitService {
        // Whenever Dagger needs to provide an instance of type LoginRetrofitService,
        // this code (the one inside the @Provides method) is run.
        return Retrofit.Builder()
                .baseUrl("https://example.com")
                .build()
                .create(LoginService::class.java)
    }
}
Java
// @Module informs Dagger that this class is a Dagger Module
@Module
public class NetworkModule {

    // @Provides tell Dagger how to create instances of the type that this function
    // returns (i.e. LoginRetrofitService).
    // Function parameters are the dependencies of this type.
    @Provides
    public LoginRetrofitService provideLoginRetrofitService() {
        // Whenever Dagger needs to provide an instance of type LoginRetrofitService,
        // this code (the one inside the @Provides method) is run.
        return new Retrofit.Builder()
                .baseUrl("https://example.com")
                .build()
                .create(LoginService.class);
    }
}
モジュールは、オブジェクトを提供する方法に関するセマンティック情報をカプセル化したものです。上記の例では、NetworkModule クラスを呼び出して、ネットワーキングに関連するオブジェクトを提供するロジックをグループ化しました。アプリが拡張された場合は、ここで OkHttpClient を指定する方法や、Gson または Moshi を構成する方法も利用できます。
@Provides メソッドの依存対象は、このメソッドのパラメータです。上記の例では、LoginRetrofitService メソッドはパラメータを持たないため、依存関係なしで提供できました。OkHttpClient をパラメータとして宣言するのであれば、Dagger は LoginRetrofitService の依存関係を充足するために、グラフから OkHttpClient インスタンスを提供する必要があります。次に例を示します。
Kotlin
@Module
class NetworkModule {
    // Hypothetical dependency on LoginRetrofitService
    @Provides
    fun provideLoginRetrofitService(
        okHttpClient: OkHttpClient
    ): LoginRetrofitService { ... }
}
Java
@Module
public class NetworkModule {

    @Provides
    public LoginRetrofitService provideLoginRetrofitService(OkHttpClient okHttpClient) {
        ...
    }
}
Dagger グラフがこのモジュールを認識するためには、次のように、@Component インターフェースにモジュールを追加する必要があります。
Kotlin
// The "modules" attribute in the @Component annotation tells Dagger what Modules
// to include when building the graph
@Component(modules = [NetworkModule::class])
interface ApplicationComponent {
    ...
}
Java
// The "modules" attribute in the @Component annotation tells Dagger what Modules
// to include when building the graph
@Component(modules = NetworkModule.class)
public interface ApplicationComponent {
    ...
}
Dagger グラフに型を追加するには、(たとえばクラスのコンストラクタで @Inject アノテーションを使用して)コンストラクタ インジェクションを行う方法をおすすめします。ただし、この方法をとることが不可能で、Dagger モジュールを使用しなければならない場合もあります。たとえば、Dagger が計算の結果を使用してオブジェクトのインスタンスの作成方法を決定する場合などです。その型のインスタンスを提供する必要があるときはいつでも、Dagger は @Provides メソッド内のコードを実行します。
この場合の Dagger グラフは次のようになります。
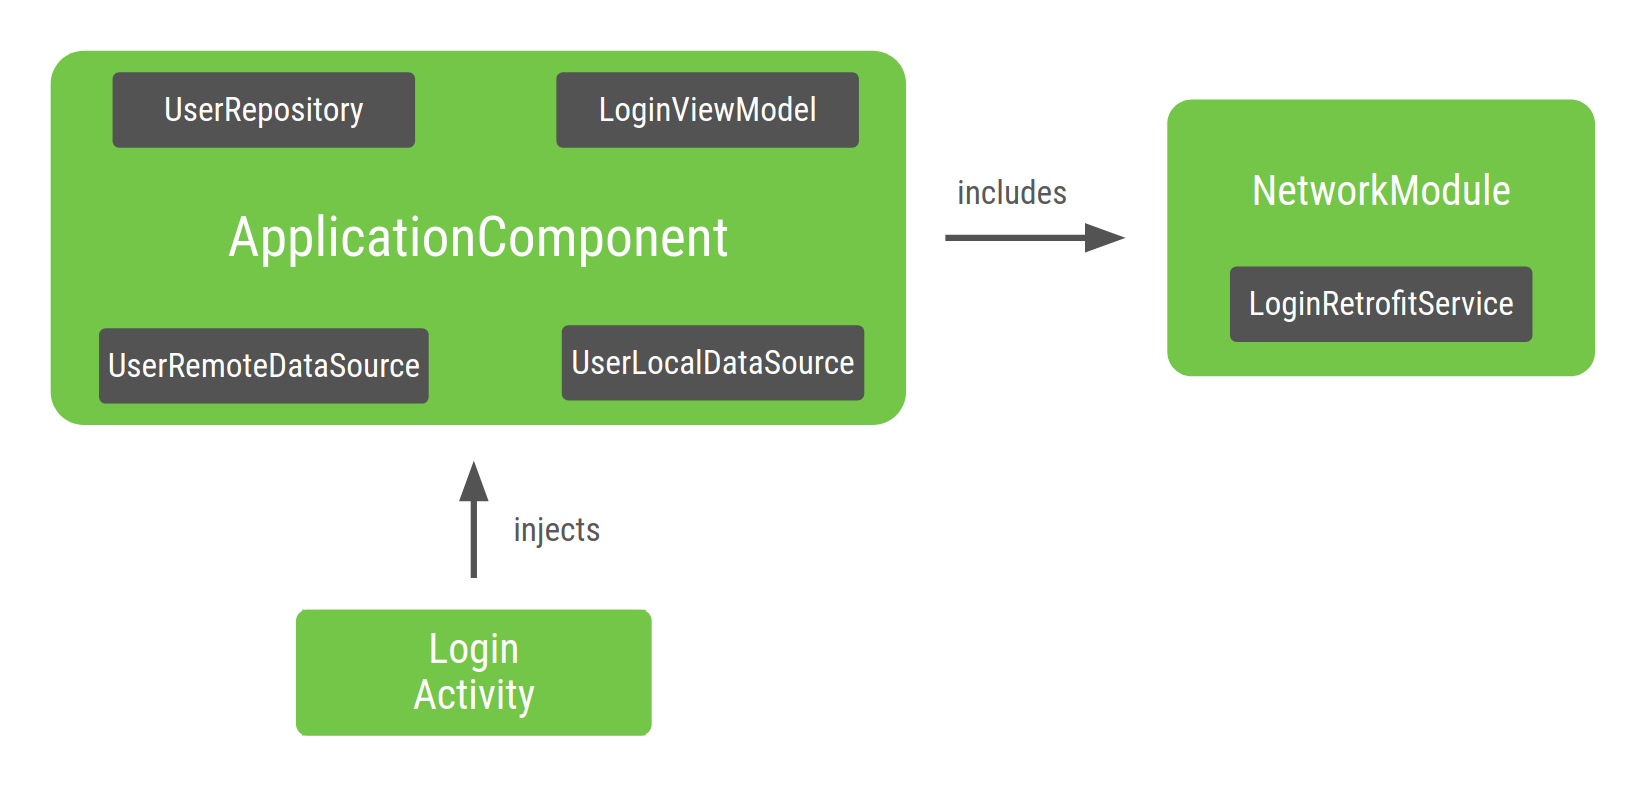
図 2. Dagger によって LoginActivity が注入される依存関係グラフ
グラフのエントリ ポイントは LoginActivity です。LoginActivity によって LoginViewModel が注入されるため、Dagger は、LoginViewModel のインスタンスとその依存関係のインスタンスを再帰的に提供する方法を認識したうえでグラフを作成します。Dagger がこの方法を認識できるのは、クラスのコンストラクタに @Inject アノテーションがあるためです。
Dagger によって生成された ApplicationComponent の内部には、Dagger が提供方法を認識しているすべてのクラスのインスタンスを取得できる Factory 型のメソッドがあります。この例では、Dagger は LoginRetrofitService のインスタンスの取得を ApplicationComponent に含まれる NetworkModule に委任します。
Dagger のスコープ
Dagger の基本ページでは、スコープはコンポーネント内で型の一意のインスタンスを持つために使用されていました。これは、型のスコープをコンポーネントのライフサイクルに設定することを意味します。
アプリの他の機能で UserRepository を使用したい場合、それが必要になるたびに新しいオブジェクトを作成することを避けるため、これをアプリ全体で一意のインスタンスとして指定できます。LoginRetrofitService の場合も同様で、作成するとコストがかかる可能性があるので、そのオブジェクトの一意のインスタンスを再利用するのが適切です。UserRemoteDataSource のインスタンスの作成はそれほど高コストではないので、スコープをコンポーネントのライフサイクルに設定する必要はありません。
@Singleton は、javax.inject パッケージに付属している唯一のスコープ アノテーションです。これを使用して、ApplicationComponent と、アプリ全体で再利用したいオブジェクトにアノテーションを付けることができます。
Kotlin
@Singleton
@Component(modules = [NetworkModule::class])
interface ApplicationComponent {
    fun inject(activity: LoginActivity)
}

@Singleton
class UserRepository @Inject constructor(
    private val localDataSource: UserLocalDataSource,
    private val remoteDataSource: UserRemoteDataSource
) { ... }

@Module
class NetworkModule {
    // Way to scope types inside a Dagger Module
    @Singleton
    @Provides
    fun provideLoginRetrofitService(): LoginRetrofitService { ... }
}
Java
@Singleton
@Component(modules = NetworkModule.class)
public interface ApplicationComponent {
    void inject(LoginActivity loginActivity);
}

@Singleton
public class UserRepository {

    private final UserLocalDataSource userLocalDataSource;
    private final UserRemoteDataSource userRemoteDataSource;

    @Inject
    public UserRepository(UserLocalDataSource userLocalDataSource, UserRemoteDataSource userRemoteDataSource) {
        this.userLocalDataSource = userLocalDataSource;
        this.userRemoteDataSource = userRemoteDataSource;
    }
}

@Module
public class NetworkModule {

    @Singleton
    @Provides
    public LoginRetrofitService provideLoginRetrofitService() { ... }
}
スコープをオブジェクトに適用する際は、メモリリークが発生しないように注意してください。スコープを持つコンポーネントがメモリ内にある間は、作成されたオブジェクトもメモリ内に存在します。ApplicationComponent はアプリの起動時に(Application クラスで)作成されるため、アプリが破棄されると破棄されます。したがって、UserRepository の一意のインスタンスは、アプリが破棄されるまで常にメモリ内に残ります。
Dagger のサブコンポーネント
ログインフロー(単一の LoginActivity によって管理される)が複数のフラグメントで構成されている場合は、すべてのフラグメントで LoginViewModel の同じインスタンスを再利用する必要があります。@Singleton は、次の理由により、LoginViewModel にアノテーションを付ける方法でインスタンスを再利用することはできません。
フローの終了後、
LoginViewModelのインスタンスはメモリ内に永続的に残ります。ログインフローごとに
LoginViewModelの異なるインスタンスが必要です。 たとえば、ユーザーがログアウトした場合、ユーザーが初めてログインしたときと同じインスタンスではなく、LoginViewModelの異なるインスタンスが必要になります。
LoginViewModel のスコープを LoginActivity のライフサイクルに設定するには、ログインフローの新しいコンポーネント(新しいサブグラフ)と新しいスコープを作成する必要があります。
以下では、ログインフローに固有のグラフを作成します。
Kotlin
@Component
interface LoginComponent {}
Java
@Component
public interface LoginComponent {
}
ここで、ログイン固有の構成が LoginActivity に含まれているため、これを LoginComponent から注入する必要があります。これにより、ApplicationComponent クラスから LoginActivity を注入する必要がなくなります。
Kotlin
@Component
interface LoginComponent {
    fun inject(activity: LoginActivity)
}
Java
@Component
public interface LoginComponent {
    void inject(LoginActivity loginActivity);
}
LoginViewModel は UserRepository に依存しているため、LoginComponent は ApplicationComponent からオブジェクトにアクセスできる必要があります。新しいコンポーネントが別のコンポーネントの一部を使用することを Dagger に伝えるには、Dagger のサブコンポーネントを使用します。新しいコンポーネントは、共有リソースを含むコンポーネントのサブコンポーネントでなければなりません。
サブコンポーネントとは、親コンポーネントのオブジェクト グラフを継承して拡張するコンポーネントです。したがって、親コンポーネントで提供されるすべてのオブジェクトはサブコンポーネントでも提供されます。その結果、サブコンポーネントからのオブジェクトは、親コンポーネントによって提供されるオブジェクトに依存する場合があります。
サブコンポーネントのインスタンスを作成するには、親コンポーネントのインスタンスが必要です。したがって、親コンポーネントからサブコンポーネントに渡されるオブジェクトのスコープは親コンポーネントに設定されます。
この例では、LoginComponent を ApplicationComponent のサブコンポーネントとして定義する必要があります。そのためには、LoginComponent に @Subcomponent アノテーションを付けます。
Kotlin
// @Subcomponent annotation informs Dagger this interface is a Dagger Subcomponent
@Subcomponent
interface LoginComponent {

    // This tells Dagger that LoginActivity requests injection from LoginComponent
    // so that this subcomponent graph needs to satisfy all the dependencies of the
    // fields that LoginActivity is injecting
    fun inject(loginActivity: LoginActivity)
}
Java
// @Subcomponent annotation informs Dagger this interface is a Dagger Subcomponent
@Subcomponent
public interface LoginComponent {

    // This tells Dagger that LoginActivity requests injection from LoginComponent
    // so that this subcomponent graph needs to satisfy all the dependencies of the
    // fields that LoginActivity is injecting
    void inject(LoginActivity loginActivity);
}
また、LoginComponent 内にサブコンポーネント Factory を定義して、LoginComponent のインスタンスを作成する方法を ApplicationComponent に知らせる必要があります。
Kotlin
@Subcomponent
interface LoginComponent {

    // Factory that is used to create instances of this subcomponent
    @Subcomponent.Factory
    interface Factory {
        fun create(): LoginComponent
    }

    fun inject(loginActivity: LoginActivity)
}
Java
@Subcomponent
public interface LoginComponent {

    // Factory that is used to create instances of this subcomponent
    @Subcomponent.Factory
    interface Factory {
        LoginComponent create();
    }

    void inject(LoginActivity loginActivity);
}
LoginComponent が ApplicationComponent のサブコンポーネントであることを Dagger に伝えるには、次の手順でそのことを示します。
サブコンポーネントのクラスをアノテーションの
subcomponents属性に渡す新しい Dagger モジュール(たとえばSubcomponentsModule)を作成します。Kotlin
// The "subcomponents" attribute in the @Module annotation tells Dagger what
// Subcomponents are children of the Component this module is included in.
@Module(subcomponents = LoginComponent::class)
class SubcomponentsModule {}
Java
// The "subcomponents" attribute in the @Module annotation tells Dagger what
// Subcomponents are children of the Component this module is included in.
@Module(subcomponents = LoginComponent.class)
public class SubcomponentsModule {
}
新しいモジュール(たとえば
SubcomponentsModule)をApplicationComponentに追加します。Kotlin
// Including SubcomponentsModule, tell ApplicationComponent that
// LoginComponent is its subcomponent.
@Singleton
@Component(modules = [NetworkModule::class, SubcomponentsModule::class])
interface ApplicationComponent {
}
Java
// Including SubcomponentsModule, tell ApplicationComponent that
// LoginComponent is its subcomponent.
@Singleton
@Component(modules = {NetworkModule.class, SubcomponentsModule.class})
public interface ApplicationComponent {
}
ここで、
LoginActivityを注入する役割はLoginComponentが担うことになったので、ApplicationComponentで注入する必要はなくなりました。したがって、ApplicationComponentからinject()メソッドを削除できます。ApplicationComponentのコンシューマーは、LoginComponentのインスタンスを作成する方法を認識する必要があります。コンシューマーが親コンポーネントのインスタンスからサブコンポーネントのインスタンスを作成できるようにするため、親コンポーネントは自身のインターフェースにメソッドを追加する必要があります。インターフェースで
LoginComponentのインスタンスを作成する Factory を公開します。Kotlin
@Singleton
@Component(modules = [NetworkModule::class, SubcomponentsModule::class])
interface ApplicationComponent {
// This function exposes the LoginComponent Factory out of the graph so consumers
// can use it to obtain new instances of LoginComponent
fun loginComponent(): LoginComponent.Factory
}
Java
@Singleton
@Component(modules = { NetworkModule.class, SubcomponentsModule.class} )
public interface ApplicationComponent {
// This function exposes the LoginComponent Factory out of the graph so consumers
// can use it to obtain new instances of LoginComponent
LoginComponent.Factory loginComponent();
}
サブコンポーネントにスコープを割り当てる
プロジェクトをビルドすると、ApplicationComponent と LoginComponent の両方のインスタンスを作成できます。アプリがメモリ内にある間はグラフの同じインスタンスを使用することが望ましいので、ApplicationComponent はアプリのライフサイクルに関連付けられます。
LoginComponent のライフサイクルについて考えてみましょう。LoginComponent が必要な理由の 1 つは、ログインに関連するフラグメント間で LoginViewModel の同じインスタンスを共有する必要があることです。しかし、新しいログインフローが発生するたびに、LoginViewModel の異なるインスタンスも必要になります。LoginComponent の適切なライフタイムは LoginActivity です。つまり、新しいアクティビティごとに、LoginComponent の新しいインスタンスと、LoginComponent のそのインスタンスを使用できるフラグメントが必要になります。
LoginComponent は LoginActivity のライフサイクルに関連付けられるため、Application クラスで applicationComponent への参照を保持していたのと同様に、アクティビティ内のコンポーネントへの参照を保持する必要があります。これにより、フラグメントがコンポーネントにアクセスできるようになります。
Kotlin
class LoginActivity: Activity() {
    // Reference to the Login graph
    lateinit var loginComponent: LoginComponent
    ...
}
Java
public class LoginActivity extends Activity {

    // Reference to the Login graph
    LoginComponent loginComponent;

    ...
}
変数 loginComponent に @Inject アノテーションが付いていないことに注目してください。これは、この変数が Dagger によって提供されると想定していないためです。
次のように、ApplicationComponent を使用して LoginComponent への参照を取得した後、LoginActivity を注入できます。
Kotlin
class LoginActivity: Activity() {
    // Reference to the Login graph
    lateinit var loginComponent: LoginComponent

    // Fields that need to be injected by the login graph
    @Inject lateinit var loginViewModel: LoginViewModel

    override fun onCreate(savedInstanceState: Bundle?) {
        // Creation of the login graph using the application graph
        loginComponent = (applicationContext as MyDaggerApplication)
                            .appComponent.loginComponent().create()

        // Make Dagger instantiate @Inject fields in LoginActivity
        loginComponent.inject(this)

        // Now loginViewModel is available

        super.onCreate(savedInstanceState)
    }
}
Java
public class LoginActivity extends Activity {

    // Reference to the Login graph
    LoginComponent loginComponent;

    // Fields that need to be injected by the login graph
    @Inject
    LoginViewModel loginViewModel;

    @Override
    protected void onCreate(Bundle savedInstanceState) {
        // Creation of the login graph using the application graph
        loginComponent = ((MyApplication) getApplicationContext())
                                .appComponent.loginComponent().create();

        // Make Dagger instantiate @Inject fields in LoginActivity
        loginComponent.inject(this);

        // Now loginViewModel is available

        super.onCreate(savedInstanceState);
    }
}
LoginComponent はアクティビティの onCreate() メソッドで作成され、アクティビティが破棄されると暗黙的に破棄されます。
LoginComponent は、LoginViewModel のインスタンスを要求されるたびに、必ず同じインスタンスを提供する必要があります。これを確実に行うには、カスタム アノテーション スコープを作成して、LoginComponent と LoginViewModel の両方にそのアノテーションを付けます。なお、@Singleton アノテーションは使用できません。このアノテーションは、親コンポーネントによってすでに使用されており、オブジェクトをアプリのシングルトン(アプリ全体の一意のインスタンス)にするからです。別のアノテーション スコープを作成する必要があります。
この場合、このスコープに @LoginScope という名前を付けることもできますが、これはおすすめしません。スコープ アノテーションは、その目的を明示する名前にするべきではないからです。アノテーションは RegistrationComponent や SettingsComponent などの兄弟コンポーネントで再利用できるので、ライフタイムに応じた名前を付ける必要があります。したがって、@LoginScope ではなく @ActivityScope という名前を付けます。
Kotlin
// Definition of a custom scope called ActivityScope
@Scope
@Retention(value = AnnotationRetention.RUNTIME)
annotation class ActivityScope

// Classes annotated with @ActivityScope are scoped to the graph and the same
// instance of that type is provided every time the type is requested.
@ActivityScope
@Subcomponent
interface LoginComponent { ... }

// A unique instance of LoginViewModel is provided in Components
// annotated with @ActivityScope
@ActivityScope
class LoginViewModel @Inject constructor(
    private val userRepository: UserRepository
) { ... }
Java
// Definition of a custom scope called ActivityScope
@Scope
@Retention(RetentionPolicy.RUNTIME)
public @interface ActivityScope {}

// Classes annotated with @ActivityScope are scoped to the graph and the same
// instance of that type is provided every time the type is requested.
@ActivityScope
@Subcomponent
public interface LoginComponent { ... }

// A unique instance of LoginViewModel is provided in Components
// annotated with @ActivityScope
@ActivityScope
public class LoginViewModel {

    private final UserRepository userRepository;

    @Inject
    public LoginViewModel(UserRepository userRepository) {
        this.userRepository = userRepository;
    }
}
ここで、LoginViewModel を必要とするフラグメントが 2 つある場合、両方とも同じインスタンスで提供されます。たとえば、LoginUsernameFragment と LoginPasswordFragment がある場合は、LoginComponent で注入する必要があります。
Kotlin
@ActivityScope
@Subcomponent
interface LoginComponent {

    @Subcomponent.Factory
    interface Factory {
        fun create(): LoginComponent
    }

    // All LoginActivity, LoginUsernameFragment and LoginPasswordFragment
    // request injection from LoginComponent. The graph needs to satisfy
    // all the dependencies of the fields those classes are injecting
    fun inject(loginActivity: LoginActivity)
    fun inject(usernameFragment: LoginUsernameFragment)
    fun inject(passwordFragment: LoginPasswordFragment)
}
Java
@ActivityScope
@Subcomponent
public interface LoginComponent {

    @Subcomponent.Factory
    interface Factory {
        LoginComponent create();
    }

    // All LoginActivity, LoginUsernameFragment and LoginPasswordFragment
    // request injection from LoginComponent. The graph needs to satisfy
    // all the dependencies of the fields those classes are injecting
    void inject(LoginActivity loginActivity);
    void inject(LoginUsernameFragment loginUsernameFragment);
    void inject(LoginPasswordFragment loginPasswordFragment);
}
コンポーネントは、LoginActivity オブジェクト内に存在するコンポーネントのインスタンスにアクセスします。次のコード スニペットは、LoginUserNameFragment のコード例を示しています。
Kotlin
class LoginUsernameFragment: Fragment() {

    // Fields that need to be injected by the login graph
    @Inject lateinit var loginViewModel: LoginViewModel

    override fun onAttach(context: Context) {
        super.onAttach(context)

        // Obtaining the login graph from LoginActivity and instantiate
        // the @Inject fields with objects from the graph
        (activity as LoginActivity).loginComponent.inject(this)

        // Now you can access loginViewModel here and onCreateView too
        // (shared instance with the Activity and the other Fragment)
    }
}
Java
public class LoginUsernameFragment extends Fragment {

    // Fields that need to be injected by the login graph
    @Inject
    LoginViewModel loginViewModel;

    @Override
    public void onAttach(Context context) {
        super.onAttach(context);

        // Obtaining the login graph from LoginActivity and instantiate
        // the @Inject fields with objects from the graph
        ((LoginActivity) getActivity()).loginComponent.inject(this);

        // Now you can access loginViewModel here and onCreateView too
        // (shared instance with the Activity and the other Fragment)
    }
}
同様に、LoginPasswordFragment のコード例を次に示します。
Kotlin
class LoginPasswordFragment: Fragment() {

    // Fields that need to be injected by the login graph
    @Inject lateinit var loginViewModel: LoginViewModel

    override fun onAttach(context: Context) {
        super.onAttach(context)

        (activity as LoginActivity).loginComponent.inject(this)

        // Now you can access loginViewModel here and onCreateView too
        // (shared instance with the Activity and the other Fragment)
    }
}
Java
public class LoginPasswordFragment extends Fragment {

    // Fields that need to be injected by the login graph
    @Inject
    LoginViewModel loginViewModel;

    @Override
    public void onAttach(Context context) {
        super.onAttach(context);

        ((LoginActivity) getActivity()).loginComponent.inject(this);

        // Now you can access loginViewModel here and onCreateView too
        // (shared instance with the Activity and the other Fragment)
    }
}
図 3 は、新しいサブコンポーネントを使用した Dagger グラフを表しています。白い点が付いているクラス(UserRepository、LoginRetrofitService、LoginViewModel)には、それぞれのコンポーネントをスコープとする一意のインスタンスがあります。
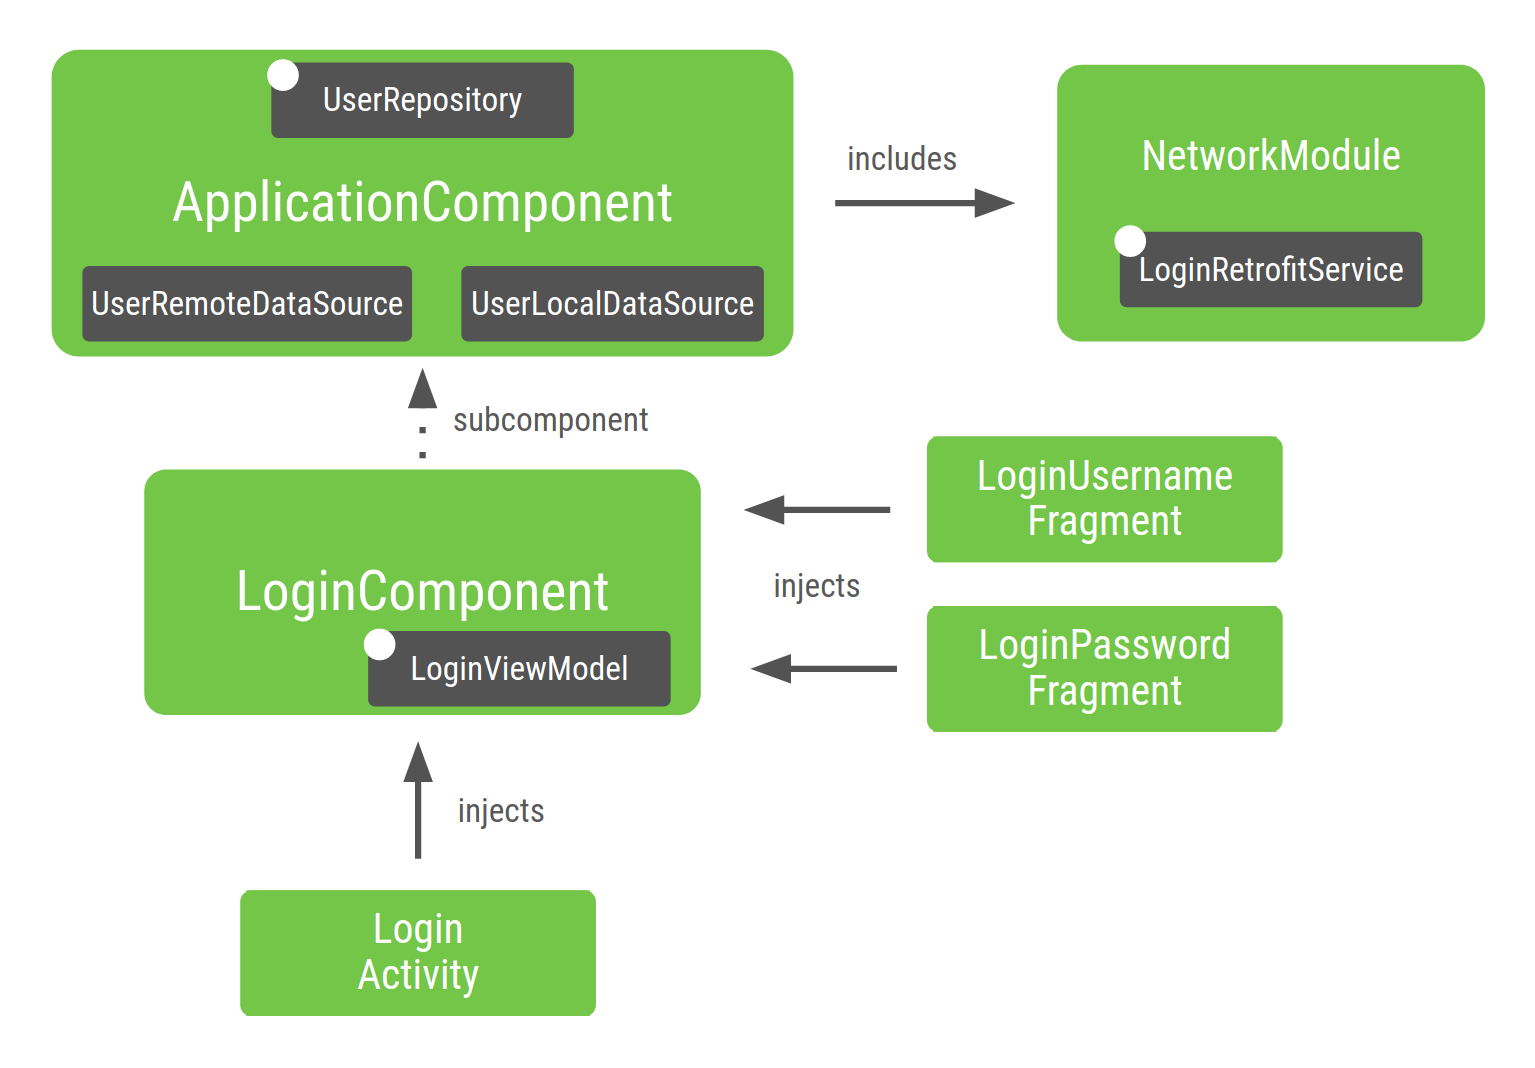
図 3. Android アプリのサンプル用に作成したグラフ
グラフの各部分を細かく見てみましょう。
コンポーネントで指定したので、
NetworkModuleは(したがってLoginRetrofitServiceも)ApplicationComponentに含まれています。UserRepositoryはスコープがApplicationComponentに設定されているため、引き続きApplicationComponent内にあります。プロジェクトが拡張された場合、各種の機能(登録など)の間で同じインスタンスを共有する必要があります。UserRepositoryはApplicationComponentの一部であるため、UserRepositoryのインスタンスを提供するためには、その依存関係(UserLocalDataSourceとUserRemoteDataSource)もこのコンポーネント内に存在する必要があります。LoginViewModelは、LoginComponentによって注入されたクラスでのみ必要となるため、LoginComponentに含まれています。ApplicationComponentの依存関係はLoginViewModelを必要としないので、LoginViewModelはApplicationComponentに含まれていません。同様に、
UserRepositoryのスコープをApplicationComponentに設定しなかった場合、Dagger は自動的にUserRepositoryとその依存関係をLoginComponentに含めます。このコンポーネントが、現在UserRepositoryが使用されている唯一の場所だからです。
オブジェクトのスコープを異なるライフサイクルに設定するのではなく、アプリの異なる部分を相互にカプセル化するためにサブコンポーネントを作成することをおすすめします。
アプリのフローに応じて異なる Dagger サブグラフを作成するようにアプリを構造化すると、メモリと起動時間の点でアプリのパフォーマンスとスケーラビリティが向上します。
Dagger グラフを作成する際のベスト プラクティス
アプリの Dagger グラフを作成する場合:
コンポーネントを作成するときは、そのコンポーネントのライフタイムを制御する要素を考慮します。今回の場合は、
ApplicationクラスがApplicationComponent、LoginActivityがLoginComponentを制御しています。スコープ設定は必要な場合にのみ使用します。スコープ設定を過度に使用すると、アプリのランタイム パフォーマンスに悪影響を及ぼす可能性があります。コンポーネントがメモリ内にある間はオブジェクトもメモリ内にあり、スコープを持つオブジェクトを取得するほうがコストがかかります。オブジェクトを提供するとき、Dagger は Factory 型プロバイダではなく
DoubleCheckロックを使用します。
Dagger を使用するプロジェクトをテストする
Dagger のような依存関係の注入フレームワークを使用する利点の 1 つは、コードのテストが容易になることです。
単体テスト
単体テストでは、Dagger を使用する必要はありません。コンストラクタ インジェクションを使用するクラスをテストする場合、Dagger を使用してそのクラスをインスタンス化する必要はありません。クラスにアノテーションが付いていない場合と同様に、偽の依存関係もしくはモック依存関係を直接渡すコンストラクタを呼び出すことができます。
たとえば、LoginViewModel をテストする場合は次のようなコードを使用します。
Kotlin
@ActivityScope
class LoginViewModel @Inject constructor(
    private val userRepository: UserRepository
) { ... }

class LoginViewModelTest {

    @Test
    fun `Happy path`() {
        // You don't need Dagger to create an instance of LoginViewModel
        // You can pass a fake or mock UserRepository
        val viewModel = LoginViewModel(fakeUserRepository)
        assertEquals(...)
    }
}
Java
@ActivityScope
public class LoginViewModel {

    private final UserRepository userRepository;

    @Inject
    public LoginViewModel(UserRepository userRepository) {
        this.userRepository = userRepository;
    }
}

public class LoginViewModelTest {

    @Test
    public void happyPath() {
        // You don't need Dagger to create an instance of LoginViewModel
        // You can pass a fake or mock UserRepository
        LoginViewModel viewModel = new LoginViewModel(fakeUserRepository);
        assertEquals(...);
    }
}
エンドツーエンド テスト
統合テストでは、テスト用の TestApplicationComponent を作成することをおすすめします。本番環境とテスト環境では、異なるコンポーネント構成を使用します。
そのためには、事前にアプリ内のモジュールを設計することが必要です。テスト コンポーネントでは、本番コンポーネントを拡張し、異なるモジュールのセットをインストールします。
Kotlin
// TestApplicationComponent extends from ApplicationComponent to have them both
// with the same interface methods. You need to include the modules of the
// component here as well, and you can replace the ones you want to override.
// This sample uses FakeNetworkModule instead of NetworkModule
@Singleton
@Component(modules = [FakeNetworkModule::class, SubcomponentsModule::class])
interface TestApplicationComponent : ApplicationComponent {
}
Java
// TestApplicationComponent extends from ApplicationComponent to have them both
// with the same interface methods. You need to include the modules of the
// Component here as well, and you can replace the ones you want to override.
// This sample uses FakeNetworkModule instead of NetworkModule
@Singleton
@Component(modules = {FakeNetworkModule.class, SubcomponentsModule.class})
public interface TestApplicationComponent extends ApplicationComponent {
}
FakeNetworkModule には、元の NetworkModule の偽の実装が含まれています。
これを使用して、さまざまな偽のインスタンスもしくはモックに置き換えることができます。
Kotlin
// In the FakeNetworkModule, pass a fake implementation of LoginRetrofitService
// that you can use in your tests.
@Module
class FakeNetworkModule {
    @Provides
    fun provideLoginRetrofitService(): LoginRetrofitService {
        return FakeLoginService()
    }
}
Java
// In the FakeNetworkModule, pass a fake implementation of LoginRetrofitService
// that you can use in your tests.
@Module
public class FakeNetworkModule {

    @Provides
    public LoginRetrofitService provideLoginRetrofitService() {
        return new FakeLoginService();
    }
}
統合テストまたはエンドツーエンド テストでは、ApplicationComponent ではなく TestApplicationComponent を作成する TestApplication を使用します。
Kotlin
// Your test application needs an instance of the test graph
class MyTestApplication: MyApplication() {
    override val appComponent = DaggerTestApplicationComponent.create()
}
Java
// Your test application needs an instance of the test graph
public class MyTestApplication extends MyApplication {
    ApplicationComponent appComponent = DaggerTestApplicationComponent.create();
}
次に、インストゥルメンテーション テストの実行に使用するカスタム TestRunner でこのテストアプリを使用します。詳細については、Android アプリで Dagger を使用する方法に関する Codelab をご覧ください。
Dagger モジュールの処理
Dagger モジュールは、オブジェクトを提供する方法に関するセマンティック情報をカプセル化したものです。モジュールをコンポーネントに含めることも、他のモジュールに含めることもできます。モジュールは強力ですが、誤使用に注意してください。
モジュールがコンポーネントまたは別のモジュールに追加されると、そのモジュールは直ちに Dagger グラフに挿入されます。つまり、Dagger がそのコンポーネントでそれらのオブジェクトを提供します。モジュールを追加する前に、そのモジュールがすでに Dagger グラフに含まれているかどうかを確認してください。そのためには、そのモジュールがすでにコンポーネントに追加されているかどうかをチェックするか、プロジェクトをコンパイルして Dagger がそのモジュールに必要な依存関係を見つけられるかどうかをチェックします。
モジュールは、コンポーネント内で一度だけ宣言することをおすすめします(ただし、特定の高度な Dagger ユースケースを除きます)。
グラフを次のように構成したとしましょう。ApplicationComponent には Module1 と Module2 が含まれ、Module1 には ModuleX が含まれています。
Kotlin
@Component(modules = [Module1::class, Module2::class])
interface ApplicationComponent { ... }

@Module(includes = [ModuleX::class])
class Module1 { ... }

@Module
class Module2 { ... }
Java
@Component(modules = {Module1.class, Module2.class})
public interface ApplicationComponent { ... }

@Module(includes = {ModuleX.class})
public class Module1 { ... }

@Module
public class Module2 { ... }
ここで、Module2 が ModuleX によって提供されるクラスに依存しているとします。この場合、次のコード スニペットに示すように、Module2 に ModuleX を含めることはおすすめしません。なぜなら、ModuleX がグラフに 2 回追加されるからです。
Kotlin
// Bad practice: ModuleX is declared multiple times in this Dagger graph
@Component(modules = [Module1::class, Module2::class])
interface ApplicationComponent { ... }

@Module(includes = [ModuleX::class])
class Module1 { ... }

@Module(includes = [ModuleX::class])
class Module2 { ... }
Java
// Bad practice: ModuleX is declared multiple times in this Dagger graph.
@Component(modules = {Module1.class, Module2.class})
public interface ApplicationComponent { ... }

@Module(includes = ModuleX.class)
public class Module1 { ... }

@Module(includes = ModuleX.class)
public class Module2 { ... }
代わりに、次のいずれかを行います。
- モジュールをリファクタリングし、共通のモジュールをコンポーネントに展開します。
- 両方のモジュールが共有するオブジェクトで新しいモジュールを作成し、それをコンポーネントに展開します。
このようなリファクタリングを行わないと、お互いの包含関係が不明確な多くのモジュールが作成され、個々の依存関係のソースを確認することが困難になります。
おすすめの方法(オプション 1): ModuleX を Dagger グラフで一度だけ宣言します。
Kotlin
@Component(modules = [Module1::class, Module2::class, ModuleX::class])
interface ApplicationComponent { ... }

@Module
class Module1 { ... }

@Module
class Module2 { ... }
Java
@Component(modules = {Module1.class, Module2.class, ModuleX.class})
public interface ApplicationComponent { ... }

@Module
public class Module1 { ... }

@Module
public class Module2 { ... }
おすすめの方法(オプション 2): ModuleX 内の Module1 と Module2 からの共通の依存関係を、コンポーネントに含まれる ModuleXCommon という名前の新しいモジュールに展開します。次に、ModuleXWithModule1Dependencies と ModuleXWithModule2Dependencies という名前の他の 2 つのモジュールを、各モジュールに固有の依存関係を使用して作成します。すべてのモジュールは Dagger グラフで一度だけ宣言されます。
Kotlin
@Component(modules = [Module1::class, Module2::class, ModuleXCommon::class])
interface ApplicationComponent { ... }

@Module
class ModuleXCommon { ... }

@Module
class ModuleXWithModule1SpecificDependencies { ... }

@Module
class ModuleXWithModule2SpecificDependencies { ... }

@Module(includes = [ModuleXWithModule1SpecificDependencies::class])
class Module1 { ... }

@Module(includes = [ModuleXWithModule2SpecificDependencies::class])
class Module2 { ... }
Java
@Component(modules = {Module1.class, Module2.class, ModuleXCommon.class})
public interface ApplicationComponent { ... }

@Module
public class ModuleXCommon { ... }

@Module
public class ModuleXWithModule1SpecificDependencies { ... }

@Module
public class ModuleXWithModule2SpecificDependencies { ... }

@Module(includes = ModuleXWithModule1SpecificDependencies.class)
public class Module1 { ... }

@Module(includes = ModuleXWithModule2SpecificDependencies.class)
public class Module2 { ... }
アシスト インジェクション
アシスト インジェクションは、オブジェクトを構成するために使用される DI パターンです。パラメータには、DI フレームワークによって提供されるものと、ユーザーが作成時に渡す必要のあるものがあります。
Android では、詳細画面でこのパターンがよく見られます。表示される要素の ID は、Dagger が DI グラフを生成したときのコンパイル時ではなく、実行時にのみ確認できます。Dagger のアシスト インジェクションについて詳しくは、Dagger のドキュメントをご覧ください。
おわりに
ベスト プラクティスのサマリーをまだ読んでいない場合は、戻って確認してください。Android アプリで Dagger を使用する方法については、Android アプリで Dagger を使用する方法に関する Codelab をご覧ください。