Встраивание активности

Встраивание действий оптимизирует приложения на устройствах с большим экраном, разделяя окно задач приложения между двумя действиями или двумя экземплярами одного и того же действия.
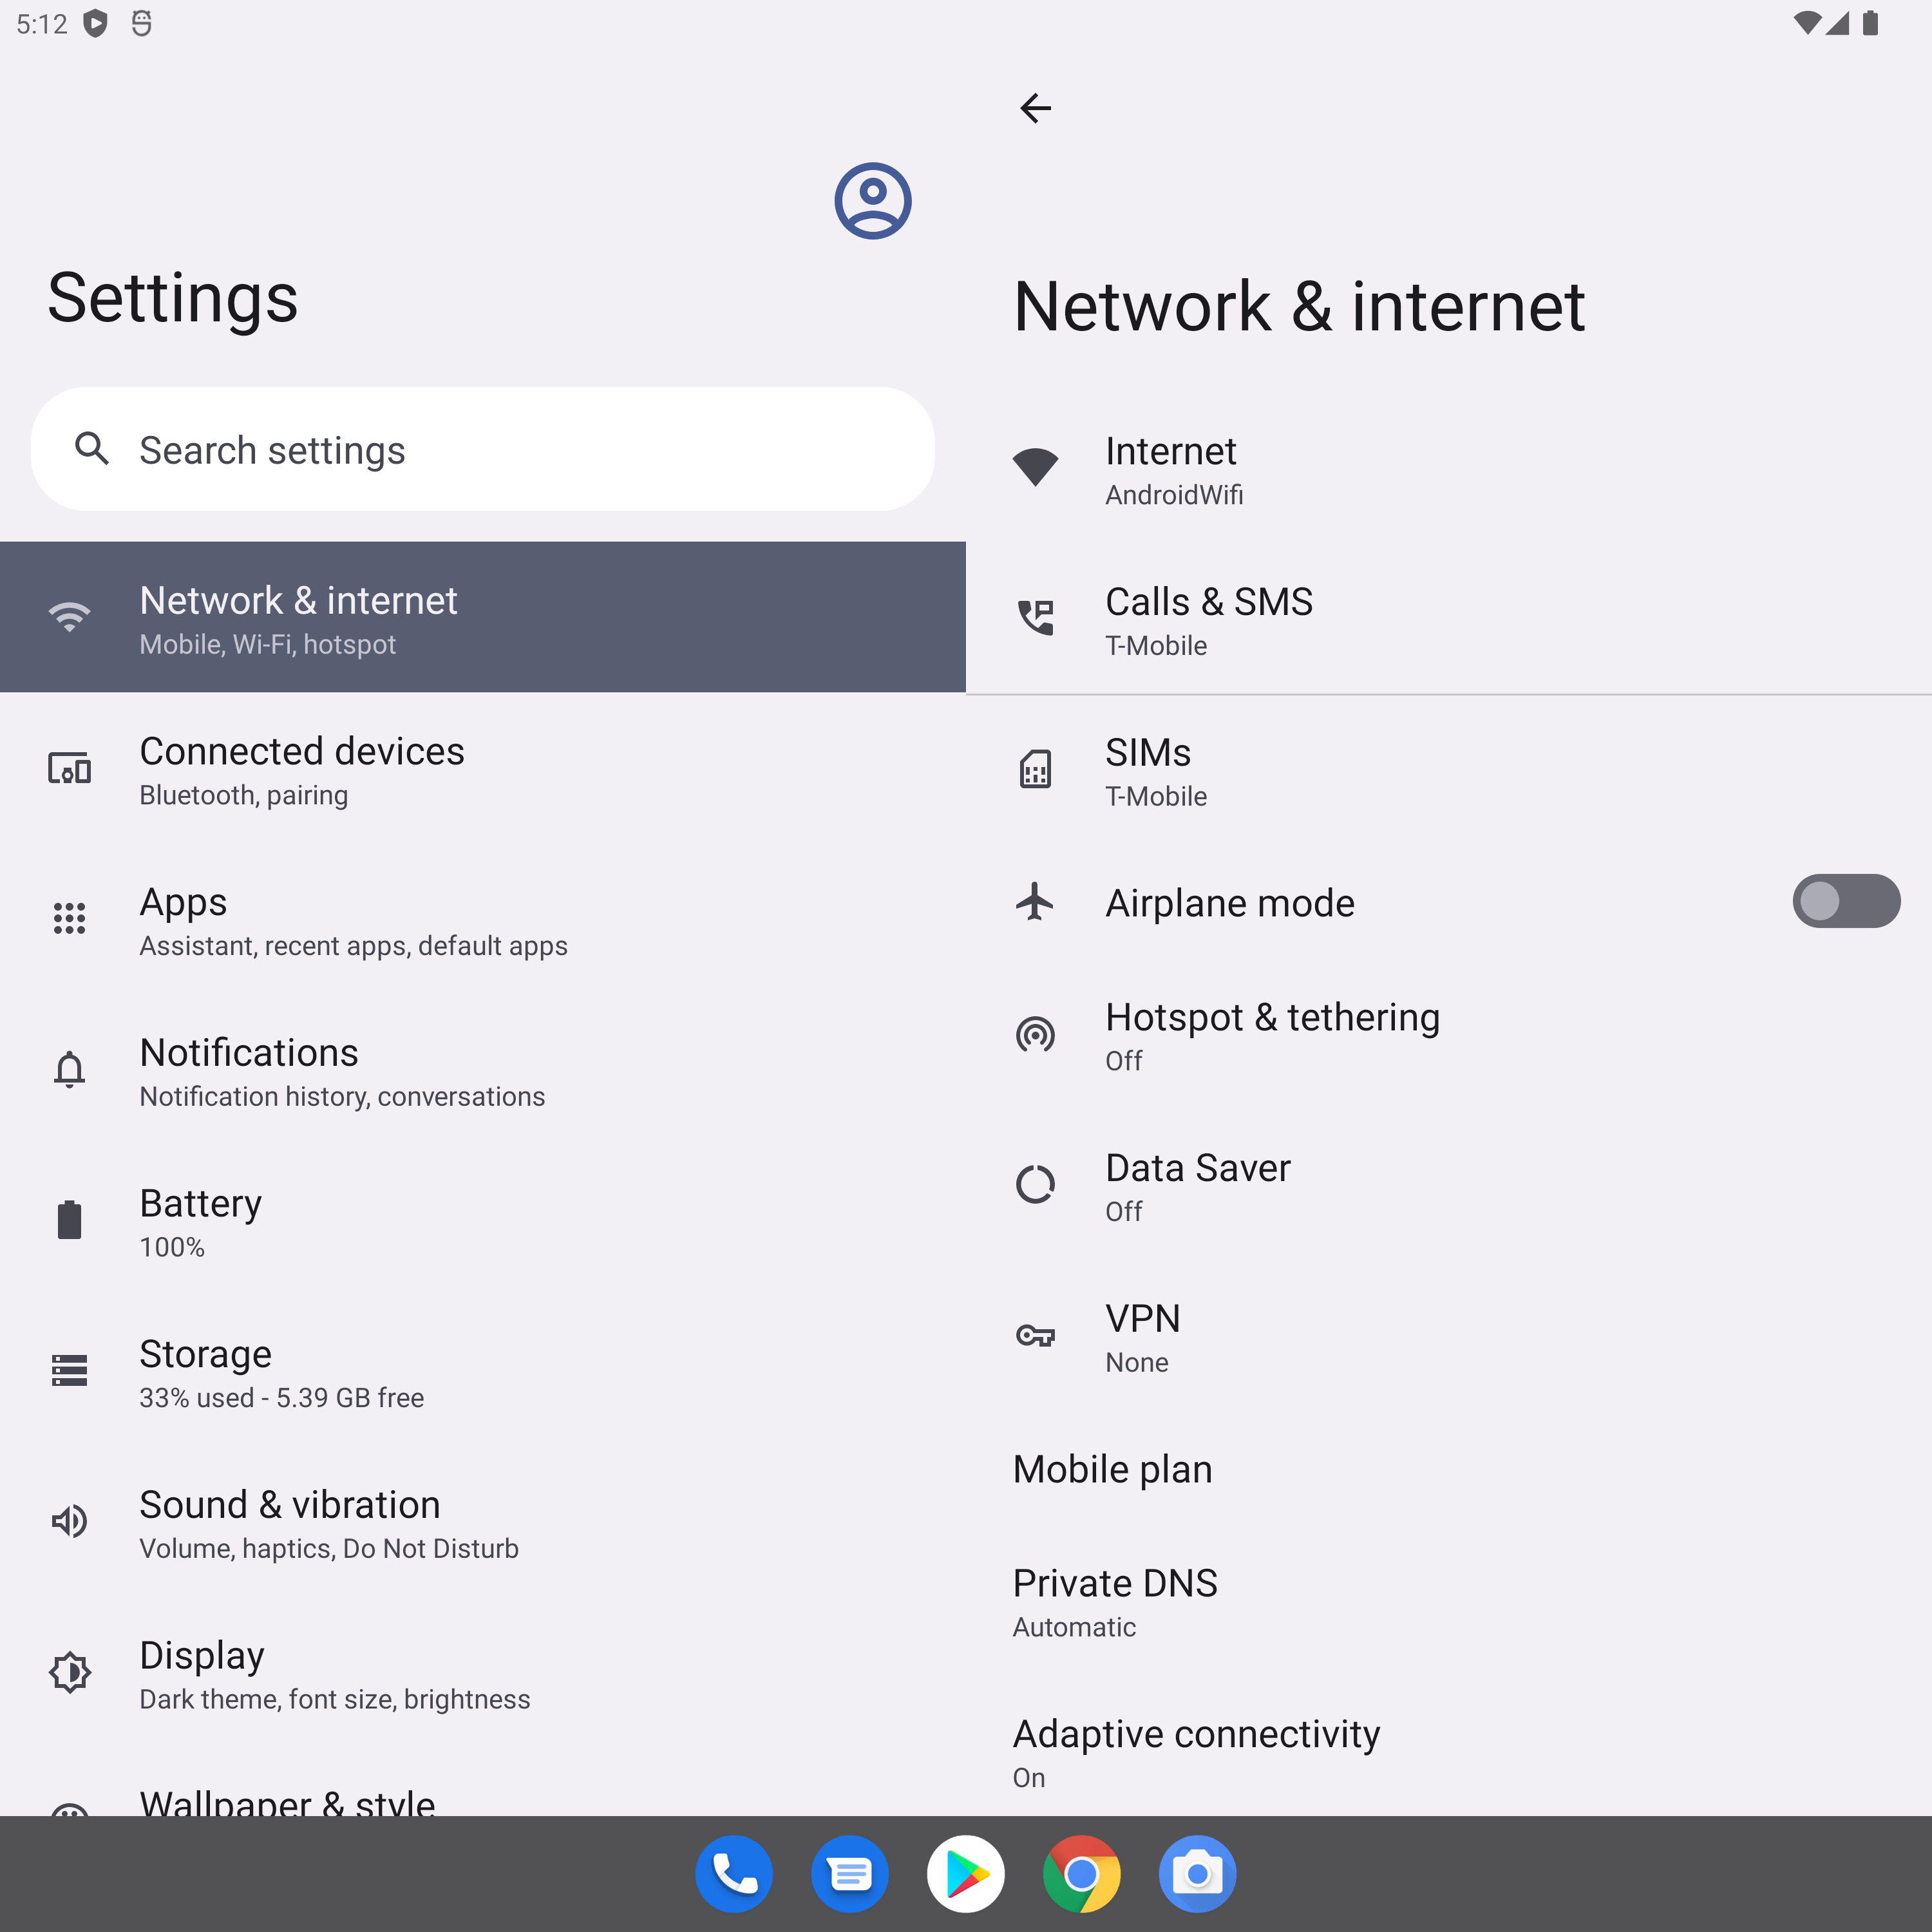
Рисунок 1. Приложение настроек с рядом действий.

Если ваше приложение состоит из нескольких действий, внедрение действий позволит вам улучшить взаимодействие с пользователем на планшетах, складных устройствах и устройствах ChromeOS.

Внедрение активности не требует рефакторинга кода. Вы определяете, как ваше приложение отображает свои действия — рядом или в стопке — путем создания файла конфигурации XML или путем выполнения вызовов API Jetpack WindowManager .

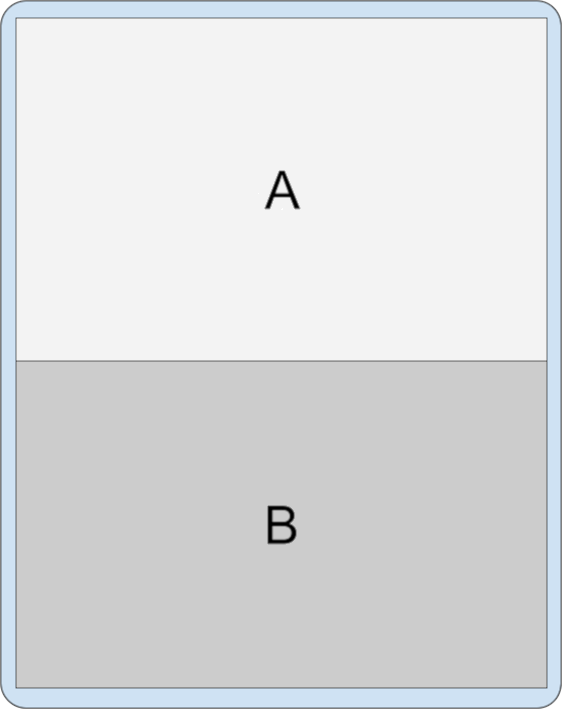
Поддержка маленьких экранов поддерживается автоматически. Когда ваше приложение установлено на устройстве с маленьким экраном, действия располагаются одно поверх другого. На больших экранах действия отображаются рядом. Система определяет представление на основе созданной вами конфигурации — логика ветвления не требуется.

Встраивание действий учитывает изменения ориентации устройства и безупречно работает на складных устройствах, складывая и раскладывая действия по мере того, как устройство складывается и раскладывается.

Встраивание действий поддерживается на большинстве устройств с большим экраном под управлением Android 12L (уровень API 32) и выше.

Разделить окно задач

Встраивание действий разделяет окно задач приложения на два контейнера: основной и дополнительный. Контейнеры содержат действия, запущенные из основного действия или из других действий, уже находящихся в контейнерах.

Действия располагаются во вторичном контейнере при их запуске, а вторичный контейнер размещается поверх основного контейнера на маленьких экранах, поэтому расположение действий и обратная навигация соответствуют порядку действий, уже встроенному в ваше приложение.

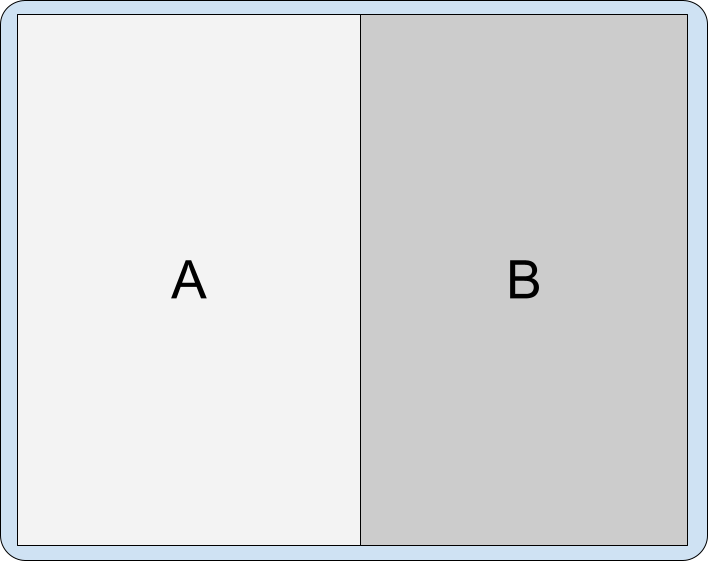
Внедрение действий позволяет отображать действия различными способами. Ваше приложение может разделить окно задач, одновременно запуская два действия одновременно:

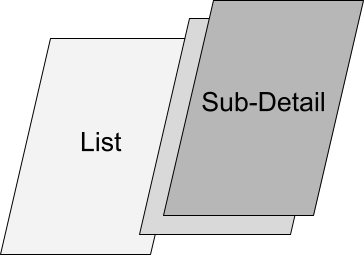
Рисунок 2. Два действия рядом.

Или действие, занимающее все окно задачи, может создать разделение, запустив рядом с ним новое действие:

Рисунок 3. Действие A запускает действие B в стороне.

Действия, которые уже разделены и совместно используют окно задач, могут запускать другие действия следующими способами:

  • В сторону поверх другого действия:

    Рисунок 4. Действие A начинает действие C сбоку от действия B.
  • В сторону и сдвиньте раскол в сторону, скрывая предыдущую основную деятельность:

    Рисунок 5. Действие B запускает действие C в сторону и смещает разделение в сторону.
  • Запустить активность на месте сверху; то есть в том же стеке действий:

    Рисунок 6. Действие B запускает действие C без дополнительных флагов намерения.
  • Запустите полное окно активности в той же задаче:

    Рисунок 7. Действие A или действие B запускает действие C, которое заполняет окно задачи.

Обратная навигация

Различные типы приложений могут иметь разные правила обратной навигации в состоянии разделенного окна задачи в зависимости от зависимостей между действиями или того, как пользователи запускают обратное событие, например:

  • Объединение: если действия связаны и одно не должно отображаться без другого, можно настроить обратную навигацию для завершения обоих.
  • Работа в одиночку: если действия полностью независимы, обратная навигация по действию не влияет на состояние другого действия в окне задачи.

Событие Back отправляется на последнее сфокусированное действие при использовании навигации с помощью кнопок.

Для навигации на основе жестов:

  • Android 14 (уровень API 34) и более ранние версии — событие Back отправляется на действие, в котором произошел жест. Когда пользователи проводят пальцем по левому краю экрана, обратное событие отправляется на действие на левой панели разделенного окна. Когда пользователи проводят пальцем от правой части экрана, обратное событие отправляется на действие на правой панели.

  • Android 15 (уровень API 35) и выше

    • При работе с несколькими действиями в одном приложении жест завершает верхнее действие независимо от направления смахивания, обеспечивая более унифицированный интерфейс.

    • В сценариях, включающих два действия из разных приложений (оверлей), событие Back направляется на последнее действие в фокусе, что соответствует поведению навигации по кнопкам.

Многопанельный макет

Jetpack WindowManager позволяет создавать действия, встраивающие многопанельный макет, на устройствах с большим экраном под управлением Android 12L (уровень API 32) или выше, а также на некоторых устройствах с более ранними версиями платформы. Существующие приложения, основанные на нескольких действиях, а не на фрагментах или макетах на основе представлений, такие как SlidingPaneLayout могут обеспечить улучшенное взаимодействие с пользователем на большом экране без рефакторинга исходного кода.

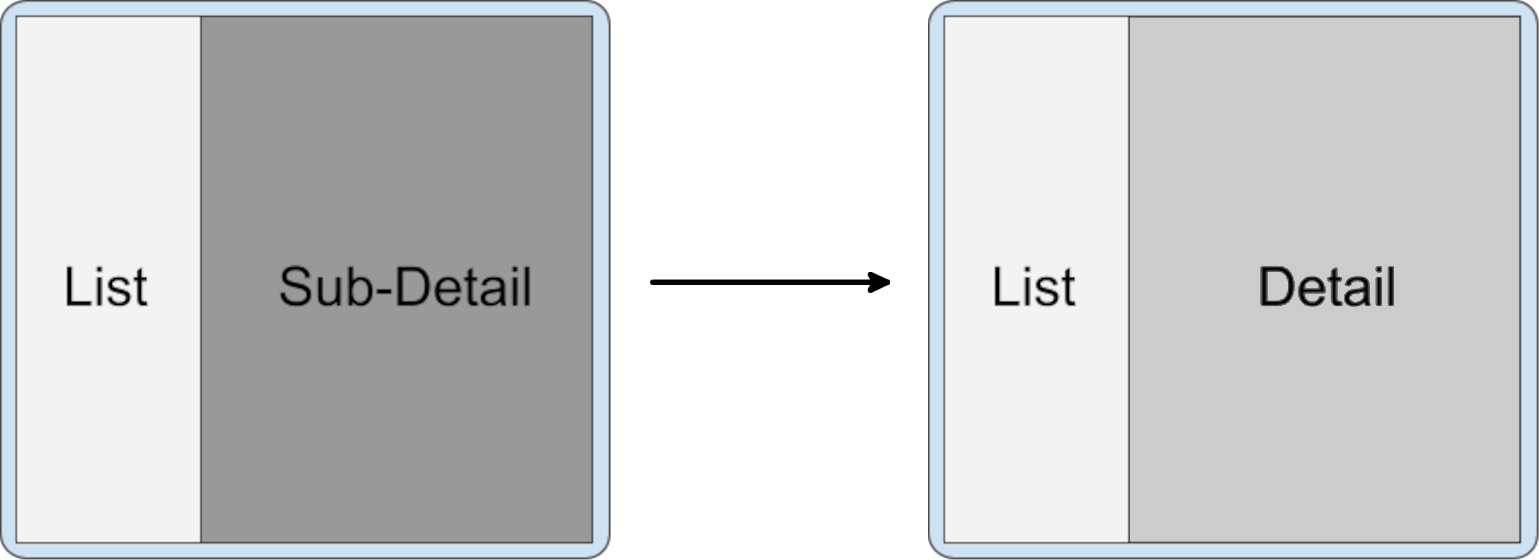
Одним из распространенных примеров является разделение списка на детали. Чтобы обеспечить качественное представление, система запускает действие списка, а затем приложение сразу же запускает действие детализации. Система перехода ждет, пока будут нарисованы оба действия, а затем отображает их вместе. Для пользователя эти два действия запускаются как одно.

Рисунок 8. Два действия запускаются одновременно в многопанельном макете.

Разделить атрибуты

Вы можете указать, как распределяется окно задачи между разделенными контейнерами и как контейнеры располагаются относительно друг друга.

Для правил, определенных в файле конфигурации XML, установите следующие атрибуты:

  • splitRatio : устанавливает пропорции контейнера. Значение представляет собой число с плавающей запятой в открытом интервале (0,0, 1,0).
  • splitLayoutDirection : определяет расположение разделенных контейнеров относительно друг друга. Ценности включают в себя:
    • ltr : слева направо
    • rtl : справа налево
    • locale : либо ltr , либо rtl определяется настройкой локали.

Примеры см. в разделе конфигурации XML .

Для правил, созданных с использованием API WindowManager, создайте объект SplitAttributes с помощью SplitAttributes.Builder и вызовите следующие методы компоновщика:

  • setSplitType() : устанавливает пропорции разделенных контейнеров. Допустимые аргументы, включая метод SplitAttributes.SplitType.ratio() , см. в разделе SplitAttributes.SplitType
  • setLayoutDirection() : устанавливает макет контейнеров. Возможные значения см. в разделе SplitAttributes.LayoutDirection .

Примеры см. в разделе API WindowManager .

Рисунок 9. Два разделения активности, расположенные слева направо, но с разными коэффициентами разделения.

Заполнители

Действия-заполнители — это пустые второстепенные действия, занимающие область разделения действий. В конечном итоге они предназначены для замены другим действием, содержащим контент. Например, действие-заполнитель может занимать второстепенную сторону разделения действия в макете с подробностями списка до тех пор, пока элемент из списка не будет выбран, после чего действие, содержащее подробную информацию для выбранного элемента списка, заменяет заполнитель.

По умолчанию система отображает заполнители только тогда, когда достаточно места для разделения действий. Заполнители автоматически завершают работу, когда размер экрана изменяется на ширину или высоту, слишком малую для отображения разделения. Если позволяет место, система перезапускает заполнитель с повторно инициализированным состоянием.

Рисунок 10. Складное устройство складывается и раскладывается. Действие заполнителя завершается и создается заново при изменении размера дисплея.

Однако атрибут stickyPlaceholder метода SplitPlaceholderRule или setSticky() метода SplitPlaceholder.Builder может переопределить поведение по умолчанию. Если атрибут или метод задает значение true , система отображает заполнитель как самое верхнее действие в окне задачи, когда размер дисплея изменяется до однопанельного с двухпанельного (пример см. в разделе Конфигурация разделения ). .

Рисунок 11. Складное устройство складывается и раскладывается. Активность заполнителя является липкой.

Изменение размера окна

При изменении конфигурации устройства уменьшите ширину окна задачи, чтобы она не была достаточно большой для многопанельного макета (например, когда складное устройство с большим экраном складывается из размера планшета до размера телефона или размер окна приложения изменяется в многооконном режиме). ), действия, не являющиеся заполнителями, на дополнительной панели окна задач располагаются поверх действий на основной панели.

Действия-заполнители отображаются только в том случае, если ширины дисплея достаточно для разделения. На экранах меньшего размера заполнитель автоматически закрывается. Когда область отображения снова становится достаточно большой, заполнитель создается заново. (См. раздел «Заполнители ».)

Объединение действий возможно, поскольку WindowManager z-упорядочивает действия на вторичной панели над действиями на основной панели.

Несколько действий на дополнительной панели

Действие B запускает действие C на месте без дополнительных флагов намерений:

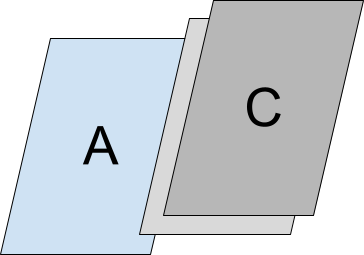
Разделение действий, содержащее действия A, B и C, а также C, наложенное друг на друга.           вершина Б.

в результате получается следующий z-порядок действий в одной задаче:

Вторичный стек действий, содержащий действие C, расположенное поверх B.           Вторичный стек размещается поверх основного стека действий.           содержащий деятельность А.

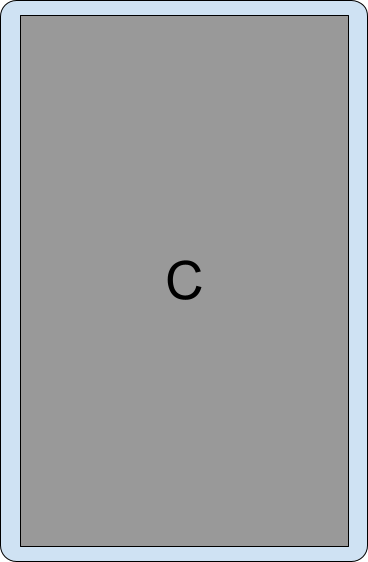
Таким образом, в меньшем окне задачи приложение сжимается до одного действия с C на вершине стека:

Небольшое окно, показывающее только действие C.

Возвращаясь назад в меньшем окне, вы перемещаетесь по действиям, расположенным друг над другом.

Если конфигурация окна задачи восстанавливается до большего размера, позволяющего разместить несколько панелей, действия снова отображаются рядом.

Сложные расколы

Действие B запускает действие C в сторону и смещает разделение в сторону:

Окно задач, показывающее действия A и B, затем действия B и C.

В результате получается следующий z-порядок действий в одной задаче:

Действия A, B и C в одном стопке. Действия сложены           в следующем порядке сверху вниз: C, B, A.

В меньшем окне задачи приложение сжимается до одного действия с буквой C сверху:

Небольшое окно, показывающее только действие C.

Фиксированная портретная ориентация

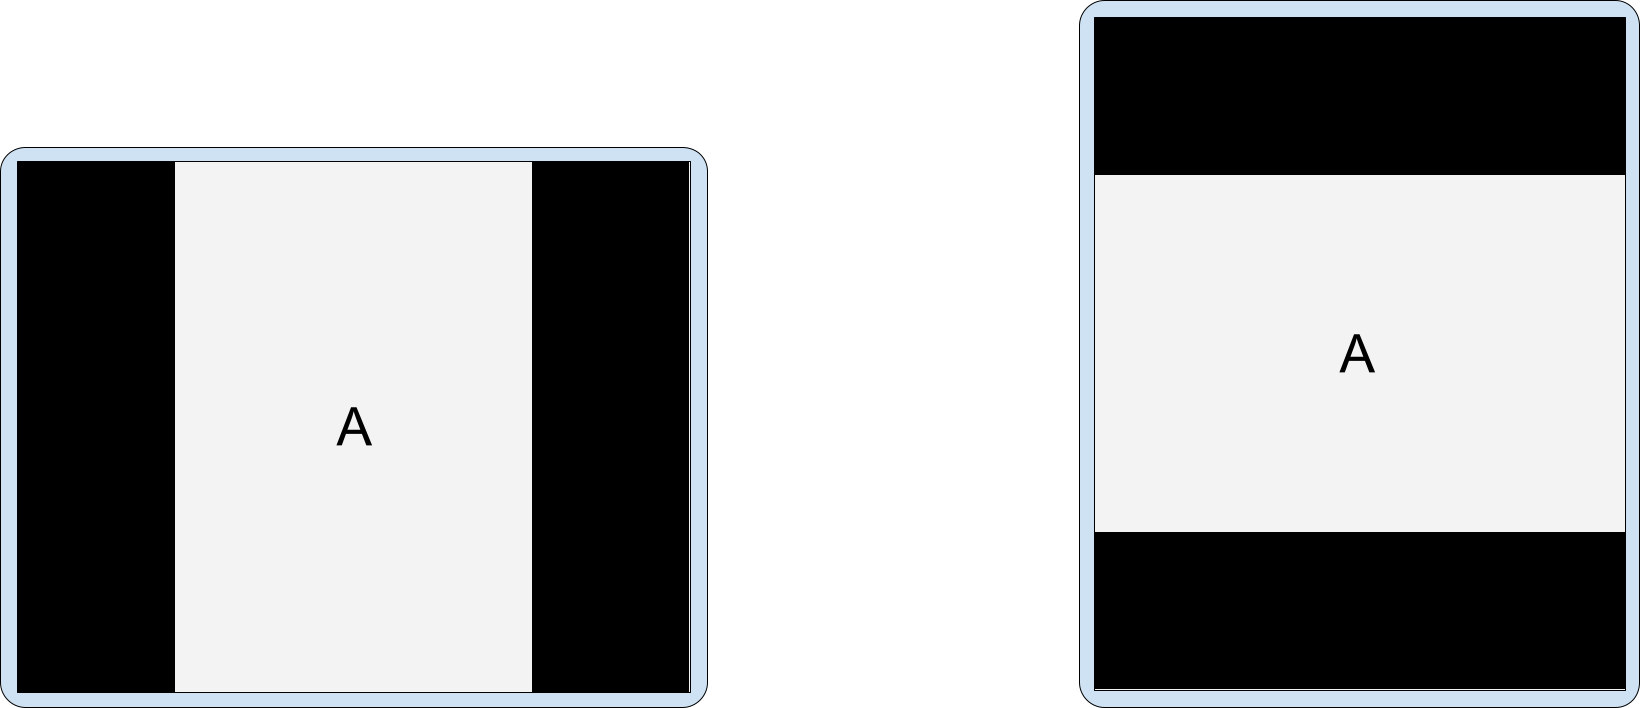
Параметр манифеста android:screenOrientation позволяет приложениям ограничивать действия книжной или альбомной ориентацией. Чтобы улучшить взаимодействие с пользователем на устройствах с большим экраном, таких как планшеты и складные устройства, производители устройств (OEM) могут игнорировать запросы на ориентацию экрана и переводить приложение в почтовый ящик в книжной ориентации на альбомных дисплеях или в альбомной ориентации на книжных дисплеях.

Рисунок 12. Действия в почтовом ящике: фиксированная ориентация на альбомном устройстве (слева), фиксированная альбомная ориентация на книжном устройстве (справа).

Аналогичным образом, когда включено встраивание действий, OEM-производители могут настраивать устройства для отображения действий в почтовом ящике с фиксированной книжной ориентацией в альбомной ориентации на больших экранах (ширина ≥ 600 точек). Когда действие с фиксированным портретом запускает второе действие, устройство может отображать два действия рядом на двухпанельном дисплее.

Рисунок 13. Действие A с фиксированным портретом запускает действие B в сторону.

Всегда добавляйте свойство android.window.PROPERTY_ACTIVITY_EMBEDDING_SPLITS_ENABLED в файл манифеста вашего приложения, чтобы информировать устройства о том, что ваше приложение поддерживает внедрение активности (см. раздел конфигурации разделения ). Устройства, настроенные OEM-производителями, могут затем определить, следует ли использовать фиксированный портретный режим почтового ящика.

Разделенная конфигурация

Правила разделения настраивают разделение активности. Вы определяете правила разделения в файле конфигурации XML или с помощью вызовов API Jetpack WindowManager .

В любом случае ваше приложение должно получить доступ к библиотеке WindowManager и сообщить системе, что приложение реализовало внедрение активности.

Сделайте следующее:

  1. Добавьте последнюю зависимость библиотеки WindowManager в файл build.gradle уровня модуля вашего приложения, например:

    implementation 'androidx.window:window:1.1.0-beta02'

    Библиотека WindowManager предоставляет все компоненты, необходимые для внедрения действий.

  2. Сообщите системе, что в вашем приложении реализовано внедрение активности.

    Добавьте свойство android.window.PROPERTY_ACTIVITY_EMBEDDING_SPLITS_ENABLED в элемент <application> файла манифеста приложения и установите значение true, например:

    <manifest xmlns:android="http://schemas.android.com/apk/res/android">
        <application>
            <property
                android:name="android.window.PROPERTY_ACTIVITY_EMBEDDING_SPLITS_ENABLED"
                android:value="true" />
        </application>
    </manifest>
    

    В выпуске WindowManager 1.1.0-alpha06 и более поздних версиях разделения внедрения действий отключены, если свойство не добавлено в манифест и не установлено в true.

    Кроме того, производители устройств используют этот параметр для включения пользовательских возможностей для приложений, поддерживающих внедрение действий. Например, устройства могут помещать в почтовый ящик действие только в книжной ориентации на альбомных дисплеях, чтобы ориентировать действие для перехода к двухпанельному макету при запуске второго действия (см. Фиксированная книжная ориентация ).

XML-конфигурация

Чтобы создать реализацию внедрения действий на основе XML, выполните следующие шаги:

  1. Создайте файл ресурсов XML, который выполняет следующие действия:

    • Определяет действия, которые разделяют разделение
    • Настраивает параметры разделения
    • Создает заполнитель для вторичного контейнера разделения, когда контент недоступен.
    • Определяет действия, которые никогда не должны быть частью разделения.

    Например:

    <!-- main_split_config.xml -->
    
    <resources
        xmlns:window="http://schemas.android.com/apk/res-auto">
    
        <!-- Define a split for the named activities. -->
        <SplitPairRule
            window:splitRatio="0.33"
            window:splitLayoutDirection="locale"
            window:splitMinWidthDp="840"
            window:splitMaxAspectRatioInPortrait="alwaysAllow"
            window:finishPrimaryWithSecondary="never"
            window:finishSecondaryWithPrimary="always"
            window:clearTop="false">
            <SplitPairFilter
                window:primaryActivityName=".ListActivity"
                window:secondaryActivityName=".DetailActivity"/>
        </SplitPairRule>
    
        <!-- Specify a placeholder for the secondary container when content is
             not available. -->
        <SplitPlaceholderRule
            window:placeholderActivityName=".PlaceholderActivity"
            window:splitRatio="0.33"
            window:splitLayoutDirection="locale"
            window:splitMinWidthDp="840"
            window:splitMaxAspectRatioInPortrait="alwaysAllow"
            window:stickyPlaceholder="false">
            <ActivityFilter
                window:activityName=".ListActivity"/>
        </SplitPlaceholderRule>
    
        <!-- Define activities that should never be part of a split. Note: Takes
             precedence over other split rules for the activity named in the
             rule. -->
        <ActivityRule
            window:alwaysExpand="true">
            <ActivityFilter
                window:activityName=".ExpandedActivity"/>
        </ActivityRule>
    
    </resources>
    
  2. Создайте инициализатор.

    Компонент WindowManager RuleController анализирует файл конфигурации XML и делает правила доступными для системы. Initializer библиотеки запуска Jetpack делает XML-файл доступным для RuleController при запуске приложения, чтобы правила вступили в силу при запуске любых действий.

    Чтобы создать инициализатор, выполните следующие действия:

    1. Добавьте последнюю зависимость библиотеки запуска Jetpack в файл build.gradle уровня модуля, например:

      implementation 'androidx.startup:startup-runtime:1.1.1'

    2. Создайте класс, реализующий интерфейс Initializer .

      Инициализатор делает правила разделения доступными для RuleController , передавая идентификатор файла конфигурации XML ( main_split_config.xml ) методу RuleController.parseRules() .

      Котлин

      class SplitInitializer : Initializer<RuleController> {
      
          override fun create(context: Context): RuleController {
              return RuleController.getInstance(context).apply {
                  setRules(RuleController.parseRules(context, R.xml.main_split_config))
              }
          }
      
          override fun dependencies(): List<Class<out Initializer<*>>> {
              return emptyList()
          }
      }

      Ява

      public class SplitInitializer implements Initializer<RuleController> {
      
           @NonNull
           @Override
           public RuleController create(@NonNull Context context) {
               RuleController ruleController = RuleController.getInstance(context);
               ruleController.setRules(
                   RuleController.parseRules(context, R.xml.main_split_config)
               );
               return ruleController;
           }
      
           @NonNull
           @Override
           public List<Class<? extends Initializer<?>>> dependencies() {
               return Collections.emptyList();
           }
      }
  3. Создайте поставщика контента для определений правил.

    Добавьте androidx.startup.InitializationProvider в файл манифеста приложения в качестве <provider> . Включите ссылку на реализацию инициализатора RuleController SplitInitializer :

    <!-- AndroidManifest.xml -->
    
    <provider android:name="androidx.startup.InitializationProvider"
        android:authorities="${applicationId}.androidx-startup"
        android:exported="false"
        tools:node="merge">
        <!-- Make SplitInitializer discoverable by InitializationProvider. -->
        <meta-data android:name="${applicationId}.SplitInitializer"
            android:value="androidx.startup" />
    </provider>
    

    InitializationProvider обнаруживает и инициализирует SplitInitializer перед вызовом метода onCreate() приложения. В результате правила разделения действуют при запуске основного действия приложения.

API оконного менеджера

Вы можете реализовать внедрение активности программно с помощью нескольких вызовов API. Выполните вызовы метода onCreate() подкласса Application чтобы убедиться, что правила действуют, прежде чем запускать какие-либо действия.

Чтобы программно создать разделение активности, выполните следующие действия:

  1. Создайте правило разделения:

    1. Создайте SplitPairFilter , который идентифицирует действия, которые разделяют разделение:

      Котлин

      val splitPairFilter = SplitPairFilter(
         ComponentName(this, ListActivity::class.java),
         ComponentName(this, DetailActivity::class.java),
         null
      )

      Ява

      SplitPairFilter splitPairFilter = new SplitPairFilter(
         new ComponentName(this, ListActivity.class),
         new ComponentName(this, DetailActivity.class),
         null
      );
    2. Добавьте фильтр в набор фильтров:

      Котлин

      val filterSet = setOf(splitPairFilter)

      Ява

      Set<SplitPairFilter> filterSet = new HashSet<>();
      filterSet.add(splitPairFilter);
    3. Создайте атрибуты макета для разделения:

      Котлин

      val splitAttributes: SplitAttributes = SplitAttributes.Builder()
          .setSplitType(SplitAttributes.SplitType.ratio(0.33f))
          .setLayoutDirection(SplitAttributes.LayoutDirection.LEFT_TO_RIGHT)
          .build()

      Ява

      final SplitAttributes splitAttributes = new SplitAttributes.Builder()
            .setSplitType(SplitAttributes.SplitType.ratio(0.33f))
            .setLayoutDirection(SplitAttributes.LayoutDirection.LEFT_TO_RIGHT)
            .build();

      SplitAttributes.Builder создает объект, содержащий атрибуты макета:

      • setSplitType() : определяет, как доступная область отображения распределяется по каждому контейнеру активности. Тип разделения соотношения определяет долю доступной области отображения, выделенную основному контейнеру; вторичный контейнер занимает оставшуюся часть доступной области отображения.
      • setLayoutDirection() : определяет, как контейнеры действий располагаются относительно друг друга, сначала основной контейнер.
    4. Создайте SplitPairRule :

      Котлин

      val splitPairRule = SplitPairRule.Builder(filterSet)
          .setDefaultSplitAttributes(splitAttributes)
          .setMinWidthDp(840)
          .setMinSmallestWidthDp(600)
          .setMaxAspectRatioInPortrait(EmbeddingAspectRatio.ratio(1.5f))
          .setFinishPrimaryWithSecondary(SplitRule.FinishBehavior.NEVER)
          .setFinishSecondaryWithPrimary(SplitRule.FinishBehavior.ALWAYS)
          .setClearTop(false)
          .build()

      Ява

      SplitPairRule splitPairRule = new SplitPairRule.Builder(filterSet)
          .setDefaultSplitAttributes(splitAttributes)
          .setMinWidthDp(840)
          .setMinSmallestWidthDp(600)
          .setMaxAspectRatioInPortrait(EmbeddingAspectRatio.ratio(1.5f))
          .setFinishPrimaryWithSecondary(SplitRule.FinishBehavior.NEVER)
          .setFinishSecondaryWithPrimary(SplitRule.FinishBehavior.ALWAYS)
          .setClearTop(false)
          .build();

      SplitPairRule.Builder создает и настраивает правило:

      • filterSet : Содержит фильтры разделенной пары, которые определяют, когда применять правило, путем определения действий, которые разделяют разделение.
      • setDefaultSplitAttributes() : применяет атрибуты макета к правилу.
      • setMinWidthDp() : устанавливает минимальную ширину дисплея (в пикселях, не зависящих от плотности, dp), при которой возможно разделение.
      • setMinSmallestWidthDp() : устанавливает минимальное значение (в dp), которое должен иметь меньший из двух размеров дисплея, чтобы включить разделение независимо от ориентации устройства.
      • setMaxAspectRatioInPortrait() : устанавливает максимальное соотношение сторон экрана (высота:ширина) в книжной ориентации, для которого отображаются разделения активности. Если соотношение сторон портретного дисплея превышает максимальное соотношение сторон, разделение отключается независимо от ширины дисплея. Примечание. Значение по умолчанию — 1,4, в результате чего на большинстве планшетов действия занимают все окно задач в книжной ориентации. См. также SPLIT_MAX_ASPECT_RATIO_PORTRAIT_DEFAULT и setMaxAspectRatioInLandscape() . Значение по умолчанию для ландшафта — ALWAYS_ALLOW .
      • setFinishPrimaryWithSecondary() : устанавливает, как завершение всех действий во вторичном контейнере влияет на действия в основном контейнере. NEVER указывает, что система не должна завершать основные действия после завершения всех действий во вторичном контейнере (см. Завершение действий ).
      • setFinishSecondaryWithPrimary() : устанавливает, как завершение всех действий в основном контейнере влияет на действия во вторичном контейнере. ALWAYS указывает, что система всегда должна завершать действия во вторичном контейнере, когда завершаются все действия в основном контейнере (см. Завершение действий ).
      • setClearTop() : указывает, завершаются ли все действия во вторичном контейнере, когда в контейнере запускается новое действие. Значение false указывает, что новые действия располагаются поверх действий, уже находящихся во вторичном контейнере.
    5. Получите одноэлементный экземпляр WindowManager RuleController и добавьте правило:

      Котлин

        val ruleController = RuleController.getInstance(this)
        ruleController.addRule(splitPairRule)
        

      Ява

        RuleController ruleController = RuleController.getInstance(this);
        ruleController.addRule(splitPairRule);
        
  2. Создайте заполнитель для вторичного контейнера, если контент недоступен:

    1. Создайте ActivityFilter , который идентифицирует действие, с которым заполнитель разделяет разделение окна задачи:

      Котлин

      val placeholderActivityFilter = ActivityFilter(
          ComponentName(this, ListActivity::class.java),
          null
      )

      Ява

      ActivityFilter placeholderActivityFilter = new ActivityFilter(
          new ComponentName(this, ListActivity.class),
          null
      );
    2. Добавьте фильтр в набор фильтров:

      Котлин

      val placeholderActivityFilterSet = setOf(placeholderActivityFilter)

      Ява

      Set<ActivityFilter> placeholderActivityFilterSet = new HashSet<>();
      placeholderActivityFilterSet.add(placeholderActivityFilter);
    3. Создайте SplitPlaceholderRule :

      Котлин

      val splitPlaceholderRule = SplitPlaceholderRule.Builder(
            placeholderActivityFilterSet,
            Intent(context, PlaceholderActivity::class.java)
          ).setDefaultSplitAttributes(splitAttributes)
           .setMinWidthDp(840)
           .setMinSmallestWidthDp(600)
           .setMaxAspectRatioInPortrait(EmbeddingAspectRatio.ratio(1.5f))
           .setFinishPrimaryWithPlaceholder(SplitRule.FinishBehavior.ALWAYS)
           .setSticky(false)
           .build()

      Ява

      SplitPlaceholderRule splitPlaceholderRule = new SplitPlaceholderRule.Builder(
            placeholderActivityFilterSet,
            new Intent(context, PlaceholderActivity.class)
          ).setDefaultSplitAttributes(splitAttributes)
           .setMinWidthDp(840)
           .setMinSmallestWidthDp(600)
           .setMaxAspectRatioInPortrait(EmbeddingAspectRatio.ratio(1.5f))
           .setFinishPrimaryWithPlaceholder(SplitRule.FinishBehavior.ALWAYS)
           .setSticky(false)
           .build();

      SplitPlaceholderRule.Builder создает и настраивает правило:

      • placeholderActivityFilterSet : содержит фильтры действий, которые определяют, когда применять правило, путем определения действий, с которыми связано действие-заполнитель.
      • Intent : определяет запуск действия-заполнителя.
      • setDefaultSplitAttributes() : применяет атрибуты макета к правилу.
      • setMinWidthDp() : устанавливает минимальную ширину дисплея (в пикселях, не зависящих от плотности, dp), при которой допускается разделение.
      • setMinSmallestWidthDp() : устанавливает минимальное значение (в dp), которое должен иметь меньший из двух размеров дисплея, чтобы обеспечить разделение независимо от ориентации устройства.
      • setMaxAspectRatioInPortrait() : устанавливает максимальное соотношение сторон экрана (высота:ширина) в книжной ориентации, для которого отображаются разделения активности. Примечание. Значение по умолчанию — 1,4, в результате чего на большинстве планшетов действия заполняют окно задачи в книжной ориентации. См. также SPLIT_MAX_ASPECT_RATIO_PORTRAIT_DEFAULT и setMaxAspectRatioInLandscape() . Значение по умолчанию для ландшафта — ALWAYS_ALLOW .
      • setFinishPrimaryWithPlaceholder() : устанавливает, как завершение действия заполнителя влияет на действия в основном контейнере. ВСЕГДА указывает, что система всегда должна завершать действия в основном контейнере после завершения заполнителя (см. Завершение действий ).
      • setSticky() : определяет, появляется ли действие-заполнитель поверх стека действий на небольших дисплеях после того, как заполнитель впервые появился в разделении с достаточной минимальной шириной.
    4. Добавьте правило в RuleController WindowManager:

      Котлин

      ruleController.addRule(splitPlaceholderRule)

      Ява

      ruleController.addRule(splitPlaceholderRule);
  3. Укажите действия, которые никогда не должны быть частью разделения:

    1. Создайте ActivityFilter , который идентифицирует действие, которое всегда должно занимать всю область отображения задачи:

      Котлин

      val expandedActivityFilter = ActivityFilter(
        ComponentName(this, ExpandedActivity::class.java),
        null
      )

      Ява

      ActivityFilter expandedActivityFilter = new ActivityFilter(
        new ComponentName(this, ExpandedActivity.class),
        null
      );
    2. Добавьте фильтр в набор фильтров:

      Котлин

      val expandedActivityFilterSet = setOf(expandedActivityFilter)

      Ява

      Set<ActivityFilter> expandedActivityFilterSet = new HashSet<>();
      expandedActivityFilterSet.add(expandedActivityFilter);
    3. Создайте ActivityRule :

      Котлин

      val activityRule = ActivityRule.Builder(expandedActivityFilterSet)
          .setAlwaysExpand(true)
          .build()

      Ява

      ActivityRule activityRule = new ActivityRule.Builder(
          expandedActivityFilterSet
      ).setAlwaysExpand(true)
       .build();

      ActivityRule.Builder создает и настраивает правило:

      • expandedActivityFilterSet : содержит фильтры действий, которые определяют, когда применять правило, путем определения действий, которые вы хотите исключить из разделения.
      • setAlwaysExpand() : указывает, должно ли действие заполнять все окно задачи.
    4. Добавьте правило в RuleController WindowManager:

      Котлин

      ruleController.addRule(activityRule)

      Ява

      ruleController.addRule(activityRule);

Межприкладное внедрение

В Android 13 (уровень API 33) и более поздних версиях приложения могут встраивать действия из других приложений. Внедрение действий между приложениями или с использованием нескольких UID обеспечивает визуальную интеграцию действий из нескольких приложений Android. Система отображает активность главного приложения и встроенную активность из другого приложения на экране рядом или сверху и снизу, как при внедрении активности одного приложения.

Например, приложение «Настройки» может встроить действие выбора обоев из приложения WallpaperPicker:
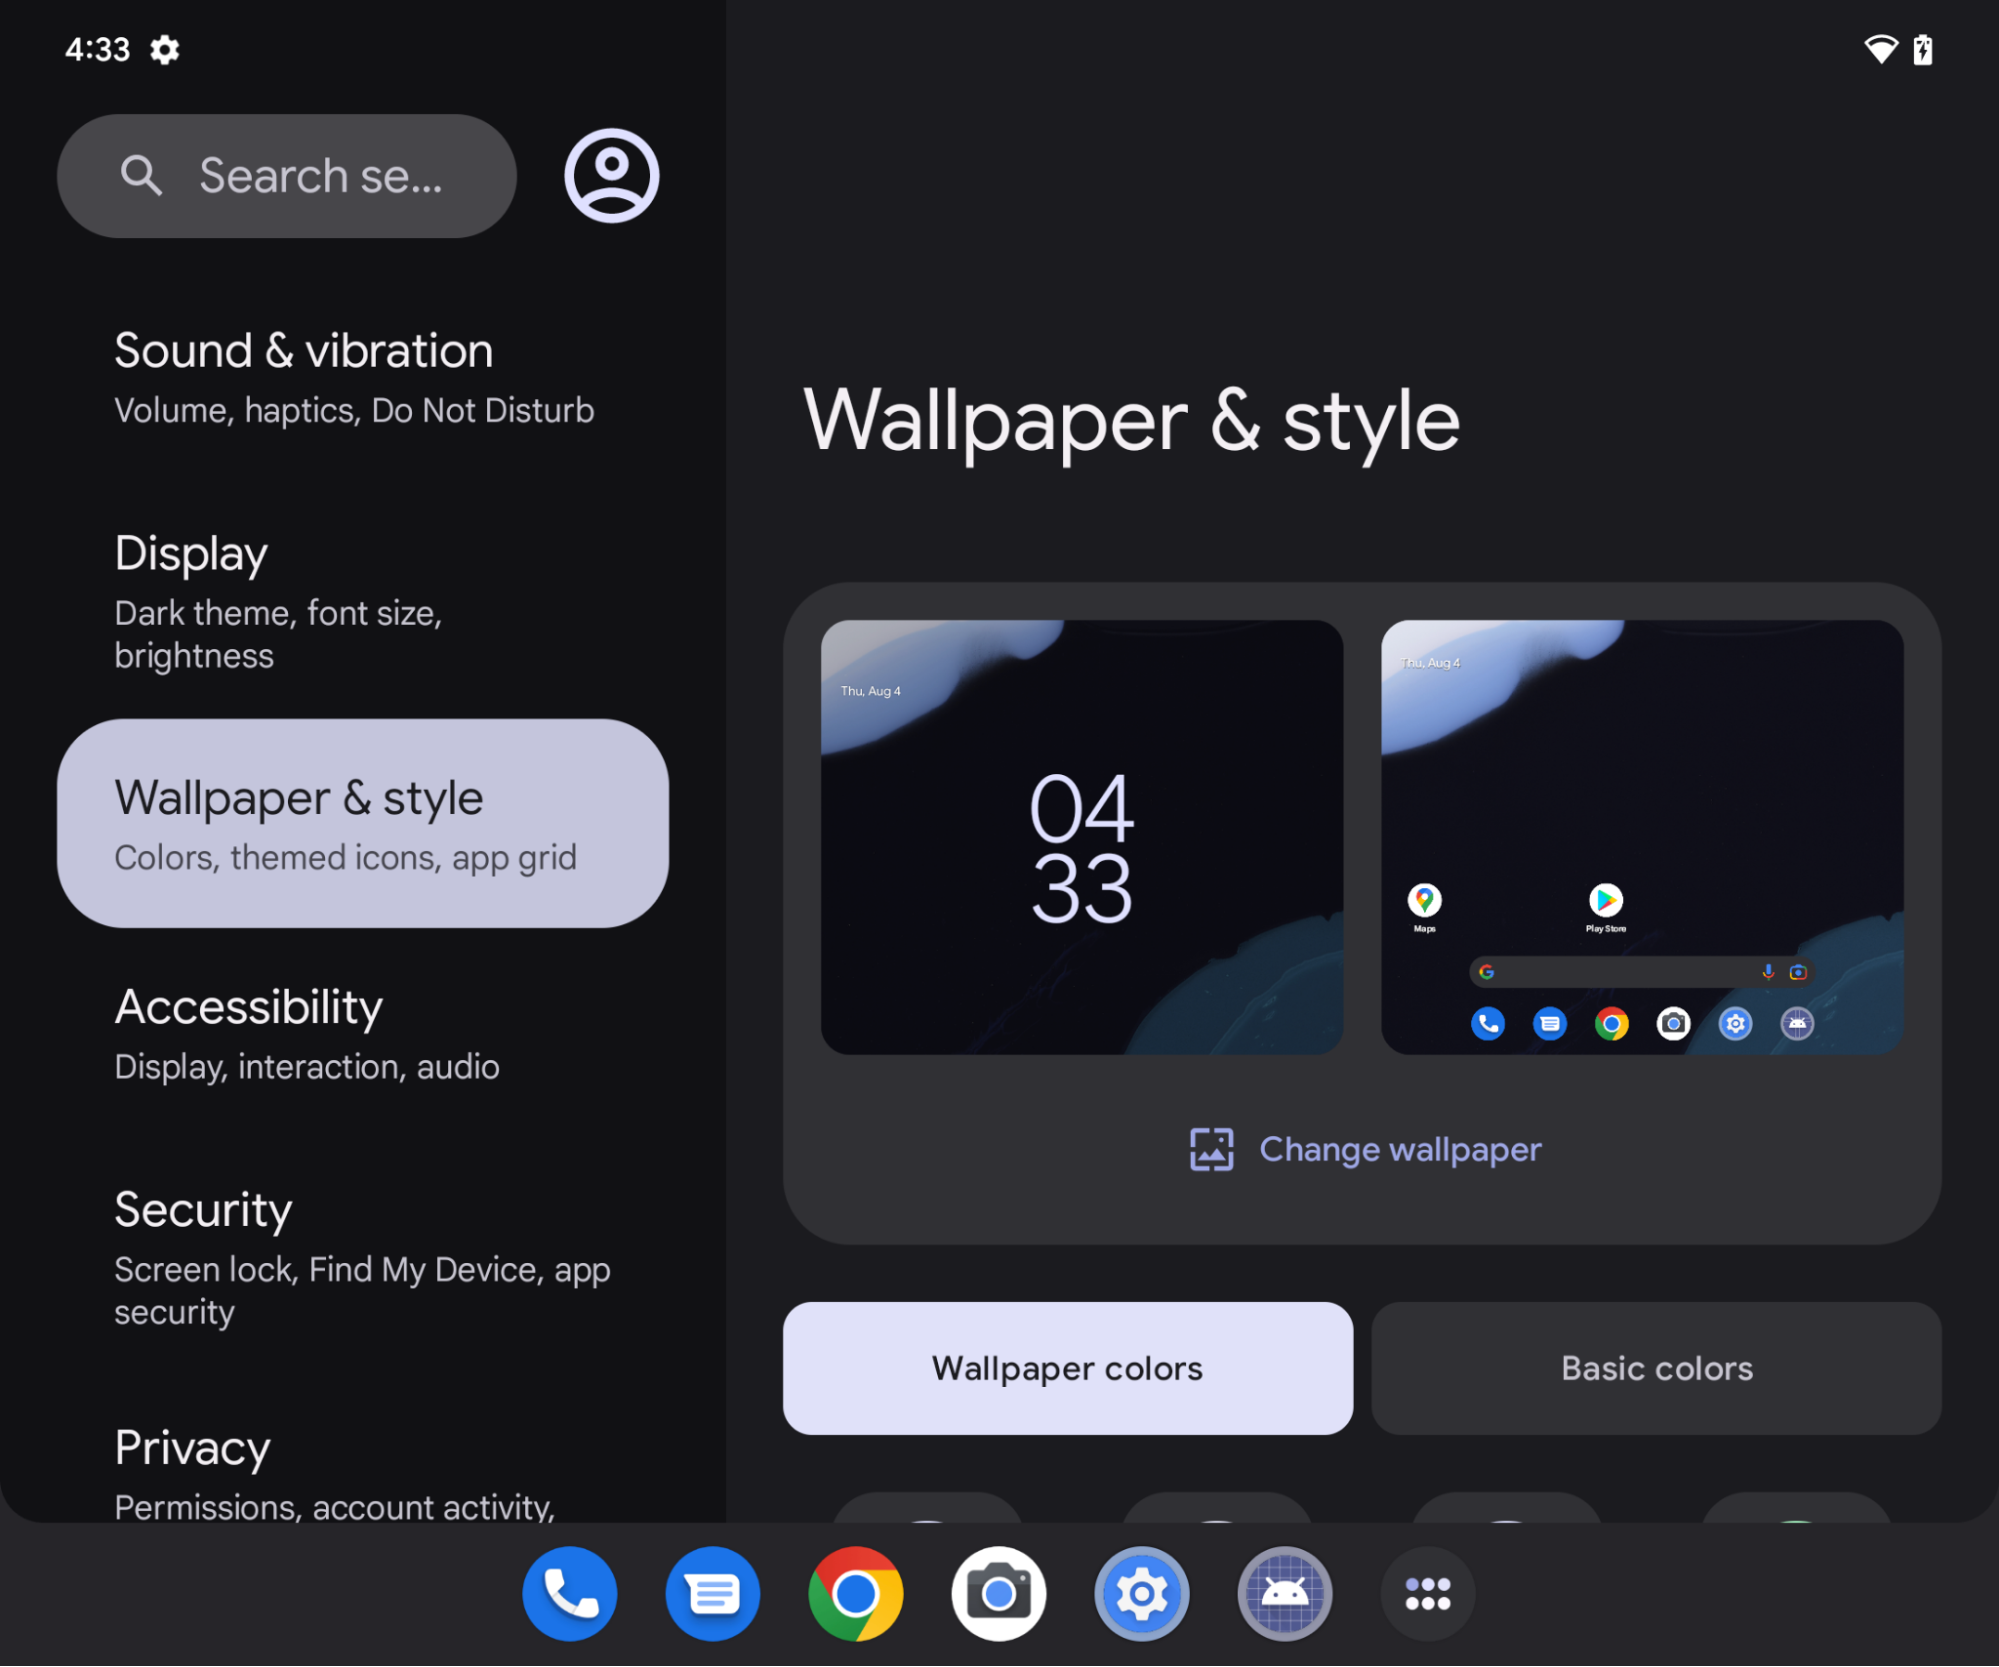
Рис. 14. Приложение «Настройки» (меню слева) со встроенным средством выбора обоев (справа).

Модель доверия

Хост-процессы, встраивающие действия из других приложений, могут переопределить представление внедренных действий, включая размер, положение, обрезку и прозрачность. Вредоносные хосты могут использовать эту возможность, чтобы ввести пользователей в заблуждение и организовать кликджекинг или другие атаки, направленные на исправление пользовательского интерфейса.

Чтобы предотвратить неправомерное использование встраивания действий между приложениями, Android требует, чтобы приложения разрешили встраивание своих действий. Приложения могут обозначать хосты как доверенные или ненадежные.

Доверенные хосты

Чтобы другие приложения могли внедрять и полностью контролировать представление действий из вашего приложения, укажите сертификат SHA-256 ведущего приложения в атрибуте android:knownActivityEmbeddingCerts элементов <activity> или <application> файла манифеста вашего приложения.

Установите значение android:knownActivityEmbeddingCerts в виде строки:

<activity
    android:name=".MyEmbeddableActivity"
    android:knownActivityEmbeddingCerts="@string/known_host_certificate_digest"
    ... />

или, чтобы указать несколько сертификатов, массив строк:

<activity
    android:name=".MyEmbeddableActivity"
    android:knownActivityEmbeddingCerts="@array/known_host_certificate_digests"
    ... />

который ссылается на такой ресурс:

<resources>
    <string-array name="known_host_certificate_digests">
      <item>cert1</item>
      <item>cert2</item>
      ...
    </string-array>
</resources>

Владельцы приложений могут получить дайджест сертификата SHA, запустив задачу Gradle signingReport . Дайджест сертификата представляет собой отпечаток SHA-256 без разделительных двоеточий. Дополнительные сведения см. в разделах «Запуск отчета о подписи» и «Аутентификация клиента» .

Ненадежные хосты

Чтобы разрешить любому приложению встраивать действия вашего приложения и управлять их представлением, укажите атрибут android:allowUntrustedActivityEmbedding в элементах <activity> или <application> манифеста приложения, например:

<activity
    android:name=".MyEmbeddableActivity"
    android:allowUntrustedActivityEmbedding="true"
    ... />

Значением атрибута по умолчанию является false, что предотвращает внедрение активности между приложениями.

Пользовательская аутентификация

Чтобы снизить риски внедрения ненадежных действий, создайте собственный механизм аутентификации, который проверяет личность хоста. Если вы знаете сертификаты хоста, используйте библиотеку androidx.security.app.authenticator для аутентификации. Если хост проходит аутентификацию после внедрения вашей активности, вы можете отобразить фактический контент. Если нет, вы можете сообщить пользователю, что действие не разрешено, и заблокировать контент.

Используйте метод ActivityEmbeddingController#isActivityEmbedded() из библиотеки Jetpack WindowManager, чтобы проверить, внедряет ли хост вашу активность, например:

Котлин

fun isActivityEmbedded(activity: Activity): Boolean {
    return ActivityEmbeddingController.getInstance(this).isActivityEmbedded(activity)
}

Ява

boolean isActivityEmbedded(Activity activity) {
    return ActivityEmbeddingController.getInstance(this).isActivityEmbedded(activity);
}

Ограничение минимального размера

Система Android применяет минимальную высоту и ширину, указанные в элементе <layout> манифеста приложения, ко внедренным действиям. Если приложение не указывает минимальную высоту и ширину, применяются системные значения по умолчанию ( sw220dp ).

Если хост пытается изменить размер встроенного контейнера до размера меньше минимального, встроенный контейнер расширяется, занимая все границы задачи.

<псевдоним активности>

Чтобы внедрение доверенных или ненадежных действий работало с элементом <activity-alias> , к целевому действию, а не к псевдониму, необходимо применить android:knownActivityEmbeddingCerts или android:allowUntrustedActivityEmbedding . Политика, проверяющая безопасность на системном сервере, основана на флагах, установленных на цели, а не на псевдониме.

Хост-приложение

Хост-приложения реализуют встраивание действий между приложениями так же, как они реализуют встраивание действий в одном приложении. Объекты SplitPairRule и SplitPairFilter или ActivityRule и ActivityFilter определяют встроенные действия и разделения окон задач. Правила разделения определяются статически в XML или во время выполнения с использованием вызовов API Jetpack WindowManager.

Если ведущее приложение пытается внедрить действие, которое не включило встраивание между приложениями, действие занимает все границы задачи. В результате хост-приложения должны знать, допускают ли целевые действия встраивание между приложениями.

Если встроенное действие запускает новое действие в той же задаче, и новое действие не включило встраивание между приложениями, действие занимает все границы задачи, а не накладывает действие во внедренном контейнере.

Хост-приложение может без ограничений встраивать свои собственные действия при условии, что действия запускаются в одной и той же задаче.

Примеры разделения

Разделить из всего окна

Рисунок 15. Действие A запускает действие B в стороне.

Рефакторинг не требуется. Вы можете определить конфигурацию разделения статически или во время выполнения, а затем вызвать Context#startActivity() без каких-либо дополнительных параметров.

<SplitPairRule>
    <SplitPairFilter
        window:primaryActivityName=".A"
        window:secondaryActivityName=".B"/>
</SplitPairRule>

Разделить по умолчанию

Когда целевая страница приложения спроектирована так, чтобы ее можно было разделить на два контейнера на больших экранах, пользовательский опыт будет лучше, когда оба действия создаются и отображаются одновременно. Однако контент может быть недоступен для вторичного контейнера разделения до тех пор, пока пользователь не взаимодействует с действием в основном контейнере (например, пользователь не выбирает элемент в меню навигации). Действие-заполнитель может заполнять пустоту до тех пор, пока содержимое не будет отображаться во вторичном контейнере разделения (см. раздел «Заполнители» ).

Рисунок 16. Разделение, созданное путем одновременного открытия двух действий. Одно действие — заполнитель.

Чтобы создать разделение с заполнителем, создайте заполнитель и свяжите его с основным действием:

<SplitPlaceholderRule
    window:placeholderActivityName=".PlaceholderActivity">
    <ActivityFilter
        window:activityName=".MainActivity"/>
</SplitPlaceholderRule>

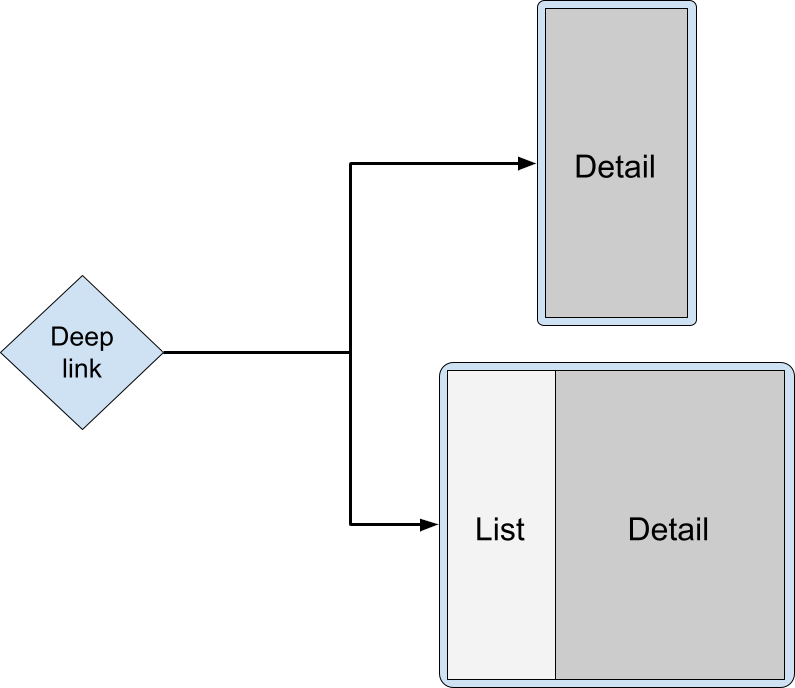
Когда приложение получает намерение, целевое действие может отображаться как второстепенная часть разделения действий; например, запрос на показ подробного экрана с информацией об элементе из списка. На небольших дисплеях подробные сведения отображаются в полном окне задачи; на больших устройствах рядом со списком.

Рисунок 17. Подробная информация о ссылках на контент отображается отдельно на маленьком экране, но вместе с активностью списка на большом экране.

Запрос на запуск должен быть перенаправлен на основное действие, а целевое подробное действие должно запускаться в виде разделения. Система автоматически выбирает правильную презентацию — стопку или рядом — в зависимости от доступной ширины дисплея.

Котлин

override fun onCreate(savedInstanceState Bundle?) {
    . . .
    RuleController.getInstance(this)
        .addRule(SplitPairRule.Builder(filterSet).build())
    startActivity(Intent(this, DetailActivity::class.java))
}

Ява

@Override
protected void onCreate(@Nullable Bundle savedInstanceState) {
    . . .
    RuleController.getInstance(this)
        .addRule(new SplitPairRule.Builder(filterSet).build());
    startActivity(new Intent(this, DetailActivity.class));
}

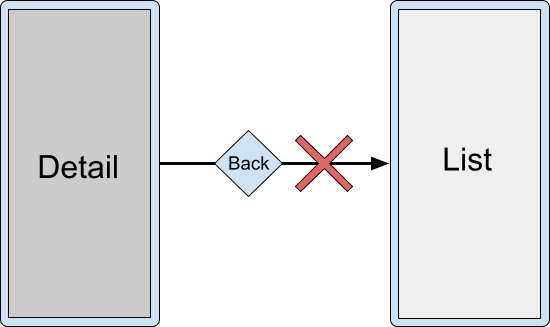
Назначение глубокой ссылки может быть единственным действием, которое должно быть доступно пользователю в стеке обратной навигации, и вы можете не захотеть отклонять подробное действие и оставлять только основное действие:

Большой дисплей со списком действий и подробными сведениями рядом.           Обратная навигация не позволяет закрыть подробную информацию и покинуть список.           активность на экране.

Маленький дисплей, отображающий только детализацию. Обратная навигация невозможна           отклонить подробную активность и раскрыть активность списка.

Вместо этого вы можете завершить оба действия одновременно, используя атрибут finishPrimaryWithSecondary :

<SplitPairRule
    window:finishPrimaryWithSecondary="always">
    <SplitPairFilter
        window:primaryActivityName=".ListActivity"
        window:secondaryActivityName=".DetailActivity"/>
</SplitPairRule>

См. раздел Атрибуты конфигурации .

Несколько действий в разделенных контейнерах

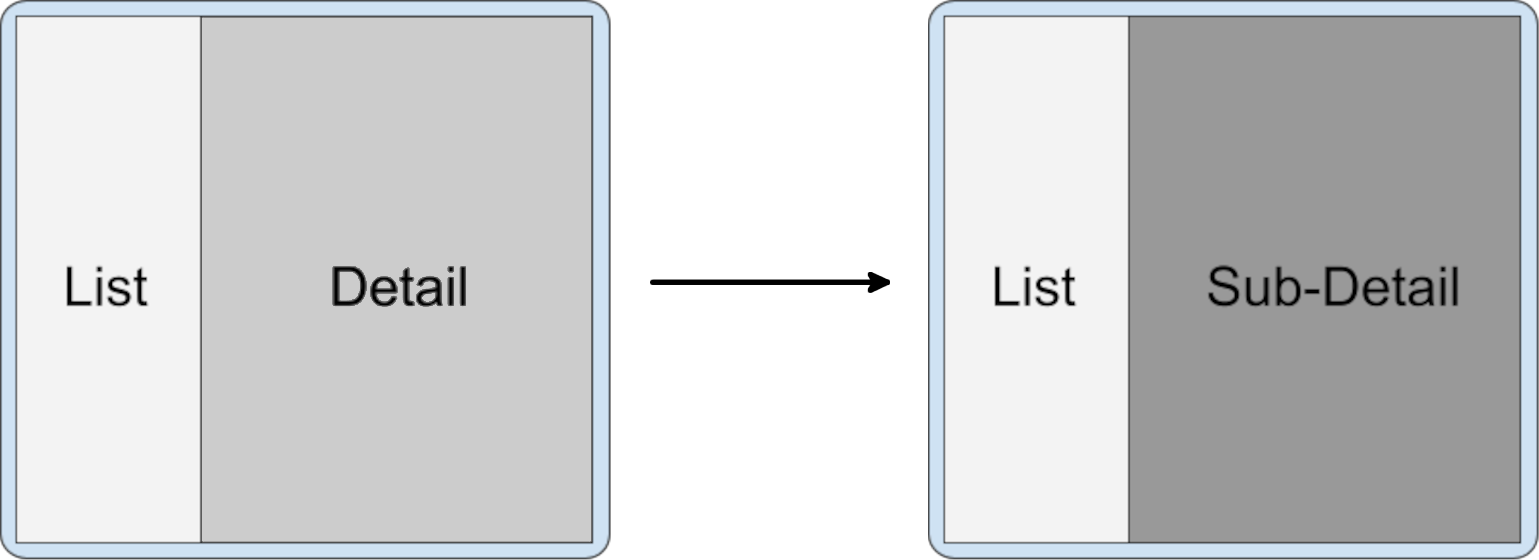
Объединение нескольких действий в разделенный контейнер позволяет пользователям получать доступ к более глубокому контенту. Например, при разделении списка на детали пользователю может потребоваться перейти в раздел с подробными сведениями, но оставить основное действие на месте:

Рисунок 18. Действие открыто на вторичной панели окна задачи.

Котлин

class DetailActivity {
    . . .
    fun onOpenSubDetail() {
      startActivity(Intent(this, SubDetailActivity::class.java))
    }
}

Ява

public class DetailActivity {
    . . .
    void onOpenSubDetail() {
        startActivity(new Intent(this, SubDetailActivity.class));
    }
}

Второстепенное действие размещается поверх подробного действия, скрывая его:

Затем пользователь может вернуться на предыдущий уровень детализации, пройдя обратно по стеку:

Рисунок 19. Действие удалено из вершины стека.

Наложение действий друг на друга — это поведение по умолчанию, когда действия запускаются из действия в одном и том же вторичном контейнере. Действия, запущенные из основного контейнера в активном разделении, также попадают во вторичный контейнер на вершине стека действий.

Действия в новой задаче

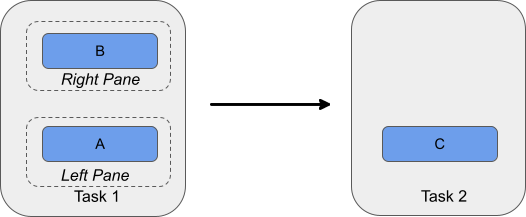
Когда действия в разделенном окне задачи начинают действия в новой задаче, новая задача отделяется от задачи, включающей разделение, и отображается в полноэкранном режиме. На экране «Последние» отображаются две задачи: задача в сплите и новая задача.

Рисунок 20. Запустите действие C в новой задаче из действия B.

Замена активности

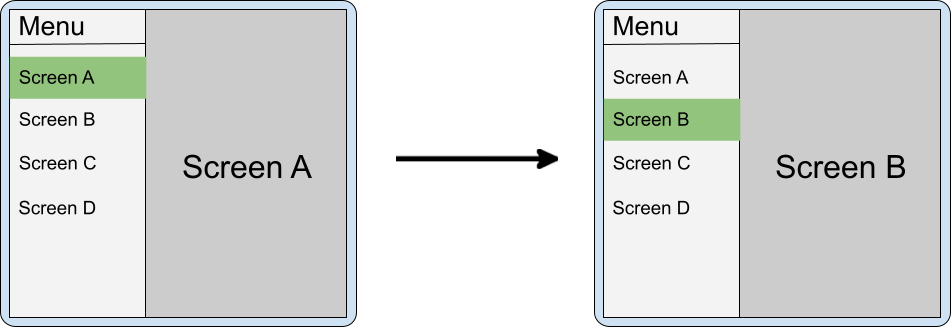
Действия можно заменить в стеке вторичного контейнера; например, когда основное действие используется для навигации верхнего уровня, а вторичное действие — выбранный пункт назначения. Каждый выбор в навигации верхнего уровня должен запускать новое действие во вторичном контейнере и удалять действие или действия, которые там находились ранее.

Рис. 21. Действия навигации верхнего уровня на основной панели заменяют действия назначения на вторичной панели.

Если приложение не завершает действие во вторичном контейнере при изменении выбора навигации, обратная навигация может сбивать с толку, когда разделение свернуто (когда устройство сложено). Например, если у вас есть меню на основной панели, а экраны A и B расположены на дополнительной панели, когда пользователь складывает телефон, B оказывается поверх A, а A — над меню. Когда пользователь возвращается из B, вместо меню появляется A.

В таких случаях экран A необходимо удалить из задней стопки.

Поведение по умолчанию при запуске в сторону нового контейнера поверх существующего разделения — размещение новых вторичных контейнеров сверху и сохранение старых в заднем стеке. Вы можете настроить разделения для очистки предыдущих вторичных контейнеров с помощью clearTop и нормального запуска новых действий.

<SplitPairRule
    window:clearTop="true">
    <SplitPairFilter
        window:primaryActivityName=".Menu"
        window:secondaryActivityName=".ScreenA"/>
    <SplitPairFilter
        window:primaryActivityName=".Menu"
        window:secondaryActivityName=".ScreenB"/>
</SplitPairRule>

Котлин

class MenuActivity {
    . . .
    fun onMenuItemSelected(selectedMenuItem: Int) {
        startActivity(Intent(this, classForItem(selectedMenuItem)))
    }
}

Ява

public class MenuActivity {
    . . .
    void onMenuItemSelected(int selectedMenuItem) {
        startActivity(new Intent(this, classForItem(selectedMenuItem)));
    }
}

Альтернативно можно использовать то же вторичное действие и из основного действия (меню) отправлять новые намерения, которые разрешаются для того же экземпляра, но вызывают обновление состояния или пользовательского интерфейса во вторичном контейнере.

Множественные разделения

Приложения могут обеспечивать многоуровневую глубокую навигацию, запуская дополнительные действия в стороне.

Когда действие во вторичном контейнере запускает новое действие в стороне, новое разделение создается поверх существующего разделения.

Рисунок 22. Действие B запускает действие C в стороне.

Задний стек содержит все действия, которые были открыты ранее, поэтому пользователи могут перейти к разделению A/B после завершения C.

Действия A, B и C в стопке. Действия сгруппированы в           в следующем порядке сверху вниз: C, B, A.

Чтобы создать новое разделение, запустите новое действие в сторону от существующего вторичного контейнера. Объявите конфигурации как для A/B, так и B/C, и запуска активность C обычно от B:

<SplitPairRule>
    <SplitPairFilter
        window:primaryActivityName=".A"
        window:secondaryActivityName=".B"/>
    <SplitPairFilter
        window:primaryActivityName=".B"
        window:secondaryActivityName=".C"/>
</SplitPairRule>

Котлин

class B {
    . . .
    fun onOpenC() {
        startActivity(Intent(this, C::class.java))
    }
}

Ява

public class B {
    . . .
    void onOpenC() {
        startActivity(new Intent(this, C.class));
    }
}

Отреагировать на изменения расщепления состояния

Различные действия в приложении могут иметь элементы пользовательского интерфейса, которые выполняют одну и ту же функцию; Например, элемент управления, который открывает окно, содержащее настройки учетной записи.

Рисунок 23. Различные действия с функционально идентичными элементами пользовательского интерфейса.

Если два действия, которые имеют общий элемент пользовательского интерфейса, находятся в расколе, это избыточно и, возможно, сбивает с толку, чтобы показать элемент в обеих действиях.

Рисунок 24. Дублируйте элементы пользовательского интерфейса в разделении активности.

Чтобы узнать, когда действия находятся в разделении, проверьте SplitController.splitInfoList Flow или зарегистрируйте слушателя с помощью SplitControllerCallbackAdapter для изменений в разделенном состоянии. Затем соответствующим образом отрегулируйте пользовательский интерфейс:

Котлин

val layout = layoutInflater.inflate(R.layout.activity_main, null)
val view = layout.findViewById<View>(R.id.infoButton)
lifecycleScope.launch {
    lifecycle.repeatOnLifecycle(Lifecycle.State.STARTED) {
        splitController.splitInfoList(this@SplitDeviceActivity) // The activity instance.
            .collect { list ->
                view.visibility = if (list.isEmpty()) View.VISIBLE else View.GONE
            }
    }
}

Ява

@Override
protected void onCreate(@Nullable Bundle savedInstanceState) {
    . . .
    new SplitControllerCallbackAdapter(SplitController.getInstance(this))
        .addSplitListener(
            this,
            Runnable::run,
            splitInfoList -> {
                View layout = getLayoutInflater().inflate(R.layout.activity_main, null);
                layout.findViewById(R.id.infoButton).setVisibility(
                    splitInfoList.isEmpty() ? View.VISIBLE : View.GONE);
            });
}

Кораки могут быть запущены в любом состоянии жизненного цикла, но обычно выпускаются в STARTED штата для сохранения ресурсов ( используйте коратики Kotlin с компонентами LifeCycle, для получения дополнительной информации).

Обратные вызовы могут быть сделаны в любом состоянии жизненного цикла, в том числе при прекращении деятельности. Слушатели обычно должны быть зарегистрированы в onStart() и незарегистрированы в onStop() .

Полный модал

Некоторые действия блокируют пользователей от взаимодействия с приложением до тех пор, пока не будет выполнено указанное действие; Например, активность экрана входа, экран подтверждения политики или сообщение об ошибке. Модальные действия должны быть предотвращены в расколе.

Заявление может быть вынуждено всегда заполнять окно задачи, используя конфигурацию Expand:

<ActivityRule
    window:alwaysExpand="true">
    <ActivityFilter
        window:activityName=".FullWidthActivity"/>
</ActivityRule>

Закончить занятия

Пользователи могут закончить действия по обе стороны от разделения, пройдя с края дисплея:

Рис.
Рисунок 26. Действительную деятельность по отделке жеста А.

Если устройство настроено для использования кнопки «Назад» вместо навигации по жестам, вход отправляется в целенаправленную деятельность - действие, которое было касается или запущено в последнее время.

Эффект, который завершает все действия в контейнере на противоположный контейнер, зависит от конфигурации разделения.

Атрибуты конфигурации

Вы можете указать атрибуты правил сплит -пары, чтобы настроить, как завершение всех действий на одной стороне разделения влияет на действия на другой стороне разделения. Атрибуты:

  • window:finishPrimaryWithSecondary - как завершение всех действий во вторичном контейнере влияет на действия в основном контейнере
  • window:finishSecondaryWithPrimary - как завершение всех действий в основном контейнере влияет на действия во вторичном контейнере

Возможные значения атрибутов включают:

  • always - всегда заканчивайте действия в связанном контейнере
  • never - никогда не заканчивайте действия в связанном контейнере
  • adjacent - закончить действия в связанном контейнере, когда два контейнера отображаются рядом друг с другом, но не когда два контейнера укладываются

Например:

<SplitPairRule
    &lt;!-- Do not finish primary container activities when all secondary container activities finish. --&gt;
    window:finishPrimaryWithSecondary="never"
    &lt;!-- Finish secondary container activities when all primary container activities finish. --&gt;
    window:finishSecondaryWithPrimary="always">
    <SplitPairFilter
        window:primaryActivityName=".A"
        window:secondaryActivityName=".B"/>
</SplitPairRule>

Конфигурация по умолчанию

Когда все действия в одном контейнере с разделенной отделкой, оставшийся контейнер занимает все окно:

<SplitPairRule>
    <SplitPairFilter
        window:primaryActivityName=".A"
        window:secondaryActivityName=".B"/>
</SplitPairRule>

Разделение, содержащее действия a и b. a закончено, оставляя B до           Занимайте все окно.

Разделение, содержащее действия A и B. B           Занимайте все окно.

Закончить занятия вместе

Завершите действия в основном контейнере автоматически, когда все действия в вторичном контейнере завершают:

<SplitPairRule
    window:finishPrimaryWithSecondary="always">
    <SplitPairFilter
        window:primaryActivityName=".A"
        window:secondaryActivityName=".B"/>
</SplitPairRule>

Разделение, содержащие действия A и B. B закончено, что также           Заканчивает А, оставляя окно задачи пустым.

Разделение, содержащее действия a и b. a закончено, оставляя B в покое           в окне задачи.

Завершите действия в вторичном контейнере автоматически, когда все действия в первичном контейнере завершают:

<SplitPairRule
    window:finishSecondaryWithPrimary="always">
    <SplitPairFilter
        window:primaryActivityName=".A"
        window:secondaryActivityName=".B"/>
</SplitPairRule>

Разделение, содержащие действия A и B. A закончено, что также           Заканчивает B, оставляя окно задачи пустым.

Разделение, содержащее действия A и B. B закончено, оставляя в одиночестве           в окне задачи.

Завершите занятия вместе, когда все виды деятельности в первичной или вторичной контейнере отделка:

<SplitPairRule
    window:finishPrimaryWithSecondary="always"
    window:finishSecondaryWithPrimary="always">
    <SplitPairFilter
        window:primaryActivityName=".A"
        window:secondaryActivityName=".B"/>
</SplitPairRule>

Разделение, содержащие действия A и B. A закончено, что также           Заканчивает B, оставляя окно задачи пустым.

Разделение, содержащие действия A и B. B закончено, что также           Заканчивает А, оставляя окно задачи пустым.

Завершить несколько мероприятий в контейнерах

Если несколько действий находятся в разделенном контейнере, завершение деятельности в нижней части стека не автоматически завершает действия сверху.

Например, если два действия находятся во вторичном контейнере, C на вершине B:

Стек вторичной активности, содержащий активность C, сложенная поверх B           сложен в верхней части стека активности PRMary, содержащей активность           А.

и конфигурация разделения определяется конфигурацией действий A и B:

<SplitPairRule>
    <SplitPairFilter
        window:primaryActivityName=".A"
        window:secondaryActivityName=".B"/>
</SplitPairRule>

Завершение верхней активности сохраняет раскол.

Разделить с активностью A в первичном контейнере и действиях B и C в           второстепенный, C сложен на вершине B. C, оставляя A и B в           активность разделен.

Завершение нижней (корневой) активности вторичного контейнера не удаляет действия сверху; И так также сохраняет раскол.

Разделить с активностью A в первичном контейнере и действиях B и C в           второстепенное, C, сложенное на вершине B. B, оставляя A и C в           активность разделен.

Любые дополнительные правила для завершения действий вместе, такие как завершение вторичной деятельности с первичной, также выполняются:

<SplitPairRule
    window:finishSecondaryWithPrimary="always">
    <SplitPairFilter
        window:primaryActivityName=".A"
        window:secondaryActivityName=".B"/>
</SplitPairRule>

Разделить с активностью A в первичном контейнере и действиях B и C в           Вторичный контейнер, C, сложенное на вершине B. также отделка, также           Отделка B и C.

И когда разделение настроено, чтобы закончить первичную и вторичную вместе:

<SplitPairRule
    window:finishPrimaryWithSecondary="always"
    window:finishSecondaryWithPrimary="always">
    <SplitPairFilter
        window:primaryActivityName=".A"
        window:secondaryActivityName=".B"/>
</SplitPairRule>

Разделить с активностью A в первичном контейнере и действиях B и C в           второстепенный, C сложен на вершине B. C, оставляя A и B в           активность разделен.

Разделить с активностью A в первичном контейнере и действиях B и C в           второстепенное, C, сложенное на вершине B. B, оставляя A и C в           активность разделен.

Разделить с активностью A в первичном контейнере и действиях B и C в           вторичный, C, сложен на вершине B. a финиша, также заканчивая B и           С.

Изменить разделенные свойства во время выполнения

Свойства активного и видимого разделения нельзя изменить. Изменение правил разделения влияет на дополнительные запуска активности и новые контейнеры, но не существующие и активные разделения.

Чтобы изменить свойства активных расщеплений, закончить боковую деятельность или действия в разделении и снова запустить в сторону с новой конфигурацией.

Динамические расколы

Android 15 (уровень API 35) и более высокий поддерживается JetPack Windowmanager 1.4 и более высокими динамическими функциями, которые обеспечивают конфигурируемость встраивания активности, в том числе:

  • Расширение панели: интерактивное, перетаскиваемое разделитель позволяет пользователям изменять размер панели в разделенной презентации.
  • Пиннинг стека активности: Пользователи могут закреплять контент в одном контейнере и изолировать навигацию в контейнере из навигации в другом контейнере.
  • Dialog Полнократный DIM: при отображении диалога приложения могут указать, следует ли размогать все окно задачи или просто контейнер, который открыл диалог.

Расширение панели

Расширение панели позволяет пользователям настраивать объем пространства экрана, выделяемого для двух действий в двухпроходной макете.

Чтобы настроить внешний вид оконного разделителя и установить диапазон перетаскивания делителя, сделайте следующее:

  1. Создайте экземпляр DividerAttributes

  2. Настройте атрибуты разделителя:

    • color : Цвет перетаскиваемого панели сепаратора.

    • widthDp : ширина перетаскиваемого сепаратора панели. Установите на WIDTH_SYSTEM_DEFAULT , чтобы система определить ширину разделителя.

    • Диапазон перетаскивания: минимальный процент экрана, которую может занять любая панель. Может варьироваться от 0,33 до 0,66. Установите в DRAG_RANGE_SYSTEM_DEFAULT , чтобы система определить диапазон перетаскивания.

Котлин

val splitAttributesBuilder: SplitAttributes.Builder = SplitAttributes.Builder()
    .setSplitType(SplitAttributes.SplitType.ratio(0.33f))
    .setLayoutDirection(SplitAttributes.LayoutDirection.LEFT_TO_RIGHT)

if (WindowSdkExtensions.getInstance().extensionVersion >= 6) {
    splitAttributesBuilder.setDividerAttributes(
      DividerAttributes.DraggableDividerAttributes.Builder()
        .setColor(getColor(context, R.color.divider_color))
        .setWidthDp(4)
        .setDragRange(DividerAttributes.DragRange.DRAG_RANGE_SYSTEM_DEFAULT)
        .build()
    )
}
val splitAttributes: SplitAttributes = splitAttributesBuilder.build()

Ява

SplitAttributes.Builder splitAttributesBuilder = new SplitAttributes.Builder()
    .setSplitType(SplitAttributes.SplitType.ratio(0.33f))
    .setLayoutDirection(SplitAttributes.LayoutDirection.LEFT_TO_RIGHT);

if (WindowSdkExtensions.getInstance().getExtensionVersion() >= 6) {
    splitAttributesBuilder.setDividerAttributes(
      new DividerAttributes.DraggableDividerAttributes.Builder()
        .setColor(ContextCompat.getColor(context, R.color.divider_color))
        .setWidthDp(4)
        .setDragRange(DividerAttributes.DragRange.DRAG_RANGE_SYSTEM_DEFAULT)
        .build()
    );
}
SplitAttributes splitAttributes = splitAttributesBuilder.build();

Стек -закрепление

Пиннинг стека активности позволяет пользователям прикреплять одно из разделенных окон, поэтому активность оставалась так, как есть, в то время как пользователи перемещаются в другом окне. Пиннинг стека активности обеспечивает улучшенный многозадачный опыт.

Чтобы включить закрепление стека активности в вашем приложении, сделайте следующее:

  1. Добавьте кнопку в файл макета деятельности, который вы хотите прикрепить, например, подробную деятельность макета списка - Detail:

    <androidx.constraintlayout.widget.ConstraintLayout
     xmlns:android="http://schemas.android.com/apk/res/android"
     xmlns:app="http://schemas.android.com/apk/res-auto"
     xmlns:tools="http://schemas.android.com/tools"
     android:id="@+id/detailActivity"
     android:layout_width="match_parent"
     android:layout_height="match_parent"
     android:background="@color/white"
     tools:context=".DetailActivity">
    
    <TextView
       android:id="@+id/textViewItemDetail"
       android:layout_width="wrap_content"
       android:layout_height="wrap_content"
       android:textSize="36sp"
       android:textColor="@color/obsidian"
       app:layout_constraintBottom_toTopOf="@id/pinButton"
       app:layout_constraintEnd_toEndOf="parent"
       app:layout_constraintStart_toStartOf="parent"
       app:layout_constraintTop_toTopOf="parent" />
    
    <androidx.appcompat.widget.AppCompatButton
       android:id="@+id/pinButton"
       android:layout_width="wrap_content"
       android:layout_height="wrap_content"
       android:text="@string/pin_this_activity"
       app:layout_constraintBottom_toBottomOf="parent"
       app:layout_constraintEnd_toEndOf="parent"
       app:layout_constraintStart_toStartOf="parent"
       app:layout_constraintTop_toBottomOf="@id/textViewItemDetail"/>
    
    </androidx.constraintlayout.widget.ConstraintLayout>
    
  2. В методе onCreate() деятельности установите на кнопку Onclick Slieder:

    Котлин

    pinButton = findViewById(R.id.pinButton)
    pinButton.setOnClickListener {
        val splitAttributes: SplitAttributes = SplitAttributes.Builder()
            .setSplitType(SplitAttributes.SplitType.ratio(0.66f))
            .setLayoutDirection(SplitAttributes.LayoutDirection.LEFT_TO_RIGHT)
            .build()
    
        val pinSplitRule = SplitPinRule.Builder()
            .setSticky(true)
            .setDefaultSplitAttributes(splitAttributes)
            .build()
    
        SplitController.getInstance(applicationContext).pinTopActivityStack(taskId, pinSplitRule)
    }

    Ява

    Button pinButton = findViewById(R.id.pinButton);
    pinButton.setOnClickListener( (view) => {
        SplitAttributes splitAttributes = new SplitAttributes.Builder()
            .setSplitType(SplitAttributes.SplitType.ratio(0.66f))
            .setLayoutDirection(SplitAttributes.LayoutDirection.LEFT_TO_RIGHT)
            .build();
    
        SplitPinRule pinSplitRule = new SplitPinRule.Builder()
            .setSticky(true)
            .setDefaultSplitAttributes(splitAttributes)
            .build();
    
        SplitController.getInstance(getApplicationContext()).pinTopActivityStack(getTaskId(), pinSplitRule);
    });

Диалог полноэкранной

Действия, как правило, смягчают их дисплеи, чтобы привлечь внимание к диалогу. При внедрении деятельности обе панели двухпространственного дисплея должны привести к тому, что не только панель, содержащая деятельность, которая открыла диалог, для единого опыта пользовательского интерфейса.

С WindowsManager 1.4 и выше, все окно приложения по умолчанию по умолчанию приведет к открытию диалога (см. EmbeddingConfiguration.DimAreaBehavior.ON_TASK ).

Чтобы смягчить только контейнер активности, который открыл диалог, используйте EmbeddingConfiguration.DimAreaBehavior.ON_ACTIVITY_STACK .

Извлеките деятельность из разделения в полное окно

Создайте новую конфигурацию, которая отображает полное окно Activity, а затем повторно запускает деятельность с намерением, которое разрешается в том же экземпляре.

Проверьте поддержку разделения во время выполнения

Внедрение деятельности поддерживается на Android 12L (API -уровне 32) и выше, но также доступно на некоторых устройствах, работающих более ранние версии платформы. Чтобы проверить во время выполнения для наличия функции, используйте свойство SplitController.splitSupportStatus или SplitController.getSplitSupportStatus() :

Котлин

if (SplitController.getInstance(this).splitSupportStatus ==
     SplitController.SplitSupportStatus.SPLIT_AVAILABLE) {
     // Device supports split activity features.
}

Ява

if (SplitController.getInstance(this).getSplitSupportStatus() ==
     SplitController.SplitSupportStatus.SPLIT_AVAILABLE) {
     // Device supports split activity features.
}

Если разрывы не поддерживаются, действия запускаются поверх стека действий (следуя модели внедрения неактивности).

Предотвратить переопределение системы

Производители устройств Android (производители оригинального оборудования или OEM) могут реализовать деятельность, внедряющие в зависимости от системы устройства. Система определяет разделенные правила для мультиактивных приложений, переопределяя окно-поведение приложений. Система переопределяет приложения многоактивности в системный режим встраивания активности.

Внедрение системной деятельности может улучшить презентацию приложений с помощью многопрофильных макетов, таких как Detail List , без каких-либо изменений в приложении. Тем не менее, встраивание активности системы может также привести к неправильным макетам приложений, ошибкам или конфликтам с внедрением деятельности, внедренной приложением.

Ваше приложение может предотвратить или разрешить внедрять активность системы, установив свойство в файле манифеста приложения, например:

<manifest xmlns:android="http://schemas.android.com/apk/res/android">
    <application>
        <property
            android:name="android.window.PROPERTY_ACTIVITY_EMBEDDING_ALLOW_SYSTEM_OVERRIDE"
            android:value="true|false" />
    </application>
</manifest>

Имя свойства определено в объекте JetPack Windowmanager WindowProperties . Установите значение false если ваше приложение реализует внедрение действий, или если вы хотите иначе предотвратить применение системы внедрения своей деятельности в ваше приложение. Установите значение true , чтобы позволить системе применять системную деятельность, встраивая в ваше приложение.

Ограничения, ограничения и предостережения

  • Только приложение хоста задачи, которое идентифицируется как владелец корневой деятельности в задаче, может организовать и внедрять другие действия в задачу. Если действия, которые поддерживают встраивание и разделение, выполняются в задаче, которая принадлежит к другому применению, то встраивание и разделения не будут работать для этих действий.
  • Действия могут быть организованы только в течение одной задачи. Запуск деятельности в новой задаче всегда ставит его в новое расширенное окно за пределами каких -либо существующих расколов.
  • Только действия в том же процессе могут быть организованы и поместить в раскол. Обратный вызов SplitInfo сообщает только о действиях, которые принадлежат к одному и тому же процессу, поскольку нет способа узнать о действиях в разных процессах.
  • Каждая пара или правило единственной активности применяется только к запуску активности, которые происходят после зарегистрированного правила. В настоящее время нет способа обновлять существующие разделы или их визуальные свойства.
  • Конфигурация Filter Split Pare должна соответствовать намерениям, используемым при полном запуска действий. Соответствие происходит в точке, когда новое действие начинается с процесса применения, поэтому он может не знать об именах компонентов, которые разрешены позже в системном процессе при использовании неявных намерений. Если имя компонента не известно во время запуска, вместо этого можно использовать подстановку ("*/*"), и фильтрация может быть выполнена на основе действия намерения.
  • В настоящее время нет способа перемещать деятельность между контейнерами или в и выходе из расщепления после их создания. Разделы создаются только библиотекой Windowmanager только тогда, когда запущены новые действия с правилами соответствующих правил, а расколы разрушаются, когда завершено последнее действие в разделенном контейнере.
  • Действия могут быть перезабощены при изменении конфигурации, поэтому, когда создается или удаляется разделение и изменяется границы активности, деятельность может пройти полное разрушение предыдущего экземпляра и создание нового. В результате разработчики приложений должны быть осторожны с такими вещами, как запуск новых видов деятельности из обратных вызовов жизненного цикла.
  • Устройства должны включать интерфейс расширения окна для поддержки встраивания деятельности. Почти все большие экранные устройства, управляющие Android 12L (уровень 32) или выше, включают интерфейс. Тем не менее, некоторые большие экранные устройства, которые не способны выполнять несколько действий, не включают интерфейс расширения окна. Если устройство с большим экраном не поддерживает режим мульти-Window, оно может не поддерживать встраивание активности.

Дополнительные ресурсы

,

Внедрение активности оптимизирует приложения на больших экранных устройствах, разделяя окно задачи приложения между двумя или двумя экземплярами одной и той же деятельности.

Рисунок 1. Настройки приложения с действиями рядом.

Если ваше приложение состоит из нескольких действий, встраивание деятельности позволяет вам обеспечить улучшенный пользовательский опыт на планшетах, складных устройствах и устройствах Chromeos.

Внедрение деятельности не требует рефакторирования кода. Вы определяете, как ваше приложение отображает свою деятельность - рядом или накладывается, - создавая файл конфигурации XML или сделав вызовы jetpack windowmanager API.

Поддержка небольших экранов поддерживается автоматически. Когда ваше приложение находится на устройстве с небольшим экраном, действия сложены один на другом. На больших экранах действия отображаются рядом. Система определяет презентацию на основе созданной вами конфигурации - не требуется логика ветвления.

Внедрение деятельности приспосабливает изменение ориентации устройства и беспрепятственно работает на складываемых устройствах, складывании и упражнении, когда устройство складывается и разворачивается.

Внедрение активности поддерживается на большинстве больших экранов, использующих Android 12L (API -уровень 32) и выше.

Разделение окна задачи

Внедрение деятельности, встраивающее окно задачи приложения на два контейнера: первичный и вторичный. Контейнеры проводят мероприятия, запущенные из основной деятельности или других мероприятий, уже в контейнерах.

Мероприятия сложены во вторичном контейнере по мере их запуска, а вторичный контейнер сложен на вершине основного контейнера на небольших экранах, поэтому укладка активности и обратная навигация соответствуют упорядочению действий, уже встроенных в ваше приложение.

Внедрение деятельности позволяет отображать мероприятия различными способами. Ваше приложение может разделить окно задачи, одновременно запустив два действия бок о бок:

Рисунок 2. Два действия бок о бок.

Или, занятие, которое занимает все окно задачи, может создать разделение, запустив новое занятие вместе с:

Рисунок 3. Активность A Запускает активность B в сторону.

Действия, которые уже находятся в разделении и обмен окном задачи могут запустить другие действия следующими способами:

  • В сторону на вершине другого деятельности:

    Рисунок 4. Активность A начинает активность C в сторону над активностью B.
  • В сторону и переключите раскол в сторону, скрывая предыдущую первичную деятельность:

    Рисунок 5. Активность B начинает активность C в сторону и сдвигает расщепление в сторону.
  • Запустить деятельность на месте; то есть в том же стеке деятельности:

    Рисунок 6. Активность B начинает активность C без флагов дополнительных намерений.
  • Запустите полное окно деятельности в той же задаче:

    Рисунок 7. Активность A или действие B Запускает активность C, которая заполняет окно задачи.

Задняя навигация

Различные типы приложений могут иметь разные правила навигации в разделенном состоянии окна задачи в зависимости от зависимостей между действиями или как пользователи запускают событие обратного, например:

  • Собираясь вместе: если действия связаны, а один не должен показывать без другого, навигация на задней панели может быть настроена, чтобы завершить оба.
  • Переход в одиночку: если действия являются полностью независимыми, навигация на деятельность не влияет на состояние другого действия в окне задачи.

Задняя событие отправляется в последнюю сфокусированную деятельность при использовании навигации кнопки.

Для жестов навигации:

  • Android 14 (уровень API 34) и ниже - событие заднего хода отправляется на действие, где произошел жест. Когда пользователи проводят с левой стороны экрана, обратное событие отправляется на действие на левой панели с разделенным окном. Когда пользователи проводят с правой стороны экрана, обратное событие отправляется на действие на правой панели.

  • Android 15 (API -уровень 35) и выше

    • При работе с несколькими действиями из одного и того же приложения жест завершает высшую деятельность независимо от направления удара, обеспечивая более единый опыт.

    • В сценариях, включающих два вида деятельности из разных приложений (наложение), событие Back направлено на последнее действие в фокусе, соответствующее поведению навигации кнопок.

Многослойный макет

JetPack Windowmanager позволяет создавать активность, внедряющую многослойную компоновку на большие экранные устройства с Android 12L (API-уровень 32) или выше, а также на некоторых устройствах с более ранними версиями платформы. Существующие приложения, основанные на нескольких действиях, а не на фрагментах или макетах, основанных на представлениях, таких как SlidingPaneLayout могут обеспечить улучшенный пользовательский опыт работы с большим экраном без рефакторинга исходного кода.

Одним из распространенных примеров является разделение списка. Чтобы обеспечить высококачественную презентацию, система запускает деятельность списка, а затем приложение немедленно запускает подробную деятельность. Система перехода ждет, пока оба действия не будут нарисованы, а затем отображат их вместе. Для пользователя эти два действия запускаются как одно.

Рисунок 8. Два действия начались одновременно в многослойной планировке.

Разделенные атрибуты

Вы можете указать, как окно задачи пропорционаруется между разделенными контейнерами и тем, как контейнеры выкладываются относительно друг друга.

Для правил, определенных в файле конфигурации XML, установите следующие атрибуты:

  • splitRatio : устанавливает пропорции контейнера. Значение представляет собой номер плавающей запятой в открытом интервале (0,0, 1,0).
  • splitLayoutDirection : указывает, как разделились контейнеры по сравнению с ними. Значения включают:
    • ltr : слева направо
    • rtl : справа налево
    • locale : либо ltr , либо rtl определяется из настройки локализации

См. Раздел конфигурации XML для примеров.

Для правил, созданных с использованием API windowmanager, создайте объект SplitAttributes с SplitAttributes.Builder и вызовите следующие методы строителя:

  • setSplitType() : устанавливает пропорции разделенных контейнеров. См. SplitAttributes.SplitType для действительных аргументов, включая метод SplitAttributes.SplitType.ratio() .
  • setLayoutDirection() : устанавливает макет контейнеров. См. SplitAttributes.LayoutDirection для возможных значений.

Смотрите раздел API Windowmanager для примеров.

Рисунок 9. Два активности разбивают разбитые влево вправо, но с различными коэффициентами разделения.

Заполнители

Заполнительные мероприятия - это пустая вторичная деятельность, которая занимает область разделения деятельности. В конечном итоге они должны быть заменены другим занятием, которое содержит контент. Например, деятельность заполнителя может занять вторичную сторону действия, разделенной в макете, до тех пор, пока не будет выбран элемент из списка, после чего деятельность, содержащая подробную информацию для выбранного элемента списка, заменяет заполнителя.

По умолчанию система отображает заполнители только тогда, когда достаточно места для разделения деятельности. Заполнители автоматически заканчиваются, когда размер дисплея меняется на ширину или высоту слишком малой, чтобы отобразить разделение. Когда позволяет пространство, система перезапускает заполнителя с повторным состоянием.

Рисунок 10. Складываемое складное устройство и развертывание. Заполнительная деятельность завершена и воссоздана в качестве изменения размера дисплея.

Тем не менее, атрибут stickyPlaceholder метода SplitPlaceholderRule или setSticky() SplitPlaceholder.Builder может переопределить поведение по умолчанию. Когда атрибут или метод определяет значение true , система отображает заполнитель в качестве самой верхней активности в окне задачи, когда дисплей изменяется до одного дисплея с одним панели с двухэтажного дисплея (см. Пример, см. Пример, см. Смотрите разделенную конфигурацию ). .

Рисунок 11. Складное складывание устройства и развертывание. Заполнительская деятельность липкая.

Изменения размера окна

Когда изменение конфигурации устройства уменьшает ширину окна задачи, так что она недостаточно велика для многопрофильного макета (например, когда большое складываемое устройство складывается от размера планшета до размера телефона или окно приложения изменяется в режиме с несколькими окнами ), деятельность, не являющиеся местами, на вторичной панели окна задачи, сложена поверх действий на первичной панели.

Действия заполнителей показаны только тогда, когда есть достаточно ширины дисплея для разделения. На небольших экранах заполнитель автоматически уволен. Когда область отображения снова становится достаточно большой, заполнитель воссоздан. (См. Раздел «Заполнители» .)

Упаковка активности возможна, потому что Windowmanager Z-orders деятельность на вторичной панели выше действий на первичной панели.

Многочисленные действия на вторичной панели

Активность B начинает активность C на месте без каких -либо дополнительных флагов намерения:

Разделение активности, содержащее действия A, B и C с C, сложенным на           вершина Б.

В результате следующего Z-порядка действий в той же задаче:

Вторичный стек активности, содержащий активность C, сложенная поверх B.           Вторичный стек сложен на вершине стека активности PRMary           содержащая деятельность А.

Итак, в меньшем окне задачи приложение сжимается до одного действия с C в верхней части стека:

Небольшое окно показывает только активность C.

Навигация обратно в меньшее окно проходит через действия, сложенные друг на друга.

Если конфигурация окна задачи восстановлена ​​до большего размера, который может вместить несколько панелей, действия снова отображаются рядом.

Сложные разделения

Активность B начинает активность C в сторону и сдвигает раскол в сторону:

Окно задачи показывает действия A и B, затем действия B и C.

Результатом является следующий Z-порядок действий в той же задаче:

Действия A, B и C в одном стеке. Деятельность сложена           В следующем порядке сверху вниз: C, B, A.

В меньшем окне задачи приложение сжимается до одного действия с C сверху:

Небольшое окно показывает только активность C.

Ориентация с фиксированным портретом

Настройка Android: Manifest Screenorientation позволяет приложениям ограничивать действия на портретную или ландшафтную ориентацию. Чтобы улучшить пользовательский опыт на больших экранных устройствах, таких как планшеты и складки, производители устройств (OEM) могут игнорировать запросы на ориентацию экрана, а письма - приложение в ориентации портретной ориентации на ландшафтных дисплеях или ландшафтной ориентации на портретных дисплеях.

Рисунок 12. Занимание по буквам: фиксированный портчик на ландшафтном устройстве (слева), фиксированный ландшафт на портретном устройстве (справа).

Аналогичным образом, когда включено встраивание активности, OEM-производители могут настраивать устройства для действий с фиксированным видом на буквы в ориентации ландшафта на больших экранах (ширина ≥ 600 дрп). Когда активность с фиксированным портретом запускает второе действие, устройство может отображать два действия рядом на двухэтажном дисплее.

Рисунок 13. Активность с фиксированным портретом A Запускает активность B на сторону.

Всегда добавляйте свойство android.window.PROPERTY_ACTIVITY_EMBEDDING_SPLITS_ENABLED в ваш файл Manifest вашего приложения, чтобы информировать устройства, которые ваше приложение поддерживает внедрение деятельности (см. Раздел «Разделитель конфигурации» ). Устройства OEM-корзины могут затем определить, предстоит ли сфотографировать деятельность с фиксированным почтовым ящиком.

Разделенная конфигурация

Раздельные правила Настройка разрыва активности. Вы определяете правила разделения в файле конфигурации XML или делая вызовы API jetpack windowmanager .

В любом случае, ваше приложение должно получить доступ к библиотеке Windowmanager и должно сообщить системе, что приложение внедрило внедрение деятельности.

Сделайте следующее:

  1. Добавьте последнюю зависимость библиотеки Windowmanager в файл на build.gradle модуля вашего приложения, например:

    implementation 'androidx.window:window:1.1.0-beta02'

    Библиотека Windowmanager предоставляет все компоненты, необходимые для встраивания деятельности.

  2. Сообщите системе, что ваше приложение внедрило внедрение деятельности.

    Добавьте свойство android.window.PROPERTY_ACTIVITY_EMBEDDING_SPLITS_ENABLED в элемент <plapice> файла манифеста приложения и установите значение True, например:

    <manifest xmlns:android="http://schemas.android.com/apk/res/android">
        <application>
            <property
                android:name="android.window.PROPERTY_ACTIVITY_EMBEDDING_SPLITS_ENABLED"
                android:value="true" />
        </application>
    </manifest>
    

    На выпуске Windowmanager 1.1.0-Alpha06, а затем и более позднее, встраивание активности отключено, если свойство не добавляется в манифест и не установлен в True.

    Кроме того, производители устройств используют настройку, чтобы включить пользовательские возможности для приложений, которые поддерживают встраивание деятельности. Например, устройства могут буквы, только по портретной деятельности на ландшафтных дисплеях для ориентации деятельности для перехода к двустороннему макету, когда начинается вторая деятельность (см. Ориентацию с фиксированным портретом ).

Конфигурация XML

Чтобы создать реализацию внедрения деятельности на основе XML, выполните следующие шаги:

  1. Создайте файл ресурса XML, который выполняет следующее:

    • Определяет действия, которые разделяют раскол
    • Настраивает параметры разделения
    • Создает заполнитель для вторичного контейнера раскола, когда контент недоступен
    • Определяет действия, которые никогда не должны быть частью раскола

    Например:

    <!-- main_split_config.xml -->
    
    <resources
        xmlns:window="http://schemas.android.com/apk/res-auto">
    
        <!-- Define a split for the named activities. -->
        <SplitPairRule
            window:splitRatio="0.33"
            window:splitLayoutDirection="locale"
            window:splitMinWidthDp="840"
            window:splitMaxAspectRatioInPortrait="alwaysAllow"
            window:finishPrimaryWithSecondary="never"
            window:finishSecondaryWithPrimary="always"
            window:clearTop="false">
            <SplitPairFilter
                window:primaryActivityName=".ListActivity"
                window:secondaryActivityName=".DetailActivity"/>
        </SplitPairRule>
    
        <!-- Specify a placeholder for the secondary container when content is
             not available. -->
        <SplitPlaceholderRule
            window:placeholderActivityName=".PlaceholderActivity"
            window:splitRatio="0.33"
            window:splitLayoutDirection="locale"
            window:splitMinWidthDp="840"
            window:splitMaxAspectRatioInPortrait="alwaysAllow"
            window:stickyPlaceholder="false">
            <ActivityFilter
                window:activityName=".ListActivity"/>
        </SplitPlaceholderRule>
    
        <!-- Define activities that should never be part of a split. Note: Takes
             precedence over other split rules for the activity named in the
             rule. -->
        <ActivityRule
            window:alwaysExpand="true">
            <ActivityFilter
                window:activityName=".ExpandedActivity"/>
        </ActivityRule>
    
    </resources>
    
  2. Создайте инициализатор.

    Компонент Windowmanager RuleController анализирует файл конфигурации XML и предоставляет правила доступны для системы. Initializer библиотеки стартапа JetPack предоставляет файл XML доступным для RuleController при запуске приложения, чтобы правила действовали, когда начнутся какие -либо действия.

    Чтобы создать инициализатор, сделайте следующее:

    1. Добавьте последнюю зависимость библиотеки библиотеки JetPack в свой файл на build.gradle модуля, например:

      implementation 'androidx.startup:startup-runtime:1.1.1'

    2. Создайте класс, который реализует интерфейс Initializer .

      Инициализатор предоставляет правила разделения доступным для RuleController передавая идентификатор файла конфигурации XML ( main_split_config.xml ) методу RuleController.parseRules() .

      Котлин

      class SplitInitializer : Initializer<RuleController> {
      
          override fun create(context: Context): RuleController {
              return RuleController.getInstance(context).apply {
                  setRules(RuleController.parseRules(context, R.xml.main_split_config))
              }
          }
      
          override fun dependencies(): List<Class<out Initializer<*>>> {
              return emptyList()
          }
      }

      Ява

      public class SplitInitializer implements Initializer<RuleController> {
      
           @NonNull
           @Override
           public RuleController create(@NonNull Context context) {
               RuleController ruleController = RuleController.getInstance(context);
               ruleController.setRules(
                   RuleController.parseRules(context, R.xml.main_split_config)
               );
               return ruleController;
           }
      
           @NonNull
           @Override
           public List<Class<? extends Initializer<?>>> dependencies() {
               return Collections.emptyList();
           }
      }
  3. Создайте поставщик контента для определений правил.

    Добавьте androidx.startup.InitializationProvider в ваш файл манифеста приложения в качестве <provider> провайдера>. Включите ссылку на реализацию вашего инициализатора RuleController , SplitInitializer :

    <!-- AndroidManifest.xml -->
    
    <provider android:name="androidx.startup.InitializationProvider"
        android:authorities="${applicationId}.androidx-startup"
        android:exported="false"
        tools:node="merge">
        <!-- Make SplitInitializer discoverable by InitializationProvider. -->
        <meta-data android:name="${applicationId}.SplitInitializer"
            android:value="androidx.startup" />
    </provider>
    

    InitializationProvider обнаруживает и инициализирует SplitInitializer до того, как будет вызван метод приложения onCreate() . В результате правила разделения действуют, когда начинается основная деятельность приложения.

Windowmanager API

Вы можете реализовать активность, встраивая программно с помощью нескольких вызовов API. Сделайте вызовы в методе onCreate() подкласса Application чтобы гарантировать, что правила действуют до запуска любых действий.

Чтобы программно создать разделение активности, сделайте следующее:

  1. Создайте правило разделения:

    1. Создайте SplitPairFilter , который идентифицирует действия, которые разделяют раскол:

      Котлин

      val splitPairFilter = SplitPairFilter(
         ComponentName(this, ListActivity::class.java),
         ComponentName(this, DetailActivity::class.java),
         null
      )

      Ява

      SplitPairFilter splitPairFilter = new SplitPairFilter(
         new ComponentName(this, ListActivity.class),
         new ComponentName(this, DetailActivity.class),
         null
      );
    2. Добавьте фильтр в набор фильтра:

      Котлин

      val filterSet = setOf(splitPairFilter)

      Ява

      Set<SplitPairFilter> filterSet = new HashSet<>();
      filterSet.add(splitPairFilter);
    3. Создайте атрибуты макета для разделения:

      Котлин

      val splitAttributes: SplitAttributes = SplitAttributes.Builder()
          .setSplitType(SplitAttributes.SplitType.ratio(0.33f))
          .setLayoutDirection(SplitAttributes.LayoutDirection.LEFT_TO_RIGHT)
          .build()

      Ява

      final SplitAttributes splitAttributes = new SplitAttributes.Builder()
            .setSplitType(SplitAttributes.SplitType.ratio(0.33f))
            .setLayoutDirection(SplitAttributes.LayoutDirection.LEFT_TO_RIGHT)
            .build();

      SplitAttributes.Builder создает объект, содержащий атрибуты макета:

      • setSplitType() : определяет, как доступна область отображения на каждом контейнере активности. Тип разделения соотношения указывает долю доступной области отображения, выделенной на первичный контейнер; Вторичный контейнер занимает оставшуюся часть доступной зоны отображения.
      • setLayoutDirection() : указывает, как контейнеры активности изложены относительно друг друга, сначала первичный контейнер.
    4. Создайте SplitPairRule :

      Котлин

      val splitPairRule = SplitPairRule.Builder(filterSet)
          .setDefaultSplitAttributes(splitAttributes)
          .setMinWidthDp(840)
          .setMinSmallestWidthDp(600)
          .setMaxAspectRatioInPortrait(EmbeddingAspectRatio.ratio(1.5f))
          .setFinishPrimaryWithSecondary(SplitRule.FinishBehavior.NEVER)
          .setFinishSecondaryWithPrimary(SplitRule.FinishBehavior.ALWAYS)
          .setClearTop(false)
          .build()

      Ява

      SplitPairRule splitPairRule = new SplitPairRule.Builder(filterSet)
          .setDefaultSplitAttributes(splitAttributes)
          .setMinWidthDp(840)
          .setMinSmallestWidthDp(600)
          .setMaxAspectRatioInPortrait(EmbeddingAspectRatio.ratio(1.5f))
          .setFinishPrimaryWithSecondary(SplitRule.FinishBehavior.NEVER)
          .setFinishSecondaryWithPrimary(SplitRule.FinishBehavior.ALWAYS)
          .setClearTop(false)
          .build();

      SplitPairRule.Builder создает и настраивает правило:

      • filterSet : содержит разделенные парные фильтры, которые определяют, когда применять правило, выявляя действия, которые разделяют разделение.
      • setDefaultSplitAttributes() : применяет атрибуты макета к правилу.
      • setMinWidthDp() : устанавливает минимальную ширину отображения (в независимых от плотности пикселей, DP), которая позволяет разделить.
      • setMinSmallestWidthDp() : устанавливает минимальное значение (в DP), что меньшее из двух измерений отображения должно включать разделение независимо от ориентации устройства.
      • setMaxAspectRatioInPortrait() : устанавливает максимальное соотношение сторон (высота: ширина) в ориентации на портрету, для которой отображаются разделения активности. Если соотношение сторон портретного дисплея превышает максимальное соотношение сторон, разрывы отключены независимо от ширины дисплея. ПРИМЕЧАНИЕ. Значение по умолчанию составляет 1.4, что приводит к действиям, занимающим все окно задачи в портретной ориентации на большинстве планшетов. See also SPLIT_MAX_ASPECT_RATIO_PORTRAIT_DEFAULT and setMaxAspectRatioInLandscape() . The default value for landscape is ALWAYS_ALLOW .
      • setFinishPrimaryWithSecondary() : Sets how finishing all activities in the secondary container affects the activities in the primary container. NEVER indicates the system shouldn't finish the primary activities when all activities in the secondary container finish (see Finish activities ).
      • setFinishSecondaryWithPrimary() : Sets how finishing all activities in the primary container affects the activities in the secondary container. ALWAYS indicates the system should always finish the activities in the secondary container when all activities in the primary container finish (see Finish activities ).
      • setClearTop() : Specifies whether all activities in the secondary container are finished when a new activity is launched in the container. A false value specifies that new activities are stacked on top of activities already in the secondary container.
    5. Get the singleton instance of the WindowManager RuleController , and add the rule:

      Котлин

        val ruleController = RuleController.getInstance(this)
        ruleController.addRule(splitPairRule)
        

      Ява

        RuleController ruleController = RuleController.getInstance(this);
        ruleController.addRule(splitPairRule);
        
  2. Create a placeholder for the secondary container when content is not available:

    1. Create an ActivityFilter that identifies the activity with which the placeholder shares a task window split:

      Котлин

      val placeholderActivityFilter = ActivityFilter(
          ComponentName(this, ListActivity::class.java),
          null
      )

      Ява

      ActivityFilter placeholderActivityFilter = new ActivityFilter(
          new ComponentName(this, ListActivity.class),
          null
      );
    2. Add the filter to a filter set:

      Котлин

      val placeholderActivityFilterSet = setOf(placeholderActivityFilter)

      Ява

      Set<ActivityFilter> placeholderActivityFilterSet = new HashSet<>();
      placeholderActivityFilterSet.add(placeholderActivityFilter);
    3. Create a SplitPlaceholderRule :

      Котлин

      val splitPlaceholderRule = SplitPlaceholderRule.Builder(
            placeholderActivityFilterSet,
            Intent(context, PlaceholderActivity::class.java)
          ).setDefaultSplitAttributes(splitAttributes)
           .setMinWidthDp(840)
           .setMinSmallestWidthDp(600)
           .setMaxAspectRatioInPortrait(EmbeddingAspectRatio.ratio(1.5f))
           .setFinishPrimaryWithPlaceholder(SplitRule.FinishBehavior.ALWAYS)
           .setSticky(false)
           .build()

      Ява

      SplitPlaceholderRule splitPlaceholderRule = new SplitPlaceholderRule.Builder(
            placeholderActivityFilterSet,
            new Intent(context, PlaceholderActivity.class)
          ).setDefaultSplitAttributes(splitAttributes)
           .setMinWidthDp(840)
           .setMinSmallestWidthDp(600)
           .setMaxAspectRatioInPortrait(EmbeddingAspectRatio.ratio(1.5f))
           .setFinishPrimaryWithPlaceholder(SplitRule.FinishBehavior.ALWAYS)
           .setSticky(false)
           .build();

      SplitPlaceholderRule.Builder creates and configures the rule:

      • placeholderActivityFilterSet : Contains activity filters that determine when to apply the rule by identifying activities with which the placeholder activity is associated.
      • Intent : Specifies the launch of the placeholder activity.
      • setDefaultSplitAttributes() : Applies layout attributes to the rule.
      • setMinWidthDp() : Sets the minimum display width (in density-independent pixels, dp) that allows a split.
      • setMinSmallestWidthDp() : Sets the minimum value (in dp) that the smaller of the two display dimensions must have to allow a split regardless of the device orientation.
      • setMaxAspectRatioInPortrait() : Sets the maximum display aspect ratio (height:width) in portrait orientation for which activity splits are displayed. Note: The default value is 1.4, which results in activities filling the task window in portrait orientation on most tablets. See also SPLIT_MAX_ASPECT_RATIO_PORTRAIT_DEFAULT and setMaxAspectRatioInLandscape() . The default value for landscape is ALWAYS_ALLOW .
      • setFinishPrimaryWithPlaceholder() : Sets how finishing the placeholder activity affects the activities in the primary container. ALWAYS indicates the system should always finish the activities in the primary container when the placeholder finishes (see Finish activities ).
      • setSticky() : Determines whether the placeholder activity appears on top of the activity stack on small displays once the placeholder has first appeared in a split with sufficient minimum width.
    4. Add the rule to the WindowManager RuleController :

      Котлин

      ruleController.addRule(splitPlaceholderRule)

      Ява

      ruleController.addRule(splitPlaceholderRule);
  3. Specify activities that should never be part of a split:

    1. Create an ActivityFilter that identifies an activity that should always occupy the entire task display area:

      Котлин

      val expandedActivityFilter = ActivityFilter(
        ComponentName(this, ExpandedActivity::class.java),
        null
      )

      Ява

      ActivityFilter expandedActivityFilter = new ActivityFilter(
        new ComponentName(this, ExpandedActivity.class),
        null
      );
    2. Add the filter to a filter set:

      Котлин

      val expandedActivityFilterSet = setOf(expandedActivityFilter)

      Ява

      Set<ActivityFilter> expandedActivityFilterSet = new HashSet<>();
      expandedActivityFilterSet.add(expandedActivityFilter);
    3. Create an ActivityRule :

      Котлин

      val activityRule = ActivityRule.Builder(expandedActivityFilterSet)
          .setAlwaysExpand(true)
          .build()

      Ява

      ActivityRule activityRule = new ActivityRule.Builder(
          expandedActivityFilterSet
      ).setAlwaysExpand(true)
       .build();

      ActivityRule.Builder creates and configures the rule:

      • expandedActivityFilterSet : Contains activity filters that determine when to apply the rule by identifying activities that you want to exclude from splits.
      • setAlwaysExpand() : Specifies whether the activity should fill the entire task window.
    4. Add the rule to the WindowManager RuleController :

      Котлин

      ruleController.addRule(activityRule)

      Ява

      ruleController.addRule(activityRule);

Cross-application embedding

On Android 13 (API level 33) and higher, apps can embed activities from other apps. Cross‑application, or cross‑ UID , activity embedding enables visual integration of activities from multiple Android applications. The system displays an activity of the host app and an embedded activity from another app on screen side by side or top and bottom just as in single-app activity embedding.

For example, the Settings app could embed the wallpaper selector activity from the WallpaperPicker app:

Figure 14. Settings app (menu on left) with wallpaper selector as embedded activity (right).

Trust model

Host processes that embed activities from other apps are able to redefine the presentation of the embedded activities, including size, position, cropping, and transparency. Malicious hosts can use this capability to mislead users and create clickjacking or other UI-redressing attacks.

To prevent misuse of cross-app activity embedding, Android requires apps to opt in to allow embedding of their activities. Apps can designate hosts as trusted or untrusted.

Trusted hosts

To allow other applications to embed and fully control the presentation of activities from your app, specify the SHA-256 certificate of the host application in the android:knownActivityEmbeddingCerts attribute of the <activity> or <application> elements of your app's manifest file.

Set the value of android:knownActivityEmbeddingCerts either as a string:

<activity
    android:name=".MyEmbeddableActivity"
    android:knownActivityEmbeddingCerts="@string/known_host_certificate_digest"
    ... />

or, to specify multiple certificates, an array of strings:

<activity
    android:name=".MyEmbeddableActivity"
    android:knownActivityEmbeddingCerts="@array/known_host_certificate_digests"
    ... />

which references a resource like the following:

<resources>
    <string-array name="known_host_certificate_digests">
      <item>cert1</item>
      <item>cert2</item>
      ...
    </string-array>
</resources>

App owners can get a SHA certificate digest by running the Gradle signingReport task. The certificate digest is the SHA-256 fingerprint without the separating colons. For more information, see Run a signing report and Authenticating Your Client .

Untrusted hosts

To allow any app to embed your app's activities and control their presentation, specify the android:allowUntrustedActivityEmbedding attribute in the <activity> or <application> elements in the app manifest, for example:

<activity
    android:name=".MyEmbeddableActivity"
    android:allowUntrustedActivityEmbedding="true"
    ... />

The default value of the attribute is false, which prevents cross-app activity embedding.

Пользовательская аутентификация

To mitigate the risks of untrusted activity embedding, create a custom authentication mechanism that verifies the host identity. If you know the host certificates, use the androidx.security.app.authenticator library to authenticate. If the host authenticates after embedding your activity, you can display the actual content. If not, you can inform the user that the action was not allowed and block the content.

Use the ActivityEmbeddingController#isActivityEmbedded() method from the Jetpack WindowManager library to check whether a host is embedding your activity, for example:

Котлин

fun isActivityEmbedded(activity: Activity): Boolean {
    return ActivityEmbeddingController.getInstance(this).isActivityEmbedded(activity)
}

Ява

boolean isActivityEmbedded(Activity activity) {
    return ActivityEmbeddingController.getInstance(this).isActivityEmbedded(activity);
}

Minimum size restriction

The Android system applies the minimum height and width specified in the app manifest <layout> element to embedded activities. If an application does not specify minimum height and width, the system default values apply ( sw220dp ).

If the host attempts to resize the embedded container to a size smaller than the minimum, the embedded container expands to occupy the entire task bounds.

<activity-alias>

For trusted or untrusted activity embedding to work with the <activity-alias> element, android:knownActivityEmbeddingCerts or android:allowUntrustedActivityEmbedding must be applied to the target activity rather than the alias. The policy that verifies security on the system server is based on the flags set on the target, not the alias.

Host application

Host applications implement cross-app activity embedding the same way they implement single-app activity embedding. SplitPairRule and SplitPairFilter or ActivityRule and ActivityFilter objects specify embedded activities and task window splits. Split rules are defined statically in XML or at runtime using Jetpack WindowManager API calls.

If a host application attempts to embed an activity that has not opted in to cross-app embedding, the activity occupies the entire task bounds. As a result, host applications need to know whether target activities allow cross-app embedding.

If an embedded activity starts a new activity in the same task and the new activity has not opted in to cross-app embedding, the activity occupies the entire task bounds instead of overlaying the activity in the embedded container.

A host application can embed its own activities without restriction as long as the activities launch in the same task.

Split examples

Split from full window

Figure 15. Activity A starts activity B to the side.

No refactoring required. You can define the configuration for the split statically or at runtime and then call Context#startActivity() without any additional parameters.

<SplitPairRule>
    <SplitPairFilter
        window:primaryActivityName=".A"
        window:secondaryActivityName=".B"/>
</SplitPairRule>

Split by default

When the landing page of an application is designed to be split into two containers on large screens, the user experience is best when both activities are created and presented simultaneously. However, content might not be available for the secondary container of the split until the user interacts with the activity in the primary container (for example, the user selects an item from a navigation menu). A placeholder activity can fill the void until content can be displayed in the secondary container of the split (see the Placeholders section).

Figure 16. Split created by opening two activities simultaneously. One activity is a placeholder.

To create a split with a placeholder, create a placeholder and associate it with the primary activity:

<SplitPlaceholderRule
    window:placeholderActivityName=".PlaceholderActivity">
    <ActivityFilter
        window:activityName=".MainActivity"/>
</SplitPlaceholderRule>

When an app receives an intent, the target activity can be shown as the secondary part of an activity split; for example, a request to show a detail screen with information about an item from a list. On small displays, the detail is shown in the full task window; on larger devices, beside the list.

Figure 17. Deep link detail activity shown alone on a small screen, but together with a list activity on a large screen.

The launch request should be routed to the main activity, and the target detail activity should be launched in a split. The system automatically chooses the correct presentation—stacked or side by side—based on the available display width.

Котлин

override fun onCreate(savedInstanceState Bundle?) {
    . . .
    RuleController.getInstance(this)
        .addRule(SplitPairRule.Builder(filterSet).build())
    startActivity(Intent(this, DetailActivity::class.java))
}

Ява

@Override
protected void onCreate(@Nullable Bundle savedInstanceState) {
    . . .
    RuleController.getInstance(this)
        .addRule(new SplitPairRule.Builder(filterSet).build());
    startActivity(new Intent(this, DetailActivity.class));
}

The deep link destination might be the only activity that should be available to the user in the back navigation stack, and you might want to avoid dismissing the detail activity and leaving only the main activity:

Large display with list activity and detail activity side by side.
          Back navigation unable to dismiss detail activity and leave list
          activity on screen.

Small display with detail activity only. Back navigation unable to
          dismiss detail activity and reveal list activity.

Instead, you can finish both activities at the same time by using the finishPrimaryWithSecondary attribute:

<SplitPairRule
    window:finishPrimaryWithSecondary="always">
    <SplitPairFilter
        window:primaryActivityName=".ListActivity"
        window:secondaryActivityName=".DetailActivity"/>
</SplitPairRule>

See the Configuration attributes section.

Multiple activities in split containers

Stacking multiple activities in a split container enables users to access deep content. For example, with a list-detail split, the user might need to go into a sub-detail section but keep the primary activity in place:

Figure 18. Activity opened in place in the secondary pane of the task window.

Котлин

class DetailActivity {
    . . .
    fun onOpenSubDetail() {
      startActivity(Intent(this, SubDetailActivity::class.java))
    }
}

Ява

public class DetailActivity {
    . . .
    void onOpenSubDetail() {
        startActivity(new Intent(this, SubDetailActivity.class));
    }
}

The sub-detail activity is placed on top of the detail activity, concealing it:

The user can then go back to the previous detail level by navigating back through the stack:

Figure 19. Activity removed from the top of the stack.

Stacking activities on top of each other is the default behavior when activities are launched from an activity in the same secondary container. Activities launched from the primary container within an active split also end up in the secondary container on the top of the activity stack.

Activities in a new task

When activities in a split task window start activities in a new task, the new task is separate from the task that includes the split and is displayed full window. The Recents screen shows two tasks: the task in the split and the new task.

Figure 20. Start activity C in a new task from activity B.

Activity replacement

Activities can be replaced in the secondary container stack; for example, when the primary activity is used for top-level navigation and the secondary activity is a selected destination. Each selection from the top-level navigation should start a new activity in the secondary container and remove the activity or activities that were previously there.

Figure 21. Top-level navigation activity in the primary pane replaces destination activities in the secondary pane.

If the app doesn't finish the activity in the secondary container when the navigation selection changes, back navigation might be confusing when the split is collapsed (when the device is folded). For example, if you have a menu in the primary pane and screens A and B stacked in the secondary pane, when the user folds the phone, B is on top of A, and A is on top of the menu. When the user navigates back from B, A appears instead of the menu.

Screen A must be removed from the back stack in such cases.
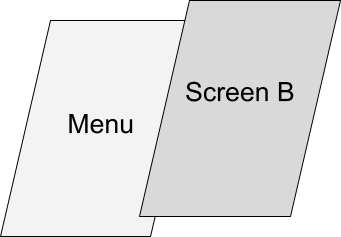
The default behavior when launching to the side in a new container over an existing split is to put the new secondary containers on top and retain the old ones in the back stack. You can configure the splits to clear the previous secondary containers with clearTop and launch new activities normally.

<SplitPairRule
    window:clearTop="true">
    <SplitPairFilter
        window:primaryActivityName=".Menu"
        window:secondaryActivityName=".ScreenA"/>
    <SplitPairFilter
        window:primaryActivityName=".Menu"
        window:secondaryActivityName=".ScreenB"/>
</SplitPairRule>

Котлин

class MenuActivity {
    . . .
    fun onMenuItemSelected(selectedMenuItem: Int) {
        startActivity(Intent(this, classForItem(selectedMenuItem)))
    }
}

Ява

public class MenuActivity {
    . . .
    void onMenuItemSelected(int selectedMenuItem) {
        startActivity(new Intent(this, classForItem(selectedMenuItem)));
    }
}

Alternatively, use the same secondary activity, and from the primary (menu) activity send new intents that resolve to the same instance but trigger a state or UI update in the secondary container.

Multiple splits

Apps can provide multi-level deep navigation by launching additional activities to the side.

When an activity in a secondary container launches a new activity to the side, a new split is created over top of the existing split.

Figure 22. Activity B starts activity C to the side.

The back stack contains all activities that were previously opened, so users can navigate to the A/B split after finishing C.
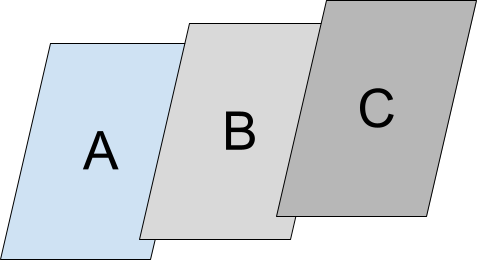
Activities A, B, and C in a stack. The activities are stacked in
          the following order from top to bottom: C, B, A.

To create a new split, launch the new activity to the side from the existing secondary container. Declare the configurations for both the A/B and B/C splits and launch activity C normally from B:

<SplitPairRule>
    <SplitPairFilter
        window:primaryActivityName=".A"
        window:secondaryActivityName=".B"/>
    <SplitPairFilter
        window:primaryActivityName=".B"
        window:secondaryActivityName=".C"/>
</SplitPairRule>

Котлин

class B {
    . . .
    fun onOpenC() {
        startActivity(Intent(this, C::class.java))
    }
}

Ява

public class B {
    . . .
    void onOpenC() {
        startActivity(new Intent(this, C.class));
    }
}

React to split state changes

Different activities in an app can have UI elements that perform the same function; for example, a control that opens a window containing account settings.
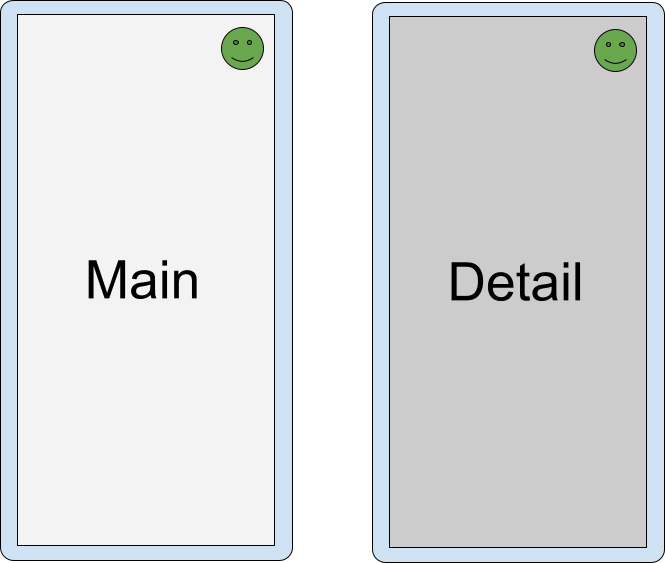
Figure 23. Different activities with functionally identical UI elements.

If two activities that have a UI element in common are in a split, it's redundant and perhaps confusing to show the element in both activities.
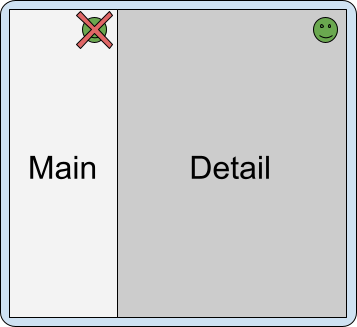
Figure 24. Duplicate UI elements in activity split.

To know when activities are in a split, check the SplitController.splitInfoList flow or register a listener with SplitControllerCallbackAdapter for changes in the split state. Then, adjust the UI accordingly:

Котлин

val layout = layoutInflater.inflate(R.layout.activity_main, null)
val view = layout.findViewById<View>(R.id.infoButton)
lifecycleScope.launch {
    lifecycle.repeatOnLifecycle(Lifecycle.State.STARTED) {
        splitController.splitInfoList(this@SplitDeviceActivity) // The activity instance.
            .collect { list ->
                view.visibility = if (list.isEmpty()) View.VISIBLE else View.GONE
            }
    }
}

Ява

@Override
protected void onCreate(@Nullable Bundle savedInstanceState) {
    . . .
    new SplitControllerCallbackAdapter(SplitController.getInstance(this))
        .addSplitListener(
            this,
            Runnable::run,
            splitInfoList -> {
                View layout = getLayoutInflater().inflate(R.layout.activity_main, null);
                layout.findViewById(R.id.infoButton).setVisibility(
                    splitInfoList.isEmpty() ? View.VISIBLE : View.GONE);
            });
}

Coroutines can be launched in any lifecycle state, but are typically launched in the STARTED state to conserve resources (see Use Kotlin coroutines with lifecycle-aware components for more information).

Callbacks can be made in any lifecycle state, including when an activity is stopped. Listeners should usually be registered in onStart() and unregistered in onStop() .

Full-window modal

Some activities block users from interacting with the application until a specified action is performed; for example, a login screen activity, policy acknowledgement screen, or error message. Modal activities should be prevented from appearing in a split.

An activity can be forced to always fill the task window by using the expand configuration:

<ActivityRule
    window:alwaysExpand="true">
    <ActivityFilter
        window:activityName=".FullWidthActivity"/>
</ActivityRule>

Finish activities

Users can finish activities on either side of the split by swiping from the edge of the display:
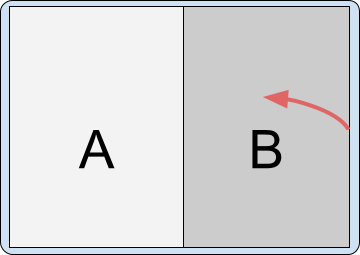
Figure 25. Swipe gesture finishing activity B.
Figure 26. Swipe gesture finishing activity A.

If the device is set up to use the back button instead of gesture navigation, the input is sent to the focused activity—the activity that was touched or launched last.

The effect that finishing all activities in a container has on the opposing container depends on the split configuration.

Configuration attributes

You can specify split pair rule attributes to configure how finishing all activities on one side of the split affects the activities on the other side of the split. The attributes are:

  • window:finishPrimaryWithSecondary — How finishing all activities in the secondary container affects the activities in the primary container
  • window:finishSecondaryWithPrimary — How finishing all activities in the primary container affects the activities in the secondary container

Possible values of the attributes include:

  • always — Always finish the activities in the associated container
  • never — Never finish the activities in the associated container
  • adjacent — Finish the activities in the associated container when the two containers are displayed adjacent to each other, but not when the two containers are stacked

Например:

<SplitPairRule
    &lt;!-- Do not finish primary container activities when all secondary container activities finish. --&gt;
    window:finishPrimaryWithSecondary="never"
    &lt;!-- Finish secondary container activities when all primary container activities finish. --&gt;
    window:finishSecondaryWithPrimary="always">
    <SplitPairFilter
        window:primaryActivityName=".A"
        window:secondaryActivityName=".B"/>
</SplitPairRule>

Default configuration

When all activities in one container of a split finish, the remaining container occupies the entire window:

<SplitPairRule>
    <SplitPairFilter
        window:primaryActivityName=".A"
        window:secondaryActivityName=".B"/>
</SplitPairRule>

Split containing activities A and B. A is finished, leaving B to
          occupy the entire window.

Split containing activities A and B. B is finished, leaving A to
          occupy the entire window.

Finish activities together

Finish the activities in the primary container automatically when all activities in the secondary container finish:

<SplitPairRule
    window:finishPrimaryWithSecondary="always">
    <SplitPairFilter
        window:primaryActivityName=".A"
        window:secondaryActivityName=".B"/>
</SplitPairRule>

Split containing activities A and B. B is finished, which also
          finishes A, leaving the task window empty.

Split containing activities A and B. A is finished, leaving B alone
          in the task window.

Finish the activities in the secondary container automatically when all activities in the primary container finish:

<SplitPairRule
    window:finishSecondaryWithPrimary="always">
    <SplitPairFilter
        window:primaryActivityName=".A"
        window:secondaryActivityName=".B"/>
</SplitPairRule>

Split containing activities A and B. A is finished, which also
          finishes B, leaving the task window empty.

Split containing activities A and B. B is finished, leaving A alone
          in the task window.

Finish activities together when all activities in either the primary or secondary container finish:

<SplitPairRule
    window:finishPrimaryWithSecondary="always"
    window:finishSecondaryWithPrimary="always">
    <SplitPairFilter
        window:primaryActivityName=".A"
        window:secondaryActivityName=".B"/>
</SplitPairRule>

Split containing activities A and B. A is finished, which also
          finishes B, leaving the task window empty.

Split containing activities A and B. B is finished, which also
          finishes A, leaving the task window empty.

Finish multiple activities in containers

If multiple activities are stacked in a split container, finishing an activity on the bottom of the stack does not automatically finish activities on top.

For example, if two activities are in the secondary container, C on top of B:

Secondary activity stack containing activity C stacked on top of B           is stacked on top of the prmary activity stack containing activity           А.

and the configuration of the split is defined by the configuration of activities A and B:

<SplitPairRule>
    <SplitPairFilter
        window:primaryActivityName=".A"
        window:secondaryActivityName=".B"/>
</SplitPairRule>

finishing the top activity retains the split.

Split with activity A in primary container and activities B and C in
          secondary, C stacked on top of B. C finishes, leaving A and B in the
          activity split.

Finishing the bottom (root) activity of the secondary container does not remove the activities on top of it; and so, also retains the split.

Split with activity A in primary container and activities B and C in
          secondary, C stacked on top of B. B finishes, leaving A and C in the
          activity split.

Any additional rules for finishing activities together, such as finishing the secondary activity with the primary, are also executed:

<SplitPairRule
    window:finishSecondaryWithPrimary="always">
    <SplitPairFilter
        window:primaryActivityName=".A"
        window:secondaryActivityName=".B"/>
</SplitPairRule>

Split with activity A in primary container and activities B and C in
          secondary container, C stacked on top of B. A finishes, also
          finishing B and C.

And when the split is configured to finish primary and secondary together:

<SplitPairRule
    window:finishPrimaryWithSecondary="always"
    window:finishSecondaryWithPrimary="always">
    <SplitPairFilter
        window:primaryActivityName=".A"
        window:secondaryActivityName=".B"/>
</SplitPairRule>

Split with activity A in primary container and activities B and C in
          secondary, C stacked on top of B. C finishes, leaving A and B in the
          activity split.

Split with activity A in primary container and activities B and C in
          secondary, C stacked on top of B. B finishes, leaving A and C in the
          activity split.

Split with activity A in primary container and activities B and C in           secondary, C stacked on top of B. A finishes, also finishing B and           С.

Change split properties at runtime

The properties of an active and visible split cannot be changed. Changing the split rules affects additional activity launches and new containers, but not existing and active splits.

To change the properties of active splits, finish the side activity or activities in the split and launch to the side again with a new configuration.

Dynamic split properties

Android 15 (API level 35) and higher supported by Jetpack WindowManager 1.4 and higher offer dynamic features that enable configurability of activity embedding splits, including:

  • Pane expansion: An interactive, draggable divider enables users to resize the panes in a split presentation.
  • Activity stack pinning: Users can pin the content in one container and isolate navigation in the container from navigation in the other container.
  • Dialog full-screen dim: When displaying a dialog, apps can specify whether to dim the entire task window or just the container that opened the dialog.

Pane expansion

Pane expansion enables users to adjust the amount of screen space allocated to the two activities in a dual‑pane layout.

To customize the appearance of the window divider and set the divider's draggable range, do the following:

  1. Create an instance of DividerAttributes

  2. Customize the divider attributes:

    • color : The color of the draggable pane separator.

    • widthDp : The width of the draggable pane separator. Set to WIDTH_SYSTEM_DEFAULT to let the system determine the divider width.

    • Drag range: The minimum percentage of the screen either pane can occupy. Can range from 0.33 to 0.66. Set to DRAG_RANGE_SYSTEM_DEFAULT to let the system determine the drag range.

Котлин

val splitAttributesBuilder: SplitAttributes.Builder = SplitAttributes.Builder()
    .setSplitType(SplitAttributes.SplitType.ratio(0.33f))
    .setLayoutDirection(SplitAttributes.LayoutDirection.LEFT_TO_RIGHT)

if (WindowSdkExtensions.getInstance().extensionVersion >= 6) {
    splitAttributesBuilder.setDividerAttributes(
      DividerAttributes.DraggableDividerAttributes.Builder()
        .setColor(getColor(context, R.color.divider_color))
        .setWidthDp(4)
        .setDragRange(DividerAttributes.DragRange.DRAG_RANGE_SYSTEM_DEFAULT)
        .build()
    )
}
val splitAttributes: SplitAttributes = splitAttributesBuilder.build()

Ява

SplitAttributes.Builder splitAttributesBuilder = new SplitAttributes.Builder()
    .setSplitType(SplitAttributes.SplitType.ratio(0.33f))
    .setLayoutDirection(SplitAttributes.LayoutDirection.LEFT_TO_RIGHT);

if (WindowSdkExtensions.getInstance().getExtensionVersion() >= 6) {
    splitAttributesBuilder.setDividerAttributes(
      new DividerAttributes.DraggableDividerAttributes.Builder()
        .setColor(ContextCompat.getColor(context, R.color.divider_color))
        .setWidthDp(4)
        .setDragRange(DividerAttributes.DragRange.DRAG_RANGE_SYSTEM_DEFAULT)
        .build()
    );
}
SplitAttributes splitAttributes = splitAttributesBuilder.build();

Activity stack pinning

Activity stack pinning enables users to pin one of the split windows so the activity stays as is while users navigate within the other window. Activity stack pinning provides an enhanced multitasking experience.

To enable activity stack pinning in your app, do the following:

  1. Add a button to the layout file of the activity you want to pin, for example, the detail activity of an list‑detail layout:

    <androidx.constraintlayout.widget.ConstraintLayout
     xmlns:android="http://schemas.android.com/apk/res/android"
     xmlns:app="http://schemas.android.com/apk/res-auto"
     xmlns:tools="http://schemas.android.com/tools"
     android:id="@+id/detailActivity"
     android:layout_width="match_parent"
     android:layout_height="match_parent"
     android:background="@color/white"
     tools:context=".DetailActivity">
    
    <TextView
       android:id="@+id/textViewItemDetail"
       android:layout_width="wrap_content"
       android:layout_height="wrap_content"
       android:textSize="36sp"
       android:textColor="@color/obsidian"
       app:layout_constraintBottom_toTopOf="@id/pinButton"
       app:layout_constraintEnd_toEndOf="parent"
       app:layout_constraintStart_toStartOf="parent"
       app:layout_constraintTop_toTopOf="parent" />
    
    <androidx.appcompat.widget.AppCompatButton
       android:id="@+id/pinButton"
       android:layout_width="wrap_content"
       android:layout_height="wrap_content"
       android:text="@string/pin_this_activity"
       app:layout_constraintBottom_toBottomOf="parent"
       app:layout_constraintEnd_toEndOf="parent"
       app:layout_constraintStart_toStartOf="parent"
       app:layout_constraintTop_toBottomOf="@id/textViewItemDetail"/>
    
    </androidx.constraintlayout.widget.ConstraintLayout>
    
  2. In the onCreate() method of the activity, set an onclick listener on the button:

    Котлин

    pinButton = findViewById(R.id.pinButton)
    pinButton.setOnClickListener {
        val splitAttributes: SplitAttributes = SplitAttributes.Builder()
            .setSplitType(SplitAttributes.SplitType.ratio(0.66f))
            .setLayoutDirection(SplitAttributes.LayoutDirection.LEFT_TO_RIGHT)
            .build()
    
        val pinSplitRule = SplitPinRule.Builder()
            .setSticky(true)
            .setDefaultSplitAttributes(splitAttributes)
            .build()
    
        SplitController.getInstance(applicationContext).pinTopActivityStack(taskId, pinSplitRule)
    }

    Ява

    Button pinButton = findViewById(R.id.pinButton);
    pinButton.setOnClickListener( (view) => {
        SplitAttributes splitAttributes = new SplitAttributes.Builder()
            .setSplitType(SplitAttributes.SplitType.ratio(0.66f))
            .setLayoutDirection(SplitAttributes.LayoutDirection.LEFT_TO_RIGHT)
            .build();
    
        SplitPinRule pinSplitRule = new SplitPinRule.Builder()
            .setSticky(true)
            .setDefaultSplitAttributes(splitAttributes)
            .build();
    
        SplitController.getInstance(getApplicationContext()).pinTopActivityStack(getTaskId(), pinSplitRule);
    });

Dialog full-screen dim

Activities typically dim their displays to draw attention to a dialog. In activity embedding, both panes of the dual‑pane display should dim, not just the pane containing the activity that opened the dialog, for a unified UI experience.

With WindowManager 1.4 and higher, the entire app window dims by default when a dialog opens (see EmbeddingConfiguration.DimAreaBehavior.ON_TASK ).

To dim only the container of the activity that opened the dialog, use EmbeddingConfiguration.DimAreaBehavior.ON_ACTIVITY_STACK .

Extract an activity from a split to full window

Create a new configuration that displays the side activity full window, and then relaunch the activity with an intent that resolves to the same instance.

Check for split support at runtime

Activity embedding is supported on Android 12L (API level 32) and higher, but is also available on some devices running earlier platform versions. To check at runtime for the availability of the feature, use the SplitController.splitSupportStatus property or SplitController.getSplitSupportStatus() method:

Котлин

if (SplitController.getInstance(this).splitSupportStatus ==
     SplitController.SplitSupportStatus.SPLIT_AVAILABLE) {
     // Device supports split activity features.
}

Ява

if (SplitController.getInstance(this).getSplitSupportStatus() ==
     SplitController.SplitSupportStatus.SPLIT_AVAILABLE) {
     // Device supports split activity features.
}

If splits are not supported, activities are launched on top of the activity stack (following the non-activity embedding model).

Prevent system override

The manufacturers of Android devices (original equipment manufacturers, or OEMs), can implement activity embedding as a function of the device system. The system specifies split rules for multi-activity apps, overriding the windowing behavior of the apps. The system override forces multi-activity apps into a system-defined activity embedding mode.

System activity embedding can enhance app presentation through multi-pane layouts, such as list-detail , without any changes to the app. However, the system's activity embedding might also cause incorrect app layouts, bugs, or conflicts with activity embedding implemented by the app.

Your app can prevent or permit system activity embedding by setting a property in the app manifest file, for example:

<manifest xmlns:android="http://schemas.android.com/apk/res/android">
    <application>
        <property
            android:name="android.window.PROPERTY_ACTIVITY_EMBEDDING_ALLOW_SYSTEM_OVERRIDE"
            android:value="true|false" />
    </application>
</manifest>

The property name is defined in the Jetpack WindowManager WindowProperties object. Set the value to false if your app implements activity embedding, or if you want to otherwise prevent the system from applying its activity embedding rules to your app. Set the value to true to permit the system to apply system-defined activity embedding to your app.

Limitations, restrictions, and caveats

  • Only the host app of the task, which is identified as the owner of the root activity in the task, can organize and embed other activities in the task. If activities that support embedding and splits run in a task that belongs to a different application, then embedding and splits will not work for those activities.
  • Activities can only be organized within a single task. Launching an activity in a new task always puts it in a new expanded window outside of any existing splits.
  • Only activities in the same process can be organized and put in a split. The SplitInfo callback only reports activities that belong to the same process, since there is no way of knowing about activities in different processes.
  • Each pair or singular activity rule applies only to activity launches that happen after the rule has been registered. There is currently no way to update existing splits or their visual properties.
  • The split pair filter configuration must match the intents used when launching activities completely. The matching occurs at the point when a new activity is started from the application process, so it might not know about component names that are resolved later in the system process when using implicit intents. If a component name is not known at the time of launch, a wildcard can be used instead ("*/*") and filtering can be performed based on intent action.
  • There is currently no way to move activities between containers or in and out of splits after they were created. Splits are only created by the WindowManager library when new activities with matching rules are launched, and splits are destroyed when the last activity in a split container is finished.
  • Activities can be relaunched when the configuration changes, so when a split is created or removed and activity bounds change, the activity can go through complete destruction of the previous instance and creation of the new one. As a result, app developers should be careful with things like launching new activities from lifecycle callbacks.
  • Devices must include the window extensions interface to support activity embedding. Nearly all large screen devices running Android 12L (API level 32) or higher include the interface. However, some large screen devices that are not capable of running multiple activities don't include the window extensions interface. If a large screen device doesn't support multi-window mode, it might not support activity embedding.

Дополнительные ресурсы

,

Activity embedding optimizes apps on large screen devices by splitting an application's task window between two activities or two instances of the same activity.

Figure 1. Settings app with activities side by side.

If your app consists of multiple activities, activity embedding enables you to provide an enhanced user experience on tablets, foldables, and ChromeOS devices.

Activity embedding requires no code refactoring. You determine how your app displays its activities—side by side or stacked—by creating an XML configuration file or by making Jetpack WindowManager API calls.

Support for small screens is maintained automatically. When your app is on a device with a small screen, activities are stacked one on top of the other. On large screens, activities are displayed side by side. The system determines the presentation based on the configuration you've created—no branching logic required.

Activity embedding accommodates device orientation changes and works seamlessly on foldable devices, stacking and unstacking activities as the device folds and unfolds.

Activity embedding is supported on most large screen devices running Android 12L (API level 32) and higher.

Split task window

Activity embedding splits the app task window into two containers: primary and secondary. The containers hold activities launched from the main activity or from other activities already in the containers.

Activities are stacked in the secondary container as they're launched, and the secondary container is stacked on top of the primary container on small screens, so activity stacking and back navigation are consistent with the ordering of activities already built into your app.

Activity embedding enables you to display activities in a variety of ways. Your app can split the task window by launching two activities side by side simultaneously:

Figure 2. Two activities side by side.

Or, an activity that's occupying the entire task window can create a split by launching a new activity alongside:

Figure 3. Activity A starts activity B to the side.

Activities that are already in a split and sharing a task window can launch other activities in the following ways:

  • To the side on top of another activity:

    Figure 4. Activity A starts activity C to the side over activity B.
  • To the side, and shift the split sideways, concealing the previous primary activity:

    Figure 5. Activity B starts activity C to the side and shifts the split sideways.
  • Launch an activity in place on top; that is, in the same activity stack:

    Figure 6. Activity B starts activity C with no extra intent flags.
  • Launch an activity full window in the same task:

    Figure 7. Activity A or activity B starts activity C which fills the task window.

Back navigation

Different types of applications can have different back navigation rules in a split task window state depending on the dependencies between activities or how users trigger the back event, for example:

  • Going together: If activities are related, and one shouldn't be shown without the other, back navigation can be configured to finish both.
  • Going it alone: If activities are fully independent, back navigation on an activity does not affect the state of another activity in the task window.

The back event is sent to the last focused activity when using button navigation.

For gesture-based navigation:

  • Android 14 (API level 34) and lower — The back event is sent to the activity where the gesture occurred. When users swipe from the left side of the screen, the back event is sent to the activity in the left‑hand pane of the split window. When users swipe from the right side of the screen, the back event is sent to the activity in the right‑hand pane.

  • Android 15 (API level 35) and higher

    • When dealing with multiple activities from the same app, the gesture finishes the top activity regardless of the swipe direction, providing a more unified experience.

    • In scenarios involving two activities from different apps (overlay), the back event is directed to the last activity in focus, aligning with the behavior of button navigation.

Multi-pane layout

Jetpack WindowManager enables you to build an activity embedding multi-pane layout on large screen devices with Android 12L (API level 32) or higher and on some devices with earlier platform versions. Existing apps that are based on multiple activities rather than fragments or view-based layouts such as SlidingPaneLayout can provide an improved large screen user experience without refactoring source code.

One common example is a list-detail split. To ensure a high-quality presentation, the system starts the list activity, and then the application immediately starts the detail activity. The transition system waits until both activities are drawn, then displays them together. To the user, the two activities launch as one.

Figure 8. Two activities started simultaneously in a multi-pane layout.

Split attributes

You can specify how the task window is proportioned between the split containers and how the containers are layed out relative to one another.

For rules defined in an XML configuration file, set the following attributes:

  • splitRatio : Sets the container proportions. The value is a floating point number in the open interval (0.0, 1.0).
  • splitLayoutDirection : Specifies how the split containers are layed out relative to one another. Values include:
    • ltr : Left to right
    • rtl : Right to left
    • locale : Either ltr or rtl is determined from the locale setting

See the XML configuration section for examples.

For rules created using the WindowManager APIs, create a SplitAttributes object with SplitAttributes.Builder and call the following builder methods:

See the WindowManager API section for examples.

Figure 9. Two activity splits layed out left to right but with different split ratios.

Placeholders

Placeholder activities are empty secondary activities that occupy an area of an activity split. They are ultimately meant to be replaced with another activity that contains content. For example, a placeholder activity could occupy the secondary side of an activity split in a list-detail layout until an item from the list is selected, at which point an activity containing the detail information for the selected list item replaces the placeholder.

By default, the system displays placeholders only when there is enough space for an activity split. Placeholders automatically finish when the display size changes to a width or height too small to display a split. When space permits, the system relaunches the placeholder with a reinitialized state.

Figure 10. Foldable device folding and unfolding. Placeholder activity is finished and recreated as display size changes.

However, the stickyPlaceholder attribute of a SplitPlaceholderRule or setSticky() method of SplitPlaceholder.Builder can override the default behavior. When the attribute or method specifies a value of true , the system displays the placeholder as the topmost activity in the task window when the display is resized down to a single-pane display from a two-pane display (see Split configuration for an example) .

Figure 11. Foldable device folding and unfolding. Placeholder activity is sticky.

Window size changes

When device configuration changes reduce the task window width so that it is not large enough for a multi-pane layout (for example, when a large screen foldable device folds from tablet size to phone size or the app window is resized in multi-window mode), the non-placeholder activities in the secondary pane of the task window are stacked on top of the activities in the primary pane.

Placeholder activities are shown only when there is enough display width for a split. On smaller screens, the placeholder is automatically dismissed. When the display area becomes large enough again, the placeholder is recreated. (See the Placeholders section.)

Activity stacking is possible because WindowManager z-orders the activities in the secondary pane above activities in the primary pane.

Multiple activities in secondary pane

Activity B starts activity C in place with no extra intent flags:

Activity split containing activities A, B, and C with C stacked on
          top of B.

resulting in the following z-order of activities in the same task:

Secondary activity stack containing activity C stacked on top of B.
          Secondary stack is stacked on top of prmary activity stack
          containing activity A.

So, in a smaller task window, the application shrinks to a single activity with C at the top of the stack:

Small window showing only activity C.

Navigating back in the smaller window navigates through the activities stacked on top of each other.

If the task window configuration is restored to a larger size that can accommodate multiple panes, the activities are displayed side by side again.

Stacked splits

Activity B starts activity C to the side and shifts the split sideways:

Task window showing activities A and B, then activities B and C.

The result is the following z-order of activities in the same task:

Activities A, B, and C in a single stack. The activities are stacked
          in the following order from top to bottom: C, B, A.

In a smaller task window, the application shrinks to a single activity with C on top:

Small window showing only activity C.

Fixed-portrait orientation

The android:screenOrientation manifest setting enables apps to constrain activities to portrait or landscape orientation. To improve the user experience on large screen devices such as tablets and foldables, device manufacturers (OEMs) can ignore screen orientation requests and letterbox the app in portrait orientation on landscape displays or landscape orientation on portrait displays.

Figure 12. Letterboxed activities: fixed-portrait on landscape device (left), fixed-landscape on portrait device (right).

Similarly, when activity embedding is enabled, OEMs can customize devices to letterbox fixed-portrait activities in landscape orientation on large screens (width ≥ 600dp). When a fixed-portrait activity launches a second activity, the device can display the two activities side by side in a two-pane display.

Figure 13. Fixed-portrait activity A starts activity B to the side.

Always add the android.window.PROPERTY_ACTIVITY_EMBEDDING_SPLITS_ENABLED property to your app manifest file to inform devices that your app supports activity embedding (see the Split configuration section). OEM-customized devices can then determine whether to letterbox fixed-portrait activities.

Split configuration

Split rules configure activity splits. You define split rules in an XML configuration file or by making Jetpack WindowManager API calls.

In either case, your app must access the WindowManager library and must inform the system that the app has implemented activity embedding.

Сделайте следующее:

  1. Add the latest WindowManager library dependency to your app's module-level build.gradle file, for example:

    implementation 'androidx.window:window:1.1.0-beta02'

    The WindowManager library provides all the components required for activity embedding.

  2. Inform the system that your app has implemented activity embedding.

    Add the android.window.PROPERTY_ACTIVITY_EMBEDDING_SPLITS_ENABLED property to the <application> element of the app manifest file, and set the value to true, for example:

    <manifest xmlns:android="http://schemas.android.com/apk/res/android">
        <application>
            <property
                android:name="android.window.PROPERTY_ACTIVITY_EMBEDDING_SPLITS_ENABLED"
                android:value="true" />
        </application>
    </manifest>
    

    On WindowManager release 1.1.0-alpha06 and later, activity embedding splits are disabled unless the property is added to the manifest and set to true.

    Also, device manufacturers use the setting to enable custom capabilities for apps that support activity embedding. For example, devices can letterbox a portrait-only activity on landscape displays to orient the activity for the transition to a two-pane layout when a second activity starts (see Fixed-portrait orientation ).

XML configuration

To create an XML-based implementation of activity embedding, complete the following steps:

  1. Create an XML resource file that does the following:

    • Defines activities that share a split
    • Configures the split options
    • Creates a placeholder for the secondary container of the split when content is not available
    • Specifies activities that should never be part of a split

    Например:

    <!-- main_split_config.xml -->
    
    <resources
        xmlns:window="http://schemas.android.com/apk/res-auto">
    
        <!-- Define a split for the named activities. -->
        <SplitPairRule
            window:splitRatio="0.33"
            window:splitLayoutDirection="locale"
            window:splitMinWidthDp="840"
            window:splitMaxAspectRatioInPortrait="alwaysAllow"
            window:finishPrimaryWithSecondary="never"
            window:finishSecondaryWithPrimary="always"
            window:clearTop="false">
            <SplitPairFilter
                window:primaryActivityName=".ListActivity"
                window:secondaryActivityName=".DetailActivity"/>
        </SplitPairRule>
    
        <!-- Specify a placeholder for the secondary container when content is
             not available. -->
        <SplitPlaceholderRule
            window:placeholderActivityName=".PlaceholderActivity"
            window:splitRatio="0.33"
            window:splitLayoutDirection="locale"
            window:splitMinWidthDp="840"
            window:splitMaxAspectRatioInPortrait="alwaysAllow"
            window:stickyPlaceholder="false">
            <ActivityFilter
                window:activityName=".ListActivity"/>
        </SplitPlaceholderRule>
    
        <!-- Define activities that should never be part of a split. Note: Takes
             precedence over other split rules for the activity named in the
             rule. -->
        <ActivityRule
            window:alwaysExpand="true">
            <ActivityFilter
                window:activityName=".ExpandedActivity"/>
        </ActivityRule>
    
    </resources>
    
  2. Create an initializer.

    The WindowManager RuleController component parses the XML configuration file and makes the rules available to the system. A Jetpack Startup library Initializer makes the XML file available to RuleController at app startup so that the rules are in effect when any activities start.

    To create an initializer, do the following:

    1. Add the latest Jetpack Startup library dependency to your module-level build.gradle file, for example:

      implementation 'androidx.startup:startup-runtime:1.1.1'

    2. Create a class that implements the Initializer interface.

      The initializer makes the split rules available to RuleController by passing the ID of the XML configuration file ( main_split_config.xml ) to the RuleController.parseRules() method.

      Котлин

      class SplitInitializer : Initializer<RuleController> {
      
          override fun create(context: Context): RuleController {
              return RuleController.getInstance(context).apply {
                  setRules(RuleController.parseRules(context, R.xml.main_split_config))
              }
          }
      
          override fun dependencies(): List<Class<out Initializer<*>>> {
              return emptyList()
          }
      }

      Ява

      public class SplitInitializer implements Initializer<RuleController> {
      
           @NonNull
           @Override
           public RuleController create(@NonNull Context context) {
               RuleController ruleController = RuleController.getInstance(context);
               ruleController.setRules(
                   RuleController.parseRules(context, R.xml.main_split_config)
               );
               return ruleController;
           }
      
           @NonNull
           @Override
           public List<Class<? extends Initializer<?>>> dependencies() {
               return Collections.emptyList();
           }
      }
  3. Create a content provider for the rule definitions.

    Add androidx.startup.InitializationProvider to your app manifest file as a <provider> . Include a reference to the implementation of your RuleController initializer, SplitInitializer :

    <!-- AndroidManifest.xml -->
    
    <provider android:name="androidx.startup.InitializationProvider"
        android:authorities="${applicationId}.androidx-startup"
        android:exported="false"
        tools:node="merge">
        <!-- Make SplitInitializer discoverable by InitializationProvider. -->
        <meta-data android:name="${applicationId}.SplitInitializer"
            android:value="androidx.startup" />
    </provider>
    

    InitializationProvider discovers and initializes SplitInitializer before the app's onCreate() method is called. As a result, the split rules are in effect when the app's main activity starts.

WindowManager API

You can implement activity embedding programmatically with a handful of API calls. Make the calls in the onCreate() method of a subclass of Application to ensure the rules are in effect before any activities launch.

To programmatically create an activity split, do the following:

  1. Create a split rule:

    1. Create a SplitPairFilter that identifies the activities that share the split:

      Котлин

      val splitPairFilter = SplitPairFilter(
         ComponentName(this, ListActivity::class.java),
         ComponentName(this, DetailActivity::class.java),
         null
      )

      Ява

      SplitPairFilter splitPairFilter = new SplitPairFilter(
         new ComponentName(this, ListActivity.class),
         new ComponentName(this, DetailActivity.class),
         null
      );
    2. Add the filter to a filter set:

      Котлин

      val filterSet = setOf(splitPairFilter)

      Ява

      Set<SplitPairFilter> filterSet = new HashSet<>();
      filterSet.add(splitPairFilter);
    3. Create layout attributes for the split:

      Котлин

      val splitAttributes: SplitAttributes = SplitAttributes.Builder()
          .setSplitType(SplitAttributes.SplitType.ratio(0.33f))
          .setLayoutDirection(SplitAttributes.LayoutDirection.LEFT_TO_RIGHT)
          .build()

      Ява

      final SplitAttributes splitAttributes = new SplitAttributes.Builder()
            .setSplitType(SplitAttributes.SplitType.ratio(0.33f))
            .setLayoutDirection(SplitAttributes.LayoutDirection.LEFT_TO_RIGHT)
            .build();

      SplitAttributes.Builder creates an object containing layout attributes:

      • setSplitType() : Defines how the available display area is allocated to each activity container. The ratio split type specifies the proportion of the available display area allocated to the primary container; the secondary container occupies the remainder of the available display area.
      • setLayoutDirection() : Specifies how the activity containers are laid out relative to one another, primary container first.
    4. Build a SplitPairRule :

      Котлин

      val splitPairRule = SplitPairRule.Builder(filterSet)
          .setDefaultSplitAttributes(splitAttributes)
          .setMinWidthDp(840)
          .setMinSmallestWidthDp(600)
          .setMaxAspectRatioInPortrait(EmbeddingAspectRatio.ratio(1.5f))
          .setFinishPrimaryWithSecondary(SplitRule.FinishBehavior.NEVER)
          .setFinishSecondaryWithPrimary(SplitRule.FinishBehavior.ALWAYS)
          .setClearTop(false)
          .build()

      Ява

      SplitPairRule splitPairRule = new SplitPairRule.Builder(filterSet)
          .setDefaultSplitAttributes(splitAttributes)
          .setMinWidthDp(840)
          .setMinSmallestWidthDp(600)
          .setMaxAspectRatioInPortrait(EmbeddingAspectRatio.ratio(1.5f))
          .setFinishPrimaryWithSecondary(SplitRule.FinishBehavior.NEVER)
          .setFinishSecondaryWithPrimary(SplitRule.FinishBehavior.ALWAYS)
          .setClearTop(false)
          .build();

      SplitPairRule.Builder creates and configures the rule:

      • filterSet : Contains split pair filters that determine when to apply the rule by identifying activities that share a split.
      • setDefaultSplitAttributes() : Applies layout attributes to the rule.
      • setMinWidthDp() : Sets the minimum display width (in density‑independent pixels, dp) that enables a split.
      • setMinSmallestWidthDp() : Sets the minimum value (in dp) that the smaller of the two display dimensions must have to enable a split regardless of the device orientation.
      • setMaxAspectRatioInPortrait() : Sets the maximum display aspect ratio (height:width) in portrait orientation for which activity splits are displayed. If the aspect ratio of a portrait display exceeds the maximum aspect ratio, splits are disabled regardless of the width of the display. Note: The default value is 1.4, which results in activities occupying the entire task window in portrait orientation on most tablets. See also SPLIT_MAX_ASPECT_RATIO_PORTRAIT_DEFAULT and setMaxAspectRatioInLandscape() . The default value for landscape is ALWAYS_ALLOW .
      • setFinishPrimaryWithSecondary() : Sets how finishing all activities in the secondary container affects the activities in the primary container. NEVER indicates the system shouldn't finish the primary activities when all activities in the secondary container finish (see Finish activities ).
      • setFinishSecondaryWithPrimary() : Sets how finishing all activities in the primary container affects the activities in the secondary container. ALWAYS indicates the system should always finish the activities in the secondary container when all activities in the primary container finish (see Finish activities ).
      • setClearTop() : Specifies whether all activities in the secondary container are finished when a new activity is launched in the container. A false value specifies that new activities are stacked on top of activities already in the secondary container.
    5. Get the singleton instance of the WindowManager RuleController , and add the rule:

      Котлин

        val ruleController = RuleController.getInstance(this)
        ruleController.addRule(splitPairRule)
        

      Ява

        RuleController ruleController = RuleController.getInstance(this);
        ruleController.addRule(splitPairRule);
        
  2. Create a placeholder for the secondary container when content is not available:

    1. Create an ActivityFilter that identifies the activity with which the placeholder shares a task window split:

      Котлин

      val placeholderActivityFilter = ActivityFilter(
          ComponentName(this, ListActivity::class.java),
          null
      )

      Ява

      ActivityFilter placeholderActivityFilter = new ActivityFilter(
          new ComponentName(this, ListActivity.class),
          null
      );
    2. Add the filter to a filter set:

      Котлин

      val placeholderActivityFilterSet = setOf(placeholderActivityFilter)

      Ява

      Set<ActivityFilter> placeholderActivityFilterSet = new HashSet<>();
      placeholderActivityFilterSet.add(placeholderActivityFilter);
    3. Create a SplitPlaceholderRule :

      Котлин

      val splitPlaceholderRule = SplitPlaceholderRule.Builder(
            placeholderActivityFilterSet,
            Intent(context, PlaceholderActivity::class.java)
          ).setDefaultSplitAttributes(splitAttributes)
           .setMinWidthDp(840)
           .setMinSmallestWidthDp(600)
           .setMaxAspectRatioInPortrait(EmbeddingAspectRatio.ratio(1.5f))
           .setFinishPrimaryWithPlaceholder(SplitRule.FinishBehavior.ALWAYS)
           .setSticky(false)
           .build()

      Ява

      SplitPlaceholderRule splitPlaceholderRule = new SplitPlaceholderRule.Builder(
            placeholderActivityFilterSet,
            new Intent(context, PlaceholderActivity.class)
          ).setDefaultSplitAttributes(splitAttributes)
           .setMinWidthDp(840)
           .setMinSmallestWidthDp(600)
           .setMaxAspectRatioInPortrait(EmbeddingAspectRatio.ratio(1.5f))
           .setFinishPrimaryWithPlaceholder(SplitRule.FinishBehavior.ALWAYS)
           .setSticky(false)
           .build();

      SplitPlaceholderRule.Builder creates and configures the rule:

      • placeholderActivityFilterSet : Contains activity filters that determine when to apply the rule by identifying activities with which the placeholder activity is associated.
      • Intent : Specifies the launch of the placeholder activity.
      • setDefaultSplitAttributes() : Applies layout attributes to the rule.
      • setMinWidthDp() : Sets the minimum display width (in density-independent pixels, dp) that allows a split.
      • setMinSmallestWidthDp() : Sets the minimum value (in dp) that the smaller of the two display dimensions must have to allow a split regardless of the device orientation.
      • setMaxAspectRatioInPortrait() : Sets the maximum display aspect ratio (height:width) in portrait orientation for which activity splits are displayed. Note: The default value is 1.4, which results in activities filling the task window in portrait orientation on most tablets. See also SPLIT_MAX_ASPECT_RATIO_PORTRAIT_DEFAULT and setMaxAspectRatioInLandscape() . The default value for landscape is ALWAYS_ALLOW .
      • setFinishPrimaryWithPlaceholder() : Sets how finishing the placeholder activity affects the activities in the primary container. ALWAYS indicates the system should always finish the activities in the primary container when the placeholder finishes (see Finish activities ).
      • setSticky() : Determines whether the placeholder activity appears on top of the activity stack on small displays once the placeholder has first appeared in a split with sufficient minimum width.
    4. Add the rule to the WindowManager RuleController :

      Котлин

      ruleController.addRule(splitPlaceholderRule)

      Ява

      ruleController.addRule(splitPlaceholderRule);
  3. Specify activities that should never be part of a split:

    1. Create an ActivityFilter that identifies an activity that should always occupy the entire task display area:

      Котлин

      val expandedActivityFilter = ActivityFilter(
        ComponentName(this, ExpandedActivity::class.java),
        null
      )

      Ява

      ActivityFilter expandedActivityFilter = new ActivityFilter(
        new ComponentName(this, ExpandedActivity.class),
        null
      );
    2. Add the filter to a filter set:

      Котлин

      val expandedActivityFilterSet = setOf(expandedActivityFilter)

      Ява

      Set<ActivityFilter> expandedActivityFilterSet = new HashSet<>();
      expandedActivityFilterSet.add(expandedActivityFilter);
    3. Create an ActivityRule :

      Котлин

      val activityRule = ActivityRule.Builder(expandedActivityFilterSet)
          .setAlwaysExpand(true)
          .build()

      Ява

      ActivityRule activityRule = new ActivityRule.Builder(
          expandedActivityFilterSet
      ).setAlwaysExpand(true)
       .build();

      ActivityRule.Builder creates and configures the rule:

      • expandedActivityFilterSet : Contains activity filters that determine when to apply the rule by identifying activities that you want to exclude from splits.
      • setAlwaysExpand() : Specifies whether the activity should fill the entire task window.
    4. Add the rule to the WindowManager RuleController :

      Котлин

      ruleController.addRule(activityRule)

      Ява

      ruleController.addRule(activityRule);

Cross-application embedding

On Android 13 (API level 33) and higher, apps can embed activities from other apps. Cross‑application, or cross‑ UID , activity embedding enables visual integration of activities from multiple Android applications. The system displays an activity of the host app and an embedded activity from another app on screen side by side or top and bottom just as in single-app activity embedding.

For example, the Settings app could embed the wallpaper selector activity from the WallpaperPicker app:

Figure 14. Settings app (menu on left) with wallpaper selector as embedded activity (right).

Trust model

Host processes that embed activities from other apps are able to redefine the presentation of the embedded activities, including size, position, cropping, and transparency. Malicious hosts can use this capability to mislead users and create clickjacking or other UI-redressing attacks.

To prevent misuse of cross-app activity embedding, Android requires apps to opt in to allow embedding of their activities. Apps can designate hosts as trusted or untrusted.

Trusted hosts

To allow other applications to embed and fully control the presentation of activities from your app, specify the SHA-256 certificate of the host application in the android:knownActivityEmbeddingCerts attribute of the <activity> or <application> elements of your app's manifest file.

Set the value of android:knownActivityEmbeddingCerts either as a string:

<activity
    android:name=".MyEmbeddableActivity"
    android:knownActivityEmbeddingCerts="@string/known_host_certificate_digest"
    ... />

or, to specify multiple certificates, an array of strings:

<activity
    android:name=".MyEmbeddableActivity"
    android:knownActivityEmbeddingCerts="@array/known_host_certificate_digests"
    ... />

which references a resource like the following:

<resources>
    <string-array name="known_host_certificate_digests">
      <item>cert1</item>
      <item>cert2</item>
      ...
    </string-array>
</resources>

App owners can get a SHA certificate digest by running the Gradle signingReport task. The certificate digest is the SHA-256 fingerprint without the separating colons. For more information, see Run a signing report and Authenticating Your Client .

Untrusted hosts

To allow any app to embed your app's activities and control their presentation, specify the android:allowUntrustedActivityEmbedding attribute in the <activity> or <application> elements in the app manifest, for example:

<activity
    android:name=".MyEmbeddableActivity"
    android:allowUntrustedActivityEmbedding="true"
    ... />

The default value of the attribute is false, which prevents cross-app activity embedding.

Пользовательская аутентификация

To mitigate the risks of untrusted activity embedding, create a custom authentication mechanism that verifies the host identity. If you know the host certificates, use the androidx.security.app.authenticator library to authenticate. If the host authenticates after embedding your activity, you can display the actual content. If not, you can inform the user that the action was not allowed and block the content.

Use the ActivityEmbeddingController#isActivityEmbedded() method from the Jetpack WindowManager library to check whether a host is embedding your activity, for example:

Котлин

fun isActivityEmbedded(activity: Activity): Boolean {
    return ActivityEmbeddingController.getInstance(this).isActivityEmbedded(activity)
}

Ява

boolean isActivityEmbedded(Activity activity) {
    return ActivityEmbeddingController.getInstance(this).isActivityEmbedded(activity);
}

Minimum size restriction

The Android system applies the minimum height and width specified in the app manifest <layout> element to embedded activities. If an application does not specify minimum height and width, the system default values apply ( sw220dp ).

If the host attempts to resize the embedded container to a size smaller than the minimum, the embedded container expands to occupy the entire task bounds.

<activity-alias>

For trusted or untrusted activity embedding to work with the <activity-alias> element, android:knownActivityEmbeddingCerts or android:allowUntrustedActivityEmbedding must be applied to the target activity rather than the alias. The policy that verifies security on the system server is based on the flags set on the target, not the alias.

Host application

Host applications implement cross-app activity embedding the same way they implement single-app activity embedding. SplitPairRule and SplitPairFilter or ActivityRule and ActivityFilter objects specify embedded activities and task window splits. Split rules are defined statically in XML or at runtime using Jetpack WindowManager API calls.

If a host application attempts to embed an activity that has not opted in to cross-app embedding, the activity occupies the entire task bounds. As a result, host applications need to know whether target activities allow cross-app embedding.

If an embedded activity starts a new activity in the same task and the new activity has not opted in to cross-app embedding, the activity occupies the entire task bounds instead of overlaying the activity in the embedded container.

A host application can embed its own activities without restriction as long as the activities launch in the same task.

Split examples

Split from full window

Figure 15. Activity A starts activity B to the side.

No refactoring required. You can define the configuration for the split statically or at runtime and then call Context#startActivity() without any additional parameters.

<SplitPairRule>
    <SplitPairFilter
        window:primaryActivityName=".A"
        window:secondaryActivityName=".B"/>
</SplitPairRule>

Split by default

When the landing page of an application is designed to be split into two containers on large screens, the user experience is best when both activities are created and presented simultaneously. However, content might not be available for the secondary container of the split until the user interacts with the activity in the primary container (for example, the user selects an item from a navigation menu). A placeholder activity can fill the void until content can be displayed in the secondary container of the split (see the Placeholders section).

Figure 16. Split created by opening two activities simultaneously. One activity is a placeholder.

To create a split with a placeholder, create a placeholder and associate it with the primary activity:

<SplitPlaceholderRule
    window:placeholderActivityName=".PlaceholderActivity">
    <ActivityFilter
        window:activityName=".MainActivity"/>
</SplitPlaceholderRule>

When an app receives an intent, the target activity can be shown as the secondary part of an activity split; for example, a request to show a detail screen with information about an item from a list. On small displays, the detail is shown in the full task window; on larger devices, beside the list.

Figure 17. Deep link detail activity shown alone on a small screen, but together with a list activity on a large screen.

The launch request should be routed to the main activity, and the target detail activity should be launched in a split. The system automatically chooses the correct presentation—stacked or side by side—based on the available display width.

Котлин

override fun onCreate(savedInstanceState Bundle?) {
    . . .
    RuleController.getInstance(this)
        .addRule(SplitPairRule.Builder(filterSet).build())
    startActivity(Intent(this, DetailActivity::class.java))
}

Ява

@Override
protected void onCreate(@Nullable Bundle savedInstanceState) {
    . . .
    RuleController.getInstance(this)
        .addRule(new SplitPairRule.Builder(filterSet).build());
    startActivity(new Intent(this, DetailActivity.class));
}

The deep link destination might be the only activity that should be available to the user in the back navigation stack, and you might want to avoid dismissing the detail activity and leaving only the main activity:

Large display with list activity and detail activity side by side.
          Back navigation unable to dismiss detail activity and leave list
          activity on screen.

Small display with detail activity only. Back navigation unable to
          dismiss detail activity and reveal list activity.

Instead, you can finish both activities at the same time by using the finishPrimaryWithSecondary attribute:

<SplitPairRule
    window:finishPrimaryWithSecondary="always">
    <SplitPairFilter
        window:primaryActivityName=".ListActivity"
        window:secondaryActivityName=".DetailActivity"/>
</SplitPairRule>

See the Configuration attributes section.

Multiple activities in split containers

Stacking multiple activities in a split container enables users to access deep content. For example, with a list-detail split, the user might need to go into a sub-detail section but keep the primary activity in place:

Figure 18. Activity opened in place in the secondary pane of the task window.

Котлин

class DetailActivity {
    . . .
    fun onOpenSubDetail() {
      startActivity(Intent(this, SubDetailActivity::class.java))
    }
}

Ява

public class DetailActivity {
    . . .
    void onOpenSubDetail() {
        startActivity(new Intent(this, SubDetailActivity.class));
    }
}

The sub-detail activity is placed on top of the detail activity, concealing it:

The user can then go back to the previous detail level by navigating back through the stack:

Figure 19. Activity removed from the top of the stack.

Stacking activities on top of each other is the default behavior when activities are launched from an activity in the same secondary container. Activities launched from the primary container within an active split also end up in the secondary container on the top of the activity stack.

Activities in a new task

When activities in a split task window start activities in a new task, the new task is separate from the task that includes the split and is displayed full window. The Recents screen shows two tasks: the task in the split and the new task.

Figure 20. Start activity C in a new task from activity B.

Activity replacement

Activities can be replaced in the secondary container stack; for example, when the primary activity is used for top-level navigation and the secondary activity is a selected destination. Each selection from the top-level navigation should start a new activity in the secondary container and remove the activity or activities that were previously there.

Figure 21. Top-level navigation activity in the primary pane replaces destination activities in the secondary pane.

If the app doesn't finish the activity in the secondary container when the navigation selection changes, back navigation might be confusing when the split is collapsed (when the device is folded). For example, if you have a menu in the primary pane and screens A and B stacked in the secondary pane, when the user folds the phone, B is on top of A, and A is on top of the menu. When the user navigates back from B, A appears instead of the menu.

Screen A must be removed from the back stack in such cases.

The default behavior when launching to the side in a new container over an existing split is to put the new secondary containers on top and retain the old ones in the back stack. You can configure the splits to clear the previous secondary containers with clearTop and launch new activities normally.

<SplitPairRule
    window:clearTop="true">
    <SplitPairFilter
        window:primaryActivityName=".Menu"
        window:secondaryActivityName=".ScreenA"/>
    <SplitPairFilter
        window:primaryActivityName=".Menu"
        window:secondaryActivityName=".ScreenB"/>
</SplitPairRule>

Котлин

class MenuActivity {
    . . .
    fun onMenuItemSelected(selectedMenuItem: Int) {
        startActivity(Intent(this, classForItem(selectedMenuItem)))
    }
}

Ява

public class MenuActivity {
    . . .
    void onMenuItemSelected(int selectedMenuItem) {
        startActivity(new Intent(this, classForItem(selectedMenuItem)));
    }
}

Alternatively, use the same secondary activity, and from the primary (menu) activity send new intents that resolve to the same instance but trigger a state or UI update in the secondary container.

Multiple splits

Apps can provide multi-level deep navigation by launching additional activities to the side.

When an activity in a secondary container launches a new activity to the side, a new split is created over top of the existing split.

Figure 22. Activity B starts activity C to the side.

The back stack contains all activities that were previously opened, so users can navigate to the A/B split after finishing C.

Activities A, B, and C in a stack. The activities are stacked in
          the following order from top to bottom: C, B, A.

To create a new split, launch the new activity to the side from the existing secondary container. Declare the configurations for both the A/B and B/C splits and launch activity C normally from B:

<SplitPairRule>
    <SplitPairFilter
        window:primaryActivityName=".A"
        window:secondaryActivityName=".B"/>
    <SplitPairFilter
        window:primaryActivityName=".B"
        window:secondaryActivityName=".C"/>
</SplitPairRule>

Котлин

class B {
    . . .
    fun onOpenC() {
        startActivity(Intent(this, C::class.java))
    }
}

Ява

public class B {
    . . .
    void onOpenC() {
        startActivity(new Intent(this, C.class));
    }
}

React to split state changes

Different activities in an app can have UI elements that perform the same function; for example, a control that opens a window containing account settings.

Figure 23. Different activities with functionally identical UI elements.

If two activities that have a UI element in common are in a split, it's redundant and perhaps confusing to show the element in both activities.

Figure 24. Duplicate UI elements in activity split.

To know when activities are in a split, check the SplitController.splitInfoList flow or register a listener with SplitControllerCallbackAdapter for changes in the split state. Then, adjust the UI accordingly:

Котлин

val layout = layoutInflater.inflate(R.layout.activity_main, null)
val view = layout.findViewById<View>(R.id.infoButton)
lifecycleScope.launch {
    lifecycle.repeatOnLifecycle(Lifecycle.State.STARTED) {
        splitController.splitInfoList(this@SplitDeviceActivity) // The activity instance.
            .collect { list ->
                view.visibility = if (list.isEmpty()) View.VISIBLE else View.GONE
            }
    }
}

Ява

@Override
protected void onCreate(@Nullable Bundle savedInstanceState) {
    . . .
    new SplitControllerCallbackAdapter(SplitController.getInstance(this))
        .addSplitListener(
            this,
            Runnable::run,
            splitInfoList -> {
                View layout = getLayoutInflater().inflate(R.layout.activity_main, null);
                layout.findViewById(R.id.infoButton).setVisibility(
                    splitInfoList.isEmpty() ? View.VISIBLE : View.GONE);
            });
}

Coroutines can be launched in any lifecycle state, but are typically launched in the STARTED state to conserve resources (see Use Kotlin coroutines with lifecycle-aware components for more information).

Callbacks can be made in any lifecycle state, including when an activity is stopped. Listeners should usually be registered in onStart() and unregistered in onStop() .

Full-window modal

Some activities block users from interacting with the application until a specified action is performed; for example, a login screen activity, policy acknowledgement screen, or error message. Modal activities should be prevented from appearing in a split.

An activity can be forced to always fill the task window by using the expand configuration:

<ActivityRule
    window:alwaysExpand="true">
    <ActivityFilter
        window:activityName=".FullWidthActivity"/>
</ActivityRule>

Finish activities

Users can finish activities on either side of the split by swiping from the edge of the display:
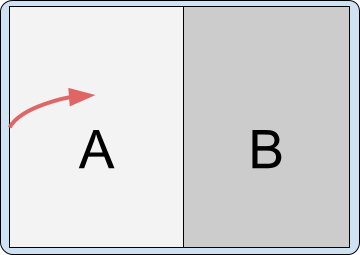
Figure 25. Swipe gesture finishing activity B.
Figure 26. Swipe gesture finishing activity A.

If the device is set up to use the back button instead of gesture navigation, the input is sent to the focused activity—the activity that was touched or launched last.

The effect that finishing all activities in a container has on the opposing container depends on the split configuration.

Configuration attributes

You can specify split pair rule attributes to configure how finishing all activities on one side of the split affects the activities on the other side of the split. The attributes are:

  • window:finishPrimaryWithSecondary — How finishing all activities in the secondary container affects the activities in the primary container
  • window:finishSecondaryWithPrimary — How finishing all activities in the primary container affects the activities in the secondary container

Possible values of the attributes include:

  • always — Always finish the activities in the associated container
  • never — Never finish the activities in the associated container
  • adjacent — Finish the activities in the associated container when the two containers are displayed adjacent to each other, but not when the two containers are stacked

Например:

<SplitPairRule
    &lt;!-- Do not finish primary container activities when all secondary container activities finish. --&gt;
    window:finishPrimaryWithSecondary="never"
    &lt;!-- Finish secondary container activities when all primary container activities finish. --&gt;
    window:finishSecondaryWithPrimary="always">
    <SplitPairFilter
        window:primaryActivityName=".A"
        window:secondaryActivityName=".B"/>
</SplitPairRule>

Default configuration

When all activities in one container of a split finish, the remaining container occupies the entire window:

<SplitPairRule>
    <SplitPairFilter
        window:primaryActivityName=".A"
        window:secondaryActivityName=".B"/>
</SplitPairRule>

Split containing activities A and B. A is finished, leaving B to
          occupy the entire window.

Split containing activities A and B. B is finished, leaving A to
          occupy the entire window.

Finish activities together

Finish the activities in the primary container automatically when all activities in the secondary container finish:

<SplitPairRule
    window:finishPrimaryWithSecondary="always">
    <SplitPairFilter
        window:primaryActivityName=".A"
        window:secondaryActivityName=".B"/>
</SplitPairRule>

Split containing activities A and B. B is finished, which also
          finishes A, leaving the task window empty.

Split containing activities A and B. A is finished, leaving B alone
          in the task window.

Finish the activities in the secondary container automatically when all activities in the primary container finish:

<SplitPairRule
    window:finishSecondaryWithPrimary="always">
    <SplitPairFilter
        window:primaryActivityName=".A"
        window:secondaryActivityName=".B"/>
</SplitPairRule>

Split containing activities A and B. A is finished, which also
          finishes B, leaving the task window empty.

Split containing activities A and B. B is finished, leaving A alone
          in the task window.

Finish activities together when all activities in either the primary or secondary container finish:

<SplitPairRule
    window:finishPrimaryWithSecondary="always"
    window:finishSecondaryWithPrimary="always">
    <SplitPairFilter
        window:primaryActivityName=".A"
        window:secondaryActivityName=".B"/>
</SplitPairRule>

Split containing activities A and B. A is finished, which also
          finishes B, leaving the task window empty.

Split containing activities A and B. B is finished, which also
          finishes A, leaving the task window empty.

Finish multiple activities in containers

If multiple activities are stacked in a split container, finishing an activity on the bottom of the stack does not automatically finish activities on top.

For example, if two activities are in the secondary container, C on top of B:

Secondary activity stack containing activity C stacked on top of B           is stacked on top of the prmary activity stack containing activity           А.

and the configuration of the split is defined by the configuration of activities A and B:

<SplitPairRule>
    <SplitPairFilter
        window:primaryActivityName=".A"
        window:secondaryActivityName=".B"/>
</SplitPairRule>

finishing the top activity retains the split.

Split with activity A in primary container and activities B and C in
          secondary, C stacked on top of B. C finishes, leaving A and B in the
          activity split.

Finishing the bottom (root) activity of the secondary container does not remove the activities on top of it; and so, also retains the split.

Split with activity A in primary container and activities B and C in
          secondary, C stacked on top of B. B finishes, leaving A and C in the
          activity split.

Any additional rules for finishing activities together, such as finishing the secondary activity with the primary, are also executed:

<SplitPairRule
    window:finishSecondaryWithPrimary="always">
    <SplitPairFilter
        window:primaryActivityName=".A"
        window:secondaryActivityName=".B"/>
</SplitPairRule>

Split with activity A in primary container and activities B and C in
          secondary container, C stacked on top of B. A finishes, also
          finishing B and C.

And when the split is configured to finish primary and secondary together:

<SplitPairRule
    window:finishPrimaryWithSecondary="always"
    window:finishSecondaryWithPrimary="always">
    <SplitPairFilter
        window:primaryActivityName=".A"
        window:secondaryActivityName=".B"/>
</SplitPairRule>

Split with activity A in primary container and activities B and C in
          secondary, C stacked on top of B. C finishes, leaving A and B in the
          activity split.

Split with activity A in primary container and activities B and C in
          secondary, C stacked on top of B. B finishes, leaving A and C in the
          activity split.

Split with activity A in primary container and activities B and C in           secondary, C stacked on top of B. A finishes, also finishing B and           С.

Change split properties at runtime

The properties of an active and visible split cannot be changed. Changing the split rules affects additional activity launches and new containers, but not existing and active splits.

To change the properties of active splits, finish the side activity or activities in the split and launch to the side again with a new configuration.

Dynamic split properties

Android 15 (API level 35) and higher supported by Jetpack WindowManager 1.4 and higher offer dynamic features that enable configurability of activity embedding splits, including:

  • Pane expansion: An interactive, draggable divider enables users to resize the panes in a split presentation.
  • Activity stack pinning: Users can pin the content in one container and isolate navigation in the container from navigation in the other container.
  • Dialog full-screen dim: When displaying a dialog, apps can specify whether to dim the entire task window or just the container that opened the dialog.

Pane expansion

Pane expansion enables users to adjust the amount of screen space allocated to the two activities in a dual‑pane layout.

To customize the appearance of the window divider and set the divider's draggable range, do the following:

  1. Create an instance of DividerAttributes

  2. Customize the divider attributes:

    • color : The color of the draggable pane separator.

    • widthDp : The width of the draggable pane separator. Set to WIDTH_SYSTEM_DEFAULT to let the system determine the divider width.

    • Drag range: The minimum percentage of the screen either pane can occupy. Can range from 0.33 to 0.66. Set to DRAG_RANGE_SYSTEM_DEFAULT to let the system determine the drag range.

Котлин

val splitAttributesBuilder: SplitAttributes.Builder = SplitAttributes.Builder()
    .setSplitType(SplitAttributes.SplitType.ratio(0.33f))
    .setLayoutDirection(SplitAttributes.LayoutDirection.LEFT_TO_RIGHT)

if (WindowSdkExtensions.getInstance().extensionVersion >= 6) {
    splitAttributesBuilder.setDividerAttributes(
      DividerAttributes.DraggableDividerAttributes.Builder()
        .setColor(getColor(context, R.color.divider_color))
        .setWidthDp(4)
        .setDragRange(DividerAttributes.DragRange.DRAG_RANGE_SYSTEM_DEFAULT)
        .build()
    )
}
val splitAttributes: SplitAttributes = splitAttributesBuilder.build()

Ява

SplitAttributes.Builder splitAttributesBuilder = new SplitAttributes.Builder()
    .setSplitType(SplitAttributes.SplitType.ratio(0.33f))
    .setLayoutDirection(SplitAttributes.LayoutDirection.LEFT_TO_RIGHT);

if (WindowSdkExtensions.getInstance().getExtensionVersion() >= 6) {
    splitAttributesBuilder.setDividerAttributes(
      new DividerAttributes.DraggableDividerAttributes.Builder()
        .setColor(ContextCompat.getColor(context, R.color.divider_color))
        .setWidthDp(4)
        .setDragRange(DividerAttributes.DragRange.DRAG_RANGE_SYSTEM_DEFAULT)
        .build()
    );
}
SplitAttributes splitAttributes = splitAttributesBuilder.build();

Activity stack pinning

Activity stack pinning enables users to pin one of the split windows so the activity stays as is while users navigate within the other window. Activity stack pinning provides an enhanced multitasking experience.

To enable activity stack pinning in your app, do the following:

  1. Add a button to the layout file of the activity you want to pin, for example, the detail activity of an list‑detail layout:

    <androidx.constraintlayout.widget.ConstraintLayout
     xmlns:android="http://schemas.android.com/apk/res/android"
     xmlns:app="http://schemas.android.com/apk/res-auto"
     xmlns:tools="http://schemas.android.com/tools"
     android:id="@+id/detailActivity"
     android:layout_width="match_parent"
     android:layout_height="match_parent"
     android:background="@color/white"
     tools:context=".DetailActivity">
    
    <TextView
       android:id="@+id/textViewItemDetail"
       android:layout_width="wrap_content"
       android:layout_height="wrap_content"
       android:textSize="36sp"
       android:textColor="@color/obsidian"
       app:layout_constraintBottom_toTopOf="@id/pinButton"
       app:layout_constraintEnd_toEndOf="parent"
       app:layout_constraintStart_toStartOf="parent"
       app:layout_constraintTop_toTopOf="parent" />
    
    <androidx.appcompat.widget.AppCompatButton
       android:id="@+id/pinButton"
       android:layout_width="wrap_content"
       android:layout_height="wrap_content"
       android:text="@string/pin_this_activity"
       app:layout_constraintBottom_toBottomOf="parent"
       app:layout_constraintEnd_toEndOf="parent"
       app:layout_constraintStart_toStartOf="parent"
       app:layout_constraintTop_toBottomOf="@id/textViewItemDetail"/>
    
    </androidx.constraintlayout.widget.ConstraintLayout>
    
  2. In the onCreate() method of the activity, set an onclick listener on the button:

    Котлин

    pinButton = findViewById(R.id.pinButton)
    pinButton.setOnClickListener {
        val splitAttributes: SplitAttributes = SplitAttributes.Builder()
            .setSplitType(SplitAttributes.SplitType.ratio(0.66f))
            .setLayoutDirection(SplitAttributes.LayoutDirection.LEFT_TO_RIGHT)
            .build()
    
        val pinSplitRule = SplitPinRule.Builder()
            .setSticky(true)
            .setDefaultSplitAttributes(splitAttributes)
            .build()
    
        SplitController.getInstance(applicationContext).pinTopActivityStack(taskId, pinSplitRule)
    }

    Ява

    Button pinButton = findViewById(R.id.pinButton);
    pinButton.setOnClickListener( (view) => {
        SplitAttributes splitAttributes = new SplitAttributes.Builder()
            .setSplitType(SplitAttributes.SplitType.ratio(0.66f))
            .setLayoutDirection(SplitAttributes.LayoutDirection.LEFT_TO_RIGHT)
            .build();
    
        SplitPinRule pinSplitRule = new SplitPinRule.Builder()
            .setSticky(true)
            .setDefaultSplitAttributes(splitAttributes)
            .build();
    
        SplitController.getInstance(getApplicationContext()).pinTopActivityStack(getTaskId(), pinSplitRule);
    });

Dialog full-screen dim

Activities typically dim their displays to draw attention to a dialog. In activity embedding, both panes of the dual‑pane display should dim, not just the pane containing the activity that opened the dialog, for a unified UI experience.

With WindowManager 1.4 and higher, the entire app window dims by default when a dialog opens (see EmbeddingConfiguration.DimAreaBehavior.ON_TASK ).

To dim only the container of the activity that opened the dialog, use EmbeddingConfiguration.DimAreaBehavior.ON_ACTIVITY_STACK .

Extract an activity from a split to full window

Create a new configuration that displays the side activity full window, and then relaunch the activity with an intent that resolves to the same instance.

Check for split support at runtime

Activity embedding is supported on Android 12L (API level 32) and higher, but is also available on some devices running earlier platform versions. To check at runtime for the availability of the feature, use the SplitController.splitSupportStatus property or SplitController.getSplitSupportStatus() method:

Котлин

if (SplitController.getInstance(this).splitSupportStatus ==
     SplitController.SplitSupportStatus.SPLIT_AVAILABLE) {
     // Device supports split activity features.
}

Ява

if (SplitController.getInstance(this).getSplitSupportStatus() ==
     SplitController.SplitSupportStatus.SPLIT_AVAILABLE) {
     // Device supports split activity features.
}

If splits are not supported, activities are launched on top of the activity stack (following the non-activity embedding model).

Prevent system override

The manufacturers of Android devices (original equipment manufacturers, or OEMs), can implement activity embedding as a function of the device system. The system specifies split rules for multi-activity apps, overriding the windowing behavior of the apps. The system override forces multi-activity apps into a system-defined activity embedding mode.

System activity embedding can enhance app presentation through multi-pane layouts, such as list-detail , without any changes to the app. However, the system's activity embedding might also cause incorrect app layouts, bugs, or conflicts with activity embedding implemented by the app.

Your app can prevent or permit system activity embedding by setting a property in the app manifest file, for example:

<manifest xmlns:android="http://schemas.android.com/apk/res/android">
    <application>
        <property
            android:name="android.window.PROPERTY_ACTIVITY_EMBEDDING_ALLOW_SYSTEM_OVERRIDE"
            android:value="true|false" />
    </application>
</manifest>

The property name is defined in the Jetpack WindowManager WindowProperties object. Set the value to false if your app implements activity embedding, or if you want to otherwise prevent the system from applying its activity embedding rules to your app. Set the value to true to permit the system to apply system-defined activity embedding to your app.

Limitations, restrictions, and caveats

  • Only the host app of the task, which is identified as the owner of the root activity in the task, can organize and embed other activities in the task. If activities that support embedding and splits run in a task that belongs to a different application, then embedding and splits will not work for those activities.
  • Activities can only be organized within a single task. Launching an activity in a new task always puts it in a new expanded window outside of any existing splits.
  • Only activities in the same process can be organized and put in a split. The SplitInfo callback only reports activities that belong to the same process, since there is no way of knowing about activities in different processes.
  • Each pair or singular activity rule applies only to activity launches that happen after the rule has been registered. There is currently no way to update existing splits or their visual properties.
  • The split pair filter configuration must match the intents used when launching activities completely. The matching occurs at the point when a new activity is started from the application process, so it might not know about component names that are resolved later in the system process when using implicit intents. If a component name is not known at the time of launch, a wildcard can be used instead ("*/*") and filtering can be performed based on intent action.
  • There is currently no way to move activities between containers or in and out of splits after they were created. Splits are only created by the WindowManager library when new activities with matching rules are launched, and splits are destroyed when the last activity in a split container is finished.
  • Activities can be relaunched when the configuration changes, so when a split is created or removed and activity bounds change, the activity can go through complete destruction of the previous instance and creation of the new one. As a result, app developers should be careful with things like launching new activities from lifecycle callbacks.
  • Devices must include the window extensions interface to support activity embedding. Nearly all large screen devices running Android 12L (API level 32) or higher include the interface. However, some large screen devices that are not capable of running multiple activities don't include the window extensions interface. If a large screen device doesn't support multi-window mode, it might not support activity embedding.

Дополнительные ресурсы