
從 Android 8.0 (API 級別 26) 開始,所有通知都必須指派專屬管道。你可以為每個管道設定視覺和聽覺行為,並套用至該管道的所有通知。使用者可以變更這些設定,決定應用程式的哪些通知管道會造成干擾或顯示通知。
如要概略瞭解 Android 8.0 中的通知管道和其他通知功能,請觀看以下影片。
如圖 1 所示,使用者可以在系統設定中,為每個應用程式設定通知管道。

圖 1. 「時鐘」應用程式的通知設定,以及該應用程式的某個管道。
建立通知管道後,就無法變更通知行為。此時使用者擁有完整控制權,不過,你還是可以變更頻道的名稱和說明。
為每種要傳送的通知建立管道。您也可以建立通知管道,以反映使用者所做的決定。舉例來說,您可以為使用者在訊息應用程式中建立的每個對話群組,設定不同的通知管道。
如果指定 Android 8.0 (API 級別 26) 以上版本,就必須實作一或多個通知管道。如果 targetSdkVersion 設為 25 以下,應用程式在 Android 8.0 (API 級別 26) 以上版本上執行時,行為與在 Android 7.1 (API 級別 25) 以下版本上執行時相同。
建立通知管道
如要建立通知管道,請按照下列步驟操作:
使用專屬管道 ID、使用者可見名稱和重要程度,建構
NotificationChannel物件。您也可以選擇使用
setDescription(),指定使用者在系統設定中看到的說明。將通知管道傳遞至
createNotificationChannel(),即可註冊通知管道。
下列範例說明如何建立及註冊通知管道:
Kotlin
if (Build.VERSION.SDK_INT >= Build.VERSION_CODES.O) {
    // Create the NotificationChannel.
    val name = getString(R.string.channel_name)
    val descriptionText = getString(R.string.channel_description)
    val importance = NotificationManager.IMPORTANCE_DEFAULT
    val mChannel = NotificationChannel(CHANNEL_ID, name, importance)
    mChannel.description = descriptionText
    // Register the channel with the system. You can't change the importance
    // or other notification behaviors after this.
    val notificationManager = getSystemService(NOTIFICATION_SERVICE) as NotificationManager
    notificationManager.createNotificationChannel(mChannel)
}
Java
private void createNotificationChannel() {
    // Create the NotificationChannel, but only on API 26+ because
    // the NotificationChannel class is not in the Support Library.
    if (Build.VERSION.SDK_INT >= Build.VERSION_CODES.O) {
        CharSequence name = getString(R.string.channel_name);
        String description = getString(R.string.channel_description);
        int importance = NotificationManager.IMPORTANCE_DEFAULT;
        NotificationChannel channel = new NotificationChannel(CHANNEL_ID, name, importance);
        channel.setDescription(description);
        // Register the channel with the system. You can't change the importance
        // or other notification behaviors after this.
        NotificationManager notificationManager = getSystemService(NotificationManager.class);
        notificationManager.createNotificationChannel(channel);
    }
}
使用原始值重新建立現有通知管道不會執行任何作業,因此啟動應用程式時可以放心呼叫這段程式碼。
根據預設,發布至特定管道的所有通知都會使用 NotificationManagerCompat 類別中重要性層級定義的視覺和聽覺行為,例如 IMPORTANCE_DEFAULT 或 IMPORTANCE_HIGH。如要進一步瞭解重要性等級,請參閱下一節。
如要進一步自訂頻道的預設通知行為,可以在 NotificationChannel 上呼叫 enableLights()、setLightColor() 和 setVibrationPattern() 等方法。請注意,建立頻道後就無法變更這些設定,且使用者可最終決定是否啟用這些行為。
您也可以呼叫 createNotificationChannels(),在單一作業中建立多個通知管道。
設定重要性等級
頻道重要性會影響頻道中所有通知的中斷程度。在 NotificationChannel 建構函式中指定,使用五個重要性等級之一,範圍從 IMPORTANCE_NONE(0) 到 IMPORTANCE_HIGH(4)。
如要支援搭載 Android 7.1 (API 級別 25) 以下版本的裝置,您也必須針對每則通知呼叫 setPriority(),並使用 NotificationCompat 類別中的優先順序常數。
重要性 (NotificationManager.IMPORTANCE_*) 和優先順序 (NotificationCompat.PRIORITY_*) 常數會對應至使用者可見的重要性選項,如下表所示。
| 向使用者顯示的重要性等級 | 重要性 (Android 8.0 以上版本) | 優先順序 (Android 7.1 以下版本) |
|---|---|---|
| 緊急 會發出音效,並顯示為抬頭通知。 |
IMPORTANCE_HIGH |
PRIORITY_HIGH 或 PRIORITY_MAX |
| 高 會發出音效。 |
IMPORTANCE_DEFAULT |
PRIORITY_DEFAULT |
| 中 不會發出音效。 |
IMPORTANCE_LOW |
PRIORITY_LOW |
| 低 不會發出音效,也不會顯示在狀態列中。 |
IMPORTANCE_MIN |
PRIORITY_MIN |
| 無 不會發出音效,也不會顯示在狀態列或通知欄中。 |
IMPORTANCE_NONE |
N/A |
無論重要性為何,所有通知都會顯示在不會造成干擾的系統 UI 位置 (例如通知導覽匣),也會在啟動器圖示上顯示標記,不過您可以修改通知標記的外觀。
將頻道提交至 NotificationManager 後,就無法變更重要性等級。不過,使用者隨時可以變更應用程式頻道的偏好設定。
如要瞭解如何選擇適當的優先順序等級,請參閱通知設計指南中的「優先順序等級」。
讀取通知管道設定
使用者可以修改通知管道的設定,包括震動和警示音效等行為。如要瞭解使用者對通知管道套用的設定,請按照下列步驟操作:
呼叫
getNotificationChannel()或getNotificationChannels()即可取得NotificationChannel物件。查詢特定頻道設定,例如
getVibrationPattern()、getSound()和getImportance()。
如果發現某項頻道設定會妨礙應用程式的預期行為,可以建議使用者變更設定,並提供開啟頻道設定的動作,如下一節所示。
開啟通知管道設定
建立通知管道後,您就無法以程式輔助方式變更通知管道的視覺和聽覺行為。只有使用者可以透過系統設定變更管道行為。如要讓使用者輕鬆存取這些通知設定,請在應用程式的設定 UI 中新增項目,開啟這些系統設定。
您可以使用 Intent 開啟通知管道的系統設定,該 Intent 會使用 ACTION_CHANNEL_NOTIFICATION_SETTINGS 動作。
舉例來說,以下程式碼範例說明如何將使用者重新導向至通知管道的設定:
Kotlin
val intent = Intent(Settings.ACTION_CHANNEL_NOTIFICATION_SETTINGS).apply {
    putExtra(Settings.EXTRA_APP_PACKAGE, packageName)
    putExtra(Settings.EXTRA_CHANNEL_ID, myNotificationChannel.getId())
}
startActivity(intent)
Java
Intent intent = new Intent(Settings.ACTION_CHANNEL_NOTIFICATION_SETTINGS);
intent.putExtra(Settings.EXTRA_APP_PACKAGE, getPackageName());
intent.putExtra(Settings.EXTRA_CHANNEL_ID, myNotificationChannel.getId());
startActivity(intent);
請注意,意圖需要兩個額外項目,分別指定應用程式的套件名稱 (也稱為應用程式 ID) 和要編輯的頻道。
刪除通知管道
您可以呼叫 deleteNotificationChannel() 刪除通知管道。以下範例程式碼示範如何完成這項程序:
Kotlin
// The id of the channel.
val notificationManager = getSystemService(Context.NOTIFICATION_SERVICE) as NotificationManager
val id: String = "my_channel_01"
notificationManager.deleteNotificationChannel(id)
Java
NotificationManager notificationManager =
        (NotificationManager) getSystemService(Context.NOTIFICATION_SERVICE);
// The id of the channel.
String id = "my_channel_01";
notificationManager.deleteNotificationChannel(id);
建立通知管道群組
如要進一步整理設定使用者介面中的頻道外觀,可以建立頻道群組。如果應用程式支援多個使用者帳戶,建議您為每個帳戶建立通知管道群組。使用者可透過頻道群組區分並控管多個名稱相同的通知頻道。
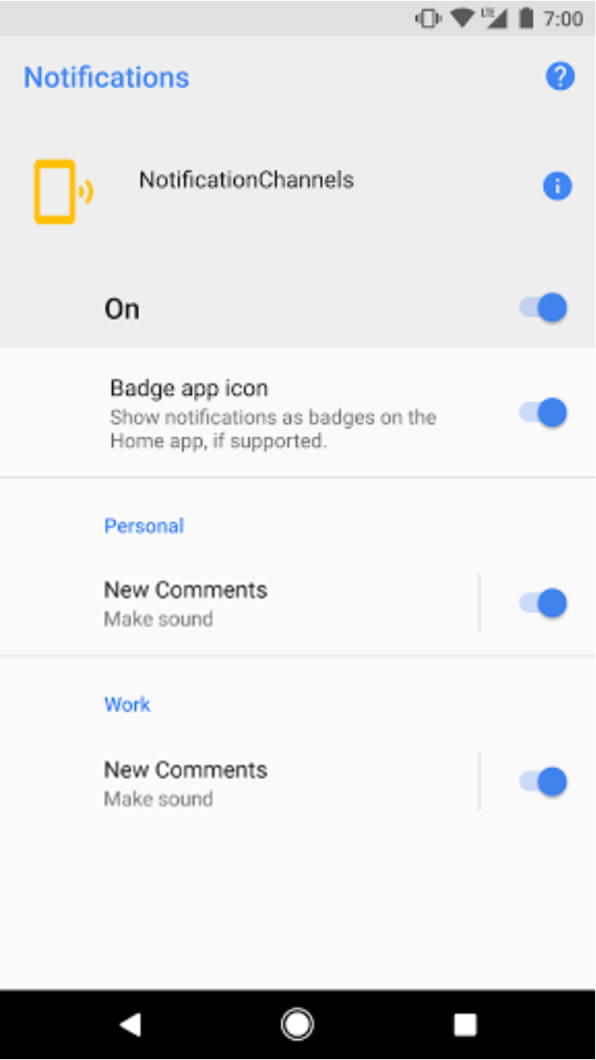
圖 2. 通知管道設定,並依個人和公司帳戶分組。
舉例來說,社群網路應用程式可能支援個人和工作帳戶。在這種情況下,每個帳戶可能都需要多個功能和名稱相同的通知管道,例如:
個人帳戶有兩個頻道:
新留言
貼文建議
擁有兩個頻道的商家帳戶:
新留言
貼文建議
將各帳戶的通知管道分組,方便使用者區分。
每個通知管道群組都需要 ID,且 ID 在套件中不得重複,還需要使用者可見的名稱。下列程式碼片段說明如何建立通知管道群組。
Kotlin
// The id of the group.
val groupId = "my_group_01"
// The user-visible name of the group.
val groupName = getString(R.string.group_name)
val notificationManager = getSystemService(Context.NOTIFICATION_SERVICE) as NotificationManager
notificationManager.createNotificationChannelGroup(NotificationChannelGroup(groupId, groupName))
Java
// The id of the group.
String groupId = "my_group_01";
// The user-visible name of the group.
CharSequence groupName = getString(R.string.group_name);
NotificationManager notificationManager =
        (NotificationManager) getSystemService(Context.NOTIFICATION_SERVICE);
notificationManager.createNotificationChannelGroup(new NotificationChannelGroup(groupId, groupName));
建立新群組後,您可以呼叫
setGroup()
將新的 NotificationChannel 物件與群組建立關聯。
將頻道提交至通知管理員後,就無法變更通知頻道與群組之間的關聯。