
从 Android 8.0(API 级别 26)开始,所有通知都必须分配到相应的渠道。对于每个渠道,您可以设置应用于其中的所有通知的视觉和听觉行为。用户可以更改这些设置,并确定您应用中的哪些通知渠道可以具有干扰性或应该可见。
请观看下面的视频,简要了解 Android 8.0 中的渠道和其他通知功能。
您可以在系统设置中找到每个应用的通知渠道的用户设置(如图 1 所示)。
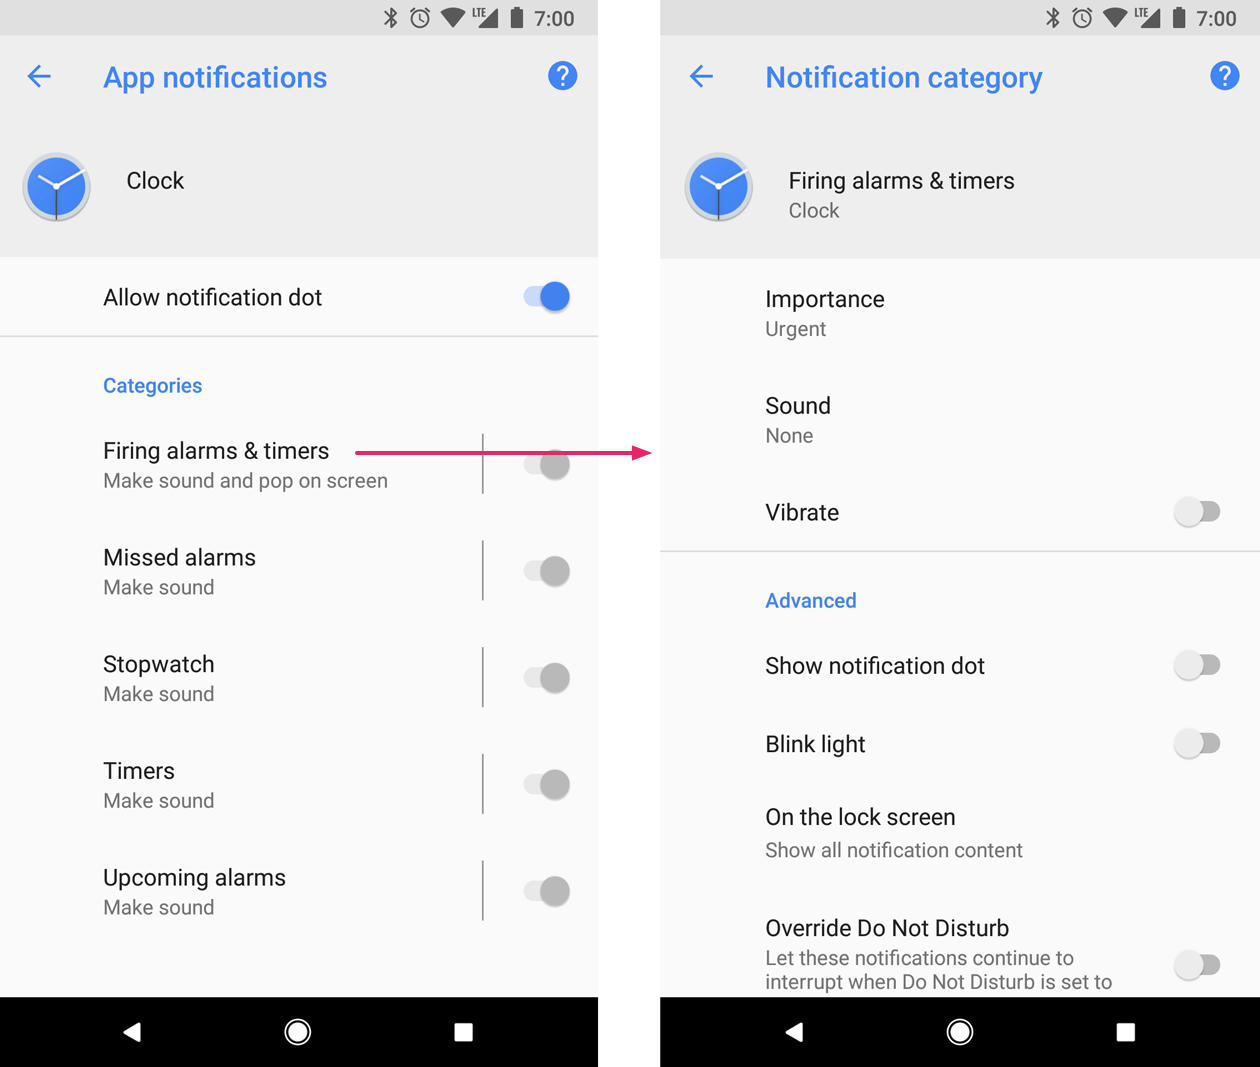
图 1. 时钟应用以及该应用的其中一个渠道的通知设置。
创建通知渠道后,您便无法更改通知行为。此时,用户拥有完全控制权。不过,您仍然可以更改频道的名称和说明。
为需要发送的每种类型的通知创建一个渠道。您还可以创建通知渠道来响应用户做出的选择。例如,您可以为用户在即时通讯应用中创建的每个会话组设置不同的通知渠道。
如果您以 Android 8.0(API 级别 26)或更高版本为目标平台,则必须实现一个或多个通知渠道。如果您的 targetSdkVersion 设置为 25 或更低级别,那么当您的应用在搭载 Android 8.0(API 级别 26)或更高版本的设备上运行时,其行为方式与在搭载 Android 7.1(API 级别 25)或更低版本的设备上相同。
创建通知渠道
如需创建通知渠道,请按以下步骤操作:
构建一个具有唯一频道 ID、用户可见名称和重要性级别的
NotificationChannel对象。(可选)使用
setDescription()指定用户在系统设置中看到的说明。注册通知渠道,方法是将该渠道传递给
createNotificationChannel()。
以下示例展示了如何创建和注册通知渠道:
  if (Build.VERSION.SDK_INT >= Build.VERSION_CODES.O) {
      // Create the NotificationChannel.
      val name = getString(R.string.channel_name)
      val descriptionText = getString(R.string.channel_description)
      val importance = NotificationManager.IMPORTANCE_DEFAULT
      val mChannel = NotificationChannel(CHANNEL_ID, name, importance)
      mChannel.description = descriptionText
      // Register the channel with the system. You can't change the importance
      // or other notification behaviors after this.
      val notificationManager = getSystemService(NOTIFICATION_SERVICE) as NotificationManager
      notificationManager.createNotificationChannel(mChannel)
  }
重新创建采用其原始值的现有通知渠道不会执行任何操作,因此可以放心地在启动应用时调用此代码。
默认情况下,发布到给定渠道的所有通知都使用由 NotificationManagerCompat 类中的重要性级别(如 IMPORTANCE_DEFAULT 或 IMPORTANCE_HIGH)定义的视觉和听觉行为。如需详细了解重要性级别,请参阅下一部分。
如果您想进一步自定义渠道的默认通知行为,可以在 NotificationChannel 上调用 enableLights()、setLightColor() 和 setVibrationPattern() 等方法。请注意,创建渠道后,您将无法更改这些设置,而且对于是否启用相应行为,用户拥有最终控制权。
您还可以通过调用 createNotificationChannels() 在一次操作中创建多个通知渠道。
设置重要性级别
渠道重要性会影响在渠道中发布的所有通知的干扰级别。在 NotificationChannel 构造函数中指定它,使用从 IMPORTANCE_NONE(0) 到 IMPORTANCE_HIGH(4) 的五个重要性级别之一。
如需支持搭载 Android 7.1(API 级别 25)或更低版本的设备,您还必须使用 NotificationCompat 类中的优先级常量针对每条通知调用 setPriority()。
重要性 (NotificationManager.IMPORTANCE_*) 和优先级 (NotificationCompat.PRIORITY_*) 常量会映射到用户可见的重要性选项,如下表所示。
| 用户可见的重要性级别 | 重要性(Android 8.0 及更高版本) | 优先级(Android 7.1 及更低版本) |
|---|---|---|
| 紧急 :发出提示音,并以浮动通知的形式显示。 |
IMPORTANCE_HIGH |
PRIORITY_HIGH 或 PRIORITY_MAX |
| 高 :发出提示音。 |
IMPORTANCE_DEFAULT |
PRIORITY_DEFAULT |
| 中 :不发出提示音。 |
IMPORTANCE_LOW |
PRIORITY_LOW |
| 低 :不发出提示音,且不会在状态栏中显示。 |
IMPORTANCE_MIN |
PRIORITY_MIN |
| 无 :不发出提示音,也不会在状态栏或通知栏中显示。 |
IMPORTANCE_NONE |
N/A |
无论重要性级别如何,所有通知都会在非干扰系统界面位置显示,例如,显示在抽屉式通知栏中,以及在启动器图标上作为标记显示,不过,您可以修改通知标记的外观。
将渠道提交至 NotificationManager 后,您便无法更改重要性级别。不过,用户可以随时更改他们对您的应用渠道的偏好设置。
如需了解如何选择适当的优先级,请参阅通知设计指南中的“优先级”部分。
读取通知渠道设置
用户可以修改通知渠道的设置,其中包括振动和提醒提示音等行为。如果您想了解用户对您的通知渠道所应用的设置,请按以下步骤操作:
通过调用
getNotificationChannel()或getNotificationChannels()来获取NotificationChannel对象。查询特定的渠道设置,例如
getVibrationPattern()、getSound()和getImportance()。
如果您检测到某项渠道设置禁止应用的预期行为,可以建议用户更改该设置,并提供一项用于打开渠道设置的操作,如下一部分所示。
打开通知渠道设置
创建通知渠道后,您便无法以编程方式更改通知渠道的视觉和听觉行为。只有用户可以通过系统设置更改渠道行为。为了让用户快速访问这些通知设置,您应在应用的设置界面中添加一个用于打开这些系统设置的项。
您可以通过一个使用 ACTION_CHANNEL_NOTIFICATION_SETTINGS 操作的 Intent 打开通知渠道的系统设置。
例如,以下示例代码展示了如何将用户重定向到通知渠道的设置:
  val intent = Intent(Settings.ACTION_CHANNEL_NOTIFICATION_SETTINGS).apply {
      putExtra(Settings.EXTRA_APP_PACKAGE, packageName)
      putExtra(Settings.EXTRA_CHANNEL_ID, myNotificationChannel.getId())
  }
  startActivity(intent)
请注意,该 intent 需要两个提取项,分别用于指定您应用的软件包名称(也称为应用 ID)和要修改的渠道。
删除通知渠道
您可以通过调用 deleteNotificationChannel() 删除通知渠道。以下示例代码演示了如何完成此过程:
  // The id of the channel.
  val notificationManager = getSystemService(Context.NOTIFICATION_SERVICE) as NotificationManager
  val id: String = "my_channel_01"
  notificationManager.deleteNotificationChannel(id)
创建通知渠道分组
如果您希望进一步整理您的渠道在设置界面中的外观,则可以创建渠道分组。当您的应用支持多个用户账号时,强烈建议您这么做,因为这么做可以为每个账号各创建一个通知渠道分组。渠道组有助于用户区分和控制具有相同名称的多个通知渠道。
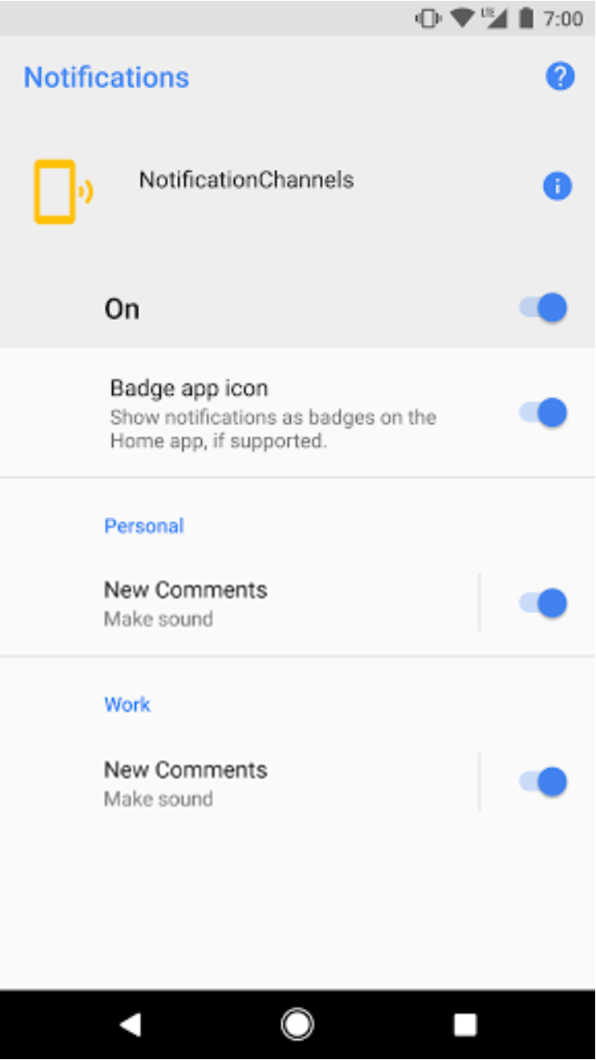
图 2. 包含个人账号和工作账号分组的通知渠道设置。
例如,社交网络应用可能包含对个人账号和工作账号的支持。在这种情况下,每个账号可能都需要具有相同功能和名称的多个通知渠道,如下所示:
具有两个渠道的个人账号:
新评论
帖子推荐
具有两个频道的企业账号:
新评论
帖子推荐
整理每个账号的通知渠道并对其分组可让用户区分它们。
每个通知渠道分组都需要一个 ID(在您的软件包内必须是唯一的)以及一个用户可见名称。以下代码段演示了如何创建通知渠道分组。
  // The id of the group.
  val groupId = "my_group_01"
  // The user-visible name of the group.
  val groupName = getString(R.string.group_name)
  val notificationManager = getSystemService(Context.NOTIFICATION_SERVICE) as NotificationManager
  <b>notificationManager.createNotificationChannelGroup(NotificationChannelGroup(groupId, groupName))</b>
创建新群组后,您可以调用 setGroup() 以将新的 NotificationChannel 对象与该群组相关联。
将渠道提交至通知管理器后,您便无法更改通知渠道和分组之间的关联。