
ฟิลด์ข้อความทุกช่องคาดหวังการป้อนข้อความบางประเภท เช่น อีเมล หมายเลขโทรศัพท์ หรือ ข้อความธรรมดา คุณต้องระบุประเภทอินพุตสำหรับช่องข้อความแต่ละช่องในแอปเพื่อให้ระบบแสดงวิธีการป้อนข้อมูลบนหน้าจอที่เหมาะสม เช่น แป้นพิมพ์บนหน้าจอ
นอกเหนือจากประเภทปุ่มที่มีให้ใช้งานในวิธีการป้อนข้อมูลแล้ว คุณยังระบุลักษณะการทำงานได้ เช่น วิธีการป้อนข้อมูลมีคำแนะนำการสะกดคำหรือไม่ ขึ้นต้นประโยคใหม่ด้วยตัวพิมพ์ใหญ่หรือไม่ และแทนที่ปุ่มขึ้นบรรทัดใหม่ด้วยปุ่มดำเนินการ เช่น เสร็จสิ้นหรือถัดไป หน้านี้แสดงวิธีระบุลักษณะเหล่านี้
ระบุประเภทแป้นพิมพ์
ประกาศวิธีการป้อนข้อมูลสำหรับช่องข้อความเสมอโดยเพิ่มแอตทริบิวต์
android:inputType
ลงในองค์ประกอบ
<EditText>
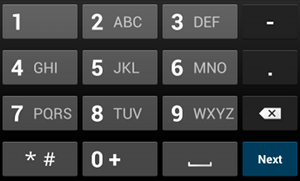
phoneประเภทอินพุตเช่น หากต้องการวิธีการป้อนข้อมูลสำหรับป้อนหมายเลขโทรศัพท์ ให้ใช้ค่า
"phone"
<EditText
    android:id="@+id/phone"
    android:layout_width="fill_parent"
    android:layout_height="wrap_content"
    android:hint="@string/phone_hint"
    android:inputType="phone" />
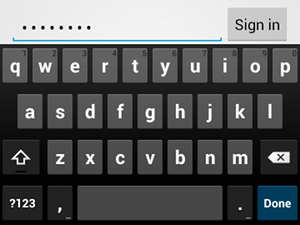
textPasswordประเภทอินพุตหากช่องข้อความเป็นรหัสผ่าน ให้ใช้ค่า "textPassword" เพื่อให้ช่องข้อความ
ซ่อนข้อมูลที่ผู้ใช้ป้อน
<EditText
    android:id="@+id/password"
    android:hint="@string/password_hint"
    android:inputType="textPassword"
    ... />
ค่าที่เป็นไปได้หลายค่าจะบันทึกไว้พร้อมกับแอตทริบิวต์ android:inputType
และคุณสามารถรวมค่าบางค่าเพื่อระบุลักษณะที่ปรากฏของวิธีการป้อนข้อมูลและลักษณะการทำงานเพิ่มเติม
ได้
เปิดใช้คำแนะนำการสะกดและลักษณะการทำงานอื่นๆ
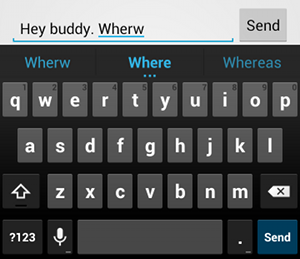
textAutoCorrect จะช่วยให้ระบบแก้ไขคำที่สะกดผิดโดยอัตโนมัติแอตทริบิวต์ android:inputType ช่วยให้คุณระบุลักษณะการทำงานต่างๆ สำหรับวิธีการป้อนข้อมูลได้ สิ่งสำคัญที่สุดคือ หากช่องข้อความมีไว้สำหรับการป้อนข้อความพื้นฐาน เช่น ข้อความ SMS ให้เปิดใช้การแก้ไขการสะกดอัตโนมัติด้วย"textAutoCorrect"
ค่า
คุณสามารถรวมลักษณะการทำงานและรูปแบบวิธีการป้อนข้อมูลต่างๆ เข้าด้วยกันได้โดยใช้แอตทริบิวต์ android:inputType ตัวอย่างเช่น วิธีสร้างช่องข้อความที่
ขึ้นต้นคำแรกของประโยคด้วยตัวพิมพ์ใหญ่และแก้ไขคำที่สะกดผิดโดยอัตโนมัติมีดังนี้
<EditText
    android:id="@+id/message"
    android:layout_width="wrap_content"
    android:layout_height="wrap_content"
    android:inputType=
        "textCapSentences|textAutoCorrect"
    ... />
ระบุการดำเนินการของวิธีการป้อนข้อมูล
วิธีการป้อนข้อมูลแบบนุ่มส่วนใหญ่จะมีปุ่มการดำเนินการของผู้ใช้ที่มุมล่างซึ่งเหมาะกับ
ช่องข้อความปัจจุบัน โดยค่าเริ่มต้น ระบบจะใช้ปุ่มนี้สำหรับการดำเนินการถัดไปหรือเสร็จสิ้น เว้นแต่ช่องข้อความจะรองรับข้อความหลายบรรทัด เช่น ในกรณีของ
android:inputType="textMultiLine" ซึ่งในกรณีนี้ปุ่มดำเนินการจะเป็นปุ่มขึ้นบรรทัดใหม่ อย่างไรก็ตาม คุณสามารถระบุการทำงานอื่นๆ ที่อาจเหมาะสมกับช่องข้อความมากกว่าได้ เช่น ส่งหรือไป
หากต้องการระบุปุ่มดำเนินการของแป้นพิมพ์ ให้ใช้แอตทริบิวต์
android:imeOptions
ที่มีค่าการทำงาน เช่น "actionSend" หรือ "actionSearch" เช่น

android:imeOptions="actionSend"<EditText android:id="@+id/search" android:layout_width="fill_parent" android:layout_height="wrap_content" android:hint="@string/search_hint" android:inputType="text" android:imeOptions="actionSend" />
จากนั้นคุณจะรอกิจกรรมสำหรับการกดปุ่มดำเนินการได้โดยกำหนด
TextView.OnEditorActionListener
สำหรับองค์ประกอบ EditText ใน
Listener ให้ตอบรหัสการทำงานของ IME ที่เหมาะสมซึ่งกำหนดไว้ในคลาส
EditorInfo เช่น
IME_ACTION_SEND
ดังที่แสดงในตัวอย่างต่อไปนี้
Kotlin
findViewById<EditText>(R.id.search).setOnEditorActionListener { v, actionId, event ->
    return@setOnEditorActionListener when (actionId) {
        EditorInfo.IME_ACTION_SEND -> {
            sendMessage()
            true
        }
        else -> false
    }
}
Java
EditText editText = (EditText) findViewById(R.id.search);
editText.setOnEditorActionListener(new OnEditorActionListener() {
    @Override
    public boolean onEditorAction(TextView v, int actionId, KeyEvent event) {
        boolean handled = false;
        if (actionId == EditorInfo.IME_ACTION_SEND) {
            sendMessage();
            handled = true;
        }
        return handled;
    }
});
แสดงคำแนะนำแบบเติมข้อความอัตโนมัติ
หากต้องการแสดงคำแนะนำแก่ผู้ใช้ขณะที่พิมพ์ คุณสามารถใช้คลาสย่อยของ
EditText ที่ชื่อ
AutoCompleteTextView
หากต้องการใช้การเติมข้อความอัตโนมัติ คุณต้องระบุ
Adapter ที่ให้คำแนะนำข้อความ
มีอแดปเตอร์หลายตัวให้ใช้งาน ขึ้นอยู่กับว่าข้อมูลมาจากที่ใด เช่น จากฐานข้อมูลหรืออาร์เรย์
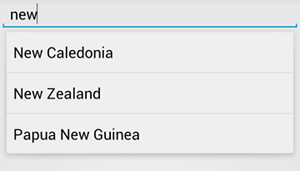
AutoCompleteTextView พร้อมข้อความ
ที่แนะนำขั้นตอนต่อไปนี้อธิบายวิธีตั้งค่า AutoCompleteTextView ที่
ให้คำแนะนำจากอาร์เรย์โดยใช้
ArrayAdapter
- เพิ่ม
AutoCompleteTextViewลงในเลย์เอาต์ ต่อไปนี้คือเลย์เอาต์ที่มีเฉพาะช่องข้อความ<?xml version="1.0" encoding="utf-8"?> <AutoCompleteTextView xmlns:android="http://schemas.android.com/apk/res/android" android:id="@+id/autocomplete_country" android:layout_width="fill_parent" android:layout_height="wrap_content" />
- กำหนดอาร์เรย์ที่มีคำแนะนำข้อความทั้งหมด ตัวอย่างเช่น อาร์เรย์ชื่อประเทศมีดังนี้
<?xml version="1.0" encoding="utf-8"?>
<resources>
    <string-array name="countries_array">
        <item>Afghanistan</item>
        <item>Albania</item>
        <item>Algeria</item>
        <item>American Samoa</item>
        <item>Andorra</item>
        <item>Angola</item>
        <item>Anguilla</item>
        <item>Antarctica</item>
        ...
    </string-array>
</resources>
- ใน
ActivityหรือFragmentให้ใช้โค้ดต่อไปนี้เพื่อ ระบุอแดปเตอร์ที่ให้คำแนะนำKotlin
// Get a reference to the AutoCompleteTextView in the layout.
val textView = findViewById(R.id.autocomplete_country) as AutoCompleteTextView
// Get the string array.
val countries: Array<out String> = resources.getStringArray(R.array.countries_array)
// Create the adapter and set it to the AutoCompleteTextView.
ArrayAdapter<String>(this, android.R.layout.simple_list_item_1, countries).also { adapter ->
    textView.setAdapter(adapter)
}
Java
// Get a reference to the AutoCompleteTextView in the layout.
AutoCompleteTextView textView = (AutoCompleteTextView) findViewById(R.id.autocomplete_country);
// Get the string array.
String[] countries = getResources().getStringArray(R.array.countries_array);
// Create the adapter and set it to the AutoCompleteTextView.
ArrayAdapter<String> adapter =
        new ArrayAdapter<String>(this, android.R.layout.simple_list_item_1, countries);
textView.setAdapter(adapter);
ในตัวอย่างก่อนหน้า ระบบจะเริ่มต้น
ArrayAdapterใหม่เพื่อเชื่อมโยงแต่ละรายการในอาร์เรย์สตริงcountries_arrayกับTextViewที่มีอยู่ในเลย์เอาต์simple_list_item_1นี่คือเลย์เอาต์ที่ Android จัดเตรียมไว้ให้ ซึ่งมี ลักษณะมาตรฐานสำหรับข้อความในรายการ -
กำหนดอะแดปเตอร์ให้กับ
AutoCompleteTextViewโดยโทรไปที่setAdapter()