Di Android 11 dan yang lebih baru, fitur Kontrol Perangkat Akses Cepat memungkinkan pengguna melihat dan mengontrol perangkat eksternal dengan cepat, seperti lampu, termostat, dan kamera dari affordance pengguna dalam tiga interaksi dari peluncur default. OEM perangkat memilih peluncur yang mereka gunakan. Agregator perangkat—misalnya, Google Home—dan aplikasi vendor pihak ketiga dapat menyediakan perangkat untuk ditampilkan di ruang ini. Halaman ini menunjukkan cara memunculkan kontrol perangkat di ruang ini dan menautkannya ke aplikasi kontrol.
Untuk menambahkan dukungan ini, buat dan deklarasikan ControlsProviderService. Buat kontrol yang didukung aplikasi Anda berdasarkan jenis kontrol yang telah ditentukan, lalu buat penayang untuk kontrol ini.
Antarmuka pengguna
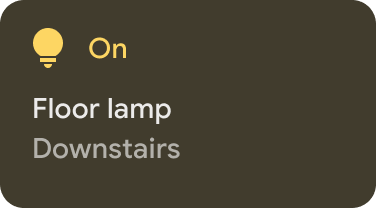
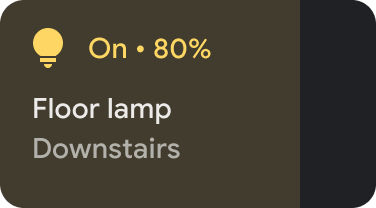
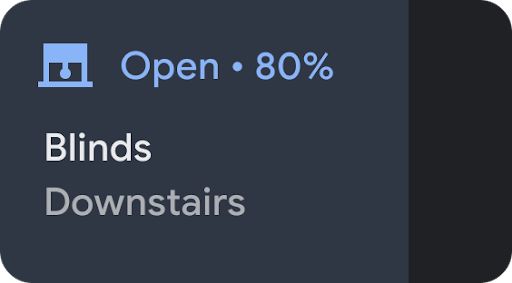
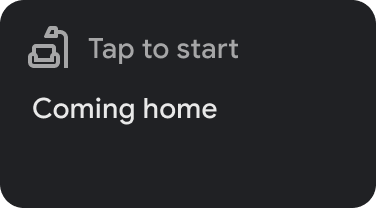
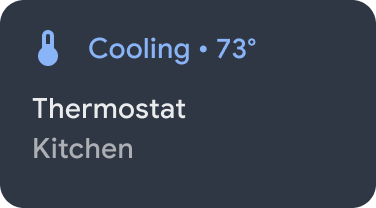
Perangkat ditampilkan di bagian Kontrol perangkat sebagai widget template. Lima widget kontrol perangkat tersedia, seperti yang ditunjukkan pada gambar berikut:
|
|
|
|
|
Menyentuh lama widget akan mengarahkan Anda ke aplikasi untuk kontrol yang lebih lengkap. Anda dapat menyesuaikan ikon dan warna setiap widget, tetapi untuk pengalaman pengguna terbaik, gunakan ikon dan warna default jika kumpulan default cocok dengan perangkat.
Membuat layanan
Bagian ini menunjukkan cara membuat
ControlsProviderService.
Layanan ini memberi tahu UI sistem Android bahwa aplikasi Anda menyertakan kontrol perangkat yang harus muncul di area Kontrol perangkat UI Android.
API ControlsProviderService mengasumsikan pengetahuan tentang aliran reaktif, seperti
dijelaskan dalam project Reactive Streams GitHub
dan diimplementasikan dalam antarmuka Java 9 Flow.
API ini dibuat berdasarkan konsep berikut:
- Penayang: aplikasi Anda adalah penayang.
- Pelanggan: UI sistem adalah pelanggan dan dapat meminta sejumlah kontrol dari penayang.
- Langganan: jangka waktu saat penayang dapat mengirimkan update ke UI Sistem. Penayang atau pelanggan dapat menutup jendela ini.
Mendeklarasikan layanan
Aplikasi Anda harus mendeklarasikan layanan—seperti MyCustomControlService—dalam manifes aplikasinya.
Layanan harus menyertakan filter intent untuk ControlsProviderService. Filter ini memungkinkan aplikasi memberikan kontrol ke UI sistem.
Anda juga memerlukan label yang ditampilkan dalam kontrol di UI sistem.
Contoh berikut menunjukkan cara mendeklarasikan layanan:
<service
    android:name="MyCustomControlService"
    android:label="My Custom Controls"
    android:permission="android.permission.BIND_CONTROLS"
    android:exported="true"
    >
    <intent-filter>
      <action android:name="android.service.controls.ControlsProviderService" />
    </intent-filter>
</service>
Selanjutnya, buat file Kotlin baru bernama MyCustomControlService.kt dan buat file tersebut memperluas ControlsProviderService():
Kotlin
    class MyCustomControlService : ControlsProviderService() {
        ...
    }
Java
    public class MyCustomJavaControlService extends ControlsProviderService {
        ...
    }
Memilih jenis kontrol yang tepat
API menyediakan metode builder untuk membuat kontrol. Untuk mengisi builder, tentukan perangkat yang ingin dikontrol dan cara pengguna berinteraksi dengannya. Lakukan langkah-langkah berikut:
- Pilih jenis perangkat yang diwakili oleh kontrol. Class
DeviceTypesadalah enumerasi dari semua perangkat yang didukung. Jenis ini digunakan untuk menentukan ikon dan warna perangkat di UI. - Tentukan nama yang akan dilihat pengguna, lokasi perangkat—misalnya, dapur—dan elemen teks UI lainnya yang diatribusikan dengan kontrol.
- Pilih template terbaik untuk mendukung interaksi pengguna. Kontrol ditetapkan ke
ControlTemplatedari aplikasi. Template ini secara langsung menunjukkan status kontrol kepada pengguna, beserta metode input yang tersedia—yaituControlAction. Tabel berikut menguraikan beberapa template yang tersedia dan tindakan yang didukungnya:
| Template | Tindakan | Deskripsi |
ControlTemplate.getNoTemplateObject()
|
None
|
Aplikasi dapat menggunakannya untuk menyampaikan informasi tentang kontrol, tetapi pengguna tidak dapat berinteraksi dengannya. |
ToggleTemplate
|
BooleanAction
|
Mewakili kontrol yang statusnya dapat dialihkan antara aktif dan nonaktif
status. Objek BooleanAction berisi kolom yang berubah
untuk mewakili status baru yang diminta saat pengguna mengetuk kontrol.
|
RangeTemplate
|
FloatAction
|
Mewakili widget penggeser dengan nilai minimal, maksimal, dan langkah yang ditetapkan. Saat
pengguna berinteraksi dengan penggeser, kirim objek FloatAction
kembali ke aplikasi dengan nilai yang sudah diperbarui.
|
ToggleRangeTemplate
|
BooleanAction, FloatAction
|
Template ini adalah kombinasi dari ToggleTemplate dan
RangeTemplate. Template ini mendukung peristiwa sentuh serta penggeser,
seperti untuk mengontrol lampu yang dapat diredupkan.
|
TemperatureControlTemplate
|
ModeAction, BooleanAction, FloatAction
|
Selain mengenkapsulasi tindakan sebelumnya, template ini memungkinkan pengguna menentukan mode, seperti hangat, dingin, hangat/dingin, hemat energi, atau nonaktif. |
StatelessTemplate
|
CommandAction
|
Digunakan untuk menunjukkan kontrol yang menyediakan kemampuan sentuh tetapi statusnya tidak dapat ditentukan, misalnya remote televisi IR. Anda dapat menggunakan ini template untuk menentukan rutinitas atau makro, yang merupakan agregasi kontrol dan perubahan status. |
Dengan informasi ini, Anda dapat membuat kontrol:
- Gunakan class builder
Control.StatelessBuilderjika status kontrol tidak diketahui. - Gunakan class builder
Control.StatefulBuilderjika status kontrol diketahui.
Misalnya, untuk mengontrol bohlam lampu smart dan termostat, tambahkan konstanta berikut ke MyCustomControlService:
Kotlin
    private const val LIGHT_ID = 1234
    private const val LIGHT_TITLE = "My fancy light"
    private const val LIGHT_TYPE = DeviceTypes.TYPE_LIGHT
    private const val THERMOSTAT_ID = 5678
    private const val THERMOSTAT_TITLE = "My fancy thermostat"
    private const val THERMOSTAT_TYPE = DeviceTypes.TYPE_THERMOSTAT

    class MyCustomControlService : ControlsProviderService() {
      ...
    }
Java
    public class MyCustomJavaControlService extends ControlsProviderService {

    private final int LIGHT_ID = 1337;
    private final String LIGHT_TITLE = "My fancy light";
    private final int LIGHT_TYPE = DeviceTypes.TYPE_LIGHT;
    private final int THERMOSTAT_ID = 1338;
    private final String THERMOSTAT_TITLE = "My fancy thermostat";
    private final int THERMOSTAT_TYPE = DeviceTypes.TYPE_THERMOSTAT;

    ...
    }
Membuat penayang untuk kontrol
Setelah dibuat, kontrol memerlukan penayang. Penayang memberi tahu UI sistem tentang keberadaan kontrol. Class ControlsProviderService memiliki dua metode penayang yang harus Anda ganti dalam kode aplikasi:
createPublisherForAllAvailable(): membuatPublisheruntuk semua kontrol yang tersedia di aplikasi Anda. GunakanControl.StatelessBuilder()untuk membuat objekControlbagi penayang ini.createPublisherFor(): membuatPublisheruntuk daftar kontrol tertentu, seperti yang diidentifikasi oleh ID stringnya. GunakanControl.StatefulBuilderuntuk membuat objekControlini karena penayang harus menetapkan status bagi setiap kontrol.
Membuat penayang
Saat menayangkan kontrol ke UI sistem untuk pertama kalinya, aplikasi tidak mengetahui status setiap kontrol. Akan memerlukan banyak waktu untuk mendapatkan status ini, yang melibatkan banyak lonjakan pada jaringan penyedia perangkat. Gunakan metode
createPublisherForAllAvailable()
untuk memberi tahu sistem tentang kontrol yang tersedia. Metode ini menggunakan class builder Control.StatelessBuilder karena status setiap kontrol tidak diketahui.
Setelah kontrol muncul di UI Android , pengguna dapat memilih kontrol favorit.
Untuk menggunakan coroutine Kotlin guna membuat ControlsProviderService, tambahkan dependensi baru ke build.gradle:
Groovy
dependencies {
    implementation "org.jetbrains.kotlinx:kotlinx-coroutines-jdk9:1.6.4"
}
Kotlin
dependencies {
    implementation("org.jetbrains.kotlinx:kotlinx-coroutines-jdk9:1.6.4")
}
Setelah Anda menyinkronkan file Gradle, tambahkan cuplikan berikut ke Service untuk menerapkan createPublisherForAllAvailable():
Kotlin
class MyCustomControlService : ControlsProviderService() { override fun createPublisherForAllAvailable(): Flow.Publisher= flowPublish { send(createStatelessControl(LIGHT_ID, LIGHT_TITLE, LIGHT_TYPE)) send(createStatelessControl(THERMOSTAT_ID, THERMOSTAT_TITLE, THERMOSTAT_TYPE)) } private fun createStatelessControl(id: Int, title: String, type: Int): Control { val intent = Intent(this, MainActivity::class.java) .putExtra(EXTRA_MESSAGE, title) .addFlags(Intent.FLAG_ACTIVITY_NEW_TASK) val action = PendingIntent.getActivity( this, id, intent, PendingIntent.FLAG_UPDATE_CURRENT or PendingIntent.FLAG_IMMUTABLE ) return Control.StatelessBuilder(id.toString(), action) .setTitle(title) .setDeviceType(type) .build() } override fun createPublisherFor(controlIds: List ): Flow.Publisher { TODO() } override fun performControlAction( controlId: String, action: ControlAction, consumer: Consumer ) { TODO() } }
Java
    public class MyCustomJavaControlService extends ControlsProviderService {

        private final int LIGHT_ID = 1337;
        private final String LIGHT_TITLE = "My fancy light";
        private final int LIGHT_TYPE = DeviceTypes.TYPE_LIGHT;
        private final int THERMOSTAT_ID = 1338;
        private final String THERMOSTAT_TITLE = "My fancy thermostat";
        private final int THERMOSTAT_TYPE = DeviceTypes.TYPE_THERMOSTAT;

        private boolean toggleState = false;
        private float rangeState = 18f;
        private final Map<String, ReplayProcessor> controlFlows = new HashMap<>();

        @NonNull
        @Override
        public Flow.Publisher createPublisherForAllAvailable() {
            List controls = new ArrayList<>();
            controls.add(createStatelessControl(LIGHT_ID, LIGHT_TITLE, LIGHT_TYPE));
            controls.add(createStatelessControl(THERMOSTAT_ID, THERMOSTAT_TITLE, THERMOSTAT_TYPE));
            return FlowAdapters.toFlowPublisher(Flowable.fromIterable(controls));
        }

        @NonNull
        @Override
        public Flow.Publisher createPublisherFor(@NonNull List controlIds) {
            ReplayProcessor updatePublisher = ReplayProcessor.create();

            controlIds.forEach(control -> {
                controlFlows.put(control, updatePublisher);
                updatePublisher.onNext(createLight());
                updatePublisher.onNext(createThermostat());
            });

            return FlowAdapters.toFlowPublisher(updatePublisher);
        }
    }
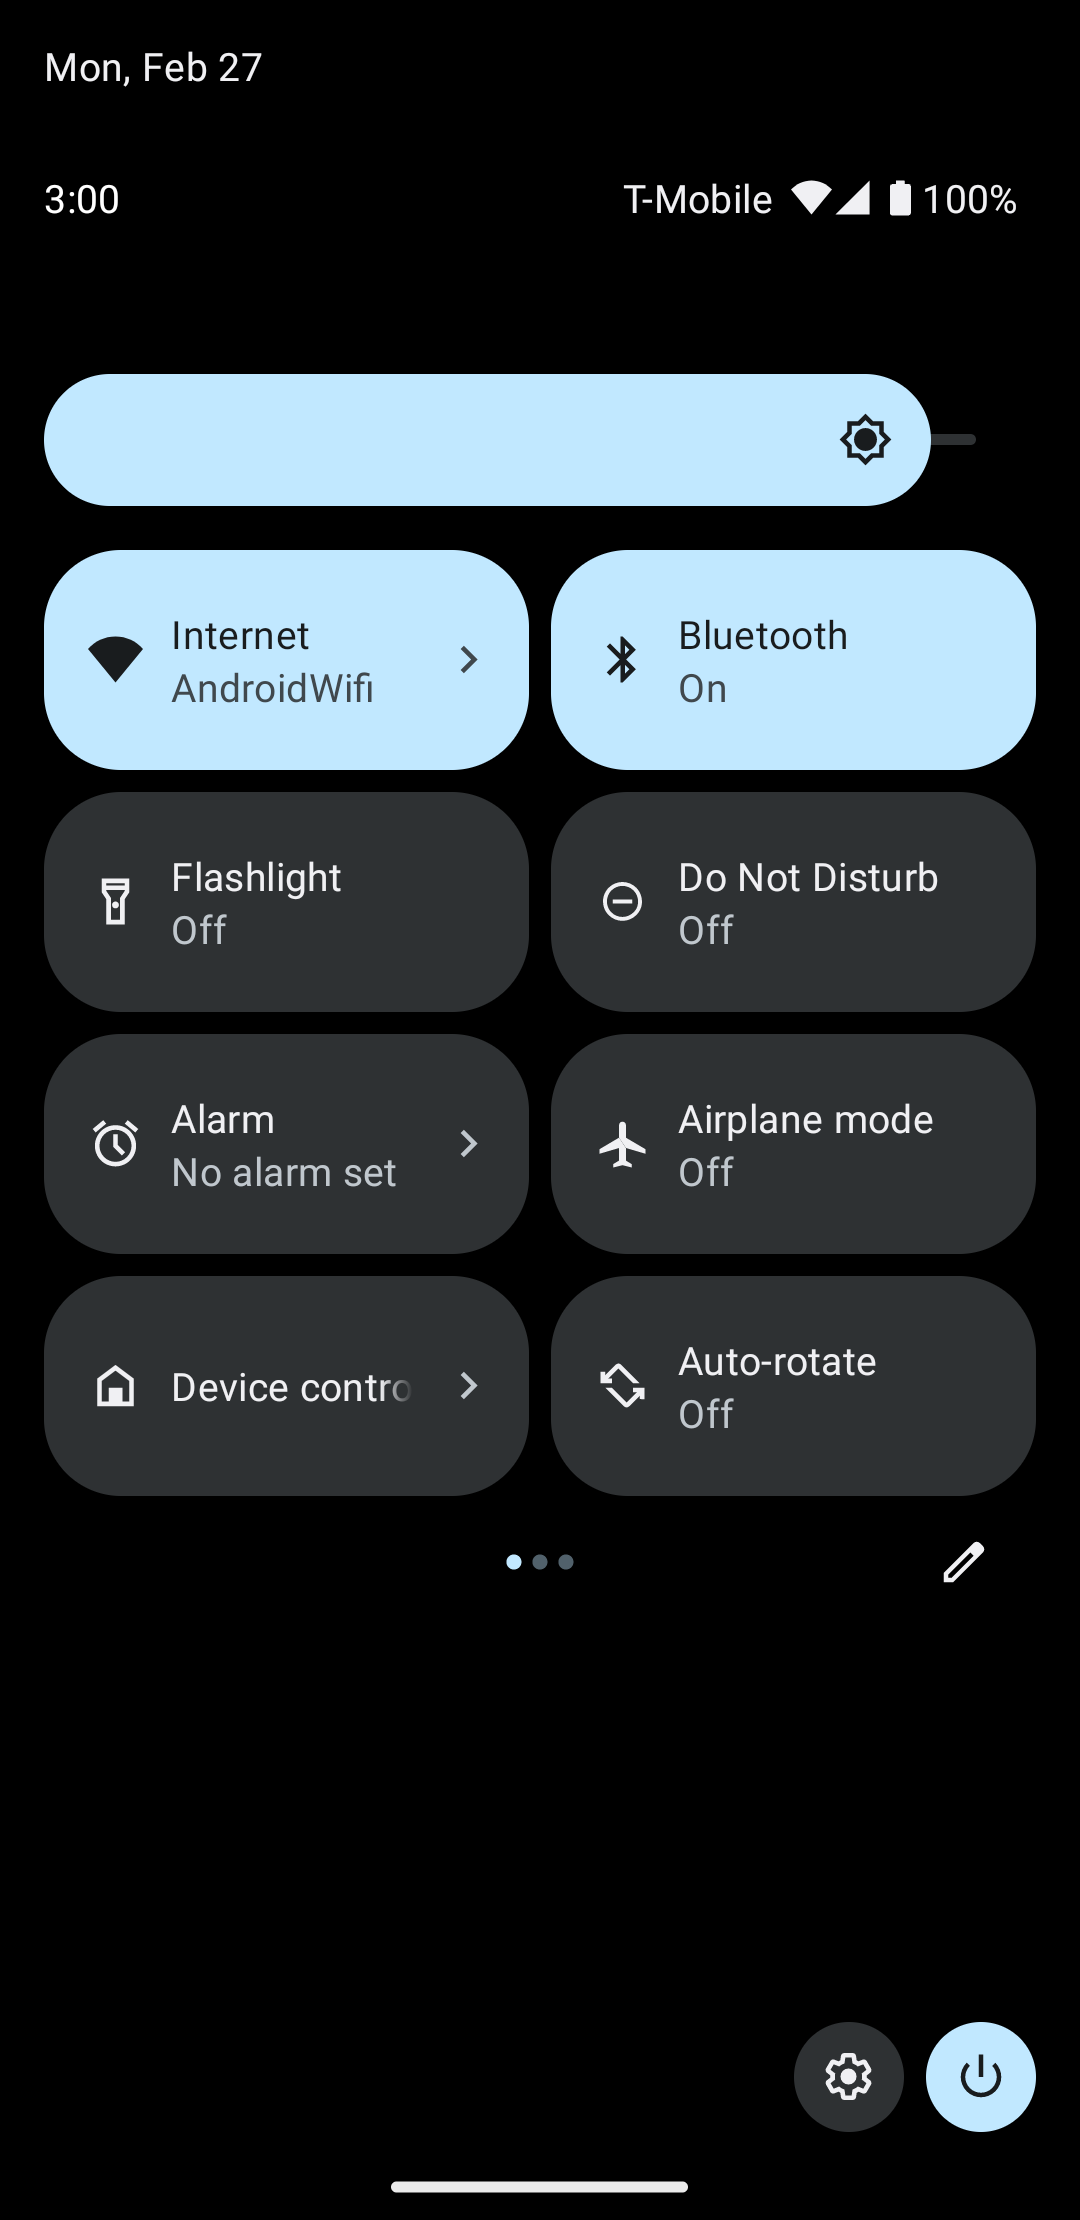
Geser ke bawah menu sistem dan temukan tombol Kontrol perangkat, yang ditunjukkan pada gambar 4:
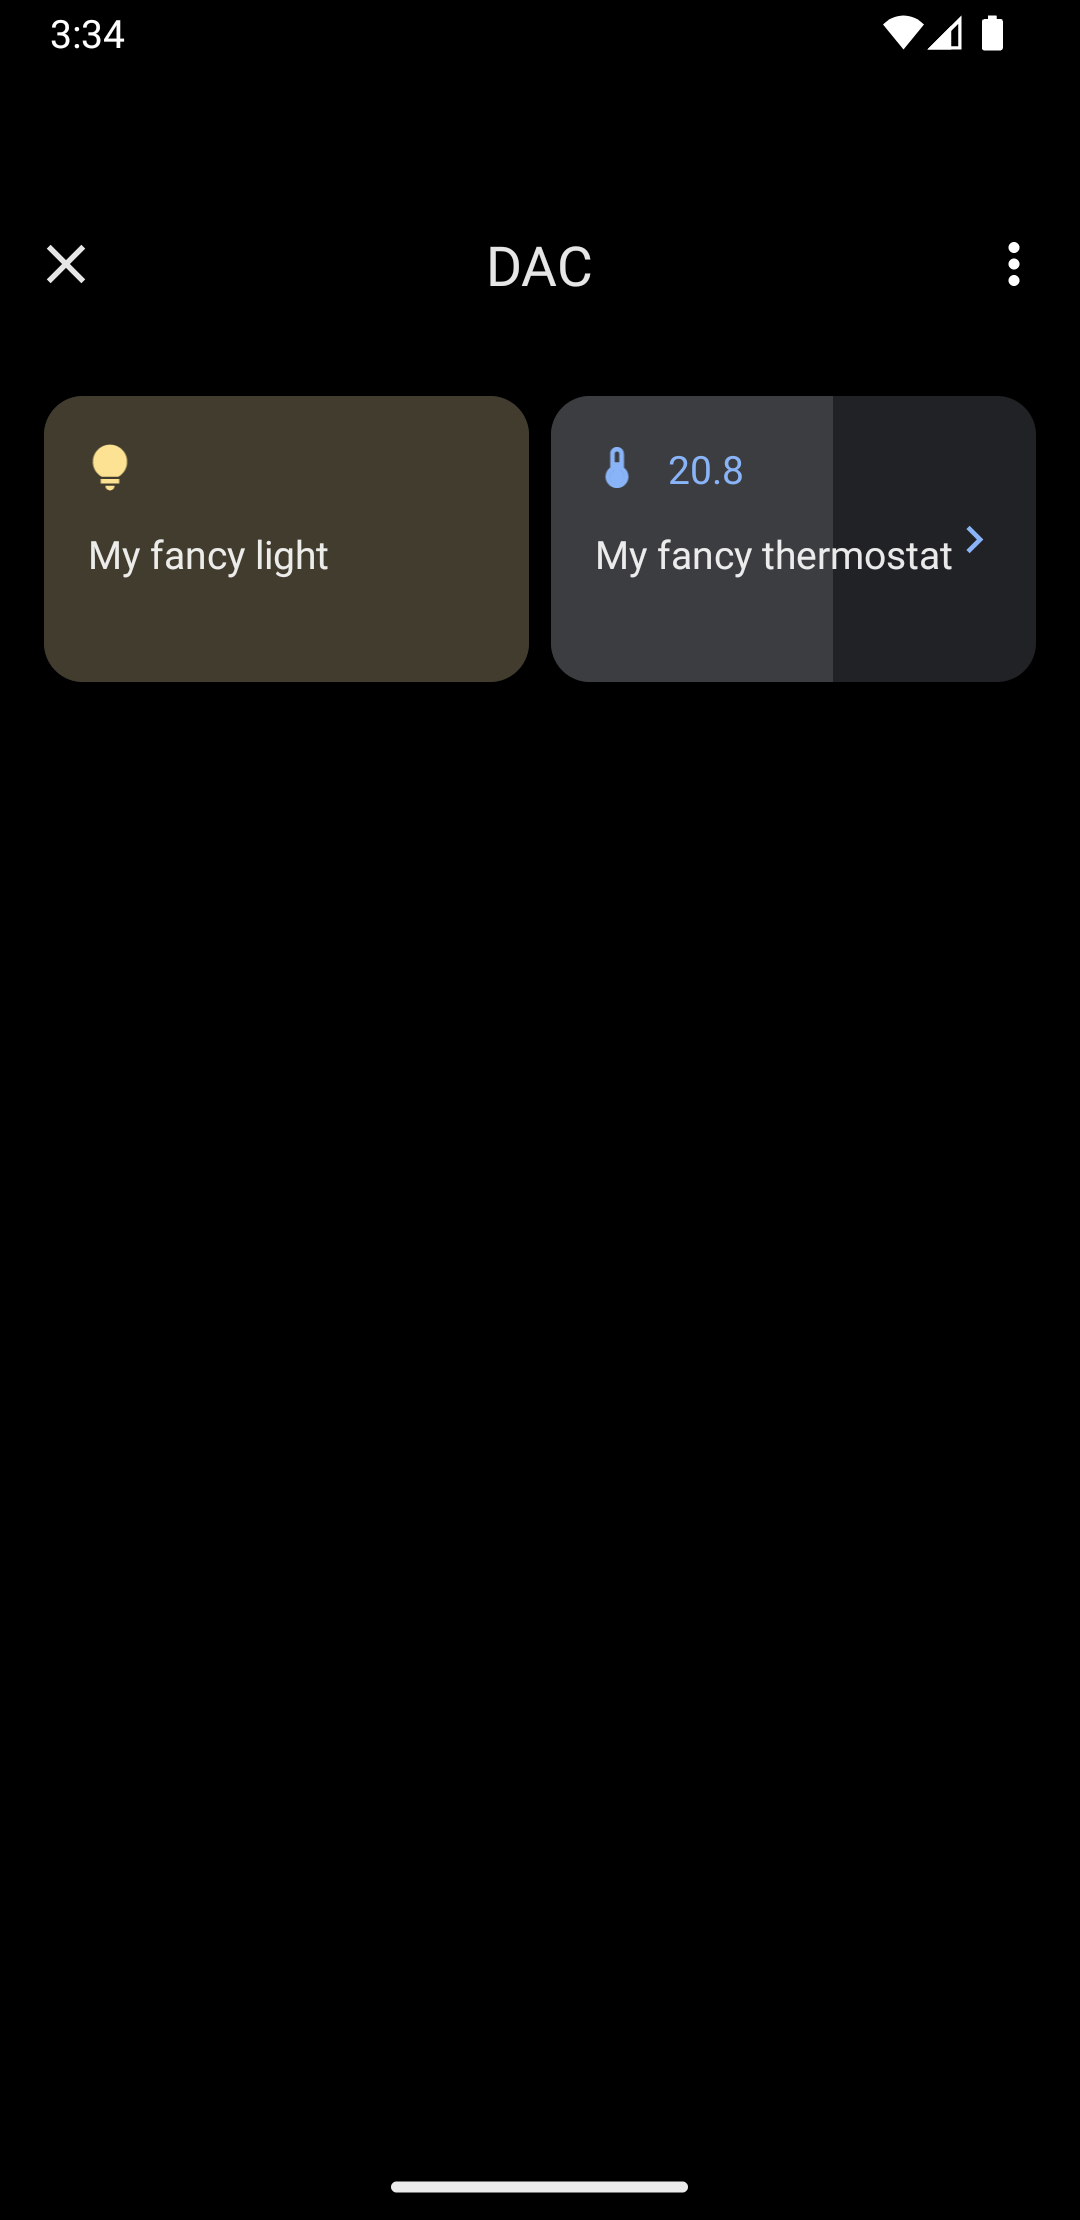
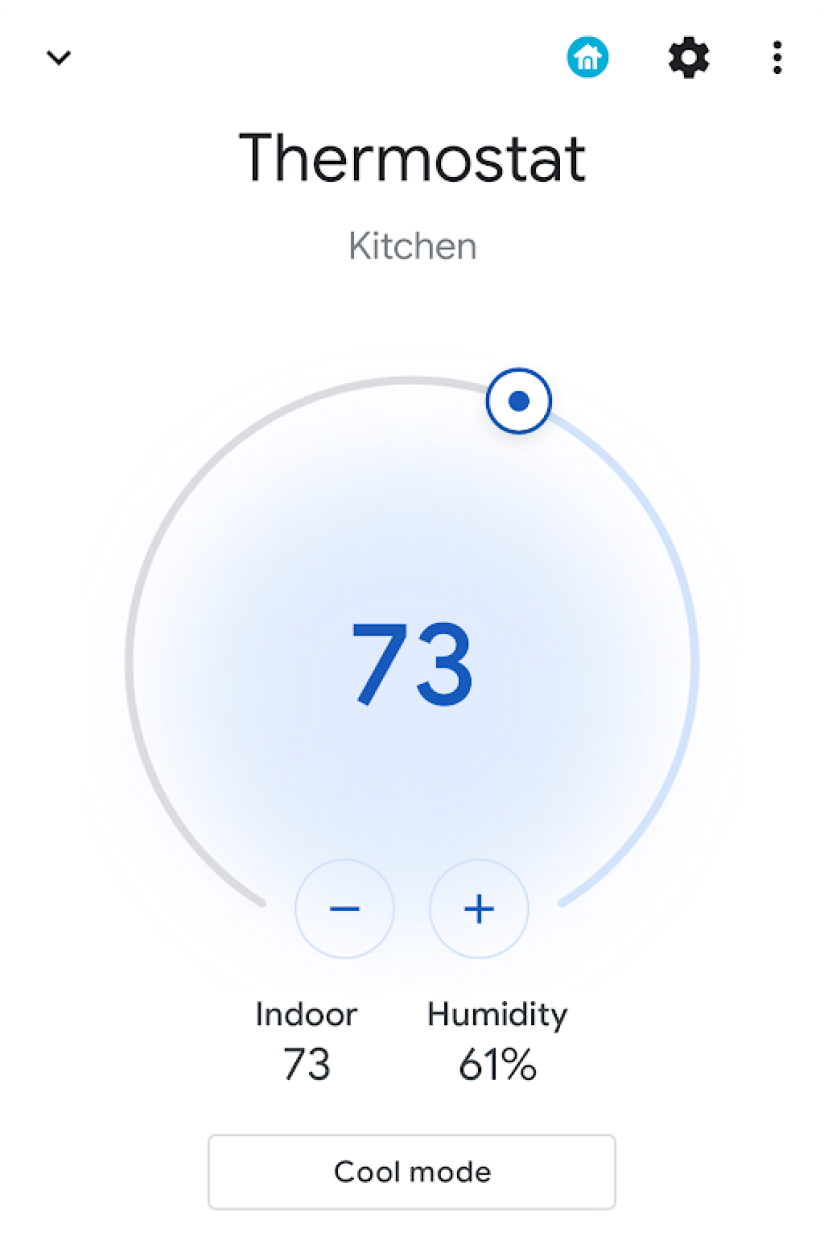
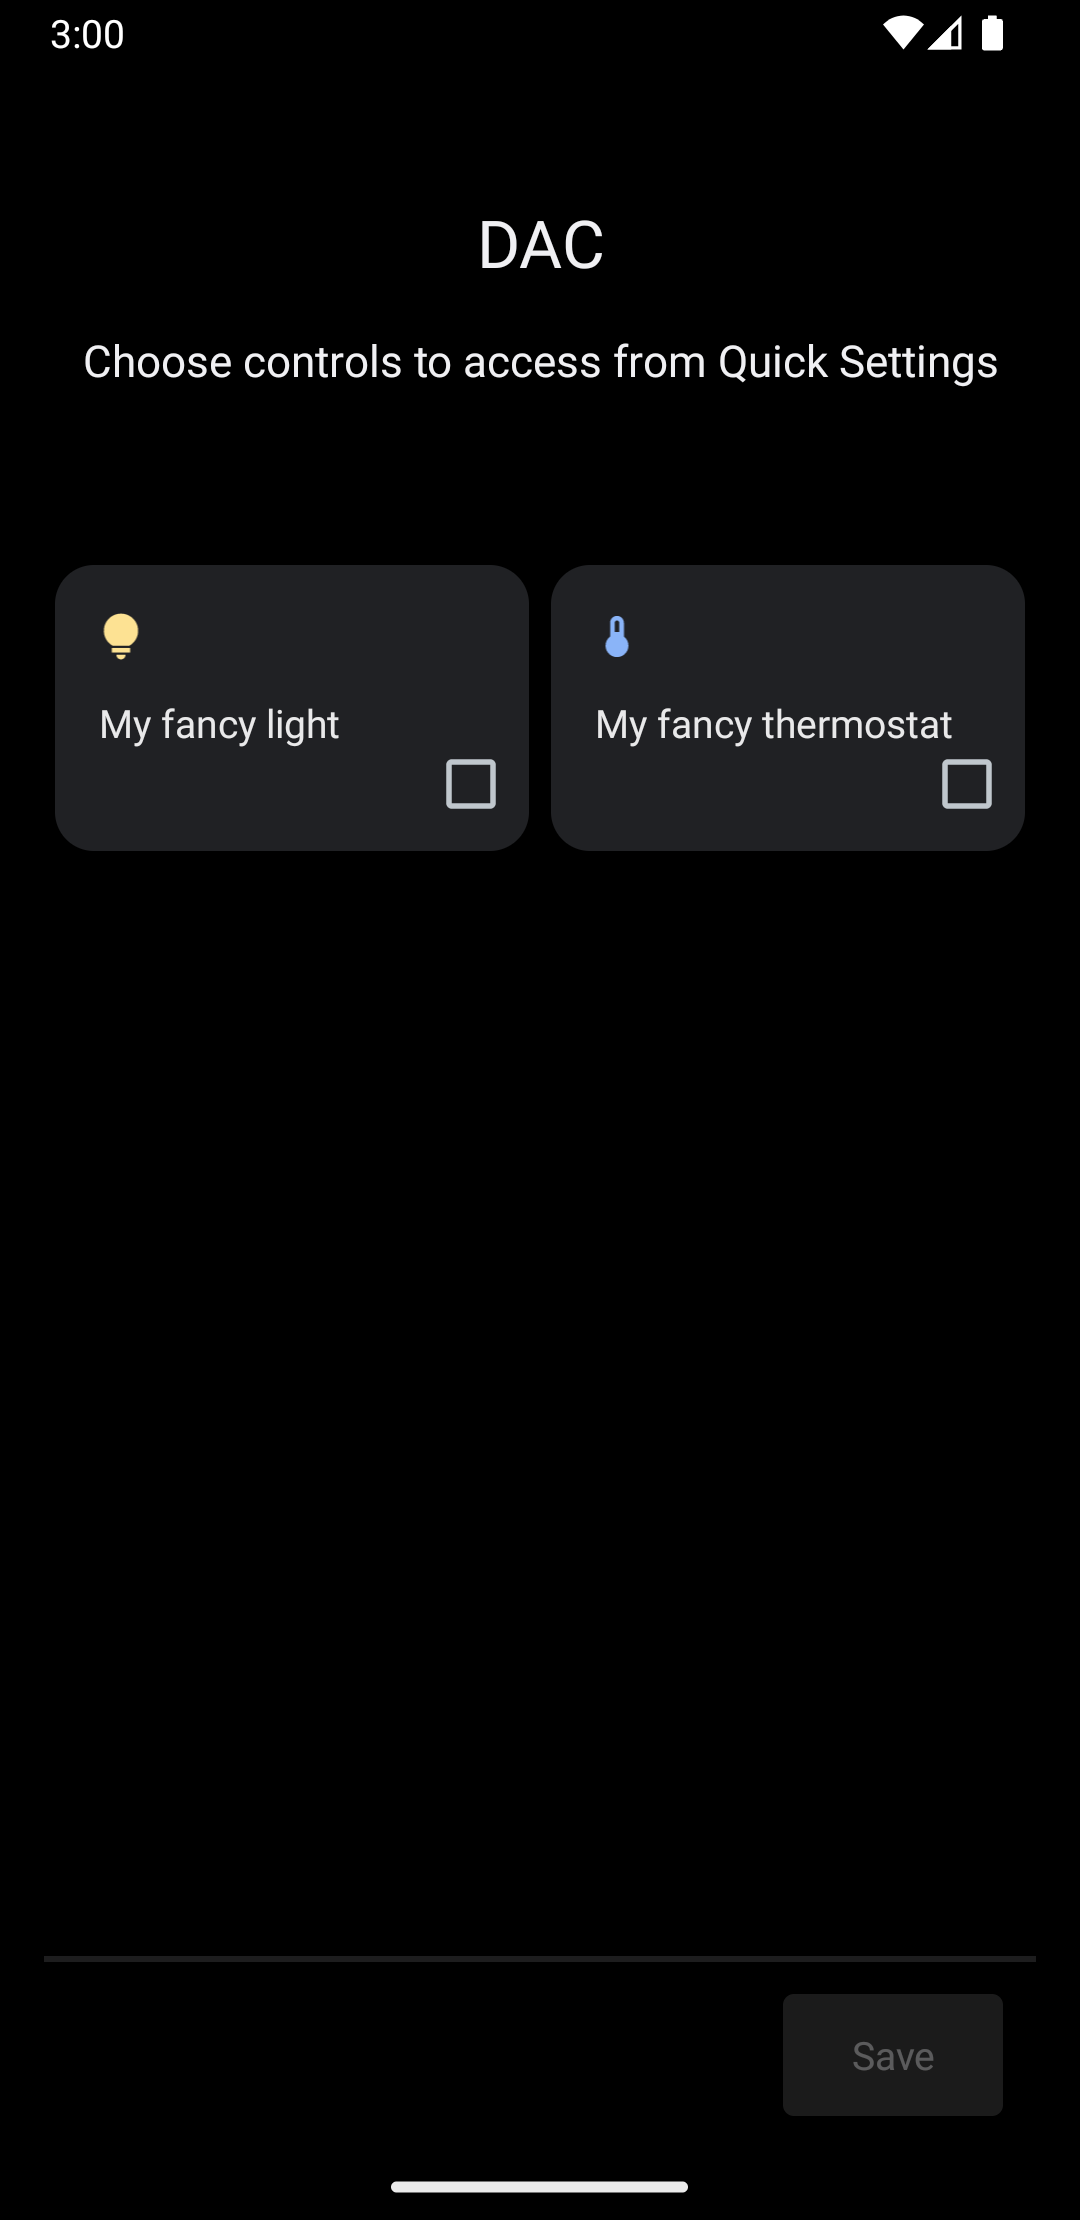
Mengetuk Kontrol perangkat akan mengarahkan Anda ke layar kedua tempat Anda dapat memilih aplikasi. Setelah memilih aplikasi, Anda akan melihat cara cuplikan sebelumnya membuat menu sistem kustom yang menampilkan kontrol baru Anda, seperti yang ditunjukkan pada gambar 5:
Sekarang, terapkan metode createPublisherFor(), dengan menambahkan kode berikut ke Service:
Kotlin
private val job = SupervisorJob() private val scope = CoroutineScope(Dispatchers.IO + job) private val controlFlows = mutableMapOf<String, MutableSharedFlow>() private var toggleState = false private var rangeState = 18f override fun createPublisherFor(controlIds: List ): Flow.Publisher { val flow = MutableSharedFlow (replay = 2, extraBufferCapacity = 2) controlIds.forEach { controlFlows[it] = flow } scope.launch { delay(1000) // Retrieving the toggle state. flow.tryEmit(createLight()) delay(1000) // Retrieving the range state. flow.tryEmit(createThermostat()) } return flow.asPublisher() } private fun createLight() = createStatefulControl( LIGHT_ID, LIGHT_TITLE, LIGHT_TYPE, toggleState, ToggleTemplate( LIGHT_ID.toString(), ControlButton( toggleState, toggleState.toString().uppercase(Locale.getDefault()) ) ) ) private fun createThermostat() = createStatefulControl( THERMOSTAT_ID, THERMOSTAT_TITLE, THERMOSTAT_TYPE, rangeState, RangeTemplate( THERMOSTAT_ID.toString(), 15f, 25f, rangeState, 0.1f, "%1.1f" ) ) private fun createStatefulControl(id: Int, title: String, type: Int, state: T, template: ControlTemplate): Control { val intent = Intent(this, MainActivity::class.java) .putExtra(EXTRA_MESSAGE, "$title $state") .addFlags(Intent.FLAG_ACTIVITY_NEW_TASK) val action = PendingIntent.getActivity( this, id, intent, PendingIntent.FLAG_UPDATE_CURRENT or PendingIntent.FLAG_IMMUTABLE ) return Control.StatefulBuilder(id.toString(), action) .setTitle(title) .setDeviceType(type) .setStatus(Control.STATUS_OK) .setControlTemplate(template) .build() } override fun onDestroy() { super.onDestroy() job.cancel() }
Java
@NonNull @Override public Flow.PublishercreatePublisherFor(@NonNull List controlIds) { ReplayProcessor updatePublisher = ReplayProcessor.create(); controlIds.forEach(control -> { controlFlows.put(control, updatePublisher); updatePublisher.onNext(createLight()); updatePublisher.onNext(createThermostat()); }); return FlowAdapters.toFlowPublisher(updatePublisher); } private Control createStatelessControl(int id, String title, int type) { Intent intent = new Intent(this, MainActivity.class) .putExtra(EXTRA_MESSAGE, title) .addFlags(Intent.FLAG_ACTIVITY_NEW_TASK); PendingIntent action = PendingIntent.getActivity( this, id, intent, PendingIntent.FLAG_UPDATE_CURRENT | PendingIntent.FLAG_IMMUTABLE ); return new Control.StatelessBuilder(id + "", action) .setTitle(title) .setDeviceType(type) .build(); } private Control createLight() { return createStatefulControl( LIGHT_ID, LIGHT_TITLE, LIGHT_TYPE, toggleState, new ToggleTemplate( LIGHT_ID + "", new ControlButton( toggleState, String.valueOf(toggleState).toUpperCase(Locale.getDefault()) ) ) ); } private Control createThermostat() { return createStatefulControl( THERMOSTAT_ID, THERMOSTAT_TITLE, THERMOSTAT_TYPE, rangeState, new RangeTemplate( THERMOSTAT_ID + "", 15f, 25f, rangeState, 0.1f, "%1.1f" ) ); } private Control createStatefulControl(int id, String title, int type, T state, ControlTemplate template) { Intent intent = new Intent(this, MainActivity.class) .putExtra(EXTRA_MESSAGE, "$title $state") .addFlags(Intent.FLAG_ACTIVITY_NEW_TASK); PendingIntent action = PendingIntent.getActivity( this, id, intent, PendingIntent.FLAG_UPDATE_CURRENT | PendingIntent.FLAG_IMMUTABLE ); return new Control.StatefulBuilder(id + "", action) .setTitle(title) .setDeviceType(type) .setStatus(Control.STATUS_OK) .setControlTemplate(template) .build(); }
Dalam contoh ini, metode createPublisherFor() berisi implementasi palsu dari apa yang harus dilakukan aplikasi Anda: berkomunikasi dengan perangkat Anda untuk mengambil statusnya, dan mengirimkan status tersebut ke sistem.
Metode createPublisherFor() menggunakan coroutine dan flow Kotlin untuk memenuhi Reactive Streams API yang diperlukan dengan melakukan hal berikut:
- Membuat
Flow. - Menunggu selama satu detik.
- Membuat dan mengirimkan status lampu smart.
- Menunggu selama satu detik lagi.
- Membuat dan mengirimkan status termostat.
Menangani tindakan
Metode performControlAction() memberi sinyal saat pengguna berinteraksi dengan kontrol yang dipublikasikan. Jenis ControlAction yang dikirimkan menentukan tindakan.
Lakukan tindakan yang sesuai untuk kontrol yang ditentukan, lalu perbarui status perangkat di UI Android.
Untuk menyelesaikan contoh, tambahkan kode berikut ke Service:
Kotlin
override fun performControlAction( controlId: String, action: ControlAction, consumer: Consumer) { controlFlows[controlId]?.let { flow -> when (controlId) { LIGHT_ID.toString() -> { consumer.accept(ControlAction.RESPONSE_OK) if (action is BooleanAction) toggleState = action.newState flow.tryEmit(createLight()) } THERMOSTAT_ID.toString() -> { consumer.accept(ControlAction.RESPONSE_OK) if (action is FloatAction) rangeState = action.newValue flow.tryEmit(createThermostat()) } else -> consumer.accept(ControlAction.RESPONSE_FAIL) } } ?: consumer.accept(ControlAction.RESPONSE_FAIL) }
Java
@Override public void performControlAction(@NonNull String controlId, @NonNull ControlAction action, @NonNull Consumerconsumer) { ReplayProcessor processor = controlFlows.get(controlId); if (processor == null) return; if (controlId.equals(LIGHT_ID + "")) { consumer.accept(ControlAction.RESPONSE_OK); if (action instanceof BooleanAction) toggleState = ((BooleanAction) action).getNewState(); processor.onNext(createLight()); } if (controlId.equals(THERMOSTAT_ID + "")) { consumer.accept(ControlAction.RESPONSE_OK); if (action instanceof FloatAction) rangeState = ((FloatAction) action).getNewValue() processor.onNext(createThermostat()); } }
Jalankan aplikasi, akses menu Kontrol perangkat, dan lihat kontrol lampu dan termostat Anda.