Android 11 이상에서는 사용자가 기본 런처에서 세 번의 상호작용 내에 있는 사용자 어포던스에서 조명, 온도 조절기, 카메라와 같은 외부 기기를 빠르게 확인하고 제어할 수 있는 빠른 액세스 기기 제어 기능을 사용할 수 있습니다. 기기 OEM은 사용할 런처를 선택합니다. 기기 애그리게이터(예: Google Home) 및 서드 파티 공급업체 앱은 이 공간에 표시할 기기를 제공할 수 있습니다. 이 페이지에서는 이 공간에 기기 컨트롤을 표시하고 제어 앱에 연결하는 방법을 설명합니다.
이 지원을 추가하려면 ControlsProviderService를 만들고 선언합니다. 사전 정의된 컨트롤 유형에 따라 앱에서 지원하는 컨트롤을 만든 다음 이러한 컨트롤의 게시자를 만듭니다.
사용자 인터페이스
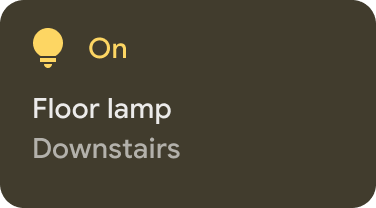
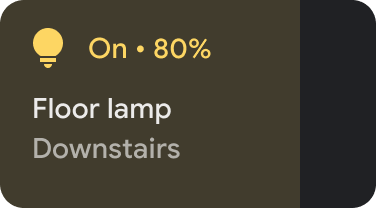
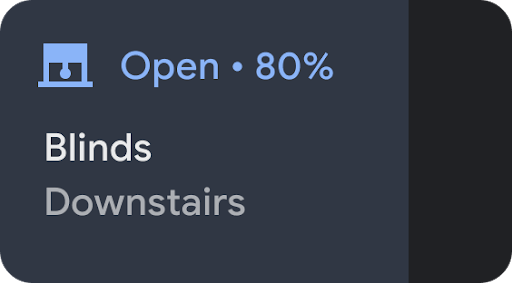
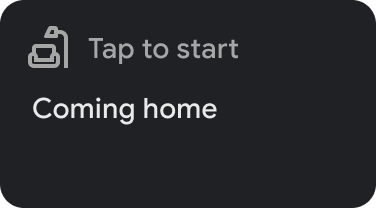
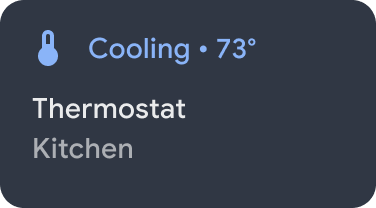
기기는 기기 제어 아래에 템플릿 위젯으로 표시됩니다. 다음 그림과 같이 5개의 기기 제어 위젯을 사용할 수 있습니다.
 |
 |
|
 |
|
위젯을 길게 터치하면 앱을 더 세부적으로 제어할 수 있습니다. 각 위젯에서 아이콘과 색상을 맞춤설정할 수 있지만 최상의 사용자 환경을 위해서는 기본 세트가 기기와 일치하는 경우 기본 아이콘과 색상을 사용하세요.
서비스 만들기
이 섹션에서는
ControlsProviderService를 만드는 방법을 보여줍니다.
이 서비스는 앱에 Android UI의 기기 제어 영역에 표시되어야 하는 기기 제어가 포함되어 있다고 Android 시스템 UI에 알려줍니다.
ControlsProviderService API는 반응형 스트림 GitHub 프로젝트에서 정의되고 자바 9 흐름 인터페이스에서 구현된 대로 반응형 스트림에 익숙하다고 가정합니다.
API는 다음 개념을 기반으로 빌드됩니다.
- 게시자: 애플리케이션이 게시자입니다.
- 구독자: 시스템 UI가 구독자이며 게시자에게 여러 컨트롤을 요청할 수 있습니다.
- 구독: 게시자가 시스템 UI에 업데이트를 전송할 수 있는 기간입니다. 게시자 또는 구독자가 이 기간을 종료할 수 있습니다.
서비스 선언
앱은 앱 매니페스트에서 MyCustomControlService와 같은 서비스를 선언해야 합니다.
서비스에는 ControlsProviderService의 인텐트 필터가 포함되어야 합니다. 이 필터를 사용하면 애플리케이션이 시스템 UI에 컨트롤을 제공할 수 있습니다.
시스템 UI의 컨트롤에 표시되는 label도 필요합니다.
다음 예는 서비스를 선언하는 방법을 보여줍니다.
<service
    android:name="MyCustomControlService"
    android:label="My Custom Controls"
    android:permission="android.permission.BIND_CONTROLS"
    android:exported="true"
    >
    <intent-filter>
      <action android:name="android.service.controls.ControlsProviderService" />
    </intent-filter>
</service>
그런 다음 MyCustomControlService.kt라는 새 Kotlin 파일을 만들고 ControlsProviderService()를 확장하도록 합니다.
Kotlin
    class MyCustomControlService : ControlsProviderService() {
        ...
    }
자바
    public class MyCustomJavaControlService extends ControlsProviderService {
        ...
    }
올바른 컨트롤 유형 선택
이 API는 컨트롤을 만드는 빌더 메서드를 제공합니다. 빌더를 채우려면 제어하려는 기기와 사용자가 기기와 상호작용하는 방식을 결정합니다. 다음 단계를 따르세요.
- 컨트롤이 나타내는 기기 유형을 선택합니다.
DeviceTypes클래스는 지원되는 모든 기기를 열거합니다. 이 유형은 UI에서 기기의 아이콘과 색상을 결정하는 데 사용됩니다. - 사용자에게 표시되는 이름, 기기 위치(예: 주방) 및 컨트롤과 연결된 기타 UI 텍스트 요소를 결정합니다.
- 사용자 상호작용을 지원하는 최적의 템플릿을 선택합니다. 컨트롤에는 애플리케이션의
ControlTemplate할당됩니다. 이 템플릿은 컨트롤 상태와 사용할 수 있는 입력 방법(ControlAction)을 사용자에게 직접 보여줍니다. 다음 표는 사용 가능한 템플릿과 템플릿에서 지원하는 작업을 간략히 설명합니다.
| 템플릿 | 작업 | 설명 |
ControlTemplate.getNoTemplateObject()
|
None
|
애플리케이션은 이를 사용하여 컨트롤에 관한 정보를 전달할 수 있지만 사용자는 컨트롤과 상호작용할 수 없습니다. |
ToggleTemplate
|
BooleanAction
|
사용 설정 및 사용 중지 상태 간에 전환할 수 있는 컨트롤을 나타냅니다. BooleanAction 객체에는 사용자가 컨트롤을 탭할 때 요청된 새 상태를 나타내도록 변경되는 필드가 포함되어 있습니다.
|
RangeTemplate
|
FloatAction
|
지정된 최솟값, 최댓값, 단계 값이 있는 슬라이더 위젯을 나타냅니다. 사용자가 슬라이더와 상호작용할 때 업데이트된 값으로 새 FloatAction
객체를 애플리케이션에 다시 보냅니다.
|
ToggleRangeTemplate
|
BooleanAction, FloatAction
|
이 템플릿은 ToggleTemplate과
RangeTemplate의 조합으로, 터치 이벤트와 슬라이더(예: 밝기 조절이 가능한 조명의 제어)를 지원합니다.
|
TemperatureControlTemplate
|
ModeAction, BooleanAction, FloatAction
|
위 작업 중 하나를 캡슐화하는 것 외에도 이 템플릿으로 사용자는 모드를 설정할 수 있습니다(예: 난방, 냉방, 절전, 사용 중지). |
StatelessTemplate
|
CommandAction
|
터치 기능을 제공하지만 상태 를 확인할 수 없는 컨트롤(예: IR TV 리모컨)을 나타내는 데 사용됩니다. 이 템플릿을 사용하여 컨트롤 및 상태 변경의 집계인 루틴 또는 매크로를 정의할 수 있습니다. |
이 정보를 사용하여 컨트롤을 만들 수 있습니다.
- 컨트롤의 상태를 알 수 없는 경우
Control.StatelessBuilder빌더 클래스를 사용합니다. - 컨트롤의 상태가 알려진 경우
Control.StatefulBuilder빌더 클래스를 사용합니다.
예를 들어 스마트 조명과 온도 조절기를 제어하려면 MyCustomControlService에 다음 상수를 추가합니다.
Kotlin
    private const val LIGHT_ID = 1234
    private const val LIGHT_TITLE = "My fancy light"
    private const val LIGHT_TYPE = DeviceTypes.TYPE_LIGHT
    private const val THERMOSTAT_ID = 5678
    private const val THERMOSTAT_TITLE = "My fancy thermostat"
    private const val THERMOSTAT_TYPE = DeviceTypes.TYPE_THERMOSTAT

    class MyCustomControlService : ControlsProviderService() {
      ...
    }
자바
    public class MyCustomJavaControlService extends ControlsProviderService {

    private final int LIGHT_ID = 1337;
    private final String LIGHT_TITLE = "My fancy light";
    private final int LIGHT_TYPE = DeviceTypes.TYPE_LIGHT;
    private final int THERMOSTAT_ID = 1338;
    private final String THERMOSTAT_TITLE = "My fancy thermostat";
    private final int THERMOSTAT_TYPE = DeviceTypes.TYPE_THERMOSTAT;

    ...
    }
컨트롤의 게시자 만들기
컨트롤을 만든 후에는 게시자가 있어야 합니다. 게시자는 시스템 UI에 컨트롤의 존재를 알립니다. ControlsProviderService 클래스에는 애플리케이션 코드에서 재정의해야 하는 두 가지 게시자 메서드가 있습니다.
createPublisherForAllAvailable(): 앱에서 사용할 수 있는 모든 컨트롤의Publisher를 만듭니다. 이 게시자의Control객체를 빌드하려면Control.StatelessBuilder()를 사용합니다.createPublisherFor(): 지정된 컨트롤 목록의Publisher를 만듭니다. 문자열 식별자로 식별된 대로 게시자가 각 컨트롤에 상태를 할당해야 하므로Control.StatefulBuilder를 사용하여 이러한Control객체를 빌드합니다.
게시자 만들기
앱이 처음으로 컨트롤을 시스템 UI에 게시할 때 앱은 각 컨트롤의 상태를 알지 못합니다. 상태 가져오기는 기기 제공업체 네트워크의 여러 홉이 관련되는 시간이 많이 걸리는 작업일 수 있습니다.
createPublisherForAllAvailable()
메서드를 사용하여 사용 가능한 컨트롤을 시스템에 알립니다. 이 메서드는 각 컨트롤의 상태를 알 수 없으므로 Control.StatelessBuilder 빌더 클래스를 사용합니다.
컨트롤이 Android UI에 표시되면 사용자는 즐겨찾기 컨트롤을 선택할 수 있습니다.
Kotlin 코루틴을 사용하여 ControlsProviderService를 만들려면 build.gradle에 새 종속 항목을 추가합니다.
Groovy
dependencies {
    implementation "org.jetbrains.kotlinx:kotlinx-coroutines-jdk9:1.6.4"
}
Kotlin
dependencies {
    implementation("org.jetbrains.kotlinx:kotlinx-coroutines-jdk9:1.6.4")
}
Gradle 파일을 동기화한 후 다음 스니펫을 Service에 추가하여 createPublisherForAllAvailable()을 구현합니다.
Kotlin
class MyCustomControlService : ControlsProviderService() { override fun createPublisherForAllAvailable(): Flow.Publisher= flowPublish { send(createStatelessControl(LIGHT_ID, LIGHT_TITLE, LIGHT_TYPE)) send(createStatelessControl(THERMOSTAT_ID, THERMOSTAT_TITLE, THERMOSTAT_TYPE)) } private fun createStatelessControl(id: Int, title: String, type: Int): Control { val intent = Intent(this, MainActivity::class.java) .putExtra(EXTRA_MESSAGE, title) .addFlags(Intent.FLAG_ACTIVITY_NEW_TASK) val action = PendingIntent.getActivity( this, id, intent, PendingIntent.FLAG_UPDATE_CURRENT or PendingIntent.FLAG_IMMUTABLE ) return Control.StatelessBuilder(id.toString(), action) .setTitle(title) .setDeviceType(type) .build() } override fun createPublisherFor(controlIds: List ): Flow.Publisher { TODO() } override fun performControlAction( controlId: String, action: ControlAction, consumer: Consumer ) { TODO() } }
자바
    public class MyCustomJavaControlService extends ControlsProviderService {

        private final int LIGHT_ID = 1337;
        private final String LIGHT_TITLE = "My fancy light";
        private final int LIGHT_TYPE = DeviceTypes.TYPE_LIGHT;
        private final int THERMOSTAT_ID = 1338;
        private final String THERMOSTAT_TITLE = "My fancy thermostat";
        private final int THERMOSTAT_TYPE = DeviceTypes.TYPE_THERMOSTAT;

        private boolean toggleState = false;
        private float rangeState = 18f;
        private final Map<String, ReplayProcessor> controlFlows = new HashMap<>();

        @NonNull
        @Override
        public Flow.Publisher createPublisherForAllAvailable() {
            List controls = new ArrayList<>();
            controls.add(createStatelessControl(LIGHT_ID, LIGHT_TITLE, LIGHT_TYPE));
            controls.add(createStatelessControl(THERMOSTAT_ID, THERMOSTAT_TITLE, THERMOSTAT_TYPE));
            return FlowAdapters.toFlowPublisher(Flowable.fromIterable(controls));
        }

        @NonNull
        @Override
        public Flow.Publisher createPublisherFor(@NonNull List controlIds) {
            ReplayProcessor updatePublisher = ReplayProcessor.create();

            controlIds.forEach(control -> {
                controlFlows.put(control, updatePublisher);
                updatePublisher.onNext(createLight());
                updatePublisher.onNext(createThermostat());
            });

            return FlowAdapters.toFlowPublisher(updatePublisher);
        }
    }
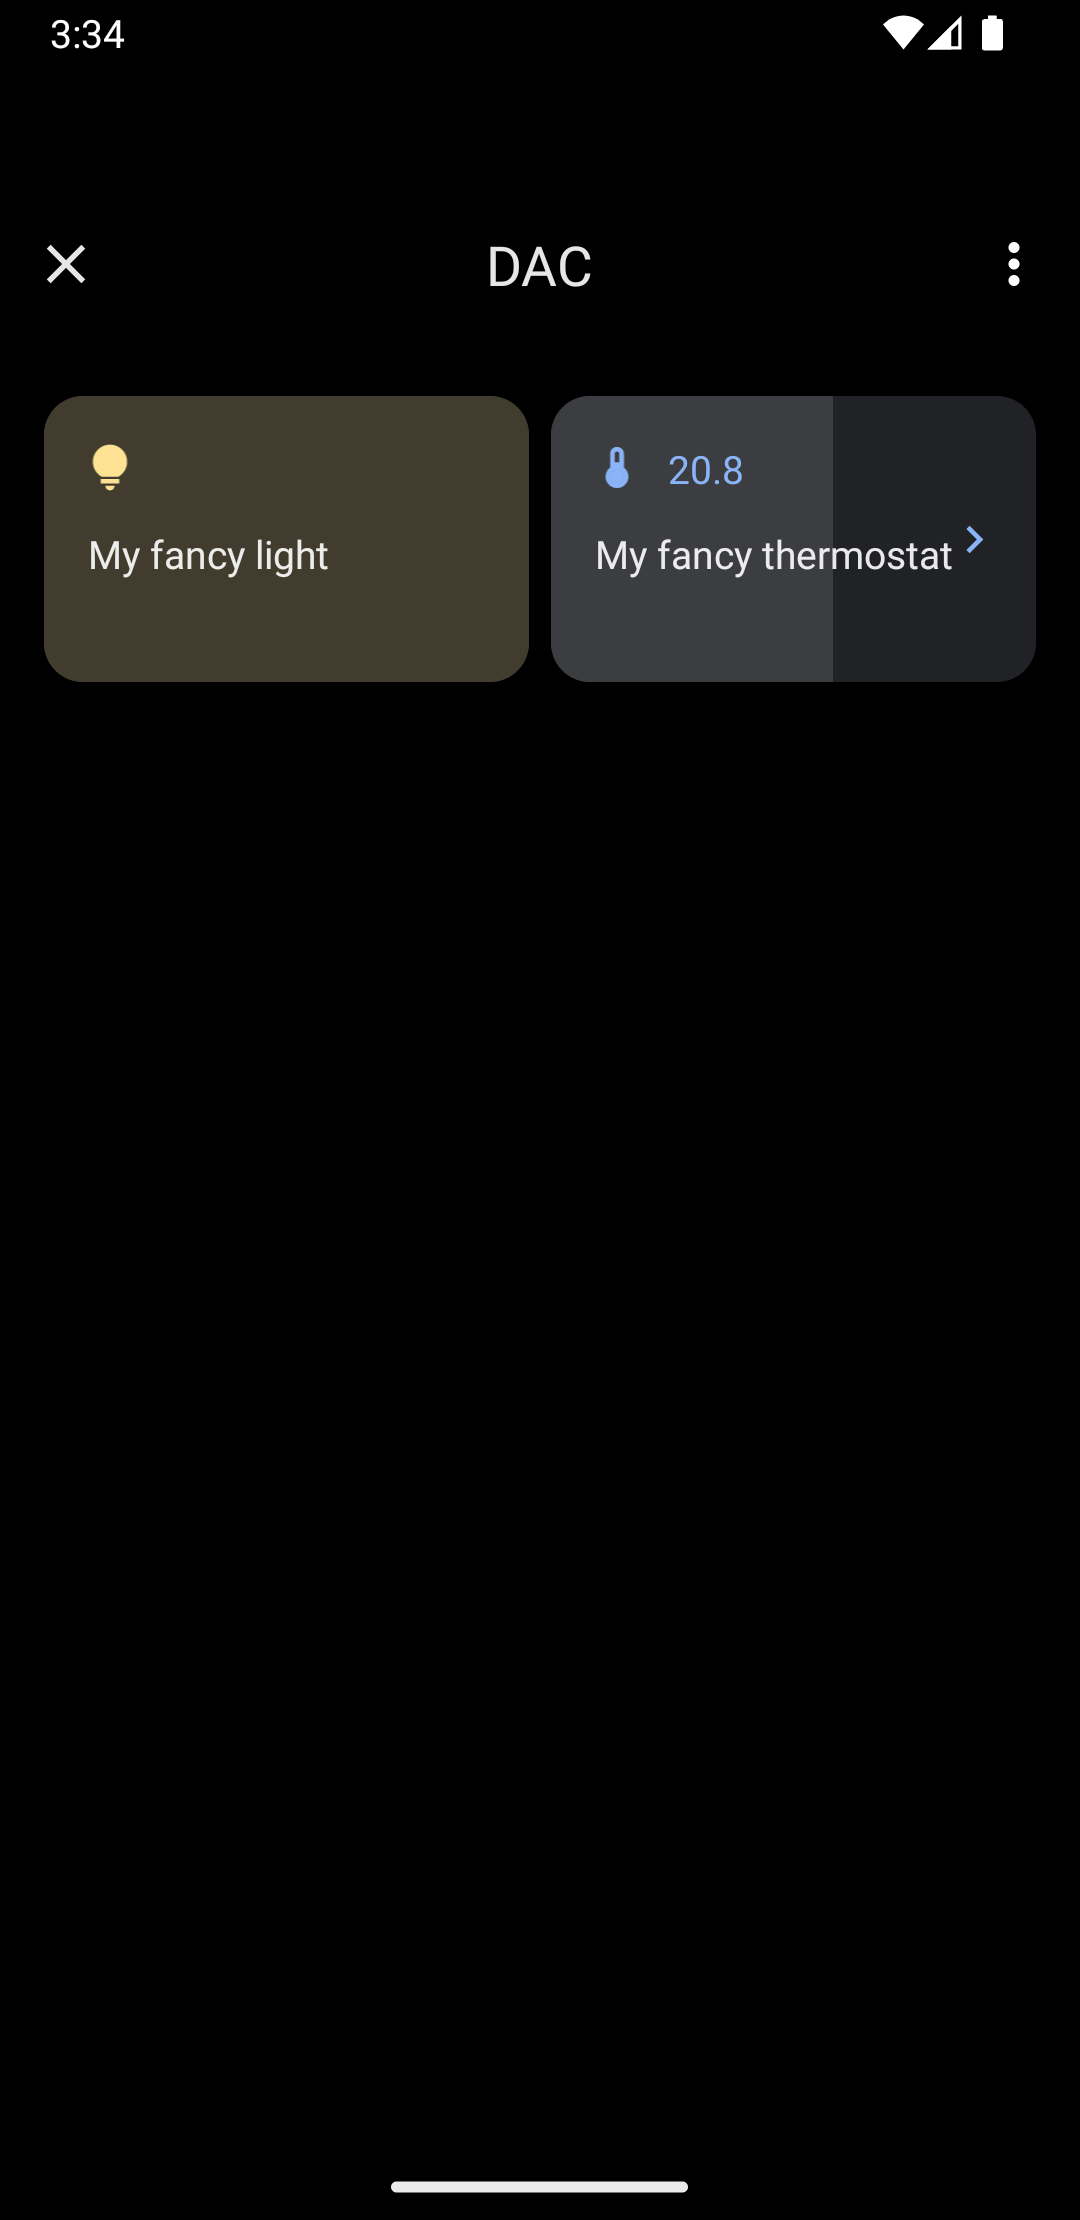
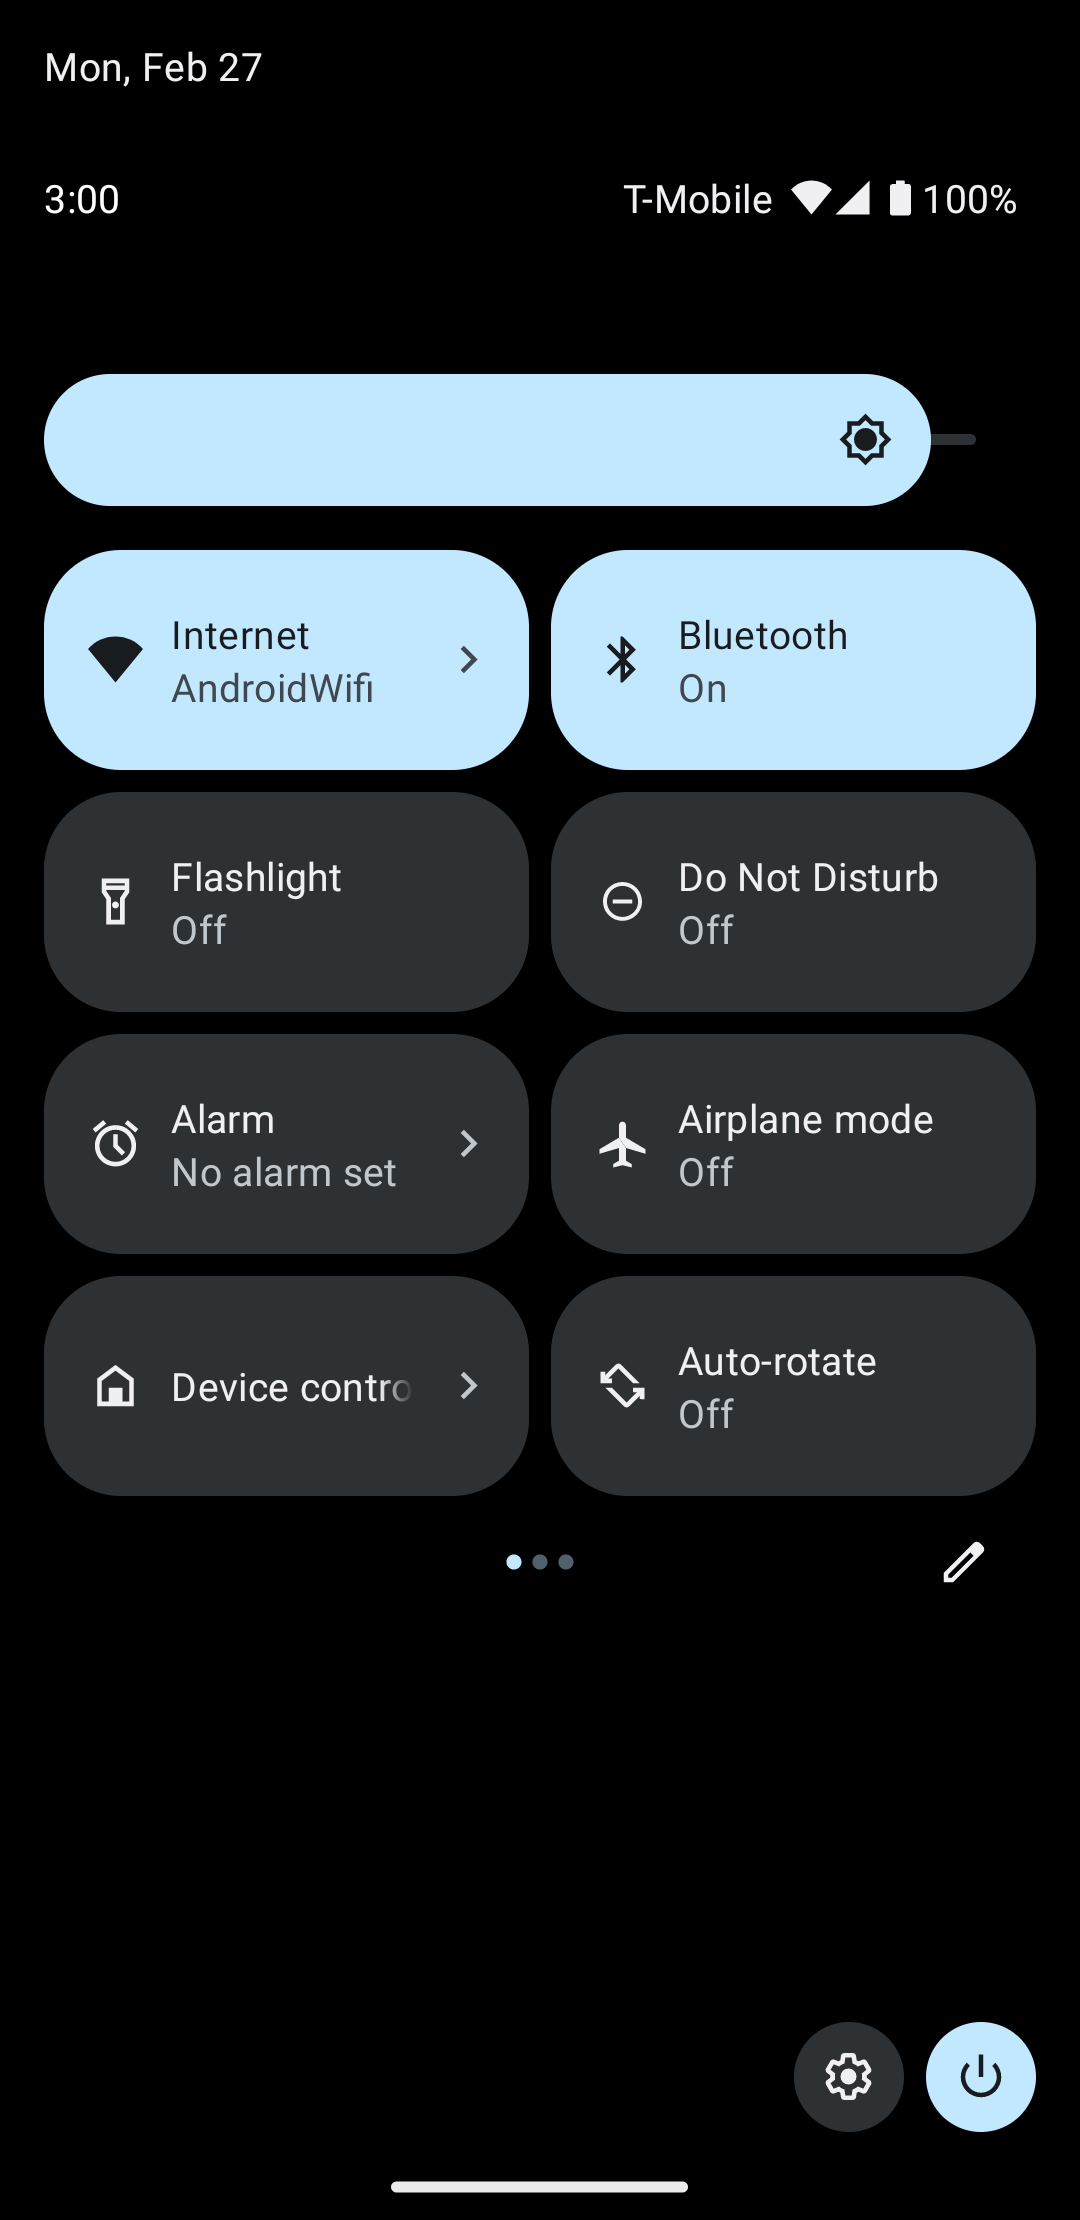
시스템 메뉴를 아래로 스와이프하고 그림 4에 표시된 기기 제어 버튼을 찾습니다.
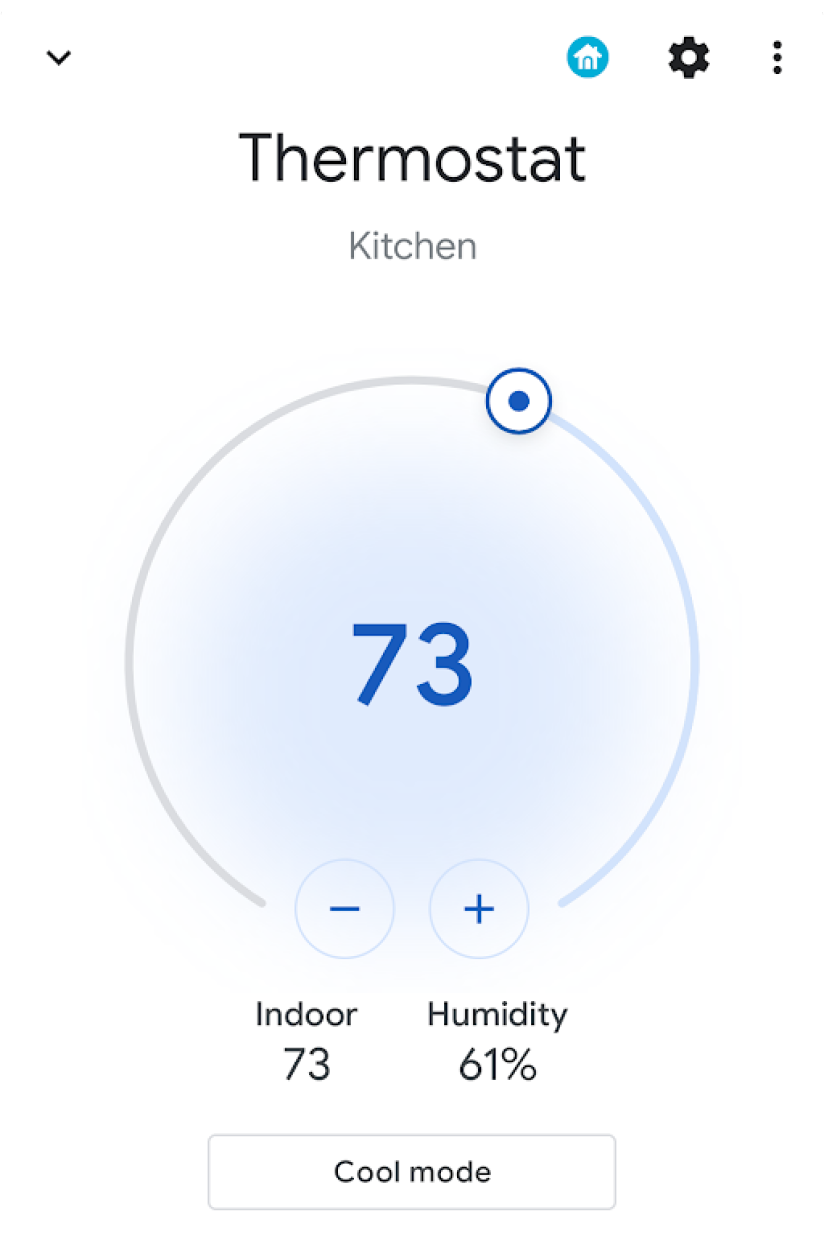
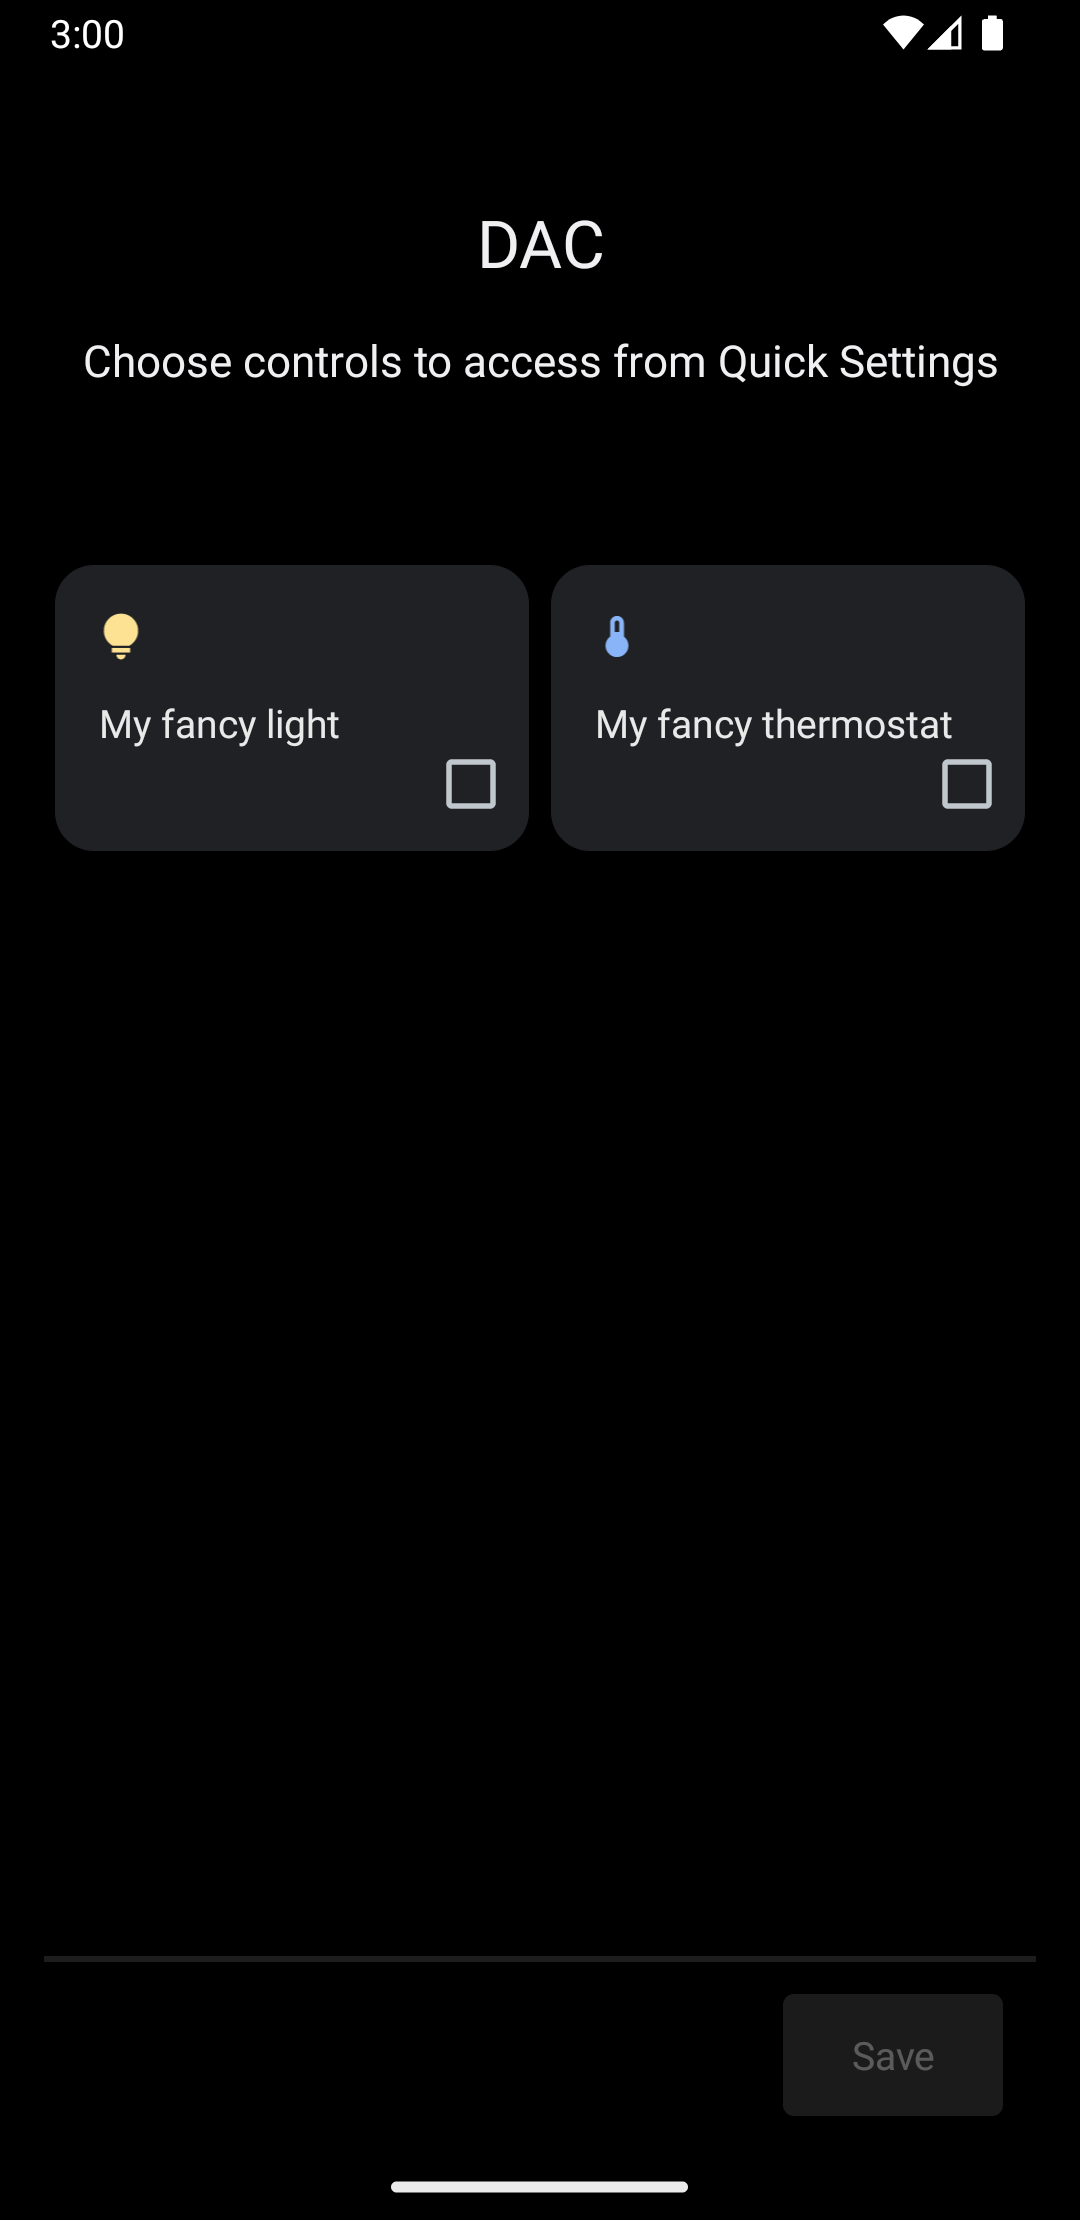
기기 제어 를 탭하면 앱을 선택할 수 있는 두 번째 화면으로 이동합니다. 앱을 선택하면 이전 스니펫이 그림 5와 같이 새 컨트롤을 표시하는 맞춤 시스템 메뉴를 만드는 방법을 확인할 수 있습니다.
이제 createPublisherFor() 메서드를 구현하고 Service에 다음을 추가합니다.
Kotlin
private val job = SupervisorJob() private val scope = CoroutineScope(Dispatchers.IO + job) private val controlFlows = mutableMapOf<String, MutableSharedFlow>() private var toggleState = false private var rangeState = 18f override fun createPublisherFor(controlIds: List ): Flow.Publisher { val flow = MutableSharedFlow (replay = 2, extraBufferCapacity = 2) controlIds.forEach { controlFlows[it] = flow } scope.launch { delay(1000) // Retrieving the toggle state. flow.tryEmit(createLight()) delay(1000) // Retrieving the range state. flow.tryEmit(createThermostat()) } return flow.asPublisher() } private fun createLight() = createStatefulControl( LIGHT_ID, LIGHT_TITLE, LIGHT_TYPE, toggleState, ToggleTemplate( LIGHT_ID.toString(), ControlButton( toggleState, toggleState.toString().uppercase(Locale.getDefault()) ) ) ) private fun createThermostat() = createStatefulControl( THERMOSTAT_ID, THERMOSTAT_TITLE, THERMOSTAT_TYPE, rangeState, RangeTemplate( THERMOSTAT_ID.toString(), 15f, 25f, rangeState, 0.1f, "%1.1f" ) ) private fun createStatefulControl(id: Int, title: String, type: Int, state: T, template: ControlTemplate): Control { val intent = Intent(this, MainActivity::class.java) .putExtra(EXTRA_MESSAGE, "$title $state") .addFlags(Intent.FLAG_ACTIVITY_NEW_TASK) val action = PendingIntent.getActivity( this, id, intent, PendingIntent.FLAG_UPDATE_CURRENT or PendingIntent.FLAG_IMMUTABLE ) return Control.StatefulBuilder(id.toString(), action) .setTitle(title) .setDeviceType(type) .setStatus(Control.STATUS_OK) .setControlTemplate(template) .build() } override fun onDestroy() { super.onDestroy() job.cancel() }
자바
@NonNull @Override public Flow.PublishercreatePublisherFor(@NonNull List controlIds) { ReplayProcessor updatePublisher = ReplayProcessor.create(); controlIds.forEach(control -> { controlFlows.put(control, updatePublisher); updatePublisher.onNext(createLight()); updatePublisher.onNext(createThermostat()); }); return FlowAdapters.toFlowPublisher(updatePublisher); } private Control createStatelessControl(int id, String title, int type) { Intent intent = new Intent(this, MainActivity.class) .putExtra(EXTRA_MESSAGE, title) .addFlags(Intent.FLAG_ACTIVITY_NEW_TASK); PendingIntent action = PendingIntent.getActivity( this, id, intent, PendingIntent.FLAG_UPDATE_CURRENT | PendingIntent.FLAG_IMMUTABLE ); return new Control.StatelessBuilder(id + "", action) .setTitle(title) .setDeviceType(type) .build(); } private Control createLight() { return createStatefulControl( LIGHT_ID, LIGHT_TITLE, LIGHT_TYPE, toggleState, new ToggleTemplate( LIGHT_ID + "", new ControlButton( toggleState, String.valueOf(toggleState).toUpperCase(Locale.getDefault()) ) ) ); } private Control createThermostat() { return createStatefulControl( THERMOSTAT_ID, THERMOSTAT_TITLE, THERMOSTAT_TYPE, rangeState, new RangeTemplate( THERMOSTAT_ID + "", 15f, 25f, rangeState, 0.1f, "%1.1f" ) ); } private Control createStatefulControl(int id, String title, int type, T state, ControlTemplate template) { Intent intent = new Intent(this, MainActivity.class) .putExtra(EXTRA_MESSAGE, "$title $state") .addFlags(Intent.FLAG_ACTIVITY_NEW_TASK); PendingIntent action = PendingIntent.getActivity( this, id, intent, PendingIntent.FLAG_UPDATE_CURRENT | PendingIntent.FLAG_IMMUTABLE ); return new Control.StatefulBuilder(id + "", action) .setTitle(title) .setDeviceType(type) .setStatus(Control.STATUS_OK) .setControlTemplate(template) .build(); }
이 예에서 createPublisherFor() 메서드에는 앱이 해야 하는 작업, 즉 기기와 통신하여 상태를 가져오고 시스템에 상태를 내보내는 작업의 가짜 구현이 포함되어 있습니다.
createPublisherFor() 메서드는 Kotlin 코루틴과 흐름을 사용하여 다음을 실행하여 필요한 반응형 스트림 API를 충족합니다.
Flow를 만듭니다.- 1초 동안 기다립니다.
- 스마트 조명의 상태를 만들고 내보냅니다.
- 1초 더 기다립니다.
- 온도 조절기의 상태를 만들고 내보냅니다.
작업 처리
performControlAction() 메서드는 사용자가 게시된 컨트롤과 상호작용할 때 신호를 보냅니다. 전송된 ControlAction의 유형에 따라 작업이 결정됩니다.
지정된 컨트롤에 적절한 작업을 실행한 다음 Android UI에서 기기 상태를 업데이트합니다.
예를 완료하려면 Service에 다음을 추가합니다.
Kotlin
override fun performControlAction( controlId: String, action: ControlAction, consumer: Consumer) { controlFlows[controlId]?.let { flow -> when (controlId) { LIGHT_ID.toString() -> { consumer.accept(ControlAction.RESPONSE_OK) if (action is BooleanAction) toggleState = action.newState flow.tryEmit(createLight()) } THERMOSTAT_ID.toString() -> { consumer.accept(ControlAction.RESPONSE_OK) if (action is FloatAction) rangeState = action.newValue flow.tryEmit(createThermostat()) } else -> consumer.accept(ControlAction.RESPONSE_FAIL) } } ?: consumer.accept(ControlAction.RESPONSE_FAIL) }
자바
@Override public void performControlAction(@NonNull String controlId, @NonNull ControlAction action, @NonNull Consumerconsumer) { ReplayProcessor processor = controlFlows.get(controlId); if (processor == null) return; if (controlId.equals(LIGHT_ID + "")) { consumer.accept(ControlAction.RESPONSE_OK); if (action instanceof BooleanAction) toggleState = ((BooleanAction) action).getNewState(); processor.onNext(createLight()); } if (controlId.equals(THERMOSTAT_ID + "")) { consumer.accept(ControlAction.RESPONSE_OK); if (action instanceof FloatAction) rangeState = ((FloatAction) action).getNewValue() processor.onNext(createThermostat()); } }
앱을 실행하고 기기 제어 메뉴에 액세스하여 조명 및 온도 조절기 컨트롤을 확인합니다.