拖曳

在 Android 拖曳架構中,使用者可透過互動式拖曳手勢來移動資料。使用者可以將文字、圖片、物件 (由 URI 代表的任何內容) 從 View 拖曳至應用程式內的另一個項目,或在多視窗模式中,將資料在應用程式間拖曳。

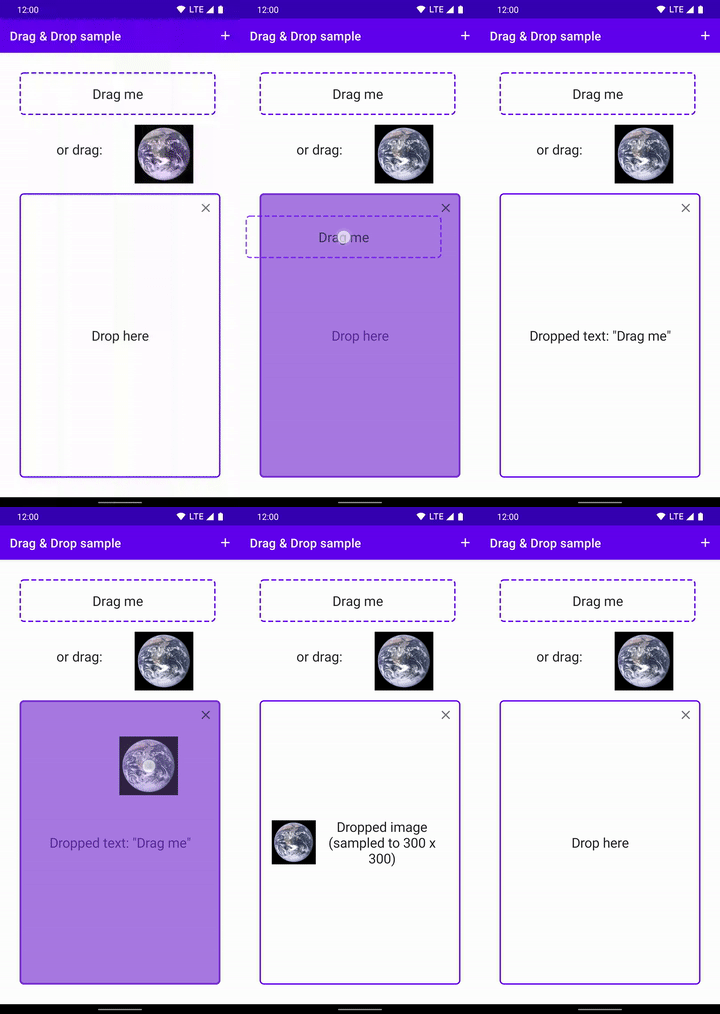
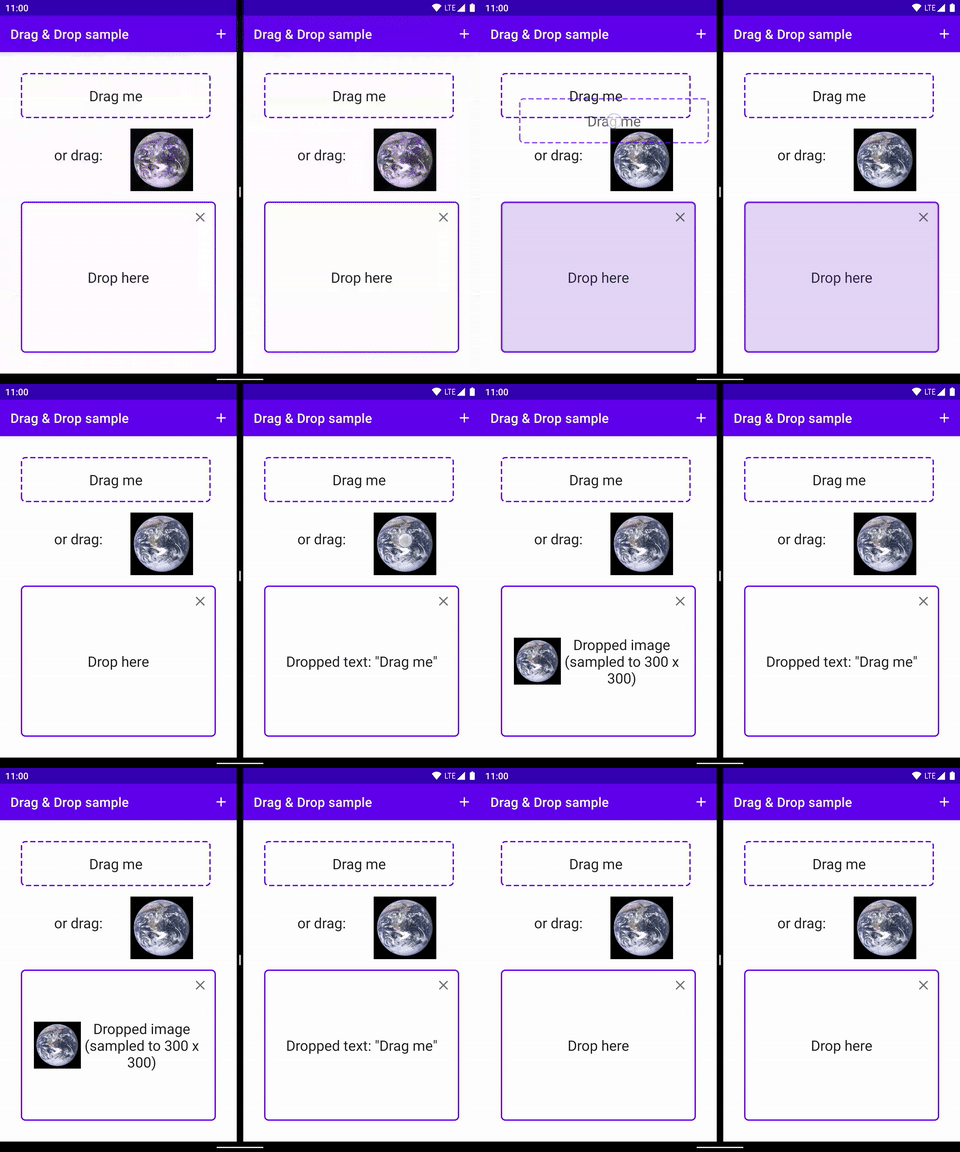
將文字字串和圖片拖曳到應用程式中。 在分割畫面模式中,將文字字串和圖片在應用程式之間拖曳。
圖 1.在應用程式中拖曳。
圖 2.在應用程式間拖曳。

架構包含拖曳事件類別、拖曳事件監聽器及輔助類別和方法。雖然此架構主要是用來資料移轉,但也可以用於其他 UI 動作。舉例來說,您可以建立混色應用程式,使用者直接將某個顏色圖示拖曳到另一個圖示即可混色。不過,本指南的其餘部分將介紹資料移轉的拖曳架構。

總覽

當使用者做出 UI 手勢讓應用程式辨識到開始拖曳的訊號時,拖曳作業就會開始。應用程式的回應是通知系統拖曳作業開始。系統會再呼叫應用程式,取得拖曳的資料表示法 (拖曳陰影)。當使用者將拖曳陰影移動到應用程式版面配置上時,系統會傳送拖曳事件給拖曳事件監聽器,並傳送與版面配置中 View 物件相關的回呼方法。如果使用者在可接受資料的檢視畫面放開拖曳陰影 (放置目標),系統會將資料傳送至目標。無論拖曳陰影是否在放置目標上,當使用者放開拖曳陰影時,拖曳作業即結束。

您可以實作 View.OnDragListener 來建立拖曳事件監聽器。請使用 View 物件的 setOnDragListener() 方法為放置目標設立事件監聽器。版面配置中的每個檢視畫面都有 onDragEvent() 回呼方法。

應用程式會呼叫 startDragAndDrop() 方法來通知系統開始傳送拖曳事件,藉此通知系統開始執行拖曳作業。此方法也會向系統提供使用者拖曳的資料,並提供描述資料的中繼資料。您可以在現行版面配置的任何 View 上呼叫 startDragAndDrop()。系統只會使用 View 物件來取得版面配置中的全域設定。

在拖曳作業期間,系統會傳送拖曳事件給拖曳事件監聽器,或版面配置中 View 物件的回呼方法。監聽器或回呼方法會使用中繼資料來判斷在是否要接受拖放的資料。如果使用者將資料放置到放置目標 (會接受資料的 View),系統會將含有資料的拖曳事件物件,傳送至放置目標的拖曳事件監聽器或回呼方法。

拖曳事件監聽器和回呼方法

View 收到的拖曳事件可能包含實作 View.OnDragListener 的拖曳事件監聽器,或包含檢視畫面的 onDragEvent() 回呼方法。系統會在呼叫方法或監聽器時提供 DragEvent 引數。

在大部分情況下,使用監聽器時最好使用回呼方法。設計 UI 時,您通常不會將 View 類別設為子類別,不過如果您使用回呼方法,則必須建立子類別來覆寫此方法。相較之下,您可以導入一個事件監聽器類別,然後搭配多個不同的 View 物件使用。您也可以將其實作為匿名內嵌類別或 lambda 運算式。如要設定 View 物件的監聽器,請呼叫 setOnDragListener()

或者,您也可以變更 onDragEvent() 的預設實作方式,而不須覆寫該方法。如果您在檢視畫面上設定 OnReceiveContentListener (請參閱 setOnReceiveContentListener()),onDragEvent() 方法會根據預設執行下列操作:

  • 回傳 true 值以回應對 startDragAndDrop() 的呼叫
  • 如果拖曳資料在檢視畫面上放置,則呼叫 performReceiveContent()

    資料會以 ContentInfo 物件的形式傳送至方法。此方法會叫用 OnReceiveContentListener

  • 如果拖放資料在檢視畫面上放置,且 OnReceiveContentListener 時會取用任何內容,則會回傳 true

請定義 OnReceiveContentListener 以專門處理應用程式的資料。為了回溯相容到 API 級別 24,請使用 OnReceiveContentListener 的 Jetpack 版本。

View 物件可同時有拖曳事件監聽器和回呼方法;在此情況下,系統會先呼叫事件監聽器。除非監聽器回傳 false,否則系統不會呼叫回呼方法。

onDragEvent() 方法與 View.OnDragListener 的組合可類比為用於觸控事件的 onTouchEvent()View.OnTouchListener 組合。

拖曳流程

拖曳流程大致有四個步驟或狀態,分別是「已開始」、「繼續」、「已放置」和「已結束」。

已開始

為回應使用者的拖曳手勢,應用程式會呼叫 startDragAndDrop() 以指示系統開始拖放作業。方法的引數提供以下內容:

  • 要拖曳的資料
  • 用於繪製拖曳陰影的回呼
  • 描述拖曳資料的中繼資料

系統回應時,會先呼叫應用程式以取得拖曳陰影。然後在裝置上顯示拖曳陰影。

接著,系統會將動作類型為 ACTION_DRAG_STARTED 的拖曳事件傳送至目前版面配置中所有 View 的拖曳事件監聽器。如要繼續接收拖曳事件 (包括可能的放置事件),拖曳事件監聽器必須回傳 true。此指令會向系統註冊事件監聽器。只有已註冊的監聽器會繼續收到拖曳事件。此時,事件監聽器也可以變更放置目標 View 物件的外觀,以表示檢視畫面能夠接受拖曳事件。

如果拖曳事件監聽器回傳 false,將不會收到目前作業的拖曳事件,直到系統傳送動作類型為 ACTION_DRAG_ENDED 的拖曳事件。事件監聽器會藉由回傳 false,向系統表示不想參與拖曳作業及接受拖曳的資料。

繼續

使用者持續拖曳。如果拖曳陰影與放置目標的在定界框交會,系統會傳送一或多個拖曳事件至目標的拖曳事件監聽器。監聽器可以選擇變更放置目標的外觀 View 來回應事件。舉例來說,如果事件指出拖曳陰影已進入放置目標的定界框 (動作類型 ACTION_DRAG_ENTERED),事件監聽器就會醒目顯示 View

已拖曳

使用者在放置目標的定界框內放開拖曳陰影。系統會將動作類型為 ACTION_DROP 的拖曳事件傳送給放置目標的事件監聽器。拖曳事件物件包含在開始作業的 startDragAndDrop() 在呼叫中傳遞給系統的資料。如果事件監聽器成功處理已拖曳的資料,就應將布林值 true 回傳系統。

請注意,使用者必須將拖曳陰影拖曳到已經過註冊而得以接收拖曳事件的 View (放置目標) 定界框中,此步驟才會有效。如果使用者在其他情況下放開拖曳陰影,系統就不會傳送 ACTION_DROP 拖曳事件。

已結束

使用者放開拖曳陰影,且在系統傳送動作類型為 ACTION_DROP 的拖曳事件 (如有需要) 後,系統會傳送動作類型為 ACTION_DRAG_ENDED 的拖曳事件來表示拖曳作業已結束。無論使用者放開拖曳陰影的位置為何。即使事件監聽器收到 ACTION_DROP 事件,系統仍會將事件傳送給每個註冊接收拖曳事件的事件監聽器。

如要進一步瞭解這四個步驟,請參閱「拖曳作業」。

拖曳事件

系統會以 DragEvent 物件的形式傳送拖曳事件。此物件包含描述拖曳過程的動作類型。視動作類型而定,物件中也可能包含其他資料。

拖曳事件監聽器會接收 DragEvent 物件。為了取得動作類型,事件監聽器會呼叫 DragEvent#getAction()DragEvent 類別中的常數定義了六個可能的值。

表 1. DragEvent 動作類型

動作類型 意義
ACTION_DRAG_STARTED 應用程式呼叫 startDragAndDrop() 並出現拖曳陰影。如果事件監聽器要繼續接收此作業的拖曳事件,則必須將布林值 true 回傳系統。
ACTION_DRAG_ENTERED 拖曳陰影剛進入拖曳事件監聽器 View 的定界框。這是拖曳陰影進入定界框時,事件監聽器收到的第一個事件動作類型。
ACTION_DRAG_LOCATION ACTION_DRAG_ENTERED 事件之後,拖曳陰影仍位於拖曳事件監聽器 View 的定界框內。
ACTION_DRAG_EXITED ACTION_DRAG_ENTERED 和至少一個 ACTION_DRAG_LOCATION 事件之後,拖曳陰影已移至拖曳事件監聽器 View 的定界框外。
ACTION_DROP 拖曳陰影已在拖曳事件監聽器的 View 上放開。只有在事件監聽器回傳布林值 true 以回應 ACTION_DRAG_STARTED 拖曳事件時,系統才會將動作類型傳送至 View 物件的事件監聽器。如果使用者在未註冊事件監聽器的 View 上放開拖曳陰影,或在不屬於目前版面配置的任一處放開,就不會傳送此動作類型。

如果拖曳成功並放開,會回傳布林值 true;否則,應回傳 false

ACTION_DRAG_ENDED 系統即將結束拖曳動作。動作類型不一定要放在 ACTION_DROP 事件之前。如果系統傳送了 ACTION_DROP,即使收到 ACTION_DRAG_ENDED 動作類型也不表示有成功放開。事件監聽器必須呼叫 getResult() (請參閱表 2) 以取得回應 ACTION_DROP 時回傳的值。如未傳送 ACTION_DROP 事件,則 getResult() 會回傳 false

DragEvent 物件也會包含應用程式呼叫 startDragAndDrop() 時提供給系統的資料和中繼資料。有些資料僅適用於特定動作類型,如表 2 所列。如要進一步瞭解事件及其相關資料,請參閱「拖曳作業」。

表 2. 各動作類型的有效 DragEvent 資料

getAction()
getClipDescription()
getLocalState()
getX()
getY()
getClipData()
getResult()
ACTION_DRAG_STARTED ✓ ✓ ✓ ✓    
ACTION_DRAG_ENTERED ✓ ✓        
ACTION_DRAG_LOCATION ✓ ✓ ✓ ✓    
ACTION_DRAG_EXITED ✓ ✓        
ACTION_DROP ✓ ✓ ✓ ✓ ✓  
ACTION_DRAG_ENDED   ✓       ✓

DragEventgetAction()describeContents()writeToParcel()、和 toString() 方法一律回傳有效資料。

如果方法未包含特定動作類型的有效資料,系統會根據其結果類型回傳 null 或 0。

拖曳陰影

在拖曳作業期間,系統會顯示使用者拖曳的圖片。若是移動資料,此圖片則代表拖曳的資料。若是其他作業,圖片則代表拖曳作業的某些部分。

此圖片稱為拖曳陰影。是以您為 View.DragShadowBuilder 物件宣告的方法建立而成。使用 startDragAndDrop() 啟動拖曳作業時,請將建構工具傳遞給系統。為回應 startDragAndDrop(),系統會叫用您在 View.DragShadowBuilder 中定義的回呼方法,藉此取得拖曳陰影。

View.DragShadowBuilder 類別有兩個建構函式:

View.DragShadowBuilder(View)

此建構函式接受應用程式的任何 View 物件。建構函式會將 View 物件儲存在 View.DragShadowBuilder 物件中,因此回呼可以存取該物件來建構拖曳陰影。檢視畫面不一定要是使用者為了開始作業而選取的 View (如果有的話)。

使用此建構函式時,您不必擴充 View.DragShadowBuilder 或覆寫其方法。根據預設,您取得的拖曳陰影外觀會與做為引數傳遞的 View 相同,並在使用者觸控畫面的位置下方置中顯示。

View.DragShadowBuilder()

如果使用此建構函式,View.DragShadowBuilder 物件就不會有 View 物件 (該欄位已設為 null)。您必須擴充 View.DragShadowBuilder 並覆寫其方法,否則陰影就不會顯示。系統不會擲回錯誤。

View.DragShadowBuilder 類別有兩種方法共同建立拖曳陰影:

onProvideShadowMetrics()

當您呼叫 startDragAndDrop() 後,系統會立即呼叫此方法。此方法會將拖曳陰影的維度和觸控點傳送到系統。此方法有兩個參數:

outShadowSize
Point 物件。拖曳陰影寬度為 x,高度為 y
outShadowTouchPoint
Point 物件。觸控點是指拖曳陰影內的位置,拖曳時應位於使用者手指下方。其 X 座標會是 x,Y 座標會是 y
onDrawShadow()

呼叫 onProvideShadowMetrics() 後,系統會立即呼叫 onDrawShadow() 來建立拖曳陰影。此方法有一個引數,即系統使用您在 onProvideShadowMetrics() 中提供的參數建構的 Canvas 物件。此方法會在提供的 Canvas 上繪製拖曳陰影。

為提升效能,請盡量使用較小的拖曳陰影。如果是單一項目,建議您使用圖示。如果需要選擇多個項目,建議您使用堆疊中的圖示,而不要將整個圖片蓋滿螢幕畫面。

拖曳作業

本節將逐步說明如何開始拖曳、在拖曳時如何回應事件、如何回應拖放事件,以及如何結束拖曳作業。

開始拖曳

使用者先對 View 物件使用拖曳手勢 (通常是按住) 以開始拖曳。為回應此動作,應用程式應執行下列事項:

  1. 為要移動的資料建立 ClipData 物件和 ClipData.Item 物件。在 ClipData 中,提供在 ClipData 內儲存於 ClipDescription 物件的中繼資料。如果不是代表資料移動的拖曳作業,建議您使用 null,而非實際物件。

    例如,此程式碼片段說明如何建立包含 ImageView 標記 (或標籤) 的 ClipData 物件,藉此回應 ImageView 的按住手勢:

    Kotlin

    // Create a string for the ImageView label.
    val IMAGEVIEW_TAG = "icon bitmap"
    
    ...
    
    val imageView = ImageView(this).apply {
        // Sets the bitmap for the ImageView from an icon bit map (defined elsewhere).
        setImageBitmap(iconBitmap)
        tag = IMAGEVIEW_TAG
        setOnLongClickListener { v ->
            // Create a new ClipData.
            // This is done in two steps to provide clarity. The convenience method
            // ClipData.newPlainText() can create a plain text ClipData in one step.
    
            // Create a new ClipData.Item from the ImageView object's tag.
            val item = ClipData.Item(v.tag as? CharSequence)
    
            // Create a new ClipData using the tag as a label, the plain text MIME type, and
            // the already-created item. This creates a new ClipDescription object within the
            // ClipData and sets its MIME type to "text/plain".
            val dragData = ClipData(
                v.tag as? CharSequence,
                arrayOf(ClipDescription.MIMETYPE_TEXT_PLAIN),
                item)
    
            // Instantiate the drag shadow builder.
            val myShadow = MyDragShadowBuilder(this)
    
            // Start the drag.
            v.startDragAndDrop(dragData,  // The data to be dragged
                               myShadow,  // The drag shadow builder
                               null,      // No need to use local data
                               0          // Flags (not currently used, set to 0)
            )
    
           // Indicate that the long-click was handled.
           true
        }
    }
    

    Java

    // Create a string for the ImageView label.
    private static final String IMAGEVIEW_TAG = "icon bitmap";
    
    ...
    
    // Create a new ImageView.
    ImageView imageView = new ImageView(this);
    
    // Set the bitmap for the ImageView from an icon bit map (defined elsewhere).
    imageView.setImageBitmap(iconBitmap);
    
    // Set the tag.
    imageView.setTag(IMAGEVIEW_TAG);
    
    // Sets a long click listener for the ImageView using an anonymous listener object that
    // implements the OnLongClickListener interface.
    imageView.setOnLongClickListener( v -> {
    
        // Create a new ClipData.
        // This is done in two steps to provide clarity. The convenience method
        // ClipData.newPlainText() can create a plain text ClipData in one step.
    
        // Create a new ClipData.Item from the ImageView object's tag.
        ClipData.Item item = new ClipData.Item((CharSequence) v.getTag());
    
        // Create a new ClipData using the tag as a label, the plain text MIME type, and
        // the already-created item. This creates a new ClipDescription object within the
        // ClipData and sets its MIME type to "text/plain".
        ClipData dragData = new ClipData(
            (CharSequence) v.getTag(),
            new String[] { ClipDescription.MIMETYPE_TEXT_PLAIN },
            item);
    
        // Instantiate the drag shadow builder.
        View.DragShadowBuilder myShadow = new MyDragShadowBuilder(imageView);
    
        // Start the drag.
        v.startDragAndDrop(dragData,  // The data to be dragged
                           myShadow,  // The drag shadow builder
                           null,      // No need to use local data
                           0          // Flags (not currently used, set to 0)
        );
    
        // Indicate that the long-click was handled.
        return true;
    });
    
  2. 以下程式碼片段會覆寫 View.DragShadowBuilder 中的方法,藉此定義 myDragShadowBuilder。程式碼會為 TextView 建立小型的灰色矩形拖曳陰影:

    Kotlin

    private class MyDragShadowBuilder(v: View) : View.DragShadowBuilder(v) {
    
        private val shadow = ColorDrawable(Color.LTGRAY)
    
        // Defines a callback that sends the drag shadow dimensions and touch point
        // back to the system.
        override fun onProvideShadowMetrics(size: Point, touch: Point) {
    
            // Set the width of the shadow to half the width of the original View.
            val width: Int = view.width / 2
    
            // Set the height of the shadow to half the height of the original View.
            val height: Int = view.height / 2
    
            // The drag shadow is a ColorDrawable. This sets its dimensions to be the
            // same as the Canvas that the system provides. As a result, the drag shadow
            // fills the Canvas.
            shadow.setBounds(0, 0, width, height)
    
            // Set the size parameter's width and height values. These get back to
            // the system through the size parameter.
            size.set(width, height)
    
            // Set the touch point's position to be in the middle of the drag shadow.
            touch.set(width / 2, height / 2)
        }
    
        // Defines a callback that draws the drag shadow in a Canvas that the system
        // constructs from the dimensions passed to onProvideShadowMetrics().
        override fun onDrawShadow(canvas: Canvas) {
    
            // Draw the ColorDrawable on the Canvas passed in from the system.
            shadow.draw(canvas)
        }
    }
    

    Java

    private static class MyDragShadowBuilder extends View.DragShadowBuilder {
    
        // The drag shadow image, defined as a drawable object.
        private static Drawable shadow;
    
        // Constructor
        public MyDragShadowBuilder(View v) {
    
            // Stores the View parameter.
            super(v);
    
            // Creates a draggable image that fills the Canvas provided by the system.
            shadow = new ColorDrawable(Color.LTGRAY);
        }
    
        // Defines a callback that sends the drag shadow dimensions and touch point
        // back to the system.
        @Override
        public void onProvideShadowMetrics (Point size, Point touch) {
    
            // Defines local variables
            int width, height;
    
            // Set the width of the shadow to half the width of the original View.
            width = getView().getWidth() / 2;
    
            // Set the height of the shadow to half the height of the original View.
            height = getView().getHeight() / 2;
    
            // The drag shadow is a ColorDrawable. This sets its dimensions to be the
            // same as the Canvas that the system provides. As a result, the drag shadow
            // fills the Canvas.
            shadow.setBounds(0, 0, width, height);
    
            // Set the size parameter's width and height values. These get back to the
            // system through the size parameter.
            size.set(width, height);
    
            // Set the touch point's position to be in the middle of the drag shadow.
            touch.set(width / 2, height / 2);
        }
    
        // Defines a callback that draws the drag shadow in a Canvas that the system
        // constructs from the dimensions passed to onProvideShadowMetrics().
        @Override
        public void onDrawShadow(Canvas canvas) {
    
            // Draw the ColorDrawable on the Canvas passed in from the system.
            shadow.draw(canvas);
        }
    }
    

回應拖曳開始事件

在拖曳作業中,系統會把拖曳事件分派到目前版面配置中 View 物件的拖曳事件監聽器。事件監聽器應呼叫 DragEvent#getAction() 來取得動作類型。拖曳開始時,此方法會回傳 ACTION_DRAG_STARTED

為回應動作類型為 ACTION_DRAG_STARTED 的事件,拖曳事件監聽器應執行下列事項:

  1. 呼叫 DragEvent#getClipDescription(),並在回傳的 ClipDescription 中使用 MIME 類型方法,確認事件監聽器是否能接受拖曳的資料。

    如果拖曳作業不是資料移動,就不需要進行此步驟。

  2. 如果拖曳事件監聽器可接受放置,則應回傳 true 來告知系統繼續將拖曳事件傳送至事件監聽器。如果事件監聽器不接受放置,監聽器應回傳 false,而系統會停止將拖曳事件傳送至事件監聽器,直到系統傳送 ACTION_DRAG_ENDED 以完成拖曳作業。

請注意,針對 ACTION_DRAG_STARTED 事件,下列 DragEvent 方法無效:getClipData()getX()getY()getResult()

在拖曳期間處理事件

在拖曳過程中,回傳 true 以回應 ACTION_DRAG_STARTED 拖曳事件的拖曳事件監聽器,會繼續接收拖曳事件。事件監聽器在拖曳時接收的拖曳事件類型,取決於拖曳陰影的位置和事件監聽器 View 的瀏覽權限。事件監聽器主要使用拖曳事件來判斷是否應變更 View 的外觀。

在拖曳過程中,DragEvent#getAction() 會回傳下列三個值的其中之一:

  • ACTION_DRAG_ENTERED:當觸控點 (畫面上使用者手指或滑鼠下方的點) 進入事件監聽器 View 的定界框時,事件監聽器會接收此事件動作類型。
  • ACTION_DRAG_LOCATION:監聽器收到 ACTION_DRAG_ENTERED 事件後,會在每次觸控點移動時接收新的 ACTION_DRAG_LOCATION 事件,直到收到 ACTION_DRAG_EXITED 事件為止。getX()getY() 方法會回傳觸控點的 X 和 Y 座標。
  • ACTION_DRAG_EXITED:此事件動作類型會傳送給先前接收 ACTION_DRAG_ENTERED 的事件監聽器。當拖曳陰影觸控點從事件監聽器 View 的定界框內移動至框外,就會傳送事件。

拖曳事件監聽器不需要回應以上任何動作類型。如果事件監聽器回傳該值,系統會忽略該值。

以下是回應各種動作類型的方針:

  • 回應 ACTION_DRAG_ENTEREDACTION_DRAG_LOCATION 時,事件監聽器可以變更 View 的外觀,以表示檢視畫面是潛在的放置目標。
  • 動作類型為 ACTION_DRAG_LOCATION 的事件包含 getX()getY() 的有效資料,對應至觸控點位置。事件監聽器可使用此資訊調整觸控點的 View 外觀,或決定使用者可放開拖曳陰影 (也就是放置資料) 的確切位置。
  • 為回應 ACTION_DRAG_EXITED,事件監聽器應重設回應 ACTION_DRAG_ENTEREDACTION_DRAG_LOCATION 時套用的任何外觀變更。這會向使用者表明 View 不再是預期的放置目標。

回應放置

當使用者在 View 上放開拖曳陰影,且 View 已回報可接受拖曳的內容時,系統就會將拖曳事件分派給動作類型為 ACTION_DROPView

拖曳事件監聽器應執行以下操作:

  1. 呼叫 getClipData() 以取得原先在呼叫 startDragAndDrop() 中提供的 ClipData 物件,並處理資料。

    如果拖曳作業不是資料移動,就不需要進行此步驟。

  2. 回傳布林值 true,表示已成功處理放置;如未成功處理,則回傳 false。回傳的值會成為 getResult() 最終為 ACTION_DRAG_ENDED 事件回傳的值。

    請注意,如果系統未傳送 ACTION_DROP 事件,則 getResult()ACTION_DRAG_ENDED 事件回傳的值會是 false

如果是 ACTION_DROP 事件,getX()getY() 會使用收到放置的 View 座標系統,在放置時回傳觸控點的 X 和 Y 位置。

系統允許使用者在拖曳事件監聽器未收到拖曳事件的 View 上放開拖曳陰影。使用者也可以在應用程式 UI 的空白區域或應用程式外的區域放開拖曳陰影。在各該情況下,雖然不會傳送動作類型為 ACTION_DROP 的事件,但會傳送 ACTION_DRAG_ENDED 事件。

回應拖曳結束事件

在使用者放開拖曳陰影後,系統會立即將動作類型為 ACTION_DRAG_ENDED 的拖曳事件傳送至應用程式中的所有拖曳事件監聽器。這代表拖曳作業已結束。

每個拖曳事件監聽器都應執行以下操作:

  1. 如果事件監聽器在作業期間變更了其 View 物件的外觀,事件監聽器應將 View 重設為預設外觀。這是讓使用者知道作業已經結束的視覺指標。
  2. 事件監聽器可以選擇呼叫 getResult() 以進一步瞭解作業。如果事件監聽器回傳 true 以回應動作類型 ACTION_DROP 的事件,則 getResult() 會回傳布林值 true。在所有其他情況下,getResult() 都會回傳布林值 false,包括系統未傳送 ACTION_DROP 事件的情況。
  3. 如要表示拖曳作業成功完成,事件監聽器應將布林值 true 回傳系統。

回應拖曳事件:範例

所有拖曳事件均由拖曳事件方法或事件監聽器接收。以下程式碼片段是回應拖曳事件的簡單範例:

Kotlin

val imageView = ImageView(this)

// Set the drag event listener for the View.
imageView.setOnDragListener { v, e ->

    // Handles each of the expected events.
    when (e.action) {
        DragEvent.ACTION_DRAG_STARTED -> {
            // Determines if this View can accept the dragged data.
            if (e.clipDescription.hasMimeType(ClipDescription.MIMETYPE_TEXT_PLAIN)) {
                // As an example of what your application might do, applies a blue color tint
                // to the View to indicate that it can accept data.
                (v as? ImageView)?.setColorFilter(Color.BLUE)

                // Invalidate the view to force a redraw in the new tint.
                v.invalidate()

                // Returns true to indicate that the View can accept the dragged data.
                true
            } else {
                // Returns false to indicate that, during the current drag and drop operation,
                // this View will not receive events again until ACTION_DRAG_ENDED is sent.
                false
            }
        }
        DragEvent.ACTION_DRAG_ENTERED -> {
            // Applies a green tint to the View.
            (v as? ImageView)?.setColorFilter(Color.GREEN)

            // Invalidates the view to force a redraw in the new tint.
            v.invalidate()

            // Returns true; the value is ignored.
            true
        }

        DragEvent.ACTION_DRAG_LOCATION ->
            // Ignore the event.
            true
        DragEvent.ACTION_DRAG_EXITED -> {
            // Resets the color tint to blue.
            (v as? ImageView)?.setColorFilter(Color.BLUE)

            // Invalidates the view to force a redraw in the new tint.
            v.invalidate()

            // Returns true; the value is ignored.
            true
        }
        DragEvent.ACTION_DROP -> {
            // Gets the item containing the dragged data.
            val item: ClipData.Item = e.clipData.getItemAt(0)

            // Gets the text data from the item.
            val dragData = item.text

            // Displays a message containing the dragged data.
            Toast.makeText(this, "Dragged data is $dragData", Toast.LENGTH_LONG).show()

            // Turns off any color tints.
            (v as? ImageView)?.clearColorFilter()

            // Invalidates the view to force a redraw.
            v.invalidate()

            // Returns true. DragEvent.getResult() will return true.
            true
        }

        DragEvent.ACTION_DRAG_ENDED -> {
            // Turns off any color tinting.
            (v as? ImageView)?.clearColorFilter()

            // Invalidates the view to force a redraw.
            v.invalidate()

            // Does a getResult(), and displays what happened.
            when(e.result) {
                true ->
                    Toast.makeText(this, "The drop was handled.", Toast.LENGTH_LONG)
                else ->
                    Toast.makeText(this, "The drop didn't work.", Toast.LENGTH_LONG)
            }.show()

            // Returns true; the value is ignored.
            true
        }
        else -> {
            // An unknown action type was received.
            Log.e("DragDrop Example", "Unknown action type received by View.OnDragListener.")
            false
        }
    }
}

Java

View imageView = new ImageView(this);

// Set the drag event listener for the View.
imageView.setOnDragListener( (v, e) -> {

    // Handles each of the expected events.
    switch(e.getAction()) {

        case DragEvent.ACTION_DRAG_STARTED:

            // Determines if this View can accept the dragged data.
            if (e.getClipDescription().hasMimeType(ClipDescription.MIMETYPE_TEXT_PLAIN)) {

                // As an example of what your application might do, applies a blue color tint
                // to the View to indicate that it can accept data.
                ((ImageView)v).setColorFilter(Color.BLUE);

                // Invalidate the view to force a redraw in the new tint.
                v.invalidate();

                // Returns true to indicate that the View can accept the dragged data.
                return true;

            }

            // Returns false to indicate that, during the current drag and drop operation,
            // this View will not receive events again until ACTION_DRAG_ENDED is sent.
            return false;

        case DragEvent.ACTION_DRAG_ENTERED:

            // Applies a green tint to the View.
            ((ImageView)v).setColorFilter(Color.GREEN);

            // Invalidates the view to force a redraw in the new tint.
            v.invalidate();

            // Returns true; the value is ignored.
            return true;

        case DragEvent.ACTION_DRAG_LOCATION:

            // Ignore the event.
            return true;

        case DragEvent.ACTION_DRAG_EXITED:

            // Resets the color tint to blue.
            ((ImageView)v).setColorFilter(Color.BLUE);

            // Invalidates the view to force a redraw in the new tint.
            v.invalidate();

            // Returns true; the value is ignored.
            return true;

        case DragEvent.ACTION_DROP:

            // Gets the item containing the dragged data.
            ClipData.Item item = e.getClipData().getItemAt(0);

            // Gets the text data from the item.
            CharSequence dragData = item.getText();

            // Displays a message containing the dragged data.
            Toast.makeText(this, "Dragged data is " + dragData, Toast.LENGTH_LONG).show();

            // Turns off any color tints.
            ((ImageView)v).clearColorFilter();

            // Invalidates the view to force a redraw.
            v.invalidate();

            // Returns true. DragEvent.getResult() will return true.
            return true;

        case DragEvent.ACTION_DRAG_ENDED:

            // Turns off any color tinting.
            ((ImageView)v).clearColorFilter();

            // Invalidates the view to force a redraw.
            v.invalidate();

            // Does a getResult(), and displays what happened.
            if (e.getResult()) {
                Toast.makeText(this, "The drop was handled.", Toast.LENGTH_LONG).show();
            } else {
                Toast.makeText(this, "The drop didn't work.", Toast.LENGTH_LONG).show();
            }

            // Returns true; the value is ignored.
            return true;

        // An unknown action type was received.
        default:
            Log.e("DragDrop Example","Unknown action type received by View.OnDragListener.");
            break;
    }

    return false;

});

在多視窗模式下拖曳

搭載 Android 7.0 (API 等級 24) 或以上版本的裝置支援多視窗模式,可讓使用者透過拖曳作業,在不同應用程式間移動資料 (請參閱「多視窗支援」)。

來源應用程式會提供資料。拖曳作業會在來源應用程式中開始執行,而目標應用程式則會接收資料。拖曳作業會在目標應用程式中結束。

開始拖曳作業時,來源應用程式必須設定 DRAG_FLAG_GLOBAL 旗標,以表示使用者可將資料拖曳到其他應用程式。

由於資料會跨應用程式邊界移動,因此應用程式會使用內容 URI 共用資料的存取權:

  • 視來源應用程式要授予目標應用程式的資料讀取/寫入權限而定,來源應用程式必須設定 DRAG_FLAG_GLOBAL_URI_READDRAG_FLAG_GLOBAL_URI_WRITE,或兩者皆設定。
  • 目標應用程式在處理使用者拖曳到應用程式中的資料前,必須立即呼叫 requestDragAndDropPermissions()。如果目標應用程式不再需要存取拖曳資料,應用程式就可以 requestDragAndDropPermissions() 回傳的物件呼叫 release()。否則,當內含活動刪除時,權限就會撤銷。

下列程式碼片段說明如何在拖曳作業發生後,立即撤銷拖曳資料的唯讀存取權。如需完整範例,請參閱 GitHub 上的 DragAndDrop 範例

來源拖曳活動

Kotlin

// Drag a file stored in internal storage. The file is in an "images/" directory.
val internalImagesDir = File(context.filesDir, "images")
val imageFile = File(internalImagesDir, imageFilename)
val uri = FileProvider.getUriForFile(context, contentAuthority, imageFile)

val listener = OnDragStartListener@{ view: View, _: DragStartHelper ->
    val clipData = ClipData(ClipDescription("Image Description",
                                            arrayOf("image/*")),
                            ClipData.Item(uri))
    // Must include DRAG_FLAG_GLOBAL to allow for dragging data between apps.
    // This example provides read-only access to the data.
    val flags = View.DRAG_FLAG_GLOBAL or View.DRAG_FLAG_GLOBAL_URI_READ
    return@OnDragStartListener view.startDragAndDrop(clipData,
                                                     View.DragShadowBuilder(view),
                                                     null,
                                                     flags)
}

// Container where the image originally appears in the source app.
val srcImageView = findViewById<ImageView>(R.id.imageView)

// Detect and start the drag event.
DragStartHelper(srcImageView, listener).apply {
    attach()
}

Java

// Drag a file stored under an "images/" directory in internal storage.
File internalImagesDir = new File(context.getFilesDir(), "images");
File imageFile = new File(internalImagesDir, imageFilename);
final Uri uri = FileProvider.getUriForFile(context, contentAuthority, imageFile);

// Container where the image originally appears in the source app.
ImageView srcImageView = findViewById(R.id.imageView);

// Enable the view to detect and start the drag event.
new DragStartHelper(srcImageView, (view, helper) -> {
    ClipData clipData = new ClipData(new ClipDescription("Image Description",
                                                          new String[] {"image/*"}),
                                     new ClipData.Item(uri));
    // Must include DRAG_FLAG_GLOBAL to allow for dragging data between apps.
    // This example provides read-only access to the data.
    int flags = View.DRAG_FLAG_GLOBAL | View.DRAG_FLAG_GLOBAL_URI_READ;
    return view.startDragAndDrop(clipData,
                                 new View.DragShadowBuilder(view),
                                 null,
                                 flags);
}).attach();

目標拖曳活動

Kotlin

// Container for where the image is to be dropped in the target app.
val targetImageView = findViewById<ImageView>(R.id.imageView)

targetImageView.setOnDragListener { view, event ->

    when (event.action) {

        ACTION_DROP -> {
            val imageItem: ClipData.Item = event.clipData.getItemAt(0)
            val uri = imageItem.uri

            // Request permission to access the image data being dragged into
            // the target activity's ImageView element.
            val dropPermissions = requestDragAndDropPermissions(event)
            (view as ImageView).setImageURI(uri)

            // Release the permission immediately afterwards because it's
            // no longer needed.
            dropPermissions.release()
            return@setOnDragListener true
        }

        // Implement logic for other DragEvent cases here.

        // An unknown action type was received.
        else -> {
            Log.e("DragDrop Example", "Unknown action type received by View.OnDragListener.")
            return@setOnDragListener false
        }

    }
}

Java

// Container where the image is to be dropped in the target app.
ImageView targetImageView = findViewById(R.id.imageView);

targetImageView.setOnDragListener( (view, event) -> {

    switch (event.getAction()) {

        case ACTION_DROP:
            ClipData.Item imageItem = event.getClipData().getItemAt(0);
            Uri uri = imageItem.getUri();

            // Request permission to access the image data being
            // dragged into the target activity's ImageView element.
            DragAndDropPermissions dropPermissions =
                requestDragAndDropPermissions(event);

            ((ImageView)view).setImageURI(uri);

            // Release the permission immediately afterwards because
            // it's no longer needed.
            dropPermissions.release();

            return true;

        // Implement logic for other DragEvent cases here.

        // An unknown action type was received.
        default:
            Log.e("DragDrop Example","Unknown action type received by View.OnDragListener.");
            break;
    }

    return false;
});

使用 DropHelper 可簡化拖曳作業

DropHelper 類別簡化了拖曳功能的實作方式。DropHelper (隸屬於 Jetpack DragAndDrop 資源庫) 提供回溯至 API 級別 24 的相容性。

使用 DropHelper 來指定放置目標、自訂放置目標醒目顯示,以及定義系統如何處理放置的資料。

放置目標

DropHelper#configureView() 是靜態的超載方法,可讓您指定放置目標。參數包括:

舉例來說,如要建立可接受圖片的放置目標,請使用下列任一方法呼叫:

Kotlin

configureView(
    myActivity,
    targetView,
    arrayOf("image/*"),
    options,
    onReceiveContentListener)

// or

configureView(
    myActivity,
    targetView,
    arrayOf("image/*"),
    onReceiveContentListener)

Java

DropHelper.configureView(
    myActivity,
    targetView,
    new String[] {"image/*"},
    options,
    onReceiveContentlistener);

// or

DropHelper.configureView(
    myActivity,
    targetView,
    new String[] {"image/*"},
    onReceiveContentlistener);

第二個呼叫會忽略放置目標設定選項,在此情況下,放置目標醒目顯示顏色會設為主題次要 (或強調) 顏色,醒目顯示的圓角半徑設為 16dp,EditText 清單則為空白 (請參閱下方的放置目標設定)。

放置目標設定

DropHelper.Options 內部類別可讓您設定放置目標。請將類別例項提供給 DropHelper.configureView(Activity, View, String[], Options, OnReceiveContentListener) 方法 (請參閱上方的「放置目標」)。

放置目標醒目顯示

DropHelper 會設定放置目標,在使用者將內容拖曳到目標上方時顯示醒目效果。DropHelper 提供預設樣式,但 DropHelper.Options 可讓您設定醒目顯示的顏色,以及指定醒目顯示矩形的圓角半徑。

請使用 DropHelper.Options.Builder 類別建立 DropHelper.Options 例項並指定設定選項,例如:

Kotlin

val options: DropHelper.Options = DropHelper.Options.Builder()
                                      .setHighlightColor(getColor(R.color.purple_300))
                                      .setHighlightCornerRadiusPx(resources.getDimensionPixelSize(R.dimen.drop_target_corner_radius))
                                      .build()

Java

DropHelper.Options options = new DropHelper.Options.Builder()
                                     .setHighlightColor(getColor(R.color.purple_300))
                                     .setHighlightCornerRadiusPx(getResources().getDimensionPixelSize(R.dimen.drop_target_corner_radius))
                                     .build();

放置目標中的 EditText 元件

當目標包含可編輯的文字欄位時,DropHelper 也會控制放置目標中的焦點。

放置目標可以是單一資料檢視或檢視區塊階層。如果放置目標檢視區塊階層包含一或多個 EditText 元件,您必須將元件清單提供給 DropHelper.Options.Builder#addInnerEditTexts(EditText...),以確保放置目標醒目顯示功能和文字資料處理功能都正常運作。

DropHelper 可防止放置目標檢視區塊階層中的 EditText 元件在拖曳互動期間,從內含檢視畫面奪走焦點。

此外,如果拖曳 ClipData 包含文字和 URI 資料,DropHelper 則會選取放置目標的其中一個 EditText 元件來處理文字資料。選取順序會按照以下優先順序:

  1. 放置 ClipDataEditText
  2. 包含文字游標 (插入點) 的 EditText
  3. 提供給 DropHelper.Options.Builder#addInnerEditTexts(EditText...) 呼叫的第一個 EditText

如要將 EditText 設為預設文字資料處理常式,請將 EditText 做為 DropHelper.Options.Builder#addInnerEditTexts(EditText...) 呼叫的第一個引數傳遞。舉例來說,如果您的放置目標會處理圖片,但包含可編輯的文字欄位 T1T2T3,請將 T2 設為預設值,如下所示:

Kotlin

val options: DropHelper.Options = DropHelper.Options.Builder()
                                      .addInnerEditTexts(T2, T1, T3)
                                      .build()

Java

DropHelper.Options options = new DropHelper.Options.Builder()
                                     .addInnerEditTexts(T2, T1, T3)
                                     .build();

放置目標資料處理

DropHelper#configureView() 方法會接受您為了處理拖曳 ClipData 而建立的 OnReceiveContentListener。拖曳資料會提供給 ContentInfoCompat 物件中的事件監聽器。物件中會顯示文字資料;媒體 (例如圖片) 則是以 URI 表示。

使用 DropHelper#configureView() 來設定下列類型的檢視畫面時,OnReceiveContentListener 也會處理使用者互動 (例如複製及貼上,而非拖曳) 提供給放置目標的資料:

  • 所有檢視 (如果使用者執行 Android 12 以上版本)
  • AppCompatEditText 回溯相容至 Android 7.0

MIME 類型、權限和內容驗證

DropHelper 的 MIME 類型檢查以拖曳 ClipDescription 為根據,而這由提供拖曳資料的應用程式建立。建議您驗證 ClipDescription,以確保 MIME 類型設定正確。

DropHelper 會要求拖曳 ClipData 內含的內容 URI 所有存取權 (請參閱 DragAndDropPermissions)。相關權限可讓您在處理拖曳資料時解析內容 URI。

DropHelper 不會在解析放置資料中的 URI 時,驗證內容供應器回傳的資料。建議您檢查空值,並驗證所有解析的資料正確無誤。

其他資源