
השלב הראשון בשימוש בתכונה OpenGL ES היא היכולת להגדיר צורות לשרטוט בהקשר של תצוגת OpenGL ES ויצירה של גרפיקה מתקדמת לאפליקציה. השרטוט עם OpenGL ES יכול להיות קצת מסובך בלי כשיש כמה דברים בסיסיים על האופן שבו OpenGL ES מצפה ממך להגדיר אובייקטים גרפיים.
בשיעור הזה נסביר את מערכת הקואורדינטות OpenGL ES ביחס למסך של מכשיר Android, העקרונות הבסיסיים של הגדרת צורה, צורות משטחי פנים וגם הגדרת משולש וריבוע.
הגדרת משולש
OpenGL ES מאפשר לך להגדיר אובייקטים מצוירים באמצעות קואורדינטות במרחב תלת-ממדי. אז,
לפני שאפשר לשרטט משולש, עליכם להגדיר את הקואורדינטות שלו. ב-OpenGL, הדרך הרגילה
כלומר להגדיר מערך קודקוד של מספרים עם נקודה צפה (floating-point) לקואורדינטות. למקסימום
אפשר לכתוב את הקואורדינטות האלה ב-ByteBuffer, שיועבר
צינור הגרפיקה של OpenGL ES לעיבוד.
Kotlin
// number of coordinates per vertex in this array
const val COORDS_PER_VERTEX = 3
var triangleCoords = floatArrayOf(     // in counterclockwise order:
        0.0f, 0.622008459f, 0.0f,      // top
        -0.5f, -0.311004243f, 0.0f,    // bottom left
        0.5f, -0.311004243f, 0.0f      // bottom right
)

class Triangle {

    // Set color with red, green, blue and alpha (opacity) values
    val color = floatArrayOf(0.63671875f, 0.76953125f, 0.22265625f, 1.0f)

    private var vertexBuffer: FloatBuffer =
            // (number of coordinate values * 4 bytes per float)
            ByteBuffer.allocateDirect(triangleCoords.size * 4).run {
                // use the device hardware's native byte order
                order(ByteOrder.nativeOrder())

                // create a floating point buffer from the ByteBuffer
                asFloatBuffer().apply {
                    // add the coordinates to the FloatBuffer
                    put(triangleCoords)
                    // set the buffer to read the first coordinate
                    position(0)
                }
            }
}
Java
public class Triangle {

    private FloatBuffer vertexBuffer;

    // number of coordinates per vertex in this array
    static final int COORDS_PER_VERTEX = 3;
    static float triangleCoords[] = {   // in counterclockwise order:
             0.0f,  0.622008459f, 0.0f, // top
            -0.5f, -0.311004243f, 0.0f, // bottom left
             0.5f, -0.311004243f, 0.0f  // bottom right
    };

    // Set color with red, green, blue and alpha (opacity) values
    float color[] = { 0.63671875f, 0.76953125f, 0.22265625f, 1.0f };

    public Triangle() {
        // initialize vertex byte buffer for shape coordinates
        ByteBuffer bb = ByteBuffer.allocateDirect(
                // (number of coordinate values * 4 bytes per float)
                triangleCoords.length * 4);
        // use the device hardware's native byte order
        bb.order(ByteOrder.nativeOrder());

        // create a floating point buffer from the ByteBuffer
        vertexBuffer = bb.asFloatBuffer();
        // add the coordinates to the FloatBuffer
        vertexBuffer.put(triangleCoords);
        // set the buffer to read the first coordinate
        vertexBuffer.position(0);
    }
}
כברירת מחדל, OpenGL ES מתבססת על ההנחה שמערכת קואורדינטות שבה [0,0,0] (X,Y,Z) מציינת את המרכז של
המסגרת GLSurfaceView,
[1,1,0] הוא הפינה הימנית העליונה של המסגרת ו
[-1,-1,0] הוא הפינה השמאלית התחתונה של המסגרת. להמחשת מערכת הקואורדינטות הזו, ראו את
מפתח OpenGL ES
guide.
שימו לב שהקואורדינטות של הצורה הזו מוגדרות בסדר נגד כיוון השעון. השרטוט הסדר הזה חשוב כי הוא מגדיר איזה צד הוא הצד הקדמי של הצורה, שבדרך כלל שרוצים לצייר, ואת הפנים האחוריות שניתן לבחור לא לצייר באמצעות OpenGL ES cull תכונת הפנים. למידע נוסף על פנים ואיסוף, אפשר לעיין ב מדריך למפתחים של OpenGL ES.
הגדרת ריבוע
ב-OpenGL קל להגדיר משולשים, אבל מה עושים אם רוצים לקבל קצת יותר מורכבים? נניח, ריבוע? יש כמה דרכים לעשות זאת, אבל יש בדרך כלל נתיב כזה ב-OpenGL ES היא תשתמש בשני משולשים שמשורטטים יחד:
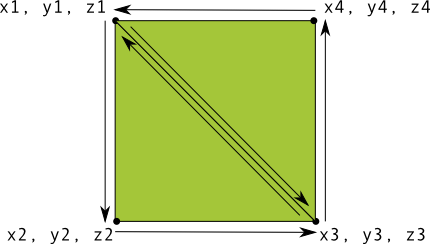
איור 1. שרטוט ריבוע באמצעות שני משולשים.
שוב, עליכם להגדיר את הקודקודים בסדר נגד כיוון השעון עבור שני המשולשים
שמייצגים את הצורה הזו ומציבים את הערכים ב-ByteBuffer. כדי להימנע
את שתי הקואורדינטות שמשותפות על ידי כל משולש פעמיים, השתמשו ברשימת שרטוט כדי לומר
איך לשרטט את הקודקודים האלה בצינור הגרפיקה של OpenGL ES. זה הקוד של הצורה הזו:
Kotlin
// number of coordinates per vertex in this array
const val COORDS_PER_VERTEX = 3
var squareCoords = floatArrayOf(
        -0.5f,  0.5f, 0.0f,      // top left
        -0.5f, -0.5f, 0.0f,      // bottom left
         0.5f, -0.5f, 0.0f,      // bottom right
         0.5f,  0.5f, 0.0f       // top right
)

class Square2 {

    private val drawOrder = shortArrayOf(0, 1, 2, 0, 2, 3) // order to draw vertices

    // initialize vertex byte buffer for shape coordinates
    private val vertexBuffer: FloatBuffer =
            // (# of coordinate values * 4 bytes per float)
            ByteBuffer.allocateDirect(squareCoords.size * 4).run {
                order(ByteOrder.nativeOrder())
                asFloatBuffer().apply {
                    put(squareCoords)
                    position(0)
                }
            }

    // initialize byte buffer for the draw list
    private val drawListBuffer: ShortBuffer =
            // (# of coordinate values * 2 bytes per short)
            ByteBuffer.allocateDirect(drawOrder.size * 2).run {
                order(ByteOrder.nativeOrder())
                asShortBuffer().apply {
                    put(drawOrder)
                    position(0)
                }
            }
}
Java
public class Square {

    private FloatBuffer vertexBuffer;
    private ShortBuffer drawListBuffer;

    // number of coordinates per vertex in this array
    static final int COORDS_PER_VERTEX = 3;
    static float squareCoords[] = {
            -0.5f,  0.5f, 0.0f,   // top left
            -0.5f, -0.5f, 0.0f,   // bottom left
             0.5f, -0.5f, 0.0f,   // bottom right
             0.5f,  0.5f, 0.0f }; // top right

    private short drawOrder[] = { 0, 1, 2, 0, 2, 3 }; // order to draw vertices

    public Square() {
        // initialize vertex byte buffer for shape coordinates
        ByteBuffer bb = ByteBuffer.allocateDirect(
        // (# of coordinate values * 4 bytes per float)
                squareCoords.length * 4);
        bb.order(ByteOrder.nativeOrder());
        vertexBuffer = bb.asFloatBuffer();
        vertexBuffer.put(squareCoords);
        vertexBuffer.position(0);

        // initialize byte buffer for the draw list
        ByteBuffer dlb = ByteBuffer.allocateDirect(
        // (# of coordinate values * 2 bytes per short)
                drawOrder.length * 2);
        dlb.order(ByteOrder.nativeOrder());
        drawListBuffer = dlb.asShortBuffer();
        drawListBuffer.put(drawOrder);
        drawListBuffer.position(0);
    }
}
בדוגמה הזו ניתן לראות מה נדרש כדי ליצור צורות מורכבות יותר באמצעות OpenGL. לחשבון באופן כללי, משתמשים באוספים של משולשים כדי לצייר אובייקטים. בשיעור הבא נלמד איך לצייר את הצורות האלה במסך.