
כל שדה טקסט מצפה לסוג מסוים של קלט טקסט, כמו כתובת אימייל, מספר טלפון או טקסט פשוט. צריך לציין את סוג הקלט לכל שדה טקסט באפליקציה, כדי שהמערכת תציג את שיטת הקלט המתאימה, כמו מקלדת וירטואלית.
בנוסף לסוג הכפתורים שזמינים בשיטת קלט, אפשר לציין התנהגויות כמו האם שיטת הקלט מספקת הצעות איות, האם היא משתמשת באותיות רישיות בתחילת משפטים חדשים והאם היא מחליפה את כפתור החזרת הגררה בכפתור פעולה כמו סיום או הבא. בדף הזה מוסבר איך מציינים את המאפיינים האלה.
בחירת סוג המקלדת
תמיד צריך להצהיר על שיטת הקלט של שדות הטקסט על ידי הוספת המאפיין android:inputType לרכיב <EditText>.
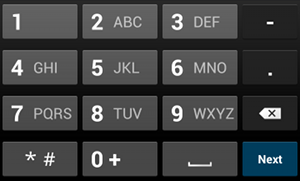
phone סוג הקלט.לדוגמה, אם רוצים שיטת קלט להזנת מספר טלפון, משתמשים בערך "phone":
<EditText
    android:id="@+id/phone"
    android:layout_width="fill_parent"
    android:layout_height="wrap_content"
    android:hint="@string/phone_hint"
    android:inputType="phone" />
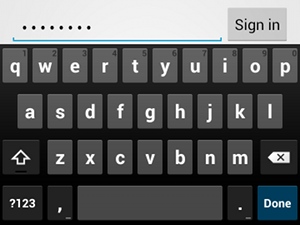
textPassword סוג הקלט.אם שדה הטקסט הוא לסיסמה, משתמשים בערך "textPassword" כדי ששדה הטקסט יסתיר את הקלט של המשתמש:
<EditText
    android:id="@+id/password"
    android:hint="@string/password_hint"
    android:inputType="textPassword"
    ... />
יש כמה ערכים אפשריים שמתועדים במאפיין android:inputType, ואפשר לשלב חלק מהערכים כדי לציין את המראה של שיטת הקלט והתנהגויות נוספות.
הפעלת הצעות איות והתנהגויות אחרות
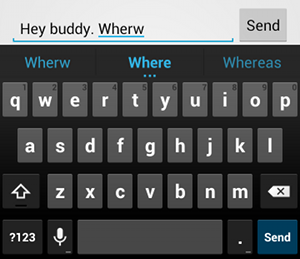
textAutoCorrect מספקת תיקון אוטומטי של שגיאות כתיב.המאפיין android:inputType מאפשר לציין התנהגויות שונות לשיטת הקלט. והכי חשוב, אם שדה הטקסט מיועד להזנת טקסט בסיסית – למשל, להודעת טקסט – צריך להפעיל את התיקון האוטומטי של האיות באמצעות הערך "textAutoCorrect".
אפשר לשלב בין התנהגויות שונות וסגנונות שונים של שיטות קלט באמצעות המאפיין android:inputType. לדוגמה, כך יוצרים שדה טקסט שבו האות הראשונה של כל מילה במשפט מופיעה באות גדולה, וגם מתבצע תיקון אוטומטי של שגיאות כתיב:
<EditText
    android:id="@+id/message"
    android:layout_width="wrap_content"
    android:layout_height="wrap_content"
    android:inputType=
        "textCapSentences|textAutoCorrect"
    ... />
ציון הפעולה של שיטת הקלט
ברוב שיטות הקלט הרכות יש לחצן פעולה למשתמש בפינה התחתונה, שמתאים לתיבת הטקסט הנוכחית. כברירת מחדל, המערכת משתמשת בכפתור הזה לפעולה הבא או סיום, אלא אם שדה הטקסט תומך בטקסט רב-שורה – כמו במקרה של android:inputType="textMultiLine" – ואז כפתור הפעולה הוא מקש Enter. עם זאת, אתם יכולים לציין פעולות אחרות שעשויות להתאים יותר לשדה הטקסט, כמו שליחה או מעבר.
כדי לציין את כפתור הפעולה במקלדת, משתמשים במאפיין
android:imeOptions
עם ערך פעולה כמו "actionSend" או "actionSearch". לדוגמה:

android:imeOptions="actionSend".<EditText android:id="@+id/search" android:layout_width="fill_parent" android:layout_height="wrap_content" android:hint="@string/search_hint" android:inputType="text" android:imeOptions="actionSend" />
אחר כך אפשר להאזין ללחיצות על כפתור הפעולה על ידי הגדרת TextView.OnEditorActionListener לרכיב EditText. במאזין, מגיבים למזהה הפעולה המתאים של ה-IME שמוגדר במחלקה EditorInfo, כמו IME_ACTION_SEND, כפי שמוצג בדוגמה הבאה:
Kotlin
findViewById<EditText>(R.id.search).setOnEditorActionListener { v, actionId, event ->
    return@setOnEditorActionListener when (actionId) {
        EditorInfo.IME_ACTION_SEND -> {
            sendMessage()
            true
        }
        else -> false
    }
}
Java
EditText editText = (EditText) findViewById(R.id.search);
editText.setOnEditorActionListener(new OnEditorActionListener() {
    @Override
    public boolean onEditorAction(TextView v, int actionId, KeyEvent event) {
        boolean handled = false;
        if (actionId == EditorInfo.IME_ACTION_SEND) {
            sendMessage();
            handled = true;
        }
        return handled;
    }
});
הצגת הצעות להשלמה אוטומטית
אם רוצים לספק הצעות למשתמשים בזמן שהם מקלידים, אפשר להשתמש במחלקת משנה של EditText שנקראת AutoCompleteTextView.
כדי להטמיע השלמה אוטומטית, צריך לציין Adapter שמספק את הצעות הטקסט. יש כמה מתאמים זמינים, בהתאם למקור הנתונים, למשל ממסד נתונים או ממערך.
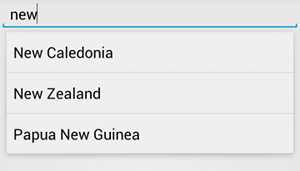
AutoCompleteTextView עם הצעות לטקסט.בקטע הבא מוסבר איך להגדיר AutoCompleteTextView שמספק הצעות ממערך באמצעות ArrayAdapter:
- מוסיפים את הצורה
AutoCompleteTextViewלפריסה. לפניכם פריסה עם שדה הטקסט בלבד:<?xml version="1.0" encoding="utf-8"?> <AutoCompleteTextView xmlns:android="http://schemas.android.com/apk/res/android" android:id="@+id/autocomplete_country" android:layout_width="fill_parent" android:layout_height="wrap_content" />
- מגדירים את המערך שמכיל את כל הצעות הטקסט. לדוגמה, מערך של שמות מדינות:
<?xml version="1.0" encoding="utf-8"?>
<resources>
    <string-array name="countries_array">
        <item>Afghanistan</item>
        <item>Albania</item>
        <item>Algeria</item>
        <item>American Samoa</item>
        <item>Andorra</item>
        <item>Angola</item>
        <item>Anguilla</item>
        <item>Antarctica</item>
        ...
    </string-array>
</resources>
- ב-
Activityאו ב-Fragment, משתמשים בקוד הבא כדי לציין את המתאם שמספק את ההצעות:Kotlin
// Get a reference to the AutoCompleteTextView in the layout.
val textView = findViewById(R.id.autocomplete_country) as AutoCompleteTextView
// Get the string array.
val countries: Array<out String> = resources.getStringArray(R.array.countries_array)
// Create the adapter and set it to the AutoCompleteTextView.
ArrayAdapter<String>(this, android.R.layout.simple_list_item_1, countries).also { adapter ->
    textView.setAdapter(adapter)
}
Java
// Get a reference to the AutoCompleteTextView in the layout.
AutoCompleteTextView textView = (AutoCompleteTextView) findViewById(R.id.autocomplete_country);
// Get the string array.
String[] countries = getResources().getStringArray(R.array.countries_array);
// Create the adapter and set it to the AutoCompleteTextView.
ArrayAdapter<String> adapter =
        new ArrayAdapter<String>(this, android.R.layout.simple_list_item_1, countries);
textView.setAdapter(adapter);
בדוגמה הקודמת,
ArrayAdapterחדש מאותחל כדי לקשור כל פריט במערך המחרוזותcountries_arrayל-TextViewשקיים בפריסהsimple_list_item_1. זו פריסה שמוצעת על ידי Android, שמאפשרת להציג טקסט ברשימה במראה סטנדרטי. -
מקצים את המתאם ל-
AutoCompleteTextViewעל ידי התקשרות אלsetAdapter().