
通知は、アプリが使用されていないときに、アプリ内のイベントに関する簡潔な情報をタイムリーに提供します。このドキュメントでは、さまざまな機能を備えた通知を作成する方法について説明します。Android で通知を表示する方法の概要については、通知の概要をご覧ください。通知を使用するサンプルコードについては、GitHub の SociaLite サンプルをご覧ください。
このページのコードでは、AndroidX ライブラリの NotificationCompat API を使用しています。これらの API を使用すると、Android 9(API レベル 28)との後方互換性を維持しつつ、新しいバージョンの Android でのみ使用可能な機能を追加できます。ただし、インライン返信アクションなどの一部の機能は、以前のバージョンでは何も実施しません。
基本的な通知を作成する
最も基本的でコンパクトなフォーム(折りたたみフォームとも呼びます)の通知は、アイコンとタイトルと少量のテキスト コンテンツを表示します。このセクションでは、ユーザーがタップしてアプリのアクティビティを起動できる通知を作成する方法について説明します。
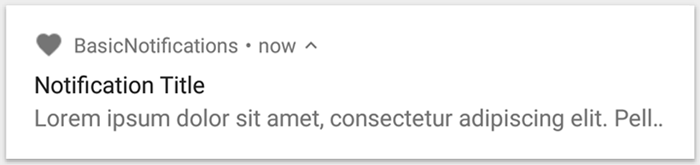
図 1. アイコン、タイトル、テキストを含む通知。
通知を構成する各要素の詳細については、通知の構造をご覧ください。
実行時の権限を宣言する
Android 13(API レベル 33)以降では、アプリから除外対象外(フォアグラウンド サービス(FGS)を含む)通知を投稿するための実行時の権限がサポートされています。
アプリのマニフェスト ファイルで宣言する必要がある権限を、次のコード スニペットに示します。
<manifest ...>
    <uses-permission android:name="android.permission.POST_NOTIFICATIONS"/>
    <application ...>
        ...
    </application>
</manifest>
実行時の権限について詳しくは、通知の実行時の権限をご覧ください。
通知のコンテンツを設定する
最初に、NotificationCompat.Builder オブジェクトを使用して、通知のコンテンツとチャネルを設定します。次の例は、次の要素を含む通知を作成する方法を示しています。
setSmallIcon()で設定される小さなアイコン。これは、ユーザーに表示されるコンテンツのうち、唯一必須な要素です。setContentTitle()で設定されるタイトル。setContentText()で設定される本文テキスト。setPriority()で設定される通知の優先度。Android 7.1 以前では、優先度は、通知がユーザーの操作に割り込む度合いを表します。Android 8.0 以降では、次のセクションで説明するように、チャネルの重要度を設定します。
val textTitle = "Title" val textContent = "Content" val builder = NotificationCompat.Builder(context, CHANNEL_ID) .setSmallIcon(R.drawable.ic_logo) .setContentTitle(textTitle) .setContentText(textContent) .setPriority(NotificationCompat.PRIORITY_DEFAULT)
NotificationCompat.Builder コンストラクタでは、チャネル ID を指定する必要があります。これは Android 8.0(API レベル 26)以上との互換性のためですが、古いバージョンでは無視されます。
デフォルトでは、通知のテキスト コンテンツは 1 行に収まるように切り捨てられます。展開可能な通知を作成することで、追加情報を表示できます。
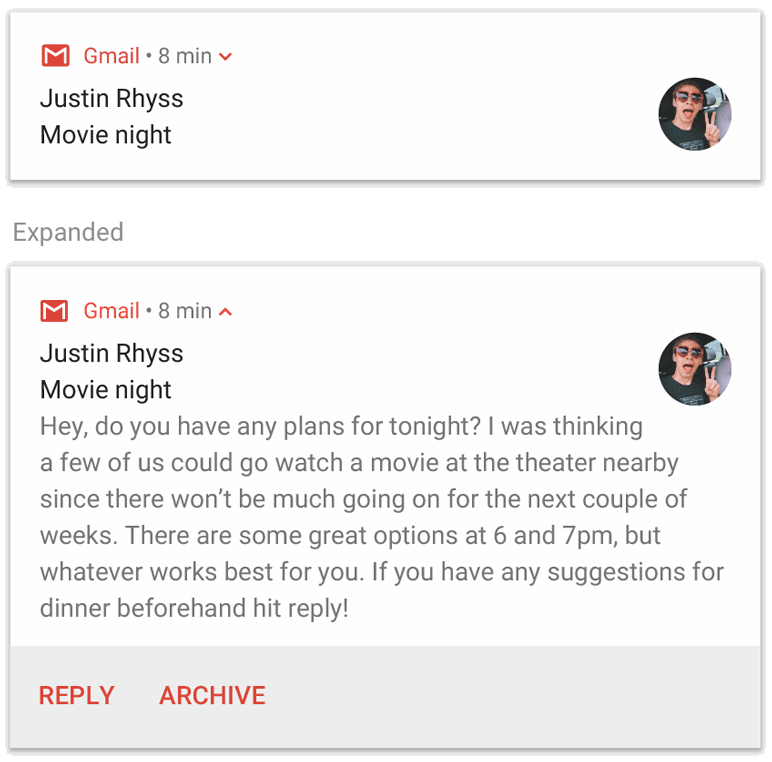
図 2. 折りたたみ状態と展開状態の展開可能な通知。
通知で長いテキストを使用したい場合は、setStyle() でスタイル テンプレートを追加して、展開可能な通知を有効にします。たとえば次のコードは、より大きなテキスト領域を作成します。
val builder = NotificationCompat.Builder(context, CHANNEL_ID) .setSmallIcon(R.drawable.ic_logo) .setContentTitle("My notification") .setContentText("Much longer text that cannot fit one line...") .setStyle(NotificationCompat.BigTextStyle() .bigText("Much longer text that cannot fit one line...")) .setPriority(NotificationCompat.PRIORITY_DEFAULT)
その他のサイズの大きな通知のスタイル(メディアの再生コントロールや画像を追加する方法を含む)について詳しくは、展開可能な通知を作成するをご覧ください。
チャネルを作成して重要度を設定する
Android 8.0 以降で通知を配信するには、NotificationChannel のインスタンスを createNotificationChannel() に渡すことにより、アプリの通知チャネルをシステムに登録しておく必要があります。次のコードは、SDK_INT バージョンの条件によってブロックされます。
fun createNotificationChannel(context: Context) { // Create the NotificationChannel, but only on API 26+ because // the NotificationChannel class is not in the Support Library. if (Build.VERSION.SDK_INT >= Build.VERSION_CODES.O) { val name = context.getString(R.string.channel_name) val descriptionText = context.getString(R.string.channel_description) val importance = NotificationManager.IMPORTANCE_DEFAULT val channel = NotificationChannel(CHANNEL_ID, name, importance).apply { description = descriptionText } // Register the channel with the system. val notificationManager: NotificationManager = context.getSystemService(NotificationManager::class.java) as NotificationManager notificationManager.createNotificationChannel(channel) } }
Android 8.0 以降では、通知を送信する前に通知チャネルを作成する必要があるため、アプリが起動したらすぐにこのコードを実行します。既存の通知チャネルを作成してもオペレーションは実行されないので、これを繰り返し呼び出しても問題ありません。
NotificationChannel コンストラクタには、NotificationManager クラスの定数の 1 つを使用する importance が必要です。このパラメータは、このチャネルに属する通知でユーザーの操作に割り込む方法を決定します。前の例に示すように、Android 7.1 以前をサポートするために setPriority() で優先度を設定します。
次の例のように通知の重要度または優先度を設定する必要がありますが、設定したとおりにアラートが動作する保証はありません。場合によっては、システムは他の要因に基づいて重要度レベルを変更することがあり、ユーザーは特定のチャネルの重要度レベルをいつでも再定義できます。
各レベルの意味については、通知の重要度レベルをご覧ください。
通知のタップ アクションを設定する
すべての通知はタップに応答する必要があります。一般的には、通知に対応するアクティビティをアプリで開きます。そのためには、PendingIntent オブジェクトで定義されたコンテンツ インテントを指定し、それを setContentIntent() に渡します。
次のスニペットは、ユーザーが通知をタップしたときにアクティビティを開く基本的なインテントを作成する方法を示しています。
// Create an explicit intent for an Activity in your app. val intent = Intent(context, AlertDetails::class.java).apply { flags = Intent.FLAG_ACTIVITY_NEW_TASK or Intent.FLAG_ACTIVITY_CLEAR_TASK } val pendingIntent: PendingIntent = PendingIntent.getActivity(context, 0, intent, PendingIntent.FLAG_IMMUTABLE) val builder = NotificationCompat.Builder(context, CHANNEL_ID) .setSmallIcon(R.drawable.ic_logo) .setContentTitle("My notification") .setContentText("Hello World!") .setPriority(NotificationCompat.PRIORITY_DEFAULT) // Set the intent that fires when the user taps the notification. .setContentIntent(pendingIntent) .setAutoCancel(true)
このコードは setAutoCancel() を呼び出します。これにより、ユーザーが通知をタップすると、自動的に通知が消去されます。
上記の例のインテント フラグは、ユーザーが通知を使用してアプリを開いた後、ユーザーが期待するナビゲーション エクスペリエンスを維持します。開始するアクティビティのタイプ(次のいずれか)によっては、これを使用することをおすすめします。
通知への応答のためだけに存在するアクティビティ。アプリの通常の使用中にユーザーがこのアクティビティに移動する理由はないため、アクティビティはアプリの既存のタスクとバックスタックに追加される代わりに、新しいタスクを開始します。上記のサンプルでは、このタイプのインテントが作成されます。
アプリの通常のアプリフロー内に存在するアクティビティ。この場合、アクティビティを開始するとバックスタックが作成され、ユーザーが期待する「戻る」ボタンと「上へ」ボタンが維持されます。
通知を表示する
通知を表示するには、NotificationManagerCompat.notify() を呼び出して、通知の一意の ID と NotificationCompat.Builder.build() の結果を渡します。次の例に示します。
with(NotificationManagerCompat.from(context)) { if (ActivityCompat.checkSelfPermission( context, Manifest.permission.POST_NOTIFICATIONS ) != PackageManager.PERMISSION_GRANTED ) { // TODO: Consider calling ActivityCompat#requestPermissions here // to request the missing permissions, and then overriding // public fun onRequestPermissionsResult(requestCode: Int, permissions: Array<out String>, // grantResults: IntArray) // to handle the case where the user grants the permission. See the documentation // for ActivityCompat#requestPermissions for more details. return@with } // notificationId is a unique int for each notification that you must define. notify(notificationId, builder.build())
NotificationManagerCompat.notify() に渡す通知 ID は、後で通知を更新または削除する場合に必要になるため、必ず保存しておいてください。
また、Android 13 以降を搭載したデバイスで基本的な通知をテストするには、通知を手動でオンにするか、通知をリクエストするダイアログを作成します。
アクション ボタンを追加する
通知には、ユーザーがすばやく応答できるようにするためのアクション ボタン(リマインダーのスヌーズやテキスト メッセージへの返信など)を最大で 3 つ設定できます。ただし、これらのアクション ボタンは、ユーザーが通知をタップしたときに実行されるアクションと同じであってはなりません。
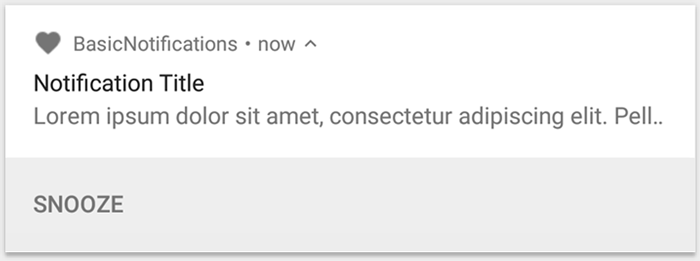
図 3. 操作ボタンが 1 つある通知。
操作ボタンを追加するには、addAction() メソッドに PendingIntent を渡します。これは、通知のデフォルトのタップ アクションを設定する場合と同様です。ただし、アクティビティを起動する代わりに、バックグラウンドでジョブを実行する BroadcastReceiver を開始するなどのさまざまな処理を実行でき、アクションはすでに開いているアプリを中断しません。
たとえば次のコードは、特定のレシーバにブロードキャストを送信する方法を示しています。
val ACTION_SNOOZE = "snooze" val snoozeIntent = Intent(context, MyBroadcastReceiver::class.java).apply { action = ACTION_SNOOZE putExtra(EXTRA_NOTIFICATION_ID, 0) } val snoozePendingIntent: PendingIntent = PendingIntent.getBroadcast(context, 0, snoozeIntent, PendingIntent.FLAG_IMMUTABLE) val builder = NotificationCompat.Builder(context, CHANNEL_ID) .setSmallIcon(R.drawable.ic_logo) .setContentTitle("My notification") .setContentText("Hello World!") .setPriority(NotificationCompat.PRIORITY_DEFAULT) .setContentIntent(pendingIntent) .addAction(R.drawable.snooze, context.getString(R.string.snooze), snoozePendingIntent)
バックグラウンド処理を実行する BroadcastReceiver を作成する方法については、ブロードキャストの概要をご覧ください。
また、メディア再生ボタン(トラックの一時停止やスキップなど)を含む通知を作成する場合は、メディア コントロールを備えた通知を作成する方法をご覧ください。
ダイレクト返信アクションを追加する
Android 7.0(API レベル 24)で導入されたダイレクト返信アクションでは、ユーザーは通知にテキストを直接入力できます。テキストはアクティビティを開くことなくアプリに配信されます。たとえば、ダイレクト返信アクションにより、ユーザーがテキスト メッセージに返信したり、通知内からタスクリストを更新したりすることが可能になります。

図 4. [返信] ボタンをタップすると、テキスト入力が開きます。
ダイレクト返信アクションは、テキスト入力を開く通知内の追加ボタンとして表示されます。ユーザーが入力を完了すると、通知アクションに指定したインテントにテキスト応答が添付され、アプリにインテントが送信されます。
返信ボタンを追加する
ダイレクト返信をサポートする通知アクションを作成する手順は次のとおりです。
通知アクションに追加可能な RemoteInput.Builder のインスタンスを作成します。このクラスのコンストラクタは、システムがテキスト入力のキーとして使用する文字列を受け取ります。アプリは後でそのキーを使用して、入力テキストを取得します。
// Key for the string that's delivered in the action's intent. val replyLabel: String = context.resources.getString(R.string.reply_label) val remoteInput: RemoteInput = RemoteInput.Builder(KEY_TEXT_REPLY).run { setLabel(replyLabel) build() }
返信アクション用の PendingIntent を作成します。
// Build a PendingIntent for the reply action to trigger. val replyPendingIntent: PendingIntent = PendingIntent.getBroadcast(context, conversationId, getMessageReplyIntent(conversationId), PendingIntent.FLAG_MUTABLE)
addRemoteInput() を使用して RemoteInput オブジェクトをアクションにアタッチします。
// Create the reply action and add the remote input. val action: NotificationCompat.Action = NotificationCompat.Action.Builder(R.drawable.reply, context.getString(R.string.reply_label), replyPendingIntent) .addRemoteInput(remoteInput) .build()
アクションを通知に適用し、通知を発行します。
// Build the notification and add the action.
val newMessageNotification = NotificationCompat.Builder(context, CHANNEL_ID)
    .setSmallIcon(R.drawable.ic_message)
    .setContentTitle(context.getString(R.string.title))
    .setContentText(context.getString(R.string.content))
    .addAction(action)
    .build()

// Issue the notification.
NotificationManagerCompat.from(context).notify(notificationId, newMessageNotification)
図 4 に示すように、通知アクションをトリガーすると、システムは応答の入力をユーザーに促します。
返信からユーザー入力を取得する
通知の返信 UI からユーザー入力を受け取るには、RemoteInput.getResultsFromIntent() を呼び出して、BroadcastReceiver が受信した Intent を渡します。
private fun getMessageText(intent: Intent): CharSequence? { return RemoteInput.getResultsFromIntent(intent)?.getCharSequence(KEY_TEXT_REPLY) }
テキストを処理したら、同じ ID とタグ(使用している場合)を指定して NotificationManagerCompat.notify() を呼び出して、通知を更新します。これが必要なのは、ダイレクト返信 UI を非表示にして、返信が正常に受信および処理されたことをユーザーに確認するためです。
// Build a new notification, which informs the user that the system // handled their interaction with the previous notification. val repliedNotification = NotificationCompat.Builder(context, CHANNEL_ID) .setSmallIcon(R.drawable.message) .setContentText(context.getString(R.string.replied)) .build() // Issue the new notification. NotificationManagerCompat.from(context).notify(notificationId, repliedNotification)
その他のデータを取得する
他のデータ型の処理も RemoteInput と同様に機能します。次の例では、入力として画像を使用します。
val replyLabel: String = context.resources.getString(R.string.reply_label) val remoteInput: RemoteInput = RemoteInput.Builder(KEY_REPLY).run { setLabel(replyLabel) // Allow for image data types in the input. // This method can be used again to allow for other data types. setAllowDataType("image/*", true) build() }
RemoteInput#getDataResultsFromIntent を呼び出して、対応するデータを抽出します。
class ReplyReceiver : BroadcastReceiver() { override fun onReceive(context: Context, intent: Intent) { val dataResults = RemoteInput.getDataResultsFromIntent(intent, KEY_REPLY) val imageUri: Uri? = dataResults?.get("image/*") as? Uri if (imageUri != null) { // Extract the image context.contentResolver.openInputStream(imageUri)?.use { inputStream -> val bitmap = BitmapFactory.decodeStream(inputStream) // Display the image // ... } } } companion object { const val KEY_REPLY = "key_reply" const val KEY_TEXT_REPLY = "key_text_reply" } }
この新しい通知を使用する場合、レシーバの onReceive() メソッドに渡されるコンテキストを使用します。
setRemoteInputHistory() を呼び出して、通知の下部に返信を付加します。ただし、メッセージング アプリを作成する場合は、メッセージング スタイルの通知を作成して、新しいメッセージを会話の最後に付加してください。
メッセージング アプリからの通知に関するアドバイスについては、メッセージング アプリのおすすめの方法のセクションをご覧ください。
緊急メッセージを表示する
アプリでは、電話の着信呼び出しやアラームなどの緊急メッセージを表示しなければならない場合があります。このような場合、全画面インテントを通知に関連付けることができます。
通知が呼び出されると、デバイスのロック状態に応じて、次のいずれかがユーザーに表示されます。
- ユーザーのデバイスがロックされている場合、ロック画面を覆う全画面アクティビティが表示されます。
- ユーザーのデバイスがロックされていない場合、通知に対する応答または却下の選択肢を含む展開フォームで通知が表示されます。
次のコード スニペットは、通知を全画面インテントに関連付ける方法を示しています。
val fullScreenIntent = Intent(context, ImportantActivity::class.java) val fullScreenPendingIntent = PendingIntent.getActivity(context, 0, fullScreenIntent, PendingIntent.FLAG_IMMUTABLE) val builder = NotificationCompat.Builder(context, CHANNEL_ID) .setSmallIcon(R.drawable.ic_logo) .setContentTitle("My notification") .setContentText("Hello World!") .setPriority(NotificationCompat.PRIORITY_DEFAULT) .setFullScreenIntent(fullScreenPendingIntent, true)
ロック画面の可視性を設定する
ロック画面での通知に表示される情報の詳細度を制御するには、次の値のいずれかを指定して setVisibility() を呼び出します。
VISIBILITY_PUBLIC: 通知のコンテンツ全体がロック画面に表示されます。VISIBILITY_SECRET: ロック画面に通知の一部が表示されません。VISIBILITY_PRIVATE: 通知のアイコンやコンテンツ タイトルなどの基本情報のみがロック画面に表示されます。通知の完全なコンテンツが表示されません。
VISIBILITY_PRIVATE を設定すると、特定の詳細を非表示にした通知コンテンツの代替バージョンを提供できます。たとえば、SMS アプリで「新しいテキスト メッセージが 3 件あります」という通知を表示する場合、メッセージ コンテンツと送信者を非表示にできます。この代替バージョンの通知を提供するには、最初に NotificationCompat.Builder で通常どおりに代替通知を作成します。次に、setPublicVersion() でその代替通知を通常の通知に添付します。
なお、ユーザーは常に、ロック画面に通知を表示するかどうかを最終的に制御できます。さらに、アプリの通知チャネルに基づいて制御することもできます。
通知を更新する
通知を発行した後で更新するには、NotificationManagerCompat.notify() を再度呼び出して、以前に使用したのと同じ ID を渡します。以前の通知が却下されている場合は、代わりに新しい通知が作成されます。
必要に応じて setOnlyAlertOnce() を呼び出すこともできます。これは、通知が最初に表示されたときにだけ、(サウンド、バイブレーション、視覚的ヒントで)ユーザーの操作を中断し、その後の更新では中断しないようにします。
通知を消去する
次のいずれかが発生するまで、通知は表示され続けます。
- ユーザーが通知を閉じます。
- 通知の作成時に
setAutoCancel()を呼び出した場合、ユーザーが通知をタップする。 - 特定の通知 ID を指定して
cancel()を呼び出す。このメソッドは、継続的な通知も削除します。 cancelAll()を呼び出す(このメソッドは、それまでに発行した通知をすべて削除します)。setTimeoutAfter()を使用して通知の作成時にタイムアウトを設定した場合、指定された期間が経過します。必要であれば、指定されたタイムアウト期間が経過する前に通知をキャンセルすることもできます。
メッセージング アプリのおすすめの方法
メッセージング アプリとチャットアプリの通知を作成する際は、以下のおすすめの方法を考慮してください。
MessagingStyle を使用する
Android 7.0(API レベル 24)以降では、Android によりメッセージング コンテンツ専用の通知スタイル テンプレートが提供されます。NotificationCompat.MessagingStyle クラスを使用して、会話タイトル、追加メッセージ、通知のコンテンツ ビューなど、通知に表示する複数のラベルを変更できます。
次のコード スニペットは、MessagingStyle クラスを使用して通知のスタイルをカスタマイズする方法を示しています。
val message1 = NotificationCompat.MessagingStyle.Message( messages[0].text, messages[0].time, messages[0].sender ) val message2 = NotificationCompat.MessagingStyle.Message( messages[1].text, messages[1].time, messages[1].sender ) notification = NotificationCompat.Builder(context, CHANNEL_ID) .setSmallIcon(R.drawable.ic_logo) .setStyle( NotificationCompat.MessagingStyle(Person.Builder().setName("Me").build()) .addMessage(message1) .addMessage(message2) ) .build()
Android 9.0(API レベル 28)以降では、通知とそのアバターを最適にレンダリングするために Person クラスを使用することも必要です。
NotificationCompat.MessagingStyle を使用する場合は、次の操作を行います。
MessagingStyle.setConversationTitle()を呼び出して、3 人以上の参加者とのグループ チャットのタイトルを設定します。会話のタイトルは、グループ チャットの名前か、特に名前を付けていない場合は会話の参加者のリストにすることをおすすめします。このようにしないと、メッセージが、会話内の最新のメッセージの送信者との 1 対 1 の会話に属していると誤解される可能性があります。MessagingStyle.setData()メソッドを使用して、画像などのメディア メッセージを含めます。パターン image/* の MIME タイプがサポートされています。
ダイレクト返信を使用する
ダイレクト返信では、ユーザーがメッセージにインラインで返信できます。
- ユーザーがインライン返信アクションで返信したら、
MessagingStyle.addMessage()を使用してMessagingStyleの通知を更新し、通知を撤回またはキャンセルしないでください。通知をキャンセルしなければ、ユーザーは通知から複数の返信を送信できます。 - Wear OS と互換性のあるインライン返信アクションを作成するには、
Action.WearableExtender.setHintDisplayInlineAction(true)を呼び出します。 addHistoricMessage()メソッドを使用して、通知に履歴メッセージを追加し、ダイレクト返信の会話にコンテキストを提供します。
スマート リプライを有効にする
- スマート リプライを有効にするには、返信アクションで
setAllowGeneratedResponses(true)を呼び出します。これにより、通知が Wear OS デバイスにブリッジされたときに、ユーザーがスマート リプライ応答を使用できるようになります。スマート リプライ応答は、NotificationCompat.MessagingStyleの通知から提供されるコンテキストを使用して、完全にスマートウォッチ上で動作する機械学習モデルによって生成されます。応答の生成のためにデータがインターネットにアップロードされることはありません。
通知メタデータを追加する
- 通知メタデータを割り当てて、デバイスがサイレント モードのときにアプリ通知を処理する方法をシステムに伝えます。たとえば、
addPerson()メソッドまたはsetCategory(Notification.CATEGORY_MESSAGE)メソッドを使用して、サイレント モードをオーバーライドします。