
ההתראות מספקות מידע קצר ועדכני על אירועים באפליקציה בזמן שהיא לא בשימוש. במאמר הזה מוסבר איך ליצור התראה עם תכונות שונות. בסקירה הכללית על התראות מוסבר איך התראות מוצגות ב-Android. קוד לדוגמה שמשתמש בהתראות זמין בדוגמה של SociaLite ב-GitHub.
הקוד בדף הזה משתמש בממשקי ה-API NotificationCompat מהספרייה AndroidX. ממשקי ה-API האלה מאפשרים להוסיף תכונות שזמינות רק בגרסאות חדשות יותר של Android, תוך שמירה על תאימות לגרסה 9 של Android (רמת API 28).
עם זאת, חלק מהתכונות, כמו פעולת התשובה בתוך השורה, לא יפעלו בגרסאות קודמות.
יצירת התראה בסיסית
ההתראה בפורמט הבסיסי והקומפקטי ביותר שלה – שנקרא גם פורמט מכווץ – מציגה סמל, כותרת וכמות קטנה של תוכן טקסט. בקטע הזה מוסבר איך ליצור התראה שהמשתמש יכול להקיש עליה כדי להפעיל פעילות באפליקציה.
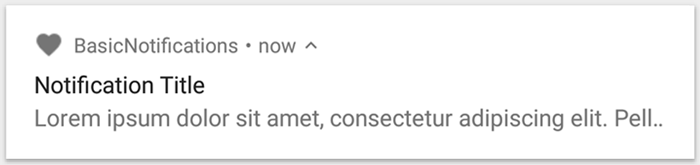
איור 1. התראה עם סמל, כותרת וטקסט.
לפרטים נוספים על כל חלק בהתראה, אפשר לקרוא על המבנה של ההתראה.
הצהרה על הרשאה בתחילת ההפעלה
Android מגרסה 13 (רמת API 33) ואילך תומך בהרשאה בתחילת ההפעלה לפרסום התראות באפליקציה שלא פטורות (כולל שירותים שפועלים בחזית (FGS)).
ההרשאה שצריך להצהיר עליה בקובץ המניפסט של האפליקציה מופיעה בקטע הקוד הבא:
<manifest ...>
    <uses-permission android:name="android.permission.POST_NOTIFICATIONS"/>
    <application ...>
        ...
    </application>
</manifest>
פרטים נוספים על הרשאות בתחילת ההפעלה זמינים במאמר בנושא הרשאת זמן ריצה להצגת התראות.
הגדרת תוכן ההתראות
כדי להתחיל, מגדירים את התוכן ואת הערוץ של ההתראה באמצעות אובייקט NotificationCompat.Builder. בדוגמה הבאה אפשר לראות איך ליצור התראה עם הפרטים הבאים:
סמל קטן, שמוגדר על ידי
setSmallIcon(). זהו התוכן היחיד שנדרש וגלוי למשתמשים.שם, שהוגדר על ידי
setContentTitle().גוף הטקסט, שהוגדר על ידי
setContentText().רמת העדיפות של ההתראה, שהוגדרה על ידי
setPriority(). העדיפות קובעת עד כמה ההתראה פולשנית ב-Android 7.1 ובגרסאות קודמות. ב-Android מגרסה 8.0 ואילך, צריך להגדיר את חשיבות הערוץ כמו שמוסבר בקטע הבא.
val textTitle = "Title" val textContent = "Content" val builder = NotificationCompat.Builder(context, CHANNEL_ID) .setSmallIcon(R.drawable.ic_logo) .setContentTitle(textTitle) .setContentText(textContent) .setPriority(NotificationCompat.PRIORITY_DEFAULT)
הקונסטרוקטור NotificationCompat.Builder מחייב לספק מזהה ערוץ. הדרישה הזו נחוצה לתאימות ל-Android מגרסה 8.0 (רמת API 26) ואילך, אבל המערכת מתעלמת ממנה בגרסאות קודמות.
כברירת מחדל, תוכן הטקסט של ההתראה נחתך כדי להתאים לשורה אחת. אתם יכולים להציג מידע נוסף על ידי יצירת התראה שניתן להרחיב.
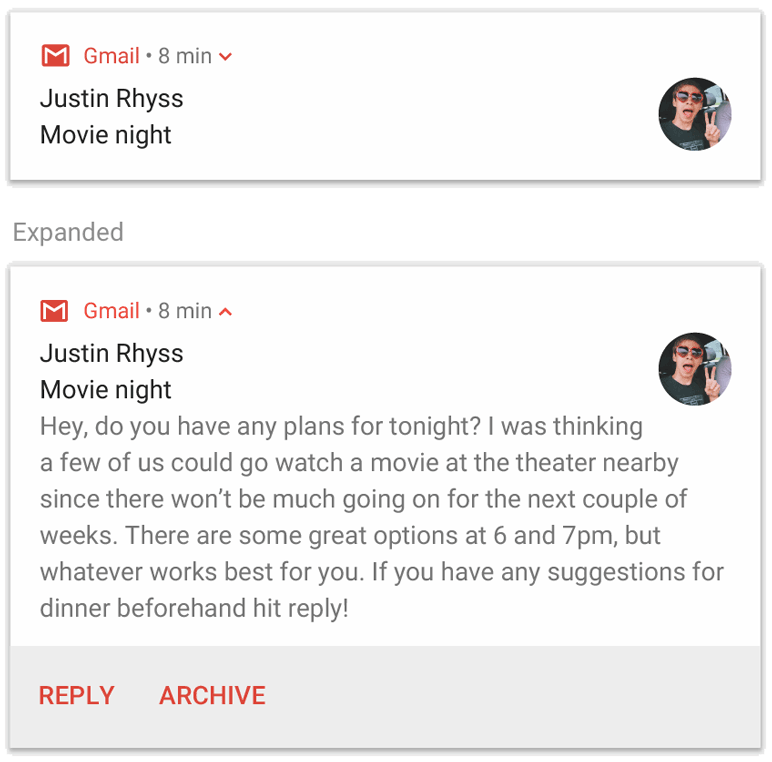
איור 2. התראה שאפשר להרחיב, כשהיא מכווצת ומוצגת במצב מורחב.
אם רוצים שההתראה תהיה ארוכה יותר, אפשר להוסיף תבנית סגנון עם setStyle() כדי להפעיל התראה שניתן להרחיב. לדוגמה, הקוד הבא יוצר אזור טקסט גדול יותר:
val builder = NotificationCompat.Builder(context, CHANNEL_ID) .setSmallIcon(R.drawable.ic_logo) .setContentTitle("My notification") .setContentText("Much longer text that cannot fit one line...") .setStyle(NotificationCompat.BigTextStyle() .bigText("Much longer text that cannot fit one line...")) .setPriority(NotificationCompat.PRIORITY_DEFAULT)
מידע נוסף על סגנונות אחרים של התראות גדולות, כולל איך להוסיף תמונה ופקדים להפעלת מדיה, זמין במאמר יצירת התראה שניתן להרחיב.
יצירת ערוץ והגדרת רמת החשיבות
כדי להציג את ההתראה ב-Android מגרסה 8.0 ואילך, צריך לרשום את ערוץ ההתראות של האפליקציה במערכת על ידי העברת מופע של NotificationChannel אל createNotificationChannel(). הקוד הבא חסום על ידי תנאי בגרסה SDK_INT:
fun createNotificationChannel(context: Context) { // Create the NotificationChannel, but only on API 26+ because // the NotificationChannel class is not in the Support Library. if (Build.VERSION.SDK_INT >= Build.VERSION_CODES.O) { val name = context.getString(R.string.channel_name) val descriptionText = context.getString(R.string.channel_description) val importance = NotificationManager.IMPORTANCE_DEFAULT val channel = NotificationChannel(CHANNEL_ID, name, importance).apply { description = descriptionText } // Register the channel with the system. val notificationManager: NotificationManager = context.getSystemService(NotificationManager::class.java) as NotificationManager notificationManager.createNotificationChannel(channel) } }
מכיוון שצריך ליצור את ערוץ ההתראות לפני שמפרסמים התראות ב-Android 8.0 ואילך, צריך להריץ את הקוד הזה ברגע שהאפליקציה מתחילה לפעול. אפשר לקרוא לפונקציה הזו שוב ושוב, כי יצירה של ערוץ התראות קיים לא מבצעת פעולה.
הקונסטרוקטור NotificationChannel דורש importance, באמצעות אחת מהקבועים מהמחלקה NotificationManager. הפרמטר הזה קובע איך להפריע למשתמש בכל התראה ששייכת לערוץ הזה. כדי לתמוך ב-Android 7.1 ובגרסאות קודמות, מגדירים את העדיפות עם הערך setPriority(), כמו בדוגמה הקודמת.
למרות שצריך להגדיר את רמת החשיבות או העדיפות של ההתראה כמו בדוגמה הבאה, המערכת לא מבטיחה את התנהגות ההתראה שתקבלו. במקרים מסוימים, המערכת עשויה לשנות את רמת החשיבות על סמך גורמים אחרים, והמשתמש תמיד יכול להגדיר מחדש את רמת החשיבות של ערוץ מסוים.
מידע נוסף על רמות החשיבות של ההתראות
הגדרת פעולת ההקשה של ההתראה
כל התראה צריכה להגיב להקשה, בדרך כלל כדי לפתוח פעילות באפליקציה שתואמת להתראה. כדי לעשות זאת, מציינים כוונת תוכן שמוגדרת באמצעות אובייקט PendingIntent ומעבירים אותו אל setContentIntent().
בקטע הקוד הבא אפשר לראות איך ליצור intent בסיסי לפתיחת פעילות כשמשתמש מקיש על ההתראה:
// Create an explicit intent for an Activity in your app. val intent = Intent(context, AlertDetails::class.java).apply { flags = Intent.FLAG_ACTIVITY_NEW_TASK or Intent.FLAG_ACTIVITY_CLEAR_TASK } val pendingIntent: PendingIntent = PendingIntent.getActivity(context, 0, intent, PendingIntent.FLAG_IMMUTABLE) val builder = NotificationCompat.Builder(context, CHANNEL_ID) .setSmallIcon(R.drawable.ic_logo) .setContentTitle("My notification") .setContentText("Hello World!") .setPriority(NotificationCompat.PRIORITY_DEFAULT) // Set the intent that fires when the user taps the notification. .setContentIntent(pendingIntent) .setAutoCancel(true)
הקוד הזה קורא ל-setAutoCancel(), שמסיר את ההתראה באופן אוטומטי כשהמשתמש מקיש עליה.
דגלי הכוונה בדוגמה הקודמת שומרים על חוויית הניווט הצפויה של המשתמש אחרי שהוא פותח את האפליקציה באמצעות ההתראה. יכול להיות שתרצו להשתמש בו בהתאם לסוג הפעילות שאתם מתחילים, שיכול להיות אחד מהסוגים הבאים:
פעילות שקיימת רק כדי להגיב להתראה. אין סיבה שהמשתמש ינווט לפעילות הזו במהלך שימוש רגיל באפליקציה, ולכן הפעילות מתחילה משימה חדשה במקום להתווסף למשימה ולמקבץ פעילויות קודמות (back stack) הקיימות של האפליקציה. זהו סוג הכוונה שנוצר בדוגמה הקודמת.
פעילות שקיימת בתהליך הרגיל של האפליקציה. במקרה הזה, הפעלת ה-Activity יוצרת מקבץ פעילויות קודמות (back stack) כדי לשמור על הציפיות של המשתמש לגבי הלחצנים 'חזרה' ו'למעלה'.
הצגת ההתראה
כדי שההתראה תופיע, קוראים לפונקציה
NotificationManagerCompat.notify() ומעבירים לה מזהה ייחודי של ההתראה ואת התוצאה של NotificationCompat.Builder.build(). בדוגמה הבאה אפשר לראות איך זה נראה:
with(NotificationManagerCompat.from(context)) { if (ActivityCompat.checkSelfPermission( context, Manifest.permission.POST_NOTIFICATIONS ) != PackageManager.PERMISSION_GRANTED ) { // TODO: Consider calling ActivityCompat#requestPermissions here // to request the missing permissions, and then overriding // public fun onRequestPermissionsResult(requestCode: Int, permissions: Array<out String>, // grantResults: IntArray) // to handle the case where the user grants the permission. See the documentation // for ActivityCompat#requestPermissions for more details. return@with } // notificationId is a unique int for each notification that you must define. notify(notificationId, builder.build())
שומרים את מזהה ההתראה שמעבירים ל-NotificationManagerCompat.notify(), כי הוא נחוץ כשרוצים לעדכן או להסיר את ההתראה.
בנוסף, כדי לבדוק התראות בסיסיות במכשירים עם Android מגרסה 13 ואילך, צריך להפעיל את ההתראות באופן ידני או ליצור תיבת דו-שיח לבקשת התראות.
הוספת כפתורי פעולה
התראה יכולה לכלול עד שלושה לחצני פעולה שמאפשרים למשתמש להגיב במהירות, למשל להעביר תזכורת למצב נודניק או לענות להודעת טקסט. אבל לחצני הפעולה האלה לא יכולים לשכפל את הפעולה שמתבצעת כשמשתמש מקיש על ההתראה.
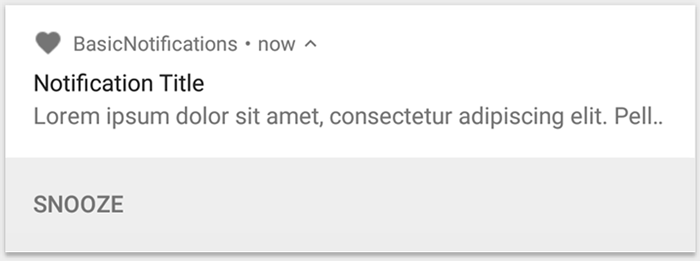
איור 3. התראה עם כפתור פעולה אחד.
כדי להוסיף כפתור פעולה, מעבירים PendingIntent לשיטה addAction(). הפעולה הזו דומה להגדרת פעולת ברירת המחדל של ההתראה בלחיצה, רק שבמקום להפעיל פעילות, אפשר לבצע פעולות אחרות כמו הפעלה של BroadcastReceiver שמבצעת עבודה ברקע כדי שהפעולה לא תפריע לאפליקציה שכבר פתוחה.
לדוגמה, הקוד הבא מראה איך לשלוח שידור למקלט ספציפי:
val ACTION_SNOOZE = "snooze" val snoozeIntent = Intent(context, MyBroadcastReceiver::class.java).apply { action = ACTION_SNOOZE putExtra(EXTRA_NOTIFICATION_ID, 0) } val snoozePendingIntent: PendingIntent = PendingIntent.getBroadcast(context, 0, snoozeIntent, PendingIntent.FLAG_IMMUTABLE) val builder = NotificationCompat.Builder(context, CHANNEL_ID) .setSmallIcon(R.drawable.ic_logo) .setContentTitle("My notification") .setContentText("Hello World!") .setPriority(NotificationCompat.PRIORITY_DEFAULT) .setContentIntent(pendingIntent) .addAction(R.drawable.snooze, context.getString(R.string.snooze), snoozePendingIntent)
מידע נוסף על יצירת BroadcastReceiver להרצת עבודה ברקע זמין במאמר סקירה כללית על שידורים.
אם אתם מנסים ליצור התראה עם לחצני הפעלה של מדיה, כמו השהיה ודילוג על טראקים, תוכלו לקרוא איך ליצור התראה עם אמצעי בקרה של מדיה.
הוספת פעולה של תגובה ישירה
פעולת התשובה הישירה, שהוצגה ב-Android 7.0 (רמת API 24), מאפשרת למשתמשים להזין טקסט ישירות בהתראה. הטקסט נשלח לאפליקציה בלי לפתוח פעילות. לדוגמה, אפשר להשתמש בפעולת תגובה ישירה כדי לאפשר למשתמשים להשיב להודעות טקסט או לעדכן רשימות משימות מתוך ההתראה.

איור 4. הקשה על הלחצן 'תשובה' פותחת את הזנת הטקסט.
פעולת התשובה הישירה מופיעה כלחצן נוסף בהתראה, שפותח שדה להזנת טקסט. כשהמשתמש מסיים להקליד, המערכת מצרפת את תשובת הטקסט ל-Intent שציינתם לפעולת ההתראה ושולחת את ה-Intent לאפליקציה.
הוספת כפתור התשובה
כדי ליצור פעולת התראה שתומכת בתשובה ישירה, פועלים לפי השלבים הבאים:
יוצרים מופע של RemoteInput.Builder שאפשר להוסיף לפעולת ההתראה. הקונסטרוקטור של המחלקה הזו מקבל מחרוזת שהמערכת משתמשת בה כמפתח לקלט הטקסט. בהמשך האפליקציה משתמשת במפתח הזה כדי לאחזר את הטקסט של הקלט.
// Key for the string that's delivered in the action's intent. val replyLabel: String = context.resources.getString(R.string.reply_label) val remoteInput: RemoteInput = RemoteInput.Builder(KEY_TEXT_REPLY).run { setLabel(replyLabel) build() }
יוצרים PendingIntent לפעולת התשובה.
// Build a PendingIntent for the reply action to trigger. val replyPendingIntent: PendingIntent = PendingIntent.getBroadcast(context, conversationId, getMessageReplyIntent(conversationId), PendingIntent.FLAG_MUTABLE)
מצרפים את האובייקט RemoteInput לפעולה באמצעות addRemoteInput().
// Create the reply action and add the remote input. val action: NotificationCompat.Action = NotificationCompat.Action.Builder(R.drawable.reply, context.getString(R.string.reply_label), replyPendingIntent) .addRemoteInput(remoteInput) .build()
החלת הפעולה על ההתראה ושליחת ההתראה.
// Build the notification and add the action.
val newMessageNotification = NotificationCompat.Builder(context, CHANNEL_ID)
    .setSmallIcon(R.drawable.ic_message)
    .setContentTitle(context.getString(R.string.title))
    .setContentText(context.getString(R.string.content))
    .addAction(action)
    .build()

// Issue the notification.
NotificationManagerCompat.from(context).notify(notificationId, newMessageNotification)
המערכת מבקשת מהמשתמש להזין תגובה כשהוא מפעיל את פעולת ההתראה, כמו שמוצג באיור 4.
שליפת הקלט של המשתמש מהתשובה
כדי לקבל קלט של משתמשים מממשק המשתמש של התגובה להתראה, קוראים ל-RemoteInput.getResultsFromIntent() ומעבירים לו את Intent שמתקבל על ידי BroadcastReceiver:
private fun getMessageText(intent: Intent): CharSequence? { return RemoteInput.getResultsFromIntent(intent)?.getCharSequence(KEY_TEXT_REPLY) }
אחרי שמבצעים את העיבוד של הטקסט, מעדכנים את ההתראה באמצעות הקריאה
NotificationManagerCompat.notify() עם אותו מזהה ותג, אם נעשה בהם שימוש. הפעולה הזו נדרשת כדי להסתיר את ממשק המשתמש של התגובה הישירה ולוודא שהמשתמש יודע שהתגובה שלו התקבלה ועברה עיבוד בצורה תקינה.
// Build a new notification, which informs the user that the system // handled their interaction with the previous notification. val repliedNotification = NotificationCompat.Builder(context, CHANNEL_ID) .setSmallIcon(R.drawable.message) .setContentText(context.getString(R.string.replied)) .build() // Issue the new notification. NotificationManagerCompat.from(context).notify(notificationId, repliedNotification)
אחזור נתונים אחרים
הטיפול בסוגי נתונים אחרים דומה לטיפול ב-RemoteInput. בדוגמה הבאה נעשה שימוש בתמונה כקלט.
val replyLabel: String = context.resources.getString(R.string.reply_label) val remoteInput: RemoteInput = RemoteInput.Builder(KEY_REPLY).run { setLabel(replyLabel) // Allow for image data types in the input. // This method can be used again to allow for other data types. setAllowDataType("image/*", true) build() }
מתקשרים אל RemoteInput#getDataResultsFromIntent ומחלצים את הנתונים המתאימים.
class ReplyReceiver : BroadcastReceiver() { override fun onReceive(context: Context, intent: Intent) { val dataResults = RemoteInput.getDataResultsFromIntent(intent, KEY_REPLY) val imageUri: Uri? = dataResults?.get("image/*") as? Uri if (imageUri != null) { // Extract the image context.contentResolver.openInputStream(imageUri)?.use { inputStream -> val bitmap = BitmapFactory.decodeStream(inputStream) // Display the image // ... } } } companion object { const val KEY_REPLY = "key_reply" const val KEY_TEXT_REPLY = "key_text_reply" } }
כשעובדים עם ההתראה החדשה הזו, צריך להשתמש בהקשר שמועבר לשיטה onReceive() של הנמען.
מוסיפים את התשובה לתחתית ההודעה על ידי קריאה ל-setRemoteInputHistory(). אבל אם אתם יוצרים אפליקציית הודעות, אתם צריכים ליצור התראה בסגנון הודעה ולצרף את ההודעה החדשה לשיחה.
בקטע שיטות מומלצות לשימוש באפליקציות לשליחת הודעות מפורטים טיפים נוספים לגבי התראות מאפליקציות לשליחת הודעות.
הצגת הודעה דחופה
יכול להיות שהאפליקציה שלכם תצטרך להציג הודעה דחופה שמוגבלת בזמן, כמו שיחה טלפונית נכנסת או שעון מעורר מצלצל. במצבים כאלה, אפשר לשייך intent במסך מלא להתראה.
כשמוצגת ההתראה, המשתמשים רואים אחת מהאפשרויות הבאות, בהתאם לסטטוס הנעילה של המכשיר:
- אם המכשיר של המשתמש נעול, מופיעה פעילות במסך מלא שמכסה את מסך הנעילה.
- אם המכשיר של המשתמש לא נעול, ההתראה מופיעה בצורה מורחבת שכוללת אפשרויות לטיפול בהתראה או לסגירה שלה.
בקטע הקוד הבא אפשר לראות איך משייכים את ההתראה ל-Intent במסך מלא:
val fullScreenIntent = Intent(context, ImportantActivity::class.java) val fullScreenPendingIntent = PendingIntent.getActivity(context, 0, fullScreenIntent, PendingIntent.FLAG_IMMUTABLE) val builder = NotificationCompat.Builder(context, CHANNEL_ID) .setSmallIcon(R.drawable.ic_logo) .setContentTitle("My notification") .setContentText("Hello World!") .setPriority(NotificationCompat.PRIORITY_DEFAULT) .setFullScreenIntent(fullScreenPendingIntent, true)
הגדרת סטטוס השיתוף של מסך הנעילה
כדי לשלוט ברמת הפירוט שמוצגת בהתראה במסך הנעילה, צריך להתקשר אל setVisibility() ולציין אחד מהערכים הבאים:
VISIBILITY_PUBLIC: התוכן המלא של ההתראה מוצג במסך הנעילה.
VISIBILITY_SECRET: אף חלק מההתראה לא מוצג במסך הנעילה.
VISIBILITY_PRIVATE: במסך הנעילה מוצג רק מידע בסיסי, כמו הסמל של ההתראה ושם התוכן. התוכן המלא של ההתראה לא מוצג.
כשמגדירים את הערך VISIBILITY_PRIVATE, אפשר גם לספק גרסה חלופית של תוכן ההתראה שבה פרטים מסוימים מוסתרים. לדוגמה, אפליקציה ל-SMS עשויה להציג התראה עם הכיתוב 'יש לך 3 הודעות טקסט חדשות', אבל להסתיר את תוכן ההודעות ואת השולחים. כדי לספק את ההתראה החלופית הזו, צריך קודם ליצור את ההתראה החלופית באמצעות NotificationCompat.Builder כרגיל. לאחר מכן, מצרפים את ההתראה החלופית להתראה הרגילה באמצעות setPublicVersion().
חשוב לזכור שהמשתמש תמיד יכול להחליט אם ההתראות שלו יוצגו במסך הנעילה, והוא יכול לשלוט בהן על סמך ערוצי ההתראות של האפליקציה.
עדכון התראה
כדי לעדכן התראה אחרי ששולחים אותה, צריך להתקשר שוב אל NotificationManagerCompat.notify() ולהעביר לה את אותו מזהה שבו השתמשתם קודם. אם ההתראה הקודמת נסגרה, במקומה נוצרת התראה חדשה.
אפשר גם לקרוא ל-setOnlyAlertOnce() כדי שההתראה תפריע למשתמש – באמצעות צליל, רטט או רמזים חזותיים – רק בפעם הראשונה שההתראה מופיעה ולא בעדכונים מאוחרים יותר.
הסרת התראה
ההתראות מוצגות עד שאחד מהדברים הבאים קורה:
- המשתמש סוגר את ההתראה.
- המשתמש מקיש על ההתראה, אם מפעילים את
setAutoCancel()כשיוצרים את ההתראה. - מתקשרים אל
cancel()עם מזהה התראה ספציפי. השיטה הזו גם מוחקת התראות מתמשכות. - אתם מתקשרים אל
cancelAll(), והוא מסיר את כל ההתראות ששלחתם קודם. - אם הגדרתם זמן קצוב לתפוגה כשנוצרה ההתראה באמצעות
setTimeoutAfter(), הוא יחלוף. אם צריך, אפשר לבטל התראה לפני שמשך הזמן הקצוב לתפוגה שצוין יסתיים.
שיטות מומלצות לשימוש באפליקציות להעברת הודעות
כדאי לפעול לפי השיטות המומלצות שמפורטות כאן כשיוצרים התראות לאפליקציות של הודעות וצ'אט.
שימוש ב-MessagingStyle
החל מ-Android 7.0 (רמת API 24), Android מספק תבנית של סגנון התראה שמיועדת במיוחד לתוכן של הודעות. באמצעות המחלקה NotificationCompat.MessagingStyle, אפשר לשנות כמה מהתוויות שמוצגות בהתראה, כולל שם השיחה, הודעות נוספות ותצוגת התוכן של ההתראה.
בקטע הקוד הבא אפשר לראות איך להתאים אישית את הסגנון של התראה באמצעות המחלקה MessagingStyle.
val message1 = NotificationCompat.MessagingStyle.Message( messages[0].text, messages[0].time, messages[0].sender ) val message2 = NotificationCompat.MessagingStyle.Message( messages[1].text, messages[1].time, messages[1].sender ) notification = NotificationCompat.Builder(context, CHANNEL_ID) .setSmallIcon(R.drawable.ic_logo) .setStyle( NotificationCompat.MessagingStyle(Person.Builder().setName("Me").build()) .addMessage(message1) .addMessage(message2) ) .build()
החל מ-Android 9.0 (רמת API 28), נדרש גם להשתמש במחלקה Person כדי לקבל עיבוד אופטימלי של ההתראה והאווטרים שלה.
כשמשתמשים ב-NotificationCompat.MessagingStyle, מבצעים את הפעולות הבאות:
- מתקשרים אל
MessagingStyle.setConversationTitle()כדי להגדיר שם לצ'אטים קבוצתיים עם יותר משני אנשים. שם טוב לשיחה יכול להיות השם של הצ'אט הקבוצתי, או אם אין לו שם, רשימה של המשתתפים בשיחה. בלי זה, יכול להיות שההודעה תזוהה בטעות כהודעה בשיחה ישירה עם השולח של ההודעה האחרונה בשיחה. - משתמשים בשיטה
MessagingStyle.setData()כדי לכלול הודעות מדיה כמו תמונות. יש תמיכה בסוגי MIME של תמונת הדפוס image/*.
איך משתמשים בתשובה ישירה
התכונה 'תשובה ישירה' מאפשרת למשתמשים להוסיף תשובה בשרשור.
- אחרי שהמשתמש משיב באמצעות פעולת התשובה בתוך ההודעה, צריך להשתמש ב-
MessagingStyle.addMessage()כדי לעדכן את ההתראהMessagingStyle, ולא לבטל או למחוק את ההתראה. אם לא מבטלים את ההתראה, המשתמש יכול לשלוח כמה תשובות מההתראה. - כדי שהפעולה של תשובה מוטבעת תהיה תואמת ל-Wear OS, צריך להפעיל את הפונקציה
Action.WearableExtender.setHintDisplayInlineAction(true). - אפשר להשתמש בשיטה
addHistoricMessage()כדי להוסיף הקשר לשיחה ישירה באמצעות הוספה של הודעות קודמות להתראה.
הפעלת התכונה 'תשובה מהירה'
- כדי להפעיל את התשובה המהירה, קוראים לפעולת התשובה
setAllowGeneratedResponses(true). כתוצאה מכך, התשובות המהירות זמינות למשתמשים כשההתראה מגשרת למכשיר Wear OS. התשובות של התכונה 'תשובה מהירה' נוצרות על ידי מודל למידת מכונה שפועל כולו בשעון, על סמך ההקשר שמופיע בהתראהNotificationCompat.MessagingStyle. אף נתון לא מועלה לאינטרנט כדי ליצור את התשובות.
הוספת מטא-נתונים של התראות
- הקצאת מטא-נתונים של התראות כדי להגדיר למערכת איך לטפל בהתראות של האפליקציה כשמצב נא לא להפריע מופעל במכשיר. לדוגמה, אפשר להשתמש בשיטה
addPerson()או בשיטהsetCategory(Notification.CATEGORY_MESSAGE)כדי לבטל את המצב 'נא לא להפריע'.