
스팬은 강력한 마크업 객체로 문자나 단락 수준에서 텍스트 스타일을 지정하는 데 사용할 수 있습니다. 텍스트 객체에 스팬을 연결하여 다양한 방식으로 텍스트를 변경할 수 있습니다. 예를 들면 색상 추가, 텍스트를 클릭 가능하게 만들기, 텍스트 크기 조정, 맞춤설정 방식으로 텍스트 그리기 등이 있습니다. 스팬은 TextPaint 속성을 변경하고 Canvas에 그리며 텍스트 레이아웃을 변경할 수도 있습니다.
Android는 다양한 일반 텍스트 스타일 지정 패턴을 다루는 여러 유형의 스팬을 제공합니다. 자체 스팬을 만들어 맞춤 스타일 지정을 적용할 수도 있습니다.
스팬 만들기 및 적용
스팬을 만들려면 다음 표에 나열된 클래스 중 하나를 사용하면 됩니다. 클래스는 텍스트 자체 및 텍스트 마크업의 변경 가능 여부와 스팬 데이터가 포함된 기본 데이터 구조에 따라 달라집니다.
| 클래스 | 변경 가능한 텍스트 | 변경 가능한 마크업 | 데이터 구조 |
|---|---|---|---|
SpannedString |
아니요 | 아니요 | 선형 배열 |
SpannableString |
아니요 | 예 | 선형 배열 |
SpannableStringBuilder |
예 | 예 | 간격 트리 |
세 클래스 모두 Spanned 인터페이스를 확장합니다. SpannableString 및 SpannableStringBuilder도 Spannable 인터페이스를 확장합니다.
어떤 클래스를 사용할지 판단하는 방법은 다음과 같습니다.
- 만들고 나서 텍스트 또는 마크업을 수정하지 않는다면
SpannedString을 사용합니다. - 적은 수의 스팬을 단일 텍스트 객체에 연결해야 하고 텍스트 자체가 읽기 전용이면
SpannableString을 사용합니다. - 만들고 나서 텍스트를 수정하고 스팬을 텍스트에 연결해야 한다면
SpannableStringBuilder를 사용합니다. - 텍스트 자체의 읽기 전용 여부와 상관없이 많은 수의 스팬을 텍스트 객체에 연결해야 한다면
SpannableStringBuilder를 사용합니다.
스팬을 적용하려면 Spannable 객체의 setSpan(Object _what_, int _start_, int _end_, int
_flags_)을 호출하세요. what 매개변수는 텍스트에 적용할 스팬을 표시하고 start 및 end 매개변수는 스팬을 적용할 텍스트의 부분을 표시합니다.
스팬 경계 내부에 텍스트를 삽입하면 스팬이 자동으로 확장되어 삽입된 텍스트를 포함합니다. 스팬 경계에 텍스트를 삽입하면 즉, start 또는 end 색인에 삽입하면 flags 매개변수가 스팬이 확장되어 삽입된 텍스트를 포함해야 하는지 판단합니다. Spannable.SPAN_EXCLUSIVE_INCLUSIVE 플래그를 사용하여 삽입된 텍스트를 포함하고 Spannable.SPAN_EXCLUSIVE_EXCLUSIVE를 사용하여 삽입된 텍스트를 제외합니다.
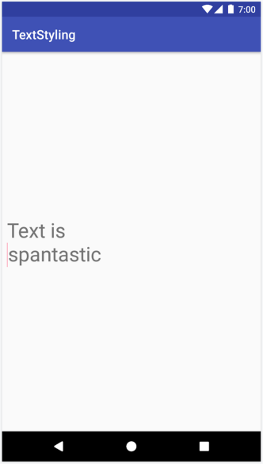
다음 예는 ForegroundColorSpan을 문자열에 연결하는 방법을 보여줍니다.
Kotlin
val spannable = SpannableStringBuilder("Text is spantastic!")
spannable.setSpan(
    ForegroundColorSpan(Color.RED),
    8, // start
    12, // end
    Spannable.SPAN_EXCLUSIVE_INCLUSIVE
)
자바
SpannableStringBuilder spannable = new SpannableStringBuilder("Text is spantastic!");
spannable.setSpan(
    new ForegroundColorSpan(Color.RED),
    8, // start
    12, // end
    Spannable.SPAN_EXCLUSIVE_INCLUSIVE
);

ForegroundColorSpan으로 스타일이 지정된 텍스트
스팬은 Spannable.SPAN_EXCLUSIVE_INCLUSIVE를 사용하여 설정되었으므로 다음 예와 같이 스팬 경계에 삽입된 텍스트를 포함하기 위해 확장됩니다.
Kotlin
val spannable = SpannableStringBuilder("Text is spantastic!")
spannable.setSpan(
    ForegroundColorSpan(Color.RED),
    8, // start
    12, // end
    Spannable.SPAN_EXCLUSIVE_INCLUSIVE
)
spannable.insert(12, "(& fon)")
자바
SpannableStringBuilder spannable = new SpannableStringBuilder("Text is spantastic!");
spannable.setSpan(
    new ForegroundColorSpan(Color.RED),
    8, // start
    12, // end
    Spannable.SPAN_EXCLUSIVE_INCLUSIVE
);
spannable.insert(12, "(& fon)");
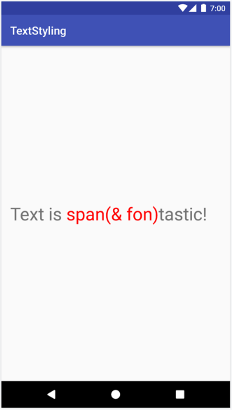
Spannable.SPAN_EXCLUSIVE_INCLUSIVE를 사용하면 스팬이 확장되어 추가 텍스트를 포함합니다.
여러 스팬을 동일한 텍스트에 연결할 수 있습니다. 다음 예는 텍스트를 굵고 빨간색으로 만드는 방법을 보여줍니다.
Kotlin
val spannable = SpannableString("Text is spantastic!")
spannable.setSpan(ForegroundColorSpan(Color.RED), 8, 12, Spannable.SPAN_EXCLUSIVE_EXCLUSIVE)
spannable.setSpan(
    StyleSpan(Typeface.BOLD),
    8,
    spannable.length,
    Spannable.SPAN_EXCLUSIVE_EXCLUSIVE
)
자바
SpannableString spannable = new SpannableString("Text is spantastic!");
spannable.setSpan(
    new ForegroundColorSpan(Color.RED),
    8, 12,
    Spannable.SPAN_EXCLUSIVE_EXCLUSIVE
);
spannable.setSpan(
    new StyleSpan(Typeface.BOLD),
    8, spannable.length(),
    Spannable.SPAN_EXCLUSIVE_EXCLUSIVE
);
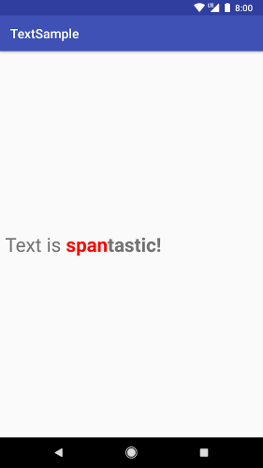
ForegroundColorSpan(Color.RED) 및 StyleSpan(BOLD))을 사용한 텍스트
Android 스팬 유형
Android는 android.text.style 패키지에서 스팬 유형 20개 이상을 제공합니다. Android는 두 가지 기본 방법으로 스팬을 분류합니다.
- 스팬이 텍스트에 미치는 영향: 스팬은 텍스트 모양이나 텍스트 측정항목에 영향을 미칠 수 있습니다.
- 스팬 범위: 일부 스팬은 개별 문자에 적용할 수 있지만 다른 스팬은 전체 단락에 적용해야 합니다.
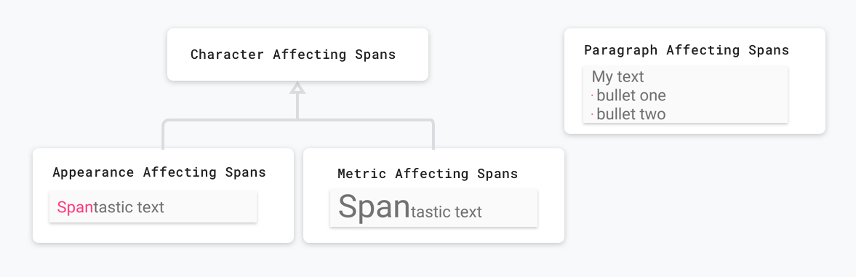
다음 섹션에서는 이러한 카테고리를 자세히 설명합니다.
텍스트 모양에 영향을 미치는 스팬
문자 수준에서 적용되는 일부 스팬은 텍스트나 배경 색상을 변경하고 밑줄이나 취소선을 추가하는 등 텍스트 모양에 영향을 미칩니다. 이러한 스팬은 CharacterStyle 클래스를 확장합니다.
다음 코드 예는 UnderlineSpan을 적용하여 텍스트에 밑줄을 긋는 방법을 보여줍니다.
Kotlin
val string = SpannableString("Text with underline span")
string.setSpan(UnderlineSpan(), 10, 19, Spanned.SPAN_EXCLUSIVE_EXCLUSIVE)
자바
SpannableString string = new SpannableString("Text with underline span");
string.setSpan(new UnderlineSpan(), 10, 19, Spanned.SPAN_EXCLUSIVE_EXCLUSIVE);

UnderlineSpan을 사용하여 밑줄이 그어진 텍스트
텍스트 모양에만 영향을 미치는 스팬은 레이아웃 다시 계산을 트리거하지 않고 텍스트 다시 그리기를 트리거합니다. 이러한 스팬은 UpdateAppearance를 구현하고 CharacterStyle을 확장합니다.
CharacterStyle 서브클래스는 TextPaint 업데이트 액세스 권한을 제공하여 텍스트를 그리는 방법을 정의합니다.
텍스트 측정항목에 영향을 미치는 스팬
문자 수준에서 적용되는 다른 스팬은 줄 높이 및 텍스트 크기와 같은 텍스트 측정항목에 영향을 미칩니다. 이러한 스팬은 MetricAffectingSpan 클래스를 확장합니다.
다음 코드 예에서는 텍스트 크기를 50% 늘리는 RelativeSizeSpan을 만듭니다.
Kotlin
val string = SpannableString("Text with relative size span")
string.setSpan(RelativeSizeSpan(1.5f), 10, 24, Spanned.SPAN_EXCLUSIVE_EXCLUSIVE)
자바
SpannableString string = new SpannableString("Text with relative size span");
string.setSpan(new RelativeSizeSpan(1.5f), 10, 24, Spanned.SPAN_EXCLUSIVE_EXCLUSIVE);

RelativeSizeSpan을 사용하여 텍스트를 확대했습니다.
텍스트 측정항목에 영향을 미치는 스팬을 적용하면 관찰 객체가 올바른 레이아웃 및 렌더링을 위해 텍스트를 다시 측정하게 됩니다. 예를 들어 텍스트 크기가 변경되면 단어가 다른 줄에 표시될 수 있습니다. 위의 스팬을 적용하면 다시 측정, 텍스트 레이아웃 다시 계산, 텍스트 다시 그리기가 트리거됩니다.
텍스트 측정항목에 영향을 미치는 스팬은 MetricAffectingSpan 클래스를 확장합니다. 이 클래스는 추상 클래스이며 TextPaint 액세스 권한을 제공하여 서브클래스가 스팬이 텍스트 측정에 미치는 영향을 정의할 수 있습니다. MetricAffectingSpan이 CharacterStyle을 확장하므로 서브클래스는 문자 수준에서 텍스트 모양에 영향을 미칩니다.
단락에 영향을 미치는 스팬
스팬은 텍스트 블록의 정렬이나 여백을 변경하는 등 단락 수준에서 텍스트에 영향을 미칠 수도 있습니다. 전체 단락에 영향을 미치는 스팬은 ParagraphStyle을 구현합니다. 이러한 스팬을 사용하려면 마지막 줄바꿈 문자를 제외한 전체 단락에 연결해야 합니다. 단락 스팬을 전체 단락이 아닌 다른 부분에 적용하려고 하면 Android에서 스팬을 전혀 적용하지 않습니다.
그림 8은 Android가 텍스트에서 단락을 구분하는 방법을 보여줍니다.
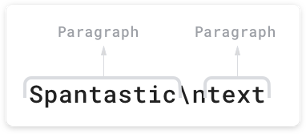
\n) 문자로 끝납니다.
다음 코드 예에서는 QuoteSpan을 단락에 적용합니다. 스팬을 단락의 시작이나 끝이 아닌 다른 위치에 연결하면 Android에서 스타일을 전혀 적용하지 않습니다.
Kotlin
spannable.setSpan(QuoteSpan(color), 8, text.length, Spannable.SPAN_EXCLUSIVE_EXCLUSIVE)
자바
spannable.setSpan(new QuoteSpan(color), 8, text.length, Spannable.SPAN_EXCLUSIVE_EXCLUSIVE);
QuoteSpan
맞춤 스팬 만들기
기존 Android 스팬에서 제공하는 것보다 더 많은 기능이 필요하다면 맞춤 스팬을 구현하면 됩니다. 자체 스팬을 구현할 때 스팬이 문자 수준에서 텍스트에 영향을 미치는지, 단락 수준에서 텍스트에 영향을 미치는지, 텍스트의 레이아웃이나 모양에 영향을 미치는지 결정해야 합니다. 이렇게 하면 확장할 수 있는 기본 클래스와 구현해야 할 수 있는 인터페이스를 판단하는 데 도움이 됩니다. 다음 표를 참고하세요.
| 시나리오 | 클래스 또는 인터페이스 |
|---|---|
| 스팬이 문자 수준에서 텍스트에 영향을 미칩니다. | CharacterStyle |
| 스팬이 텍스트 모양에 영향을 미칩니다. | UpdateAppearance |
| 스팬이 텍스트 측정항목에 영향을 미칩니다. | UpdateLayout |
| 스팬이 단락 수준에서 텍스트에 영향을 미칩니다. | ParagraphStyle |
예를 들어 텍스트 크기와 색상을 수정하는 맞춤 스팬을 구현해야 한다면 RelativeSizeSpan를 확장하면 됩니다. 상속을 통해 RelativeSizeSpan는 CharacterStyle를 확장하고 두 개의 Update 인터페이스를 구현합니다. 이 클래스는 이미 updateDrawState 및 updateMeasureState 콜백을 제공하므로 이러한 콜백을 재정의하여 맞춤 동작을 구현할 수 있습니다. 다음 코드는 RelativeSizeSpan을 확장하고 updateDrawState 콜백을 재정의하여 TextPaint의 색상을 설정하는 맞춤 스팬을 만듭니다.
Kotlin
class RelativeSizeColorSpan(
    size: Float,
    @ColorInt private val color: Int
) : RelativeSizeSpan(size) {
    override fun updateDrawState(textPaint: TextPaint) {
        super.updateDrawState(textPaint)
        textPaint.color = color
    }
}
자바
public class RelativeSizeColorSpan extends RelativeSizeSpan {
    private int color;
    public RelativeSizeColorSpan(float spanSize, int spanColor) {
        super(spanSize);
        color = spanColor;
    }
    @Override
    public void updateDrawState(TextPaint textPaint) {
        super.updateDrawState(textPaint);
        textPaint.setColor(color);
    }
}
이 예에서는 맞춤 스팬을 만드는 방법을 보여줍니다. RelativeSizeSpan 및 ForegroundColorSpan을 텍스트에 적용하여 동일한 효과를 달성할 수 있습니다.
테스트 스팬 사용
Spanned 인터페이스를 사용하면 텍스트에서 스팬을 설정하고 검색할 수 있습니다. 테스트할 때 Android JUnit 테스트를 구현하여 올바른 위치에 올바른 스팬을 추가했는지 확인합니다. 텍스트 스타일 지정 샘플 앱에는 텍스트에 BulletPointSpan을 연결하여 마크업을 글머리 기호에 적용하는 스팬이 포함되어 있습니다. 다음 코드 예는 글머리 기호가 예상대로 표시되는지 테스트하는 방법을 보여줍니다.
Kotlin
@Test fun textWithBulletPoints() {
   val result = builder.markdownToSpans("Points\n* one\n+ two")

   // Check whether the markup tags are removed.
   assertEquals("Points\none\ntwo", result.toString())

   // Get all the spans attached to the SpannedString.
   val spans = result.getSpans<Any>(0, result.length, Any::class.java)

   // Check whether the correct number of spans are created.
   assertEquals(2, spans.size.toLong())

   // Check whether the spans are instances of BulletPointSpan.
   val bulletSpan1 = spans[0] as BulletPointSpan
   val bulletSpan2 = spans[1] as BulletPointSpan

   // Check whether the start and end indices are the expected ones.
   assertEquals(7, result.getSpanStart(bulletSpan1).toLong())
   assertEquals(11, result.getSpanEnd(bulletSpan1).toLong())
   assertEquals(11, result.getSpanStart(bulletSpan2).toLong())
   assertEquals(14, result.getSpanEnd(bulletSpan2).toLong())
}
자바
@Test
public void textWithBulletPoints() {
    SpannedString result = builder.markdownToSpans("Points\n* one\n+ two");

    // Check whether the markup tags are removed.
    assertEquals("Points\none\ntwo", result.toString());

    // Get all the spans attached to the SpannedString.
    Object[] spans = result.getSpans(0, result.length(), Object.class);

    // Check whether the correct number of spans are created.
    assertEquals(2, spans.length);

    // Check whether the spans are instances of BulletPointSpan.
    BulletPointSpan bulletSpan1 = (BulletPointSpan) spans[0];
    BulletPointSpan bulletSpan2 = (BulletPointSpan) spans[1];

    // Check whether the start and end indices are the expected ones.
    assertEquals(7, result.getSpanStart(bulletSpan1));
    assertEquals(11, result.getSpanEnd(bulletSpan1));
    assertEquals(11, result.getSpanStart(bulletSpan2));
    assertEquals(14, result.getSpanEnd(bulletSpan2));
}
자세한 테스트 예는 GitHub의 MarkdownBuilderTest를 참고하세요.
맞춤 스팬 테스트
스팬을 테스트할 때 TextPaint에 예상한 수정사항이 포함되어 있는지, 올바른 요소가 Canvas에 표시되는지 확인해야 합니다. 예를 들어 글머리 기호를 일부 텍스트 앞에 붙이는 맞춤 스팬 구현을 고려하세요. 글머리 기호는 지정된 크기와 색상이 있고 드로어블 영역의 왼쪽 여백과 글머리 기호 사이에는 간격이 존재합니다.
AndroidJUnit 테스트를 구현하고 다음을 확인하여 이 클래스의 동작을 테스트할 수 있습니다.
- 스팬을 올바르게 적용하면 지정된 크기와 색상의 글머리 기호가 캔버스에 표시되고 왼쪽 여백과 글머리 기호 사이에 적절한 공간이 존재합니다.
- 스팬을 적용하지 않으면 어떤 맞춤 동작도 표시되지 않습니다.
GitHub의 TextStyling 샘플에서 이러한 테스트 구현을 확인할 수 있습니다.
캔버스를 모의 테스트하고 모의 테스트된 객체를 drawLeadingMargin() 메서드에 전달하며 올바른 매개변수로 올바른 메서드가 호출되었는지 확인하여 캔버스 상호작용을 테스트할 수 있습니다.
BulletPointSpanTest에서 더 많은 스팬 테스트 샘플을 확인할 수 있습니다.
스팬 사용 권장사항
필요에 따라 TextView에서 텍스트를 설정하는 메모리 효율적인 방법이 여러 개 있습니다.
기본 텍스트 변경 없이 스팬 연결 또는 분리
TextView.setText()에는 스팬을 다양하게 처리하는 여러 오버로드가 포함되어 있습니다. 예를 들어 다음 코드를 사용하여 Spannable 텍스트 객체를 설정할 수 있습니다.
Kotlin
textView.setText(spannableObject)
자바
textView.setText(spannableObject);
setText()의 이 오버로드를 호출할 때 TextView는 Spannable의 복사본을 SpannedString으로 만들고 CharSequence로 메모리에 보관합니다.
즉, 텍스트와 스팬은 변경할 수 없으므로 텍스트나 스팬을 업데이트해야 할 경우 새로운 Spannable 객체를 만들고 setText()를 다시 호출해야 합니다. 그러면 레이아웃 다시 측정 및 다시 그리기도 트리거됩니다.
스팬이 변경 가능해야 한다는 것을 표시하려면 다음 예와 같이 setText(CharSequence text, TextView.BufferType
type)를 대신 사용하면 됩니다.
Kotlin
textView.setText(spannable, BufferType.SPANNABLE)
val spannableText = textView.text as Spannable
spannableText.setSpan(
     ForegroundColorSpan(color),
     8, spannableText.length,
     SPAN_INCLUSIVE_INCLUSIVE
)
자바
textView.setText(spannable, BufferType.SPANNABLE);
Spannable spannableText = (Spannable) textView.getText();
spannableText.setSpan(
     new ForegroundColorSpan(color),
     8, spannableText.getLength(),
     SPAN_INCLUSIVE_INCLUSIVE);
이 예에서 BufferType.SPANNABLE 매개변수로 인해 TextView이 SpannableString을 만들고 TextView에 보관된 CharSequence 객체에는 이제 변경 가능한 마크업과 변경 불가능한 텍스트가 있습니다. 스팬을 업데이트하려면 텍스트를 Spannable로 검색한 후 필요에 따라 스팬을 업데이트하면 됩니다.
스팬을 연결, 분리 또는 재배치할 때 TextView가 자동으로 업데이트되어 텍스트의 변경사항을 반영합니다. 기존 스팬의 내부 속성을 변경하는 경우 invalidate()을 호출하여 모양 관련 변경을 실행하거나 requestLayout()을 호출하여 측정항목 관련 변경을 실행합니다.
TextView에서 텍스트를 여러 번 설정
RecyclerView.ViewHolder를 사용할 때처럼 어떤 경우에는 TextView를 재사용하여 텍스트를 여러 번 설정하는 것이 좋습니다. 기본적으로 BufferType 설정 여부에 상관없이 TextView는 CharSequence 객체의 복사본을 만들어 메모리에 보관합니다. 이렇게 하면 모든 TextView 업데이트가 의도적으로 됩니다. 원본 CharSequence 객체를 업데이트하여 텍스트를 업데이트할 수 없습니다. 즉, 새로운 텍스트를 설정할 때마다 TextView가 새로운 객체를 만듭니다.
이 프로세스를 더 강력하게 제어하고 추가 객체 생성을 피하려면 자체 Spannable.Factory를 구현하여 newSpannable()을 재정의하면 됩니다.
새 텍스트 객체를 만드는 대신 다음 예와 같이 기존 CharSequence를 Spannable로 변환하여 반환할 수 있습니다.
Kotlin
val spannableFactory = object : Spannable.Factory() {
    override fun newSpannable(source: CharSequence?): Spannable {
        return source as Spannable
    }
}
Java
Spannable.Factory spannableFactory = new Spannable.Factory(){
    @Override
    public Spannable newSpannable(CharSequence source) {
        return (Spannable) source;
    }
};
텍스트를 설정할 때는 textView.setText(spannableObject, BufferType.SPANNABLE)를 사용해야 합니다. 사용하지 않으면 소스 CharSequence가 Spanned 인스턴스로 만들어지고 Spannable로 변환될 수 없어 newSpannable()이 ClassCastException을 발생시킵니다.
newSpannable()을 재정의한 후 TextView에 새 Factory를 사용하라고 알려야 합니다.
Kotlin
textView.setSpannableFactory(spannableFactory)
자바
textView.setSpannableFactory(spannableFactory);
TextView 참조를 가져온 후 바로 Spannable.Factory 객체를 한 번 설정합니다. RecyclerView를 사용 중이라면 뷰를 처음 확장할 때 Factory 객체를 설정합니다. 이렇게 하면 RecyclerView가 새로운 항목을 ViewHolder에 바인딩할 때 추가 객체 생성을 피할 수 있습니다.
내부 스팬 속성 변경
맞춤 글머리 기호 스팬의 글머리 기호 색상과 같은 변경 가능한 스팬의 내부 속성만 변경해야 한다면 만들어진 스팬 참조를 유지하여 오버헤드에서 setText()를 여러 번 호출하지 않도록 할 수 있습니다.
스팬을 수정해야 한다면 참조를 수정한 다음 변경한 속성 유형에 따라 TextView에서 invalidate() 또는 requestLayout()을 호출하세요.
다음 코드 예에서는 맞춤 글머리 기호 구현의 빨간색 기본 색상이 버튼을 탭할 때 회색으로 변경됩니다.
Kotlin
class MainActivity : AppCompatActivity() {

    // Keeping the span as a field.
    val bulletSpan = BulletPointSpan(color = Color.RED)

    override fun onCreate(savedInstanceState: Bundle?) {
        ...
        val spannable = SpannableString("Text is spantastic")
        // Setting the span to the bulletSpan field.
        spannable.setSpan(
            bulletSpan,
            0, 4,
            Spanned.SPAN_INCLUSIVE_INCLUSIVE
        )
        styledText.setText(spannable)
        button.setOnClickListener {
            // Change the color of the mutable span.
            bulletSpan.color = Color.GRAY
            // Color doesn't change until invalidate is called.
            styledText.invalidate()
        }
    }
}
자바
public class MainActivity extends AppCompatActivity {

    private BulletPointSpan bulletSpan = new BulletPointSpan(Color.RED);

    @Override
    protected void onCreate(Bundle savedInstanceState) {
        ...
        SpannableString spannable = new SpannableString("Text is spantastic");
        // Setting the span to the bulletSpan field.
        spannable.setSpan(bulletSpan, 0, 4, Spanned.SPAN_INCLUSIVE_INCLUSIVE);
        styledText.setText(spannable);
        button.setOnClickListener(new View.OnClickListener() {
            @Override
            public void onClick(View view) {
                // Change the color of the mutable span.
                bulletSpan.setColor(Color.GRAY);
                // Color doesn't change until invalidate is called.
                styledText.invalidate();
            }
        });
    }
}
Android KTX 확장 프로그램 기능 사용
Android KTX에 포함된 확장 프로그램 기능으로 스팬을 더 쉽게 사용할 수 있습니다. 자세한 내용은 androidx.core.text 패키지의 문서를 참고하세요.